

MIT-6.S081-2021 Lab-1 util: Unix utilities
第一个 lab,地址 https://pdos.csail.mit.edu/6.S081/2021/labs/util.html,lab 的主要目的是熟悉 xv6 以及其系统调用
1. Boot xv6
这里主要是为了启动 xv6,流程比较简单
git clone git://g.csail.mit.edu/xv6-labs-2021 cd xv6-labs-2021 git checkout util make qemu
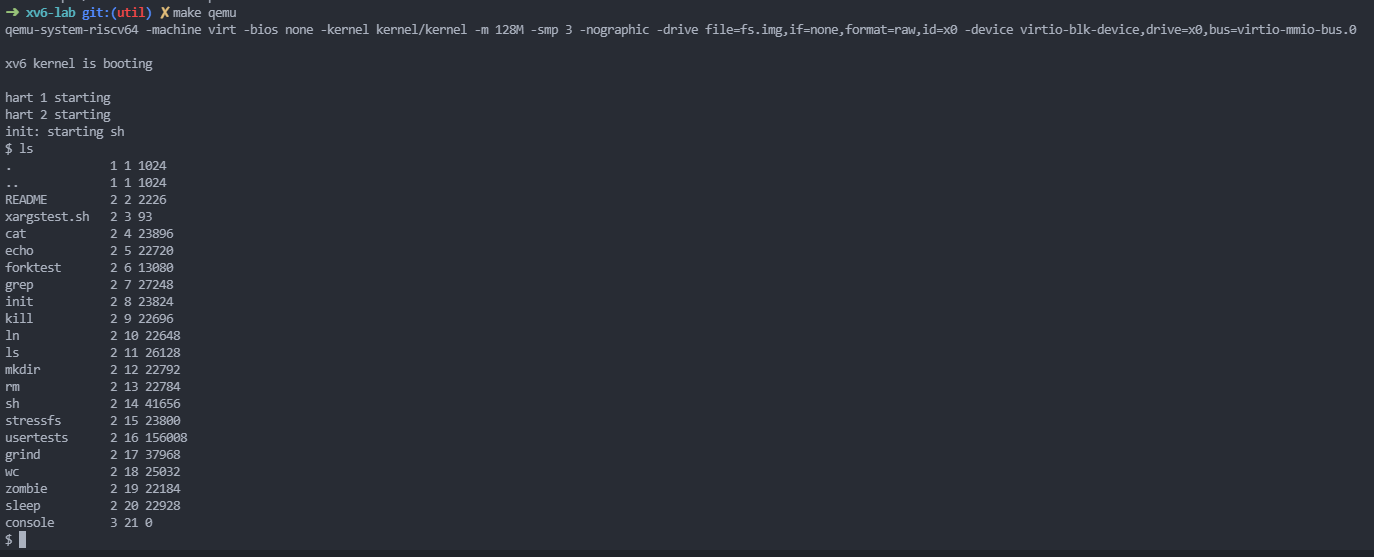
make qemu之后,就进入到 xv6 中了,如下:
2. Sleep
2.1 要求
Implement the UNIX program sleep for xv6; your sleep should pause for a user-specified number of ticks. A tick is a notion of time defined by the xv6 kernel, namely the time between two interrupts from the timer chip. Your solution should be in the file user/sleep.c.
增加系统调用 sleep
2.2 实现
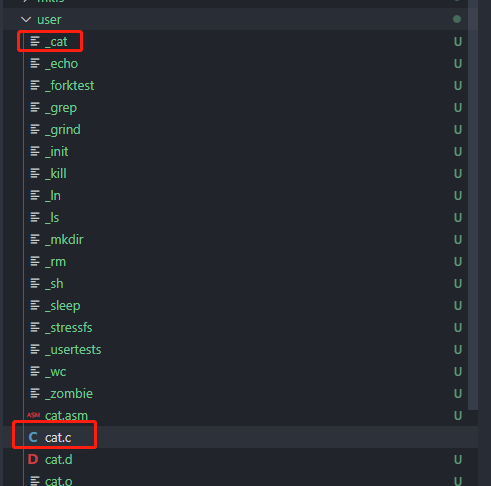
首先需要了解系统调用的流程,参考 user 目录下的程序,以 cat.c为例
#include "kernel/types.h" #include "kernel/stat.h" #include "user/user.h" char buf[512]; void cat(int fd) { int n; while((n = read(fd, buf, sizeof(buf))) > 0) { if (write(1, buf, n) != n) { fprintf(2, "cat: write error\n"); exit(1); } } if(n < 0){ fprintf(2, "cat: read error\n"); exit(1); } } int main(int argc, char *argv[]) { int fd, i; if(argc <= 1){ cat(0); exit(0); } for(i = 1; i < argc; i++){ if((fd = open(argv[i], 0)) < 0){ fprintf(2, "cat: cannot open %s\n", argv[i]); exit(1); } cat(fd); close(fd); } exit(0); }
make qemu之后,cat.c 会生产对应的 _cat 可执行文件,专门用于 xv6,并且写入到文件系统中。
因此增加 sleep 指令可以简单分为如下几步:
- 编写
sleep.c,主要执行系统调用sleep,其声明位于user.h - 在 Makefile 中的
UPROGS中增加$U/_sleep\,用于生成可执行文件 make qemu会将 step 2 的文件写入到文件系统中
PS:这里需要注意的是,sleep 的系统调用在 user.h 中只能找到声明,其定义位于 usys.S,该文件由 usys.pl 生成,里面都是系统调用
sleep.c 代码如下:
#include "kernel/types.h" #include "user/user.h" int main(int argc, char *argv[]) { if(argc < 1){ fprintf(2, "Usage: sleep [seconds]...\n"); exit(1); } int sleep_seconds = atoi(argv[1]); fprintf(2, "sleep second %d\n", sleep_seconds); if(sleep_seconds <= 0){ fprintf(2, "sleep param invalid...\n"); exit(1); } sleep(sleep_seconds); exit(0); }
3. Pingpong
3.1 要求
Write a program that uses UNIX system calls to ''ping-pong'' a byte between two processes over a pair of pipes, one for each direction. The parent should send a byte to the child; the child should print "
: received ping", where is its process ID, write the byte on the pipe to the parent, and exit; the parent should read the byte from the child, print " : received pong", and exit. Your solution should be in the file user/pingpong.c.
在控制台中输入 pingpong指令时,能够按如下格式输出,子进程先输出 ${pid}: received ping,父进程再输出 ${pid}: received pong
$ make qemu ... init: starting sh $ pingpong 4: received ping 3: received pong $
3.2 实现
该 part 比较简单,与增加 sleep流程基本一致。
#include "kernel/types.h" #include "user/user.h" int main(int argc, char *argv[]) { int fd[2]; char buf[8] = "hello\n"; if (pipe(fd) == -1) { fprintf(2, "pipe failed ...\n"); exit(1); } int pid = fork(); if (pid < 0) { fprintf(2, "fork failed ... \n"); exit(1); } // child process else if (pid == 0) { if (read(fd[0], buf, sizeof(buf))) { write(fd[1], buf, sizeof(buf)); fprintf(2, "%d: received ping\n", getpid()); } } // parent process else{ write(fd[1], buf, sizeof(buf)); wait(0); if (read(fd[0], buf, sizeof(buf))) { fprintf(2, "%d: received pong\n", getpid()); } } exit(0); }
4. Primes
4.1 要求
Write a concurrent version of prime sieve using pipes. This idea is due to Doug McIlroy, inventor of Unix pipes. The picture halfway down this page and the surrounding text explain how to do it. Your solution should be in the file user/primes.c.
输出 0 ~ 35 的素数,按照流水线的流程,每次输出完当前素数后,fork 一个进程输出下一个素数,格式大致如下:
$ make qemu ... init: starting sh $ primes prime 2 prime 3 prime 5 prime 7 prime 11 prime 13 prime 17 prime 19 prime 23 prime 29 prime 31 $
要求父进程在所有子进程结束之后,才能退出。
4.2 实现
主要需要注意等到子进程都结束了才能关闭最初的父进程
#include "kernel/types.h" #include "user/user.h" int main(int argc, char *argv[]) { int fd[2]; if (pipe(fd) == -1) { fprintf(2, "pipe failed ...\n"); exit(1); } int pid = 0; int i = 0; int cnt = 10; int primes[] = {2, 3, 5, 7, 11, 13, 17, 19, 23, 29, 31}; fprintf(2, "prime %d\n", primes[i]); repeat: pid = fork(); if (pid == 0) { if (read(fd[0], &i, sizeof(int))) { fprintf(2, "prime %d\n", primes[i]); if (i == cnt) { close(fd[1]); exit(0); } else goto repeat; } } else { i += 1; write(fd[1], &i, sizeof(int)); wait(0); } exit(0); }
5. find
5.1 要求
Write a simple version of the UNIX find program: find all the files in a directory tree with a specific name. Your solution should be in the file user/find.c.
实现在指定目录中查找指定名称的文件
5.2 实现
主要需要注意:
- 如何遍历目录
open路径,获取文件的 fd- 通过
fstat校验 fd 的类型 - 循环
read获得的 fd,强制类型转换目录项
- 需要跳过
.和..,可以通过目录项名称dirent.name来判断
#include "kernel/types.h" #include "kernel/stat.h" #include "user/user.h" #include "kernel/fs.h" void find_file(char *buf, char *p, char *search_path, char *search_file) { int fd; struct stat st; struct dirent de; if ((fd = open(search_path, 0)) < 0) { fprintf(2, "find: cannot open %s\n", search_path); return; } if (fstat(fd, &st) < 0) { fprintf(2, "find: cannot stat %s\n", search_path); close(fd); return; } strcpy(buf, search_path); p = buf + strlen(buf); *p++ = '/'; while (read(fd, &de, sizeof(de)) == sizeof(de)) { // 校验目录项是文件还是目录 memmove(p, de.name, DIRSIZ); p[DIRSIZ] = 0; if (stat(buf, &st) < 0) { fprintf(2, "ls: cannot stat %s\n", buf); continue; } // 如果是文件且名称符合搜索的文件 if (st.type == T_FILE && !strcmp(de.name, search_file)) { printf("%s\n", buf); *(p + 1) = 0; continue; } // 如果是目录,则继续递归下去 else if(st.type == T_DIR) { if (de.inum == 0) { continue; } if (!strcmp(de.name, ".") || !strcmp(de.name, "..")) { continue; } memmove(p, de.name, DIRSIZ); p[DIRSIZ] = 0; find_file(buf, p, buf, search_file); } } close(fd); } void find(char *search_path, char *search_file) { char buf[512], *p; p = buf; find_file(p, buf, search_path, search_file); } int main(int argc, char *argv[]) { if (argc < 2) { fprintf(2, "find param invalid, format find [search path] [search file] \n"); exit(0); } find(argv[1], argv[2]); exit(0); }
6. xargs
6.1 要求
Write a simple version of the UNIX xargs program: read lines from the standard input and run a command for each line, supplying the line as arguments to the command. Your solution should be in the file user/xargs.c.
实现 xargs 指令,这里的区别在于,正常情况下,当输入的结果为多行时,会合并到一起给后面的命令作为输入,比如 :
$ echo "1\n2" | xargs echo line line 1 2
而这里要求的实现版可以将多行分为多次输入,不要求做合并优化,如下:
$ echo "1\n2" | xargs -n 1 echo line line 1 line 2
6.2 实现
xargs 通常形式为 xargs [command] [arg1] [arg2],思路如下:
- 首先,
xargs输入的获取是通过 0 文件描述符,也就是标准输入 - 获取输入后便要执行
xargs后面的command,因此要先准备参数列表char* argv[]- 需要把 xargs 后面的参数先加入到
char* argv[]中 - 通过
read获取标准输入的内容,由于有多行输入,故需要类似while(readline())的操作 - 读取到一行数据后,根据空格分隔,依次将每个参数写入到
char* argv[]中
- 需要把 xargs 后面的参数先加入到
- 该行数据读取完毕后,执行
exec接口- 其接口格式为
exec(char* path, char** argv);,其中argv[0]需要为xargs后面的command argv数组中,最后一个参数的下一个元素值需要为 0 ,用于exec判断有多少个参数,如argv[argc]= 0
- 其接口格式为
- 接着读取下一行,然后覆盖原先读取的行参数
#include "kernel/types.h" #include "kernel/param.h" #include "user/user.h" char *readline() { char *buf = malloc(100); char *p = buf; while (read(0, p, 1) != 0) { if (*p == '\n' || *p == '\0') { *p = '\0'; return buf; } p++; } if (p != buf) return buf; free(buf); return 0; } int main(int argc, char *argv[]) { if (argc < 2) { printf("Usage: xargs [command]\n"); exit(-1); } // 先复制原有的参数,argv 要 +1 是因为要跳过第一个参数 xargs char* line; char* nargv[MAXARG]; char** pna = nargv; char** pa = ++argv; while(*pa != 0){ *pna = *pa; pna++; pa++; } while ((line = readline()) != 0) { //printf("read .. %s\n", line); char *pline = line; char *buf = malloc(36); char *pbuf = buf; // 每次需要重置下标,防止使用到前一行的参数 int nargc = argc - 1; // 遍历该行每个字符 while (*pline != 0) { // 遍历完一个参数 if (*pline == ' ' && buf != pbuf) { *pbuf = 0; nargv[nargc] = buf; buf = malloc(36); pbuf = buf; nargc++; } // 单字符复制 else if(*pline != ' ') { *pbuf = *pline; pbuf++; } pline++; } if (buf != pbuf) { nargv[nargc] = buf; nargc++; } // exec 要求最后一个参数的下一个元素值为 0, 便于判断 nargv[nargc] = 0; free(line); int pid = fork(); if (pid == 0) { //printf("exec %s %s\n", nargv[0], nargv[1]); exec(nargv[0], nargv); } else { wait(0); } } exit(0); }


【推荐】国内首个AI IDE,深度理解中文开发场景,立即下载体验Trae
【推荐】编程新体验,更懂你的AI,立即体验豆包MarsCode编程助手
【推荐】抖音旗下AI助手豆包,你的智能百科全书,全免费不限次数
【推荐】轻量又高性能的 SSH 工具 IShell:AI 加持,快人一步
· 分享4款.NET开源、免费、实用的商城系统
· 全程不用写代码,我用AI程序员写了一个飞机大战
· MongoDB 8.0这个新功能碉堡了,比商业数据库还牛
· 白话解读 Dapr 1.15:你的「微服务管家」又秀新绝活了
· 上周热点回顾(2.24-3.2)