【Java 并发编程】Condition
Condition
Condition 是 JDK1.5 之后才有的,它具有很好的灵活性,比如,可以实现多路通知功能,也就是在一个 Lock 对象中可以创建多个 Condition 实例(即对象监视器),线程对象可以注册在指定的 Condition 中,从而可以有选择性的进行线程通知,在调度线程上更加灵活。
在使用 notify()/notifyAll() 方法进行通知时,被通知的线程是由 JVM 选择的,用 ReentrantLock 类结合 Condition 实例可以实现“选择性通知”,这个功能非常重要,而且是 Condition 接口默认提供的。
而 synchronized 关键字就相当于整个 Lock 对象中只有一个 Condition 实例,所有的线程都注册在它一个身上。如果执行 notifyAll() 方法的话就会通知所有处于等待状态的线程,这样会造成很大的效率问题。而 Condition 实例的 signalAll() 方法,只会唤醒注册在该 Condition 实例中的所有等待线程。
可中断锁和不可中断锁有什么区别?
-
可中断锁:获取锁的过程中可以被中断,不需要一直等到获取锁之后 才能进行其他逻辑处理。
ReentrantLock 就属于是可中断锁。
-
不可中断锁:一旦线程申请了锁,就只能等到拿到锁以后才能进行其他的逻辑处理。
synchronized 就属于是不可中断锁。
原理
ConditionObject 是 AQS 的内部类,实现了 Condition 接口,Lock 中提供 newCondition() 方法,委托给内部 AQS 的实现 Sync 来创建 ConditionObject 对象,享受 AQS 对 Condition 的支持。
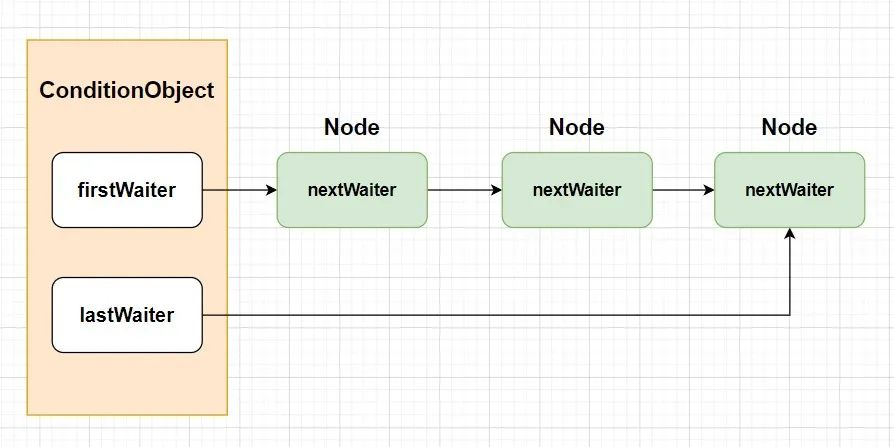
ConditionObject 内部维护了一个先进先出(FIFO)的单向队列,我们把它称为等待队列。如下图所示:
ConditionObject 可以配合锁实现线程同步,ConditionObject 可以直接访问 AQS 对象内部的变量,比如:state 状态值和 AQS 队列。
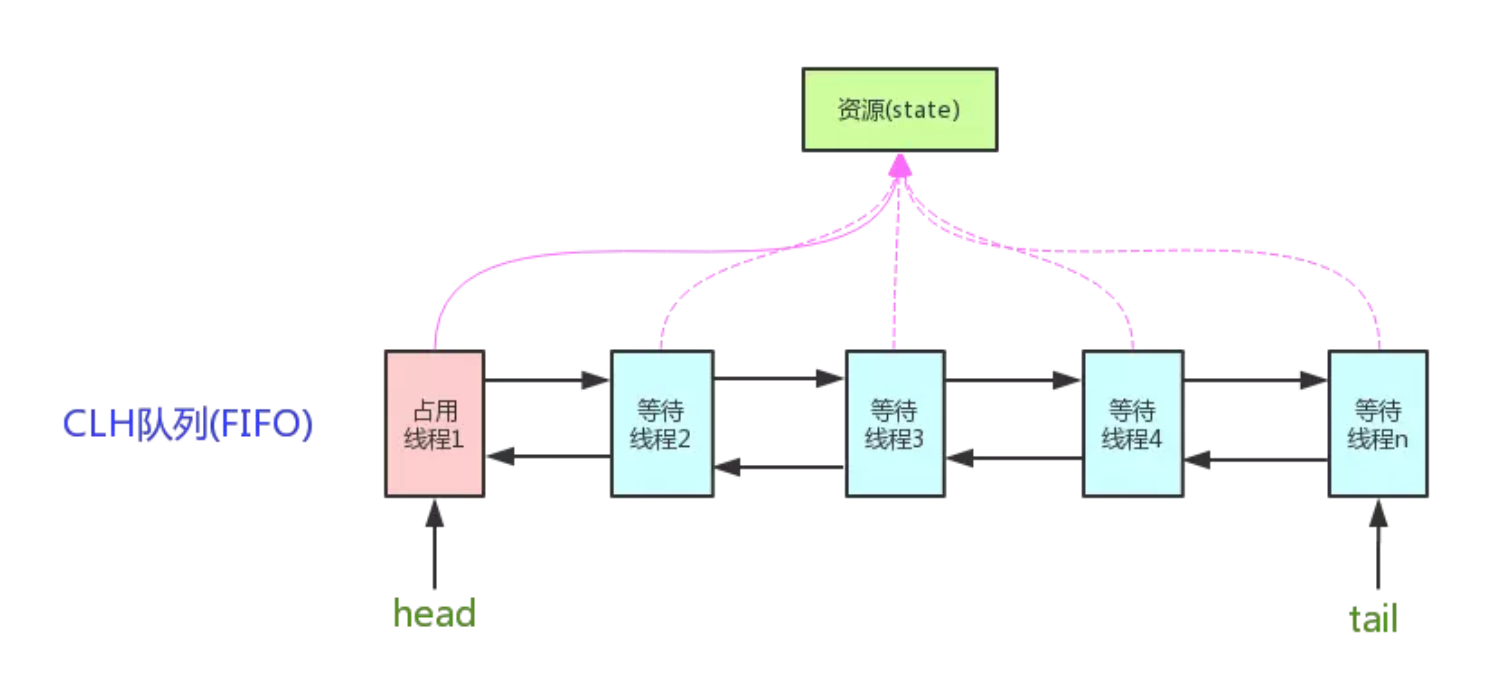
注意,在 AQS 内部维护了一个先进先出(FIFO)的双端队列,并使用了两个引用 head 和 tail 用于标识队列的头部和尾部。
等待队列与 AQS 同步队列的区别:
-
AQS 维护的是当前在等待资源的线程队列,Condition 维护的是在等待 signal 信号的线程队列。
-
每个线程会存在上述两个队列中的一个,lock 与 unlock 对应在 AQS 同步队列,signal 与 await 对应在条件队列,线程节点在他们之间反复横跳。
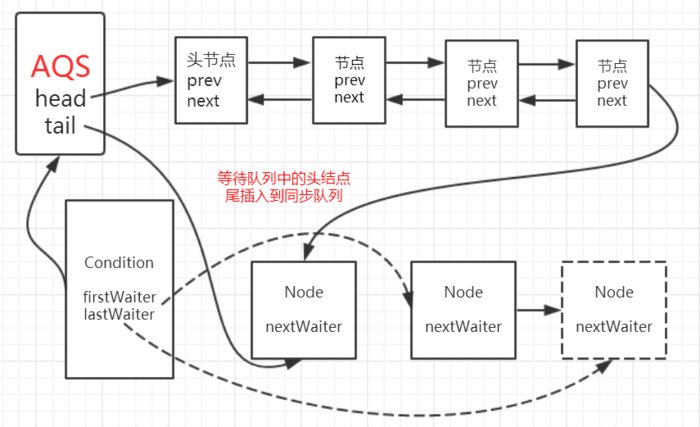
等待队列与 AQS 同步队列的关系,如下图所示:

源码分析
ConditionObject 是条件变量,每个条件变量对应一个条件队列(单向链表队列),它用来存放调用条件变量的 await 方法后被阻塞的线程,ConditionObject 维护了首尾节点。
所有调用 await 方法的线程都会加入到等待队列中,并且线程状态均为等待状态。firstWaiter 指向首节点,lastWaiter 指向尾节点。其源码如下:
public abstract class AbstractQueuedSynchronizer extends AbstractOwnableSynchronizer implements java.io.Serializable {
    public class ConditionObject implements Condition, java.io.Serializable {
        private transient Node firstWaiter;
        private transient Node lastWaiter;
        ...
    }
}
await
await() 方法,会使当前线程进入等待队列并释放锁,同时线程状态变为等待状态。其源码如下:
public abstract class AbstractQueuedSynchronizer extends AbstractOwnableSynchronizer implements java.io.Serializable {
    public class ConditionObject implements Condition, java.io.Serializable {
        ...
        public final void await() throws InterruptedException {
            if (Thread.interrupted())
                throw new InterruptedException();
            Node node = addConditionWaiter(); // 添加到条件队列中
            int savedState = fullyRelease(node); // 释放同步资源,也就是释放锁
            int interruptMode = 0;
            while (!isOnSyncQueue(node)) { // 如果这个节点的线程不在同步队列中,说明该线程还不具备竞争锁的资格
                LockSupport.park(this); // 挂起线程
                if ((interruptMode = checkInterruptWhileWaiting(node)) != 0) // 如果线程中断,退出
                    break;
            }
            if (acquireQueued(node, savedState) && interruptMode != THROW_IE) // 退出循环,被唤醒之后,进入阻塞队列,等待获取锁 acquireQueued
                interruptMode = REINTERRUPT;
            if (node.nextWaiter != null) // clean up if cancelled
                unlinkCancelledWaiters();
            if (interruptMode != 0)
                reportInterruptAfterWait(interruptMode);
        }
}
可以看出,await() 其实就是将 AQS 同步队列的首节点,即获取了锁的节点,移动到 Condition 的等待队列中。

addConditionWaiter
addConditionWaiter() 会将当前节点加入到条件队列中。其源码如下:
public abstract class AbstractQueuedSynchronizer extends AbstractOwnableSynchronizer implements java.io.Serializable {
    public class ConditionObject implements Condition, java.io.Serializable {
        ...
        private Node addConditionWaiter() {
            Node t = lastWaiter;
            // If lastWaiter is cancelled, clean out.
            if (t != null && t.waitStatus != Node.CONDITION) { // 如果 lastWaiter 被取消了,将其清除
                unlinkCancelledWaiters(); // 遍历整个条件队列,将已取消的所有节点清除出列
                t = lastWaiter; // t重新赋值一下,因为 last 可能改变了
            }
            // 注意这里,node在初始化的时候,会指定ws为CONDITION
            Node node = new Node(Thread.currentThread(), Node.CONDITION);
            if (t == null) // t == null 表示队列此时为空,初始化 firstWaiter
                firstWaiter = node;
            else
                t.nextWaiter = node; // 入队尾
            lastWaiter = node; // 将尾指针指向新建的 node
            return node;
        }
    }
    ...
}
unlinkCancelledWaiters
unlinkCancelledWaiters 用于移除条件队列中已经取消等待的节点。其源码如下:
public abstract class AbstractQueuedSynchronizer extends AbstractOwnableSynchronizer implements java.io.Serializable {
    public class ConditionObject implements Condition, java.io.Serializable {
        ...
        private void unlinkCancelledWaiters() {
            Node t = firstWaiter;
            Node trail = null; // trail 这里表示取消节点的前驱节点
            while (t != null) { // 从头到尾遍历这个单链表
                Node next = t.nextWaiter; // 取出条件队列中的下一个节点
                if (t.waitStatus != Node.CONDITION) { // 如果当前这个节点状态不是 -2,则移除该节点
                    t.nextWaiter = null;
                    // 从队列中移除当前节点
                    if (trail == null) // 前驱节点为空,说明该节点为头节点
                        firstWaiter = next;// 将头节点的 next 指向下一个节点,即删除当前节点
                    else
                        trail.nextWaiter = next; // 将前驱节点的 next 指向下一个节点,即删除当前节点
                    if (next == null) // 如果下一个节点为空,说明当前节点为尾节点
                        lastWaiter = trail; // 需要将尾指针指向前驱节点
                }
                else
                    trail = t;
                t = next; // 向后遍历单向链表
            }
        }
    ...
}
总结一下,addConditionWaiter 的过程:
-
首先判断条件队列的尾节点是否被取消了,就需要从头到尾遍历条件队列,移除等待状态不是 CONDITION 的节点。
-
然后,将当前线程包装为 Node,并指定等待状态为 CONDITION。
移除节点的时候,有两种情况:
-
如果尾节点为空,则表明队列为空,将首尾节点都指向当前节点。
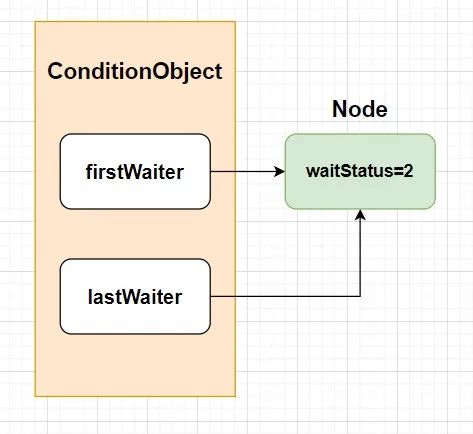
-
如果尾节点不为空,表明队列中有其他节点,则将当前尾节点的 nextWaiter 指向当前节点,将当前节点置为尾节点。
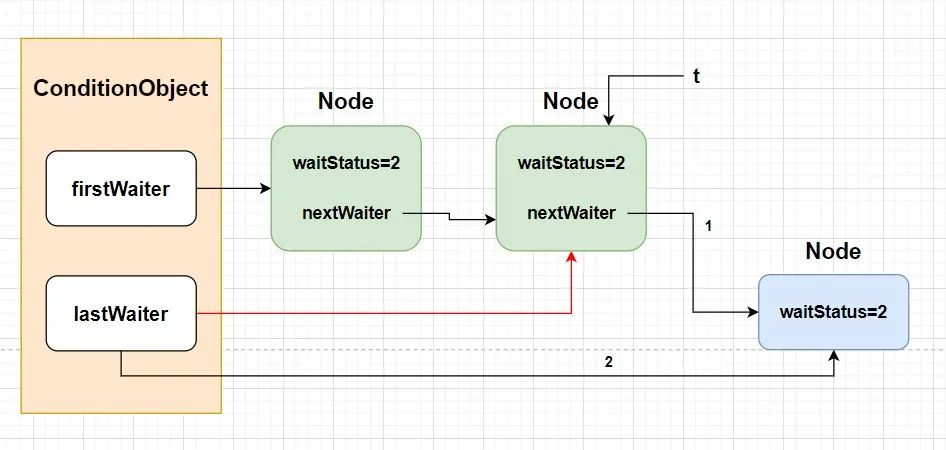
综上,addConditionWaiter() 的作用就是通过尾插入的方式将当前线程封装的 Node 插入到等待队列中。
同时可以看出,Condtion 的等待队列是一个不带头节点的链式队列。而之前我们学习 AQS 时知道同步队列是一个带头节点的链式队列,这是两者的一个区别。
signal
调用 signal() 方法,会唤醒在等待队列中等待时间最长的节点(首节点),使得该节点能够有机会获得 lock,在唤醒节点之前,会将节点移到同步队列中。
等待队列是先进先出(FIFO)的,所以等待队列的头节点必然会是等待时间最长的节点,也就是每次调用 condition 的 signal() 方法都会将头节点移动到同步队列中。
其中,signal() 的源码如下:
public abstract class AbstractQueuedSynchronizer extends AbstractOwnableSynchronizer implements java.io.Serializable {
    public class ConditionObject implements Condition, java.io.Serializable {
        ...
        public final void signal() {
            if (!isHeldExclusively()) // 检测当前线程是否已经获取 lock
                throw new IllegalMonitorStateException();
            Node first = firstWaiter; // 获取等待队列中第一个节点,之后的操作都是针对这个节点
            if (first != null)
                doSignal(first);
        }

        private void doSignal(Node first) {
            do {
                if ( (firstWaiter = first.nextWaiter) == null)
                    lastWaiter = null;
                first.nextWaiter = null; // 将头节点从等待队列中移除
            } while (!transferForSignal(first) && (first = firstWaiter) != null);
        }
    }
    ...
}
transferForSignal
处理头节点的逻辑在 transferForSignal() 方法中,其源码如下:
public abstract class AbstractQueuedSynchronizer extends AbstractOwnableSynchronizer implements java.io.Serializable {
    final boolean transferForSignal(Node node) {
        /*
         * If cannot change waitStatus, the node has been cancelled.
         */
        if (!compareAndSetWaitStatus(node, Node.CONDITION, 0)) // 更新状态为 0
            return false;

        /*
         * Splice onto queue and try to set waitStatus of predecessor to
         * indicate that thread is (probably) waiting. If cancelled or
         * attempt to set waitStatus fails, wake up to resync (in which
         * case the waitStatus can be transiently and harmlessly wrong).
         */
        Node p = enq(node); // 将该节点移入到同步队列中去
        int ws = p.waitStatus;
        if (ws > 0 || !compareAndSetWaitStatus(p, ws, Node.SIGNAL))
            LockSupport.unpark(node.thread);
        return true;
    }
    ...
}
transferForSignal() 主要做了两件事情:
-
将头节点的状态更改为 CONDITION;
-
调用 enq() 方法,将该节点尾插入到同步队列中。
综上,signal 的执行过程,如下图所示:
总结
await 与 signal
等待/通知机制,通过 condition 的 await 和 signal / signalAll 方法就可以实现,而这种机制能够解决最经典的问题就是“生产者与消费者问题”。
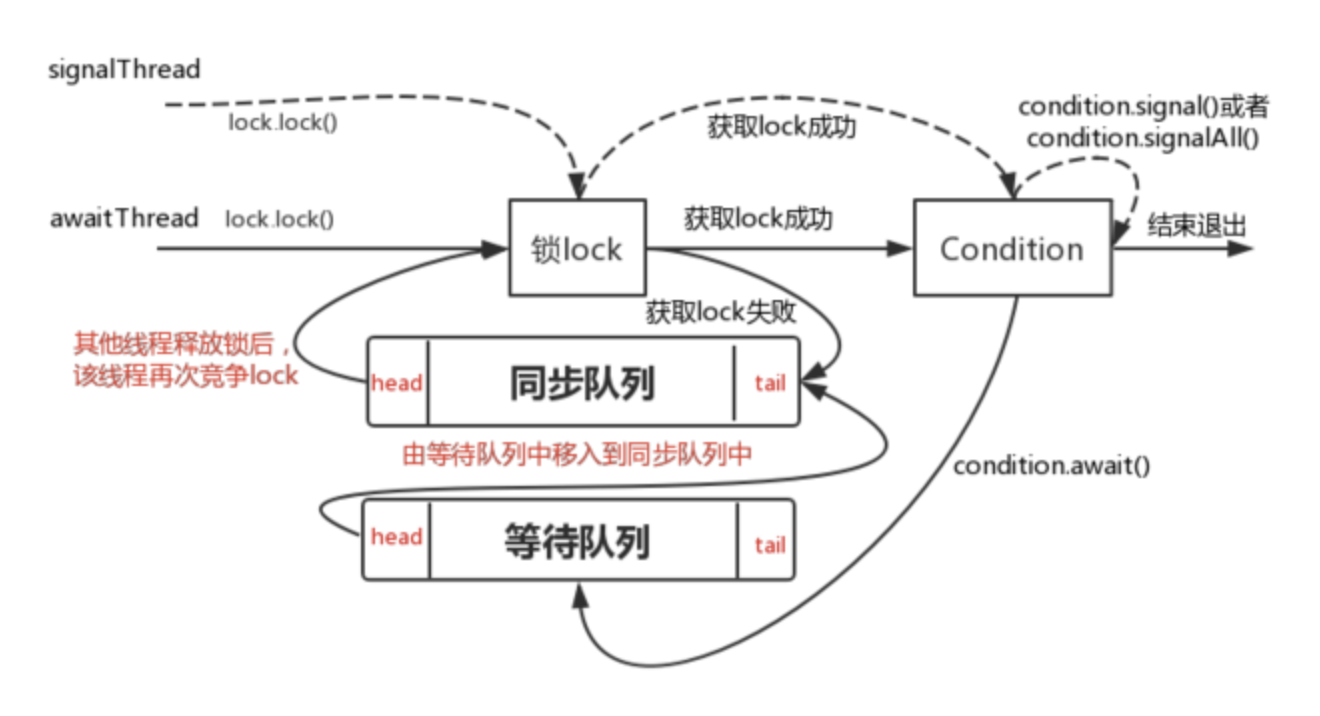
await、signal / signalAll 方法就像一个开关,控制着线程 A(等待方)和线程 B(通知方)。它们之间的关系可以用下面这幅图来说明,会更贴切:
-
线程 awaitThread 先通过 lock.lock() 方法获取锁,成功后,调用 condition.await() 方法进入等待队列;
-
而另一个线程 signalThread 通过 lock.lock() 方法获取锁,成功后,调用 condition.signal() 或 signalAll() 方法,使得线程 awaitThread 能够有机会移入到同步队列中。
当其他线程释放 lock 后,使得线程 awaitThread 能够有机会获取 lock,从而使得线程 awaitThread 能够从 await 方法中退出并执行后续操作。如果 awaitThread 获取 lock 失败,会直接进入到同步队列。
Lock 和 Condition 的应用
【示例】
import java.util.LinkedList;
import java.util.concurrent.locks.Condition;
import java.util.concurrent.locks.ReentrantLock;

public class BoundedBuffer<T> {
    private final LinkedList<T> buffer;  // 使用 LinkedList 作为缓冲区
    private final int capacity;          // 缓冲区最大容量
    private final ReentrantLock lock;    // 互斥锁
    private final Condition notEmpty;    // 缓冲区非空条件
    private final Condition notFull;     // 缓冲区非满条件

    public BoundedBuffer(int capacity) {
        this.capacity = capacity;
        this.buffer = new LinkedList<>();
        this.lock = new ReentrantLock();
        this.notEmpty = lock.newCondition();
        this.notFull = lock.newCondition();
    }

    // 放入一个元素
    public void put(T item) throws InterruptedException {
        lock.lock();
        try {
            // 如果缓冲区满,等待
            while (buffer.size() == capacity) {
                System.out.println("wait the pool to be not full");
                notFull.await();
            }
            buffer.add(item);
            // 通知可能正在等待的消费者
            notEmpty.signal();
        } finally {
            lock.unlock();
        }
    }

    // 取出一个元素
    public T take() throws InterruptedException {
        lock.lock();
        try {
            // 如果缓冲区空,等待
            while (buffer.isEmpty()) {
                System.out.println("wait the pool to be not empty");
                notEmpty.await();
            }
            T item = buffer.removeFirst();
            // 通知可能正在等待的生产者
            notFull.signal();
            return item;
        } finally {
            lock.unlock();
        }
    }
}
【测试】:
import java.util.concurrent.Executors;
import java.util.concurrent.ThreadPoolExecutor;

public class Main {
    public static void main(String[] args) {
        ThreadPoolExecutor executor = (ThreadPoolExecutor) Executors.newFixedThreadPool(30);
        BoundedBuffer<Integer> buffer = new BoundedBuffer<>(10);
        for (int i = 0 ; i < 2; i ++ ) {
            executor.execute( () -> {
                int count = 0;
                while (true) {
                    try {
                        System.out.println("[" + Thread.currentThread().getName() + "] : put :" + count);
                        buffer.put(count++);
                        Thread.sleep(1000);
                    } catch (InterruptedException e) {
                        System.out.println(e.getMessage());
                    }
                }
            });
        }

        for (int i = 0 ; i < 2; i ++ ) {
            executor.execute( () -> {
                while (true) {
                    try {
                        System.out.println("[" + Thread.currentThread().getName() + "] : take : " + buffer.take());
                        Thread.sleep(1000);
                    } catch (InterruptedException e) {
                        System.out.println(e.getMessage());
                    }
                }
            });
        }
    }
}
示例输出:
[pool-1-thread-1] : put :0
[pool-1-thread-2] : put :1
[pool-1-thread-3] : take : 0
[pool-1-thread-4] : take : 1
[pool-1-thread-2] : put :2
[pool-1-thread-1] : put :3
wait the pool to be not empty
wait the pool to be not empty
[pool-1-thread-3] : take : 2
[pool-1-thread-4] : take : 3
wait the pool to be not empty
[pool-1-thread-1] : put :4
[pool-1-thread-2] : put :5
[pool-1-thread-4] : take : 4
[pool-1-thread-3] : take : 5
[pool-1-thread-2] : put :6
wait the pool to be not empty
wait the pool to be not empty
附录
链表中头节点的作用
关于头节点的作用,我们这里简单说明一下。
不带头节点是指在链表数据结构中,链表的第一个节点就是实际存储的第一个数据元素,而不是一个特定的"头"节点(dummy),该节点不包含实际的数据。
-
不带头节点的链表:
-
链表的第一个节点就是第一个实际的数据节点。
-
当链表为空时,头引用(通常称为 head)指向 null。
-
-
带头节点的链表:
-
链表有一个特殊的节点作为链表的开头,这个特殊的节点称为头节点。
-
头节点通常不存储任何实际数据,或者它的数据字段不被使用。
-
无论链表是否为空,头节点总是存在的。当链表为空时,头节点的下一个节点指向 null。
-
使用头节点可以简化某些链表操作,因为我们不必特殊处理第一个元素的插入和删除。
-
为了更好地解释这两种链表结构,我将为每种结构提供一个简单的整数链表插入方法的示例。
不带头节点的链表
【示例】:
定义一个 Node 类:
public class Node {
    public int data;
    public Node next;

    public Node(int data) {
        this.data = data;
        this.next = null;
    }
}
定义一个不带头节点的类:
public class LinkedListWithoutHead {
    public Node head;

    public void insert(int value) {
        Node newNode = new Node(value);
        if (head == null) {
            head = newNode;
        } else {
            Node temp = head;
            while (temp.next != null) {
                temp = temp.next;
            }
            temp.next = newNode;
        }
    }
}
带头节点的链表
定义一个带头节点的类:
public class LinkedListWithHead {
    public final Node head;

    public LinkedListWithHead() {
        head = new Node(-1);  // 初始化头节点
    }

    public void insert(int value) {
        Node newNode = new Node(value);
        Node temp = head;
        while (temp.next != null) {
            temp = temp.next;
        }
        temp.next = newNode;
    }
}
【测试】:
public class Main {
    public static void main(String[] args) {
        test1();
        test2();
    }

    public static void test1() {
        System.out.println("test1 ...");
        LinkedListWithHead linkedListWithHead = new LinkedListWithHead();
        for (int i = 0; i < 3; i++) {
            linkedListWithHead.insert(i);
        }

        Node head = linkedListWithHead.head;
        while (head != null) {
            System.out.println(head.data);
            head = head.next;
        }
    }

    public static void test2() {
        System.out.println("test2 ...");
        LinkedListWithoutHead linkedListWithoutHead = new LinkedListWithoutHead();
        for (int i = 0; i < 3; i++) {
            linkedListWithoutHead.insert(i);
        }

        Node head = linkedListWithoutHead.head;
        while (head != null) {
            System.out.println(head.data);
            head = head.next;
        }
    }
}
示例代码输出:
test1 ...
-1
0
1
2
test2 ...
0
1
2
从输出打印,可以看出,带头节点的类多了一个无效的头节点,用于占位。
参考:

 浙公网安备 33010602011771号