nginx反向代理+负载均衡
Nginx 概述
Nginx ("engine x") 是一个高性能的 HTTP 和反向代理服务器,特点是占有内存少,并发能
力强
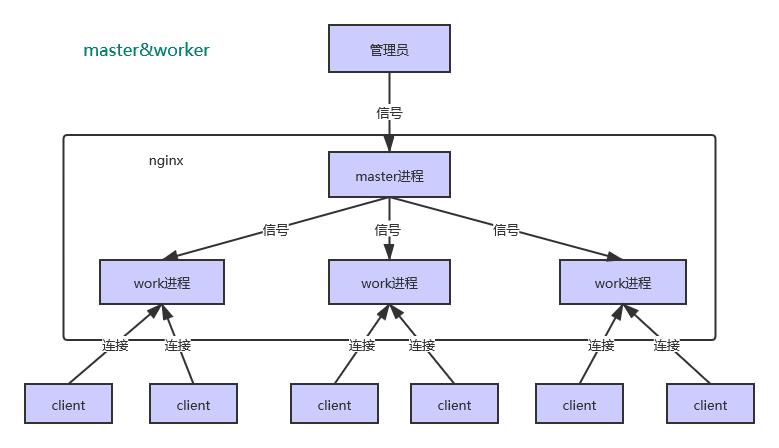
nginx has one master process and several worker processes. The main purpose of the master process is to read and evaluate configuration, and maintain worker processes. Worker processes do actual processing of requests
负载均衡:单个服务器解
决不了,我们增加服务器的数量,然后将请求分发到各个服务器上,将原先请求集中到单个
反向代理:暴露的是代理服务器地址,隐藏了真实服务器 IP 地址
一、安装
-
Install the prerequisites
sudo yum install yum-utils[备注]:如果yum库里面没有nginx软件包,需要自己配置仓库地址,见后下面的备注1说明
-
sudo yum install nginx -
查看yum安装目录
rpm -ql nginx
-
默认配置文件可能的位置configuration file default place
/usr/local/nginx/conf, /etc/nginx, /usr/local/etc/nginx
-
安装目录介绍
这个很重要-但是篇幅太长,不做记录,用到时,看官网或百度,还是蛮详细的
备注1:配置nginx.repo
-
在
/etc/yum.repos.d该目录下创建文件nginx.repotouch nginx.repo
-
在nginx.repo文件中写入配置信息
  [nginx-stable]
  name=nginx stable repo
  baseurl=http://nginx.org/packages/centos/$releasever/$basearch/
  gpgcheck=1
  enabled=1
  gpgkey=https://nginx.org/keys/nginx_signing.key
  module_hotfixes=true

  [nginx-mainline]
  name=nginx mainline repo
  baseurl=http://nginx.org/packages/mainline/centos/$releasever/$basearch/
  gpgcheck=1
  enabled=0
  gpgkey=https://nginx.org/keys/nginx_signing.key
  module_hotfixes=true
nginx 常用的命令
-
版本号以及参数
nginx -v
nginx -V -
启动、停止、重新加载
//启动 nginx // 快速关闭 nginx -s stop // 正常关闭 nginx -s quit // 重新加载配置文件 nginx -s reload //用来打开日志文件,这样nginx会把新日志信息写入这个新的文件中 nginx -s reopen -
测试配置文件是否有语法错误
nginx -t
二、配置文件概述
-
全局块-配置指令
如
worker_processe.
配置一些影响 nginx 服务器整体运行的配置指令,主要包括配
置运行 Nginx 服务器的用户(组)、允许生成的 worker process 数,进程 PID 存放路径、日志存放路径和类型以及配置文件的引入等。比如 worker_processes 1; 处理并发数的配置。其他全局配置指定参看官方文档:https://nginx.org/en/docs/ngx_core_module.html#worker_processes -
events块 :影响 Nginx 服务器与用户的网络连
比如 worker_connections 1024; 支持的最大连接数为 1024.
参看官方文档:https://nginx.org/en/docs/ngx_core_module.html#worker_processesSyntax: worker_connections number; Default: worker_connections 512; Context: events -
http块
还包含两部分:http 全局块、server 块。参看:
https://nginx.org/en/docs/http/ngx_http_core_module.html#http
三、多文件配置+反向代理
-
多配置文件
这是官方默认的配置。只需在
default.d目录下新建文件配置server模块 ,通过include 引入文件即可。试图自己创建文件夹和文件再引入一直没成功,不知道为啥。。。include /etc/nginx/default.d/*.conf;#官方默认文件部分配置nginx.conf server { listen 80; listen [::]:80; #ip或域名 server_name ip; root /usr/share/nginx/html; # Load configuration files for the default server block. include /etc/nginx/default.d/*.conf; location / { # proxy_pass http://122.51.187.235:8080; } error_page 404 /404.html; location = /40x.html { } error_page 500 502 503 504 /50x.html; location = /50x.html { } } -
示例
新建nginx-other-moudle.conf
#配一个反向代理 server{ # listen 8081; server_name ip; location /examples/ { proxy_pass http://ip:8080; } } -
注意
访问地址中双斜杆 /examples/ 依然是资源路劲的一部分。
比如:
 ip:port/examples/
 实际访问资源为: proxy_pass/examples
 而不是proxy_pass
四、访问静态资源
通过 location 指定不同的后缀名实现不同的请求转发。通过 expires 参数设置,可以使浏览器缓存过期时间,减少与服务器之前的请求和流量。具体 Expires 定义:是给一个资源设定一个过期时间,也就是说无需去 服务端验证,直接通过浏览器自身确认是否过期即可,所以不会产生额外的流量。此种方法非常适合不经常变动的资源。(如果经常更新的文件,不建议使用 Expires 来缓存),我这里设置 3d ,表示在这 3 天之内访问这个 URL ,发送一个请求,比对服务器该文件最后更新时间没有变化,则不会从服务器抓取,返回状态码 304 ,如果有修改,则直接从服务器重新下载,返回状态码200 。
	#多文件配置
	#/etc/nginx/conf.d/nginx-static.conf
	server{
	 	   listen       80;
	        server_name  ip;
			#实际的服务器资源路径为/data/image/testPic.jpg
	        location /image/ {
	        	    root /data/;
	        }
	        location /html {
	        	    root /data;
	        }
	}
ngixn+vue
         server {
          listen       80;
          server_name  localhost;
   	      root   /opt/color/dist;
          #charset koi8-r;

          #access_log  logs/host.access.log  main;

          location / {
              #防止前端项目刷新报404
          	  try_files $uri $uri/ /index.html;
              root   /opt/color/dist;
              index  index.html index.htm;

          }
       // colorService 是前端的接口路径
       // 单个斜杠即可 ,注意双斜杠如 /colorService/ ,那么colorService会追加到后台接口的url中去
  	   location /colorService {
              // 转发到后台接口路径
              proxy_pass  http://122.51.0.0:8080/color;
          }

          error_page   500 502 503 504  /50x.html;
          location = /50x.html {
              root   html;
          }
      }
五、负载均衡
-
upstream
关键字upstream,分流配置,取个名字testUpStream,路由的时候会用到
upstream testUpStream { server ip1:8080; server ip2:8081; } server{ listen 80; server_name ip; location / { proxy_pass http://testUpStream; } } -
分流策略
#多文件配置 #/etc/nginx/conf.d/nginx-upstream.conf upstream myapp1 { least_conn;或者ip_hash; server srv1.example.com; weight=3;//weight 权重 server srv2.example.com; server srv3.example.com; }-
第一种 轮询(默认)
每个请求按时间顺序逐一分配到不同的后端服务器,如果后端服务器 down掉,能自动剔除。
-
第二种 weight
weight 代表权重默认为 1, 权重越高被分配的客户端越多
-
第三种 ip_hash
每个请求按访问 ip 的 的 hash 结果分配,这样每个访客固定访问一个后端服务器
-
第四种 least-connected
将下一个请求分配给活动连接数量最少的服务器
-
第五种 fair (第三方)
按后端服务器的响应时间来分配请求,响应时间短的优先分配。
-
六、nginx 原理与优化参数配置

-
master- -s workers 的机制的好处
首先,对于每个 worker 进程来说,独立的进程,不需要加锁,所以省掉了锁带来的开销,
同时在编程以及问题查找时,也会方便很多。其次,采用独立的进程,可以让互相之间不会
影响,一个进程退出后,其它进程还在工作,服务不会中断,master 进程则很快启动新的
worker 进程。当然,worker 进程的异常退出,肯定是程序有 bug 了,异常退出,会导致当
前 worker 上的所有请求失败,不过不会影响到所有请求,所以降低了风险 -
worker数量
Nginx 同 redis 类似都采用了 io 多路复用机制,每个 worker 都是一个独立的进程,但每个进程里只有一个主线程,通过异步非阻塞的方式来处理请求, 即使是千上万个请求也不在话下。每个 worker 的线程可以把一个 cpu 的性能发挥到极致。所以 worker 数和服务器的 cpu数相等是最为适宜的。设少了会浪费 cpu,设多了会造成 cpu 频繁切换上下文带来的损耗
worker_processes 4 #work 绑定 cpu(4 work 绑定 4cpu)。 worker_cpu_affinity 0001 0010 0100 1000 #work 绑定 cpu (4 work 绑定 8cpu 中的 4 个) 。 worker_cpu_affinity 0000001 00000010 00000100 00001000 -
连接数 worker_connection
这个值是表示每个 worker 进程所能建立连接的最大值,所以,一个 nginx 能建立的最大连接数,应该是 worker_connections * worker_processes。当然,这里说的是最大连接数,对于HTTP 请 求 本 地 资 源 来 说 , 能 够 支 持 的 最 大 并 发 数 量 是 worker_connections *worker_processes,如果是支持 http1.1 的浏览器每次访问要占两个连接,所以普通的静态访问最大并发数是: worker_connections * worker_processes /2,而如果是 HTTP 作 为反向代理来说,最大并发数量应该是 worker_connections *worker_processes/4。因为作为反向代理服务器,每个并发会建立与客户端的连接和与后端服务的连接,会占用两个连接。


