使用apache cxf实现webservice服务
1、在idea中使用maven新建web工程并引入spring mvc,具体可以参考https://www.cnblogs.com/laoxia/p/9311442.html;
2、在工程POM文件中引入apache cxf的相关jar包:
1 <dependency>
2     <groupId>org.apache.cxf</groupId>
3     <artifactId>apache-cxf</artifactId>
4     <version>3.2.4</version>
5     <type>pom</type>
6 </dependency>
3、定义webservice服务的接口:
1 @WebService
2 public interface HelloWorld {
3     @WebMethod
4     String say(@WebParam(name = "inputText") String text);
5 }
4、实现webservice服务:
1 @WebService
2 public class HelloWorldImpl implements HelloWorld {
3
4     @Override
5     public String say(@WebParam(name = "inputText") String text) {
6         return "hello, My Test worlld: " + text;
7     }
8 }
5、定义发布webservice服务的xml文件cxfWebService.xml:
 1 <?xml version="1.0" encoding="UTF-8"?>
 2 <beans xmlns="http://www.springframework.org/schema/beans"
 3        xmlns:xsi="http://www.w3.org/2001/XMLSchema-instance"
 4        xmlns:context="http://www.springframework.org/schema/context"
 5        xmlns:util="http://www.springframework.org/schema/util"
 6        xmlns:jaxws="http://cxf.apache.org/jaxws"
 7        xsi:schemaLocation="
 8        http://www.springframework.org/schema/context
 9        http://www.springframework.org/schema/context/spring-context-3.0.xsd
10        http://www.springframework.org/schema/util
11        http://www.springframework.org/schema/util/spring-util.xsd
12        http://www.springframework.org/schema/beans
13        http://www.springframework.org/schema/beans/spring-beans.xsd
14        http://cxf.apache.org/jaxws
15        http://cxf.apache.org/schemas/jaxws.xsd">
16
17     <import resource="classpath*:META-INF/cxf/cxf.xml" />
18     <import resource="classpath*:META-INF/cxf/cxf-servlet.xml" />
19
20     <jaxws:endpoint id="HelloWorldBean" address="/helloworld" implementor="com.ucar.test.cxf.impl.HelloWorldImpl"/>
21 </beans>
6、在web.xml文件中指定加载webservice服务配置文件和CXFServlet:
 1 <context-param>
 2   <param-name>contextConfigLocation</param-name>
 3   <param-value>WEB-INF/cxfWebService.xml</param-value>
 4 </context-param>
 5 ..................
 6 <servlet>
 7   <servlet-name>CXFServlet</servlet-name>
 8   <servlet-class>org.apache.cxf.transport.servlet.CXFServlet</servlet-class>
 9 </servlet>
10 <servlet-mapping>
11   <servlet-name>CXFServlet</servlet-name>
12   <url-pattern>/webservice/*</url-pattern>
13 </servlet-mapping>
7、将工程打包成war包并放到tomcat下运行,在浏览器中打开http://localhost:8080/test11/webservice/helloworld?wsdl 即可看到下面的界面:
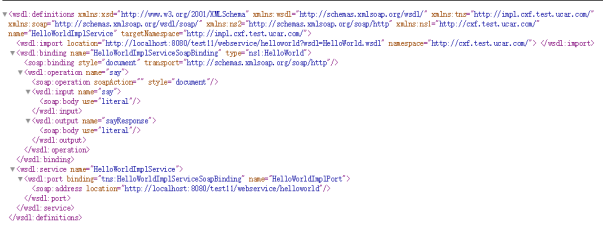
此时可以编写客户端程序调用webservice服务,也可以使用wsCaller.jar来模拟调用webService服务,调用命令:java -jar wsCaller.jar;


 浙公网安备 33010602011771号