Java NIO Reactor模式
一、NIO介绍:
NIO模型:

1、Channel为连接通道,相当于一个客户端与服务器的一个连接,Selector为通道管理器,将Channel注册到Selector上,Selector管理着这些Channel,当管理的某个通道有事件到达时,Selector将会通知应用程序去处理;Selector工作的线程和处理网络事件的应用是在不同的线程中;
2、NIO 有一个主要的类Selector,这个类似一个观察者,只要我们把需要探知的socketchannel告诉Selector,我们接着做别的事情,当有事件发生时,他会通知我们,传回一组SelectionKey,我们读取这些Key,就会获得我们刚刚注册过的socketchannel,然后,我们从这个Channel中读取数据,放心,包准能够读到,接着我们可以处理这些数据。
3、Selector内部原理实际是在做一个对所注册的channel的轮询访问,不断的轮询(目前就这一个算法),一旦轮询到一个channel有所注册的事情发生,比如数据来了,他就会站起来报告,交出一把钥匙,让我们通过这把钥匙来读取这个channel的内容。
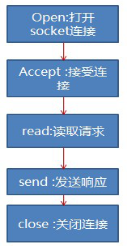
其使用流程如下:

二、单线程BIO实现:
BIO也即Blocking IO,即阻塞的IO;
传统的BIO使用流程如下:

 1 public class IOServer {
 2   public static void main(String[] args) {
 3     ServerSocket serverSocket = null;
 4     try {
 5       serverSocket = new ServerSocket();
 6       serverSocket.bind(new InetSocketAddress(2345));
 7     } catch (IOException ex) {
 8       return;
 9     }
10     try{
11       while(true) {
12         Socket socket = serverSocket.accept();
13         InputStream inputstream = socket.getInputStream();
14         IOUtils.closeQuietly(inputstream);
15       }
16     } catch(IOException ex) {
17       IOUtils.closeQuietly(serverSocket);
18     }
19   }
20 }
三、多线程BIO实现:
上例使用单线程逐个处理所有请求,同一时间只能处理一个请求,等待I/O的过程浪费大量CPU资源,同时无法充分使用多CPU的优势。下面是使用多线程对阻塞I/O模型的改进。一个连接建立成功后,创建一个单独的线程处理其I/O操作。

 1 public class IOServerMultiThread {
 2   public static void main(String[] args) {
 3     ServerSocket serverSocket = null;
 4     try {
 5       serverSocket = new ServerSocket();
 6       serverSocket.bind(new InetSocketAddress(2345));
 7     } catch (IOException ex) {
 8       return;
 9     }
10     try{
11       while(true) {
12         Socket socket = serverSocket.accept();
13         new Thread( () -> {
14           try{
15             InputStream inputstream = socket.getInputStream();
16             IOUtils.closeQuietly(inputstream);
17           } catch (IOException ex) {
18           }
19         }).start();
20       }
21     } catch(IOException ex) {
22       IOUtils.closeQuietly(serverSocket);
23     }
24   }
25 }
四、线程池处理BIO实现:
从上面的代码可以看到:当accept返回(也就是有数据网络数据到达时),创建一个线程,并在线程中处理网络读写以及逻辑处理;
为了防止连接请求过多,导致服务器创建的线程数过多,造成过多线程上下文切换的开销。可以通过线程池来限制创建的线程数:
 1 public class IOServerThreadPool {
 2   public static void main(String[] args) {
 3     ExecutorService executorService = Executors.newFixedThreadPool(Runtime.getRuntime().availableProcessors());
 4     ServerSocket serverSocket = null;
 5     try {
 6       serverSocket = new ServerSocket();
 7       serverSocket.bind(new InetSocketAddress(2345));
 8     } catch (IOException ex) {
 9       return;
10     }
11     try{
12       while(true) {
13         Socket socket = serverSocket.accept();
14         executorService.submit(() -> {
15           try{
16             InputStream inputstream = socket.getInputStream();
17           } catch (IOException ex) {
18           }
19         });
20       }
21     } catch(IOException ex) {
22       try {
23         serverSocket.close();
24       } catch (IOException e) {
25       }
26     }
27   }
28 }
与上面的代码的区别之处在读写网络数据的线程是从线程池里面分配的,充分利用了线程,避免了大量创建线程的开销以及线程上下文切换的开销;
五、经典Reactor模式实现:

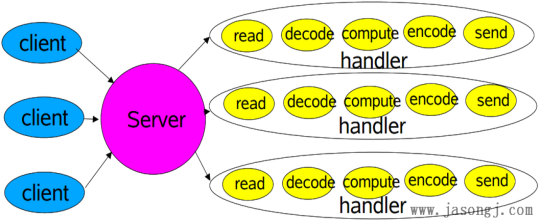
上面的模型也即NIO的标准模型,可以看到:多个Channel可以注册到同一个Selector对象上,实现了一个线程同时监控多个请求状态(Channel)。同时注册时需要指定它所关注的事件;
Acceptor处理客户端的连接请求,handlers(read,decode, compute, encode, send)执行非阻塞的读写,Reactor将IO事件派发给相应handlers来处理;Acceptor和handlers使用的是同一个管理器Selector,并且是在同一个线程中处理的;
 1 public class NIOServer {
 2   public static void main(String[] args) throws IOException {
 3     Selector selector = Selector.open();
 4     ServerSocketChannel serverSocketChannel = ServerSocketChannel.open();
 5     serverSocketChannel.configureBlocking(false);
 6     serverSocketChannel.bind(new InetSocketAddress(1234));
 7     serverSocketChannel.register(selector, SelectionKey.OP_ACCEPT);
 8     while (selector.select() > 0) {
 9       Set<SelectionKey> keys = selector.selectedKeys();
10       Iterator<SelectionKey> iterator = keys.iterator();
11       while (iterator.hasNext()) {
12         SelectionKey key = iterator.next();
13         iterator.remove();
14         if (key.isAcceptable()) {
15           ServerSocketChannel acceptServerSocketChannel = (ServerSocketChannel) key.channel();
16           SocketChannel socketChannel = acceptServerSocketChannel.accept();
17           socketChannel.configureBlocking(false);
18           socketChannel.register(selector, SelectionKey.OP_READ);
19         } else if (key.isReadable()) {
20           SocketChannel socketChannel = (SocketChannel) key.channel();
21           ByteBuffer buffer = ByteBuffer.allocate(1024);
22           int count = socketChannel.read(buffer);
23           if (count <= 0) {
24             socketChannel.close();
25             key.cancel();
26             continue;
27           }
28         }
29         keys.remove(key);
30       }
31     }
32   }
33 }
selector.select()是阻塞的,当有至少一个通道可用时该方法返回可用通道个数。同时该方法只捕获Channel注册时指定的所关注的事件。
六、多工作线程的Reactor模式实现:
经典Reactor模式中,尽管一个线程可同时监控多个请求(Channel),但是所有handler以及acceptor的处理都在同一个线程中处理,无法充分利用多CPU的优势,同时读/写操作也会阻塞对新连接请求的处理。因此可以引入多线程,并行处理多个读/写操作,其模型如下图所示:

实现代码如下:
 1 public class NIOServer {
 2   public static void main(String[] args) throws IOException {
 3     Selector selector = Selector.open();
 4     ServerSocketChannel serverSocketChannel = ServerSocketChannel.open();
 5     serverSocketChannel.configureBlocking(false);
 6     serverSocketChannel.bind(new InetSocketAddress(1234));
 7     serverSocketChannel.register(selector, SelectionKey.OP_ACCEPT);
 8     while (true) {
 9       Set<SelectionKey> keys = selector.selectedKeys();
10       Iterator<SelectionKey> iterator = keys.iterator();
11       while(iterator.hasNext()) {
12         SelectionKey key = iterator.next();
13         iterator.remove();
14         if (key.isAcceptable()) {
15           ServerSocketChannel acceptServerSocketChannel = (ServerSocketChannel) key.channel();
16           SocketChannel socketChannel = acceptServerSocketChannel.accept();
17           socketChannel.configureBlocking(false);
18           SelectionKey readKey = socketChannel.register(selector, SelectionKey.OP_READ);
19           readKey.attach(new Processor());
20         } else if (key.isReadable()) {
21           Processor processor = (Processor) key.attachment();
22           processor.process(key);
23         }
24       }
25     }
26   }
27 }
28
29 public class Processor {
30   private static final ExecutorService service = Executors.newFixedThreadPool(16);
31   public void process(SelectionKey selectionKey) {
32     service.submit(() -> {
33       ByteBuffer buffer = ByteBuffer.allocate(1024);
34       SocketChannel socketChannel = (SocketChannel) selectionKey.channel();
35       int count = socketChannel.read(buffer);
36       if (count < 0) {
37         socketChannel.close();
38         selectionKey.cancel();
39         return null;
40       } else if(count == 0) {
41         return null;
42       }
43       return null;
44     });
45   }
46 }
可以看到他与经典Reactor模式的区别就是handler处理(网络读写以及encode,computer,decode处理)是在线程池中申请一个线程来专门处理的,因此acceptor连接请求处理和网络读写请求处理是在不同的线程中,网络读写不会影响acceptor连接的处理,可以提高服务器对于连接处理的效率和相应速度;
七、多Reactor实现:
Selector的实现原理是对其所管理的所有Channel进行轮询查询(在一个单独的线程中),而上面的多线程工作Reactor模式仍然是在一个Selector上进行轮询查询acceptor和网络读写,Selector在处理网络读写的同时是无法进行acceptor连接的处理的,因此在Selector压力较大时会有网络延迟;
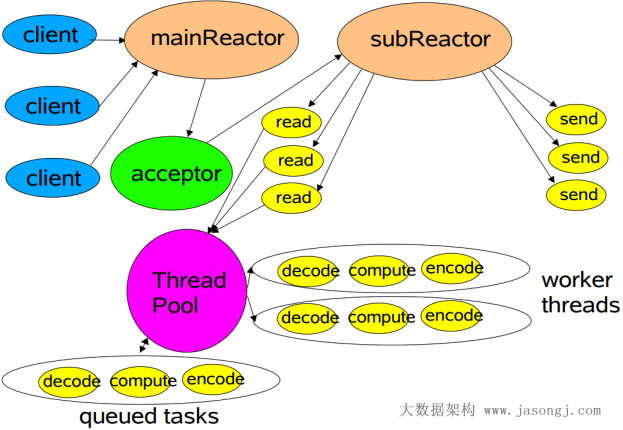
多Reactor是在网络读写与acceptor实在不同的Selector上,也即acceptor是在主Reactor上,网络读写是在子Reactor上,一个主Reactor负责监控所有的连接请求,多个子Reactor负责监控并处理读/写请求,减轻了主Reactor的压力,降低了主Reactor压力太大而造成的延迟。
并且每个子Reactor分别属于一个独立的线程,每个成功连接后的Channel的所有操作由同一个线程处理。这样保证了同一请求的所有状态和上下文在同一个线程中,避免了不必要的上下文切换,同时也方便了监控请求响应状态。
Mina的线程模型正是采用了这种模型;
模型如下图所示:

子Reactor个数是当前机器可用核数的两倍。对于每个成功连接的SocketChannel,通过round robin的方式交给不同的子Reactor。
示意代码如下:
 1 public class NIOServer {
 2   public static void main(String[] args) throws IOException {
 3     Selector selector = Selector.open();
 4     ServerSocketChannel serverSocketChannel = ServerSocketChannel.open();
 5     serverSocketChannel.configureBlocking(false);
 6     serverSocketChannel.bind(new InetSocketAddress(1234));
 7     serverSocketChannel.register(selector, SelectionKey.OP_ACCEPT);
 8     int coreNum = Runtime.getRuntime().availableProcessors();
 9     Processor[] processors = new Processor[coreNum];
10     for (int i = 0; i < processors.length; i++) {
11       processors[i] = new Processor();
12     }
13     int index = 0;
14     while (selector.select() > 0) {
15       Set<SelectionKey> keys = selector.selectedKeys();
16       for (SelectionKey key : keys) {
17         keys.remove(key);
18         if (key.isAcceptable()) {
19           ServerSocketChannel acceptServerSocketChannel = (ServerSocketChannel) key.channel();
20           SocketChannel socketChannel = acceptServerSocketChannel.accept();
21           socketChannel.configureBlocking(false);
22           Processor processor = processors[(int) ((index++) % coreNum)];
23           processor.addChannel(socketChannel);
24           processor.wakeup();
25         }
26       }
27     }
28   }
29 }
30
31 public class Processor {
32   private static final ExecutorService service =
33       Executors.newFixedThreadPool(2 * Runtime.getRuntime().availableProcessors());
34   private Selector selector;
35   public Processor() throws IOException {
36     this.selector = SelectorProvider.provider().openSelector();
37     start();
38   }
39   public void addChannel(SocketChannel socketChannel) throws ClosedChannelException {
40     socketChannel.register(this.selector, SelectionKey.OP_READ);
41   }
42   public void wakeup() {
43     this.selector.wakeup();
44   }
45   public void start() {
46     service.submit(() -> {
47       while (true) {
48         if (selector.select(500) <= 0) {
49           continue;
50         }
51         Set<SelectionKey> keys = selector.selectedKeys();
52         Iterator<SelectionKey> iterator = keys.iterator();
53         while (iterator.hasNext()) {
54           SelectionKey key = iterator.next();
55           iterator.remove();
56           if (key.isReadable()) {
57             ByteBuffer buffer = ByteBuffer.allocate(1024);
58             SocketChannel socketChannel = (SocketChannel) key.channel();
59             int count = socketChannel.read(buffer);
60             if (count < 0) {
61               socketChannel.close();
62               key.cancel();
63               continue;
64             } else if (count == 0) {
65               continue;
66             } else {
67               System.out("{}\t Read message {}", socketChannel, new String(buffer.array()));
68             }
69           }
70         }
71       }
72     });
73   }
74 }


