
AVAudioPlayer
一、AVAudioPlayer简介
AVAudioPlayer在AVFoundation框架下,所以我们要导入AVFoundation.framework。
AVAudioPlayer类封装了播放单个声音的能力。播放器可以用NSURL或者NSData来初始化,要注意的是NSURL并不可以是网络url而必须是本地文件URL,
因为 AVAudioPlayer不具备播放网络音频的能力,如果要播放网络URL,需要先转化为NSData.但是此法并不可取,
因为AVAudioPlayer只能播放一个完整的文件,并不支持流式播放,所以必须是缓冲完才能播放,所以如果网络文件过大抑或是网速不够岂不是要等很久?
所以播放网络音频我们一般用音频队列。播放较大的音频或者要对音频有精确的,这种情况会选择使用AVFoundation.framework中的AVAudioPlayer来实现。
AVAudioPlayer不支持边下边播,所以只能下载到本地再播放,这是他的缺点。但是AVAudioPlayer能够精确控制播放进度、音量、播放速度等属性,这是很强大的优点。
注意:需要添加AVFoundation.framework
二、AVAudioPlayer使用
1.实例化方法
- (instancetype)initWithContentsOfURL:(NSURL *)url error:(NSError **)outError;
2.预加载资源
- (BOOL)prepareToPlay;
3.遵守协议
AVAudioPlayerDelegate
4.播放完成之后回调以下方法
- (void)audioPlayerDidFinishPlaying:(AVAudioPlayer *)player successfully:(BOOL)flag;
先搭建UI吧,直接上图:

1 2 3 4 5 6 7 8 9 10 11 12 13 14 15 16 17 18 19 20 21 22 23 24 25 26 27 28 29 30 31 32 33 34 35 36 37 38 39 40 41 42 43 44 45 46 47 48 49 50 51 52 53 54 55 56 57 58 59 60 61 62 63 64 65 66 67 68 69 70 71 72 73 74 75 76 77 78 79 80 81 82 83 84 85 | #import "AVAudioPlayerViewController.h"#import <AVFoundation/AVFoundation.h>@interface AVAudioPlayerViewController (){ //声明一个播放器 AVAudioPlayer *_musicPlay;//音乐播放器}- (IBAction)playAction:(id)sender;//播放- (IBAction)pauseAction:(id)sender;//暂停- (IBAction)voiceAction:(UISlider *)sender;//音量- (IBAction)progressAction:(UISlider *)sender;//进度@property (weak, nonatomic) IBOutlet UISlider *progressSlider;//进度条@property (nonatomic,strong)NSTimer *myTimer;//声明一个定时器类型的成员变量@end@implementation AVAudioPlayerViewController- (void)viewDidLoad { [super viewDidLoad]; //获取资源路径 需要事先导入本地音频内容 NSString *filePath = [[NSBundle mainBundle] pathForResource:@"1" ofType:@"mp3"]; NSLog(@"%@",filePath); NSURL *URL =[NSURL fileURLWithPath:filePath]; _musicPlay = [[AVAudioPlayer alloc] initWithContentsOfURL:URL error:nil]; //实例化音乐播放器// _musicPlay = [[AVAudioPlayer alloc] initWithContentsOfURL:[NSURL fileURLWithPath:filePath] error:nil]; //设置音量大小处于中等强度 _musicPlay.volume = 0.5;<br> //循环次数,默认是1<br> _musicPlay.numberOfLoops = 1;<br> // 声道数<br> NSUInteger channels = _musicPlay.numberOfChannels;//只读属性<br><br><br> //预加载资源 if ([_musicPlay prepareToPlay]) { NSLog(@"准备完毕"); } //设置总进度大小 self.progressSlider.maximumValue = _musicPlay.duration; }#pragma mark- 各类触发事件-(void)change:(NSTimer *)sender{ //每一秒钟设置一下进度值 播放位置 self.progressSlider.value = _musicPlay.currentTime; }#pragma mark- AVAudioPlayer相关的方法- (IBAction)playAction:(id)sender { //播放 [_musicPlay play]; self.myTimer = [NSTimer scheduledTimerWithTimeInterval:1.0 target:self selector:@selector(change:) userInfo:nil repeats:YES]; }- (IBAction)pauseAction:(id)sender { //暂停 [_musicPlay pause]; //停止定时器 [self.myTimer invalidate]; NSLog(@"%f",_musicPlay.currentTime);}- (IBAction)voiceAction:(UISlider *)sender { //改变音量大小 _musicPlay.volume = sender.value; }- (IBAction)progressAction:(UISlider *)sender { //设置进度 _musicPlay.currentTime = sender.value; } |
代理方法
加入播放出现异常,或者被更高级别的系统任务打断,我们的程序还没来得及收场就挂了,怎么办?不急,我们可以通过几个委托方法很好地处理所有的情形。
首先给player设置委托是必须的:
- player.delegate = self;
- - (void)audioPlayerDidFinishPlaying:(AVAudioPlayer*)player successfully:(BOOL)flag{
- //播放结束时执行的动作
- }
- - (void)audioPlayerDecodeErrorDidOccur:(AVAudioPlayer*)player error:(NSError *)error{
- //解码错误执行的动作
- }
- - (void)audioPlayerBeginInteruption:(AVAudioPlayer*)player{
- //处理中断的代码
- }
- - (void)audioPlayerEndInteruption:(AVAudioPlayer*)player{
- //处理中断结束的代码
- }
三、AVAudioPlayer扩展
1) 如何做后台播放
1> 在plist文件下添加 key : Required background modes,并设置item0 = App plays audio or streams audio/video using AirPlay

2> 设置AVAudioSession的类型为AVAudioSessionCategoryPlayback并且调用setActive::方法启动会话。
AVAudioSession *audioSession = [AVAudioSession sharedInstance];
[audioSession setCategory:AVAudioSessionCategoryPlayback error:nil];
[audioSession setActive:YES error:nil];
正常来说,当app退到后台,程序处于悬挂状态,即暂停播放。
在iOS中每个应用都有一个音频会话,这个会话就通过AVAudioSession来表示。
AVAudioSession同样存在于AVFoundation框架中,它是单例模式设计,通过sharedInstance进行访问。在使用Apple设备时大家会发现有些应用只要打开其他音频播放就会终止,而有些应用却可以和其他应用同时播放,在多种音频环境中如何去控制播放的方式就是通过音频会话来完成的。
下面是音频会话的几种会话模式:
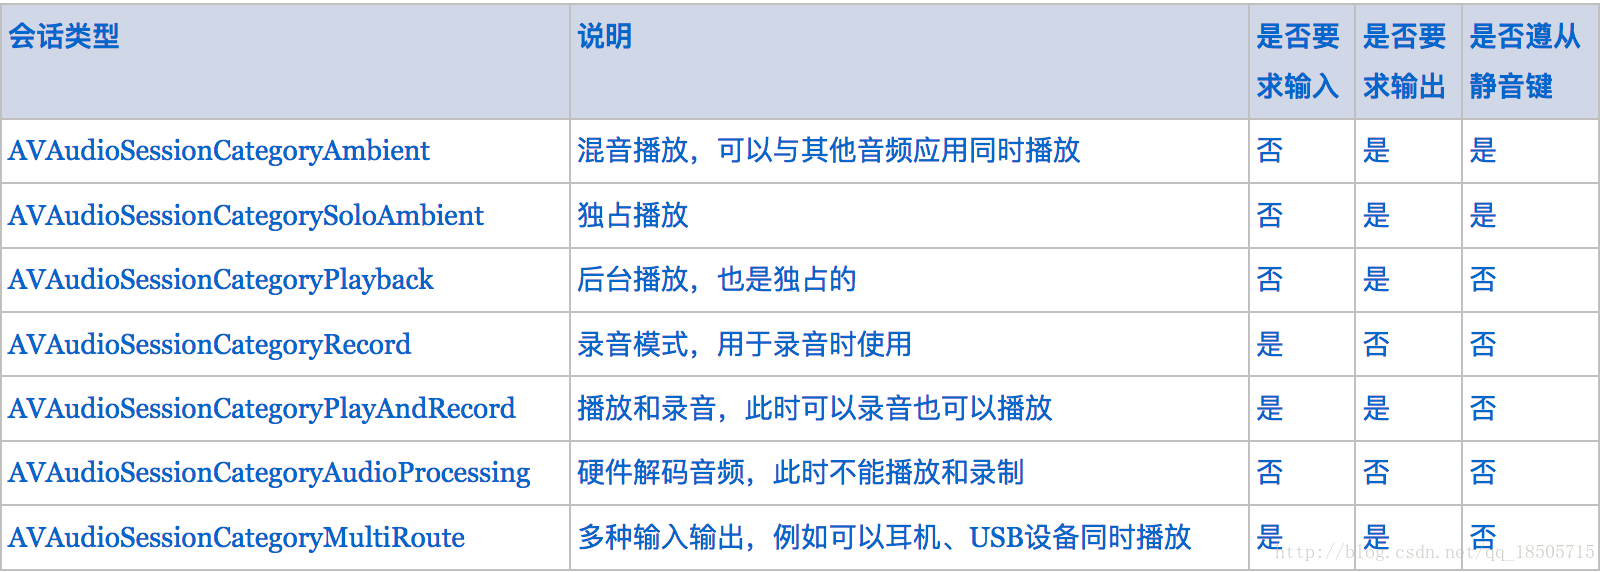
注意 : 前面的代码中也提到设置完音频会话类型之后需要调用setActive::方法将会话激活才能起作用。
(2) 如何做输出改变监听(拔出耳机音乐暂停播放)
ios6.0后还可以监听输出改变通知。通俗来说,就是拔出耳机,音乐播放暂停。
代码如下:
//添加观察者
[[NSNotificationCenter defaultCenter] addObserver:self selector:@selector(routeChange:) name:AVAudioSessionRouteChangeNotification object:nil];
// 通知方法
- (void)routeChange:(NSNotification*)notification
{
NSDictionary *dic = notification.userInfo;
int changeReason = [dic[AVAudioSessionRouteChangeReasonKey] intValue];
//等于AVAudioSessionRouteChangeReasonOldDeviceUnavailable表示旧输出不可用
if (changeReason == AVAudioSessionRouteChangeReasonOldDeviceUnavailable)
{
AVAudioSessionRouteDescription *routeDescription=dic[AVAudioSessionRouteChangePreviousRouteKey];
AVAudioSessionPortDescription *portDescription= [routeDescription.outputs firstObject];
//原设备为耳机则暂停
if ([portDescription.portType isEqualToString:@"Headphones"])
{
//这边必须回调到主线程
dispatch_async(dispatch_get_main_queue(), ^{
self.playOrPause.selected = NO;
});
[self pauseMusic];
}
}
}//输出改变通知
(3) 歌词轮播实现思路
歌词应该是 时间 和 对应歌词 的字典类型数据结构。用UITableView实现。获取播放器当前播放时间,查找字典找到对应的key,进而找到对应的NSIndexPath,滚动到当前cell在屏幕中央即可。
(4) 关于定时器的小细节
关于NSLoopMode的问题
由于+ (NSTimer *)scheduledTimerWithTimeInterval:..; 此时的timer会被加入到当前线程的runloop中,默认为NSDefaultRunLoopMode。如果当前线程是主线程,某些事件,如UIScrollView的拖动时,会将runloop切换到NSEventTrackingRunLoopMode模式,在拖动的过程中,默认的NSDefaultRunLoopMode模式中注册的事件是不会被执行的。从而此时的timer也就不会触发。
解决方案:把创建好的timer手动添加到指定模式中,此处为NSRunLoopCommonModes,这个模式其实就是NSDefaultRunLoopMode与NSEventTrackingRunLoopMode的结合。
[[NSRunLoop currentRunLoop] addTimer:self.timer forMode:NSRunLoopCommonModes];


【推荐】国内首个AI IDE,深度理解中文开发场景,立即下载体验Trae
【推荐】编程新体验,更懂你的AI,立即体验豆包MarsCode编程助手
【推荐】抖音旗下AI助手豆包,你的智能百科全书,全免费不限次数
【推荐】轻量又高性能的 SSH 工具 IShell:AI 加持,快人一步
· 如何编写易于单元测试的代码
· 10年+ .NET Coder 心语,封装的思维:从隐藏、稳定开始理解其本质意义
· .NET Core 中如何实现缓存的预热?
· 从 HTTP 原因短语缺失研究 HTTP/2 和 HTTP/3 的设计差异
· AI与.NET技术实操系列:向量存储与相似性搜索在 .NET 中的实现
· 10年+ .NET Coder 心语 ── 封装的思维:从隐藏、稳定开始理解其本质意义
· 地球OL攻略 —— 某应届生求职总结
· 周边上新:园子的第一款马克杯温暖上架
· Open-Sora 2.0 重磅开源!
· 提示词工程——AI应用必不可少的技术