MediaWiki定制化改动
Linux下面安装MediaWiki环境的方法,可以参照我上一篇文章linux使用xampp安装MediaWiki环境
重置用户密码
使用维护脚本
可以使用maintenance/changePassword.php维护脚本来重置一名用户的密码。必须在命令行下运行该脚本,需要登录到安装wiki的服务器,然后进入命令行提示符。进入安装目录,然后进入maintenance子目录。运行下列命令:
php changePassword.php --user=someuser --password=somepass
这里可见的“somepass”就是您将要设置的密码,而“someuser”就是您将修改其密码的用户名,该用户名应出现在数据库的“user”表中
直接修改数据库
同样可以使用直接修改数据库的老办法。假设变量$wgPasswordSalt已被设为true值(默认),您可以在MySQL中运行下列SQL查询:
UPDATE user SET user_password = MD5(CONCAT(user_id, '-', MD5('你的密码'))) WHERE user_name = '你的用户名';
修改维基名称
在wiki代码根目录,找到LocalSettings.php,修改相应代码为:
$wgSitename = "你的百科名称";
修改logo
现将文件上传到对应目录,即/opt/lampp/htdocs/wiki/resources/assets/。图片大小改动可以使用这个网站
在wiki代码根目录,找到LocalSettings.php,修改相应代码为:
## The URL path to the logo.  Make sure you change this from the default,
## or else you'll overwrite your logo when you upgrade!
$wgLogo = "$wgResourceBasePath/resources/assets/wiki.gif";
即将原先的wiki.png改为wiki.gif
页面底部显示最后修订人名称
在wiki代码根目录,找到LocalSettings.php,增加代码
$wgMaxCredits = 2;
这样一来就可以显示最后修改的2条记录,比如说
本页面被小芒果最后修改于2019年10月11日 (星期五) 08:10。 基于芒果百科用户小番茄的工作。
所在机器默认跳转到wiki
安装xampp后,index默认跳转到 本机xampp主页,即http://IP地址/xampp/,需要修改
修改index.php,改为
<?php
if (!empty($_SERVER['HTTPS']) && ('on' == $_SERVER['HTTPS'])) {
$uri = 'https://';
} else {
$uri = 'http://';
}
$uri .= $_SERVER['HTTP_HOST'];
header('Location: '.$uri.'/wiki/');
exit;
?>
关闭游客注册/修改/查看权限
在wiki代码根目录,找到LocalSettings.php,,在最后面附加如下代码:
$wgGroupPermissions['*']['createaccount'] = true;
$wgGroupPermissions['*']['read'] = true;
$wgGroupPermissions['*']['edit'] = false;
即打开游客 注册 / 浏览 权限,关闭 修改 权限
文档归类
为了防止出现信息孤岛,所有百科页面都该有分类,方便层层跳转。
为了将当前页面自动归类,增加如下代码即可将当前页面自动归类,比如我们有个归类,专门用来教导用户更好的使用wiki,即Wiki使用教程
[[category:Wiki使用教程]]
定制侧边栏
进入URL: /index.php/MediaWiki:Sidebar
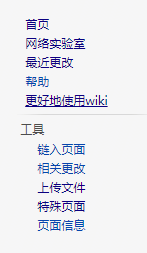
我们将上面使用的那个分类加入侧边栏,增加一行** 分类:Wiki定制化|更好地使用wiki,其中|后的文案,即你要显示在侧边栏的文本。
* navigation
** mainpage|mainpage-description
** recentchanges-url|recentchanges
** helppage|help
** 分类:Wiki定制化|更好地使用wiki

* SEARCH
* TOOLBOX
* LANGUAGES

修改后的侧边栏
Markdown文本转MediaWiki格式
有些人不熟悉mediawiki的语法,更习惯使用markdown进行文档编写;或者有大量的markdown格式的文档需要转到wiki中来,怎么办呢?
我们可以这么做:
少量文字直接使用在线版
https://pandoc.org/try/?text=&from=markdown&to=mediawiki
大量文字使用下载版
官网下载相应系统版本,比如我们使用windows版本
下载后放到任意盘(我放在D盘),将所在目录加入环境变量,输入指令进行转化
D:\>pandoc.exe -f markdown -t mediawiki test.md > test.txt
文件上传
在wiki代码根目录,找到LocalSettings.php,添加允许的格式即可,比如允许bmp
$wgFileExtensions[] = 'bmp';
有些文件比较特殊,就算加到运行上传列表还不够,还要从黑名单里删除,比如exe
$wgFileExtensions[] = 'exe';
$wgFileBlacklist = array_diff( $wgFileBlacklist, array ('exe') );
自定义皮肤
下载皮肤
下载链接,选择1.33版本
放置到/opt/lampp/htdocs/维基目录/skins/下面,解压
$ tar xvf apex-REL1_33-9f99205.tar.gz
加载皮肤
在wiki代码根目录,找到LocalSettings.php,在最后加入代码:
wfLoadSkin( 'apex' );
自定义CSS
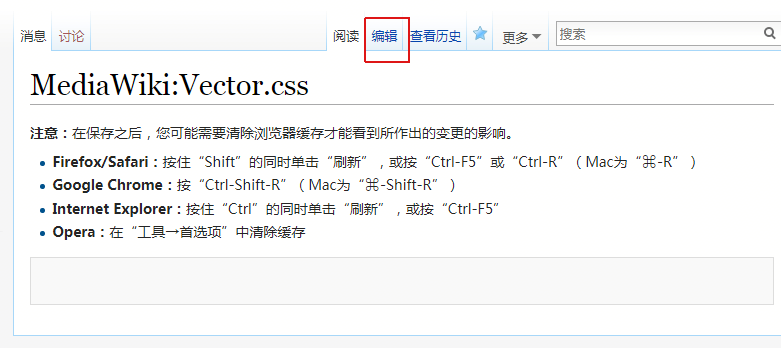
进入MediaWiki:Vector.css特殊页面,然后编辑你要覆盖重写的CSS内容

MediaWiki:Vector.css 页面
提供个不错的主题CSS: DarkVector主题CSS
给默认的vector加上本博客的样式
#p-tb {
margin-top: 10px;
}
.mw-body p {
font-size: 16px;
color: #444;
}
pre, .mw-code {
display: block;
overflow-x: auto;
padding: 20px !important;
background: #edf0f3 !important;
border: none !important;
font-family: 'Consolas','Courier New',Courier,monospace !important;
font-size: 14px !important;
}
div#mw-panel #p-logo + div.portal div.body {
margin: 0;
}
div#mw-panel div.portal {
background-image: none;
}
div#mw-panel div.portal div.body {
margin: 0;
}
div#mw-panel div.portal div.body ul {
border-top: 10px solid #CAD2DE;
background: #2B497B;
}
div#mw-panel div.portal div.body ul li {
border-bottom: 1px dotted #fff;
padding: 0.2em 10px;
line-height: 15px;
}
div#mw-panel div.portal div.body ul li:hover {
background: #A3181E;
}
div#mw-panel div.portal div.body ul li a {
font-size: 10px;
display: block;
color: #FFF;
font-weight: normal;
text-decoration: none;
text-transform: uppercase;
}
div#mw-panel div.portal div.body ul li a:visited {
color: #EEE;
}
div#mw-panel div.portal h3 {
font-size: 15px;
background: #A3181E;
color: white;
display: block;
padding: 5px 10px;
}
.mw-body h1 {
font-size: 2.5em;
font-family: "微软雅黑";
font-weight: normal;
}
.mw-body h2 {
font-size: 2em;
margin: 1em 0 0.25em;
padding: 10px 0px;
border-bottom: 5px solid #F1F4F9;
font-family: "微软雅黑";
font-weight: bold;
}
.mw-body h3:before {
content: "\25BA ";
}
.mw-body a.external {
text-decoration: none;
color: orange !important;
border-bottom: 1px dashed;
padding-bottom: 2px;
}
.mw-body a.external:before {
content: "\27A5";
}
.mw-body code {
font-family: "Courier New",sans-serif !important;
font-size: 12px !important;
background-color: #f5f5f5 !important;
padding: 0 5px !important;
border-radius: 3px !important;
border:none;
line-height: 1.8;
margin: 1px 5px;
vertical-align: middle;
display: inline-block;
}
.mw-body blockquote {
background-color: #f7f7f7;
word-break: break-word;
font-weight: 400;
line-height: 30px;
padding: 1.5em;
background: #E1E8FB;
border-left: 5px solid #D2D8FB;
margin: 10px 10px 10px 0px;
}
#catlinks {
background-color: #f1f4f9;
color: #f1f4f9;
padding: 10px 0px;
border: none;
}
#catlinks li {
border: none;
}
#catlinks li a:link {
position: relative;
display: inline-block;
height: 30px;
padding: 0 12px;
line-height: 30px;
vertical-align: top;
text-decoration: none;
background: #fff;
color: #aaa;
text-transform: uppercase;
letter-spacing: 1px;
font-size: 11px;
}
#catlinks li a:hover{
background: #237dac;
color: white;
}
#mw-normal-catlinks > a {
position: relative;
display: inline-block;
height: 30px;
padding: 0px 0px 0px 20px;
line-height: 30px;
vertical-align: top;
text-decoration: none;
text-transform: uppercase;
letter-spacing: 1px;
font-size: 11px;
}
/* 编辑按钮 */
.editButtons input {
color: #fff;
background-color: #1890ff;
border-color: #1890ff;
text-shadow: 0 -1px 0 rgba(0,0,0,0.12);
-webkit-box-shadow: 0 2px 0 rgba(0,0,0,0.045);
box-shadow: 0 2px 0 rgba(0,0,0,0.045);
line-height: 1.5;
position: relative;
display: inline-block;
font-weight: 400;
white-space: nowrap;
text-align: center;
background-image: none;
border: 1px solid transparent;
-webkit-box-shadow: 0 2px 0 rgba(0,0,0,0.015);
box-shadow: 0 2px 0 rgba(0,0,0,0.015);
cursor: pointer;
-webkit-transition: all .3s cubic-bezier(.645, .045, .355, 1);
transition: all .3s cubic-bezier(.645, .045, .355, 1);
-webkit-user-select: none;
-moz-user-select: none;
-ms-user-select: none;
user-select: none;
-ms-touch-action: manipulation;
touch-action: manipulation;
height: 32px;
padding: 0 15px;
font-size: 14px;
border-radius: 4px;
border-color: #d9d9d9;
}
.editButtons input:hover {
background-color: #40a9ff;
}
#wpSave {
background-color: #009100;
}
#wpSave:hover {
background-color: #00A600;
}
.mango-alert {
-webkit-box-sizing: border-box;
box-sizing: border-box;
margin: 0;
color: rgba(0,0,0,0.65);
font-size: 14px;
font-variant: tabular-nums;
line-height: 1.5;
list-style: none;
font-feature-settings: 'tnum';
position: relative;
padding: 8px 15px 8px 37px;
word-wrap: break-word;
border-radius: 4px;
margin: 10px 0px 10px 0px;
}
.mango-alert-info {
background-color: #e6f7ff;
border: 1px solid #91d5ff;
}
.mango-alert-warn {
background-color: #fffbe6;
border: 1px solid #ffe58f
}
.mango-alert-error {
background-color: #fff1f0;
border: 1px solid #ffa39e;
}
/**
* 左侧导航栏拓宽
*/
div#mw-panel {
width: 13em;
}
.mw-body {
margin-left: 14em;
}
#left-navigation {
margin-left: 14em;
}
#p-logo a {
width: 13em;
}
div#footer {
margin-left: 13em;
}
/**
* 表格样式
*/
table.wikitable {
border: none !important;
}
table.wikitable td {
border: none !important;
padding: 0.2em 2em !important;
}
/*设置奇数行颜色*/
table.wikitable tr:nth-child(odd) {
background: #EEE;
}
/*设置偶数行颜色*/
table.wikitable tr:nth-child(even) {
background: #FFF;
}
table.wikitable th {
background-color: #2894FF !important;
color: white;
text-align: center;
font-weight: bold;
letter-spacing: 1em;
border: none !important;
padding: 0.2em 2em !important;
}
table.wikitable tr:nth-child(1) {
background-color: #2894FF;
color: white;
text-align: center;
font-weight: bold;
letter-spacing: 1em;
}
table.wikitable tbody:last-child {
border-bottom: 1px solid;
}
模板功能
进入模板:提示路由,即可建立名字为提示的模板。
<div style="background-color: #e6f7ff;border: 1px solid #91d5ff; -webkit-box-sizing: border-box; box-sizing: border-box;margin: 0; color: rgba(0,0,0,0.65);font-size: 14px;font-variant: tabular-nums;line-height: 1.5;list-style: none; font-feature-settings: 'tnum';position: relative;padding: 8px 15px 8px 37px;word-wrap: break-word;border-radius: 4px;margin: 10px 0px 10px 0px;">
<span style="font-size: 1.5em;">🙋</span> {{{文本}}}
</div>
上面的代码中,{{{文本}}}即你可以填写变量的地方,变量名就叫做文本。保存后,在其他页面这样使用
{{提示 | 文本=这样就可以使用模板啦!]]}}
样式如下所示:

当然了,css写在单独文件是比较好的习惯,直接给div加上相应的类就好了!
嵌套模板
上面的模板,还可以设置一个母模板,以方便采用多种样式的提示框
进入模板:提示框路由,即可建立名字为提示框的母模板。
<div class="mango-alert mango-alert-{{{类型}}}">
<span style="font-size: 1.5em;">{{{图标}}}</span> {{{文本}}}
</div>
然后,重新编辑上面的模板提示
{{提示框
|类型=info
|图标=🙋
|文本={{{文本}}}
}}
在自定义CSS中加入以下代码
.mango-alert {
    -webkit-box-sizing: border-box;
    box-sizing: border-box;
    margin: 0;
    color: rgba(0,0,0,0.65);
    font-size: 14px;
    font-variant: tabular-nums;
    line-height: 1.5;
    list-style: none;
    font-feature-settings: 'tnum';
    position: relative;
    padding: 8px 15px 8px 37px;
    word-wrap: break-word;
    border-radius: 4px;
    margin: 10px 0px 10px 0px;
}

.mango-alert-info {
    background-color: #e6f7ff;
    border: 1px solid #91d5ff;
}

.mango-alert-warn {
    background-color: #fffbe6;
    border: 1px solid #ffe58f
}

.mango-alert-error {
    background-color: #fff1f0;
    border: 1px solid #ffa39e;
}
如此一来,便可以实现嵌套模板啦!
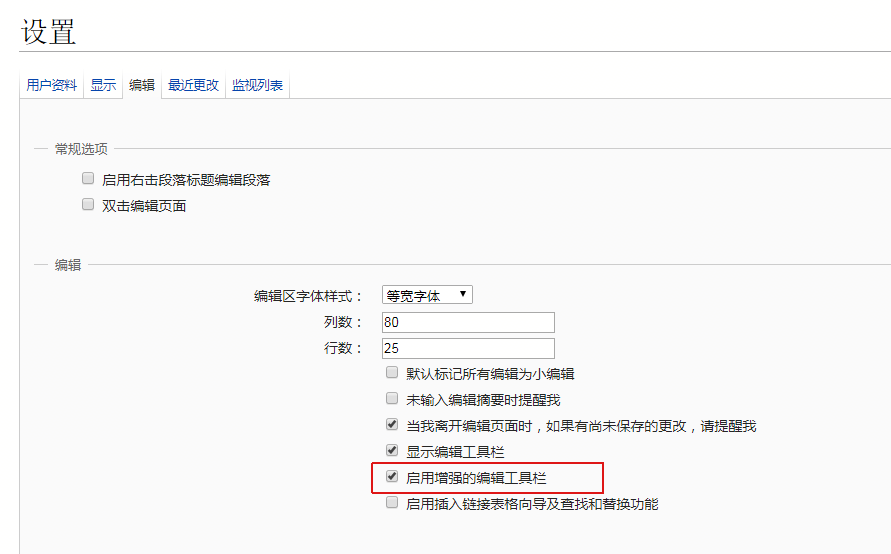
启用更强的编辑功能
如图,点击右上角设置,按照下面的设置选中相关选项即可

自动给标题加编号
如图,点击右上角设置 > 显示,按照下面的设置选中相关选项即可

升级时候全wiki只读
在wiki代码根目录,找到LocalSettings.php,增加代码
$wgReadOnly = '系统维护中,请2019年10月25日上午10点后操作....';
当用户修改文件时,将会显示下面的提示


