<Android 基础(十五)> Alert Dialog
介绍
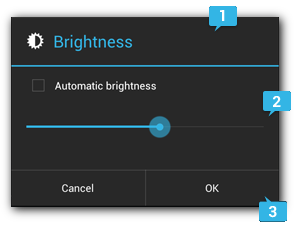
The AlertDialog class allows you to build a variety of dialog designs and is often the only dialog class you’ll need. there are three regions of an alert dialog:

1.Title
This is optional and should be used only when the content area is occupied by a detailed message, a list, or custom layout. If you need to state a simple message or question (such as the dialog in figure 1), you don’t need a title.2.Content area
This can display a message, a list, or other custom layout.3.Action buttons
There should be no more than three action buttons in a dialog.一般的AlertDialog分为2个部分,头部,内容和Action Button,头部包含图标和文字,内容部分可以自定义,也可以使用一些常见的列表,单选项,多选项等内容,Action Button就是常见的OK啊, Cancel啊等等。
类结构
AlertDialog
重点关注一下Builder类的结构
关于这些方法的使用说明,这里不做一一介绍,后面通过实例可以看出端倪,不过可以通过查阅API文档熟悉一下,AlertDialog.Builder
实际使用
Simple AlertDialog
代码使用
    private void showSimpleAlertDialog() {
        //创建alertdialog builder
        AlertDialog.Builder builder = new AlertDialog.Builder(mContext);
        //设置图标,标题,消息内容
        builder.setIcon(getResources().getDrawable(R.drawable.ic_adb_black_24dp))
                .setTitle(R.string.title)
                .setMessage(R.string.content);
        //设置Acton Buttons
        builder.setNegativeButton(R.string.cancel, new DialogInterface.OnClickListener() {
            @Override
            public void onClick(DialogInterface dialogInterface, int i) {
                Toast.makeText(mContext, "Cancal is clicked", Toast.LENGTH_SHORT).show();
            }
        });

        builder.setPositiveButton(R.string.ok, new DialogInterface.OnClickListener() {
            @Override
            public void onClick(DialogInterface dialogInterface, int i) {
                Toast.makeText(mContext, "OK is clicked", Toast.LENGTH_SHORT).show();
            }
        });

        builder.setNeutralButton(R.string.reminder, new DialogInterface.OnClickListener() {
            @Override
            public void onClick(DialogInterface dialogInterface, int i) {
                Toast.makeText(mContext, "Remind me later is clicked", Toast.LENGTH_SHORT).show();
            }
        });
        //显示alert dialog  这个是AlertDialog的show()方法是等价的
        builder.show();
    }
效果
备注
| Action Button | 意义 |
|---|---|
| setNegativeButton | 做取消、返回等操作,如Cancel |
| setPositiveButton | 做确认、提交等操作,如OK |
| setNeutralButton | 做中性操作,如Update Later |
AlertDialog.Builder中的show()方法和AlertDialog的show()方法是等价的
AlertDialog With Array
代码使用
    public void showAlertDialogWithArray() {
        AlertDialog.Builder builder = new AlertDialog.Builder(mContext);
        builder.setIcon(getResources().getDrawable(R.drawable.ic_assessment_black_24dp))
                .setTitle(R.string.title)
                .setItems(R.array.dialoglist, new DialogInterface.OnClickListener() {
                    @Override
                    public void onClick(DialogInterface dialogInterface, int i) {
                        switch (i) {
                            case 0:
                                showTwo.setBackgroundResource(R.color.pink);
                                break;
                            case 1:
                                showTwo.setBackgroundResource(R.color.stone);
                                break;
                            case 2:
                                showTwo.setBackgroundResource(R.color.yellow);
                                break;
                        }
                    }
                });
        builder.create().show();
    }
效果
备注
| 方法 | |
|---|---|
| setItems | 通过array来设置dialog的内容 |
| setAdapter | 通过ListAdapter来设置dialog的内容 |
ListAdapter可以显示的内容应该比Array要丰富,但是现在开源库很多,针对Dialog的美观的开源库也不少,一般开发过程中会使用现成的。
AlertDialog With MultiChoice
代码使用
    public void showAlertDialogWithMutiChoice() {
        final ArrayList<String> selecteditems = new ArrayList<>();
        AlertDialog.Builder builder = new AlertDialog.Builder(mContext);
        builder.setIcon(R.drawable.ic_event_seat_black_24dp)
                .setTitle(R.string.title)
                .setMultiChoiceItems(R.array.fruits, null,
                        new DialogInterface.OnMultiChoiceClickListener() {
                    @Override
                    public void onClick(DialogInterface dialogInterface, int which,
                                        boolean isChecked) {
                        if (isChecked) {
                            selecteditems.add(getResources()
                                    .getStringArray(R.array.fruits)[which]);
                            Toast.makeText(mContext, selecteditems.toString(), Toast.LENGTH_SHORT).show();
                        } else {
                            selecteditems.remove(getResources()
                                    .getStringArray(R.array.fruits)[which]);
                            Toast.makeText(mContext, selecteditems.toString(), Toast.LENGTH_SHORT).show();
                        }
                    }
                });
        builder.create().show();
    }
效果
AlertDialog With Single Choice
代码使用
    public void showAlertDialogWithSingleChoice() {
        AlertDialog.Builder builder = new AlertDialog.Builder(mContext);
        builder.setIcon(R.drawable.ic_build_black_24dp)
                .setTitle(R.string.title);
        builder.setSingleChoiceItems(R.array.places, -1,
                new DialogInterface.OnClickListener() {
            @Override
            public void onClick(DialogInterface dialogInterface, int i) {
                Toast.makeText(mContext,
                        getResources().getStringArray(R.array.places)[i] + " is selected",
                        Toast.LENGTH_SHORT).show();
            }
        });
        builder.create().show();
    }
效果
Custom Alert Dialog
代码使用
    public void showCustomAlertDialog() {
        AlertDialog.Builder builder = new AlertDialog.Builder(mContext);
        builder.setIcon(R.drawable.ic_assessment_black_24dp).setTitle(R.string.login);
        builder.setView(R.layout.custom_alert);
        builder.setCustomTitle(LayoutInflater.from(mContext).inflate(R.layout.custom_title , null ));
        builder.create().show();
    }
自定义布局文件
Title自定义
<?xml version="1.0" encoding="utf-8"?>
<LinearLayout xmlns:android="http://schemas.android.com/apk/res/android"
    android:layout_width="match_parent"
    android:layout_height="60dp"
    android:background="@drawable/shape_title"
    android:orientation="horizontal">

    <ImageView
        android:layout_width="60dp"
        android:layout_height="60dp"
        android:paddingLeft="20dp"
        android:src="@drawable/ic_adb_black_24dp" />

    <TextView
        android:layout_width="wrap_content"
        android:layout_height="wrap_content"
        android:layout_gravity="center_vertical"
        android:layout_marginLeft="40dp"
        android:text="Custom Title"
        android:textSize="15pt"
        android:textStyle="bold" />

</LinearLayout>
Content Area自定义
<?xml version="1.0" encoding="utf-8"?>
<LinearLayout xmlns:android="http://schemas.android.com/apk/res/android"
    xmlns:app="http://schemas.android.com/apk/res-auto"
    android:layout_width="match_parent"
    android:layout_height="match_parent"
    android:layout_margin="@dimen/activity_horizontal_margin"
    android:orientation="vertical">

    <android.support.design.widget.TextInputLayout
        android:layout_width="match_parent"
        android:layout_height="wrap_content"
        android:layout_marginTop="10dp">

        <EditText
            android:layout_width="match_parent"
            android:layout_height="wrap_content"
            android:hint="UserName" />
    </android.support.design.widget.TextInputLayout>

    <android.support.design.widget.TextInputLayout
        android:layout_width="match_parent"
        android:layout_height="wrap_content"
        app:counterEnabled="true"
        app:counterMaxLength="40">

        <EditText
            android:layout_width="match_parent"
            android:layout_height="wrap_content"
            android:fontFamily="sans-serif"
            android:hint="Password"
            android:inputType="textPassword" />
    </android.support.design.widget.TextInputLayout>

    <LinearLayout
        android:layout_width="match_parent"
        android:layout_height="wrap_content"
        android:layout_margin="@dimen/activity_vertical_margin"
        android:orientation="horizontal">

        <Button
            android:layout_width="wrap_content"
            android:layout_height="match_parent"
            android:layout_weight="1"
            android:background="@drawable/shaperect"
            android:text="Submit" />

        <Button
            android:layout_width="wrap_content"
            android:layout_height="match_parent"
            android:layout_weight="1"
            android:background="@drawable/shape_two"
            android:text="Reset" />
    </LinearLayout>

</LinearLayout>
效果
备注
自定义标题栏和显示的内容,Action Button可以通过在Content中添加Button的方式来实现,丰富了Alert Dialog的显示内容,Alert Dialog中应该还有很多东西待挖掘,锄头需要挥起来~


