

1、常用的服务间调用方式讲解
简介:讲解常用的服务间的调用方式
RPC:
远程过程调用,像调用本地服务(方法)一样调用服务器的服务
支持同步、异步调用
客户端和服务器之间建立TCP连接,可以一次建立一个,也可以多个调用复用一次链接
PRC数据包小
protobuf
thrift
rpc:编解码,序列化,链接,丢包,协议
Rest(Http):
http请求,支持多种协议和功能
开发方便成本低
http数据包大
java开发:HttpClient,URLConnection
2、微服务调用方式之ribbon实战 订单调用商品服务
在创建订单服务前修改一点上一节的内容,假设这样的情况:商品服务需要从服务器(备份的),这时候订单服务调用的时候如何知道调用了商品服务的主服务器还从服务器?
1)修改ProductController
 1 package com.po.product_service.controller;
 2
 3 import com.po.product_service.domain.Product;
 4 import com.po.product_service.service.ProductService;
 5 import org.springframework.beans.BeanUtils;
 6 import org.springframework.beans.factory.annotation.Autowired;
 7 import org.springframework.beans.factory.annotation.Value;
 8 import org.springframework.web.bind.annotation.RequestMapping;
 9 import org.springframework.web.bind.annotation.RequestParam;
10 import org.springframework.web.bind.annotation.RestController;
11
12 import java.util.List;
13
14 @RestController
15 @RequestMapping("/api/vi/product")
16 public class ProductController {
17     @Autowired
18     private ProductService productService;
19
        @Value("${server.port}")
20     private String port;
21     /*
22       获取所有商品列表
23      */
24     @RequestMapping("list")
25     public List<Product> findProduct(){
26     return  productService.listProduct();
27     }
28     /*
29     通过id查出商品
30    */
31     @RequestMapping("findById")
32     public Product findById(@RequestParam("id") int id){
33         Product product = productService.findProduct(id);
34         Product reslut = new Product();
35         //将product复制到result中
36         BeanUtils.copyProperties(product,reslut);
37         reslut.setName(reslut.getName()+"data from port = "+port);
38         return reslut;
39     }
40
41 }
2)启动服务调用

3)为product_server服务再添加一个节点
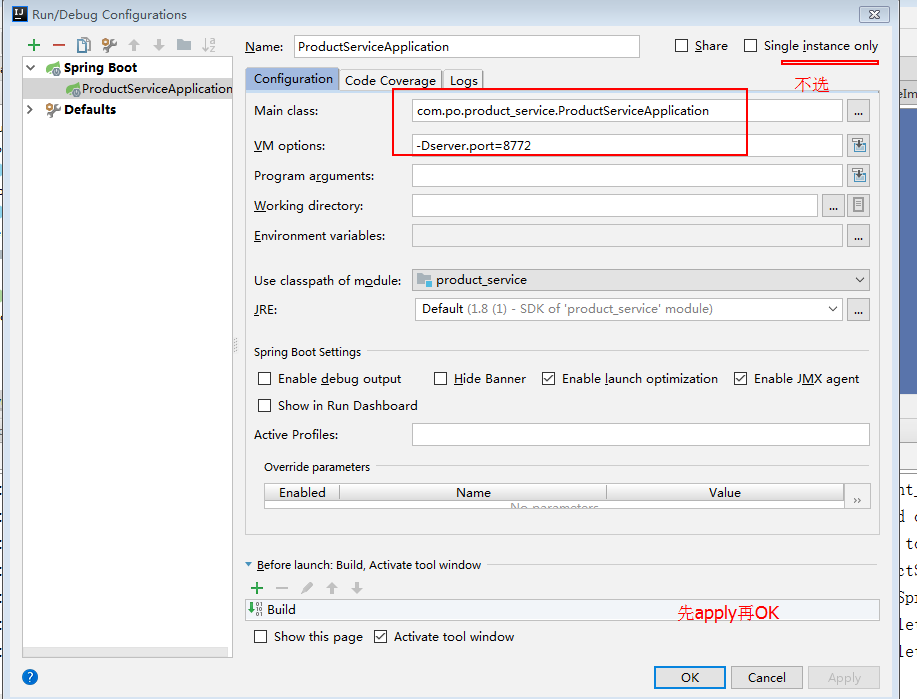
4)启动8772端口
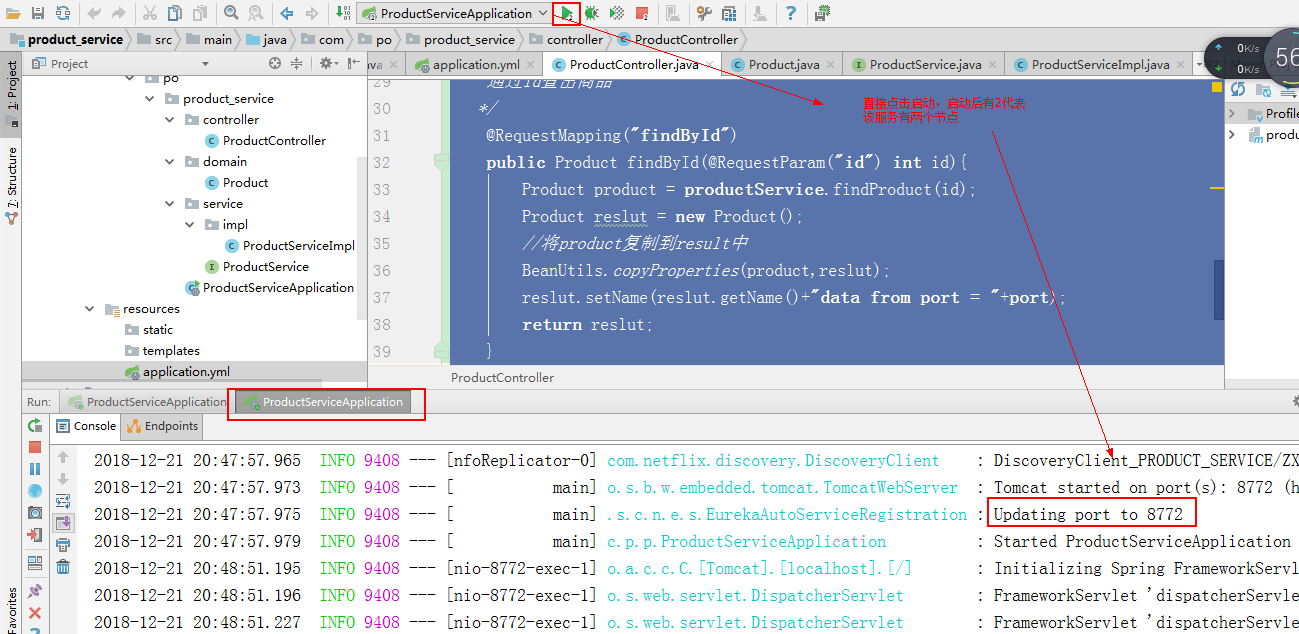
5)获取数据

这样我们就知道下次调用是哪个节点了
简介:实战电商项目 订单服务 调用商品服务获取商品信息
1、创建order_service项目
创建过程和product_service一致
1)pom
 1 <?xml version="1.0" encoding="UTF-8"?>
 2 <project xmlns="http://maven.apache.org/POM/4.0.0" xmlns:xsi="http://www.w3.org/2001/XMLSchema-instance"
 3     xsi:schemaLocation="http://maven.apache.org/POM/4.0.0 http://maven.apache.org/xsd/maven-4.0.0.xsd">
 4     <modelVersion>4.0.0</modelVersion>
 5     <parent>
 6         <groupId>org.springframework.boot</groupId>
 7         <artifactId>spring-boot-starter-parent</artifactId>
 8         <version>2.0.3.RELEASE</version>
 9         <relativePath/> <!-- lookup parent from repository -->
10     </parent>
11     <groupId>com.po</groupId>
12     <artifactId>order_service</artifactId>
13     <version>0.0.1-SNAPSHOT</version>
14     <name>order_service</name>
15     <description>Demo project for Spring Boot</description>
16
17     <properties>
18         <project.build.sourceEncoding>UTF-8</project.build.sourceEncoding>
19         <project.reporting.outputEncoding>UTF-8</project.reporting.outputEncoding>
20         <java.version>1.8</java.version>
21         <spring-cloud.version>Finchley.RELEASE</spring-cloud.version>
22     </properties>
23
24     <dependencies>
25         <dependency>
26             <groupId>org.springframework.boot</groupId>
27             <artifactId>spring-boot-starter-web</artifactId>
28         </dependency>
29         <dependency>
30             <groupId>org.springframework.cloud</groupId>
31             <artifactId>spring-cloud-starter-netflix-eureka-client</artifactId>
32         </dependency>
33         <dependency>
34             <groupId>org.springframework.cloud</groupId>
35             <artifactId>spring-cloud-starter-netflix-ribbon</artifactId>
36         </dependency>
37         <dependency>
38             <groupId>org.springframework.boot</groupId>
39             <artifactId>spring-boot-starter-test</artifactId>
40             <scope>test</scope>
41         </dependency>
42     </dependencies>
43
44     <dependencyManagement>
45         <dependencies>
46             <dependency>
47                 <groupId>org.springframework.cloud</groupId>
48                 <artifactId>spring-cloud-dependencies</artifactId>
49                 <version>${spring-cloud.version}</version>
50                 <type>pom</type>
51                 <scope>import</scope>
52             </dependency>
53         </dependencies>
54     </dependencyManagement>
55
56     <build>
57         <plugins>
58             <plugin>
59                 <groupId>org.springframework.boot</groupId>
60                 <artifactId>spring-boot-maven-plugin</artifactId>
61             </plugin>
62         </plugins>
63     </build>
64
65 </project>
使用ribbon. (类似httpClient,URLConnection)
2、开发伪下单接口
1)service接口
 1 package com.po.order_service.service;
 2
 3 import com.po.order_service.domain.ProductOrder;
 4
 5 public interface  ProductOrderService {
 6 /*
 7 下单接口
 8  */
 9
10 public ProductOrder save(int userId,int productId);
11 }
2)在主程序入口加入如下代码
1     @Bean
2     @LoadBalanced
3     public RestTemplate restTemplate() {
4         return new RestTemplate();
5     }
3)重点
 1 package com.po.order_service.service.impl;
 2
 3 import com.po.order_service.domain.ProductOrder;
 4 import com.po.order_service.service.ProductOrderService;
 5 import org.springframework.beans.factory.annotation.Autowired;
 6 import org.springframework.stereotype.Service;
 7 import org.springframework.web.client.RestTemplate;
 8
 9 import java.util.Date;
10 import java.util.UUID;
11 @Service
12 public class ProductOrderServiceImpl implements ProductOrderService {
13   @Autowired
14   private RestTemplate restTemplate;
15   //RestTemplate底层包含了
16     @Override
17     public ProductOrder save(int userId, int productId) {
18          /*调用product-service服务,userId此处暂时是null,因为还没有创建user服务
19          RestTemplate底层包装了 httpClient,URLConnection
20           */
21         Object obj = restTemplate.getForObject("http://product-service/api/vi/product/findById?id="+productId, Object.class);
22         System.out.println("调用结果: "+obj);
23         ProductOrder order = new ProductOrder();
24         order.setCreateTime(new Date());
25         order.setUserId(userId);
26         order.setTradeNo(UUID.randomUUID().toString());//订单编号
27         return order;
28     }
29 }
注意:使用ribbon实现负载均衡的时候,服务名称不能用下划线,换成中划线。所以之前的服务名称product_service改为product-service
否则会报错:java.lang.IllegalStateException: Request URI does not contain a valid hostname: http://product_service/api/vi/product/findById?id=3
4)domain
 1 package com.po.order_service.domain;
 2 /*
 3 商品订单实体
 4  */
 5
 6 import java.io.Serializable;
 7 import java.util.Date;
 8
 9 public class ProductOrder implements Serializable {
10 private  int id;
11 /*
12 商品名称
13  */
14 private  String productName;
15 /*
16 订单号
17  */
18 private String tradeNo;
19 /*
20 价格
21  */
22 private int price;
23 /*
24 创建时间
25  */
26 private Date createTime;
27
28 private int userId;
29 private  String userName;
30 //省略get set方法
31
32  }
5)controller
 1 package com.po.order_service.controller;
 2
 3 import com.po.order_service.service.ProductOrderService;
 4 import org.springframework.beans.factory.annotation.Autowired;
 5 import org.springframework.web.bind.annotation.RequestMapping;
 6 import org.springframework.web.bind.annotation.RequestParam;
 7 import org.springframework.web.bind.annotation.RestController;
 8
 9 @RestController
10 @RequestMapping("api/vi/order")
11 public class ProductOrderController {
12     @Autowired
13     private ProductOrderService productOrderService;
14     @RequestMapping("save")
15     public  Object save(@RequestParam("user_id")int userId,@RequestParam("product_id")int productId){
16        return productOrderService.save(userId,productId);
17     }
18
19 }
6)yml
 1 #本服务的端口
 2 server:
 3   port: 8781
 4 #defaultZone地址指向的是注册中心
 5 eureka:
 6   client:
 7     serviceUrl:
 8       defaultZone: http://localhost:8761/eureka/
 9 #服务的名称
10 spring:
11   application:
12     name: order_service
7)启动order_service服务查看注册中心
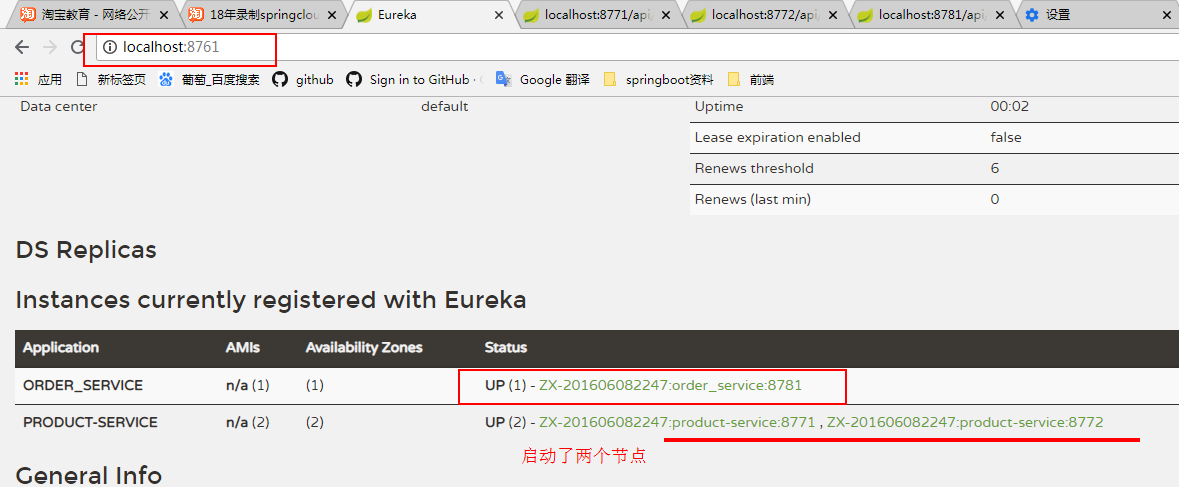
8)通过访问order_order服务调用product-service服务

9)我们再在product-service上添加一个节点不断刷新第八步骤将会随机调用product-service三个节点

结果:
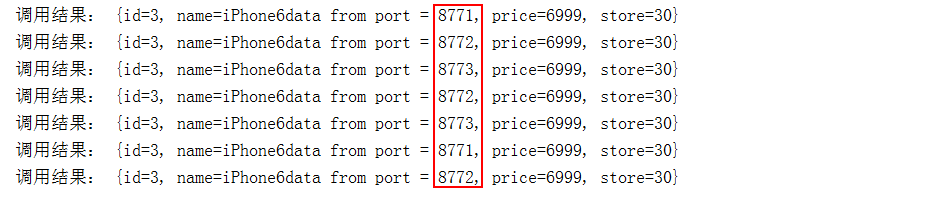
这样我们实现了通过调用去完成负债均衡
3、高级篇幅之Ribbon负载均衡源码分析实战
简介: 讲解ribbon服务间调用负载均衡源码分析
1、完善下单接口
优化上次课:
 1 package com.po.order_service.service.impl;
 2
 3 import com.po.order_service.domain.ProductOrder;
 4 import com.po.order_service.service.ProductOrderService;
 5 import org.springframework.beans.factory.annotation.Autowired;
 6 import org.springframework.stereotype.Service;
 7 import org.springframework.web.client.RestTemplate;
 8
 9 import java.util.Date;
10 import java.util.Map;
11 import java.util.UUID;
12 @Service
13 public class ProductOrderServiceImpl implements ProductOrderService {
14   @Autowired
15   private RestTemplate restTemplate;
16   //RestTemplate底层包含了
17     @Override
18     public ProductOrder save(int userId, int productId) {
19          /*调用product-service服务,userId此处暂时是null,因为还没有创建user服务
20          RestTemplate底层包装了 httpClient,URLConnection
21           */
22         Map<String,Object> map = restTemplate.getForObject("http://product-service/api/vi/product/findById?id="+productId, Map.class);
23         System.out.println("调用结果: "+map);
24         ProductOrder order = new ProductOrder();
25         order.setCreateTime(new Date());
26         order.setUserId(userId);
27         order.setTradeNo(UUID.randomUUID().toString());//订单编号
28
29         order.setProductName(map.get("name").toString());
30         //Product和ProductOrder中price都是int类型,map.get("price")获取得到是Object类型
31         order.setPrice(Integer.parseInt(map.get("price").toString()));
32         return order;
33     }
34 }
访问

2、分析@LoadBalanced
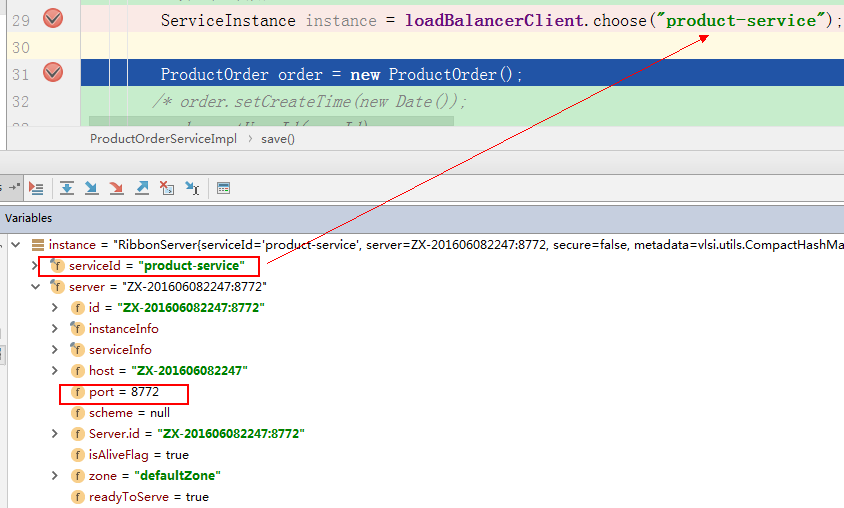
第二种方式调用product-service
 1 package com.po.order_service.service.impl;
 2
 3 import com.po.order_service.domain.ProductOrder;
 4 import com.po.order_service.service.ProductOrderService;
 5 import org.springframework.beans.factory.annotation.Autowired;
 6 import org.springframework.cloud.client.ServiceInstance;
 7 import org.springframework.cloud.client.loadbalancer.LoadBalancerClient;
 8 import org.springframework.stereotype.Service;
 9 import org.springframework.web.client.RestTemplate;
10
11 import java.util.Date;
12 import java.util.Map;
13 import java.util.UUID;
14
15 @Service
16 public class ProductOrderServiceImpl implements ProductOrderService {
17     /* @Autowired
18      private RestTemplate restTemplate;*/
19     @Autowired
20     private LoadBalancerClient loadBalancerClient;
21
22     @Override
23     public ProductOrder save(int userId, int productId) {
24          /*调用product-service服务,userId此处暂时是null,因为还没有创建user服务
25          RestTemplate底层包装了 httpClient,URLConnection
26           */
27         //  Map<String,Object> map = restTemplate.getForObject("http://product-service/api/vi/product/findById?id="+productId, Map.class);
28         // System.out.println("调用结果: "+map);
29
30         //方式二调用
31         ServiceInstance instance = loadBalancerClient.choose("product-service");
32         //    String url = String.format("http://%s:%s/api/v1/product/find?id="+productId, instance.getHost(),instance.getPort());
33         //格式化url  %s是拼接的意思
34         String url = String.format("http://%s:%s/api/vi/product/findById?id=" + productId, instance.getHost(), instance.getPort());
35         RestTemplate restTemplate = new RestTemplate();
36         Map map = restTemplate.getForObject(url, Map.class);
37         ProductOrder order = new ProductOrder();
38         order.setCreateTime(new Date());
39         order.setUserId(userId);
40         order.setTradeNo(UUID.randomUUID().toString());//订单编号
41
42         order.setProductName(map.get("name").toString());
43         //Product和ProductOrder中price都是int类型,map.get("price")获取得到是Object类型
44         order.setPrice(Integer.parseInt(map.get("price").toString()));
45         return order;
46     }
47 }
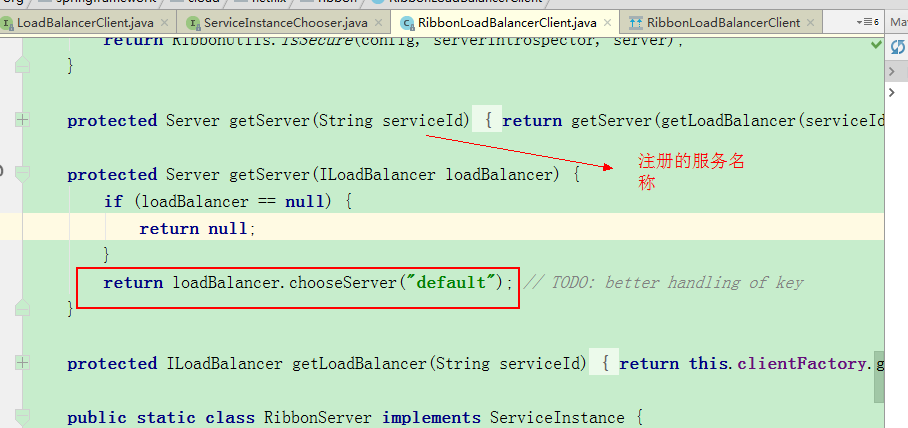
1)首先从注册中心获取provider的列表
2)通过一定的策略选择其中一个节点
3)再返回给restTemplate调用

4、高级篇幅之服务间调用之负载均衡策略调整实战
简介:实战调整默认负载均衡策略实战
自定义负载均衡策略:http://cloud.spring.io/spring-cloud-static/Finchley.RELEASE/single/spring-cloud.html#_customizing_the_ribbon_client_by_setting_properties
在配置文件yml里面,自定义负载均衡策略
#自定义负载均衡策略(随机调用product-service服务的节点)
product-service:
ribbon:
NFLoadBalancerRuleClassName: com.netflix.loadbalancer.RandomRule
策略选择:
1、如果每个机器配置一样,则建议不修改策略 (推荐)
2、如果部分机器配置强,则可以改为 WeightedResponseTimeRule
5、微服务调用方式之feign 实战 订单调用商品服务
简介:改造电商项目 订单服务 调用商品服务获取商品信息
Feign: 伪RPC客户端(本质还是用http)
官方文档: https://cloud.spring.io/spring-cloud-openfeign/
1、使用feign步骤讲解(新旧版本依赖名称不一样)
加入依赖
1 <dependency>
2 <groupId>org.springframework.cloud</groupId>
3 <artifactId>spring-cloud-starter-openfeign</artifactId>
4 </dependency>
启动类增加@EnableFeignClients
增加一个接口 并@FeignClient(name="product-service")
 1 package com.po.order_service.service;
 2
 3 import org.springframework.cloud.openfeign.FeignClient;
 4 import org.springframework.web.bind.annotation.GetMapping;
 5 import org.springframework.web.bind.annotation.RequestParam;
 6
 7 /*
 8 商品服务客户端
 9  */
10 @FeignClient(name="product-service")
11 public interface ProductClient {
12     //注意这里GetMapping的路径和product-service服务里面的findById方法的路径一致,id也是一样的
13     @GetMapping("/api/vi/product/findById")
14     String findById(@RequestParam(value ="id")int id);
15 }
注意点:
1、路径
2、Http方法必须对应
3、使用@requestBody,应该使用@PostMapping
就是product-service服务里面的findById方法中加@requestBody,则
ProductClient 里面的findById方法上不能用GetMapping应该用@PostMapping
4、多个参数的时候,通过@RequestParam("id") int id)方式调用
2、修改ProductOrderServiceImpl
 1 package com.po.order_service.service.impl;
 2
 3 import com.fasterxml.jackson.databind.JsonNode;
 4 import com.po.order_service.domain.ProductOrder;
 5 import com.po.order_service.service.ProductClient;
 6 import com.po.order_service.service.ProductOrderService;
 7 import com.po.order_service.util.JsonUtil;
 8 import org.springframework.beans.factory.annotation.Autowired;
 9 import org.springframework.cloud.client.ServiceInstance;
10 import org.springframework.cloud.client.loadbalancer.LoadBalancerClient;
11 import org.springframework.stereotype.Service;
12 import org.springframework.web.client.RestTemplate;
13
14 import java.util.Date;
15 import java.util.Map;
16 import java.util.UUID;
17
18 @Service
19 public class ProductOrderServiceImpl implements ProductOrderService {
20     @Autowired
21     private ProductClient productClient;
22
23
24     @Override
25     public ProductOrder save(int userId, int productId) {
26         final String response = productClient.findById(productId);
27         //JsonNode和Map效果一致
28         JsonNode jsonNode = JsonUtil.strToJsonNode(response);
29         ProductOrder order = new ProductOrder();
30         order.setCreateTime(new Date());
31         order.setUserId(userId);
32         order.setTradeNo(UUID.randomUUID().toString());//订单编号
33
34       order.setProductName(jsonNode.get("name").toString());
35       order.setPrice(Integer.parseInt(jsonNode.get("price").toString()));
36         return order;
37     }
38 }
访问

6、Feign核心源码解读和服务调用方式ribbon和Feign选择
简介: 讲解Feign核心源码解读和 服务间的调用方式ribbon、feign选择
1、ribbon和feign两个的区别和选择
选择feign
默认集成了ribbon
写起来更加思路清晰和方便
采用注解方式进行配置,配置熔断等方式方便
验证默认集成ribbon
1)order-service配置(依赖了feign)
1 #自定义负载均衡策略随机访问节点,还可以用以验证feign是否包含ribbon
2 product-service:
3   ribbon:
4     NFLoadBalancerRuleClassName: com.netflix.loadbalancer.RandomRule
2)访问节点是随机的(不是轮询调用节点),证明完毕

模拟接口响应慢,线程睡眠新的方式
try {
TimeUnit.SECONDS.sleep(1);
} catch (InterruptedException e) {
e.printStackTrace();
}
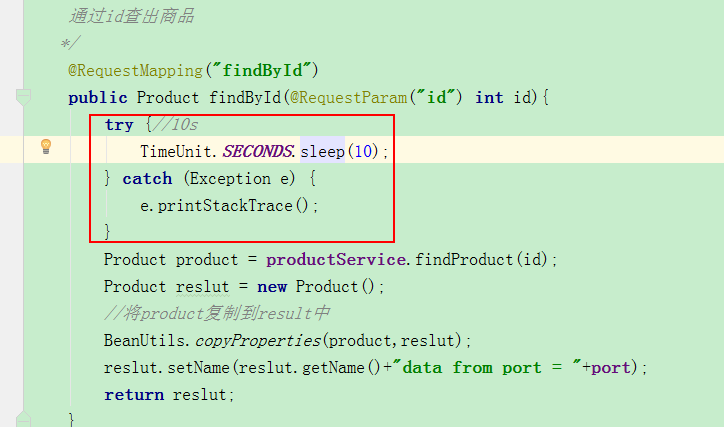
这样别的服务调用这个product-service服务的findById的方法时会报错
java.net.SocketTimeoutException: Read timed out
我们是通过order-service服务去调用的product-service所以在order-service服务的yml配置文件中加上如下配置即可
1 #修改调用超时时间,由于我们设置了10s睡眠所以这里11s再超时,一般默认connectTimeout,readTimeout都设置2000
2 feign:
3   client:
4     config:
5       default:
6         connectTimeout: 5000
7         readTimeout: 11000
问题:在使用feign时由于readTimeout底层源码默认是60s才算超时,假如没有yml的时间配置,product-service只是睡眠1s也会报错超时,为什么呢?
原因:没有yml的配置,时间超时是由hystrix决定的,其默认是1秒超时,只有yml配置了,超时才由readTimeout决定,而且此时超时时间以配置的将会覆盖底层的readTimeout(60s)

 浙公网安备 33010602011771号