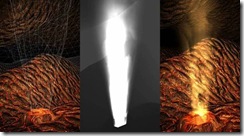
热流扰动,径向模糊
懒病又犯了,很多事情,你自以为囫囵吞枣,会了,可其实你不会,但亦有很多事情,你害怕你不会,但其实不妨来个囫囵吞枣先!戒贪戒急,戒骄戒躁,多谢多想多练,得时常打开RM和Word压压自己,
好吧,继续上篇所讲,由于前人已有铺路,我就偷懒了,仅作实现,本篇内容同样转自逍遥剑客的Blog:
1, 热流扰动 柏松分布
• 每个人都对自然界中的这种大气效果很熟悉
• 光线在穿过不同密度的介质时会弯曲
热微光
• 热空气密度比冷空气小
• 密度影响介质的折射率
• 热空气上升的同时会被冷空气替代, 这会改变光射入眼睛的路线
折射率的部分改变会导致我们看到的景物发生扭曲,具体可以参照一下实现:
• 渲染场景到RGBA离屏缓存(可渲染的纹理)
• 颜色写入RGB值
• 扭曲度写入Alpha通道(这里只是RM下单一渲染效果的QuickTrick,实际中可以使用StencilBuffer来做标记)
• 绘制全屏长方形到后备缓冲区
• 对离屏缓冲采样以获得扭曲度
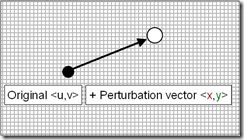
• 用扰动贴图来确定扰动向量, 用扭曲度放缩后偏移原始纹理坐标
• 基于扰动纹理坐标的可增长泊松分布(根据扭曲度来进行偏移)
扭曲度
• 逐像素判断当前像素被扭曲的程度
• 当光线穿过更多的气体时, 折射程度也相应增加
• 扭曲随场景深度增加
– 开始时把渲染目标的Alpha通道清为1.0,表示最大深度
– Pixel shader把每个像素的深度写入alpha通道
• 深度提供了一个很好的全局扭曲方案, 但是你的美工们希望局部控制
• 热浪几何体可以用来定义扭曲范围, 如热空气出口和喷气发动机尾
• 热浪纹理可以使热浪几何本上的扭曲动起来
热度几何体 & 热度纹理
• 像素扭曲度来源来热度纹理
• 扭曲度被深度放大
• 用高度进一步放大 (纹理坐标) 并且 N.V 来避免生硬的边缘
• 扭曲度被写入Alpha通道
全屏矩形
• 全屏矩形用离屏缓存(可渲染的纹理)来绘制并且用扰动贴图作为纹理
扰动贴图
• 一个2D向量储存在红色和绿色通道内
• 在全屏矩形两个方向上卷动贴图并采样两次
• 平均两次采样并把值变换到 [-1.0, 1.0] 的范围内
• 用扭曲度放缩向量
• 结果就是扭曲向量
扭曲向量
• 扭曲向量用于偏移原始纹理坐标
• 向量的大小取决于扭曲度
• 这个新的扰动纹理用于读入离屏缓存
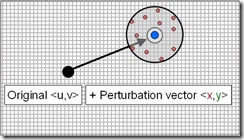
可增长泊松分布
• 模糊中心在扰动纹理坐标的中间
• 偏移基于扭曲度(Perturbation)
扭曲 Shader
|
float4 main (PsInput i) : COLOR { // fetch from perturbation map with scrolling texture coords float3 vPerturb0 = tex2D (tPerturbationMap, i.texCoord1); float3 vPerturb1 = tex2D (tPerturbationMap, i.texCoord2);
// scale and bias: (color - 0.5f)*2.0f 转回到[-1~1]范围 vPerturb0 = SiConvertColorToVector(vPerturb0); vPerturb1 = SiConvertColorToVector(vPerturb1);
// average perturbation vectors float2 offset = (vPerturb0.xy + vPerturb1.xy) * 0.5f;
// get distortion weight from renderable texture (stored in alpha)存在上一Pass的RT中 float4 cDistWeight = tex2D (tRBFullRes, i.texCoord0);
// square distortion weight cDistWeight.a *= cDistWeight.a;
// compute distorted texture cords fPerturbScale这里是一个预定义的参数,可以当做扰动偏移的强度 offset.xy = ((offset.xy * cDistWeight.a) * fPerturbScale) + i.texCoord0;
// fetch the distorted color float4 o; o.rgb = SiPoissonDisc13RGB(tRBFullRes, offset, 1.0f/screenRes.xy, cDistWeight.a); o.a = 1.0f; return o; } |
PS代码看到这里可以大体明白,基本过程与上一篇的水体扰动实现方法一致,但就是在最后出现了这个PoissonDiscl处理方法,
数学课本差不多都还给老实了吧?好吧,首先,让我们看看什么事泊松分布
根据囫囵吞枣的精神指引,首先看一下Shader代码,这里pixelSize应是外部的RT尺寸的倒数,也就是字面意义上的每个像素的uv宽度大小,这里的泊松分布也就是在当前偏移后的uv位置上继续偏移,采样,中和~~
可增长泊松分布 Shader
|
float3 SiGrowablePoissonDisc13FilterRGB (sampler tSource, float2 texCoord, float2 pixelSize, float discRadius) { float3 cOut; float2 poisson[12] = {float2(-0.326212f, -0.40581f), float2(-0.840144f, -0.07358f), float2(-0.695914f, 0.457137f), float2(-0.203345f, 0.620716f), float2(0.96234f, -0.194983f), float2(0.473434f, -0.480026f), float2(0.519456f, 0.767022f), float2(0.185461f, -0.893124f), float2(0.507431f, 0.064425f), float2(0.89642f, 0.412458f), float2(-0.32194f, -0.932615f), float2(-0.791559f, -0.59771f)}; // Center tap cOut = tex2D (tSource, texCoord); for (int tap = 0; tap < 12; tap++) { float2 coord = texCoord.xy + (pixelSize * poisson[tap] * discRadius);
// Sample pixel cOut += tex2D (tSource, coord); } return (cOut / 13.0f); } |
2, 径向模糊
看原理:
http://www.gamerendering.com/2008/12/20/radial-blur-filter/
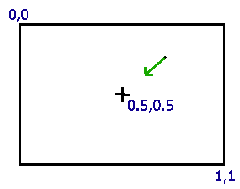
实现其实很简单,比上边的热流扰动简单多了,确定一个中心点(如0.5, 0.5), 跟当前像素连一条线. 以当前像素为中心, 在线上的附近像素进行采样, 最后取一下平均值.
HLSL(感谢逍遥博主的翻译):
1. // This texture should hold the image to blur.
2. sampler2D Texture0;
3.
4. // some const, tweak for best look
5. const float fSampleDist;
6. const float fSampleStrength;
7.
8.
9. // some sample positions
10. float samples[10] =
11. {
12. -0.08,
13. -0.05,
14. -0.03,
15. -0.02,
16. -0.01,
17. 0.01,
18. 0.02,
19. 0.03,
20. 0.05,
21. 0.08
22. };
23. float4 ps_main( float2 texCoord : TEXCOORD0 ) : COLOR
24. {
25. // 0.5,0.5 is the center of the screen
26. // so substracting uv from it will result in
27. // a vector pointing to the middle of the screen
28. float2 dir = 0.5 - texCoord;
29. // calculate the distance to the center of the screen
30. float dist = length(dir);
31. // normalize the direction (reuse the distance)
32. dir /= dist;
33.
34. // this is the original colour of this pixel
35. // using only this would result in a nonblurred version
36. float4 color = tex2D(Texture0, texCoord);
37.
38. float4 sum = color;
39. // take 10 additional blur samples in the direction towards
40. // the center of the screen
41. for (int i = 0; i < 10; ++i)
42. {
43. sum += tex2D(Texture0, texCoord + dir * samples[i] * fSampleDist);
44. }
45.
46. // we have taken eleven samples
47. sum /= 11.0;
48.
49. // weighten the blur effect with the distance to the
50. // center of the screen ( further out is blurred more)
51. float t = saturate(dist * fSampleStrength);
52.
53. //Blend the original color with the averaged pixels
54. return lerp(color, sum, t);
55. }
两个参数, 动态调整的
比如可以加入RM内置根据Time_X变化的Sin值,使得画面出现“清晰->模糊->清晰’的加速效果显示
for (int i = 0; i < 10; ++i)
{
sum += tex2D(Image, texCoord + dir * samples[i] * fSampleDist*abs(fSinTime0_X));
}
怎么样,效果是不是很赞?!Just do it!
附上这两篇的RM工程:
后处理 水底扰动(泊松分布暂未做)
/Files/hmxp8/ZephyrTest_01.rar
直接用了ScreenSpaceEffect的fx,径向模糊在其中的MotionBlur中
/Files/hmxp8/ZephyrTest_02.rar
转(http://www.cnblogs.com/hmxp8/archive/2011/11/24/2262217.html)


