SpringBoot-集成Swagger
1 - Swagger简介
1、导语
2、前后端分离
-
前端 -> 前端控制层、视图层
-
后端 -> 后端控制层、服务层、数据访问层
-
前后端通过API进行交互
-
前后端相对独立且松耦合
3、产生的问题
-
前后端集成,前端或者后端无法做到“及时协商,尽早解决”,最终导致问题集中爆发
4、解决方案
-
首先定义schema [ 计划的提纲 ],并实时跟踪最新的API,降低集成风险
5、Swagger是什么?
1、是一款让你更好的书写API文档的规范且完整框架。
2、提供描述、生产、消费和可视化RESTful Web Service。Restful Api 文档在线自动生成器 => API 文档 与API 定义同步更新
3、是由庞大工具集合支撑的形式化规范。这个集合涵盖了从终端用户接口、底层代码库到商业API管理的方方面面。
4、直接运行,在线测试API
5、支持多种语言(如:Java、PHP)
2 - SpringBoot集成Swagger
使用Swagger
要求:jdk 1.8 + 否则swagger2无法运行
1、新建一个SpringBoot-Web项目
2、在pom文件中导入两个官方提供的maven依赖
<!-- https://mvnrepository.com/artifact/io.springfox/springfox-swagger2 -->
<dependency>
   <groupId>io.springfox</groupId>
   <artifactId>springfox-swagger2</artifactId>
   <version>2.9.2</version>
</dependency>
<!-- https://mvnrepository.com/artifact/io.springfox/springfox-swagger-ui -->
<dependency>
   <groupId>io.springfox</groupId>
   <artifactId>springfox-swagger-ui</artifactId>
   <version>2.9.2</version>
</dependency>
3、编写一个HelloController,确保项目能够正常运行
@RestController
public class HelloController {
    @RequestMapping(path = "/hello",method = RequestMethod.GET)
    public String hello(){
        return "hello world";
    }
}
4、要使用Swagger,我们需要编写一个配置类 SwaggerConfig 来配置 Swagger
package com.howie.config;

import org.springframework.context.annotation.Configuration;
import springfox.documentation.swagger2.annotations.EnableSwagger2;

@Configuration // 表明 spring boot的配置类
@EnableSwagger2 // 开启Swagger2
public class SwaggerConfig {
}
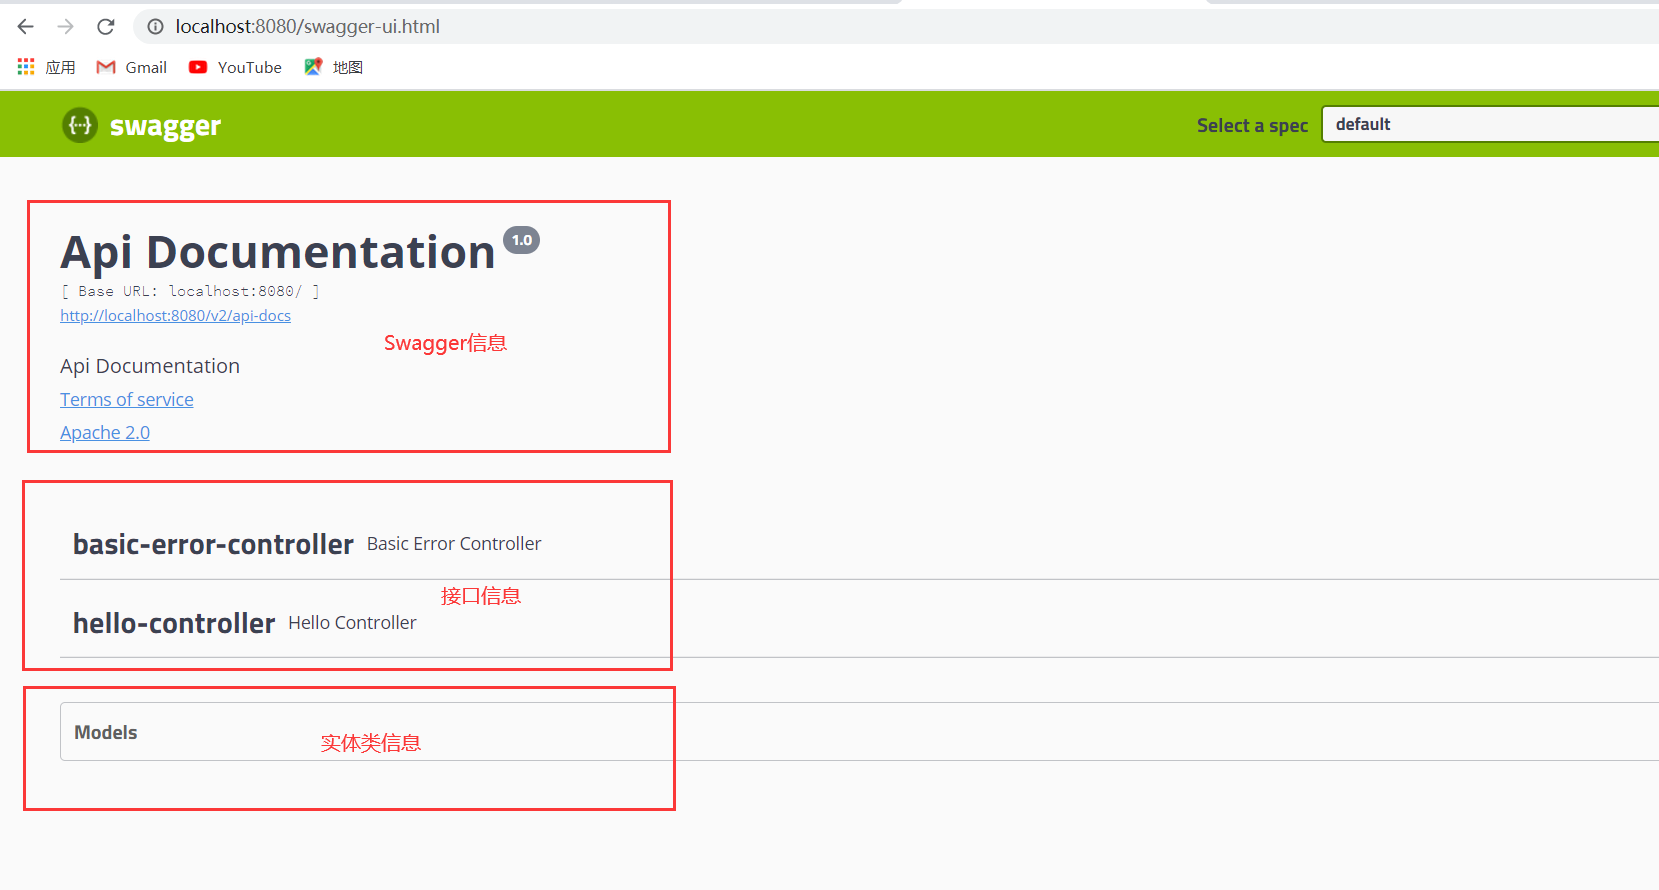
5、测试访问:http://localhost:8080/swagger-ui.html,此时我们可以看到 Swagge r的 ui 页面
3 - 配置Swagger
1、Swagger实例Bean是Docket,所以通过配置Docket实例来配置Swaggger。
// 配置Swagger的Bean实例
    @Bean
    public Docket docket(){
        return new Docket(DocumentationType.SWAGGER_2);
    }
2、可以通过apiInfo()属性配置文档信息
//配置文档信息
private ApiInfo apiInfo() {
   Contact contact = new Contact("联系人名字", "http://xxx.xxx.com/联系人访问链接", "联系人邮箱");
   return new ApiInfo(
           "Swagger学习", // 标题
           "学习演示如何配置Swagger", // 描述
           "v1.0", // 版本
           "http://terms.service.url/组织链接", // 组织链接
           contact, // 联系人信息
           "Apach 2.0 许可", // 许可
           "许可链接", // 许可连接
           new ArrayList<>()// 扩展
  );
}
代码示例
  // 配置Swagger的apiInfo信息
    private ApiInfo apiInfo(){
        // 作者信息
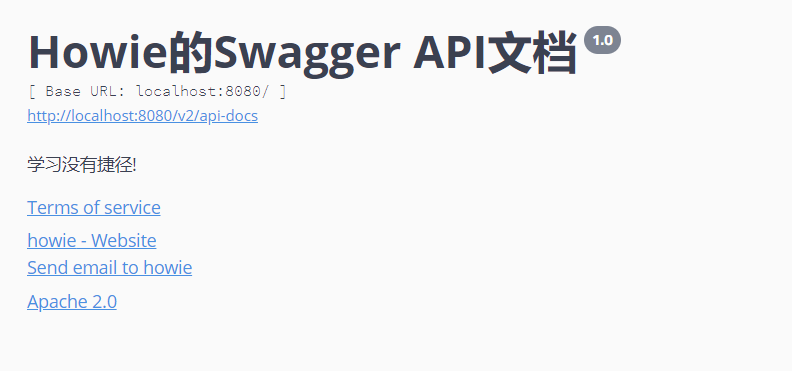
        Contact contact = new Contact("howie", "http://localhost:8080/", "3299447929@qq.com");
        return new ApiInfo(
                "Howie的Swagger API文档",
                "学习没有捷径!",
                "1.0",
                "http://localhost:8080",
                contact,
                "Apache 2.0",
                "http://www.apache.org/licenses/LICENSE-2.0", new ArrayList<VendorExtension>());
    }
3、Docket 实例关联上 apiInfo()
  // 配置Swagger的Bean实例
    @Bean
    public Docket docket(){
        return new Docket(DocumentationType.SWAGGER_2).apiInfo(apiInfo());
    }
4、重启项目,访问测试 http://localhost:8080/swagger-ui.html 看下效果
4 - 配置扫描接口
1、构建Docket时通过select()方法配置怎么扫描接口。
@Bean
public Docket docket() {
   return new Docket(DocumentationType.SWAGGER_2)
      .apiInfo(apiInfo())
      .select()// 通过.select()方法,去配置扫描接口,RequestHandlerSelectors配置如何扫描接口
      .apis(RequestHandlerSelectors.basePackage("com.kuang.swagger.controller"))
      .build();
}
2、重启项目测试,由于我们配置根据包的路径扫描接口,所以我们只能看到一个类

3、除了通过包路径配置扫描接口外,还可以通过配置其他方式扫描接口,这里注释一下所有的配置方式
any() // 扫描所有,项目中的所有接口都会被扫描到
none() // 不扫描接口
// 通过方法上的注解扫描,如withMethodAnnotation(GetMapping.class)只扫描get请求
withMethodAnnotation(final Class<? extends Annotation> annotation)

// 通过类上的注解扫描,如.withClassAnnotation(Controller.class)只扫描有controller注解的类中的接口
withClassAnnotation(final Class<? extends Annotation> annotation)
basePackage(final String basePackage) // 根据包路径扫描接口
4、除此之外,我们还可以配置接口扫描过滤:
  @Bean
    public Docket docket(){
        return new Docket(DocumentationType.SWAGGER_2).apiInfo(apiInfo()).select()
                // RequestHandlerSelector 配置要扫描的接口方式
                // basePackage:指定要扫描的包
                // any() 扫描全部
                // none() 不扫描
                // withClassAnnotation() 扫描类上的注解,参数是一个注解的反射对象
                // withMethodAnnotation() 扫描方法上的注解
                .apis(RequestHandlerSelectors.basePackage("com.howie.controller"))
                // paths() 要过滤什么路径
                .paths(PathSelectors.ant("/howie/**"))
                .build();
    }
5、这里的可选值还有
any() // 任何请求都扫描
none() // 任何请求都不扫描
regex(final String pathRegex) // 通过正则表达式控制
ant(final String antPattern) // 通过ant()控制
5 - 配置Swagger开关
1、通过enable()方法配置是否启用swagger,如果是false,swagger将不能在浏览器中访问了
    // 配置Swagger的Bean实例
    @Bean
    public Docket docket(){
        return new Docket(DocumentationType.SWAGGER_2).apiInfo(apiInfo())
                .enable(false) // 配置swagger开关,此时Swagger不能在浏览器中访问
                .select()
                // RequestHandlerSelector 配置要扫描的接口方式
                // basePackage:指定要扫描的包
                // any() 扫描全部
                // none() 不扫描
                // withClassAnnotation() 扫描类上的注解,参数是一个注解的反射对象
                // withMethodAnnotation() 扫描方法上的注解
                .apis(RequestHandlerSelectors.basePackage("com.howie.controller"))
                // paths() 要过滤什么路径
                // .paths(PathSelectors.ant("/howie/**"))
                .build();
    }
2、如何动态配置当项目处于test、dev(生产) 环境时显示swagger,处于 prod(发布) 时不显示?
- 判断是不是生产环境
- 注入enable()
@Bean
public Docket docket(Environment environment) {
   // 设置要显示swagger的环境
   Profiles of = Profiles.of("dev", "test");
   // 判断当前是否处于该环境
   // 通过 enable() 接收此参数判断是否要显示
   boolean isProd = environment.acceptsProfiles(of);

   return new Docket(DocumentationType.SWAGGER_2)
      .apiInfo(apiInfo())
      .enable(isProd) //配置是否启用Swagger,如果是false,在浏览器将无法访问
      .select()// 通过.select()方法,去配置扫描接口,RequestHandlerSelectors配置如何扫描接口
      .apis(RequestHandlerSelectors.basePackage("com.kuang.swagger.controller"))
       // 配置如何通过path过滤,即这里只扫描请求以/kuang开头的接口
      .paths(PathSelectors.ant("/kuang/**"))
      .build();
}
3、可以在项目中增加一个dev的配置文件查看效果!

6 - 配置API分组
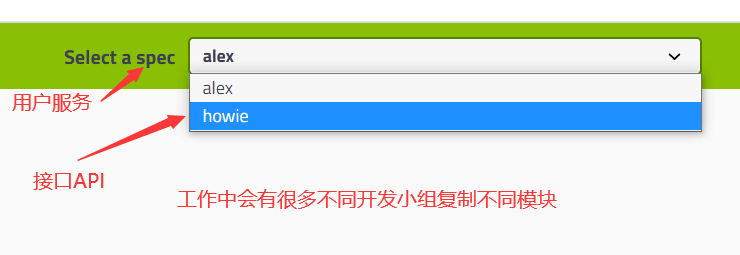
1、如果没有配置分组,默认是default。通过groupName()方法即可配置分组
@Bean
public Docket docket(Environment environment) {
   return new Docket(DocumentationType.SWAGGER_2).apiInfo(apiInfo())
      .groupName("hello") // 配置分组
       // 省略配置....
}
2、重启项目查看分组
3、如何配置多个分组?配置多个分组只需要配置多个docket即可
@Bean
public Docket docket1(){
   return new Docket(DocumentationType.SWAGGER_2).groupName("group1");
}
@Bean
public Docket docket2(){
   return new Docket(DocumentationType.SWAGGER_2).groupName("group2");
}
@Bean
public Docket docket3(){
   return new Docket(DocumentationType.SWAGGER_2).groupName("group3");
}
4、重启项目查看即可
7 - 实体配置
1、新建一个实体类
@ApiModel(value = "用户实体类")
public class User {
    @ApiModelProperty(value = "用户名")
    public String username;
    @ApiModelProperty(value = "密码")
    public String password;
}
2、只要这个实体在请求接口的返回值上(即使是泛型),都能映射到实体项中
    // 在接口中,只要返回值中存在实体类,就会被扫描到Swagger中
    @RequestMapping(path = "/user")
    public User user(){
        return new User();
    }
3、重启查看测试
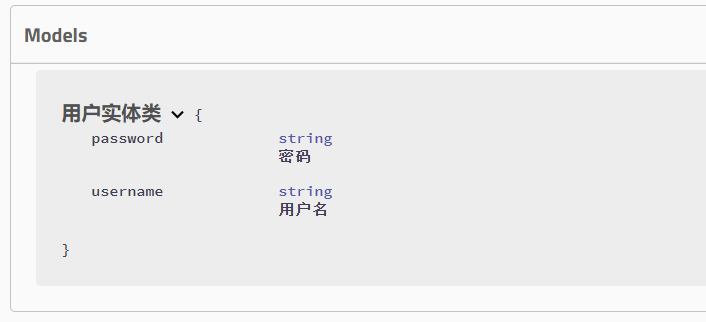
注:并不是因为@ApiModel这个注解让实体显示在这里了,而是只要出现在接口方法的返回值上的实体都会显示在这里,而@ApiModel和@ApiModelProperty这两个注解只是为实体添加注释的。
@ApiModel为类添加注释
@ApiModelProperty为类属性添加注释
8 - Swagger常用注解
Swagger 的所有注解定义在 io.swagger.annotations 包下
下面列一些经常用到的,未列举出来的可以另行查阅说明
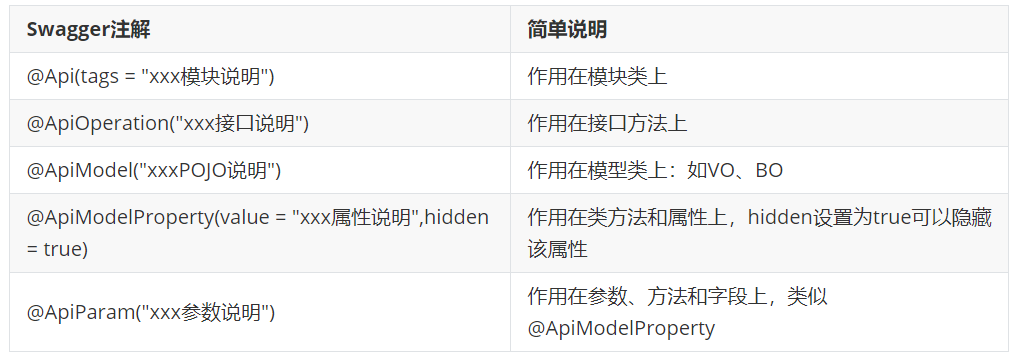
我们也可以给请求的接口配置一些注释
@ApiOperation("返回用户名的接口")
@PostMapping("/get_name")
@ResponseBody
public String kuang(@ApiParam("这个名字会被返回")String username){
   return username;
}
这样的话,可以给一些比较难理解的属性或者接口,增加一些配置信息,让人更容易阅读!
相较于传统的Postman或Curl方式测试接口,使用swagger简直就是傻瓜式操作,不需要额外说明文档(写得好本身就是文档)而且更不容易出错,只需要录入数据然后点击Execute,
如果再配合自动化框架,可以说基本就不需要人为操作了。
Swagger是个优秀的工具,现在国内已经有很多的中小型互联网公司都在使用它,相较于传统的要先出Word接口文档再测试的方式,显然这样也更符合现在的快速迭代开发行情。
当然了,提醒下大家在正式环境要记得关闭Swagger,一来出于安全考虑二来也可以节省运行时内存。
总结:
1、我们可以通过Swagger 给一些比较难理解的属性或者接口,增加注释信息
2、接口文档实时更新
3、还可以在线测试一些接口


