mybatis使用-整合到spring构架
二、将mybatis整合到spring框架中
参照mybatis官方文档:http://mybatis.org/spring/zh/getting-started.html
官方文档介绍中,对Mapper的注入使用的是xml配置文件,本文使用的java代码配置实现。
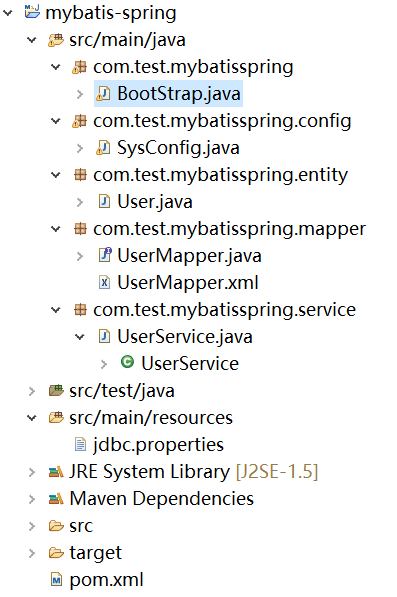
代码结构:

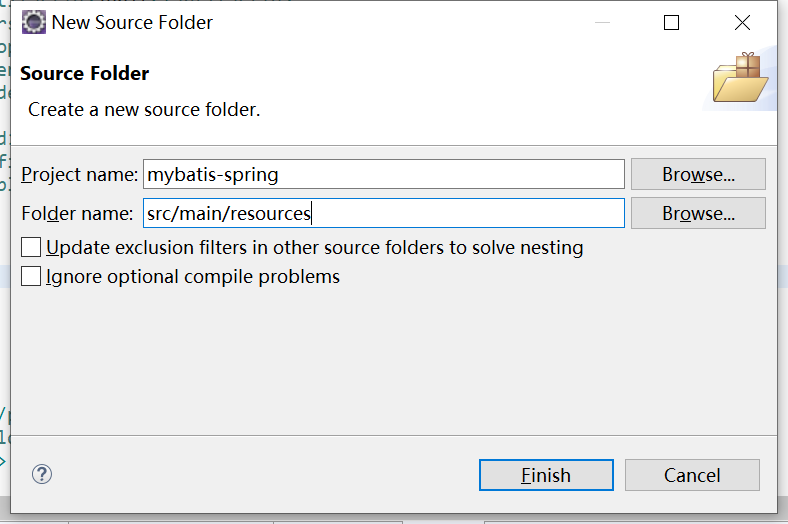
1.使用eclipse创建maven项目,同时创建resources目录用于存放数据库连接配置文件。

2.修改pom.xml,增加spring、mybatis、mybatis-spring、mysql-connector、c3p0相关依赖包。

<project xmlns="http://maven.apache.org/POM/4.0.0" xmlns:xsi="http://www.w3.org/2001/XMLSchema-instance"
  xsi:schemaLocation="http://maven.apache.org/POM/4.0.0 http://maven.apache.org/xsd/maven-4.0.0.xsd">
  <modelVersion>4.0.0</modelVersion>

  <groupId>com.test</groupId>
  <artifactId>mybatis-spring</artifactId>
  <version>0.0.1-SNAPSHOT</version>
  <packaging>jar</packaging>

  <name>mybatis-spring</name>
  <url>http://maven.apache.org</url>

  <properties>
    <project.build.sourceEncoding>UTF-8</project.build.sourceEncoding>
    <springframework.version>5.0.8.RELEASE</springframework.version>
  </properties>

  <dependencies>
    <dependency>
      <groupId>junit</groupId>
      <artifactId>junit</artifactId>
      <version>3.8.1</version>
      <scope>test</scope>
    </dependency>

    <dependency>
        <groupId>org.springframework</groupId>
        <artifactId>spring-context</artifactId>
        <version>${springframework.version}</version>
    </dependency>

    <dependency>
        <groupId>org.springframework</groupId>
        <artifactId>spring-jdbc</artifactId>
        <version>${springframework.version}</version>
    </dependency>

    <dependency>
      <groupId>org.mybatis</groupId>
      <artifactId>mybatis-spring</artifactId>
      <version>2.0.6</version>
    </dependency>

    <dependency>
      <groupId>org.mybatis</groupId>
      <artifactId>mybatis</artifactId>
      <version>3.5.7</version>
    </dependency>

    <dependency>
        <groupId>mysql</groupId>
        <artifactId>mysql-connector-java</artifactId>
        <version>5.1.49</version>
    </dependency>

    <dependency>
        <groupId>com.mchange</groupId>
        <artifactId>c3p0</artifactId>
        <version>0.9.5.5</version>
    </dependency>

  </dependencies>

      <build>
        <finalName>income</finalName>
        <plugins>
            <plugin>
                <groupId>org.apache.maven.plugins</groupId>
                <artifactId>maven-compiler-plugin</artifactId>
                <version>3.1</version>
                <configuration>
                    <source>1.8</source>
                    <target>1.8</target>
                </configuration>
            </plugin>
        </plugins>
    </build>
</project>
3.增加BootStrap.java类,同时增加@ComponentScan("com.test.mybatisspring")注解,使得AnnotationConfigApplicationContext扫描包下所有的@Service、@Component、@Configuration等组件,从容器中获取UserService类的实例,并调用它的valid方法验证用户名和密码是否与数据库内容一致。

package com.test.mybatisspring;

import org.springframework.context.annotation.AnnotationConfigApplicationContext;
import org.springframework.context.annotation.ComponentScan;

import com.test.mybatisspring.service.UserService;

@ComponentScan("com.test.mybatisspring")
public class BootStrap
{
    public static void main( String[] args )
    {
        AnnotationConfigApplicationContext context = new AnnotationConfigApplicationContext(BootStrap.class);

        UserService userService = context.getBean(UserService.class);

        Integer id = 1;
        String password = "123456";

        if(userService.valid(id, password)) {
            System.out.println("用户名与密码正确!");
        }
        else {
            System.out.println("用户名或密码错误!");
        }


    }
}
4.在resources目录下创建jdbc.properties文件

jdbc.driverClassName=com.mysql.jdbc.Driver
jdbc.url=jdbc:mysql://localhost:3306/test?useSSL=false&useUnicode=true&serverTimezone=Asia/Shanghai&characterEncoding=utf8&zeroDateTimeBehavior=convertToNull&allowPublicKeyRetrieval=true&allowMultiQueries=true
jdbc.username=root
jdbc.password=111111
5.创建SysConfig配置类,获取jdbc.properties文件的数据库配置信息,增加dataSource、sqlSesstionFactory的bean实例注入到spring容器;再增加MapperFactoryBean的bean实例注入到spring中,由MapperFactoryBean将UserMapper接口的代理类注入到spring容器中。

package com.test.mybatisspring.config;

import java.beans.PropertyVetoException;

import org.apache.ibatis.session.SqlSessionFactory;
import org.mybatis.spring.SqlSessionFactoryBean;
import org.mybatis.spring.mapper.MapperFactoryBean;
import org.springframework.beans.factory.annotation.Value;
import org.springframework.context.annotation.Bean;
import org.springframework.context.annotation.Configuration;
import org.springframework.context.annotation.PropertySource;
import org.springframework.context.annotation.PropertySources;

import com.mchange.v2.c3p0.ComboPooledDataSource;
import com.test.mybatisspring.mapper.UserMapper;

@Configuration
@PropertySource(value= {"classpath:jdbc.properties"})
public class SysConfig {
    @Value("${jdbc.driverClassName}")
    private String driverClassName;

    @Value("${jdbc.url}")
    private String url;

    @Value("${jdbc.username}")
    private String username;

    @Value("${jdbc.password}")
    private String password;

    @Bean(name="dataSource",destroyMethod="close")
    public ComboPooledDataSource dataSource() throws PropertyVetoException {
        ComboPooledDataSource dataSource = new ComboPooledDataSource();

        dataSource.setDriverClass(this.driverClassName);
        dataSource.setJdbcUrl(this.url);
        dataSource.setUser(this.username);
        dataSource.setPassword(this.password);

        return dataSource;
    }

    @Bean
    public SqlSessionFactory sqlSessionFactory() throws Exception {
        SqlSessionFactoryBean factoryBean = new SqlSessionFactoryBean();
        factoryBean.setDataSource(dataSource());
        return factoryBean.getObject();
    }

    @Bean
    public MapperFactoryBean<UserMapper> mapperFactoryBean() throws Exception{
        MapperFactoryBean<UserMapper> mapperFactoryBean = new MapperFactoryBean<UserMapper>();

        mapperFactoryBean.setSqlSessionFactory(sqlSessionFactory());
        mapperFactoryBean.setMapperInterface(UserMapper.class);

        return mapperFactoryBean;
    }

}
在使用MapperFactoryBean注入接口代理类需要一个个增加,可以使用@MapperScan注解,针对类包注入:
@MapperScan("com.test.mybatisspring.mapper");
也可以替换使用MapperScannerConfigurer类来完成类包下Mapper的注入:
    @Bean
    public  static MapperScannerConfigurer mapperScannerConfigurer() throws Exception {
        MapperScannerConfigurer configure = new MapperScannerConfigurer();

        configure.setBasePackage("com.test.mybatisspring.mapper");
        configure.setAddToConfig(true);

        return configure;
    }
注意:由于MapperScannerConfigurer类是BeanFactoryPostProcessor,因此,MapperScannerConfigurer类的实例需求优先注入到spring容器,对应的注入方法必须是static的,否则程序会抛出警告,达不到mapper注入的效果。
警告信息“Cannot enhance @Configuration bean definition 'sysConfig' since its singleton instance has been created too early. The typical cause is a non-static @Bean method with a BeanDefinitionRegistryPostProcessor return type: Consider declaring such methods as 'static'.”
在@Bean注解的源码也有相应的说明:
* <p>Special consideration must be taken for {@code @Bean} methods that return Spring * {@link org.springframework.beans.factory.config.BeanFactoryPostProcessor BeanFactoryPostProcessor} * ({@code BFPP}) types. Because {@code BFPP} objects must be instantiated very early in the * container lifecycle, they can interfere with processing of annotations such as {@code @Autowired}, * {@code @Value}, and {@code @PostConstruct} within {@code @Configuration} classes. To avoid these * lifecycle issues, mark {@code BFPP}-returning {@code @Bean} methods as {@code static}. For example: * * <pre class="code"> * @Bean * public static PropertySourcesPlaceholderConfigurer pspc() { * // instantiate, configure and return pspc ... * } * </pre>
5.创建User实体类

package com.test.mybatisspring.entity;

import java.util.Date;


public class User {
    private Integer id;
    private String userName;
    private String password;
    private Date createTime;

    public Integer getId() {
        return id;
    }
    public void setId(Integer id) {
        this.id = id;
    }
    public String getUserName() {
        return userName;
    }
    public void setUserName(String userName) {
        this.userName = userName;
    }
    public String getPassword() {
        return password;
    }
    public void setPassword(String password) {
        this.password = password;
    }
    public Date getCreateTime() {
        return createTime;
    }
    public void setCreateTime(Date createTime) {
        this.createTime = createTime;
    }


}
6.创建UserMapper接口,该接口由mybatis生成代理实现类。

package com.test.mybatisspring.mapper;

import com.test.mybatisspring.entity.User;

public interface UserMapper {

    User getUserById(Integer id);
}

<?xml version="1.0" encoding="UTF-8" ?>
<!DOCTYPE mapper
  PUBLIC "-//mybatis.org//DTD Mapper 3.0//EN"
  "http://mybatis.org/dtd/mybatis-3-mapper.dtd">
<mapper namespace="com.test.mybatisspring.mapper.UserMapper">
    <resultMap type="com.test.mybatisspring.entity.User" id="userMap">
        <id column="id" property="id"/>
        <result column="user_name" property="userName"/>
        <result column="password" property="password"/>
        <result column="create_time" property="createTime"/>
    </resultMap>

    <select id="getUserById" resultMap="userMap">
      select * from user where id = #{id}
    </select>
</mapper>
7.创建UserService服务类,设置UserMapper属性并使用@Autowired注入实现类的实例,调用UserMapper获取用User类的对象,完成密码的容易对比。

package com.test.mybatisspring.service;

import org.springframework.beans.factory.annotation.Autowired;
import org.springframework.stereotype.Service;

import com.test.mybatisspring.entity.User;
import com.test.mybatisspring.mapper.UserMapper;

@Service
public class UserService {
    @Autowired
    private UserMapper userMapper;

    public Boolean valid(Integer id,String password) {
        User user = userMapper.getUserById(id);

        System.out.println(user.getId() + ","
                + user.getUserName() + ","
                + user.getPassword() + ","
                + user.getCreateTime());

        if(user.getPassword().equals(password)) {
            return true;
        }
        else {
            return false;
        }
    }
}
链接:https://pan.baidu.com/s/1jdfNjKxZPg7GJRWslRbYug
提取码:3w9w


 浙公网安备 33010602011771号