Vim实用技巧系列 - 开篇
作者使用Vim已经有一段时间了,深深觉得它是一个非常强大的编辑器,使用习惯之后效率很高。最大的缺点是学习曲线比较陡峭。因此作者希望分享一些自己在实际使用中的经验来帮助初学者,同时也帮助作者自己学习。
在这个系列的文章中,作者所使用的Vim是windows系统下的gVim 7.4. 同时,作者在这里不打算涉及Vim的入门知识,包括几种模式等。作者假定阅读本系列文章的读者都具有这些入门知识。
好,闲话少叙。接下来进入正题。
=======================================================
本篇的主题是,在Vim中使用插件。
插件系统是Vim的一个很强大的地方。无数开发者为Vim提供了丰富的插件集,可以实现非常多的功能。但是,默认的插件管理方式不太好用,需要下载插件然后手动拷贝,需要删除的时候就很麻烦。所以,有人就开发了Vim插件来管理Vim插件。本期介绍Vundle用来管理Vim插件。
首先,为什么要用Vundle这个插件来管理Vim插件?因为它使得插件的安装、更新删除都变得很容易。
接下来是Vundle的安装方法。https://github.com/gmarik/Vundle.vim有详细的安装过程,这里做个简单的翻译,同时结合作者本身经验有简单修改,方便读者。
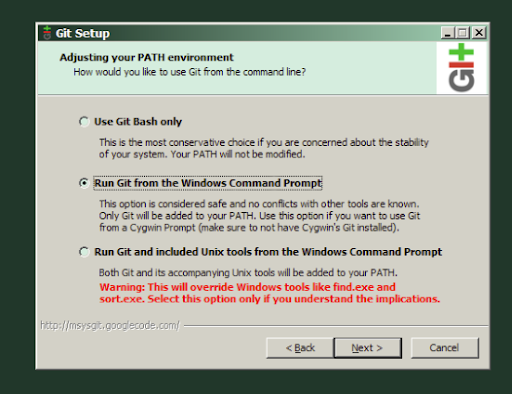
1. Vundle依赖于git. 到http://git-scm.com/去下载git. 然后安装。需要注意的是,在安装过程中,有一步让用户选择路径环境,共有三个选项,这里要选第二项,也就是Run Git from Windows Command Prompt. 如下图所示

2. 创建一个名为curl.cmd的文件,其内容如下,并且将这个文件放到C:\Program Files\Git\cmd\curl.cmd 。这里假定git安装到c:\Program Files\Git
@rem Do not use "echo off" to not affect any child calls.
@setlocal

@rem Get the abolute path to the parent directory, which is assumed to be the
@rem Git installation root.
@for /F "delims=" %%I in ("%~dp0..") do @set git_install_root=%%~fI
@set PATH=%git_install_root%\bin;%git_install_root%\mingw\bin;%PATH%

@if not exist "%HOME%" @set HOME=%HOMEDRIVE%%HOMEPATH%
@if not exist "%HOME%" @set HOME=%USERPROFILE%

@curl.exe %*
3. 打开命令行,分别运行git --version和curl --version,如果能够正常显示版本信息,则可以进行下一步。
4. 打开命令行,输入如下命令
cd %USERPROFILE%
git clone https://github.com/gmarik/vundle.git vimfiles/bundle/vundle
5. 在用户目录下,也就是C:\Users\你的用户名 或者 C:\用户\你的用户名, 创建一个文件,名为_vimrc,注意,没有扩展名。然后,在这个文件中输入如下内容。
set nocompatible              " be iMproved, required
filetype off                  " required

" set the runtime path to include Vundle and initialize
set rtp+=~/vimfiles/bundle/vundle/
let path='~/vimfiles/bundle'
call vundle#rc(path)
" alternatively, pass a path where Vundle should install bundles
"let path = '~/some/path/here'
"call vundle#rc(path)

" let Vundle manage Vundle, required
Bundle 'gmarik/vundle'

" The following are examples of different formats supported.
" Keep bundle commands between here and filetype plugin indent on.
" scripts on GitHub repos
Bundle 'tpope/vim-fugitive'
Bundle 'Lokaltog/vim-easymotion'
Bundle 'tpope/vim-rails.git'
" The sparkup vim script is in a subdirectory of this repo called vim.
" Pass the path to set the runtimepath properly.
Bundle 'rstacruz/sparkup', {'rtp': 'vim/'}
" scripts from http://vim-scripts.org/vim/scripts.html
Bundle 'L9'
Bundle 'FuzzyFinder'
" scripts not on GitHub
Bundle 'git://git.wincent.com/command-t.git'
" git repos on your local machine (i.e. when working on your own plugin)
Bundle 'file:///home/gmarik/path/to/plugin'
" ...

filetype plugin indent on     " required
"
" Brief help
" :BundleList          - list configured bundles
" :BundleInstall(!)    - install (update) bundles
" :BundleSearch(!) foo - search (or refresh cache first) for foo
" :BundleClean(!)      - confirm (or auto-approve) removal of unused bundles
"
" see :h vundle for more details or wiki for FAQ
" NOTE: comments after Bundle commands are not allowed.
6. 打开Vim,在命令模式下,输入:BundleInstall(注意要有前面的冒号),就会开始安装插件了
7. 如果要安装其他插件,只需要打开用户目录下的_vimrc文件,然后在文件中添加Bundle '<插件名字或者git路径>',并且在关闭Vim并且重新打开后输入:BundleInstall就会安装插件了。如果需要更新插件,则输入命令:BundleUpdate。如果要删除不用的Vim脚本,则输入:BundleClean命令。
好了,有了Vundle的帮助,就可以很方便的安装各种插件了。开始体验强大的Vim插件吧!

