Docker + Nginx 完成SSL证书分发
以阿里云为域名供应商为例
步骤 :
1. 给用户添加权限(云解析权限)

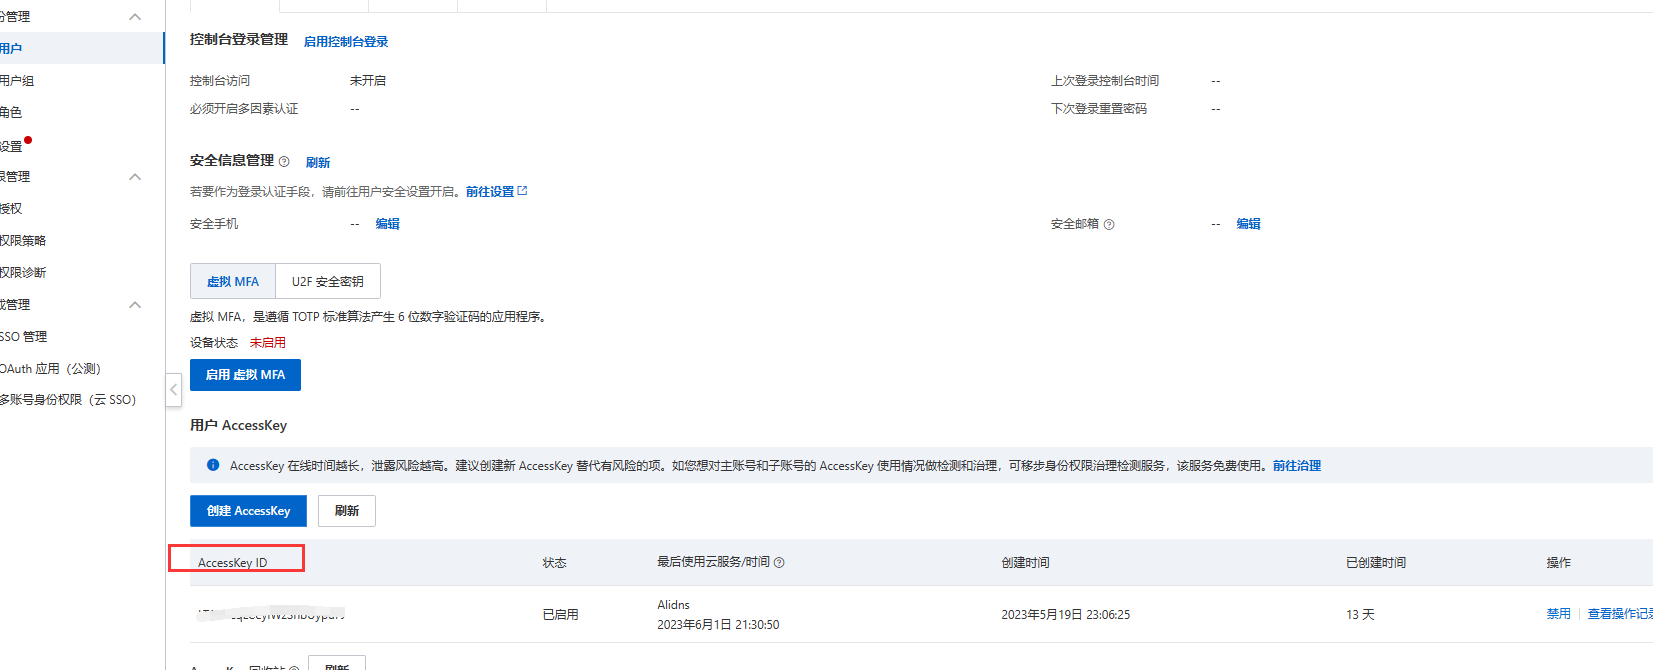
2. 拿到阿里云的AccessKey

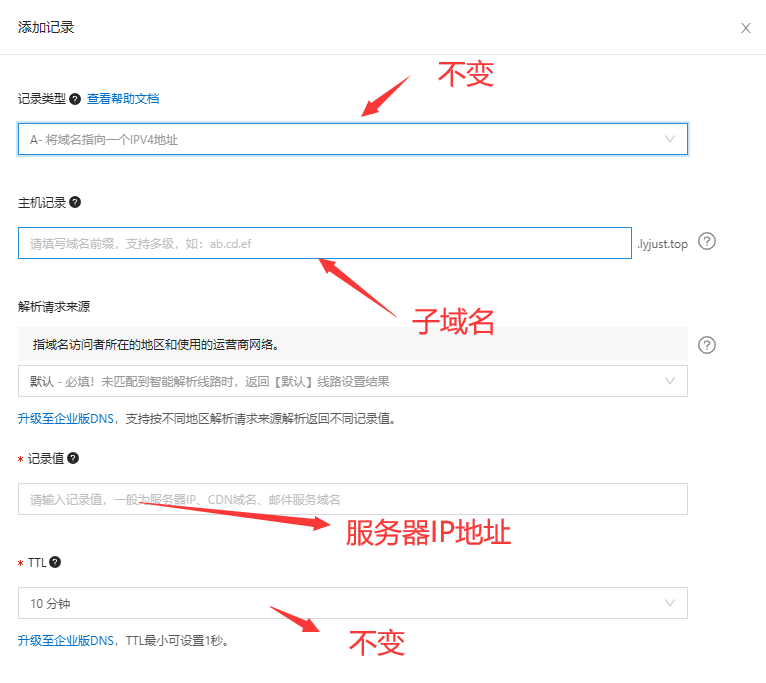
3. 解析域名到服务器


获取证书
# 拉取镜像
sudo docker pull neilpang/acme.sh:3.0.5

# 创建目录
mkdir ./acme
mkdir ./acme/domains
mkdir ./acme/domains/*.dev.lyjust.top

# 启动容器
sudo docker run --network=host \
  --restart=always -d  \
  -v "$(pwd)/acme":/acme.sh  \
  --name acme neilpang/acme.sh:3.0.5 daemon


# 注册  zerossl
sudo docker exec acme --register-account  -m 2645895206@qq.com --server zerossl

# 注意,申请域名证书需要配置相关的参数,请参照 https://github.com/acmesh-official/acme.sh/wiki 指定key和secret此处我使用阿里云

# 申请泛域名证书 *.dev.lyjust.top
sudo docker exec \
 -e Ali_Key= \      // 阿里云key
 -e Ali_Secret= \   // 阿里云secret
 acme --issue --dns dns_ali \
 -d *.dev.lyjust.top \
 --cert-file	    /acme.sh/domains/*.dev.lyjust.top/cert.cert \
 --key-file         /acme.sh/domains/*.dev.lyjust.top/key.key \
 --ca-file          /acme.sh/domains/*.dev.lyjust.top/ca.cer \
 --fullchain-file   /acme.sh/domains/*.dev.lyjust.top/fullchain.pem
注意:
一定不要乱删删acme的文件及文件夹
Nginx配置
自行修改域名,证书存放的位置
以dev.lyjust.conf为例(服务器位置:/docker/yamls/nginx/conf.d/dev.lyjust.conf)
server {
        listen 80;
        server_name *.dev.lyjust.top;

        return 301 https://$host$request_uri;   # 重定向
}


server {
        listen 443 ssl;
        server_name *.dev.lyjust.top;

        underscores_in_headers on;
        ignore_invalid_headers off;

        ssl on;
        ssl_certificate /domains/*.dev.lyjust.top/fullchain.pem;    # SSL 证书文件的存放路径
        ssl_certificate_key /domains/*.dev.lyjust.top/key.key;       # SSL 密钥文件的存放路径
        ssl_session_timeout 5m;
        ssl_ciphers ECDHE-RSA-AES128-GCM-SHA256:ECDHE:ECDH:AES:HIGH:!NULL:!aNULL:!MD5:!ADH:!RC4;
        ssl_protocols TLSv1 TLSv1.1 TLSv1.2;
        ssl_prefer_server_ciphers on;

        location / {

	proxy_set_header Host $host;
        proxy_set_header X-Real-IP $remote_addr;
        proxy_set_header X-Forwarded-For $proxy_add_x_forwarded_for;
        proxy_set_header X-Forwarded-Proto $scheme;
        proxy_set_header Upgrade $http_upgrade;
        proxy_set_header Connection $http_connection;
        proxy_set_header Connection keep-alive;
        proxy_set_header real-ip $remote_addr;
        proxy_cache_bypass $http_upgrade;
        proxy_read_timeout 72000;

        proxy_set_header Connection '';
        proxy_http_version 1.1;
        chunked_transfer_encoding off;

	proxy_buffering off;
        proxy_cache off;

        proxy_pass http://127.0.0.1:7080/; #转发到本机7080端口


      }
}
acme 配置化
配置文件
version: "3.8"

services:
  nginx:
    container_name: nginx
    image: nginx:1.19.6
    restart: always
    network_mode: host
    logging:
      options:
        max-size: "2048m"
        max-file: "10"
    labels:
      - sh.acme.autoload=nginx
    volumes:
      - /docker/yamls/nginx/acme/domains:/domains
      - /docker/yamls/nginx/conf.d:/etc/nginx/conf.d
      - /docker/yamls/nginx/nginx.conf:/etc/nginx/nginx.conf
      - /docker/yamls/nginx/www:/var/www

  acme.sh:
    container_name: acme
    image: neilpang/acme.sh:3.0.5
    restart: always
    command: daemon
    volumes:
      - /docker/yamls/nginx/acme:/acme.sh
      - /var/run/docker.sock:/var/run/docker.sock
    environment:
      - DP_Id=372080
      - DP_Key=999c4545652d365f74eea9bcdca65b54
      - DEPLOY_DOCKER_CONTAINER_LABEL=sh.acme.autoload=nginx
      - DEPLOY_DOCKER_CONTAINER_RELOAD_CMD="service nginx force-reload"
这样配置了还需要申请证书:
第一次申请
sudo docker exec \
 acme --issue --dns dns_ali \
 -d *.dev.lyjust.top \
 --cert-file	    /acme.sh/domains/*.dev.lyjust.top/cert.cert \
 --key-file         /acme.sh/domains/*.dev.lyjust.top/key.key \
 --ca-file          /acme.sh/domains/*.dev.lyjust.top/ca.cer \
 --fullchain-file   /acme.sh/domains/*.dev.lyjust.top/fullchain.pem
第二次申请
sudo docker exec \
 acme --issue --dns dns_ali \
 -d *.dev.lyjust.top \
 --cert-file	    /acme.sh/domains/*.dev.lyjust.top/cert.cert \
 --key-file         /acme.sh/domains/*.dev.lyjust.top/key.key \
 --ca-file          /acme.sh/domains/*.dev.lyjust.top/ca.cer \
 --fullchain-file   /acme.sh/domains/*.dev.lyjust.top/fullchain.pem \
 --force
注意:ssl on; 这个指令在较旧版本的 Nginx 中使用,它用于明确指示 Nginx 在特定的 server 块中启用 SSL。
在较新的 Nginx 版本中,您可以直接在 listen 指令中包含 ssl 关键字(如 listen 443 ssl;),因此无需单独使用 ssl on;。使用 listen 443 ssl; 会让 Nginx 自动为该 server 块启用 SSL。

