
HCIP-Security2.1 SLB服务器负载均衡&域间域内双向NAT
一,网络拓扑

二,规划说明
2.1二层VLAN规划
| 设备 | 接口 | 接口类型 | 所属VLAN |
| SW1 | GE0/0/1 | Access | 10 |
| GE0/0/2 | Access | 20 | |
| GE0/0/4 | Access | 30 | |
| GE0/0/5 | Access | 10 | |
| GE0/0/6 | Access | 20 | |
| GE0/0/7 | Access | 30 |
2.2IP地址规划
| 设备 | 接口 | 安全区域 | IP地址 |
| FW1 | GE0/0/0 | Local | 192.168.0.10/24 |
| GE1/0/0 | Local | 10.1.1.10/24 | |
| GE1/0/1 | Local | 192.168.1.10/24 | |
| GE1/0/3 | Local | 202.100.1.1/30 | |
| GE1/0/4 | Local | 202.100.1.5/30 | |
| ISP1 | GE0/0/0 | Untrust | 202.100.1.2/30 |
| GE0/0/1 | Untrust | 202.100.1.9/30 | |
| ISP2 | GE0/0/0 | Untrust | 202.100.1.6/30 |
| GE0/0/1 | Untrust | 202.100.1.13/30 | |
| GE0/0/2 | Untrust | 10.1.2.30/24 | |
| Internet | GE0/0/0 | Untrust | 202.100.1.10/30 |
| GE0/0/1 | Untrust | 202.100.1.14/30 | |
| RHEL | Ethernet0/0/0 | Untrust | 10.1.2.2/24 |
| kali_linux | Ethernet0/0/0 | Trust | 10.1.1.2/24 |
| MGMT_PC | Ethernet0/0/0 | Trust | 192.168.0.1/24 |
| Server1 | Ethernet0/0/0 | DMZ | 192.168.1.2/24 |
| Server2 | Ethernet0/0/0 | DMZ | 192.168.1.3/24 |
2.3需求说明
DMZ区域有两台http服务器,配置服务器负载均衡,轮询模式。配置域间双向地址转换,服务器不需要配置网关就可以提供服务。
三,实验配置
3.1路由交换底层
3.1.1 SW1

<Huawei>system-view
[Huawei]sysname SW1
[SW1]user-interface con 0
[SW1-ui-console0]idle-timeout 0 0
[SW1-ui-console0]vlan batch 10 20 30
[SW1]interface GigabitEthernet0/0/1
[SW1-GigabitEthernet0/0/1]port link-type access
[SW1-GigabitEthernet0/0/1]port default vlan 10
[SW1-GigabitEthernet0/0/1]interface GigabitEthernet0/0/2
[SW1-GigabitEthernet0/0/2]port link-type access
[SW1-GigabitEthernet0/0/2]port default vlan 20
[SW1-GigabitEthernet0/0/2]interface GigabitEthernet0/0/4
[SW1-GigabitEthernet0/0/4]port link-type access
[SW1-GigabitEthernet0/0/4]port default vlan 30
[SW1-GigabitEthernet0/0/4]interface GigabitEthernet0/0/5
[SW1-GigabitEthernet0/0/5]port link-type access
[SW1-GigabitEthernet0/0/5]port default vlan 20
[SW1-GigabitEthernet0/0/5]interface GigabitEthernet0/0/6
[SW1-GigabitEthernet0/0/6]port link-type access
[SW1-GigabitEthernet0/0/6]port default vlan 10
[SW1-GigabitEthernet0/0/6]interface GigabitEthernet0/0/7
[SW1-GigabitEthernet0/0/7]port link-type access
[SW1-GigabitEthernet0/0/7]port default vlan 30
3.1.2 FW1
对应的接口配置IP地址,管理口给与访问图形化的权限,其他接口给与ping的权限。划分入对应的安全区域。
<USG6000V1>system-view
Enter system view, return user view with Ctrl+Z.
[USG6000V1]sysname FW1
[FW1]user-interface con 0
[FW1-ui-console0]idle-timeout 0 0
[FW1-ui-console0]interface GigabitEthernet 0/0/0
[FW1-GigabitEthernet0/0/0]ip address 192.168.0.10 24
Error: The address already exists.
[FW1-GigabitEthernet0/0/0]service-manage http permit
[FW1-GigabitEthernet0/0/0]service-manage https permit
[FW1-GigabitEthernet0/0/0]service-manage ping permit
[FW1-GigabitEthernet0/0/0]interface GigabitEthernet 1/0/0
[FW1-GigabitEthernet1/0/0]ip address 10.1.1.10 24
[FW1-GigabitEthernet1/0/0]service-manage ping permit
[FW1-GigabitEthernet1/0/0]interface GigabitEthernet 1/0/1
[FW1-GigabitEthernet1/0/1]ip address 192.168.1.10 24
[FW1-GigabitEthernet1/0/1]service-manage ping permit
[FW1-GigabitEthernet1/0/1]interface GigabitEthernet 1/0/3
[FW1-GigabitEthernet1/0/3]ip address 202.100.1.1 30
[FW1-GigabitEthernet1/0/3]service-manage ping permit
[FW1-GigabitEthernet1/0/3]interface GigabitEthernet 1/0/4
[FW1-GigabitEthernet1/0/4]ip address 202.100.1.5 30
[FW1-GigabitEthernet1/0/4]service-manage ping permit
[FW1-GigabitEthernet1/0/4]firewall zone untrust
[FW1-zone-untrust]add interface GigabitEthernet 1/0/3
[FW1-zone-untrust]add interface GigabitEthernet 1/0/4
[FW1-zone-untrust]firewall zone trust
[FW1-zone-trust]add interface GigabitEthernet 1/0/0
[FW1-zone-trust]add interface GigabitEthernet 1/0/1
3.1.3 ISP1
<Huawei>system-view
[Huawei]sysname ISP1
[ISP1]user-interface con 0
[ISP1-ui-console0]idle-timeout 0 0
[ISP1-ui-console0]interface GigabitEthernet 0/0/0
[ISP1-GigabitEthernet0/0/0]ip address 202.100.1.2 30
[ISP1-GigabitEthernet0/0/0]interface GigabitEthernet 0/0/1
[ISP1-GigabitEthernet0/0/1]ip address 202.100.1.9 30
[ISP1]ip route-static  0.0.0.0 0 202.100.1.10
3.1.4ISP2
<Huawei>system-view
[Huawei]sysname ISP2
[ISP1]user-interface con 0
[ISP1-ui-console0]idle-timeout 0 0
[ISP1-ui-console0]interface GigabitEthernet 0/0/0
[ISP1-GigabitEthernet0/0/0]ip address 202.100.1.6 30
[ISP1-GigabitEthernet0/0/0]GigabitEthernet 0/0/1
[ISP1-GigabitEthernet0/0/1]ip address 202.100.1.13 30
[ISP1-GigabitEthernet0/0/1]ip route-static  0.0.0.0 0 202.100.1.14
3.1.5 Internet
<Huawei>system-view
Enter system view, return user view with Ctrl+Z.
[Huawei]sysname Internet
[Internet]user-interface con 0
[Internet-ui-console0]idle-timeout 0 0
[Internet-ui-console0]interface GigabitEthernet 0/0/0
[Internet-GigabitEthernet0/0/0]ip address 202.100.1.10 30
[Internet-GigabitEthernet0/0/0]interface GigabitEthernet 0/0/1
[Internet-GigabitEthernet0/0/1]ip address 202.100.1.14 30
[Internet-GigabitEthernet0/0/0]ip route-static 202.100.1.0 30 202.100.1.9
[Internet]ip route-static 202.100.1.4 30 202.100.1.13
[Internet]ip route-static 10.1.2.0 24 202.100.1.13
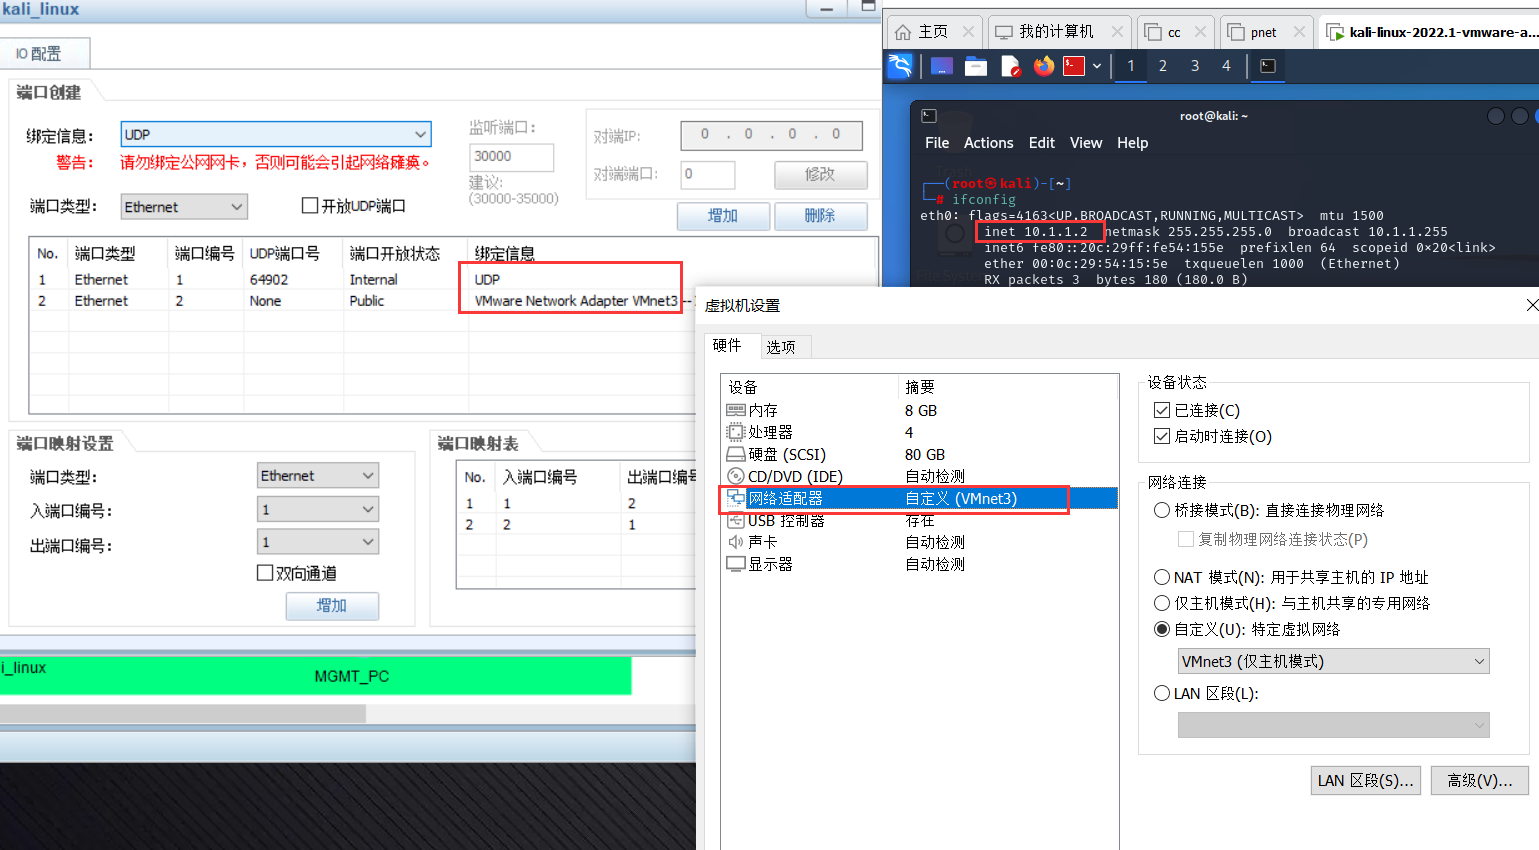
3.1.6kali_linux
ENSP桥接vmware虚拟机,虚拟网卡3。
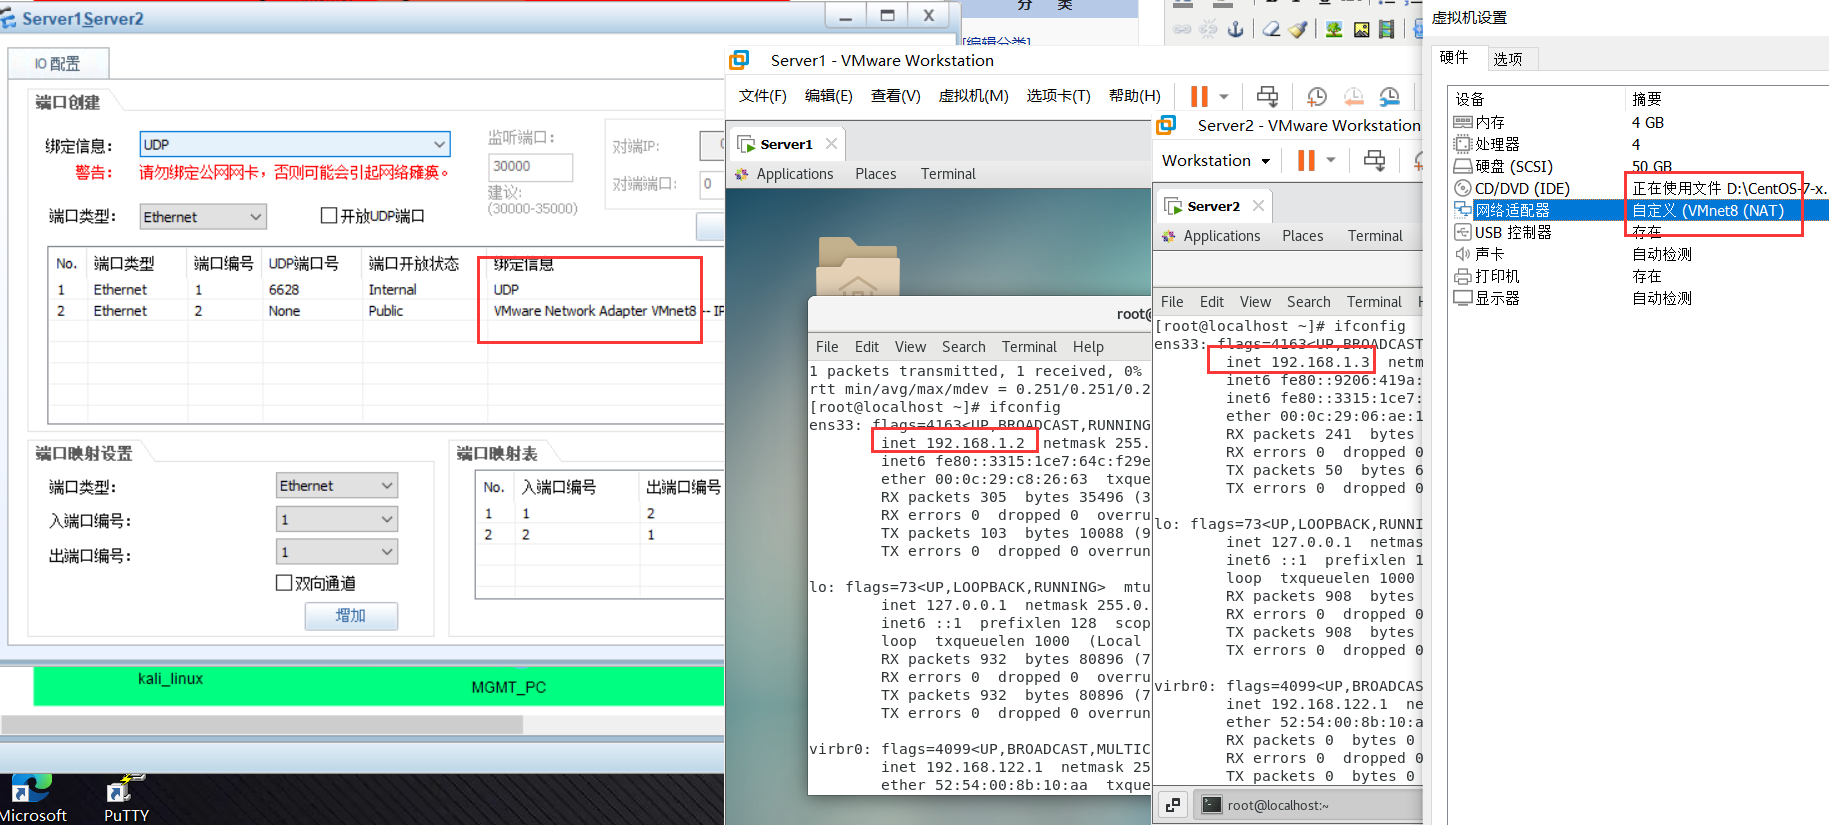
3.1.7 实服务器Server1和Server2
ENSP桥接vmware虚拟机,虚拟网卡8。
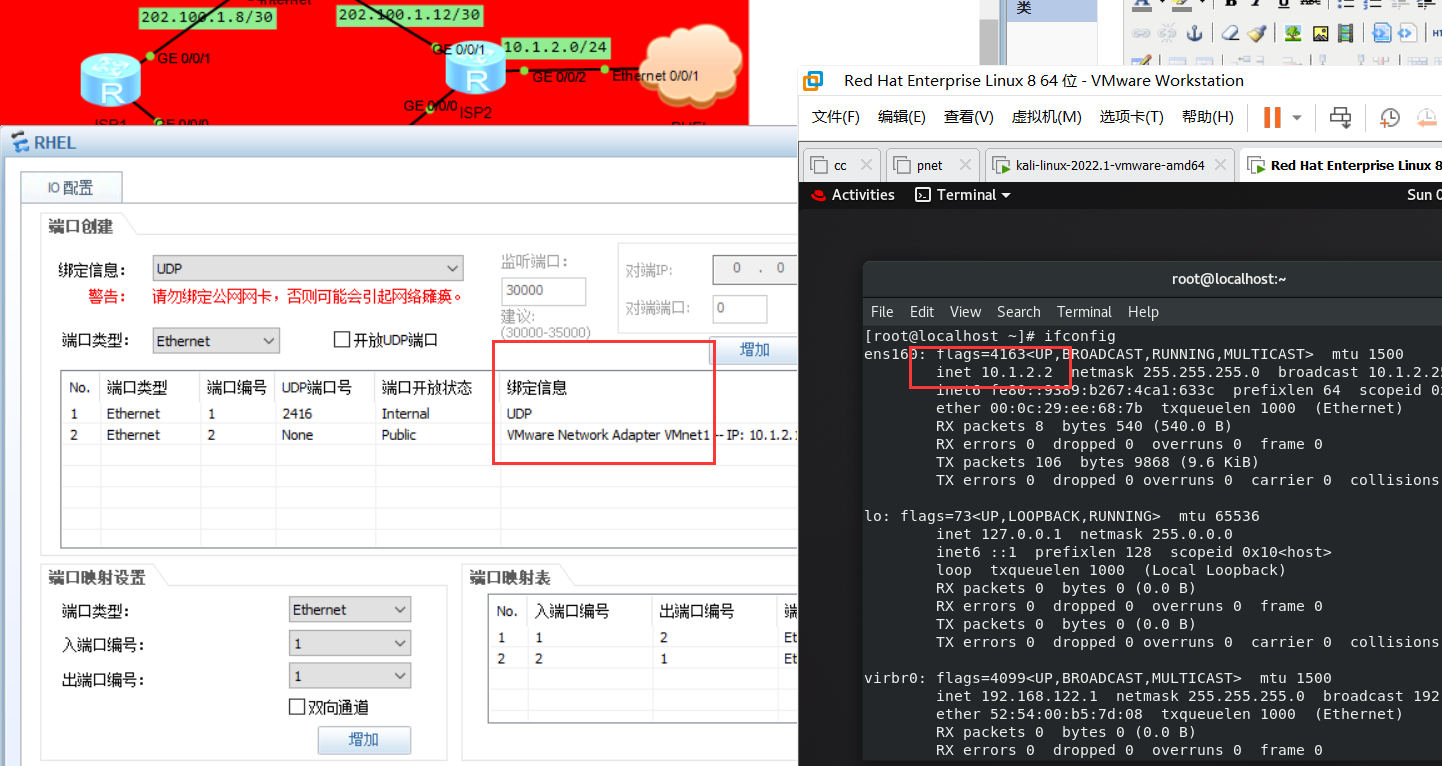
3.1.8 公网中的测试虚机RHEL
ENSP桥接vmware虚拟机,虚拟网卡1
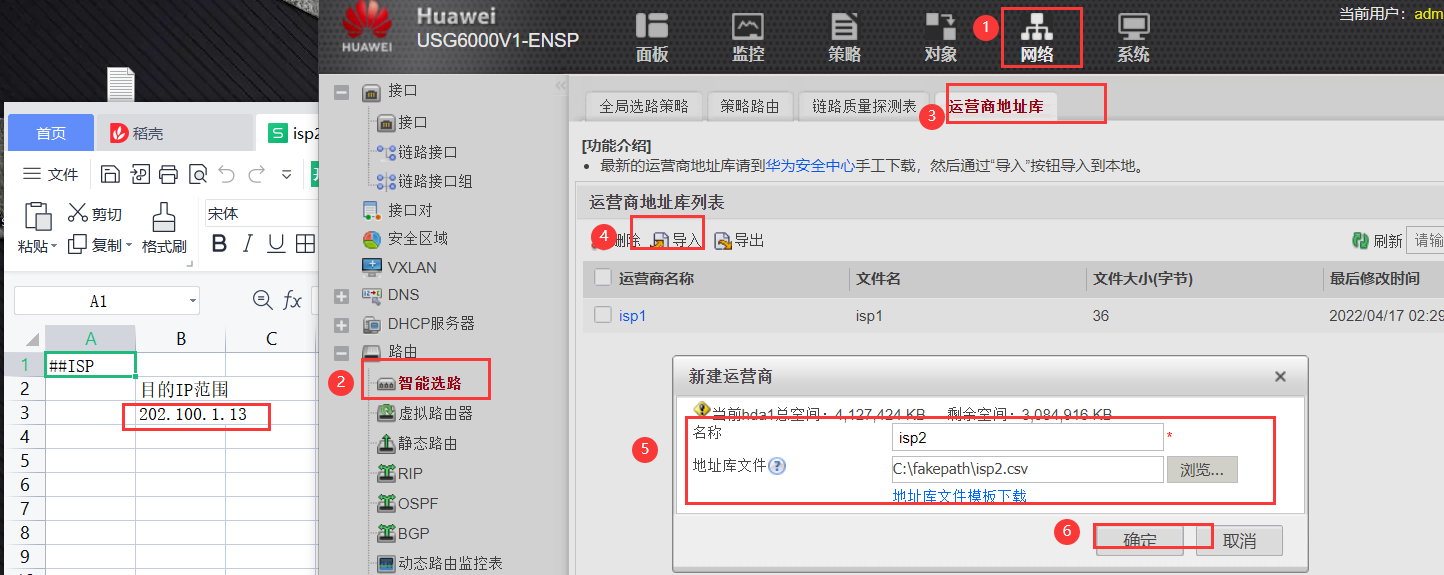
3.2ISP多出口选路
RHEL出接口所属网段在ISP2一侧为最优路径,所以将202.100.1.13写入在运营商地址库中。
①将运营商地址库文件上传到防火墙
②配置健康检查
[FW1]healthcheck enable
[FW1]healthcheck name isp1
[FW1-healthcheck-isp1]destination 202.100.1.2 interface GigabitEthernet 1/0/3 protocol icmp
[FW1-healthcheck-isp1]tx-interval 3
[FW1-healthcheck-isp1]times 2
[FW1-healthcheck-isp1]healthcheck name isp2
[FW1-healthcheck-isp2]destination 202.100.1.6 interface GigabitEthernet 1/0/4 protocol icmp
[FW1-healthcheck-isp2]tx-interval 3
[FW1-healthcheck-isp2]times 2
③配置链路接口,调用运营商地址库和健康检查,开启默认路由
[FW1]link-interface 0 name isp1
[FW1-linkif-0]interface  GigabitEthernet  1/0/3 next-hop  202.100.1.2
[FW1-linkif-0]healthcheck  isp1
[FW1-linkif-0]isp isp1 route enable
[FW1-linkif-0]link-interface 1 name isp2
[FW1-linkif-1]interface GigabitEthernet1/0/4 next-hop 202.100.1.6
[FW1-linkif-1]healthcheck isp2
[FW1-linkif-1]isp isp1 route enable
3.3 NAT(内网主机访问公网)
3.3.1 10.1.1.0/24的NAT
3.3.2 10.1.2.0/24的NAT
使得ISP2后连接的内网PC可以访问公网。
[ISP2]acl number 3000
[ISP2-acl-adv-3000]rule 0 permit ip source 10.1.2.0 0.0.0.255
[ISP2]interface  GigabitEthernet  0/0/1
[ISP2-GigabitEthernet0/0/1]nat outbound  3000
3.4 SLB服务器负载均衡
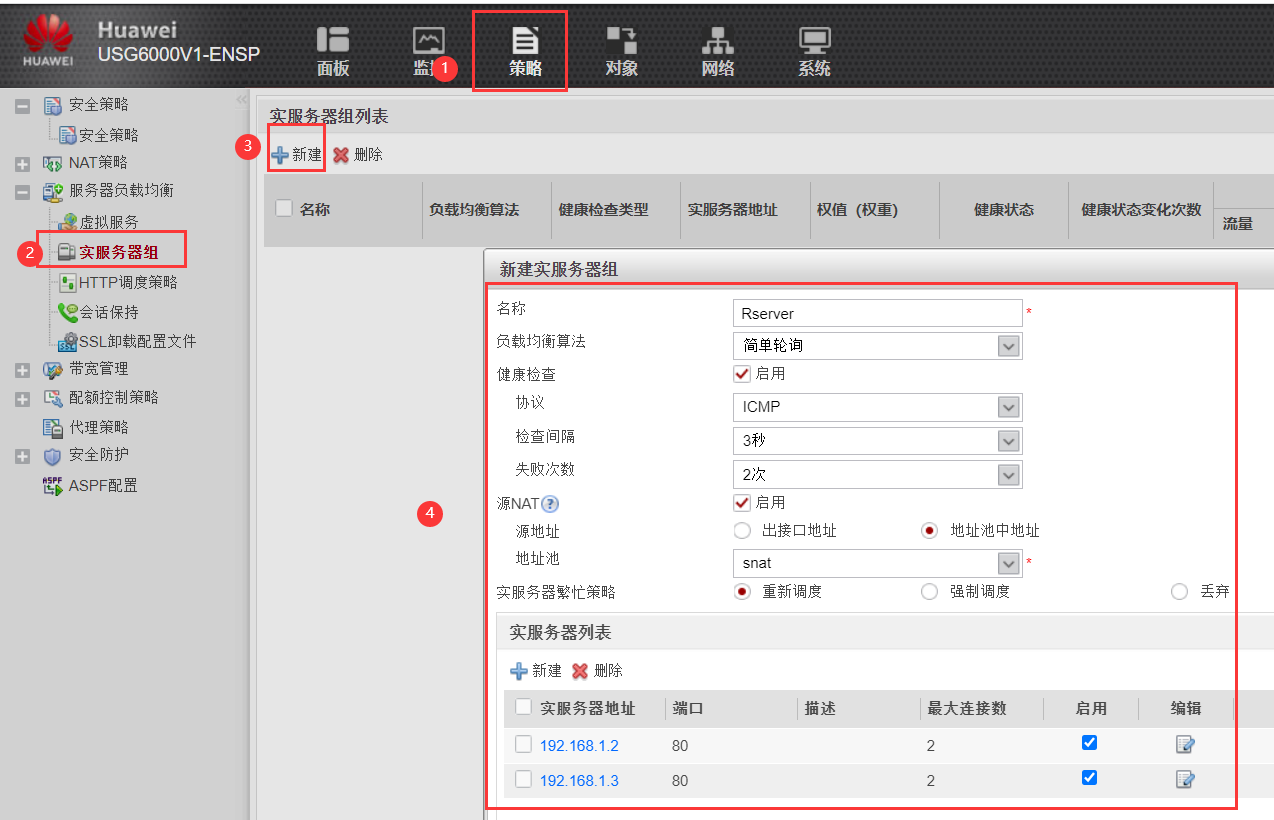
3.4.1配置实服务器组
①CLI
[FW1]nat address-group snat
[FW1-address-group-snat]mode pat
[FW1-address-group-snat]route enable
[FW1-address-group-snat]section 0 192.168.1.4 192.168.1.4
[FW1-address-group-snat] quit
[FW1]slb enable
[FW1]slb
[FW1-slb]group  0 Rserver
[FW1-slb-group-0]health-check type  icmp  tx-interval 3 times 2
[FW1-slb-group-0]rserver  0 rip  192.168.1.2 port  80 max-connection 2
[FW1-slb-group-0]rserver  1 rip  192.168.1.3 port  80 max-connection 2
[FW1-slb-group-0] source-nat address-group snat
[FW1-slb-group-0]action  optimize
②GUI
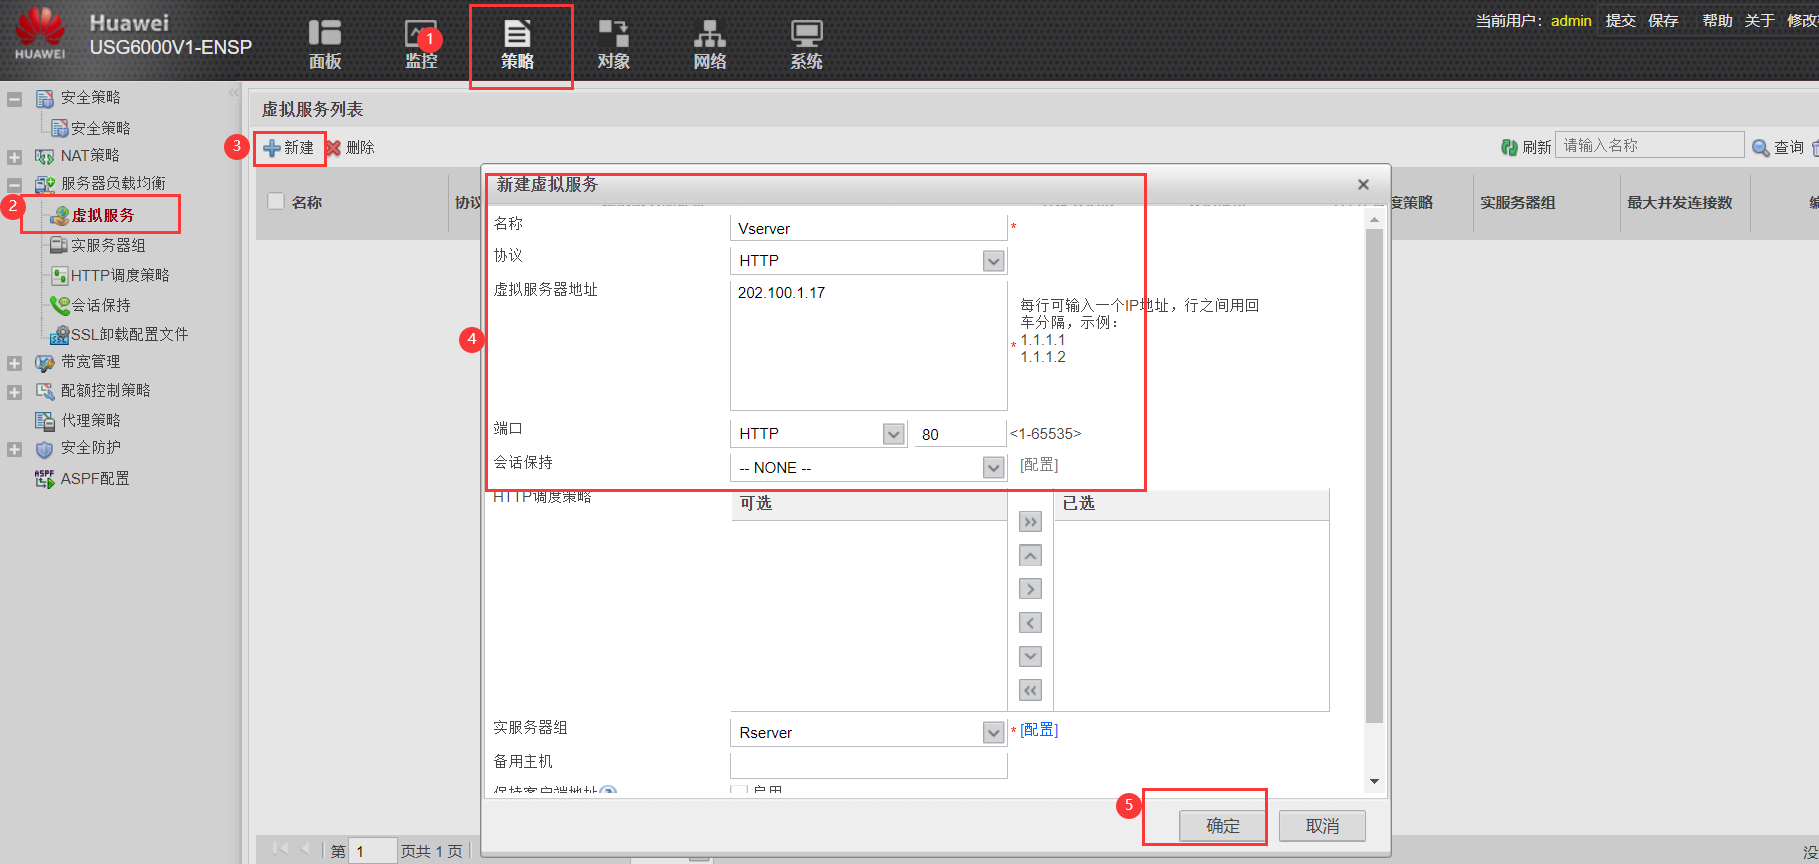
3.4.2配置虚拟服务器组
①CLI
[FW1-slb]slb
[FW1-slb]vserver 0 Vserver
[FW1-slb-vserver-0]vip 0 202.100.1.17
[FW1-slb-vserver-0]protocol http
[FW1-slb-vserver-0]vport 80
[FW1-slb-vserver-0]group Rserver
[FW1-slb-vserver-0]max-connection 4
②GUI
3.5安全策略
[FW1]security-policy
[FW1-policy-security]rule name http
[FW1-policy-security-rule-http]source-zone  untrust
[FW1-policy-security-rule-http]destination-zone dmz
 [FW1-policy-security-rule-http]service http
[FW1-policy-security-rule-http]destination-address 202.100.1.17 32
[FW1-policy-security-rule-http]action  permit
四,实验现象
1.查看虚拟服务器详细信息,虚拟地址是202.100.1.17,服务http,端口80
[FW1]display  slb  vserver verbose
2022-04-17 03:58:52.460
Virtual Server Information(Total 1)
---------------------------------------------------------------------------------------------
  Virtual Server Name      : Vserver
  Virtual Server ID        : 0
  Virtual Server IP        : 202.100.1.17
  Protocol                 : http
  Virtual Server Port      : 80
  Http X-forward Enable    : Disable
  Virtual Server Max-conn  : 4
  Group Name               : Rserver
  Group ID                 : 0
  Virtual Server Statistics
    Current Connection     : 0
    Total Connection       : 18
    Total Flow             : 6.67871_KB
---------------------------------------------------------------------------------------------
2.查看实服务器组详细信息,模式为轮询,健康探测模式是icmp。
[FW1]display  slb  group  verbose
2022-04-17 03:58:57.990
Group Information(Total 1)
------------------------------------------------------------------------------------------------------------
  Group Name               : Rserver
  Group ID                 : 0
  Metric                   : roundrobin
  Source-nat Type          : address-pool
  Health Check Type        : icmp
  Real Server Number       : 2
  Current Connection       : 0
    RserverID  IP Address       Weight  Max-connection  Status               Ratio  TotalSession  CurSession
    0          192.168.1.2      1       2               Active                0.00%            0           0
    1          192.168.1.3      1       2               Active              100.00%           18           0
------------------------------------------------------------------------------------------------------------
①RHEL访问http服务器http://202.100.1.17:8080,查看会话表和Server-map表。
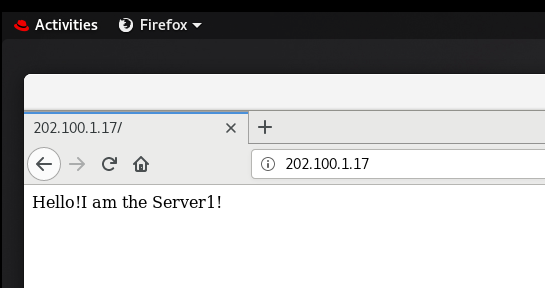
 http  VPN: public --> public  ID: c487f56628d71682b98625b917f
 Zone: untrust --> trust  TTL: 00:20:00  Left: 00:19:58
 Recv Interface: GigabitEthernet1/0/4
 Interface: GigabitEthernet1/0/1  NextHop: 192.168.1.2  MAC: 000c-29c8-2663
 <--packets: 3 bytes: 485 --> packets: 4 bytes: 639
 202.100.1.6:48304[192.168.1.4:2075] --> 202.100.1.17:80[192.168.1.2:80] PolicyName: http
 TCP State: established
[FW1]display  firewall server-map
2022-04-17 06:26:18.490
 Current Total Server-map : 1
 Type: SLB,  ANY -> 202.100.1.17:80[Vserver/0],  Zone:---,  protocol:tcp
 Vpn: public -> public
②将Server1关闭,使用RHEL访问http://202.100.1.17查看现象,查看会话表。
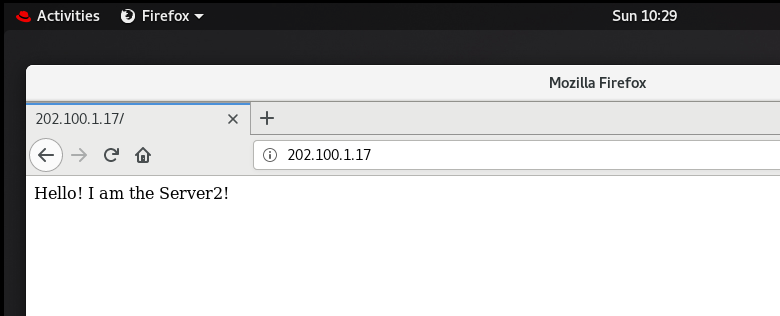
 http  VPN: public --> public  ID: c487f56628d739826a7625b916d
 Zone: untrust --> trust  TTL: 00:20:00  Left: 00:19:59
 Recv Interface: GigabitEthernet1/0/4
 Interface: GigabitEthernet1/0/1  NextHop: 192.168.1.3  MAC: 000c-2906-ae16
 <--packets: 5 bytes: 953 --> packets: 8 bytes: 1,693
 202.100.1.6:48302[192.168.1.4:2093] --> 202.100.1.17:80[192.168.1.3:80] PolicyName: http
 TCP State: established
分类:
HCIP_Security


【推荐】国内首个AI IDE,深度理解中文开发场景,立即下载体验Trae
【推荐】编程新体验,更懂你的AI,立即体验豆包MarsCode编程助手
【推荐】抖音旗下AI助手豆包,你的智能百科全书,全免费不限次数
【推荐】轻量又高性能的 SSH 工具 IShell:AI 加持,快人一步
· 震惊!C++程序真的从main开始吗?99%的程序员都答错了
· 别再用vector<bool>了!Google高级工程师:这可能是STL最大的设计失误
· 单元测试从入门到精通
· 【硬核科普】Trae如何「偷看」你的代码?零基础破解AI编程运行原理
· 上周热点回顾(3.3-3.9)