前端入职学习笔记-第二周第三天(vue组件传值:Bus传值、路由传值、Vuex传值)
Bus总线
1 定义Bus总线
在main.js中定义Bus总线
然后将Bus添加到new Vue中的data里面
Bus也可以定义在assets文件夹下的js文件中,需要用到时可以引入该文件,但是在webpack打包时,该文件会分解成多个Bus,从而报错,该方法不推荐使用。
2 传值
调用$root下的Bus,使用$emit函数在需要传值的组件中进行传值,且设置触发事件的字段"city"
3 接收值
调用$root下的Bus,使用$on函数在需要接收值的组件中响应之前的"city"字段,从而在回调函数中接收传过来的值并进行后续操作。
注意:回调函数最好使用箭头函数,不然this的指向会变向。
Bus传值可能会出现组件销毁时,再次创建组件,之前的响应会被多次触发,可以在周期函数beforeDestroy中用this.$root.Bus.$off()来消除
路由传值
在需要传值的组件的router-link中设置需要传的值params
index.js中可以把路由附加上传的值hid
在需要接受值的组件中调用传过来的值hid
Vuex传值
安装vuex
npm install vuex --save
1.在src目录下新建store文件夹并在该文件夹下新建index.js文件。 在 store/index.js写入:

import Vue from 'vue'
import Vuex from 'vuex'

Vue.use(Vuex)

const store = new Vuex.Store({
  strict:true,  // 开启严格模式  确保state 中的数据只能 mutations 修改
  state:{
    count:0
  }
})

export default store;
在main.js中引入:
import store from './store'
new Vue({
  el: '#app',
  router,
  store,
  components: { App },
  template: '<App/>'
})
此时可以在组件中使用 this.$store.state.count 获取store中state的值。如:
// 在组件的computed中使用
  computed:{
     count(){
      return this.$store.state.count;
     }
  }
<template>
  <div class="hello">
    <h2>{{count}}</h2>
  </div>
</template>

<script>
export default {
  name: 'HelloWorld',
  computed:{
     count(){
       return this.$store.state.count;
     }
  }
}
</script>
很多时候咱们要对state里的值进行操作,在vuex提供了一个方法mutations
mutations用法(使用mutations可以修改state的值)
在store/index.js中写入:
//
...
  state:{
    count:0
  },
  mutations:{ // 更改数据的方法
    add(state){
      state.count++
    },
    //提交载荷用法
//     add(state,n){
//      state.count += n
//    },
    sub(state){
      state.count--
    }
  }
...
//
在组件中使用mutations中对应的方法
<template>
  <div class="hello">
    <button @click="add">+</button>
    <h2>{{count}}</h2>
    <button @click="sub">-</button>
  </div>
</template>

<script>
export default {
  name: 'HelloWorld',
  computed:{
     count(){
       return this.$store.state.count;
     }
  },
    methods:{
    add(){
      this.$store.commit('add');
    },

    //提交载荷用法
   // add(){
   //    this.$store.commit('add',10);
   // },

   //对象风格的提交方式
   //   store.commit({
   //     type: 'add',
   //     n: 10
   //     })

    sub(){
      this.$store.commit('sub');
    }
  }
}
</script>
此时就可以对count进行修改了。
补充1:mutation接收单个参数和多个参数
利用$store.commit 里面 写参数相当于 mutation的函数名字
在组件里面:
    第一种方式: this.$store.commit("addIncrement",{name:'stark',age:18,n:5})
    第二种方式:
    this.$store.commit({
        type:"addIncrement",
        n:5,
        age:18,
        name:'stark.wang'
    })
在vuex里面接收:接收第二个参数相当于前面传过来的参数,如果多个这个就是对象,如果是一个参数,这个第二个参数payload就是前面的参数,例如
let store = new Vuex.Store({
    state: {
        num: 100
    },
    mutations: {
        // 任何时候改变state的状态都通过提交 mutation 来改变
        // 里面可以定义多个函数,当触发这个函数就会改变state状态
        addIncrement(state, stark) {
            console.log(stark);
            // 接收一个state作为参数, 相当于上面的state
             // 在vuex里面接收:接收第二个参数相当于前面传过来的参数,如果多个这个就是对象,如果是一个参数,这个第二个参数payload就是前面的参数。
            // mutations设计原则是同步的
            //state.num += stark;
            state.num += stark.n;


        },
        minIncrement(state) {
            state.num -= 5;
        }
    }

})
补充2:遇到在组件input中直接修改state中数据的问题
在组件中写入
<div class="form-control amis-control">
  <input name="name" placeholder="" type="text" autocomplete="off" :value="activeFormData.title" @input="updataMessage($event,'t1.title')">
</div>

<script>
...
computed:{
  activeFormData(){
    return this.$store.state.formData.t1
  }
},
methods:{
  updataMessage(e,dataposition){
    let newposition = dataposition.split('.);
    this.$store.commit('updataMessage',{newval:e.target.value,curposition:newposition})
  }
}
</script>
在store.js中写入
mutations:{
  ...
  updataMessage(state, stark) {
      if (stark.curposition.length == 2) {
        state.formData[stark.curposition[0]][stark.curposition[1]] = stark.newval
      } else if (stark.curposition.length == 3) {
        state.formData[stark.curposition[0]][stark.curposition[1]][stark.curposition[2]] = stark.newval
      }

    },
}
当你想异步操作的时候,由于mutation必须是同步的这一点,此时不能采用mutation对state 进行修改。action派上用场了,action就是一个函数集合,在里面怎么操作都可以,只要最后触发mutation 就可以了。
注解mutation不能异步操作的原因:

 mutations: {
   add (state) {
     api.callAsyncMethod(() => {
    state.count++
   })
  }
}
Action 用法
在store/index.js中写入
  mutations:{ // 更改数据的方法
    add(state){
      state.count++
    },
    sub(state){
      state.count--
    }
  },
++++
  actions:{
    addAction(context){  // context 与 store 实例具有相同方法和属性(但不是store 实例)
      setTimeout(()=>{
        context.commit('add');
      },1000)
    }
  }
++++
组件中使用getters里对应的方法:
<template>
  <div class="hello">
    <button @click="add">+</button>
    ++++
    <button @click="add_action">action +</button>
    ++++
    <h2>{{count}}</h2>
    <button @click="sub">-</button>
    <div>
      test: {{doneTodos[0].text}} <br>
      length: {{doneTodosLength}}
    </div>
  </div>
</template>
export default {
  methods:{
    add(){
      this.$store.commit('add');
      // console.log(this);
    },
    sub(){
      this.$store.commit('sub');
    },
    ++++
    add_action(){
      this.$store.dispatch('addAction');
    }
    ++++
  }
}
实际异步操作
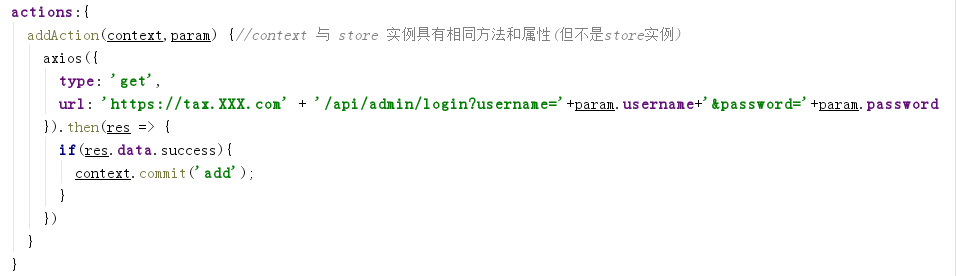
组件methods中:
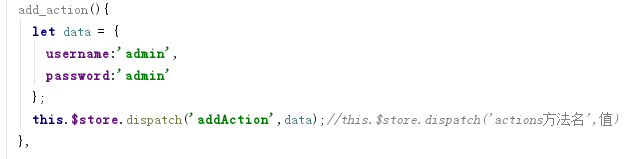
在store/index.js中引入axios :
import axios from 'axios'
看到这里有没有想过当我们使用state中某一个数据时,我们只想用该数据中符合条件的数据。比如:
state:{
    count:0,
    todos: [
      { id: 1, text: 'text1--true', done: true },
      { id: 2, text: 'text2--false', done: false }
    ]
  }
可能会有以下两种方案:
1.每个在组件中首先获取todos,然后使用filter方法过滤;
2.写一个公共函数在每个组件中调用以下;
如果用到todos中done为true的组件很多,这两种方法都是很不理想的。Vuex为此为我们引入了一个方法Getter。
Getter 用法
官方解释:Vuex 允许我们在 store 中定义“getter”(可以认为是 store 的计算属性)。就像计算属性一样,getter 的返回值会根据它的依赖被缓存起来,且只有当它的依赖值发生了改变才会被重新计算。
  mutations:{ // 更改数据的方法
    add(state){
      state.count++
    },
    sub(state){
      state.count--
    }
  },
  +++
  getters:{  // 用法类似组件中的 computed, 可以认为是store的计算属性
    doneTodos:state => { // Getter 接受 state 作为其第一个参数:
      return state.todos.filter(todo => todo.done)  // -> [{ id: 1, text: 'text1--true', done: true }]
    },
    // Getter 也可以接受其他 getter 作为第二个参数
    doneTodosLength:(state,getters) => {
      return getters.doneTodos.length // -> 1
    },
  +++
  }
在组件中使用getter对应的方法:
<template>
  <div class="hello">

    <button @click="add">+</button>
    <h2>{{count}}</h2>
    <button @click="sub">-</button>

+++
    <div>
      test: {{doneTodos[0].text}} <br>
      length: {{doneTodosLength}}
    </div>
+++
  </div>
</template>
<script>
export default {
  //...
    computed:{
    +++
        doneTodos(){
          return this.$store.getters.doneTodos // -> [{ id: 1, text: 'text1--true', done: true }]
        },
        doneTodosLength(){
          return this.$store.getters.doneTodosLength // -> 1
        }
    +++
  }
}
</script>
详细可参考:vue组件通信传值——Vuex
Vue使用webpack打包步骤:
修改请求静态资源的路径
打开config下的index.js文件,修改assetsPublicPath的值,从‘/’改为‘./’。即从根路径改为相对路径。
build: {
// Template for index.html
index: path.resolve(__dirname, '../dist/index.html'),
// Paths
assetsRoot: path.resolve(__dirname, '../dist'),
assetsSubDirectory: 'static',
assetsPublicPath: './',
}
修改本地图片的路径
打开build下的utils.js文件,增加 publicPath:'../../'
if (options.extract) {
return ExtractTextPlugin.extract({
use: loaders,
fallback: 'vue-style-loader',
publicPath:'../../'
})
} else {
return ['vue-style-loader'].concat(loaders)
}
在终端运行npm run build。

 浙公网安备 33010602011771号