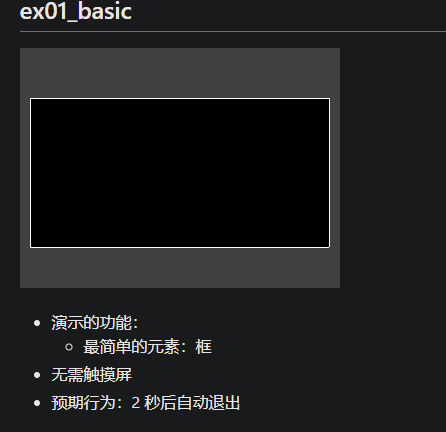
M5Stack使用GUIslice库1 官方例程1&2,图文框简单的按键事件回调
Guislice 比lvgl体积小很多,这是它的架构
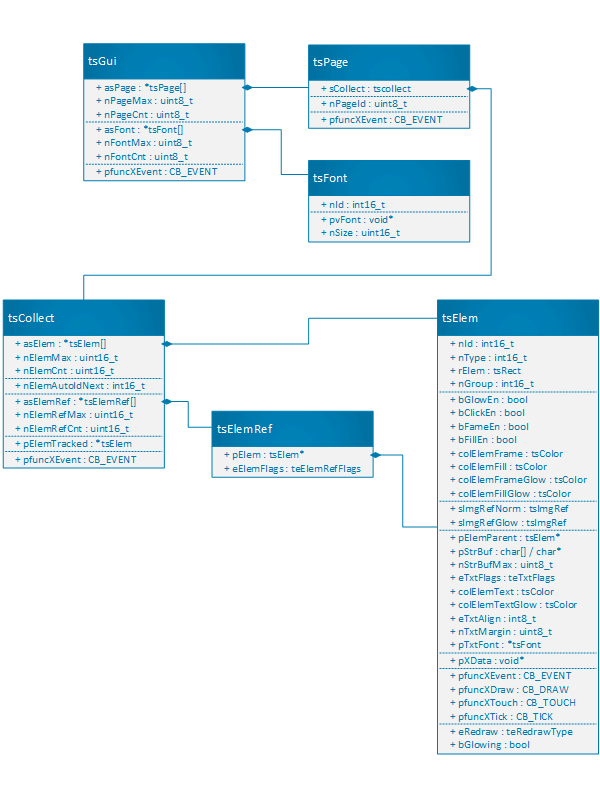

可以看出是经典的gui层次架构
库里自带了例程 示例库 ·ImpulseAdventure/GUIslice Wiki ·GitHub
例程1很简单
我翻译了下代码注释


//
// GUIslice Library Examples
// - Calvin Hass
// - https://www.impulseadventure.com/elec/guislice-gui.html
// - https://github.com/ImpulseAdventure/GUIslice
// - Example 01 (Arduino):
//   - Display a box
//   - No touchscreen required
//
// ARDUINO NOTES:
// - GUIslice_config.h must be edited to match the pinout connections
//   between the Arduino CPU and the display controller (see ADAGFX_PIN_*).
//
//
// GUIslice 库示例
// - 卡尔文哈斯
// - https://www.impulseadventure.com/elec/guislice-gui.html
// - https://github.com/ImpulseAdventure/GUIslice
// - 示例 01 (Arduino):
// - 显示一个框
// - 不需要触摸屏
//
// ARDUINO 注释:
// - 必须编辑 GUIslice_config.h 以匹配引脚连接
// 在 Arduino CPU 和显示控制器之间(参见 ADAGFX_PIN_*)。
//

#include "GUIslice.h"
#include "GUIslice_drv.h"

// Enumerations for pages, elements, fonts, images页面、元素、字体、图像的枚举
enum {E_PG_MAIN};
enum {E_ELEM_BOX};

// Instantiate the GUI实例化 GUI
#define MAX_PAGE            1
#define MAX_ELEM_PG_MAIN    1

gslc_tsGui                  m_gui;
gslc_tsDriver               m_drv;
gslc_tsPage                 m_asPage[MAX_PAGE];
gslc_tsElem                 m_asPageElem[MAX_ELEM_PG_MAIN];
gslc_tsElemRef              m_asPageElemRef[MAX_ELEM_PG_MAIN];

// Define debug message function定义调试消息函数
static int16_t DebugOut(char ch) { Serial.write(ch); return 0; }

void setup()
{
  gslc_tsElemRef*  pElemRef = NULL;

  // Initialize debug output
  Serial.begin(9600);
  gslc_InitDebug(&DebugOut);
  //delay(1000);  // NOTE: Some devices require a delay after Serial.begin() before serial port can be used

  // Initialize
  if (!gslc_Init(&m_gui,&m_drv,m_asPage,MAX_PAGE,NULL,0)) { return; }

  gslc_PageAdd(&m_gui,E_PG_MAIN,m_asPageElem,MAX_ELEM_PG_MAIN,m_asPageElemRef,MAX_ELEM_PG_MAIN);

  // Background flat color背景平面颜色
  gslc_SetBkgndColor(&m_gui,GSLC_COL_GRAY_DK2);

  // Create page elements创建页面元素
  pElemRef = gslc_ElemCreateBox(&m_gui,E_ELEM_BOX,E_PG_MAIN,(gslc_tsRect){10,50,300,150});
  gslc_ElemSetCol(&m_gui,pElemRef,GSLC_COL_WHITE,GSLC_COL_BLACK,GSLC_COL_BLACK);

  // Start up display on main page主页面启动显示
  gslc_SetPageCur(&m_gui,E_PG_MAIN);
}

void loop()
{
  // Periodically call GUIslice update function定期调用 GUIslice 更新函数
  gslc_Update(&m_gui);

  // Main code here...
  // In a real program, we would detect button presses and take action.
  // For this simple demo, we will terminate after 2 seconds.
  delay(2000);

  // Close down display关闭显示
  gslc_Quit(&m_gui);

  // Since we can't really exit an Arduino program, we're just going to
  // enter an infinite loop here.
  while (1) { }
}
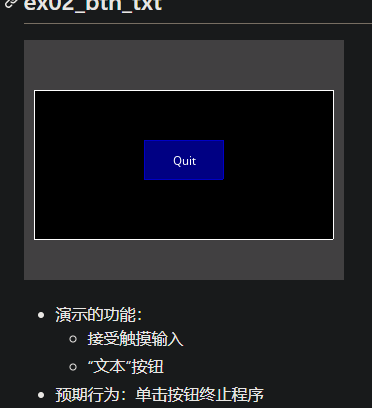
例子2是一个按键回调测试 点击quit按钮会串口发送字符串 本身的例子是针对触屏的 为了适配m5s的按键 需要添加针脚到事件的映射
需要加两段话
// 定义输入映射
#define MAX_INPUT_MAP       5
gslc_tsInputMap             m_asInputMap[MAX_INPUT_MAP];
 // Create the GUI input mapping (pin event to GUI action)  创建 GUI 输入映射(将针脚事件映射到 GUI 操作)
  gslc_InitInputMap(&m_gui, m_asInputMap, MAX_INPUT_MAP);
  gslc_InputMapAdd(&m_gui, GSLC_INPUT_PIN_DEASSERT, GSLC_PIN_BTN_A,      GSLC_ACTION_FOCUS_PREV, 0);
  gslc_InputMapAdd(&m_gui, GSLC_INPUT_PIN_DEASSERT, GSLC_PIN_BTN_B,      GSLC_ACTION_SELECT, 0);
  gslc_InputMapAdd(&m_gui, GSLC_INPUT_PIN_DEASSERT, GSLC_PIN_BTN_C,      GSLC_ACTION_FOCUS_NEXT, 0);
  gslc_InputMapAdd(&m_gui, GSLC_INPUT_PIN_ASSERT,   GSLC_PIN_BTN_A_LONG, GSLC_ACTION_SET_REL, -10);
  gslc_InputMapAdd(&m_gui, GSLC_INPUT_PIN_ASSERT,   GSLC_PIN_BTN_C_LONG, GSLC_ACTION_SET_REL, +10);
完整代码
#include <Arduino.h>
//
// GUIslice Library Examples
// - Calvin Hass
// - https://www.impulseadventure.com/elec/guislice-gui.html
// - https://github.com/ImpulseAdventure/GUIslice
// - Example 02 (Arduino):
//   - Accept touch input, text button
//   - Expected behavior: Clicking on button outputs a message
//     to the serial monitor
//   - NOTE: This is the simple version of the example without
//     optimizing for memory consumption. A "minimal"
//     version is located in the "arduino_min" folder which includes
//     FLASH memory optimization for reduced memory devices.
//

// ARDUINO NOTES:
// - GUIslice_config.h must be edited to match the pinout connections
//   between the Arduino CPU and the display controller (see ADAGFX_PIN_*).
//
// GUIslice 库示例
// - 卡尔文哈斯
// - https://www.impulseadventure.com/elec/guislice-gui.html
// - https://github.com/ImpulseAdventure/GUIslice
// - 示例 02(Arduino):
// - 接受触摸输入,文本按钮
// - 预期行为:单击按钮输出消息
//到串口监视器
// - 注意:这是示例的简单版本,没有
// 优化内存消耗。 一个“最小”
// 版本位于“arduino_min”文件夹中,其中包括
// 闪存优化减少内存设备。
//

// ARDUINO 注释:
// - 必须编辑 GUIslice_config.h 以匹配引脚连接
//

#include "GUIslice.h"
#include "GUIslice_drv.h"

// Defines for resources资源定义

// Enumerations for pages, elements, fonts, images页面、元素、字体、图像的枚举
enum {E_PG_MAIN};
enum {E_ELEM_BOX,E_ELEM_BTN_QUIT};
enum {E_FONT_BTN,MAX_FONT}; // Use separate enum for fonts, MAX_FONT at end对字体使用单独的枚举,最后使用 MAX_FONT

bool    m_bQuit = false;

// Instantiate the GUI
#define MAX_PAGE            1
#define MAX_ELEM_PG_MAIN    2

gslc_tsGui                  m_gui;
gslc_tsDriver               m_drv;
gslc_tsFont                 m_asFont[MAX_FONT];
gslc_tsPage                 m_asPage[MAX_PAGE];
gslc_tsElem                 m_asPageElem[MAX_ELEM_PG_MAIN];
gslc_tsElemRef              m_asPageElemRef[MAX_ELEM_PG_MAIN];
// 定义输入映射
#define MAX_INPUT_MAP       5
gslc_tsInputMap             m_asInputMap[MAX_INPUT_MAP];

// Define debug message function
static int16_t DebugOut(char ch) { Serial.write(ch); return 0; }

// Button callbacks
// - This function gets called when the button is pressed
// 按钮回调
// - 按下按钮时调用此函数
bool CbBtnQuit(void* pvGui,void *pvElemRef,gslc_teTouch eTouch,int16_t nX,int16_t nY)
{
  // Determine what type of event occurred on the button
  // - In this case we're just looking for the user releasing
  //   a touch over the button.
  // 判断按钮上发生了什么类型的事件
   // - 在这种情况下,我们只是在寻找用户释放
   // 触摸按钮。
  if (eTouch == GSLC_TOUCH_UP_IN) {
    // Output a message when the button is pressed按下按钮时输出消息
    Serial.println("Quit button pressed退出");
    // Set a variable flag that we can use elsewhere设置一个我们可以在其他地方使用的变量标志
    m_bQuit = true;
  }
  return true;
}

void setup()
{
  gslc_tsElemRef* pElemRef = NULL;

  // Initialize debug output初始化调试输出   很奇怪实际的波特率依旧是115200
  Serial.begin(9600);
  gslc_InitDebug(&DebugOut);
  //delay(1000);  // NOTE: Some devices require a delay after Serial.begin() before serial port can be used

  // Initialize初始化
  if (!gslc_Init(&m_gui,&m_drv,m_asPage,MAX_PAGE,m_asFont,MAX_FONT)) { return; }
    // Create the GUI input mapping (pin event to GUI action)  创建 GUI 输入映射(将针脚事件映射到 GUI 操作)
  gslc_InitInputMap(&m_gui, m_asInputMap, MAX_INPUT_MAP);
  gslc_InputMapAdd(&m_gui, GSLC_INPUT_PIN_DEASSERT, GSLC_PIN_BTN_A,      GSLC_ACTION_FOCUS_PREV, 0);
  gslc_InputMapAdd(&m_gui, GSLC_INPUT_PIN_DEASSERT, GSLC_PIN_BTN_B,      GSLC_ACTION_SELECT, 0);
  gslc_InputMapAdd(&m_gui, GSLC_INPUT_PIN_DEASSERT, GSLC_PIN_BTN_C,      GSLC_ACTION_FOCUS_NEXT, 0);
  gslc_InputMapAdd(&m_gui, GSLC_INPUT_PIN_ASSERT,   GSLC_PIN_BTN_A_LONG, GSLC_ACTION_SET_REL, -10);
  gslc_InputMapAdd(&m_gui, GSLC_INPUT_PIN_ASSERT,   GSLC_PIN_BTN_C_LONG, GSLC_ACTION_SET_REL, +10);

  // Load Fonts 加载字体
  if (!gslc_FontSet(&m_gui,E_FONT_BTN,GSLC_FONTREF_PTR,NULL,1)) { return; }

  // -----------------------------------
  // Create page elements 创建页面对象
  gslc_PageAdd(&m_gui,E_PG_MAIN,m_asPageElem,MAX_ELEM_PG_MAIN,m_asPageElemRef,MAX_ELEM_PG_MAIN);

  // Background flat color 背景色
  gslc_SetBkgndColor(&m_gui,GSLC_COL_GRAY_DK2);

  // Create background box 背景框
  pElemRef = gslc_ElemCreateBox(&m_gui,E_ELEM_BOX,E_PG_MAIN,(gslc_tsRect){10,50,300,150});
  gslc_ElemSetCol(&m_gui,pElemRef,GSLC_COL_WHITE,GSLC_COL_BLACK,GSLC_COL_BLACK);

  // Create Quit button with text label 创建图文框
  pElemRef = gslc_ElemCreateBtnTxt(&m_gui,E_ELEM_BTN_QUIT,E_PG_MAIN,
    (gslc_tsRect){120,100,80,40},(char*)"Quit",0,E_FONT_BTN,&CbBtnQuit);

  // -----------------------------------
  // Start up display on main page 显示主页
  gslc_SetPageCur(&m_gui,E_PG_MAIN);

  m_bQuit = false;
}

void loop()
{
  // Periodically call GUIslice update function 定期更新
  gslc_Update(&m_gui);

  // In most programs, we would detect the button press and take an
  // action. In this simplest of examples, the "Quit" button callback
  // just outputs a message to the serial monitor when pressed and
  // sets the variable m_bQuit to true but the main loop continues to run.
  // 在大多数程序中,我们会检测按钮按下并采取
   // 行动。 在这个最简单的示例中,“退出”按钮回调
   // 按下时只向串行监视器输出一条消息
   // 将变量 m_bQuit 设置为 true,但主循环继续运行。
}

 浙公网安备 33010602011771号