M5Stack使用GUIslice库
主页
![]()
![]()
https://github.com/ImpulseAdventure/GUIslice 文档写的很好,用谷歌翻译基本就能看懂, 支持linux,arduino,m5stack tft-espi 基本开源的嵌入式平台都支持
这里我实验用m5stack gray 有三个实体按键 主控esp32 屏幕ili9341
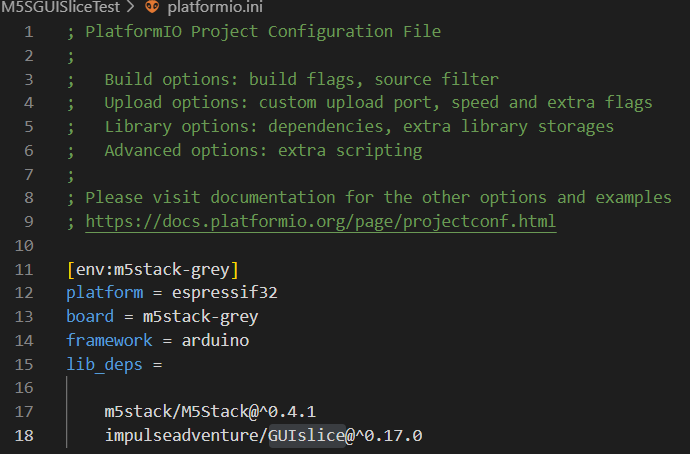
在vscode里pio内新建一个工程 平台 esp32 开发板 m5stack-grey 架构arduino 引入两个库 M5Stack GUIslice(因为网的原因引入github上得库有时很很慢,需要等)
如图
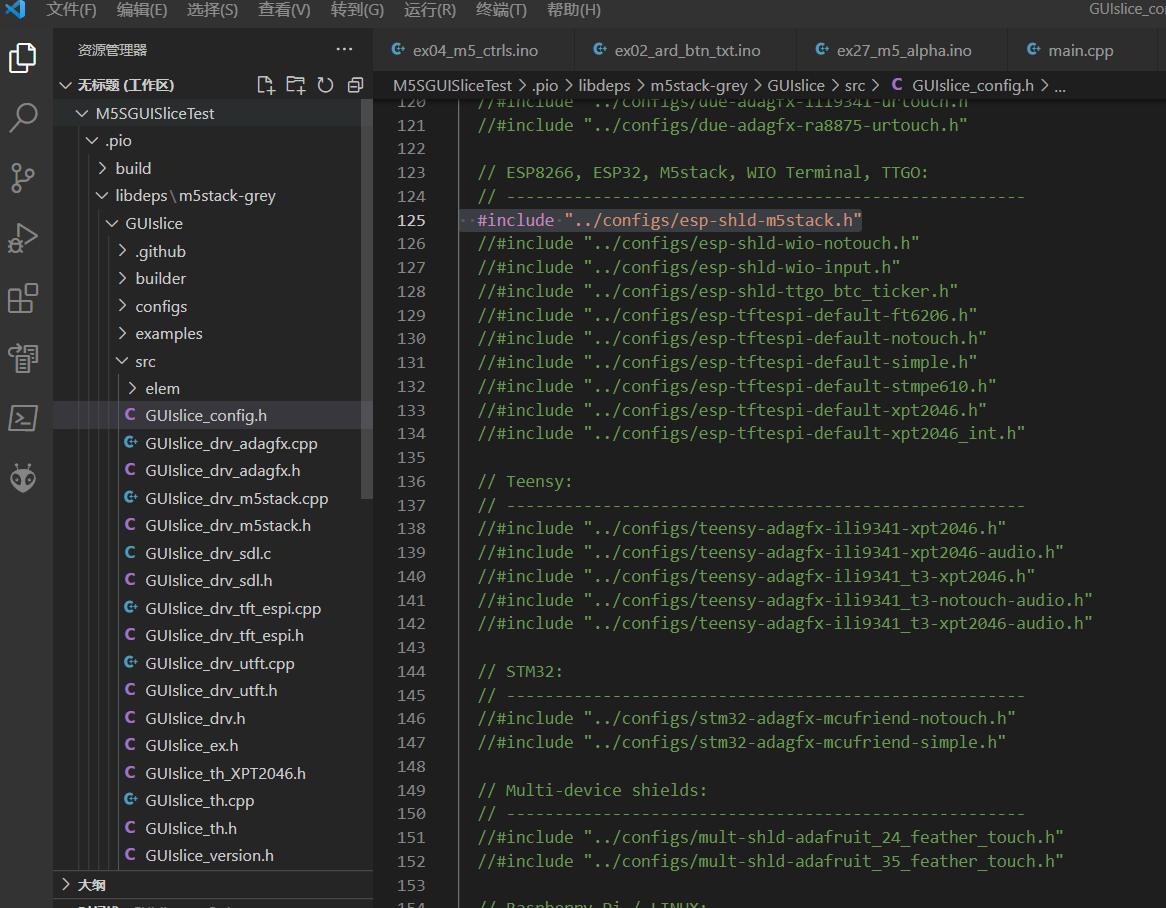
在库文件.pio\libdeps\m5stack-grey\GUIslice\src\GUIslice_config.h 中反注释这一行
#include "../configs/esp-shld-m5stack.h" 这样就给GUIslice配置了设备驱动
如图![]()
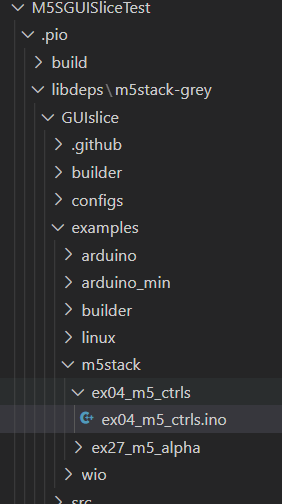
选择一个例子复制到main.cpp里,记得加入 #include <arduino.h> 这里选择 ex04_m5_ctrls
内容
#include <Arduino.h>
//
// GUIslice Library Examples
// - Calvin Hass
// - https://www.impulseadventure.com/elec/guislice-gui.html
// - https://github.com/ImpulseAdventure/GUIslice
// - Example 04 (M5stack): Dynamic content with integrated button control
//   - Same as Example 04 (Arduino), except adds GPIO pin input control
//     IMPORTANT: See notes under Button Control
//   - Demonstrates push buttons, checkboxes and slider controls
//   - NOTE: This is the simple version of the example without
//     optimizing for memory consumption. Therefore, it may not
//     run on Arduino devices with limited memory. A "minimal"
//     version is located in the "arduino_min" folder which includes
//     FLASH memory optimization for reduced memory devices.
//
// ARDUINO NOTES:
// - GUIslice_config.h must be edited to match the pinout connections
//   between the Arduino CPU and the display controller (see ADAGFX_PIN_*).
//
//GUIslice 库示例
// - 卡尔文哈斯
// - https://www.impulseadventure.com/elec/guislice-gui.html
// - https://github.com/ImpulseAdventure/GUIslice
// - 示例 04 (M5stack): 带有集成按钮控制的动态内容
// - 与示例 04 (Arduino) 相同,除了添加 GPIO 引脚输入控制
// 重要:请参阅按钮控件下的注释
// - 演示按钮、复选框和滑块控件
// - 注意:这是示例的简单版本,没有
// 优化内存消耗。 因此,它可能不会
// 在内存有限的 Arduino 设备上运行。 一个“最小”
// 版本位于“arduino_min”文件夹中,其中包括
// 闪存优化减少内存设备。
//
// ARDUINO 注释:
// - 必须编辑 GUIslice_config.h 以匹配引脚连接
// 在 Arduino CPU 和显示控制器之间(参见 ADAGFX_PIN_*)。
//

#include "GUIslice.h"
#include "GUIslice_drv.h"

// Include any extended elements 包括任何扩展元素
#include "elem/XCheckbox.h"
#include "elem/XProgress.h"
#include "elem/XSlider.h"

// Ensure config settings are correct for the sketch 确保配置设置对于草图是正确的
#if !defined(DRV_DISP_M5STACK) || !defined(DRV_TOUCH_M5STACK) || !(GSLC_FEATURE_INPUT)
  #warning "This sketch requires config: #define DRV_TOUCH_M5TACK, #define DRV_TOUCH_M5STACK, #define GSLC_FEATURE_INPUT 1"
#endif

// Defines for resources

// Enumerations for pages, elements, fonts, images  页面、元素、字体、图像的枚举
enum {E_PG_MAIN};
enum {E_ELEM_BOX,E_ELEM_BTN_QUIT,E_ELEM_TXT_COUNT,E_ELEM_PROGRESS,E_ELEM_PROGRESS1,
      E_ELEM_CHECK1,E_ELEM_RADIO1,E_ELEM_RADIO2,E_ELEM_SLIDER,E_ELEM_TXT_SLIDER};
enum {E_FONT_BTN,E_FONT_TXT,MAX_FONT}; // Use separate enum for fonts, MAX_FONT at end 对字体使用单独的枚举,最后使用 MAX_FONT
enum {E_GROUP1};

bool        m_bQuit = false;

// Free-running counter for display 用于显示的自由运行计数器
unsigned    m_nCount = 0;


// Instantiate the GUI 实例化 GUI
#define MAX_PAGE                1

// Define the maximum number of elements per page 定义每页的最大元素数
#define MAX_ELEM_PG_MAIN          16                                        // # Elems total
#define MAX_ELEM_PG_MAIN_RAM      MAX_ELEM_PG_MAIN                          // # Elems in RAM

gslc_tsGui                  m_gui;
gslc_tsDriver               m_drv;
gslc_tsFont                 m_asFont[MAX_FONT];
gslc_tsPage                 m_asPage[MAX_PAGE];
gslc_tsElem                 m_asPageElem[MAX_ELEM_PG_MAIN_RAM];
gslc_tsElemRef              m_asPageElemRef[MAX_ELEM_PG_MAIN];

gslc_tsXProgress            m_sXGauge,m_sXGauge1;
gslc_tsXCheckbox            m_asXCheck[3];
gslc_tsXSlider              m_sXSlider;

#define MAX_INPUT_MAP       5
gslc_tsInputMap             m_asInputMap[MAX_INPUT_MAP];

#define MAX_STR             15

  // Save some element references for quick access  保存一些元素参考以便快速访问
  gslc_tsElemRef*  m_pElemCnt        = NULL;
  gslc_tsElemRef*  m_pElemProgress   = NULL;
  gslc_tsElemRef*  m_pElemProgress1  = NULL;
  gslc_tsElemRef*  m_pElemSlider     = NULL;
  gslc_tsElemRef*  m_pElemSliderTxt  = NULL;

// Define debug message function  定义调试消息函数
static int16_t DebugOut(char ch) { Serial.write(ch); return 0; }

// Button callbacks  按键回调
bool CbBtnQuit(void* pvGui, void *pvElem, gslc_teTouch eTouch, int16_t nX, int16_t nY)
{
    if (eTouch == GSLC_TOUCH_UP_IN) {
        m_bQuit = true;
    }
    return true;
}


// Create page elements创建页面元素
bool InitOverlays()
{
  gslc_tsElemRef* pElemRef;

  gslc_PageAdd(&m_gui,E_PG_MAIN,m_asPageElem,MAX_ELEM_PG_MAIN_RAM,m_asPageElemRef,MAX_ELEM_PG_MAIN);


  // Background flat color 背景平面颜色
  gslc_SetBkgndColor(&m_gui,GSLC_COL_GRAY_DK2);

  // Create background box 创建背景框
  pElemRef = gslc_ElemCreateBox(&m_gui,E_ELEM_BOX,E_PG_MAIN,(gslc_tsRect){10,50,300,150});
  gslc_ElemSetCol(&m_gui,pElemRef,GSLC_COL_WHITE,GSLC_COL_BLACK,GSLC_COL_BLACK);

  // Create Quit button with text label 创建带有文本标签的退出按钮
  pElemRef = gslc_ElemCreateBtnTxt(&m_gui,E_ELEM_BTN_QUIT,E_PG_MAIN,
    (gslc_tsRect){160,80,80,40},(char*)"Quit",0,E_FONT_BTN,&CbBtnQuit);

  // Create counter 创建计数器
  pElemRef = gslc_ElemCreateTxt(&m_gui,GSLC_ID_AUTO,E_PG_MAIN,(gslc_tsRect){20,60,50,10},
    (char*)"Count:",0,E_FONT_TXT);
  static char mstr1[8] = "";
  pElemRef = gslc_ElemCreateTxt(&m_gui,E_ELEM_TXT_COUNT,E_PG_MAIN,(gslc_tsRect){80,60,50,10},
    mstr1,sizeof(mstr1),E_FONT_TXT);
  gslc_ElemSetTxtCol(&m_gui,pElemRef,GSLC_COL_YELLOW);
  m_pElemCnt = pElemRef; // Save for quick access

  // Create progress bar (horizontal)创建进度条(水平)
  pElemRef = gslc_ElemCreateTxt(&m_gui,GSLC_ID_AUTO,E_PG_MAIN,(gslc_tsRect){20,80,50,10},
    (char*)"Progress:",0,E_FONT_TXT);
  pElemRef = gslc_ElemXProgressCreate(&m_gui,E_ELEM_PROGRESS,E_PG_MAIN,&m_sXGauge,
    (gslc_tsRect){80,80,50,10},0,100,0,GSLC_COL_GREEN,false);
  m_pElemProgress = pElemRef; // Save for quick access

  // Second progress bar (vertical)第二个进度条(垂直)
  // - Demonstration of vertical bar with offset zero-pt showing both positive and negative range
  // - 带有偏移零点的垂直条的演示,显示正负范围
  pElemRef = gslc_ElemXProgressCreate(&m_gui,E_ELEM_PROGRESS1,E_PG_MAIN,&m_sXGauge1,
    (gslc_tsRect){280,80,10,100},-25,75,-15,GSLC_COL_RED,true);
  gslc_ElemSetCol(&m_gui,pElemRef,GSLC_COL_BLUE_DK3,GSLC_COL_BLACK,GSLC_COL_BLACK);
  m_pElemProgress1 = pElemRef; // Save for quick access


  // Create checkbox 1  创建复选框 1
  pElemRef = gslc_ElemCreateTxt(&m_gui,GSLC_ID_AUTO,E_PG_MAIN,(gslc_tsRect){20,100,20,20},
    (char*)"Check1:",0,E_FONT_TXT);
  pElemRef = gslc_ElemXCheckboxCreate(&m_gui,E_ELEM_CHECK1,E_PG_MAIN,&m_asXCheck[0],
    (gslc_tsRect){80,100,20,20},false,GSLCX_CHECKBOX_STYLE_X,GSLC_COL_BLUE_LT2,false);

  // Create radio 1单选按钮 1
  pElemRef = gslc_ElemCreateTxt(&m_gui,GSLC_ID_AUTO,E_PG_MAIN,(gslc_tsRect){20,135,20,20},
    (char*)"Radio1:",0,E_FONT_TXT);
  pElemRef = gslc_ElemXCheckboxCreate(&m_gui,E_ELEM_RADIO1,E_PG_MAIN,&m_asXCheck[1],
    (gslc_tsRect){80,135,20,20},true,GSLCX_CHECKBOX_STYLE_ROUND,GSLC_COL_ORANGE,false);
  gslc_ElemSetGroup(&m_gui,pElemRef,E_GROUP1);

  // Create radio 2
  pElemRef = gslc_ElemCreateTxt(&m_gui,GSLC_ID_AUTO,E_PG_MAIN,(gslc_tsRect){20,160,20,20},
    (char*)"Radio2:",0,E_FONT_TXT);
  pElemRef = gslc_ElemXCheckboxCreate(&m_gui,E_ELEM_RADIO2,E_PG_MAIN,&m_asXCheck[2],
    (gslc_tsRect){80,160,20,20},true,GSLCX_CHECKBOX_STYLE_ROUND,GSLC_COL_ORANGE,false);
  gslc_ElemSetGroup(&m_gui,pElemRef,E_GROUP1);

  // Create slider 创建滑块
  pElemRef = gslc_ElemXSliderCreate(&m_gui,E_ELEM_SLIDER,E_PG_MAIN,&m_sXSlider,
    (gslc_tsRect){160,140,100,20},0,100,60,5,false);
  gslc_ElemXSliderSetStyle(&m_gui,pElemRef,true,(gslc_tsColor){0,0,128},10,
          5,(gslc_tsColor){64,64,64});
  m_pElemSlider = pElemRef; // Save for quick access


  static char mstr2[8] = "Slider:";
  pElemRef = gslc_ElemCreateTxt(&m_gui,GSLC_ID_AUTO,E_PG_MAIN,(gslc_tsRect){160,162,60,20},
    mstr2,sizeof(mstr2),E_FONT_TXT);
  static char mstr3[6] = "???";
  pElemRef = gslc_ElemCreateTxt(&m_gui,E_ELEM_TXT_SLIDER,E_PG_MAIN,(gslc_tsRect){220,162,40,20},
    mstr3,sizeof(mstr3),E_FONT_TXT);
  gslc_ElemSetTxtCol(&m_gui,pElemRef,GSLC_COL_ORANGE);
  m_pElemSliderTxt = pElemRef; // Save for quick access

  return true;
}


void setup()
{
  // Initialize debug output初始化调试输出
  Serial.begin(9600);
  gslc_InitDebug(&DebugOut);
  //delay(1000);  // NOTE: Some devices require a delay after Serial.begin() before serial port can be used

  // Initialize  初始化
  if (!gslc_Init(&m_gui,&m_drv,m_asPage,MAX_PAGE,m_asFont,MAX_FONT)) { return; }

  // Create the GUI input mapping (pin event to GUI action)  创建 GUI 输入映射(将事件固定到 GUI 操作)
  gslc_InitInputMap(&m_gui, m_asInputMap, MAX_INPUT_MAP);
  gslc_InputMapAdd(&m_gui, GSLC_INPUT_PIN_DEASSERT, GSLC_PIN_BTN_A,      GSLC_ACTION_FOCUS_PREV, 0);
  gslc_InputMapAdd(&m_gui, GSLC_INPUT_PIN_DEASSERT, GSLC_PIN_BTN_B,      GSLC_ACTION_SELECT, 0);
  gslc_InputMapAdd(&m_gui, GSLC_INPUT_PIN_DEASSERT, GSLC_PIN_BTN_C,      GSLC_ACTION_FOCUS_NEXT, 0);
  gslc_InputMapAdd(&m_gui, GSLC_INPUT_PIN_ASSERT,   GSLC_PIN_BTN_A_LONG, GSLC_ACTION_SET_REL, -10);
  gslc_InputMapAdd(&m_gui, GSLC_INPUT_PIN_ASSERT,   GSLC_PIN_BTN_C_LONG, GSLC_ACTION_SET_REL, +10);

  // Use default font 使用默认字体
  if (!gslc_FontSet(&m_gui, E_FONT_BTN, GSLC_FONTREF_PTR, NULL, 1)) { return; }
  if (!gslc_FontSet(&m_gui,E_FONT_TXT,GSLC_FONTREF_PTR,NULL,1)) { return; }

  // Create graphic elements 创建图形元素
  InitOverlays();

  // Start up display on main page  主页面启动显示
  gslc_SetPageCur(&m_gui,E_PG_MAIN);

  m_bQuit = false;
}

void loop()
{
  char                acTxt[MAX_STR];

  // General counter  通用计数器
  m_nCount++;

  // Update elements on active page更新活动页面上的元素

  snprintf(acTxt,MAX_STR,"%u",m_nCount/5);
  gslc_ElemSetTxtStr(&m_gui,m_pElemCnt,acTxt);

  gslc_ElemXProgressSetVal(&m_gui,m_pElemProgress,((m_nCount/1)%100));

  // NOTE: A more efficient method is to move the following
  //       code into the slider position callback function.
  //       Please see example 07.
  // 注意:更有效的方法是移动以下
   // 代码到滑块位置回调函数中。
   // 请参见示例 07。
  int nPos = gslc_ElemXSliderGetPos(&m_gui,m_pElemSlider);
  snprintf(acTxt,MAX_STR,"%u",nPos);
  gslc_ElemSetTxtStr(&m_gui,m_pElemSliderTxt,acTxt);

  gslc_ElemXProgressSetVal(&m_gui,m_pElemProgress1,(nPos*80.0/100.0)-15);


  // Periodically call GUIslice update function 定期调用 GUIslice 更新函数
  gslc_Update(&m_gui);

  // Slow down updates 减慢更新
  delay(10);

  // In a real program, we would detect the button press and take an action.
  // For this Arduino demo, we will pretend to exit by emulating it with an
  // infinite loop. Note that interrupts are not disabled so that any debug
  // messages via Serial have an opportunity to be transmitted.
  // 在实际程序中,我们会检测到按钮按下并采取行动。
   // 对于这个 Arduino 演示,我们将通过模拟它来假装退出
   // 无限循环。 请注意,不会禁用中断,以便任何调试
   // 通过串行的消息有机会被传输。
  if (m_bQuit) {
    gslc_Quit(&m_gui);
    while (1) { }
  }
}
实际运行效果
7.99 Eho:/ # 单片机开发 m5stack guislice例程 https://v.douyin.com/jhG6maF/ 复制此链接,打开Dou音搜索,直接观看视频!

 浙公网安备 33010602011771号