


windows service 新手上路版
关于Widows Service,在园子里都已有大量的文章介绍。在这里,过多的理论就不说了。
此文仅是引导部分新手上路,不多说了。步骤开始
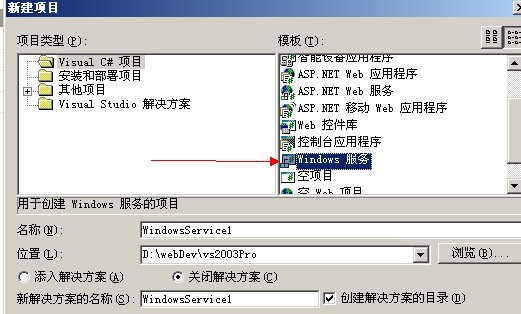
1)创建一Windows服务项目
2)创建成功后可以看到默认就有一个Service1,结构如下
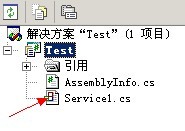
查看一下Serivce1的代码可以看到:
 代码
代码

2 using System.Collections;
3 using System.ComponentModel;
4 using System.Data;
5 using System.Diagnostics;
6 using System.ServiceProcess;
7
8 namespace Test
9 {
10 public class Service1 : System.ServiceProcess.ServiceBase
11 {
12 /// <summary>
13 /// 必需的设计器变量。
14 /// </summary>
15 private System.ComponentModel.Container components = null;
16
17 public Service1()
18 {
19 // 该调用是 Windows.Forms 组件设计器所必需的。
20 InitializeComponent();
21
22 // TODO: 在 InitComponent 调用后添加任何初始化
23 }
24
25 // 进程的主入口点
26 static void Main()
27 {
28 System.ServiceProcess.ServiceBase[] ServicesToRun;
29
30 // 同一进程中可以运行多个用户服务。若要将
31 //另一个服务添加到此进程,请更改下行
32 // 以创建另一个服务对象。例如,
33 //
34 // ServicesToRun = New System.ServiceProcess.ServiceBase[] {new Service1(), new MySecondUserService()};
35 //
36 ServicesToRun = new System.ServiceProcess.ServiceBase[] { new Service1() };
37
38 System.ServiceProcess.ServiceBase.Run(ServicesToRun);
39 }
40
41 /// <summary>
42 /// 设计器支持所需的方法 - 不要使用代码编辑器
43 /// 修改此方法的内容。
44 /// </summary>
45 private void InitializeComponent()
46 {
47 components = new System.ComponentModel.Container();
48 this.ServiceName = "Service1";
49 }
50
51 /// <summary>
52 /// 清理所有正在使用的资源。
53 /// </summary>
54 protected override void Dispose( bool disposing )
55 {
56 if( disposing )
57 {
58 if (components != null)
59 {
60 components.Dispose();
61 }
62 }
63 base.Dispose( disposing );
64 }
65
66 /// <summary>
67 /// 设置具体的操作,以便服务可以执行它的工作。
68 /// </summary>
69 protected override void OnStart(string[] args)
70 {
71 // TODO: 在此处添加代码以启动服务。
72 }
73
74 /// <summary>
75 /// 停止此服务。
76 /// </summary>
77 protected override void OnStop()
78 {
79 // TODO: 在此处添加代码以执行停止服务所需的关闭操作。
80 }
81 }
82 }
83
需要注意的有
A)Main()里new Service1(),这Service1是跟当前服务的命名要一致。
B)另外还有两就是服务的启动和停止OnStart,OnStop
3)服务创建后,我们一般都是想让它在某个时间点或是某个时间间隔进行工作,那么接着就是添加一Timer,(注意:是组件里的timer,不是Windows窗体里的timer)如下图:

在这里timer,默认是100毫秒,可以在Service1设计视图上通过右击属性查看(这时间可以自定义),双击Timer可以看到在Service1.cs文件里添加了Timer要执行的事件程序段
private void timer1_Elapsed(object sender, System.Timers.ElapsedEventArgs e)
{
}
到此Service1基本上完成,那么我们来完善一下服务启动/停止、Timer到点时要做的事情
protected override void OnStart(string[] args)
{
// TODO: 在此处添加代码以启动服务。
this.timer1.Enabled = true;
GoStart();//初始化时工作
}
protected override void OnStop()
{
// TODO: 在此处添加代码以执行停止服务所需的关闭操作。
if (timer1 != null)
{
this.timer1.Enabled = false;
timer1.Stop();
timer1.Dispose();
timer1 = null;
GetOut();
}
else
{
//
}
}
private void timer1_Elapsed(object sender, System.Timers.ElapsedEventArgs e)
{
try
{
if (timer1 != null)
{
GoStart();//到时工作
}
else
{
GetOut();
}
}
catch(Exception ex)
{
GetOut();
}
}
4)服务基本工作完成后,接着就是服务的安装了,在Service1设计视图上右击,我们就可以看到有一个“添加安装程序”。咱们选中它
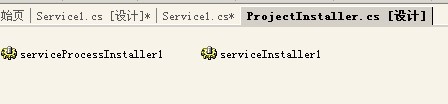
可以看到给咱就添加上了一个serviceProcessInstaller和serviceInstaller
此时要注意的地方有两
A)可以选择serviceInstaller的启动方式,如开机启动,不启动等

B)这个可能曾经给过大家麻烦就是serviceProcessInstaller的Account,因为默认是User,如没有修改过此设置的话就会发现在安装的时候,跳出一个用户登录框,要你输入用户名密码等。所以这个我们一般是设置成LocalSystem完事。呵呵
OK,一个Win service就这样完成了,那么接着就是如何来安装上这个服务?
5)安装时要注意,你当前开发环境的Framework版本。最好就是在你VS安装的目录下执行,因为它要用到Microsoft.NET\Framework\v1.1.4322\InstallUtil.exe。
命令如下InstallUtil service1.exe
或是将如下代码块另存为*.bat通过批处理来安装,方便
代码如下:
%SystemRoot%\Microsoft.NET\Framework\v1.1.4322\InstallUtil.exe TestService1.exe
pause
OK,大功告成!动手试试吧。
