

Spring MVC
○ Spring MVC
基础灵魂质问:
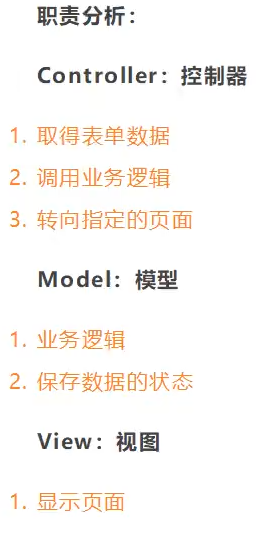
什么是MVC?
官方文档:
https://docs.spring.io/spring-framework/docs/
比较好用的老文档地址:
https://docs.spring.io/spring-framework/docs/4.3.24.RELEASE/spring-framework-reference/html/
什么是springMVC
https://docs.spring.io/spring-framework/docs/4.3.24.RELEASE/spring-framework-reference/html/mvc.html
为什么学习SpringMVC呢
Spring MVC的特点
1、轻量级,简单易学
2、高效,基于请求响应的MVC框架
3、与Spring兼容性好,无缝结合
4、约定优于配置
5、功能强大:RESTful
6、简洁灵活
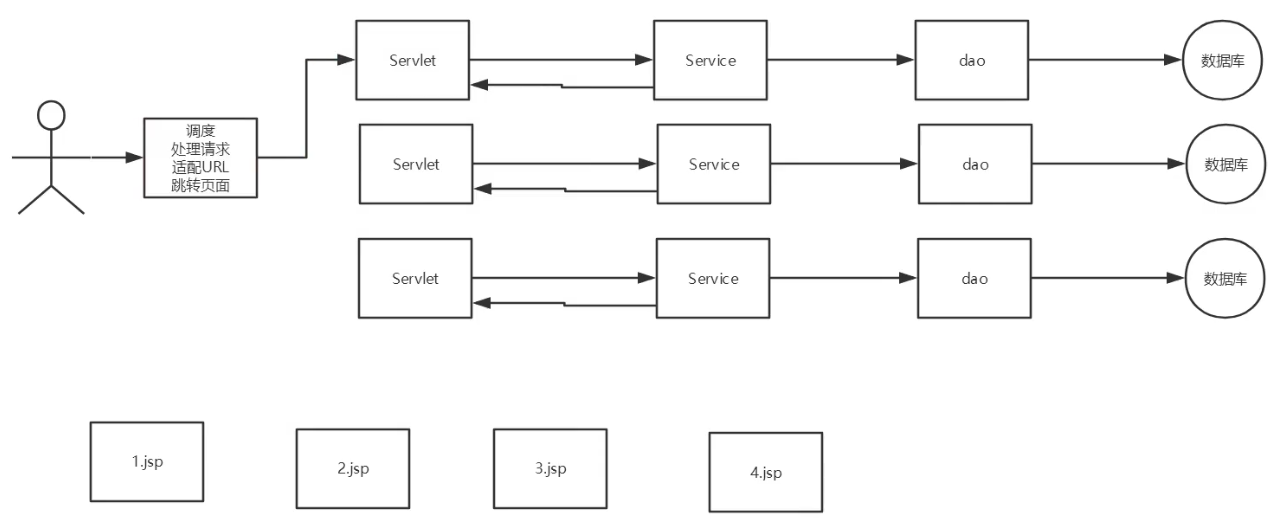
SpringMVC执行流程??
中心控制器
○ 开发流程:
1、新建项目
2、添加web支持
3、在artifacts 里导入需要的 jar 包
4、配置web.xml
<?xml version="1.0" encoding="UTF-8"?>
<web-app xmlns="http://xmlns.jcp.org/xml/ns/javaee"
         xmlns:xsi="http://www.w3.org/2001/XMLSchema-instance"
         xsi:schemaLocation="http://xmlns.jcp.org/xml/ns/javaee http://xmlns.jcp.org/xml/ns/javaee/web-app_4_0.xsd"
         version="4.0">

        <servlet>
            <servlet-name>DispatcherServlet</servlet-name>
            <!--在DispatcherServlet的初始化过程中,框架会在web应用的 WEB-INF文件夹下寻找名为[servlet-name]-servlet.xml 的配置文件,生成文件中定义的bean。-->
            <servlet-class>org.springframework.web.servlet.DispatcherServlet</servlet-class>
            <!--指明了配置文件的文件名,不使用默认配置文件名,而使用dispatcher-servlet.xml配置文件。-->
            <init-param>
                <param-name>contextConfigLocation</param-name>
                <!--其中<param-value>**.xml</param-value> 这里可以使用多种写法-->
                <!--1、不写,使用默认值:/WEB-INF/<servlet-name>-servlet.xml-->
                <!--2、<param-value>/WEB-INF/classes/dispatcher-servlet.xml</param-value>-->
                <!--3、<param-value>classpath*:dispatcher-servlet.xml</param-value>-->
                <!--4、多个值用逗号分隔-->
                <param-value>classpath:springmvc-servlet.xml</param-value>
            </init-param>
            <load-on-startup>1</load-on-startup><!--是启动顺序,让这个Servlet随Servletp容器一起启动。-->
        </servlet>
        <servlet-mapping>
            <!--这个Servlet的名字是dispatcher,可以有多个DispatcherServlet,是通过名字来区分的。每一个DispatcherServlet有自己的WebApplicationContext上下文对象。同时保存的ServletContext中和Request对象中.-->
            <!--ApplicationContext是Spring的核心,Context我们通常解释为上下文环境,我想用“容器”来表述它更容易理解一些,ApplicationContext则是“应用的容器”了:P,Spring把Bean放在这个容器中,在需要的时候,用getBean方法取出-->
            <servlet-name>DispatcherServlet</servlet-name>
            <!--Servlet拦截匹配规则可以自已定义,当映射为@RequestMapping("/user/add")时,为例,拦截哪种URL合适?-->
            <!--1、拦截*.do、*.htm, 例如:/user/add.do,这是最传统的方式,最简单也最实用。不会导致静态文件(jpg,js,css)被拦截。-->
            <!--2、拦截/,例如:/user/add,可以实现现在很流行的REST风格。很多互联网类型的应用很喜欢这种风格的URL。弊端:会导致静态文件(jpg,js,css)被拦截后不能正常显示。 -->
            <url-pattern>/</url-pattern> <!--会拦截URL中带“/”的请求。-->
        </servlet-mapping>


</web-app>
5、配置 springmvc-servlet.xml
<?xml version="1.0" encoding="UTF-8"?>
<beans xmlns="http://www.springframework.org/schema/beans"
       xmlns:xsi="http://www.w3.org/2001/XMLSchema-instance"
       xmlns:context="http://www.springframework.org/schema/context"
       xmlns:mvc="http://www.springframework.org/schema/mvc"
       xsi:schemaLocation="http://www.springframework.org/schema/beans
       http://www.springframework.org/schema/beans/spring-beans.xsd
       http://www.springframework.org/schema/context
       https://www.springframework.org/schema/context/spring-context.xsd
       http://www.springframework.org/schema/mvc
       https://www.springframework.org/schema/mvc/spring-mvc.xsd">

    <!--自动扫描包-->
    <context:component-scan base-package="com.kutsu.controller"/>

    <!--让spring mvc 不处理静态资源-->
    <mvc:default-servlet-handler/>

    <!-- 自动注入-->
    <mvc:annotation-driven/>


    <!--    视图解析器-->
    <bean class="org.springframework.web.servlet.view.InternalResourceViewResolver" id="InternalResourceViewResolver" >
        <property name="prefix" value="/WEB-INF/jsp/"/>
        <property name="suffix" value=".jsp"/>
    </bean>

<!--    <bean id="/hello" class="com.kutsu.controller"/>-->

</beans>
6、4个 组件注解
@Component     组件
@Service       service
@Controller    controller
@Repository    dao
7、@RequestMapping() 请求的注解
@Controller
@RequestMapping("/c1")
public class HelloController {

    @RequestMapping("/h1")
    public  String hello(Model model){

        //封装数据
        model.addAttribute("msg", "hello,spring mvc");

        return "hello";//会被视图解析器处理
    }
}
8、向前端发送数据
return 属性
return 默认是转发,
想重定向,就使用 redirect
return "redirect:/index.jsp"
model.addAttribute 发送一个数据
@RequestMapping("/h1")
public  String hello(Model model){

    //封装数据
    model.addAttribute("msg", "hello,spring mvc");

    return "hello";//会被视图解析器处理
}
Model
适合新手,也比较常用
ModelMap
ModelAndView
9、从前端接收数据
@RequestParm("username") 参数 别名
@RequestMapping("/h1")
public  String hello(@RequestParm("username") string naem, Model model){

    //封装数据
    model.addAttribute("msg", "hello,spring mvc");

    return "hello";//会被视图解析器处理
}
接收一个对象
1.接收前端用户传递的参数,判断参数的名字,假设名字直接在方法上,可以直接使用
2.假设传递的是一个对象 User,匹配User对象中的字段名:如果名字一致则ok,否则,匹配不到
10、乱码问题
在web.xml
<filter>
    <filter-name>encoding</filter-name>
    <filter-class>org.springframework.web.filter.CharacterEncodingFilter</filter-class>
    <init-param>
        <param-name>encoding</param-name>
        <param-value>utf-8</param-value>
    </init-param>
</filter>
<filter-mapping>
    <filter-name>encoding</filter-name>
    <url-pattern>/*</url-pattern>
</filter-mapping>
○ RestFul风格
Restful 就算是一个资源定位及资源操作的风格。不是标准也不是协议,只是一种风格。基于这个风格设计的软件可以更简洁,更有层次,更易于实现缓存等机制。
功能:
- 资源:互联网所有的事务都可以被抽象为资源。
- 资源操作:使用 POST、DELETE、PUT、GET 使用不同的方法对资源进行操作
- 分别对应 添加、删除、修改、查询。
传统方式操作资源:通过不同的参数来实现不同的效果!方法单一,post和get
使用Restful操作资源:可以通过不同的请求方式来实现不同的效果!如下:请求地址一样,但是功能可以不同!
- http://127.0.0.1/item/ 新增.POST
- http://127.0.0.1/item/ 更新.PUT
@PathVariable 参数接收
@Controller
@RequestMapping("/c3")
public class HelloController {

    @RequestMapping("/h2/{a}/{b}")
    public  String hello2(@PathVariable int a, @PathVariable int b, Model model){
        int  res = a+b;
        //封装数据
        model.addAttribute("msg", "hello2,结果为 =" + res);

        return "hello";//会被视图解析器处理
    }
}
请求类型
method ={RequestMethod.Get} 一般原理方式实现
@RequestMapping(value ="/h2/{a}/{b}", method ={RequestMethod.Get}
@RequestMapping(path ="/h2/{a}/{b}", method ={RequestMethod.Get}
    @RequestMapping(value="/h2/{a}/{b}", method ={RequestMethod.Get} )
    public  String hello2(@PathVariable int a, @PathVariable int b, Model model){
        int  res = a+b;
        //封装数据
        model.addAttribute("msg", "hello2,结果为 =" + res);

        return "hello";//会被视图解析器处理
    }
@PostMapping()
@GetMapping()
@PutMapping()
@DeleteMapping()
@PatchMapping()
○ JSON
前后端分离时代
后端部署后端,提供接口,提供数据
↓
JSON
↓
前端独立部署,负责渲染后端的数据
什么是JSON?
JavaScript Object Notation,JS 对象标记
是一种轻量级的数据交换格式,目前使用特别广泛。
前端转化
//对象转化 字符串
var json = JSON.stringify(user);

//字符串 转化 对象
var obj = JSON.parse(json);
后端转化
jackson 应该是目前
maven 包
<dependency>
    <groupId>com.fasterxml.jackson.core</groupId>
    <artifactId>jackson-databind</artifactId>
    <version>2.11.2</version>
</dependency>
一般解决:
@Controller
@RequestMapping("/c3")
public class HelloController {

    @RequestMapping(value = "/h2",produces = "application/json;charset=utf-8")
    @ResponseBody //他就不会走视图解析器,会直接返回一个字符串
    public  String hello23(Model model) throws JsonProcessingException {
        //jackson,  中有一个 objectMapper
        ObjectMapper mapper = new ObjectMapper();
        //创建一个对象
        Integer user = new Integer(44444);
        String str =  mapper.writeValueAsString(user);

        return str;
    }
}
后端 请求不进行视图解析,只返回字符串
@RestController

或者

@ResponseBody
@RestController
@RequestMapping("/c3")
public class HelloController {

    @RequestMapping("/h2/{a}/{b}")
    @ResponseBody
    public  String hello2(@PathVariable int a, @PathVariable int b, Model model){
        int  res = a+b;
        //封装数据
        model.addAttribute("msg", "hello2,结果为 =" + res);

        return "hello";//会被视图解析器处理
    }
}
乱码 springmvc 配置
就可以不写 produces = "application/json;charset=utf-8"
在 spring.xml中配置 jackson
<mvc:annotation-driven>
    <mvc:message-converters register-defaults="true">
        <bean class="org.springframework.http.converter.StringHttpMessageConverter">
            <constructor-arg value="UTF-8"/>
        </bean>
        <bean class="org.springframework.http.converter.json.MappingJackson2HttpMessageConverter">
            <property name="objectMapper">
                <bean class="org.springframework.http.converter.json.Jackson2ObjectMapperFactoryBean">
                    <property name="failOnEmptyBeans"  value="false"/>
                </bean>
            </property>
        </bean>
    </mvc:message-converters>
</mvc:annotation-driven>
写为工具类
package com.kutsu.utils;

import com.fasterxml.jackson.core.JsonProcessingException;
import com.fasterxml.jackson.databind.ObjectMapper;
import com.fasterxml.jackson.databind.SerializationFeature;

import java.text.SimpleDateFormat;

public class JsonUtils {

    public static String getJson(Object object){
        return getJson(object, "yyyy-MM-dd HH:mm:ss");
    }


    public static String getJson(Object object, String dataFormat) {
        ObjectMapper mapper = new ObjectMapper();
        //不适用时间戳的方式
        mapper.configure(SerializationFeature.WRITE_DATES_AS_TIMESTAMPS, false);
        //自定义日期的格式
        SimpleDateFormat sdf = new SimpleDateFormat(dataFormat);
        mapper.setDateFormat(sdf);

        try {
            return mapper.writeValueAsString(object);
        } catch (JsonProcessingException e) {
            e.printStackTrace();
        }
        return null;
    }
}
调用
Date date = new Date();

return JsonUtils.getJsono(date, "yyyy-MM-dd HH:mm:ss");
阿里的 fastjson
maven包
<dependency>
    <groupId>com.alibaba</groupId>
    <artifactId>fastjson</artifactId>
    <version>1.2.60</version>
</dependency>
使用
//对象 转 字符串
return JSON.toJSONString(userList);

//字符串 转 对象
User user = JSON.parseObject(str2, User.class);

//对象 转 JSON对象
JSON.toJSON(user2)

//JSON对象 转 对象
JSON.toJavaObject(jsonObject1, User.class)

 浙公网安备 33010602011771号