Spring Core 官方文档阅读笔记(十四)
1.DispatcherServlet
DispatcherServlet是Spring MVC的中心Servlet,提供了请求处理的共享算法,而实际的工作则由可配置的委托组件来执行。DispatcherServlet与其他servlet一样,都需要使用java配置或者web.xml配置来进行声明和映射。反过来,DispatcherServlet使用Spring配置来发现请求映射、视图解析、异常处理等所需的委托组件。
先来看下怎么初始化一个DispatcherServlet,直接看官方例子吧:
/**
 * @Author: kuromaru
 * @Date: Created in 16:25 2019/6/20
 * @Description:
 * @modified:
 */
public class MyWebApplicationInitializer implements WebApplicationInitializer {
    @Override
    public void onStartup(ServletContext servletContext) throws ServletException {
        AnnotationConfigWebApplicationContext acwac = new AnnotationConfigWebApplicationContext();
        acwac.register(AppConfig.class);
        acwac.refresh();

        DispatcherServlet ds = new DispatcherServlet(acwac);
        ServletRegistration.Dynamic registration = servletContext.addServlet("app", ds);
        registration.setLoadOnStartup(1);
        registration.addMapping("/app/*");
    }
}
或者使用最原始的方法,配置web.xml:
<web-app>

    <listener>
        <listener-class>org.springframework.web.context.ContextLoaderListener</listener-class>
    </listener>

    <context-param>
        <param-name>contextConfigLocation</param-name>
        <param-value>/WEB-INF/app-context.xml</param-value>
    </context-param>

    <servlet>
        <servlet-name>app</servlet-name>
        <servlet-class>org.springframework.web.servlet.DispatcherServlet</servlet-class>
        <init-param>
            <param-name>contextConfigLocation</param-name>
            <param-value></param-value>
        </init-param>
        <load-on-startup>1</load-on-startup>
    </servlet>

    <servlet-mapping>
        <servlet-name>app</servlet-name>
        <url-pattern>/app/*</url-pattern>
    </servlet-mapping>

</web-app>
2.上下文层次结构
上面在初始化DispatcherServlet的时候,首先构建了一个 AnnotationConfigWebApplicationContext,并且将其作为参数传给了DispatcherServlet构造器。AnnotationConfigWebApplicationContext继承了AbstractRefreshableWebApplicationContext,而AbstractRefreshableWebApplicationContext又是ConfigurableWebApplicationContext的子接口,ConfigurableWebApplicationContext又继承了WebApplicationContext,在WebApplicationContext接口中,只有一个接口方法:
/**
 * Return the standard Servlet API ServletContext for this application.
 * <p>Also available for a Portlet application, in addition to the PortletContext.
 */
ServletContext getServletContext();
AbstractRefreshableWebApplicationContext通过实现这个方法来与ServletContext进行关联。因此,当我们在需要获取WebApplicationContext的时候,就可以使用RequestContextUtils来获取:
RequestContextUtils.findWebApplicationContext(request, servletContext)
也可以通过WebApplicationContextUtils来获取,如下:
WebApplicationContextUtils.getWebApplicationContext(getServletContext());
实际来看一下,假设我们需要在某个请求里完成Spring容器的刷新操作,看代码:
/**
 * @Author: kuromaru
 * @Date: Created in 10:50 2019/6/21
 * @Description:
 * @modified:
 */
@Controller
public class ContextRefreshAction extends WebApplicationObjectSupport {

    private Logger logger = LoggerFactory.getLogger(this.getClass());

    @RequestMapping(value = "/context/refresh", method = RequestMethod.POST)
    @ResponseBody
    public BaseResponse refreshContext(HttpServletRequest request, HttpServletResponse response) {
        logger.info("开始刷新Spring容器上下文");

        XmlWebApplicationContext webApplicationContext = (XmlWebApplicationContext)WebApplicationContextUtils.getWebApplicationContext(getServletContext());
        webApplicationContext.refresh();
        return new BaseResponse(ResponseCode.SUCCESS.getCode(), "刷新成功");
    }
}
代码中我们通过WebApplicationContextUtils.getWebApplicationContext来获取了WebApplicationContext,然后强转为XmlWebApplicationContext(通过xml文件来完成容器的配置,如果通过java bean的方式进行配置,可以强转为AnnotationConfigWebApplicationContext)。这里注意一下getServlet()方法,这个方法是WebApplicationObjectSupport中的,这个类里有一个setServletContext方法,通过这个方法会在实例化Bean的时候将ServletContext与WebApplicationObjectSupport绑定起来。具体是什么时候设置的呢?
setServletContext方法会在ServletContextAwareProcessor的postProcessBeforeInitialization方法中调用。看代码:
@Override
public Object postProcessBeforeInitialization(Object bean, String beanName) throws BeansException {
	if (getServletContext() != null && bean instanceof ServletContextAware) {
		((ServletContextAware) bean).setServletContext(getServletContext());
	}
	if (getServletConfig() != null && bean instanceof ServletConfigAware) {
		((ServletConfigAware) bean).setServletConfig(getServletConfig());
	}
	return bean;
}
ServletContextAwareProcessor是BeanPostProcessor的实现类,前面整理过Spring的扩展点,BeanPostProcessor可以在Bean的生成前后做一些个性化处理。再回头看代码,postProcessBeforeInitialization是在Bean初始化之前做的处理,先去判断当前Bean是不是ServletContextAware类型,如果是,则设置ServletContext到bean里。这里获取ServletContext的方法还是getServletContext(),阴魂不散啊。。。接着看这个方法的实现:
/**
 * Returns the {@link ServletContext} to be injected or {@code null}. This method
 * can be overridden by subclasses when a context is obtained after the post-processor
 * has been registered.
 */
protected ServletContext getServletContext() {
	if (this.servletContext == null && getServletConfig() != null) {
		return getServletConfig().getServletContext();
	}
	return this.servletContext;
}
可以看到,这个方法会直接返回servletContext属性,或者从servletConfig属性中获取servletContext。好,那来看下servletContext和servletConfig属性是什么时候设置的。查看ServletContextAwareProcessor的代码可以看到,有一个构造器直接传入了servletContext和ServletConfig,而这个构造器会在AbstractRefreshableWebApplicationContext的postProcessBeanFactory里调用:
	/**
	 * Register request/session scopes, a {@link ServletContextAwareProcessor}, etc.
	 */
	@Override
	protected void postProcessBeanFactory(ConfigurableListableBeanFactory beanFactory) {
		beanFactory.addBeanPostProcessor(new ServletContextAwareProcessor(this.servletContext, this.servletConfig));
		beanFactory.ignoreDependencyInterface(ServletContextAware.class);
		beanFactory.ignoreDependencyInterface(ServletConfigAware.class);

		WebApplicationContextUtils.registerWebApplicationScopes(beanFactory, this.servletContext);
		WebApplicationContextUtils.registerEnvironmentBeans(beanFactory, this.servletContext, this.servletConfig);
	}
而这个postProcessBeanFactory方法,会在容器的刷新处理refresh中被调用,查看类关系图,AbstractRefreshableWebApplicationContext是AbstractApplicationContext的子抽象类,继承了AbstractApplicationContext的refresh()方法。而这个refresh方法,则会在初始化web容器的时候被调用。
看到这可能还有个疑问,postProcessBeforeInitialization是在哪个地方调用的呢?好,这个方法会在AbstractAutowireCapableBeanFactory中的applyBeanPostProcessorsBeforeInitialization方法里被调用,看代码:
	@Override
	public Object applyBeanPostProcessorsBeforeInitialization(Object existingBean, String beanName)
			throws BeansException {

		Object result = existingBean;
		for (BeanPostProcessor beanProcessor : getBeanPostProcessors()) {
			result = beanProcessor.postProcessBeforeInitialization(result, beanName);
			if (result == null) {
				return result;
			}
		}
		return result;
	}
这个处理里,获取了所有的BeanPostProcessors,逐个执行postProcessBeforeInitialization方法。而这个applyBeanPostProcessorsBeforeInitialization方法,看方法名的字面意思,"在初始化之前应用BeanPostProcessor",再来看这个方法的调用:
	/**
	 * Initialize the given bean instance, applying factory callbacks
	 * as well as init methods and bean post processors.
	 * <p>Called from {@link #createBean} for traditionally defined beans,
	 * and from {@link #initializeBean} for existing bean instances.
	 * @param beanName the bean name in the factory (for debugging purposes)
	 * @param bean the new bean instance we may need to initialize
	 * @param mbd the bean definition that the bean was created with
	 * (can also be {@code null}, if given an existing bean instance)
	 * @return the initialized bean instance (potentially wrapped)
	 * @see BeanNameAware
	 * @see BeanClassLoaderAware
	 * @see BeanFactoryAware
	 * @see #applyBeanPostProcessorsBeforeInitialization
	 * @see #invokeInitMethods
	 * @see #applyBeanPostProcessorsAfterInitialization
	 */
	protected Object initializeBean(final String beanName, final Object bean, RootBeanDefinition mbd) {
		if (System.getSecurityManager() != null) {
			AccessController.doPrivileged(new PrivilegedAction<Object>() {
				@Override
				public Object run() {
					invokeAwareMethods(beanName, bean);
					return null;
				}
			}, getAccessControlContext());
		}
		else {
			invokeAwareMethods(beanName, bean);
		}

		Object wrappedBean = bean;
		if (mbd == null || !mbd.isSynthetic()) {
			wrappedBean = applyBeanPostProcessorsBeforeInitialization(wrappedBean, beanName);
		}

		try {
			invokeInitMethods(beanName, wrappedBean, mbd);
		}
		catch (Throwable ex) {
			throw new BeanCreationException(
					(mbd != null ? mbd.getResourceDescription() : null),
					beanName, "Invocation of init method failed", ex);
		}
		if (mbd == null || !mbd.isSynthetic()) {
			wrappedBean = applyBeanPostProcessorsAfterInitialization(wrappedBean, beanName);
		}
		return wrappedBean;
	}
嗯,在AbstractAutowireCapableBeanFactory类的initializeBean方法被调用了。继续往下看,这个initializeBean方法会被doCreateBean方法调用,而doCreateBean又会被createBean方法调用,createBean又会在AbstractBeanFactory的getBean方法里被调用。看到这个getBean方法,就开心了,终于找到头了。我们在从spring容器获取bean的时候,都是通过BeanFactory的getBean来获取的,那么串起来看,也就是如果一个类继承了WebApplicationObjectSupport类,那么在spring容器获取这个类的实例的时候,会把初始化web容器时获取到的servletContext与这个类绑定。奈斯~
终于一层一层的把这个玩意剥开了。。。
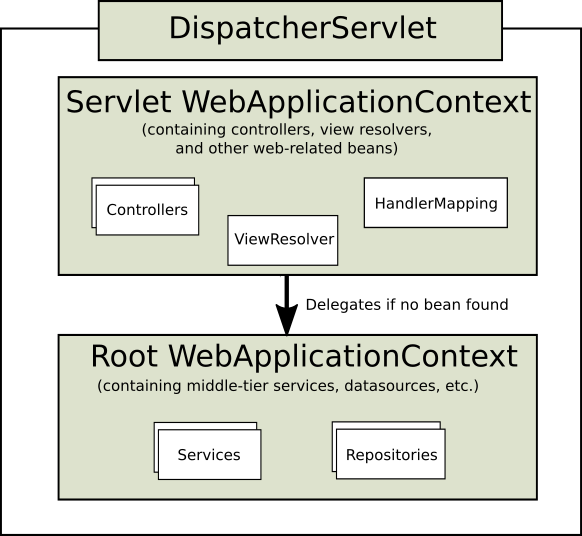
在Spring MVC中,WebApplicationContext可以分为root WebApplicationContext和servlet-specific WebApplicationContext,root WebApplicationContext中包含了基础框架Bean,如数据库存储、业务服务等,而servlet-specific WebApplicationContext则对应了各个servlet实例,这些servlet-specific都继承了root来获取基础能力。
那么对于一个DispatcherServlet来说,它的层次结构应该是下面这样:
可以通过继承AbstractAnnotationConfigDispatcherServletInitializer来配置Servlet上下文。
/**
 * @Author: kuromaru
 * @Date: Created in 15:03 2019/6/25
 * @Description:
 * @modified:
 */
public class MyWebAppInitializer extends AbstractAnnotationConfigDispatcherServletInitializer {
    @Override
    protected Class<?>[] getRootConfigClasses() {
        return new Class<?>[]{RootConfig.class};
    }

    @Override
    protected Class<?>[] getServletConfigClasses() {
        return new Class<?>[]{AppConfig.class};
    }

    @Override
    protected String[] getServletMappings() {
        return new String[]{"/app/*"};
    }
}
如代码所示,RootConfig中的配置就会被做为root WebApplicationContext来使用,而AppConfig则对应了特定的Servlet。
简单说一下AbstractAnnotationConfigDispatcherServletInitializer,这个抽象类继承了AbstractDispatcherServletInitializer,看代码:
public abstract class AbstractAnnotationConfigDispatcherServletInitializer extends AbstractDispatcherServletInitializer {
    public AbstractAnnotationConfigDispatcherServletInitializer() {
    }

    protected WebApplicationContext createRootApplicationContext() {
        Class<?>[] configClasses = this.getRootConfigClasses();
        if (!ObjectUtils.isEmpty(configClasses)) {
            AnnotationConfigWebApplicationContext rootAppContext = new AnnotationConfigWebApplicationContext();
            rootAppContext.register(configClasses);
            return rootAppContext;
        } else {
            return null;
        }
    }

    protected WebApplicationContext createServletApplicationContext() {
        AnnotationConfigWebApplicationContext servletAppContext = new AnnotationConfigWebApplicationContext();
        Class<?>[] configClasses = this.getServletConfigClasses();
        if (!ObjectUtils.isEmpty(configClasses)) {
            servletAppContext.register(configClasses);
        }

        return servletAppContext;
    }

    protected abstract Class<?>[] getRootConfigClasses();

    protected abstract Class<?>[] getServletConfigClasses();
}
AbstractDispatcherServletInitializer是WebApplicationInitializer的基础实现类,它在ServletContext里注册了一个DispathcerServlet。他是怎么注册的呢?首先我们看一下WebApplicationInitializer是干什么用的,看代码:
public interface WebApplicationInitializer {

	/**
	 * Configure the given {@link ServletContext} with any servlets, filters, listeners
	 * context-params and attributes necessary for initializing this web application. See
	 * examples {@linkplain WebApplicationInitializer above}.
	 * @param servletContext the {@code ServletContext} to initialize
	 * @throws ServletException if any call against the given {@code ServletContext}
	 * throws a {@code ServletException}
	 */
	void onStartup(ServletContext servletContext) throws ServletException;

}
WebApplicationInitializer是一个接口,这个接口有三个抽象实现类,分别是AbstractContextLoaderInitializer、AbstractDispatcherServletInitializer和AbstractAnnotationConfigDispatcherServletInitializer。而这三个都是抽象类,那么就可以推定,一定是通过WebApplicationInitializer来使这三个类发挥作用的。那么我们看一下哪里使用了WebApplicationInitializer。查询调用情况,发现在SpringServletContainerInitializer中有用到,如下:
@HandlesTypes(WebApplicationInitializer.class)
public class SpringServletContainerInitializer implements ServletContainerInitializer {

	/**
	 * Delegate the {@code ServletContext} to any {@link WebApplicationInitializer}
	 * implementations present on the application classpath.
	 * <p>Because this class declares @{@code HandlesTypes(WebApplicationInitializer.class)},
	 * Servlet 3.0+ containers will automatically scan the classpath for implementations
	 * of Spring's {@code WebApplicationInitializer} interface and provide the set of all
	 * such types to the {@code webAppInitializerClasses} parameter of this method.
	 * <p>If no {@code WebApplicationInitializer} implementations are found on the classpath,
	 * this method is effectively a no-op. An INFO-level log message will be issued notifying
	 * the user that the {@code ServletContainerInitializer} has indeed been invoked but that
	 * no {@code WebApplicationInitializer} implementations were found.
	 * <p>Assuming that one or more {@code WebApplicationInitializer} types are detected,
	 * they will be instantiated (and <em>sorted</em> if the @{@link
	 * org.springframework.core.annotation.Order @Order} annotation is present or
	 * the {@link org.springframework.core.Ordered Ordered} interface has been
	 * implemented). Then the {@link WebApplicationInitializer#onStartup(ServletContext)}
	 * method will be invoked on each instance, delegating the {@code ServletContext} such
	 * that each instance may register and configure servlets such as Spring's
	 * {@code DispatcherServlet}, listeners such as Spring's {@code ContextLoaderListener},
	 * or any other Servlet API componentry such as filters.
	 * @param webAppInitializerClasses all implementations of
	 * {@link WebApplicationInitializer} found on the application classpath
	 * @param servletContext the servlet context to be initialized
	 * @see WebApplicationInitializer#onStartup(ServletContext)
	 * @see AnnotationAwareOrderComparator
	 */
	@Override
	public void onStartup(Set<Class<?>> webAppInitializerClasses, ServletContext servletContext)
			throws ServletException {

		List<WebApplicationInitializer> initializers = new LinkedList<WebApplicationInitializer>();

		if (webAppInitializerClasses != null) {
			for (Class<?> waiClass : webAppInitializerClasses) {
				// Be defensive: Some servlet containers provide us with invalid classes,
				// no matter what @HandlesTypes says...
				if (!waiClass.isInterface() && !Modifier.isAbstract(waiClass.getModifiers()) &&
						WebApplicationInitializer.class.isAssignableFrom(waiClass)) {
					try {
						initializers.add((WebApplicationInitializer) waiClass.newInstance());
					}
					catch (Throwable ex) {
						throw new ServletException("Failed to instantiate WebApplicationInitializer class", ex);
					}
				}
			}
		}

		if (initializers.isEmpty()) {
			servletContext.log("No Spring WebApplicationInitializer types detected on classpath");
			return;
		}

		servletContext.log(initializers.size() + " Spring WebApplicationInitializers detected on classpath");
		AnnotationAwareOrderComparator.sort(initializers);
		for (WebApplicationInitializer initializer : initializers) {
			initializer.onStartup(servletContext);
		}
	}

}
我们看到在SpringServletContainerInitializer的onStartUp方法里,遍历了一个WebApplicationInitializers的List,这个List又是通过参数Set<Class<?>> webAppInitializerClasses获得的,那么就要看一下这个参数的值是哪里来的。我们看到这个SpringServletContainerInitializer实现了ServletContainerInitializer,是Servlet3.0的一个接口,用于在Web应用启动的时候触发一些处理,这个接口方法会收集实现类中@HandlesTypes注解的中指定的类型做为onStartUp的第一个参数,这个后面会单独在Servlet专题中详细介绍。那么我们看一下SpringServletContainerInitializer类的HandlesType注解,它的value指定了WebApplicationInitializer类型,所以,onStartUp方法的第一个参数就是所有实现了WebApplicationInitializer的类的集合,也就是我们前面指出来的那三个。好了,我们已经看到了AbstractAnnotationConfigDispatcherServletInitializer类提供了两个方法,用户创建rootApplicationContext和ServletApplicationContext,那么他的父类AbstractDispatcherServletInitializer做了哪些事情呢?看代码:
public abstract class AbstractDispatcherServletInitializer extends AbstractContextLoaderInitializer {
/**
* The default servlet name. Can be customized by overriding {@link #getServletName}.
*/
public static final String DEFAULT_SERVLET_NAME = "dispatcher";
@Override
public void onStartup(ServletContext servletContext) throws ServletException {
super.onStartup(servletContext);
registerDispatcherServlet(servletContext);
}
/**
* Register a {@link DispatcherServlet} against the given servlet context.
* <p>This method will create a {@code DispatcherServlet} with the name returned by
* {@link #getServletName()}, initializing it with the application context returned
* from {@link #createServletApplicationContext()}, and mapping it to the patterns
* returned from {@link #getServletMappings()}.
* <p>Further customization can be achieved by overriding {@link
* #customizeRegistration(ServletRegistration.Dynamic)} or
* {@link #createDispatcherServlet(WebApplicationContext)}.
* @param servletContext the context to register the servlet against
*/
protected void registerDispatcherServlet(ServletContext servletContext) {
String servletName = getServletName();
Assert.hasLength(servletName, "getServletName() must not return empty or null");
WebApplicationContext servletAppContext = createServletApplicationContext();
Assert.notNull(servletAppContext,
"createServletApplicationContext() did not return an application " +
"context for servlet [" + servletName + "]");
FrameworkServlet dispatcherServlet = createDispatcherServlet(servletAppContext);
dispatcherServlet.setContextInitializers(getServletApplicationContextInitializers());
ServletRegistration.Dynamic registration = servletContext.addServlet(servletName, dispatcherServlet);
Assert.notNull(registration,
"Failed to register servlet with name '" + servletName + "'." +
"Check if there is another servlet registered under the same name.");
registration.setLoadOnStartup(1);
registration.addMapping(getServletMappings());
registration.setAsyncSupported(isAsyncSupported());
Filter[] filters = getServletFilters();
if (!ObjectUtils.isEmpty(filters)) {
for (Filter filter : filters) {
registerServletFilter(servletContext, filter);
}
}
customizeRegistration(registration);
}
/**
* Return the name under which the {@link DispatcherServlet} will be registered.
* Defaults to {@link #DEFAULT_SERVLET_NAME}.
* @see #registerDispatcherServlet(ServletContext)
*/
protected String getServletName() {
return DEFAULT_SERVLET_NAME;
}
/**
* Create a servlet application context to be provided to the {@code DispatcherServlet}.
* <p>The returned context is delegated to Spring's
* {@link DispatcherServlet#DispatcherServlet(WebApplicationContext)}. As such,
* it typically contains controllers, view resolvers, locale resolvers, and other
* web-related beans.
* @see #registerDispatcherServlet(ServletContext)
*/
protected abstract WebApplicationContext createServletApplicationContext();
/**
* Create a {@link DispatcherServlet} (or other kind of {@link FrameworkServlet}-derived
* dispatcher) with the specified {@link WebApplicationContext}.
* <p>Note: This allows for any {@link FrameworkServlet} subclass as of 4.2.3.
* Previously, it insisted on returning a {@link DispatcherServlet} or subclass thereof.
*/
protected FrameworkServlet createDispatcherServlet(WebApplicationContext servletAppContext) {
return new DispatcherServlet(servletAppContext);
}
/**
* Specify application context initializers to be applied to the servlet-specific
* application context that the {@code DispatcherServlet} is being created with.
* @since 4.2
* @see #createServletApplicationContext()
* @see DispatcherServlet#setContextInitializers
* @see #getRootApplicationContextInitializers()
*/
protected ApplicationContextInitializer<?>[] getServletApplicationContextInitializers() {
return null;
}
/**
* Specify the servlet mapping(s) for the {@code DispatcherServlet} —
* for example {@code "/"}, {@code "/app"}, etc.
* @see #registerDispatcherServlet(ServletContext)
*/
protected abstract String[] getServletMappings();
/**
* Specify filters to add and map to the {@code DispatcherServlet}.
* @return an array of filters or {@code null}
* @see #registerServletFilter(ServletContext, Filter)
*/
protected Filter[] getServletFilters() {
return null;
}
/**
* Add the given filter to the ServletContext and map it to the
* {@code DispatcherServlet} as follows:
* <ul>
* <li>a default filter name is chosen based on its concrete type
* <li>the {@code asyncSupported} flag is set depending on the
* return value of {@link #isAsyncSupported() asyncSupported}
* <li>a filter mapping is created with dispatcher types {@code REQUEST},
* {@code FORWARD}, {@code INCLUDE}, and conditionally {@code ASYNC} depending
* on the return value of {@link #isAsyncSupported() asyncSupported}
* </ul>
* <p>If the above defaults are not suitable or insufficient, override this
* method and register filters directly with the {@code ServletContext}.
* @param servletContext the servlet context to register filters with
* @param filter the filter to be registered
* @return the filter registration
*/
protected FilterRegistration.Dynamic registerServletFilter(ServletContext servletContext, Filter filter) {
String filterName = Conventions.getVariableName(filter);
Dynamic registration = servletContext.addFilter(filterName, filter);
if (registration == null) {
int counter = -1;
while (counter == -1 || registration == null) {
counter++;
registration = servletContext.addFilter(filterName + "#" + counter, filter);
Assert.isTrue(counter < 100,
"Failed to register filter '" + filter + "'." +
"Could the same Filter instance have been registered already?");
}
}
registration.setAsyncSupported(isAsyncSupported());
registration.addMappingForServletNames(getDispatcherTypes(), false, getServletName());
return registration;
}
private EnumSet<DispatcherType> getDispatcherTypes() {
return (isAsyncSupported() ?
EnumSet.of(DispatcherType.REQUEST, DispatcherType.FORWARD, DispatcherType.INCLUDE, DispatcherType.ASYNC) :
EnumSet.of(DispatcherType.REQUEST, DispatcherType.FORWARD, DispatcherType.INCLUDE));
}
/**
* A single place to control the {@code asyncSupported} flag for the
* {@code DispatcherServlet} and all filters added via {@link #getServletFilters()}.
* <p>The default value is "true".
*/
protected boolean isAsyncSupported() {
return true;
}
/**
* Optionally perform further registration customization once
* {@link #registerDispatcherServlet(ServletContext)} has completed.
* @param registration the {@code DispatcherServlet} registration to be customized
* @see #registerDispatcherServlet(ServletContext)
*/
protected void customizeRegistration(ServletRegistration.Dynamic registration) {
}
}
嗯,在onStartUp做了两件事情,一个是调用父类的onStartUp方法,另一个就是注册DispatchServlet了。在registerDispatcherServlet方法中,可以看到调用了createServletApplicationContext方法,这个方法的实现就是在我们一开始介绍的AbstractAnnotationConfigDispatcherServletInitializer中实现的。接着往下看,创建完ServletApplicationContext以后,紧接着就创建DispatcherServlet,然后将DispatcherServlet注册到了ServletContext上,并且设置了Mapping、Filters等。另一个createRootApplicationContext方法在哪里调用呢?我们看一下父类的onStartUp方法:
public abstract class AbstractContextLoaderInitializer implements WebApplicationInitializer {

	/** Logger available to subclasses */
	protected final Log logger = LogFactory.getLog(getClass());


	@Override
	public void onStartup(ServletContext servletContext) throws ServletException {
		registerContextLoaderListener(servletContext);
	}

	/**
	 * Register a {@link ContextLoaderListener} against the given servlet context. The
	 * {@code ContextLoaderListener} is initialized with the application context returned
	 * from the {@link #createRootApplicationContext()} template method.
	 * @param servletContext the servlet context to register the listener against
	 */
	protected void registerContextLoaderListener(ServletContext servletContext) {
		WebApplicationContext rootAppContext = createRootApplicationContext();
		if (rootAppContext != null) {
			ContextLoaderListener listener = new ContextLoaderListener(rootAppContext);
			listener.setContextInitializers(getRootApplicationContextInitializers());
			servletContext.addListener(listener);
		}
		else {
			logger.debug("No ContextLoaderListener registered, as " +
					"createRootApplicationContext() did not return an application context");
		}
	}

	/**
	 * Create the "<strong>root</strong>" application context to be provided to the
	 * {@code ContextLoaderListener}.
	 * <p>The returned context is delegated to
	 * {@link ContextLoaderListener#ContextLoaderListener(WebApplicationContext)} and will
	 * be established as the parent context for any {@code DispatcherServlet} application
	 * contexts. As such, it typically contains middle-tier services, data sources, etc.
	 * @return the root application context, or {@code null} if a root context is not
	 * desired
	 * @see org.springframework.web.servlet.support.AbstractDispatcherServletInitializer
	 */
	protected abstract WebApplicationContext createRootApplicationContext();

	/**
	 * Specify application context initializers to be applied to the root application
	 * context that the {@code ContextLoaderListener} is being created with.
	 * @since 4.2
	 * @see #createRootApplicationContext()
	 * @see ContextLoaderListener#setContextInitializers
	 */
	protected ApplicationContextInitializer<?>[] getRootApplicationContextInitializers() {
		return null;
	}

}
父类AbstractContextLoaderInitializer的onStartUp方法中,只做了一件事,就是调用registerContextLoaderListener方法,而这个方法中,第一步就是调用createRootApplicationContext,然后为ServletContext注册一些ContextLoaderListener。
好了,至此为止,AbstractAnnotationConfigDispatcherServletInitializer类的作用已经非常清晰了。整体串联一下,Web容器启动的时候,会扫描所有实现了WebApplicationInitializer接口的类,并调用它们的onStartUp方法,在onStartUp方法中,会注册ContextLoaderListener和DispatcherServlet到ServletContext中。而在创建ContextLoaderListner的时候,会先创建RootApplicationContext,并且调用自定义的getRootConfigClasses方法来获取相关配置;同样的在创建DispatcherServlet的时候,会先创建ServletApplicationContext,并调用自定义的额getServletConfigClasses来获取相关配置。我们可以通过自定义的getRootConfigClasses和getServletConfigClasses来指定需要加载哪些配置,以及为配置分级。
根据前面贴出来的Servlet WebApplicationContext和Root WebApplicationContext的关系图来看,当Spring容器去获取一个Bean的时候,会先从Servlet级别的上下文中查找,如果找不到再去Root级别的上下文中查找。
3.DispatcherServlet中特殊的Bean
直接看表格:
| Bean | 说明 |
|---|---|
| HandlerMapping | 将请求映射到一个含有预处理和后置处理的拦截器列表的处理。有两个比较重要的HandlerMapping实现,分别是RequestMappingHandlerMapping和SimpleUrlHandlerMapping,其中RequestMappingHandlerMapping即对应了@RequestMapping注解中的值,而SimpleUrlHandlerMapping支持显示的注册URI路径到处理中。 |
| HandlerAdapter | 帮助DispatcherServlet调用映射到请求的处理,并且避免被这些处理细节影响 |
| HandlerExceptionResolver | 异常的处理策略 |
| ViewResolver | 将处理程序中返回的字符串视图名解析为实际视图 |
| LocaleResolver, LocaleContextResolver | 解析客户端正在使用的区域设置,可能还有他们的时区,以便能够提供国际化试图 |
| ThemeResolver | 解析可以使用的主题 |
| MultipartResolver | 在multi-part库的支持下,解析multi-part请求 |
| FlashMapManager | 在重定向的时候提供存储和获取输入输出的FlashMap的能力,可以将属性从一个请求传递到另一个请求 |
后面会详细介绍。
应用程序可以声明上述特殊Bean类型中列出的处理请求所需的基础结构Bean。DispatcherServlet在WebApplicationContext中检查每个特殊的Bean,如果没有匹配的Bean,它将使用DispatcherServlet.properties中配置的默认类型。
# Default implementation classes for DispatcherServlet's strategy interfaces.
# Used as fallback when no matching beans are found in the DispatcherServlet context.
# Not meant to be customized by application developers.

org.springframework.web.servlet.LocaleResolver=org.springframework.web.servlet.i18n.AcceptHeaderLocaleResolver

org.springframework.web.servlet.ThemeResolver=org.springframework.web.servlet.theme.FixedThemeResolver

org.springframework.web.servlet.HandlerMapping=org.springframework.web.servlet.handler.BeanNameUrlHandlerMapping,\
	org.springframework.web.servlet.mvc.method.annotation.RequestMappingHandlerMapping,\
	org.springframework.web.servlet.function.support.RouterFunctionMapping

org.springframework.web.servlet.HandlerAdapter=org.springframework.web.servlet.mvc.HttpRequestHandlerAdapter,\
	org.springframework.web.servlet.mvc.SimpleControllerHandlerAdapter,\
	org.springframework.web.servlet.mvc.method.annotation.RequestMappingHandlerAdapter,\
	org.springframework.web.servlet.function.support.HandlerFunctionAdapter


org.springframework.web.servlet.HandlerExceptionResolver=org.springframework.web.servlet.mvc.method.annotation.ExceptionHandlerExceptionResolver,\
	org.springframework.web.servlet.mvc.annotation.ResponseStatusExceptionResolver,\
	org.springframework.web.servlet.mvc.support.DefaultHandlerExceptionResolver

org.springframework.web.servlet.RequestToViewNameTranslator=org.springframework.web.servlet.view.DefaultRequestToViewNameTranslator

org.springframework.web.servlet.ViewResolver=org.springframework.web.servlet.view.InternalResourceViewResolver

org.springframework.web.servlet.FlashMapManager=org.springframework.web.servlet.support.SessionFlashMapManager
4. Servlet Config
根据上面的介绍,已经了解了DispatcherServlet是怎么创建并注册到ServletContext上的,我们来总结一下:
/**
 * 通过继承AbstractAnnotationConfigDispatcherServletInitializer创建DispatcherServlet
 * @Author: kuromaru
 * @Date: Created in 15:03 2019/6/25
 * @Description:
 * @modified:
 */
public class MyWebAppInitializer extends AbstractAnnotationConfigDispatcherServletInitializer {
    @Override
    protected Class<?>[] getRootConfigClasses() {
        return new Class<?>[]{RootConfig.class};
    }

    @Override
    protected Class<?>[] getServletConfigClasses() {
        return new Class<?>[]{AppConfig.class};
    }

    @Override
    protected String[] getServletMappings() {
        return new String[]{"/app/*"};
    }
}
/**
 * 通过继承AbstractDispatcherServletInitializer创建DispatcherServlet
 * @Author: kuromaru
 * @Date: Created in 15:03 2019/6/25
 * @Description:
 * @modified:
 */
public class MyWebAppInitializerByXML extends AbstractDispatcherServletInitializer {

    @Override
    protected WebApplicationContext createServletApplicationContext() {
        XmlWebApplicationContext xwac = new XmlWebApplicationContext();
        xwac.setConfigLocation("dispatcher-servlet.xml");

        return xwac;
    }

    @Override
    protected String[] getServletMappings() {
        return new String[]{"/"};
    }

    @Override
    protected WebApplicationContext createRootApplicationContext() {
        return null;
    }

    @Override
    protected Filter[] getServletFilters() {
        return new Filter[]{
                new CharacterEncodingFilter()
        };
    }
}
/**
 * 实现WebApplicationInitializer来创建DispatcherServlet
 * @Author: kuromaru
 * @Date: Created in 15:03 2019/6/25
 * @Description:
 * @modified:
 */
public class MyWebAppInitializerDefault implements WebApplicationInitializer {

    @Override
    public void onStartup(ServletContext servletContext) {
        XmlWebApplicationContext xwac = new XmlWebApplicationContext();
        xwac.setConfigLocation("dispatcher-servlet.xml");

        ServletRegistration.Dynamic registration = servletContext.addServlet("dispatcher", new DispatcherServlet(xwac));
        registration.setLoadOnStartup(1);
        registration.addMapping("/");
    }
}
5. DisptacherServlet处理请求的流程
我们来一起理一下请求处理的流程:
- 搜索WebApplicationContext,并绑定到request上,做为Controller和其他元素在处理可以使用的属性。如何搜索呢?当收到一个请求时,我们可以获取到请求的URI,然后根据所有注册的servlet的servletMapping来判断对应哪一个servlet。当适用于我们创建的DispatcherServlet时,我们就可以从中获取到相应的WebApplicationContext(创建DispatcherServlet时会做为参数传进来)。
- 当处理请求时,区域解析器会被绑定到请求,使处理中用到的元素被区域解析器所解析,以供使用,如视图展示、数据准备等等。如果不设置区域解析,则不需要区域解析程序。
- 主题解析器被绑定到请求,让视图等元素决定使用哪个主题。如果不使用主题,可以忽略。
- 如果指定了multipart文件解析器,会搜索请求中的multipart部分。如果找到了,则将请求包装进MultipartHttpServletRequest中,以供流程中其他的元素做进一步的处理。
- 搜索相关的Handler。如果Handler被找到,则执行与该Handler相关的处理链(如前置处理、后置处理、Controller等),以便获取model去渲染视图。或者,对于带注释的Controller,可以直接渲染response(通过HandlerAdpter),而不是返回视图。
- 如果返回了model,则渲染视图,否则,不会渲染。
看着不够直观。。。嗯,来结合源码看一下。
先来考虑一下,假设一个Post请求过来,根据Servlet Map,由DispatcherServlet处理。那么,查了DispatcherServlet的源码,没有对应Post的处理逻辑。。。不慌,DispatcherServlet继承了FrameworkServlet,它里面没有,父类里一定有,看一下FrameworkServlet的相关处理逻辑,有个叫doPost的挺靠谱:
/**
 * Delegate POST requests to {@link #processRequest}.
 * @see #doService
 */
@Override
protected final void doPost(HttpServletRequest request, HttpServletResponse response)
		throws ServletException, IOException {

	processRequest(request, response);
}
看注释,上面写着委托Post请求给processRequest,嗯,继续看processRequest的逻辑:
/**
	 * Process this request, publishing an event regardless of the outcome.
	 * <p>The actual event handling is performed by the abstract
	 * {@link #doService} template method.
	 */
	protected final void processRequest(HttpServletRequest request, HttpServletResponse response)
			throws ServletException, IOException {

		long startTime = System.currentTimeMillis();
		Throwable failureCause = null;

		LocaleContext previousLocaleContext = LocaleContextHolder.getLocaleContext();
		LocaleContext localeContext = buildLocaleContext(request);

		RequestAttributes previousAttributes = RequestContextHolder.getRequestAttributes();
		ServletRequestAttributes requestAttributes = buildRequestAttributes(request, response, previousAttributes);

		WebAsyncManager asyncManager = WebAsyncUtils.getAsyncManager(request);
		asyncManager.registerCallableInterceptor(FrameworkServlet.class.getName(), new RequestBindingInterceptor());

		initContextHolders(request, localeContext, requestAttributes);

		try {
			doService(request, response);
		}
		catch (ServletException ex) {
			failureCause = ex;
			throw ex;
		}
		catch (IOException ex) {
			failureCause = ex;
			throw ex;
		}
		catch (Throwable ex) {
			failureCause = ex;
			throw new NestedServletException("Request processing failed", ex);
		}

		finally {
			resetContextHolders(request, previousLocaleContext, previousAttributes);
			if (requestAttributes != null) {
				requestAttributes.requestCompleted();
			}

			if (logger.isDebugEnabled()) {
				if (failureCause != null) {
					this.logger.debug("Could not complete request", failureCause);
				}
				else {
					if (asyncManager.isConcurrentHandlingStarted()) {
						logger.debug("Leaving response open for concurrent processing");
					}
					else {
						this.logger.debug("Successfully completed request");
					}
				}
			}

			publishRequestHandledEvent(request, response, startTime, failureCause);
		}
	}
有点长。。。往下看,有一个doService方法,靠谱,进去看看,是一个抽象方法,实例方法在子类DispatcherServlet中:
/**
	 * Exposes the DispatcherServlet-specific request attributes and delegates to {@link #doDispatch}
	 * for the actual dispatching.
	 */
	@Override
	protected void doService(HttpServletRequest request, HttpServletResponse response) throws Exception {
		if (logger.isDebugEnabled()) {
			String resumed = WebAsyncUtils.getAsyncManager(request).hasConcurrentResult() ? " resumed" : "";
			logger.debug("DispatcherServlet with name '" + getServletName() + "'" + resumed +
					" processing " + request.getMethod() + " request for [" + getRequestUri(request) + "]");
		}

		// Keep a snapshot of the request attributes in case of an include,
		// to be able to restore the original attributes after the include.
		Map<String, Object> attributesSnapshot = null;
		if (WebUtils.isIncludeRequest(request)) {
			attributesSnapshot = new HashMap<String, Object>();
			Enumeration<?> attrNames = request.getAttributeNames();
			while (attrNames.hasMoreElements()) {
				String attrName = (String) attrNames.nextElement();
				if (this.cleanupAfterInclude || attrName.startsWith(DEFAULT_STRATEGIES_PREFIX)) {
					attributesSnapshot.put(attrName, request.getAttribute(attrName));
				}
			}
		}

		// Make framework objects available to handlers and view objects.
		request.setAttribute(WEB_APPLICATION_CONTEXT_ATTRIBUTE, getWebApplicationContext());
		request.setAttribute(LOCALE_RESOLVER_ATTRIBUTE, this.localeResolver);
		request.setAttribute(THEME_RESOLVER_ATTRIBUTE, this.themeResolver);
		request.setAttribute(THEME_SOURCE_ATTRIBUTE, getThemeSource());

		FlashMap inputFlashMap = this.flashMapManager.retrieveAndUpdate(request, response);
		if (inputFlashMap != null) {
			request.setAttribute(INPUT_FLASH_MAP_ATTRIBUTE, Collections.unmodifiableMap(inputFlashMap));
		}
		request.setAttribute(OUTPUT_FLASH_MAP_ATTRIBUTE, new FlashMap());
		request.setAttribute(FLASH_MAP_MANAGER_ATTRIBUTE, this.flashMapManager);

		try {
			doDispatch(request, response);
		}
		finally {
			if (!WebAsyncUtils.getAsyncManager(request).isConcurrentHandlingStarted()) {
				// Restore the original attribute snapshot, in case of an include.
				if (attributesSnapshot != null) {
					restoreAttributesAfterInclude(request, attributesSnapshot);
				}
			}
		}
	}
嗯,看到了吗,注意那一堆request.setAttribute操作:
request.setAttribute(WEB_APPLICATION_CONTEXT_ATTRIBUTE, getWebApplicationContext());
request.setAttribute(LOCALE_RESOLVER_ATTRIBUTE, this.localeResolver);
request.setAttribute(THEME_RESOLVER_ATTRIBUTE, this.themeResolver);
request.setAttribute(THEME_SOURCE_ATTRIBUTE, getThemeSource());
开心吧?找到组织了~这不正是对应了我们整理的DispatcherServlet处理请求的步骤的前4步吗。我们先来看一下这四步:
- 首先是将WebApplicationContext绑定在请求上,request.setAttribute(WEB_APPLICATION_CONTEXT_ATTRIBUTE, getWebApplicationContext()),是通过一个getWebApplicationContext方法来获取WebApplicationContext。点进去看一下,这个方法属于FrameServlet类,这个是DispatcherServlet的父类,看代码:
/**
 * Return this servlet's WebApplicationContext.
 */
public final WebApplicationContext getWebApplicationContext() {
	return this.webApplicationContext;
}
通过代码,我们看到直接返回了一个webApplicationContext属性,那这个属性是在哪里设值的呢?去代码里找一下:
	public FrameworkServlet(WebApplicationContext webApplicationContext) {
		this.webApplicationContext = webApplicationContext;
	}
在构造器的里完成了复制操作,再去看一下这个构造器在什么时候被调用:
	public DispatcherServlet(WebApplicationContext webApplicationContext) {
		super(webApplicationContext);
		setDispatchOptionsRequest(true);
	}
看到木有~在我们构建DisptacherServlet的时候,会将参数WebApplicationContext传给父类构造器,也就是FrameServlet的构造器,然后再父类构造里完成赋值。
也就是说,当我们通过一个WebApplicationContext创建DispatcherServlet以后,需要把DispatcherServlet注册到Servlet中,并设置servlet Map,那么在DispatcherServlet收到请求以后,就可以获取到已经配置的WebApplicationContext,并绑定到请求上。
- 然后是设置LocaleResolver,同样的,是获取this.localeResolver的值。来看这个localeResolver是哪里来的。查看代码,很容易找到这个localeResolver的赋值的位置,容器启动的时候会调用onRefresh方法,这个方法里调用了initLocaleResolver方法,就是在这里做的初始化。
	/**
	 * Initialize the LocaleResolver used by this class.
	 * <p>If no bean is defined with the given name in the BeanFactory for this namespace,
	 * we default to AcceptHeaderLocaleResolver.
	 */
	private void initLocaleResolver(ApplicationContext context) {
		try {
			this.localeResolver = context.getBean(LOCALE_RESOLVER_BEAN_NAME, LocaleResolver.class);
			if (logger.isDebugEnabled()) {
				logger.debug("Using LocaleResolver [" + this.localeResolver + "]");
			}
		}
		catch (NoSuchBeanDefinitionException ex) {
			// We need to use the default.
			this.localeResolver = getDefaultStrategy(context, LocaleResolver.class);
			if (logger.isDebugEnabled()) {
				logger.debug("Unable to locate LocaleResolver with name '" + LOCALE_RESOLVER_BEAN_NAME +
						"': using default [" + this.localeResolver + "]");
			}
		}
	}
如果我们配置了localeResolver,则使用我们自己的配置,如果没有配置的,就去通过getDefaultStrategy方法获取一个默认的LocaleResolver,这个默认的是什么呢?看代码:
	/**
	 * Create a List of default strategy objects for the given strategy interface.
	 * <p>The default implementation uses the "DispatcherServlet.properties" file (in the same
	 * package as the DispatcherServlet class) to determine the class names. It instantiates
	 * the strategy objects through the context's BeanFactory.
	 * @param context the current WebApplicationContext
	 * @param strategyInterface the strategy interface
	 * @return the List of corresponding strategy objects
	 */
	@SuppressWarnings("unchecked")
	protected <T> List<T> getDefaultStrategies(ApplicationContext context, Class<T> strategyInterface) {
		String key = strategyInterface.getName();
		String value = defaultStrategies.getProperty(key);
		if (value != null) {
			String[] classNames = StringUtils.commaDelimitedListToStringArray(value);
			List<T> strategies = new ArrayList<T>(classNames.length);
			for (String className : classNames) {
				try {
					Class<?> clazz = ClassUtils.forName(className, DispatcherServlet.class.getClassLoader());
					Object strategy = createDefaultStrategy(context, clazz);
					strategies.add((T) strategy);
				}
				catch (ClassNotFoundException ex) {
					throw new BeanInitializationException(
							"Could not find DispatcherServlet's default strategy class [" + className +
									"] for interface [" + key + "]", ex);
				}
				catch (LinkageError err) {
					throw new BeanInitializationException(
							"Error loading DispatcherServlet's default strategy class [" + className +
									"] for interface [" + key + "]: problem with class file or dependent class", err);
				}
			}
			return strategies;
		}
		else {
			return new LinkedList<T>();
		}
	}
通过方法注释,就可以很清楚的看到,是从DispatchcerServlet.properties去获取的。
- themeResolver的获取与localeResolver相似,这里就不再赘述。有意思的一点是,Spring会把WebApplicationContext做为默认的ThemeSource来绑定到request上。
前面的三步都已经很清晰了,回到doService方法继续往下看,有个doDispatch方法,点进去:
/**
	 * Process the actual dispatching to the handler.
	 * <p>The handler will be obtained by applying the servlet's HandlerMappings in order.
	 * The HandlerAdapter will be obtained by querying the servlet's installed HandlerAdapters
	 * to find the first that supports the handler class.
	 * <p>All HTTP methods are handled by this method. It's up to HandlerAdapters or handlers
	 * themselves to decide which methods are acceptable.
	 * @param request current HTTP request
	 * @param response current HTTP response
	 * @throws Exception in case of any kind of processing failure
	 */
	protected void doDispatch(HttpServletRequest request, HttpServletResponse response) throws Exception {
		HttpServletRequest processedRequest = request;
		HandlerExecutionChain mappedHandler = null;
		boolean multipartRequestParsed = false;

		WebAsyncManager asyncManager = WebAsyncUtils.getAsyncManager(request);

		try {
			ModelAndView mv = null;
			Exception dispatchException = null;

			try {
				processedRequest = checkMultipart(request);
				multipartRequestParsed = (processedRequest != request);

				// Determine handler for the current request.
				mappedHandler = getHandler(processedRequest);
				if (mappedHandler == null || mappedHandler.getHandler() == null) {
					noHandlerFound(processedRequest, response);
					return;
				}

				// Determine handler adapter for the current request.
				HandlerAdapter ha = getHandlerAdapter(mappedHandler.getHandler());

				// Process last-modified header, if supported by the handler.
				String method = request.getMethod();
				boolean isGet = "GET".equals(method);
				if (isGet || "HEAD".equals(method)) {
					long lastModified = ha.getLastModified(request, mappedHandler.getHandler());
					if (logger.isDebugEnabled()) {
						logger.debug("Last-Modified value for [" + getRequestUri(request) + "] is: " + lastModified);
					}
					if (new ServletWebRequest(request, response).checkNotModified(lastModified) && isGet) {
						return;
					}
				}

				if (!mappedHandler.applyPreHandle(processedRequest, response)) {
					return;
				}

				// Actually invoke the handler.
				mv = ha.handle(processedRequest, response, mappedHandler.getHandler());

				if (asyncManager.isConcurrentHandlingStarted()) {
					return;
				}

				applyDefaultViewName(processedRequest, mv);
				mappedHandler.applyPostHandle(processedRequest, response, mv);
			}
			catch (Exception ex) {
				dispatchException = ex;
			}
			catch (Throwable err) {
				// As of 4.3, we're processing Errors thrown from handler methods as well,
				// making them available for @ExceptionHandler methods and other scenarios.
				dispatchException = new NestedServletException("Handler dispatch failed", err);
			}
			processDispatchResult(processedRequest, response, mappedHandler, mv, dispatchException);
		}
		catch (Exception ex) {
			triggerAfterCompletion(processedRequest, response, mappedHandler, ex);
		}
		catch (Throwable err) {
			triggerAfterCompletion(processedRequest, response, mappedHandler,
					new NestedServletException("Handler processing failed", err));
		}
		finally {
			if (asyncManager.isConcurrentHandlingStarted()) {
				// Instead of postHandle and afterCompletion
				if (mappedHandler != null) {
					mappedHandler.applyAfterConcurrentHandlingStarted(processedRequest, response);
				}
			}
			else {
				// Clean up any resources used by a multipart request.
				if (multipartRequestParsed) {
					cleanupMultipart(processedRequest);
				}
			}
		}
	}
- 对照着我们上面整理的步骤来看,这个方法里有一个checkMultipart方法的调用,看方法名好像跟步骤里的第四部有关,点进去看一下:
/**
	 * Convert the request into a multipart request, and make multipart resolver available.
	 * <p>If no multipart resolver is set, simply use the existing request.
	 * @param request current HTTP request
	 * @return the processed request (multipart wrapper if necessary)
	 * @see MultipartResolver#resolveMultipart
	 */
	protected HttpServletRequest checkMultipart(HttpServletRequest request) throws MultipartException {
		if (this.multipartResolver != null && this.multipartResolver.isMultipart(request)) {
			if (WebUtils.getNativeRequest(request, MultipartHttpServletRequest.class) != null) {
				logger.debug("Request is already a MultipartHttpServletRequest - if not in a forward, " +
						"this typically results from an additional MultipartFilter in web.xml");
			}
			else if (hasMultipartException(request) ) {
				logger.debug("Multipart resolution failed for current request before - " +
						"skipping re-resolution for undisturbed error rendering");
			}
			else {
				try {
					return this.multipartResolver.resolveMultipart(request);
				}
				catch (MultipartException ex) {
					if (request.getAttribute(WebUtils.ERROR_EXCEPTION_ATTRIBUTE) != null) {
						logger.debug("Multipart resolution failed for error dispatch", ex);
						// Keep processing error dispatch with regular request handle below
					}
					else {
						throw ex;
					}
				}
			}
		}
		// If not returned before: return original request.
		return request;
	}
看到方法注释就开心了,Convert the request into a multipart request,好了,找到第四步了~这个方法里,会通过multipartResolver(initStrategies里初始化的)来把请求转化成Multipart请求。
- 然后就是去找对应的handler了。继续看DispatcherServlet的代码,在检查完multipart后,有一个getHandler的操作。点进去看一下:
/**
	 * Return the HandlerExecutionChain for this request.
	 * <p>Tries all handler mappings in order.
	 * @param request current HTTP request
	 * @return the HandlerExecutionChain, or {@code null} if no handler could be found
	 */
	protected HandlerExecutionChain getHandler(HttpServletRequest request) throws Exception {
		for (HandlerMapping hm : this.handlerMappings) {
			if (logger.isTraceEnabled()) {
				logger.trace(
						"Testing handler map [" + hm + "] in DispatcherServlet with name '" + getServletName() + "'");
			}
			HandlerExecutionChain handler = hm.getHandler(request);
			if (handler != null) {
				return handler;
			}
		}
		return null;
	}
这个方法遍历了一个叫handlerMappings的属性,然后再分别对每一个HandlerMapping做getHandler操作。看一下这个getHandler的定义:
	/**
	 * Return a handler and any interceptors for this request. The choice may be made
	 * on request URL, session state, or any factor the implementing class chooses.
	 * <p>The returned HandlerExecutionChain contains a handler Object, rather than
	 * even a tag interface, so that handlers are not constrained in any way.
	 * For example, a HandlerAdapter could be written to allow another framework's
	 * handler objects to be used.
	 * <p>Returns {@code null} if no match was found. This is not an error.
	 * The DispatcherServlet will query all registered HandlerMapping beans to find
	 * a match, and only decide there is an error if none can find a handler.
	 * @param request current HTTP request
	 * @return a HandlerExecutionChain instance containing handler object and
	 * any interceptors, or {@code null} if no mapping found
	 * @throws Exception if there is an internal error
	 */
	HandlerExecutionChain getHandler(HttpServletRequest request) throws Exception;
还是先看注释,上面说这个方法返回请求的一个handler和他的拦截器,那么我们就可以初步认识到,这个HandlerExecutionChain至少含有一个handler和一个拦截器的list。继续看实现类:
/**
	 * Look up a handler for the given request, falling back to the default
	 * handler if no specific one is found.
	 * @param request current HTTP request
	 * @return the corresponding handler instance, or the default handler
	 * @see #getHandlerInternal
	 */
	@Override
	public final HandlerExecutionChain getHandler(HttpServletRequest request) throws Exception {
		Object handler = getHandlerInternal(request);
		if (handler == null) {
			handler = getDefaultHandler();
		}
		if (handler == null) {
			return null;
		}
		// Bean name or resolved handler?
		if (handler instanceof String) {
			String handlerName = (String) handler;
			handler = getApplicationContext().getBean(handlerName);
		}

		HandlerExecutionChain executionChain = getHandlerExecutionChain(handler, request);
		if (CorsUtils.isCorsRequest(request)) {
			CorsConfiguration globalConfig = this.globalCorsConfigSource.getCorsConfiguration(request);
			CorsConfiguration handlerConfig = getCorsConfiguration(handler, request);
			CorsConfiguration config = (globalConfig != null ? globalConfig.combine(handlerConfig) : handlerConfig);
			executionChain = getCorsHandlerExecutionChain(request, executionChain, config);
		}
		return executionChain;
	}
源码里的第一步,就通过getHandlerInternal获取了handler,然后再通过handler构建EHandlerExecutionChain。再进去看一下怎么获取的handler,这个getHandlerInternal方法是一个接口方法,我们找到位于AbstractUrlHandlerMapping的实例方法:
/**
	 * Look up a handler for the URL path of the given request.
	 * @param request current HTTP request
	 * @return the handler instance, or {@code null} if none found
	 */
	@Override
	protected Object getHandlerInternal(HttpServletRequest request) throws Exception {
		String lookupPath = getUrlPathHelper().getLookupPathForRequest(request);
		Object handler = lookupHandler(lookupPath, request);
		if (handler == null) {
			// We need to care for the default handler directly, since we need to
			// expose the PATH_WITHIN_HANDLER_MAPPING_ATTRIBUTE for it as well.
			Object rawHandler = null;
			if ("/".equals(lookupPath)) {
				rawHandler = getRootHandler();
			}
			if (rawHandler == null) {
				rawHandler = getDefaultHandler();
			}
			if (rawHandler != null) {
				// Bean name or resolved handler?
				if (rawHandler instanceof String) {
					String handlerName = (String) rawHandler;
					rawHandler = getApplicationContext().getBean(handlerName);
				}
				validateHandler(rawHandler, request);
				handler = buildPathExposingHandler(rawHandler, lookupPath, lookupPath, null);
			}
		}
		if (handler != null && logger.isDebugEnabled()) {
			logger.debug("Mapping [" + lookupPath + "] to " + handler);
		}
		else if (handler == null && logger.isTraceEnabled()) {
			logger.trace("No handler mapping found for [" + lookupPath + "]");
		}
		return handler;
	}
这里就比较清晰了,通过URI来获取响应的handler。关于Handler的整理暂时先止于此,由于内容比较多,包括handlerMapping、handlerMethodMapping和handlerAdapter等,我们后面单独梳理。
- 接下来通过获取到的handler获取对应的handlerAdapter,然后通过handlerAdapter来执行所请求的处理。
if (!mappedHandler.applyPreHandle(processedRequest, response)) {
	return;
}

// Actually invoke the handler.
mv = ha.handle(processedRequest, response, mappedHandler.getHandler());

if (asyncManager.isConcurrentHandlingStarted()) {
	return;
}

applyDefaultViewName(processedRequest, mv);
mappedHandler.applyPostHandle(processedRequest, response, mv);
在执行请求处理的前后,会先执行HandlerInterceptor中的方法。其中,mv即是ModelAndView。这块的分析跟handler一起做。FLAG~~~
以上,就是DispatcherServlet接收到请求以后的大致处理流程。可以看到,上面的流程都是一些正常流程,那么,如果处理中,出现了错误怎么办呢?可以使用HandlerExceptionResolver来做自定义处理,后面会详细介绍。
Spring的DispatcherServlet支持返回last-modification-date,由Servlet API指定。过程也很简单,DispatcherServlet查找合适的HandlerMapping,并检测找到的Handler是否实现了LastModified接口。如果是这样,LastModified接口的getLastModified方法的返回值将返回给客户端。
可以通过想web.xml的servlet声明中添加初始化参数来自定义DispatcherServlet,支持的参数如下:
| 参数名 | 说明 |
|---|---|
| contextClass | 实现了ConfigurableWebApplicationContext的类,将被Servlet实例化和配置。默认使用XmlWebApplicationContext。 |
| contextConfigLocation | 用于对Context指明上下文配置文件的路径,支持配置多个,如果配置了两个相同的,则以最后配置的为准 |
| namespace | WebApplicationContext的命名空间,默认是[servlet-name]-servlet |
| throwExceptionIfNoHandlerFound | 用于指定是否在找不对请求对应的handler的时候抛出NoHandlerFoundException,该异常可以被HandlerExceptionResolver处理,如被@ExceptionHandler的Controller。默认是false,在这种情况下,就会提示404。需要注意,如果配置了默认的servlet,则未匹配的请求会被转发到默认的servlet中,不会引发404. |
6. Interception
所有的HandlerMapping都支持HandlerInterceptor,当你想要将特定的功能用于某些请求的时候,这些拦截器就会非常有用。
自定义的拦截器要实现HandlerInterceptor接口,接口里有三个抽象方法必须实现,分别是:
- preHandle(HttpServletRequest request, HttpServletResponse response, Object handler)
- postHandle(HttpServletRequest request, HttpServletResponse response, Object handler, ModelAndView modelAndView)
- afterCompletion(HttpServletRequest request, HttpServletResponse response, Object handler, Exception ex)
/**
 * @Author: kuromaru
 * @Date: Created in 17:12 2019/7/10
 * @Description:
 * @modified:
 */
public class MyHandlerInteceptor implements HandlerInterceptor {
    @Override
    public boolean preHandle(HttpServletRequest request, HttpServletResponse response, Object handler) throws Exception {
        return false;
    }

    @Override
    public void postHandle(HttpServletRequest request, HttpServletResponse response, Object handler, ModelAndView modelAndView) throws Exception {

    }

    @Override
    public void afterCompletion(HttpServletRequest request, HttpServletResponse response, Object handler, Exception ex) throws Exception {

    }
}
留意一下preHandler的返回值,这个方法返回一个boolean类型的值,如果返回true,则会继续执行处理链上的逻辑,而当返回false的时候,DispatcherServlet会认为已经处理了请求,不会执行链上的其他拦截器和实际处理程序。
也可以通过实现HandlerMapping来注册Interceptor。看到这,应该就想起来我们上面整理的HandlerMapping的作用,即将请求映射到一个包含前置处理和后置处理的拦截器列表的处理。因为HandlerMapping本身就是为了把请求映射到含有拦截器的处理上,所以,我们就可以通过HandlerMapping来注册拦截器。后面我们再详细介绍。
需要注意一点,postHandler对于@ResponseBody和ResponseEntity方法的作用比较小,这些response的提交和写入是在HandlerAdapter内进行的,也就是在postHandler之前。为什么在这个之前呢?想一下,postHandler是在HandlerInterceptor中的,而HandlerInterceptor的执行
7. HandlerMapping和HandlerAdapter
一直有个疑问,HandlerMapping是为了将请求映射到含有拦截器的处理上,而HandlerAdapter则是为了帮助DispatcherServlet调用映射到请求的处理。感觉差不多,仔细读一下这两个的定义,就能发现,HandlerMapping是为了找到请求映射的处理,而HandlerAdapter是为了执行这个处理。就这么简单。
8. 异常处理
当请求过程中出现了异常,DispatchServlet委托HandlerExceptionResolver处理链来进行异常处理。
可用的HandlerExceptionResolver如下:
| HandlerExceptionResolver实现类 | 说明 |
|---|---|
| SimpleMappingExceptionResolver | 异常类名和视图的映射解析,用于在浏览器中显示错误页面 |
| DefaultHandlerExceptionResolver | 解析Spring MVC的异常,并映射为HTTP状态码 |
| ResponseStatusExceptionResolver | 解析带有@ResponseStatus注解的异常,并基于注解中的value值,映射成HTTP状态码 |
| ExceptionHandlerExceptionResolver | 通过调用被@Controller或@ControllerAdvice注解的类中带有@ExceptionHandler的方法来解析异常 |
上面的DefaultHandlerExcepiton,具体的HTTP状态码映射关系如下:
| Exception | Http Status code |
|---|---|
| HttpRequestMethodNotSupportedException | 405 (SC_METHOD_NOT_ALLOWED) |
| HttpMediaTypeNotSupportedException | 415 (SC_UNSUPPORTED_MEDIA_TYPE) |
| HttpMediaTypeNotAcceptableException | 406 (SC_NOT_ACCEPTABLE) |
| MissingPathVariableException | 500 (SC_INTERNAL_SERVER_ERROR) |
| MissingServletRequestParameterException | 400 (SC_BAD_REQUEST) |
| ServletRequestBindingException | 400 (SC_BAD_REQUEST) |
| ConversionNotSupportedException | 500 (SC_INTERNAL_SERVER_ERROR) |
| TypeMismatchException | 400 (SC_BAD_REQUEST) |
| HttpMessageNotReadableException | 400 (SC_BAD_REQUEST) |
| HttpMessageNotWritableException | 500 (SC_INTERNAL_SERVER_ERROR) |
| MethodArgumentNotValidException | 400 (SC_BAD_REQUEST) |
| MissingServletRequestPartException | 400 (SC_BAD_REQUEST) |
| BindException | 400 (SC_BAD_REQUEST) |
| NoHandlerFoundException | 404 (SC_NOT_FOUND) |
| AsyncRequestTimeoutException | 503 (SC_SERVICE_UNAVAILABLE) |
根据HandlerExceptionResolver的约定,对于异常的处理可以有以下几个结果:
- 返回一个指向错误视图的ModelAndView
- 如果异常在resolver中被处理,允许返回一个空的ModelAndView
- 如果异常未被处理,允许向上抛出到Servlet
9. 视图解析
Spring MVC定义了ViewResolver和View接口,允许在浏览器中渲染Model,ViewResolver提供视图名称和实际视图之间的映射,View解决了在将数据移交给特定视图之前的数据准备工作。
具体的ViewResolver如下:
| ViewResolver | 描述 |
|---|---|
| AbstractCachingViewResolver | 解析AbstractCachingViewResolver的子类,缓存提高了某些视图的性能,可以通过将缓存禁用来关闭缓存。如果必须在某个时间刷新视图,可以调用removeFromCache来使缓存失效。 |
| XmlViewResolver | 允许接受一个与Spring XML Bean工厂相同DTD的xml配置文件,默认的配置文件是/WEB-INF/views.xml |
| ResourceBundleViewResolver | 在ResourceBundle中使用Bean定义,通过bundle的名字来指定ViewResolver。对每一个视图,使用 视图名.(class) 做为视图的class,视图名.url做为视图的url。 |
| UrlBasedViewResolver | 支持视图名到URL的直接解析,而不需要指定映射关系。 |
| InternalResourceViewResolver | UrlBasedViewResolver的子类,支持InternalResourceView及子类,例如JSP、JstlView、TilesView等。可以通过setViewClass方法为所有视图指定视图类 |
| FreeMarkerViewResolver | UrlBasedViewResolver的子类,支持FreeMarkerView及子类 |
| ContentNegotiatingViewResolver | 基于请求中的文件名或者Accept请求头来解析视图 |
第三个flag...后面挨个整理这些视图解析器。。。不能再立了...(┬_┬)
我们可以声明多个解析器,作为一个视图解析器链。ViewResolver约定返回null来标识找不到视图。但是在JSP和InternalResourceViewResolver的情况下,判断JSP是否存在的唯一标准是通过RequestDispatcher来执行分派。因此,必须将InternalResourceViewResolver作为视图解析器链的最后一个环节。
可以通过在视图名前面指定redirect:来执行重定向。UrlBasedViewResolver将此识别为需要重定向的指令。效果与使用RedirectView的效果相同,不同的是可以直接在控制器里控制重定向。逻辑视图名,如 redirect:/myapp/ome/resource,相当于对当前Servlet上下文进行重定向,而如 redirect:http://myhost.com/some/arbitrary/path 这样的则重定向到一个决定路径。
需要注意的是,如果一个Controller的方法被@ResponseStatus注解,则注解的优先级要高于RedirectView。也就是说,以@ResponseStatus的响应状态为准。
还可以通过指定forward:前缀来指定一个转发。它会被UrlBasedViewResolver解析,并创建一个InternalResourceView来执行RequestDispatcher.forward()。但是,这个前缀不适用与InternalResourceViewResolver和JSP的InternalResourceView。
ContentNegotiatingViewResolver本身不解析视图,而是委托给其他的解析器,并且选择与请求表现的视图相类似的视图。如可以从Accept表头或者查询参数来确定表示哪一个视图。
ContentNegotiatingViewResolver通过将请求的Content-Type与每个ViewResolver关联的View所支持的Content-Type进行比较,来选择合适的视图。如果找不到合适的视图,则通过DefaultView属性来指定视图。
10. Locale
Spring MVC支持国际化,DispatcherServlet允许通过LocaleResolver设置自动解析消息。
当Request进来的时候,DispatcherServlet就去找Locale解析器,如果找到了,就会尝试用它去设置Locale。可以使用RequestContext.getLocale()方法来获取当前正在使用的Locale设置。也可以在特定情况下使用拦截器来更改Locale设置。
Locale解析器和拦截器在org.springframework.web.servlet.i18n包中。
- TimeZone
除了获取Client的Locale设置以外,了解时区通常也很有用。LocaleContextResolver接口提供了对LocaleResolver的扩展,允许解析器提供更丰富的LocaleContext,其中就包括时区信息。
通常可以使用RequestContext.getTimeZone()来获取时区信息。获取到的时区信息由注册到Spring的ConversionService的任何Date/Time转换器和格式化程序自动使用。 - Header Resolver
这个区域解析器检查请求的accept-language头部信息。通常,这个头部信息包含客户端操作系统的区域设置。需要注意,该解析器并不支持Time Zone信息。 - Cookie Resolver
该区域解析器检查客户端中的Cookie设置,看有没有区域设置或者时区信息被设置。如果存在,则使用指定的详细信息。通过使用此区域解析器的属性,我们可以指定cookie的名称和最大期限。
可以通过配置CookieLocaleResolver来设置cookie信息,如下:
<bean id="localeResolver" class="org.springframework.web.servlet.i18n.CookieLocaleResolver">
    <property name="cookieName" value="clientLanguage" />
    <property name="cookieMaxAge" value="100000" />
</bean>
再来看一下CoolieLocaleResolver的属性:
| Property | Default | Description |
|---|---|---|
| cookieName | className + LOCALE | cookie的名称 |
| cookieMaxAge | Servlet容器的默认值 | cookie在客户端存活的最大时间。如果设为-1,则不会被持久化。仅在客户端关闭之前可用。 |
| cookiePath | / | 将cookie的可见性限制在某个路径下。当指定cookiePath时,cookie仅在指定的路径及其子路径下可见。 |
- Session Resovler
SessionLocaleResolver允许从用户请求的会话Session中检索区域设置和时区设置。与CookieLocaleResolver不同的是,此解析器将本地的区域设置存储在Servlet的HttpSession中。因此,这些设置的生命周期与会话的生命周期相同。
注意,此设置与Spring Session项目无关。 - Locale Interceptor
可以通过将LocaleChangeInterceptor添加到HandlerMapping定义来启用对区域设置的更改。它检测请求中的参数,并相应的更改区域设置,在Dispatcher的应用上下文中调用LocaleResolver上的setLocale方法。看下面的例子:
<bean id="localeChangeInterceptor" class="org.springframework.web.servlet.i18n.LocaleChangeInterceptor">
    <property name="paramName" value="siteLanguage" />
</bean>

<bean id="localeResolver" class="org.springframework.web.servlet.i18n.CookieLocaleResolver" />

<bean id="urlMapping" class="org.springframework.web.servlet.handler.SimpleUrlHandlerMapping">
    <property name="interceptors">
        <list>
            <ref bean="localeChangeInterceptor" />
        </list>
    </property>
    <property name="mappings">
        <value>/**/*.view=someController</value>
    </property>
</bean>
上面的例子定义了一个LocaleChangeInterceptor,用于拦截请求请求参数中有siteLanguage的请求。比如,对于请求http://www.sf.net/home.view?siteLanguage=nl,就会将view的表示语言改为荷兰语。
11. Themes
可以通过设置Spring MVC框架的主题来设置应用程序的整体外观。
如果要在Web应用中使用主题,则必须设置org.springframework.ui.context.ThemeSource接口。WebApplicationContext接口扩展了ThemeSource接口,但是将职责委托给了专门的实现。默认情况下,委托类是从类路径的根目录加载属性文件的org.springframe.ui.context.support.ResourceBundleThemeSource实现。如果要使用自定的ThemeSource,可以在spring容器中使用保留名themeSource进行配置。
当我们使用ResourceBundleThemeSource的时候,theme通常会被定义在配置文件中,如下:
styleSheet=/themes/cool/style.css
background=/themes/cool/img/coolBg.jpg
<html>
    <head>
        <link rel="stylesheet" href="<spring:theme code='styleSheet' />" type="text/css" />
    </head>
    <body style="background=<spring:theme code='background' />">
        ...
    </body>
<html>
上面在配置文件中定义了两个属性:styleSheet和background,然后在html中,通过link标签,使用spring:theme code='styleSheet'将css引入到页面中,同样的方法,在body标签中设置了背景图片。
定义完主题以后,就需要对主题进行解析,spring会查找名为themeSource的bean做为主题解析器。支持的主题解析器有:
| Class | Description |
|---|---|
| FixedThemeResolver | 选择固定主题,使用defaultThemeName属性进行设置 |
| SessionThemeResolver | 主题在用户的HTTP会话中维护,需要在每个会话中设置一次,但是不会在会话之间持久化 |
| CookieThemeResolver | 所选主题被存储在客户端的cookie中 |
同样的,spring也提供了一个ThemeChangeInterceptor来根据请求参数修改主题。
12. Multipart Resolver
来自org.springframework.web.multipart包的MultipartResolver是解析包括文件上传在内的多部分请求的策略。一种是基于Commons FileUpload的实现,另一种是基于Servlet3.0的multipart请求解析的实现。
如果要启用多部分处理,需要在DispatcherServlet Spring配置中声明一个名为multipartResolver的MultipartResolver Bean。DispatcherServlet检测到它并将其应用于传入的请求,当接收到的内容类型为multipart/form-data的Post请求时,解析器解析内容并将当前HttpServletRequest包装为MultipartHttpServletRequest,以提供对已解析部分的访问,并将它们作为请求参数公开。
若要使用Commons FileUpload,我们可以配置一个名为multipartResolver的CommonsMultipartResolver类型的bean,同时我们需要依赖commons-fileupload。
而Servlet3.0可以通过配置Servlet容器来使用,看代码:
public class AppInitializer extends AbstractAnnotationConfigDispatcherServletInitializer{

    @Override
    protected void customizeRegistration(ServletRegistration.Dynamic registration) {
        registration.setMultipartConfig(new MultipartConfigElement("/tmp"));
    }
}
也可以通过在web.xml中配置
13. Logging
可以通过DispatcherServlet上的enableLoggingRequestDetails属性来设置是否在日志中显示完整的请求数据。
public class MyInitializer
        extends AbstractAnnotationConfigDispatcherServletInitializer {

    @Override
    protected Class<?>[] getRootConfigClasses() {
        return ... ;
    }

    @Override
    protected Class<?>[] getServletConfigClasses() {
        return ... ;
    }

    @Override
    protected String[] getServletMappings() {
        return ... ;
    }

    @Override
    protected void customizeRegistration(Dynamic registration) {
        registration.setInitParameter("enableLoggingRequestDetails", "true");
    }

}
至此,DispatcherServlet告一段落,下面。。。开始填坑(┬_┬)

 浙公网安备 33010602011771号