

Linux安装 Mariadb(MySQL)卸载、与远程连接
MariaDB 安装部署(debian)
使用如下命令查询当前linux发行版的信息:
lsb_release -a
接着查看软件源是否对应,如果不对,更新对应版本的软件源:https://www.cnblogs.com/kuozhen/p/18203300
如果软件源更换后,接着执行:sudo apt update 更新命令
完整安装流程如下:

# 准备
root@us0uy7gEWkwb:~# apt-get update

root@us0uy7gEWkwb:~# lsb_release -a
No LSB modules are available.
Distributor ID: Debian
Description: Debian GNU/Linux 11 (bullseye)
Release: 11
Codename: bullseye

# 安装
root@us0uy7gEWkwb:~# apt install mariadb-server mariadb-client
# 执行安装命令,指定安装Mariadb版本,注意,一定要输入完整,不要漏了mariab-clint。
Do you want to continue? [Y/n] Y
是否要继续?[Y/n]

# 设置
root@us0uy7gEWkwb:~# sudo mysql_secure_installation
# 安装完成后,执行设置命令

Enter current password for root (enter for none): 可以直接回车
输入root用户的当前密码(无需输入):
【说明】如果这是第一次安装 MySQL,那么就根本没有设置过密码,这里直接按回车即可

OK, successfully used password, moving on...
好的,成功使用密码,继续。。。

Setting the root password or using the unix_socket ensures that nobody
can log into the MariaDB root user without the proper authorisation.
设置root密码或使用unix_socket可确保未经适当授权,任何人都无法登录MariaDB root用户。

You already have your root account protected, so you can safely answer 'n'.
您已经保护了您的 root 帐户,所以您可以安全地回答 n’。

Switch to unix_socket authentication [Y/n] y
切换到 unix _ socket 身份验证[ Y/n ]

Enabled successfully!
启动成功!
Reloading privilege tables..
重新装载特权表. 。
... Success!
... 成功!

You already have your root account protected, so you can safely answer 'n'.
您已经保护了您的 root 帐户,所以您可以安全地回答 n’。

# 设置root密码
Change the root password? [Y/n] y
更改 root 密码?

New password:
新密码:

Re-enter new password:
再输一次新密码:

Password updated successfully!
密码更新成功!
Reloading privilege tables..
... Success!


By default, a MariaDB installation has an anonymous user, allowing anyone
to log into MariaDB without having to have a user account created for
them. This is intended only for testing, and to make the installation
go a bit smoother. You should remove them before moving into a
production environment.
默认情况下,MariaDB安装有一个匿名用户,允许任何人登录MariaDB,而无需为他们创建用户帐户。这只是为了测试,并使安装更加顺利。您应该在移动到生产环境之前将其删除。

Remove anonymous users? [Y/n] Y
删除匿名用户?
... Success!
成功!

Normally, root should only be allowed to connect from 'localhost'. This
ensures that someone cannot guess at the root password from the network.
通常,只应允许root从“localhost”进行连接。这样可以确保有人无法从网络中猜测根密码。

Disallow root login remotely? [Y/n] N
是否禁止root远程登录?(如果无需远程连接,这里输入Y)
... Success!
成功!

By default, MariaDB comes with a database named 'test' that anyone can
access. This is also intended only for testing, and should be removed
before moving into a production environment.
默认情况下,MariaDB附带一个名为“test”的数据库,任何人都可以访问。
这也仅用于测试,在进入生产环境之前应将其删除。

Remove test database and access to it? [Y/n] Y
是否删除测试数据库并访问它?
- Dropping test database...
- 正在删除测试数据库 ...
... Success!
... 成功!
- Removing privileges on test database...
- 正在删除对测试数据库的权限 ...
... Success!
... 成功!

Reloading the privilege tables will ensure that all changes made so far
will take effect immediately.
重新加载特权表将确保到目前为止所做的所有更改都将立即生效。
Reload privilege tables now? [Y/n] Y
... Success!

Cleaning up...
清理...

All done! If you've completed all of the above steps, your MariaDB
installation should now be secure.
全部完成!如果您已经完成了上述所有步骤,您的MariaDB安装现在应该是安全的。

Thanks for using MariaDB!
感谢您使用MariaDB!


root@us0uy7gEWkwb:~# mysql -u root
Welcome to the MariaDB monitor. Commands end with ; or \g.
Your MariaDB connection id is 40
Server version: 10.5.21-MariaDB-0+deb11u1 Debian 11

Copyright (c) 2000, 2018, Oracle, MariaDB Corporation Ab and others.
安装 Mariadb,命令:apt install mariadb-server mariadb-client
安装 Mariadb 之后依旧是使用mysql命令,它是mysql的分支而已
设置root密码,执行:sudo mysql_secure_installation
然后提示 Set root password? [Y/n],输入Y
然后输入两次mysql数据库的密码,此密码会被设置为mysql root的密码
然后一路回车即可
Mysql基本操作练习:https://www.cnblogs.com/kuozhen/p/17999086
MySQL 的卸载
# 非root账户,需要在命令前加 sudo 提升权限。root账户不需要加sudo词。
sudo mysql --version
# 查询mysql是否安装以及安装的版本

sudo service mysqld stop
# 停止MySQL服务

sudo apt-get purge --auto-remove mariadb-server
# 删除配置文件、数据文件mariadb-server的依赖包和mariadb-server本身
Do you want to continue? [Y/n] y
# 是否要继续?

---------- 弹出框 --------
Configuring mariadb-server-10.5
配置mariadb-server-10.5
The /var/lib/mysql directory which contains the MariaDB databases is about to be removed.
包含MariaDB数据库的/var/lib/mysql目录即将被删除。
If you're removing the MariaDB package in order to later install a more recent version or if  a different mariadb-server package is already using it, the data should be kept.
如果您要删除MariaDB包以便以后安装更新的版本,或者其他MariaDB服务器包已经在使用它,则应保留数据。
Remove all MariaDB databases? <Yes> <No>  yes
是否删除所有MariaDB数据库 <Yes> <No>
-------------------------
# 搜索 mysql 残余的文件
sudo find /* -name mysql
/etc/apparmor.d/abstractions/mysql 不用删
/etc/mysql
/usr/share/bash-completion/completions/mysql 不用删
/usr/bin/mysql
# 删除这些文件夹
sudo rm -rf /etc/mysql/
sudo rm -rf /usr/bin/mysql
# 在进行完上述步骤后,MySQL 数据库软件包和相关文件已经被完全卸载。
如果要完全删除相关残余文件,可以使用以下命令进行清理:
sudo apt-get autoremove
sudo apt-get autoclean
继续执行查找
dpkg -l | grep mysql
#检查是否有残留,显示如下,表示依然有残留
ii mysql-common 5.8+1.0.7 all MySQL database common files, e.g. /etc/mysql/my.cnf
教程2:https://www.cnblogs.com/kuozhen/p/18002316
在本地远程连接Linux系统下的MySQL数据库
1、在服务器端开启远程访问
首先进入Linux,进入mysql数据库,然后输入下面两个命令:
grant all privileges on *.* to 'root'@'%' identified by 'password';
flush privileges;
说明:
第一个*是数据库,可以改成允许访问的数据库名称
第二个 *是数据库的表名称,代表允许访问任意的表
root代表远程登录使用的用户名,可以自定义
%代表允许任意ip登录,如果你想指定特定的IP,可以把%替换掉就可以了
password代表远程登录时使用的密码,可以自定义
flush privileges;这是让权限立即生效
2、修改my.cnf配置文件
这个是mysql的配置文件,如果你找不到在哪里的话,可以输入find /* -name my.cnf 找到
通过vim编辑该文件,找到 bind-address = 127.0.0.1这一句,然后在前面加个#号注释掉,保存退出
3、重启服务
service mysql restart
4、在本地远程连接
在终端输入:
mysql -h 服务器ip地址 -P 3306 -u root -p
然后输入密码即可。
默认文件备份:
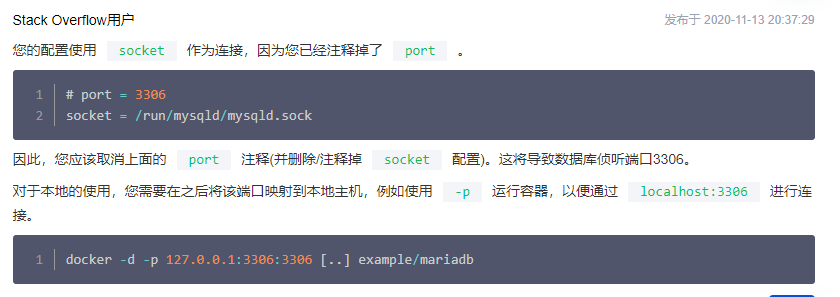
root@us0uy7gEWkwb:/etc/mysql# cat my.cnf
# The MariaDB configuration file
#
# The MariaDB/MySQL tools read configuration files in the following order:
# 0. "/etc/mysql/my.cnf" symlinks to this file, reason why all the rest is read.
# 1. "/etc/mysql/mariadb.cnf" (this file) to set global defaults,
# 2. "/etc/mysql/conf.d/*.cnf" to set global options.
# 3. "/etc/mysql/mariadb.conf.d/*.cnf" to set MariaDB-only options.
# 4. "~/.my.cnf" to set user-specific options.
#
# If the same option is defined multiple times, the last one will apply.
#
# One can use all long options that the program supports.
# Run program with --help to get a list of available options and with
# --print-defaults to see which it would actually understand and use.
#
# If you are new to MariaDB, check out https://mariadb.com/kb/en/basic-mariadb-articles/

#
# This group is read both by the client and the server
# use it for options that affect everything
#
[client-server]
# Port or socket location where to connect
# port = 3306
socket = /run/mysqld/mysqld.sock

# Import all .cnf files from configuration directory
!includedir /etc/mysql/conf.d/
!includedir /etc/mysql/mariadb.conf.d/
默认配置中,注释了 3306 端口,采用socket 的方式
我们需要注释 socket ,并取消 prot = 3306 的注释。
参考:https://cloud.tencent.com/developer/ask/sof/108695359
一些问题:
解决E: Package ‘mysql-server‘ has no installation candidate与ERROR 1698 (28000)
这里通过配置解决ERROR 1698 (28000): Access denied for user ‘root’@'localhost’报错,详细参考:https://blog.csdn.net/jlu16/article/details/82809937
首先登陆:sudo mysql -u root
然后在mysql中输入:
USE mysql;
SELECT User, Host, plugin FROM mysql.user;
可以看到:
+------------------+---------------------------------+
| User | plugin |
+------------------+---------------------------------+
| root | auth_socket(或是unix_socket) |
+------------------+---------------------------------+
此时输入:
UPDATE user SET plugin='mysql_native_password' WHERE User='root';
FLUSH PRIVILEGES;
exit;
然后在命令行中输入:
sudo service mysql restart
————————————————
本文为CSDN博主"呆萌的代Ma"原创文章,转载请注明博客链接:https://blog.csdn.net/weixin_35757704/
原文链接:https://blog.csdn.net/weixin_35757704/article/details/109378675


【推荐】国内首个AI IDE,深度理解中文开发场景,立即下载体验Trae
【推荐】编程新体验,更懂你的AI,立即体验豆包MarsCode编程助手
【推荐】抖音旗下AI助手豆包,你的智能百科全书,全免费不限次数
【推荐】轻量又高性能的 SSH 工具 IShell:AI 加持,快人一步
· winform 绘制太阳,地球,月球 运作规律
· 超详细:普通电脑也行Windows部署deepseek R1训练数据并当服务器共享给他人
· 上周热点回顾(3.3-3.9)
· AI 智能体引爆开源社区「GitHub 热点速览」
· 写一个简单的SQL生成工具