-
应用准备:使用以前springbootapp镜像,xjk27400861/springbootapp:42与xjk27400861/springbootapp:43两个镜像,部署两个版本的应用
-
创建命名空间,springistiodemo,在k3s集群的任意一个节点执行
命令:
sudo kubectl create namespace springistiodemo
![image]()
-
自动注入(给命名空间打指定标签,启用自动注入)
sudo kubectl label namespace springistiodemo istio-injection=enabled
![image]()
-
查看标签状态
sudo kubectl get ns springistiodemo --show-labels
![image]()
-
禁用自动注入命令
sudo kubectl label namespace springistiodemo istio-injection=disabled –overwrite
![image]()
-
启用命名空间,自动注入后,rancher界面显示按钮为:禁用Istio自动注入
![image]()
-
手动注入方式,(其他安装方式),rancher暂未找到执行istioctl命令的窗口
sudo istioctl kube-inject -f springbootapp-2nodes.yaml | sudo kubectl apply -f -
-
新建springbootapp-2nodes.yaml文件,执行命令部署应用
sudo kubectl create -f springbootapp-2nodes.yaml -n springistiodemo
-
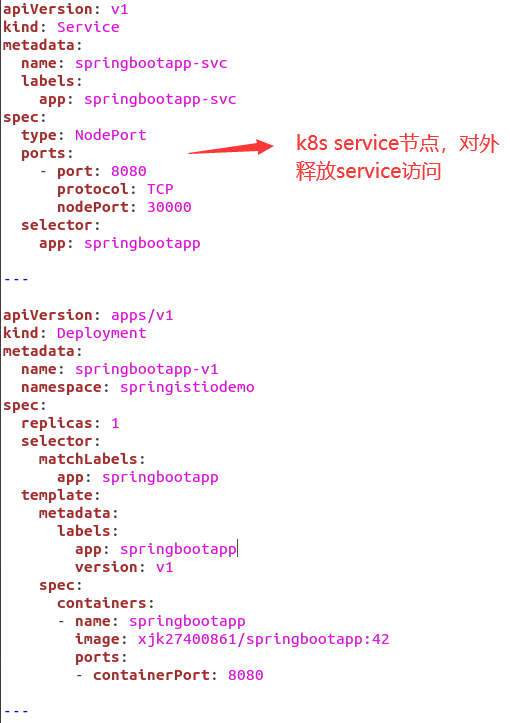
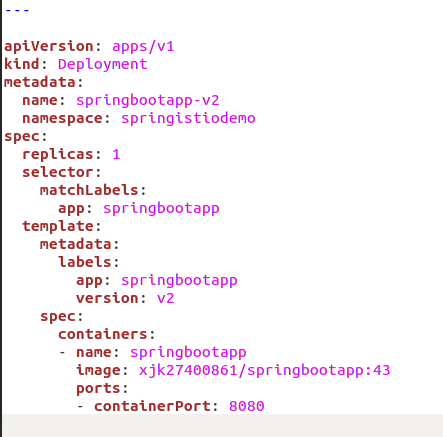
springbootapp-2nodes.yaml文件内容,2个版本的服务,分别为v1和v2
![image]()
![image]()
-
稍等片刻,可以看到两个服务创建完成
![image]()
-
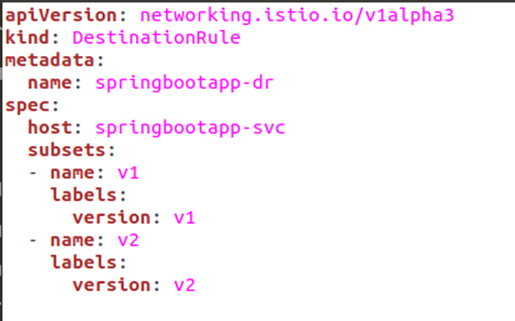
创建及部署目标规则springbootapp-destination.yaml
sudo kubectl apply -f springbootapp-destination.yaml -n springistiodemo
![image]()
-
GateWay创建,供外网访问
sudo kubectl apply -f springbootapp-vs-v1.yaml -n springistiodemo
![image]()
-
创建及部署默认路由springbootapp-vs-v1.yaml,访问都访问v1版本服务
sudo kubectl apply -f springbootapp-vs-v1.yaml -n springistiodemo
![image]()
-
输入命令:sudo kubectl get svc istio-ingressgateway -n istio-system,查看端口映射,发现31380端口对应80端口
![image]()
-
![image]()
-
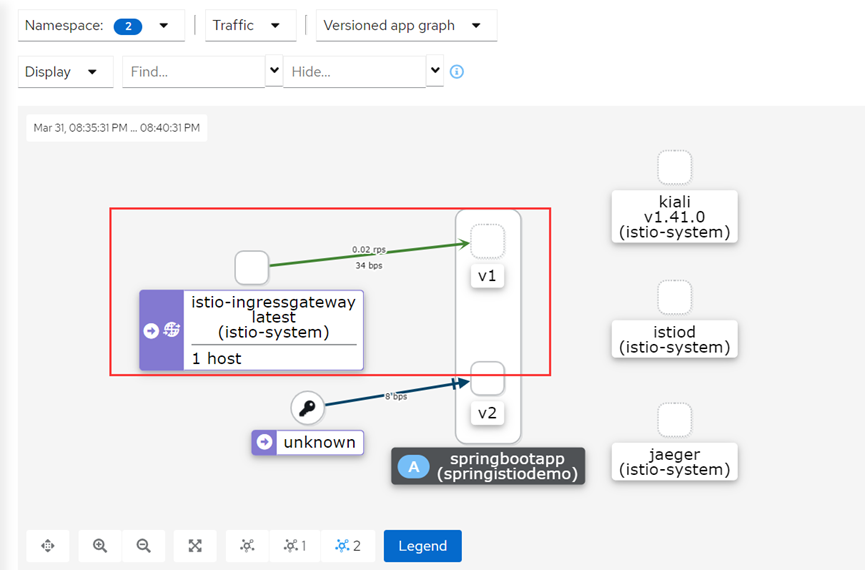
查看kiali界面,查看调用路径,namespace选择2个istio-system和springistiodemo,发现通过ingressgateway访问的服务都定位在了v1版本上
![image]()
-
也可以通过在istio-ingressgateway的service中,添加端口映射,映射到应用上,可以不用80端口;例如:加端口映射8066-8080-31386,同时gateway的yaml文件,number属性改为8066,即可通过31386端口,访问服务(http://ip:31386)
![image]()


 浙公网安备 33010602011771号