

Virtualbox Ubuntu18.04 LNMP环境搭建(PHP7.2)
1. Virtualbox
本文是基于Virtualbox虚拟机搭建的服务器环境,也可以使用VMware另行进行搭建
设置共享文件夹
1) 开启虚拟机,安装增强功能(手动安装,如自动不报错可以省去下列步骤)
点击设备 -> 共享粘贴板 -> 双向
点击设备 -> 拖放 -> 双向
sudo apt-get install virtualbox-guest-dkms
// 建议先切换至root用户再作下列操作,否则可能会出现权限不足的报错
reboot
2) 修改root密码(可不修改)
sudo passwd root
su root
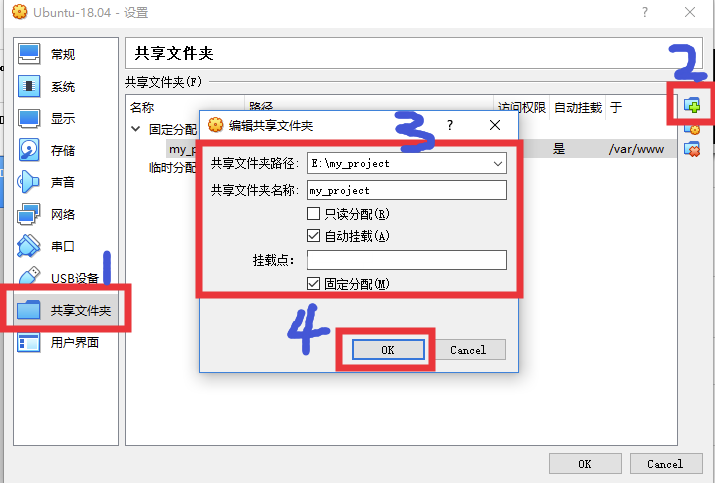
3) Windows本地:比如:E:\my_project
4) VirtuBox本地,选择虚拟机,设置-共享文件夹
5) 自动挂载
建立 rc-local.service 文件
sudo vim /etc/systemd/system/rc-local.service
[Unit]
Description=/etc/rc.local Compatibility
ConditionPathExists=/etc/rc.local

[Service]
Type=forking
ExecStart=/etc/rc.local start
TimeoutSec=0
StandardOutput=tty
RemainAfterExit=yes
SysVStartPriority=99

[Install]
WantedBy=multi-user.target
创建文件 rc.local
# 创建挂载文件夹
sudo mkdir /var/www
# 打开rc.local文件
sudo vim /etc/rc.local
#!/bin/sh -e
#
# rc.local
#
# This script is executed at the end of each multiuser runlevel.
# Make sure that the script will "exit 0" on success or any other
# value on error.
#
# In order to enable or disable this script just change the execution
# bits.
#
# By default this script does nothing.

sudo mount -t vboxsf my_project /var/www
sudo service nginx restart

exit 0
// 给rc.local加上权限
sudo chmod 755 /etc/rc.local
// 启用服务
sudo systemctl enable rc-local
// 重启测试
reboot
6) 创建后共享目录会出现在虚拟机系统上的/var/www目录中(需要root用户才能查看)

解除Virtualbox创建软链接限制
https://www.cnblogs.com/kuguats/articles/12024757.html
设置端口映射
1) 创建网络,管理 -> 全局设定 -> 网络
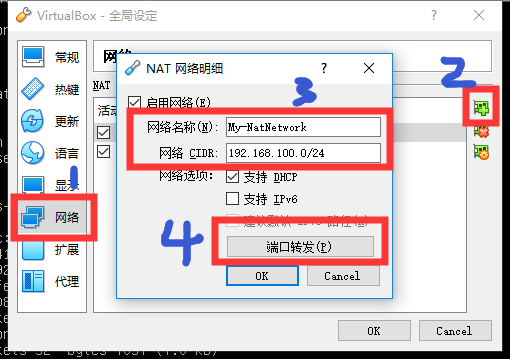
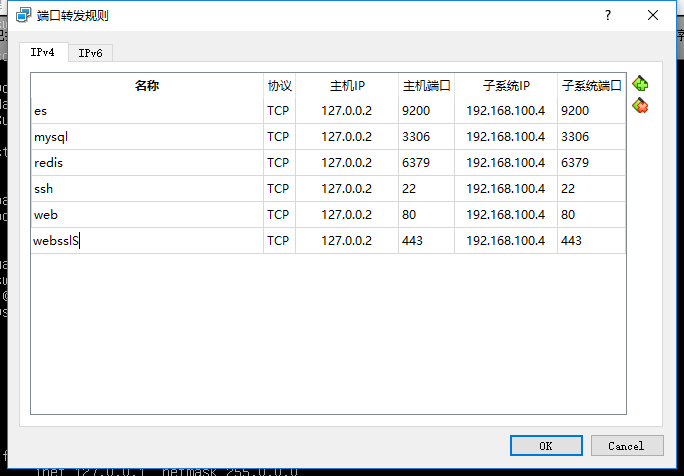
2) 设置端口转发配置
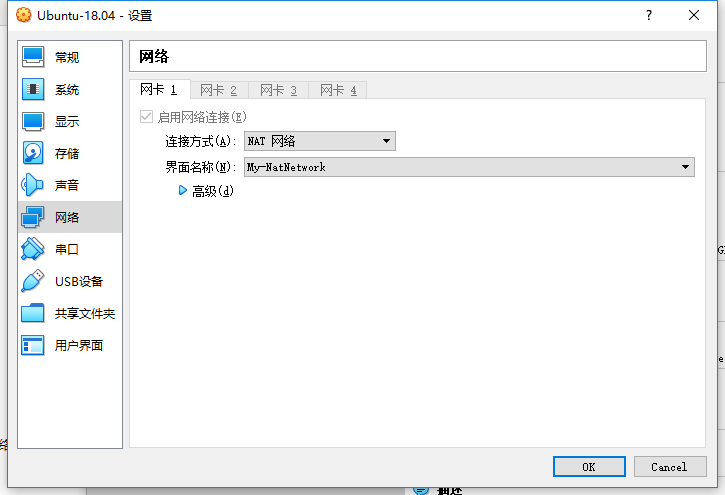
3) 选择虚拟机 -> 右键设置 -> 连接方式 -> 选择NAT 网络 -> 界面名称 -> 选择上面创建的网络
2. 安装Nginx
apt-get update
apt-get install nginx
touch /etc/nginx/conf.d/common.conf
vi /etc/nginx/conf.d/common.conf
server {
        listen       80;
        server_name  127.0.0.2;
        autoindex on;

        root /var/www;

        location / {
                #configure index
                index  index.html index.htm index.php;
                if (!-f $request_filename){
                        rewrite ^(.+)$ /index.php last;
                }
        }

        error_page 405 =200 @405;

        #php
        location ~ \.php$ {
                include fastcgi.conf;
                fastcgi_pass unix:/run/php/php7.2-fpm.sock;
                fastcgi_index index.php;
                include fastcgi_params;
        }
}
3. 安装PHP7.2
sudo apt-get update
sudo apt-get upgrade

sudo apt-get install software-properties-common
sudo add-apt-repository ppa:ondrej/php
sudo apt-get update
sudo apt-get -y install php7.2

# 如果之前有其他版本PHP,在这边禁用掉
sudo a2dismod php5
sudo a2enmod php7.2

# 安装常用扩展
sudo apt-get install -y php7.2-fpm php7.2-mysql php7.2-curl php7.2-json php7.2-mbstring php7.2-xml php7.2-intl php7.2-redis

#  安装其他扩展(按需安装)
sudo apt-get install php7.2-gd
sudo apt-get install php7.2-soap
sudo apt-get install php7.2-gmp
sudo apt-get install php7.2-odbc
sudo apt-get install php7.2-pspell
sudo apt-get install php7.2-bcmath
sudo apt-get install php7.2-enchant
sudo apt-get install php7.2-imap
sudo apt-get install php7.2-ldap
sudo apt-get install php7.2-opcache
sudo apt-get install php7.2-readline
sudo apt-get install php7.2-sqlite3
sudo apt-get install php7.2-xmlrpc
sudo apt-get install php7.2-bz2
sudo apt-get install php7.2-interbase
sudo apt-get install php7.2-pgsql
sudo apt-get install php7.2-recode
sudo apt-get install php7.2-sybase
sudo apt-get install php7.2-xsl
sudo apt-get install php7.2-cgi
sudo apt-get install php7.2-dba
sudo apt-get install php7.2-phpdbg
sudo apt-get install php7.2-snmp
sudo apt-get install php7.2-tidy
sudo apt-get install php7.2-zip
如已安装可以通过命令切换
update-alternatives --config php
4. 安装mysql
apt-get install mysql-server

sudo mysql_secure_installation
Press y|Y for Yes, any other key for No: N  # 要安装验证密码插件吗?
New password:   # 输入root的数据库密码
Re-enter new password:   # 再次输入密码
Remove anonymous users? (Press y|Y for Yes, any other key for No) : y     # 删除匿名账户
Disallow root login remotely? (Press y|Y for Yes, any other key for No) : N    # 不禁止root管理员从远程登录
Remove test database and access to it? (Press y|Y for Yes, any other key for No) : y   # 删除test数据库并取消对它的访问权限
Reload privilege tables now? (Press y|Y for Yes, any other key for No) : y   # 刷新授权表,让初始化后的设定立即生效

# 设置允许远程访问
vim /etc/mysql/mysql.conf.d/mysqld.cnf
# 注释掉bind-address = 127.0.0.1

# 进入数据库,输入密码
mysql -u root -p

mysql> grant all on *.* to root@'%' identified by '密码' with grant option;
mysql> flush privileges;  # 刷新权限
mysql> exit;

# 重启MYSQL
service mysql restart
5. 安装redis
sudo apt-get install redis-server
sudo apt-get install php7.2-redis
service php7.2-fpm restart
6. 安装composer
apt install composer
# 设置阿里云镜像
composer config -g repo.packagist composer https://mirrors.aliyun.com/composer/
