Spring Boot 开发实战
🍳 Web开发实战案例:员工信息 CRUD
本案例采用 SpringBoot + Thymeleaf,没有使用 Mybatis,全程模拟数据。
只是一个小 Demo,很多功能都没有完善,只实现了最基本的 CRUD 和登录,登录的密码写死了是123456,用户名随意。
由于实际开发中一般不使用 Thymeleaf,所以本篇对于 Thymeleaf 不做过多详细介绍,会用即可。
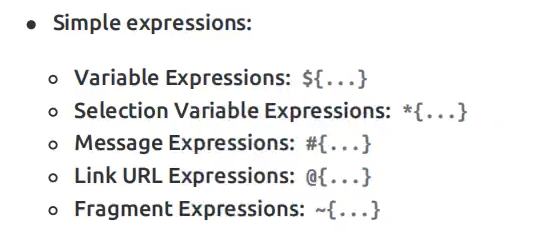
Thymeleaf 取值语法:
👇 案例的最终效果如下:

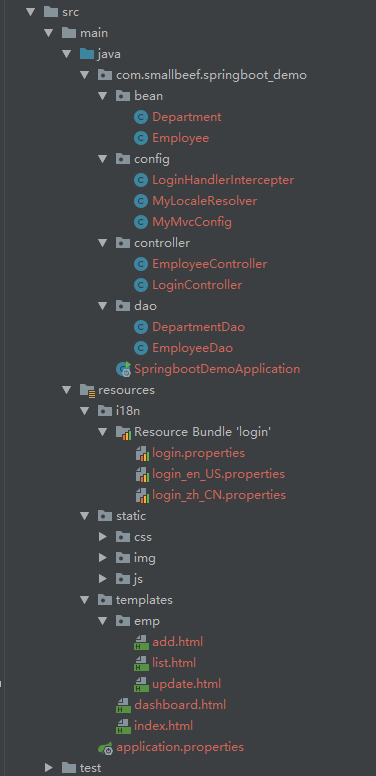
📄 目录结构如下:
1. 准备工作
准备工作包括静态资源导入,实体类编写,以及模拟数据库操作
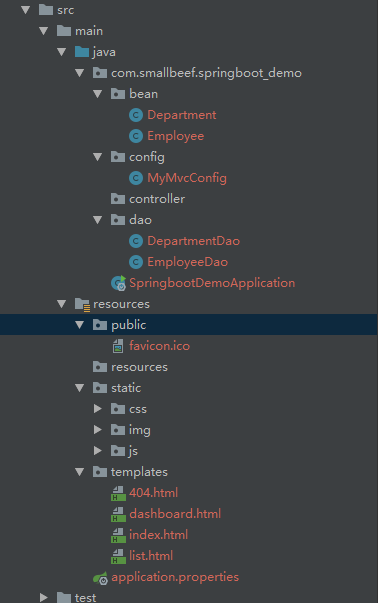
添加依赖:
<dependency>
    <groupId>org.springframework.boot</groupId>
    <artifactId>spring-boot-starter-web</artifactId>
</dependency>

<dependency>
    <groupId>org.springframework.boot</groupId>
    <artifactId>spring-boot-starter-thymeleaf</artifactId>
</dependency>
实体类:
-
Department部门类/** * 部门表 */ public class Department { private Integer id; private String departmentName; public Department() { } public Department(Integer id, String departmentName) { this.id = id; this.departmentName = departmentName; } public Integer getId() { return id; } public void setId(Integer id) { this.id = id; } public String getDepartmentName() { return departmentName; } public void setDepartmentName(String departmentName) { this.departmentName = departmentName; } @Override public String toString() { return "Department{" + "id=" + id + ", departmentName='" + departmentName + '\'' + '}'; } } -
Employee员工类/** * 员工表 */ public class Employee { private Integer id; private String lastName; private String email; private Integer gender; // 0 1 private Department department; private Date birth; public Employee() { } public Employee(Integer id, String lastName, String email, Integer gender, Department department) { this.id = id; this.lastName = lastName; this.email = email; this.gender = gender; this.department = department; this.birth = new Date(); // 偷个懒,以默认的创建日期构造 } public Integer getId() { return id; } public void setId(Integer id) { this.id = id; } public String getLastName() { return lastName; } public void setLastName(String lastName) { this.lastName = lastName; } public String getEmail() { return email; } public void setEmail(String email) { this.email = email; } public Integer getGender() { return gender; } public void setGender(Integer gender) { this.gender = gender; } public Department getDepartment() { return department; } public void setDepartment(Department department) { this.department = department; } public Date getBirth() { return birth; } public void setBirth(Date birth) { this.birth = birth; } @Override public String toString() { return "Employee{" + "id=" + id + ", lastName='" + lastName + '\'' + ", email='" + email + '\'' + ", gender=" + gender + ", department=" + department + ", birth=" + birth + '}'; } }
数据库操作类:
-
DepartmentDao/** * 部门 dao */ @Repository public class DepartmentDao { // 模拟数据库中的数据 private static Map<Integer, Department> departments = null; static{ departments = new HashMap<>(); // 创建一个部门表 departments.put(101, new Department(101, "教学部")); departments.put(102, new Department(102, "市场部")); departments.put(103, new Department(103, "教研部")); departments.put(104, new Department(104, "运营部")); departments.put(105, new Department(105, "后勤部")); } // 获得所有的部门信息 public Collection<Department> getDepartment(){ return departments.values(); } // 根据 id 获取部门信息 public Department getDepartmentById(Integer id){ return departments.get(id); } } -
EmployeeDao/** * 员工 Dao */ @Repository public class EmployeeDao { // 模拟数据库中的数据 private static Map<Integer, Employee> employees = null; // 员工有所属的部门 @Autowired private DepartmentDao departmentDao; static{ employees = new HashMap<>(); // 创建一个员工表 employees.put(101, new Employee(1001, "AA", "123456@qq.com", 1, new Department(101,"教学部"))); employees.put(102, new Employee(1002, "BB", "1546556@qq.com", 0, new Department(102, "市场部"))); employees.put(103, new Employee(1003, "CC", "765543@qq.com", 1, new Department(103, "教研部"))); employees.put(104, new Employee(1004, "DD", "34654234@qq.com", 0, new Department(104, "运营部"))); employees.put(105, new Employee(1005, "EE", "72423423456@qq.com", 1, new Department(105, "后勤部"))); } // 增加一个员工(主键自增) private static Integer initId = 1006; public void save(Employee employee){ if(employee.getId() == null) // 设置Id employee.setId(initId ++); employee.setDepartment(departmentDao.getDepartmentById(employee.getDepartment().getId())); // 设置部门 employees.put(employee.getId(),employee); // 放入 Map (数据库) } // 查询全部员工信息 public Collection<Employee> getAll(){ return employees.values(); } // 根据 id 查询员工信息 public Employee getEmployeeById(Integer id){ return employees.get(id); } // 根据 id 删除员工 public void delete(Integer id){ employees.remove(id); } }
Thymeleaf 中链接使用标签 @{...},使用 th:href = "@{...}" 导入资源路径,例如:
<link th:href="@{/css/bootstrap.min.css}" rel="stylesheet">
2. 默认访问首页
当访问 http://localhost:8080/ 的时候,默认去找静态资源文件夹下的 index.html,此处我们想要默认加载 templates 文件夹(在此文件夹中的资源才能被 Thymeleaf 解析)下的 index.html 作为首页。
扩展 SpringMVC 配置:
@Configuration
public class MyMvcConfig implements WebMvcConfigurer {

    // 添加视图映射
    @Override
    public void addViewControllers(ViewControllerRegistry registry) {
        registry.addViewController("/").setViewName("index");
        registry.addViewController("/index.html").setViewName("index");
    }
}
3. 国际化
① 创建国际化配置文件
在 resources 文件夹下创建 i18n 文件夹,以及login.properties 和 login_zh_CN.properties
创建完毕后,两个文件会自动合并成一个文件夹:
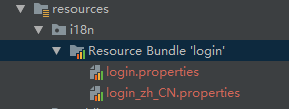
右键可直接添加配置文件

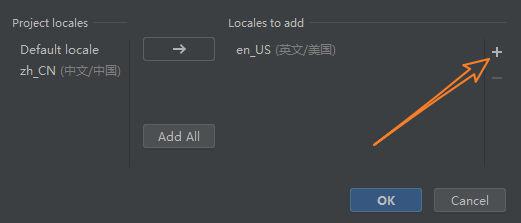
② 编写国际化配置文件
可点击 Resource Bundle 进行可视化配置:
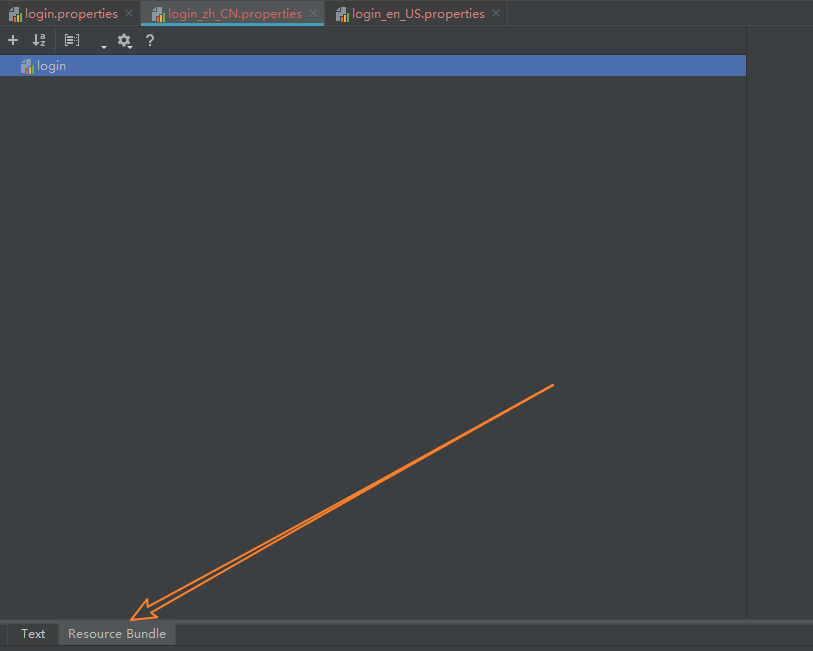
添加如下配置:
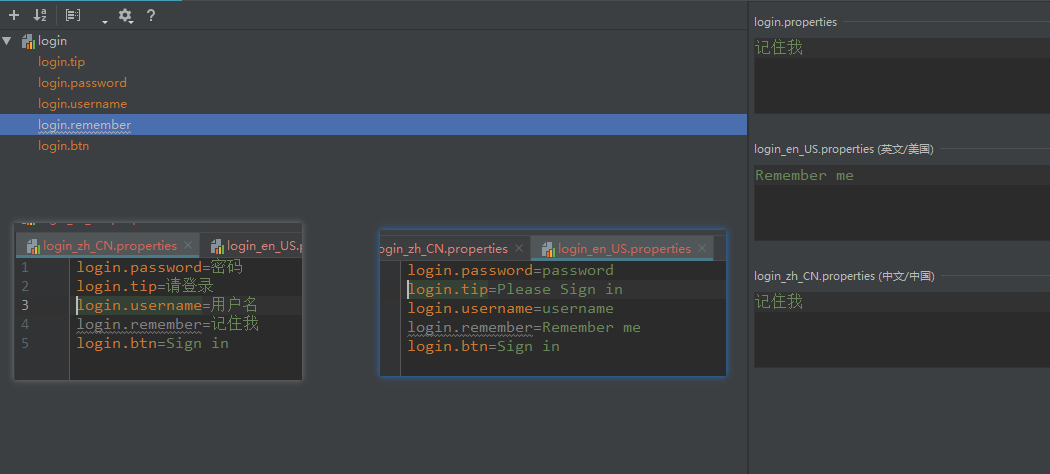
同时在全局配置文件中添加如下配置:
# 国际化配置文件的真实路径
spring.messages.basename = i18n.login
Thymeleaf 中,使用标签#{...} 来获取配置文件中的信息,例如:
<label class="sr-only" th:text="#{login.username}">Username</label>
③ 实现点击链接切换语言
给 url 地址添加参数 language,国际化解析器对参数进行解析:
<a class="btn btn-sm" th:href="@{/index.html(language='zh_CN')}">中文</a>
<a class="btn btn-sm" th:href="@{/index.html(language='en_US')}">English</a>
自定义的一个简单的国际化解析器: config.MyLocaleResolver.java
package com.smallbeef.springboot_demo.config;

import org.springframework.util.StringUtils;
import org.springframework.web.servlet.LocaleResolver;

import javax.servlet.http.HttpServletRequest;
import javax.servlet.http.HttpServletResponse;
import java.util.Locale;

/**
 * 国际化解析器
 */
public class MyLocaleResolver implements LocaleResolver {

    // 解析请求
    @Override
    public Locale resolveLocale(HttpServletRequest httpServletRequest) {
        // 获取请求url中的参数
        String language = httpServletRequest.getParameter("language");
        Locale locale =  Locale.getDefault(); // 如果没有就使用默认的
        // 如果请求携带了国际化的参数
        if(!StringUtils.isEmpty(language)){
            // zh_CN
            String[] split = language.split("_");
            // 国家,地区
            locale =  new Locale(split[0], split[1]);
        }
        return locale;
    }

    @Override
    public void setLocale(HttpServletRequest httpServletRequest, HttpServletResponse httpServletResponse, Locale locale) {

    }
}
参考LocaleResolver 类(获取区域信息对象)的源码如下:
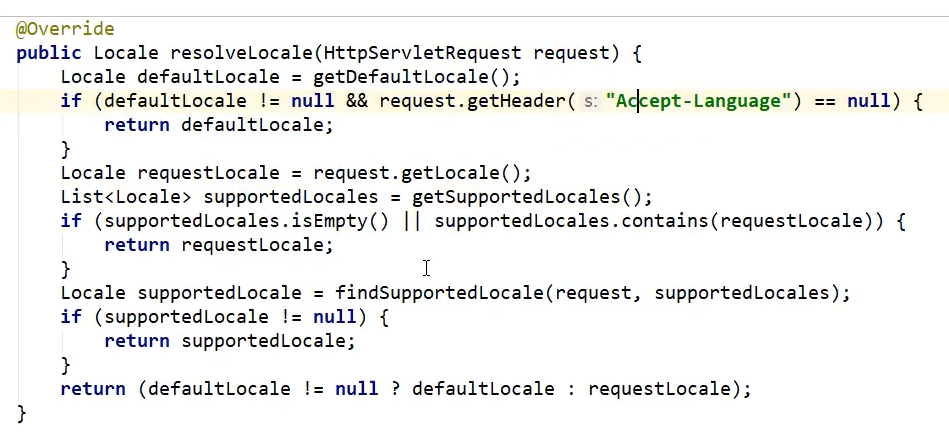
将我们自己写的国际化组件配置到 Spring 的容器中(@Bean),即注册国际化组件:
@Configuration
public class MyMvcConfig implements WebMvcConfigurer {

    // 添加视图映射
    @Override
    public void addViewControllers(ViewControllerRegistry registry) {
        registry.addViewController("/").setViewName("index");
        registry.addViewController("/index.html").setViewName("index");
    }

    // 自定义的国际化组件生效
    @Bean
    public LocaleResolver localeResolver(){
        return new MyLocaleResolver();
    }
}
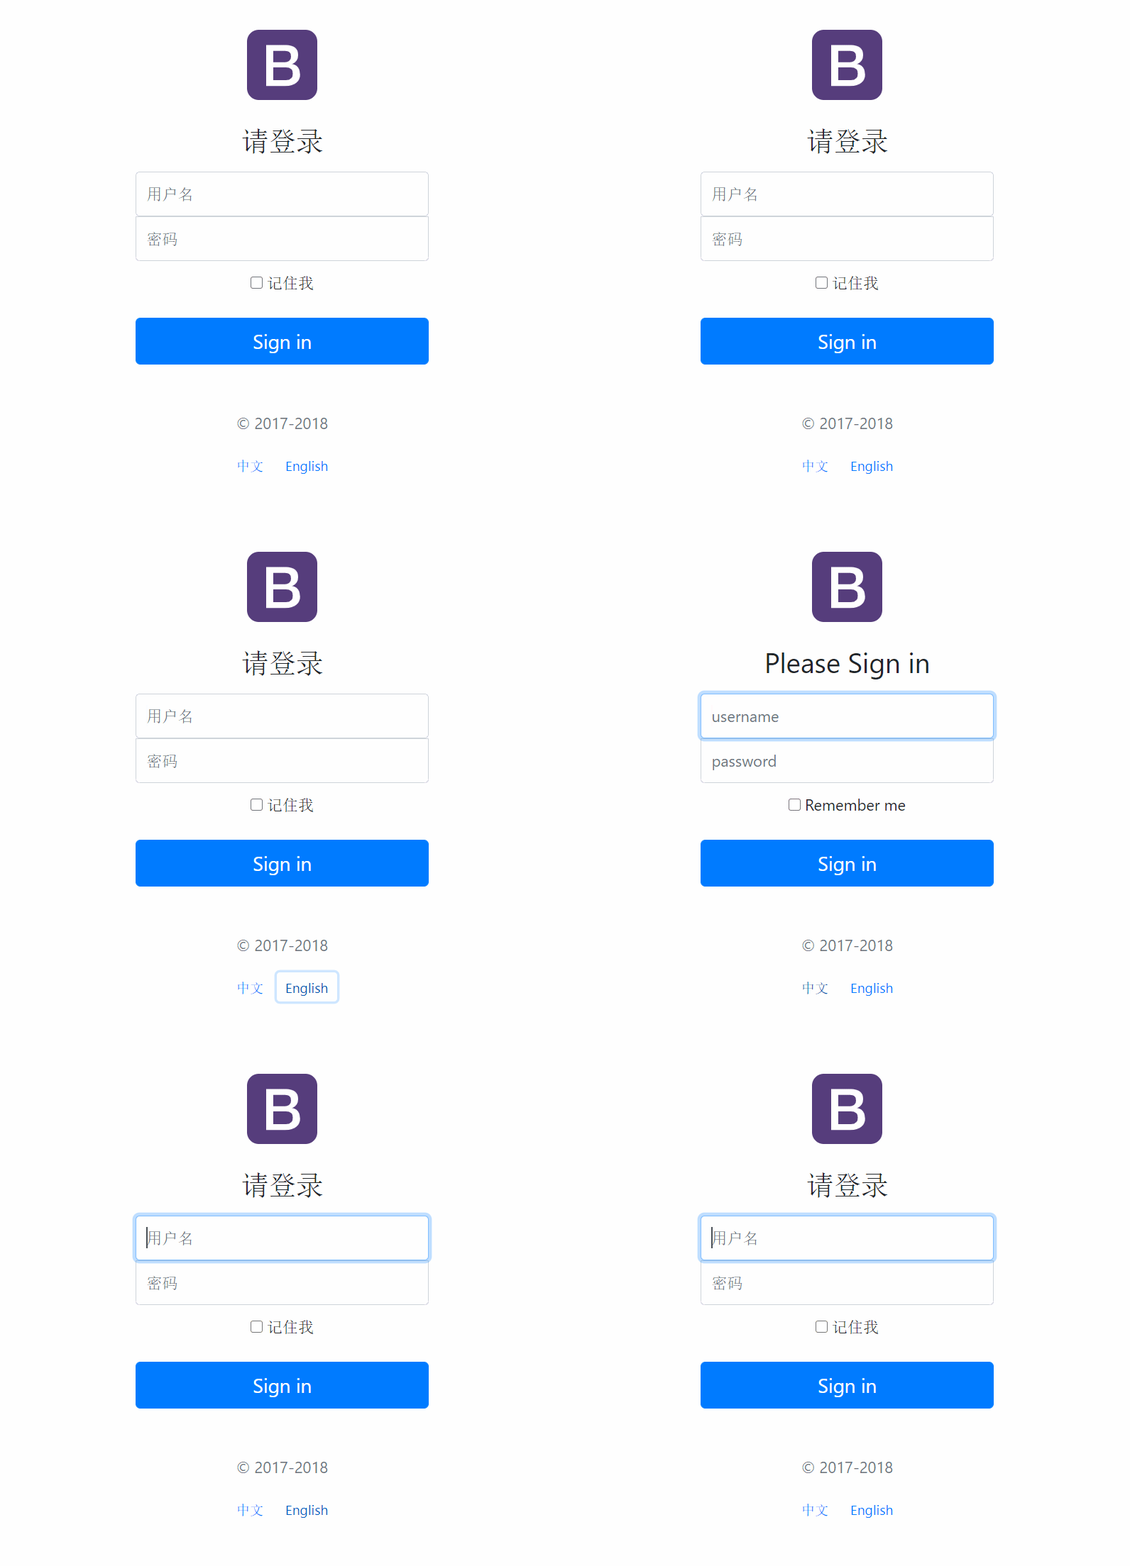
效果如下:
4. 登陆
① 禁用模板引擎的缓存
在全局配置文件中禁用模板引擎的缓存,使得开发期间模板引擎页面修改以后实时生效
# 禁用缓存
spring.thymeleaf.cache=false
② 信息校验
登录界面的部分前端代码:
<body class="text-center">
    <form class="form-signin" th:action="@{/user/login}" method="post">
        .....
        <!--错误提示信息-->
        <p style="color: red" th:text="${msg}" th:if="${not #strings.isEmpty(msg)}"></p>

        .....

        <input type="text"  name="username" class="form-control" placeholder="Username" th:placeholder="#{login.username}" required="" autofocus="">

        ......

        <input type="password" name="password" class="form-control" placeholder="Password" th:placeholder="#{login.password}" required="">
        ......

    </form>
</body>
控制器 LoginController:
@Controller
public class LoginController {

    @RequestMapping("/user/login")
    public String login(
            @RequestParam("username") String username,
            @RequestParam("password") String password,
            Model model, HttpSession session){

        // 简单的登录验证
        if(!StringUtils.isEmpty(username) && "12345".equals(password)){
            session.setAttribute("loginUser", username);  // 用户信息存入 session
            return "redirect:/main.html";
        }
        else{
            // 显示登录失败信息
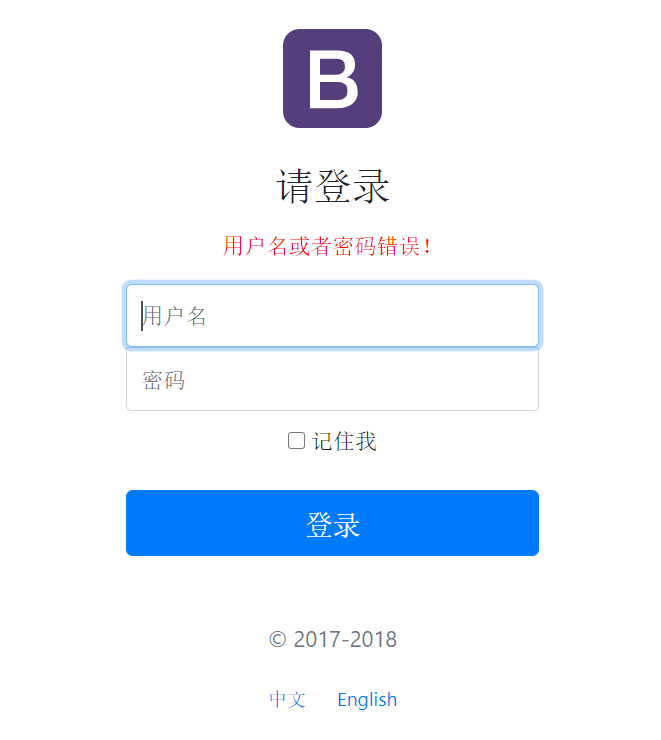
            model.addAttribute("msg","用户名或者密码错误!");
            return "index";
        }
    }
}
dashboard.html 是我们的后台界面,将其映射到 main.html 路径
registry.addViewController("/main.html").setViewName("dashboard");
效果如下:
5. 拦截器进行登陆检查
现在如果我们直接输入 http://localhost:8080/main.html 可以跳过登录直接访问,显然这是不合理的。此时需要拦截器进行登录检查
① 拦截器
public class LoginHandlerIntercepter implements HandlerInterceptor {
    @Override
    public boolean preHandle(HttpServletRequest request, HttpServletResponse response, Object handler) throws Exception {

        // 登录成功后 ,应该有用户的 session
        Object loginUser = request.getSession().getAttribute("loginUser");

        if(loginUser == null){ // 未登录
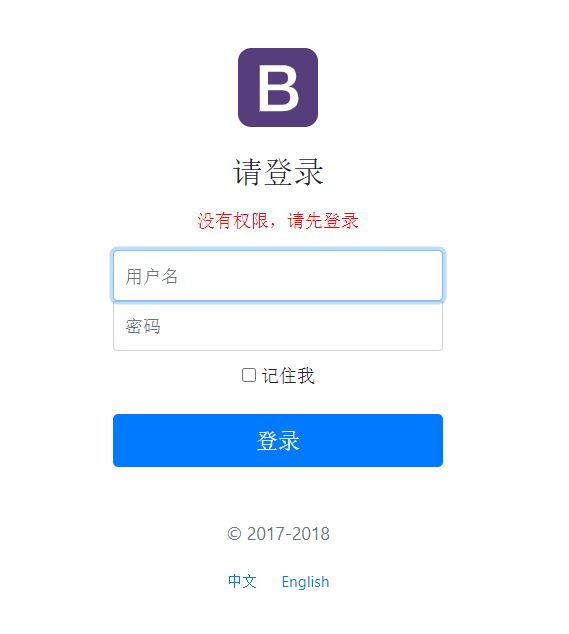
            request.setAttribute("msg", "没有权限,请先登录");
            request.getRequestDispatcher("/index.html").forward(request,response);
            return false; // 表示拦截
        }
        else
            return true; // 表示放行
    }
}
② 注册拦截器
@Configuration
public class MyMvcConfig implements WebMvcConfigurer {

    // 添加视图映射
    @Override
    public void addViewControllers(ViewControllerRegistry registry) {
        registry.addViewController("/").setViewName("index");
        registry.addViewController("/index.html").setViewName("index");
        registry.addViewController("/main.html").setViewName("dashboard");
    }

    // 自定义的国际化组件生效
    @Bean
    public LocaleResolver localeResolver(){
        return new MyLocaleResolver();
    }

    // 注册拦截器
    @Override
    public void addInterceptors(InterceptorRegistry registry) {
        registry.addInterceptor(new LoginHandlerIntercepter()).addPathPatterns("/**")
                .excludePathPatterns("/index.html","/","/user/login", "/css/**","/js/**","/img/**");
    }
}
效果如下,如果我们未经登录直接访问 main.html 的话:
③ 回显用户名
在后台管理界面实现用户名回显:
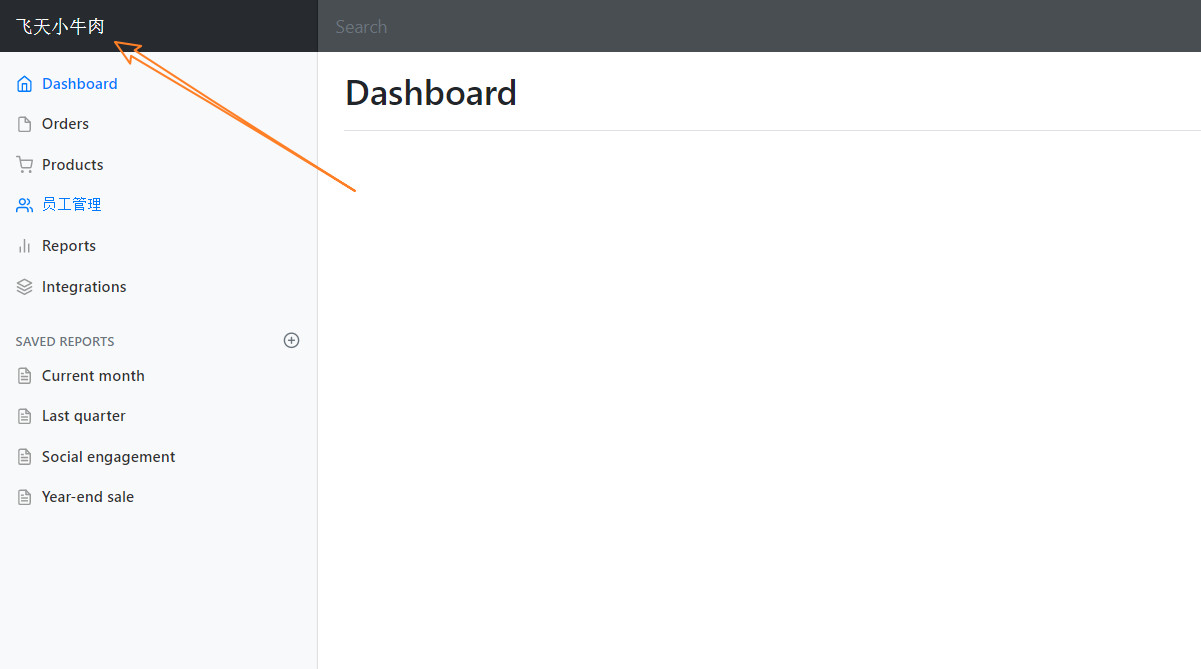
在前端界面从 session 中取出数据就行了:
<a class="navbar-brand col-sm-3 col-md-2 mr-0" href="#">[[${session.loginUser}]]</a>
6. RESTFul CRUD
CRUD 满足 Rest 风格
URI: /资源名称/资源标识 (HTTP请求方式区分对资源CRUD操作)
| 普通CRUD(uri来区分操作) | RestfulCRUD | |
|---|---|---|
| 查询 | getEmp | emp --- GET |
| 添加 | addEmp?xxx | emp --- POST |
| 修改 | updateEmp?id=xxx&xxx=xx | emp/{id}---PUT |
| 删除 | deleteEmp?id=1 | emp/{id}---DELETE |
⭐ 项目的请求架构:
| 实验功能 | 请求URI | 请求方式 |
|---|---|---|
| 查询所有员工 | emps | GET |
| 查询某个员工(来到修改页面) | emp/1 | GET |
| 来到添加页面 | emp | GET |
| 添加员工 | emp | POST |
| 来到修改页面(查出员工进行信息回显) | emp/1 | GET |
| 修改员工 | emp | PUT |
| 删除员工 | emp/1 | DELETE |
7. CRUD - 员工列表
展示员工信息

点击员工管理后调用 list 函数显示所有员工信息:
<a class="nav-link active" th:href="@{/emps}" >
    ...
    员工管理
</a>
EmployeeController:
@Controller
public class EmployeeController {

    @Autowired
    EmployeeDao employeeDao; // 因为没有数据库,所有数据库都定义在 Dao 层里面了

    @RequestMapping("/emps")
    public String list(Model model){
        Collection<Employee> employees = employeeDao.getAll();
        model.addAttribute("emps",employees);
        return "emp/list"; // 跳转员工信息显示界面
    }
}
员工信息显示界面 list.html:
从 model 中循环获取员工数据
<main role="main" class="col-md-9 ml-sm-auto col-lg-10 pt-3 px-4">
    <div class="table-responsive">
        <table class="table table-striped table-sm">
            <thead>
                <tr>
                    <th>id</th>
                    <th>lastName</th>
                    <th>email</th>
                    <th>gender</th>
                    <th>department</th>
                    <th>birth</th>
                    <th>操作</th>
                </tr>
            </thead>
            <tbody>
                <tr th:each="emp:${emps}">
                    <td th:text="${emp.id}"></td>
                    <td>[[${emp.lastName}]]</td>
                    <td th:text="${emp.getEmail()}"></td>
                    <td th:text="${emp.gender}==0?'女':'男'"></td>
                    <td th:text="${emp.department.departmentName}"></td>
                    <td th:text="${#dates.format(emp.birth, 'yyyy-MM-dd HH:mm')}"></td>
                    <td>
                        <button class="btn btn-sm btn-primary" >编辑</button>
                        <button class="btn btn-sm btn-danger deleteBtn">删除</button>
                    </td>
                </tr>
            </tbody>
        </table>
    </div>
</main>
8. CRUD - 员工添加
步骤:
- 按钮提交
- 跳转到添加界面
- 添加员工成功
- 返回首页
按钮:
<h2><a class="btn btn-sm btn-success" th:href="@{/emp}">员工添加</a></h2>
跳转到添加界面:(采用 RESTFul 风格)
// 跳转到员工添加界面
@GetMapping("/emp")
public String toAddPage(Model model){
    // 查出所有部门信息
    Collection<Department> departments = departmentDao.getDepartment();
    model.addAttribute("departments",departments); // 存入model 使得前端能够获取
    return "emp/add";
}
添加界面 add.html:
<form th:action="@{/emp}" method="post"> <!--虽然和跳转到员工界面的controller是同一个url,但是请求方式不一样-->
    <div class="form-group">
        <label>LastName</label>
        <!--正确的 name 才能够将信息顺利地提交给后端-->
        <input name="lastName" type="text" class="form-control" placeholder="飞天小牛肉" >
    </div>
    <div class="form-group">
        <label>Email</label>
        <input name="email" type="email" class="form-control" placeholder="xiaoniurou@qq.com">
    </div>
    <div class="form-group">
        <label>Gender</label><br/>
        <div class="form-check form-check-inline">
            <input class="form-check-input" type="radio" name="gender" value="1">
            <label class="form-check-label">男</label>
        </div>
        <div class="form-check form-check-inline">
            <input class="form-check-input" type="radio" name="gender" value="0">
            <label class="form-check-label">女</label>
        </div>
    </div>
    <div class="form-group">
        <label>department</label>
        <!--text 是下拉框显示的文字,提交的是 value 即部门id-->
        <select class="form-control" name="department.id">
            <option th:each="dept:${departments}"
                    th:text="${dept.departmentName}"
                    th:value="${dept.id}">
            </option>
        </select>
    </div>
    <div class="form-group">
        <label>Birth</label>
        <input name="birth" type="text" class="form-control" placeholder="2020/12/29">
    </div>
    <button type="submit" class="btn btn-primary">添加</button>
</form>
form 表单中的
action路径虽然和跳转到员工界面的 controller(toAddPage)是同一个url,但是请求方式不一样(RESTFul 风格)
添加员工:
// 添加员工
@PostMapping("/emp")
public String addEmp(Employee employee){
    employeeDao.save(employee); // 添加员工信息
    return "redirect:/emps"; // 跳转到首页
}
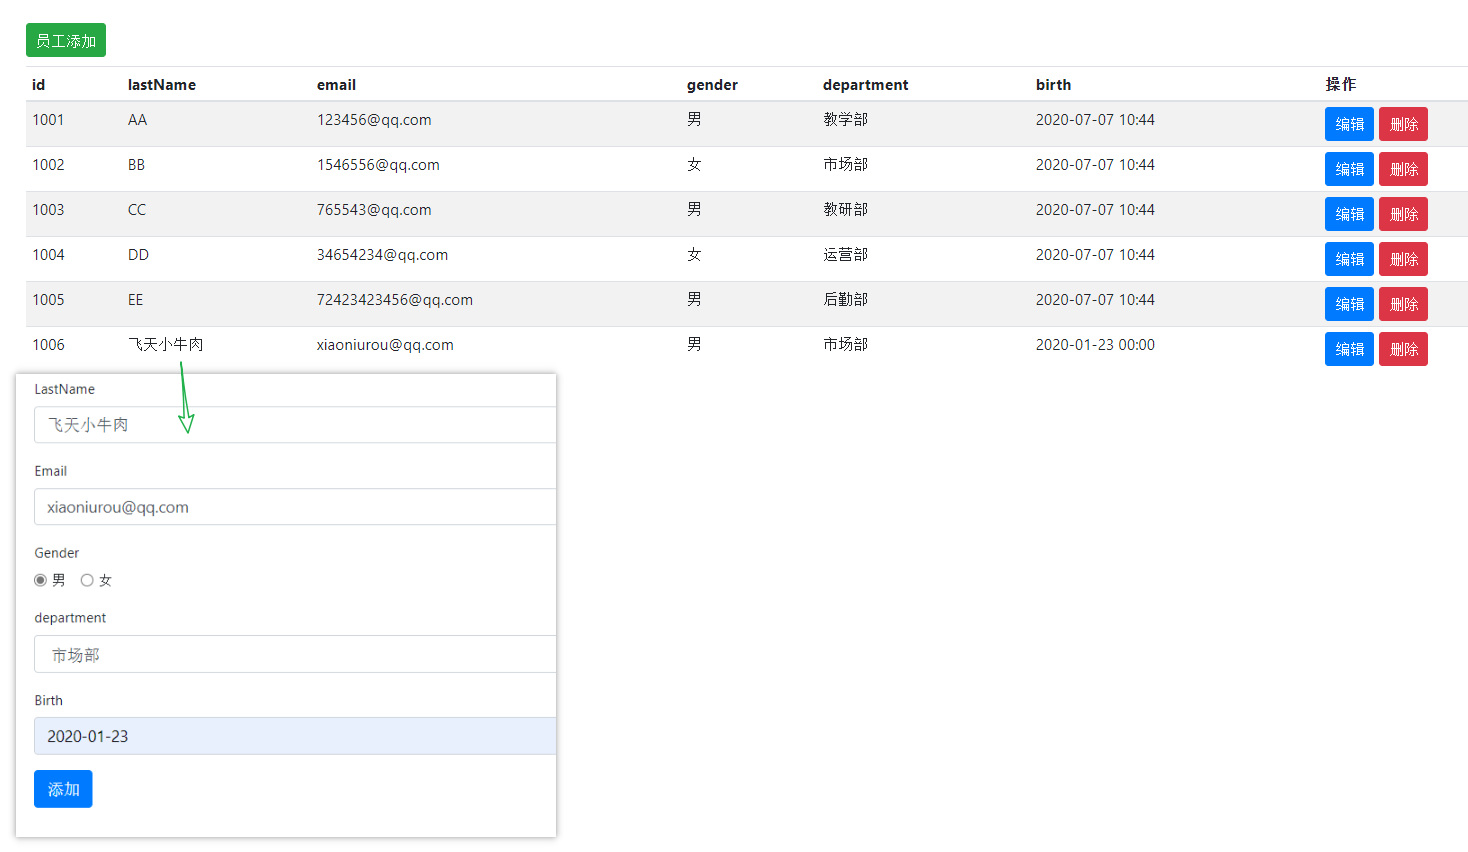
还要注意日期格式问题,SpingBoot 默认日期格式是 yyyy/MM/dd,我们可在全局配置文件中将其修改成 yyyy-MM-dd
# 日期格式化(默认是yyyy/MM/dd)
spring.mvc.format.date=yyyy-MM-dd
最终效果如下:
9. CRUD - 员工修改
OK,接下来进行员工的修改:(编辑按钮在 list 界面)
<a class="btn btn-sm btn-primary" th:href="@{'/emp/'+${emp.getId()}}">编辑</a>
url 上传入员工 id,后台获取 id 对该员工进行操作
和员工添加一样,写两个方法一个跳转到员工修改界面,一个用来实现修改员工信息
// 跳转到修改员工界面
@GetMapping("/emp/{id}")
public String toUpdateEmp(@PathVariable("id") Integer id,Model model){
    //查出原来的数据
    System.out.println(id);
    Employee employee = employeeDao.getEmployeeById(id);
    System.out.println(employee);
    model.addAttribute("emp",employee);
    //查询所有部门信息
    Collection<Department> departments=departmentDao.getDepartment();
    model.addAttribute("departments",departments);
    return "emp/update";
}

// 修改员工
@PutMapping("/updateEmp")
public String updateEmp(Employee employee){
    employeeDao.save(employee); // 保存员工信息
    return "redirect:/emps"; // 跳转到首页
}
修改界面 update.html
<form th:action="@{/updateEmp}" method="post">
    <!--隐藏域,标名我们提交的id-->
    <input type="hidden" th:value="${emp.getId()}" name="id">
    <div class="form-group">
        <label>LastName</label>
        <input th:value="${emp.getLastName()}" type="text" name="lastName" class="form-control" placeholder="yanhang">
    </div>
    <div class="form-group">
        <label>Email</label>
        <input th:value = "${emp.getEmail()}" name="email" type="email" class="form-control" >
    </div>
    <div class="form-group">
        <label>Gender</label><br/>
        <div class="form-check form-check-inline">
            <input th:checked="${emp.getGender()==1}" class="form-check-input" type="radio" name="gender" value="1">
            <label  class="form-check-label">男</label>
        </div>
        <div class="form-check form-check-inline">
            <input th:checked="${emp.getGender()==0}" class="form-check-input" type="radio" name="gender" value="0">
            <label class="form-check-label">女</label>
        </div>
    </div>
    <div class="form-group">
        <label>department</label>
        <!--text 是下拉框显示的文字,提交的是 value 即部门id-->
        <select class="form-control" name="department.id">
            <option th:selected="${dept.getId() == emp.getDepartment().getId()}"
                    th:each="dept:${departments}"
                    th:text="${dept.departmentName}"
                    th:value="${dept.id}">
            </option>
        </select>
    </div>
    <div class="form-group">
        <label>Birth</label>
        <input th:value = "${#dates.format(emp.getBirth(),'yyyy-MM-dd')}" name="birth" type="text" class="form-control" >
    </div>
    <button type="submit" class="btn btn-primary">添加</button>
</form>
10. CRUD - 员工删除
<a class="btn btn-sm btn-danger" th:href="@{'/delemp/'+${emp.getId()}}">删除</a>
// 删除员工
@GetMapping("/delemp/{id}")
public String toDeleteEmp(@PathVariable("id")Integer id){
    employeeDao.delete(id);
    return "redirect:/emps";
}
11. BUG 提醒
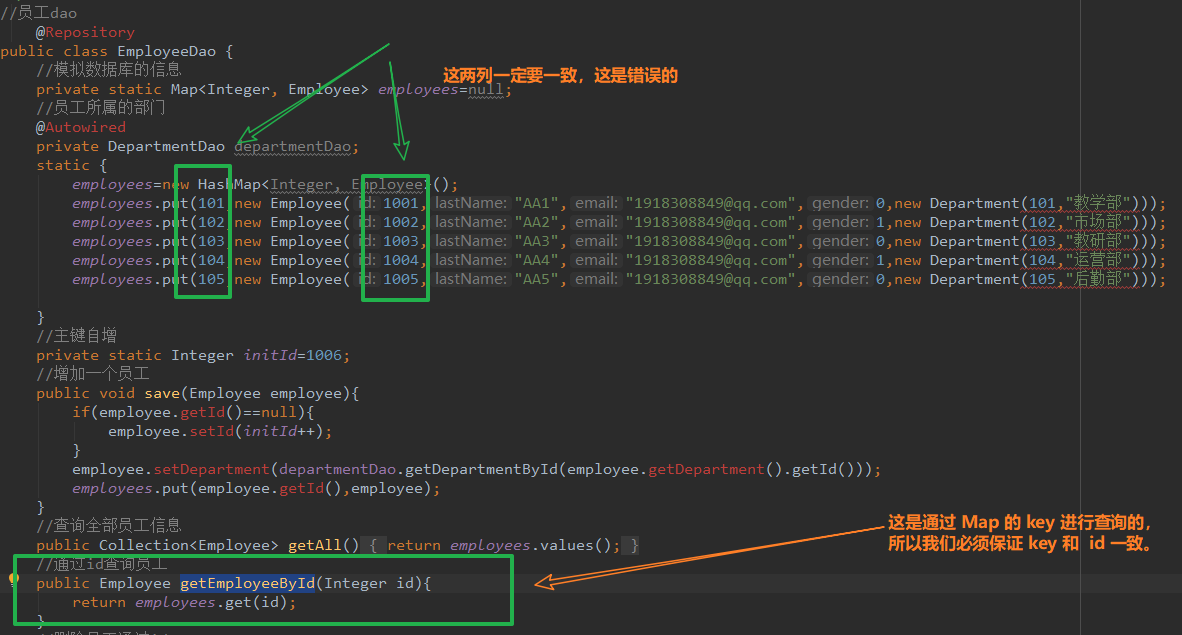
兄弟萌,在创建员工信息的时候,一定要注意Map 的 key 要和后面的 Employee 对象的 id 一致,否则没办法通过 getEmployeeById 查询到对应的员工信息。如下是错误的示范:
✅ 下面是正确的:

12. 登出
<a class="nav-link" th:href="@{/user/logout}">退出</a>
// 登出
@RequestMapping("/user/logout")
public String UserLogout(HttpSession session){
    session.invalidate();
    return "redirect:/index.html"; // 重定向到首页
}


