rabbitMQ(docker版本) 安装Stomp插件--前端消息实时提醒(消费者随机提醒,单一消费者) demo
目录
docker 安装的mq配置Stomp websokcek 插件
进入到rabbitMQ内部
docker exec -it 41ddc6d666f1 /bin/sh
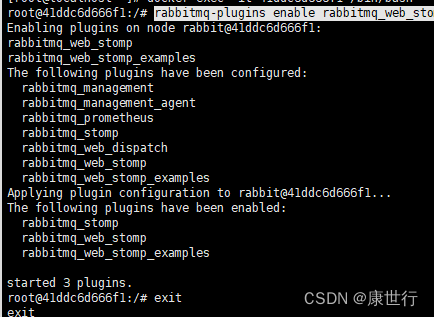
进行开启stomp 插件
rabbitmq-plugins enable rabbitmq_web_stomp rabbitmq_web_stomp_examples
把修改后的容器,再次打包成镜像
docker commit 41ddc6d666f1 rabbitmq:stomp

停止原来的mq服务
docker stop 41ddc6d666f1

从新使用新打包的镜像创建并运行容器
docker run -di --name=rabbitmq -e RABBITMQ_DEFAULT_USER=admin -e RABBITMQ_DEFAULT_PASS=admin -p 5617:5617 -p 5672:5672 -p 4369:43691:15671 -p 15672:15672 -p 25672:25672 -p 15670:15670 -p 15674:15674 rabbitmq:stomp

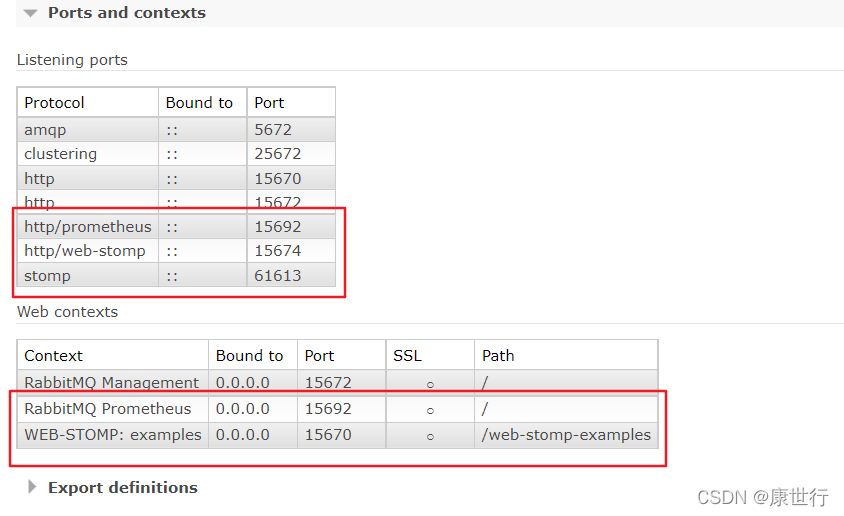
安装完成之后会在rabbitMQ可视化界面看到如下信息
设置mq 开机自启
docker update --restart=always 49ff36b2b95a

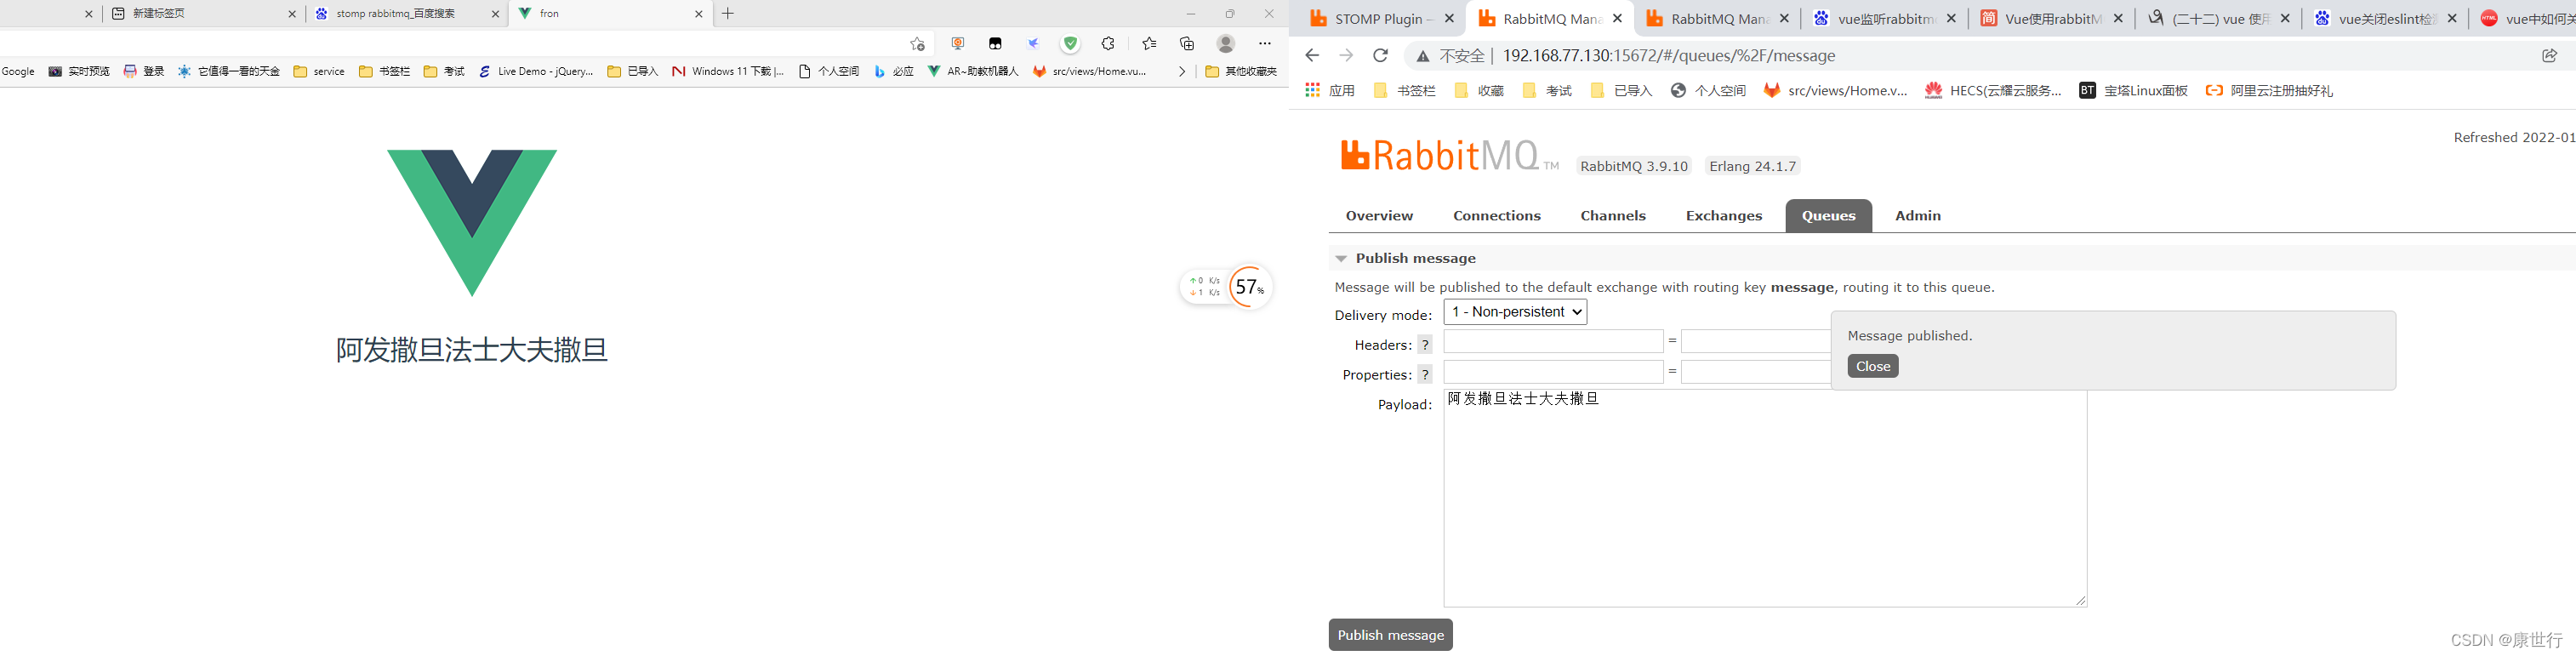
前端实时提醒demo
安装stompjs
npm install stompjs

单页面引入 stomjs
import Stomp from "stompjs";
    export const MQTT_SERVICE = 'ws://192.168.0.17:15674/ws' // mqtt服务地址
    export const MQTT_USERNAME = 'username' // 连接用户名
    export const MQTT_PASSWORD = 'passward' //  连接密码
    export const Virtual_host = 'bx' //  侦听器端口
实时通信测试demo-随机消费
<template>
  <div class="hello">
    <h1>{{ msg }}</h1>
  </div>
</template>

<script>
import Stomp from "stompjs";
export const MQTT_SERVICE = "ws://192.168.77.130:15674/ws"; // mqtt服务地址
export const MQTT_USERNAME = "admin"; // 连接用户名
export const MQTT_PASSWORD = "admin"; //  连接密码
export const Virtual_host = "/"; //  侦听器端口
export default {
  name: "HelloWorld",
  data() {
    return {
      msg: "Welcome to Your Vue.js App",
      client: Stomp.client(MQTT_SERVICE),
    };
  },
  created() {
    this.mqtthuoquMsg();
  },
  methods: {
    // 消息队列获取
    mqtthuoquMsg() {
      //初始化连接
      const headers = {
        login: MQTT_USERNAME,
        passcode: MQTT_PASSWORD,
      };
      //进行连接
      this.client.connect(
        headers.login,
        headers.passcode,
        this.onConnected,
        this.onFailed,
        Virtual_host
      );
    },
    onConnected: function () {
      //订阅频道
      const topic = localStorage.getItem("personId");
      this.client.subscribe("message", this.responseCallback, this.onFailed);
    },
    onFailed: function (frame) {
      console.log("MQ Failed: " + frame);
      this.$message.error("连接失败");
    },
    // 回传消息
    responseCallback: function (frame) {
      console.log("MQ msg=>" + frame.body);
      this.msg=frame.body
      //接收消息处理
    },
    // 断开相应的连接
    close: function () {
      this.client.disconnect(function () {
        console.log("已退出账号");
      });
    },
  },
};
</script>

<!-- Add "scoped" attribute to limit CSS to this component only -->
<style scoped>
h1,
h2 {
  font-weight: normal;
}
ul {
  list-style-type: none;
  padding: 0;
}
li {
  display: inline-block;
  margin: 0 10px;
}
a {
  color: #42b983;
}
</style>
前端实现效果
欢迎访问csdn的博客:
https://blog.csdn.net/kangshihang1998?spm=1010.2135.3001.5343

 浙公网安备 33010602011771号