SpringBoot(四)热部署
首先要知道Class加载到jvm是延迟加载的,就是用到的时候才加载,而且类只加载一次。(这个一次是指同一个类只加载一次,而同一个类是指类加载器+类全限定名才能确定)。
为了让修改过后的.java文件生效,只能重新加载类,而为了重新加载只能改变类加载器。热部署的原理也就是更换类加载重新加载。也就是要自定义类加载器。
对于JVM中的类加载器,有个双亲委派机制。
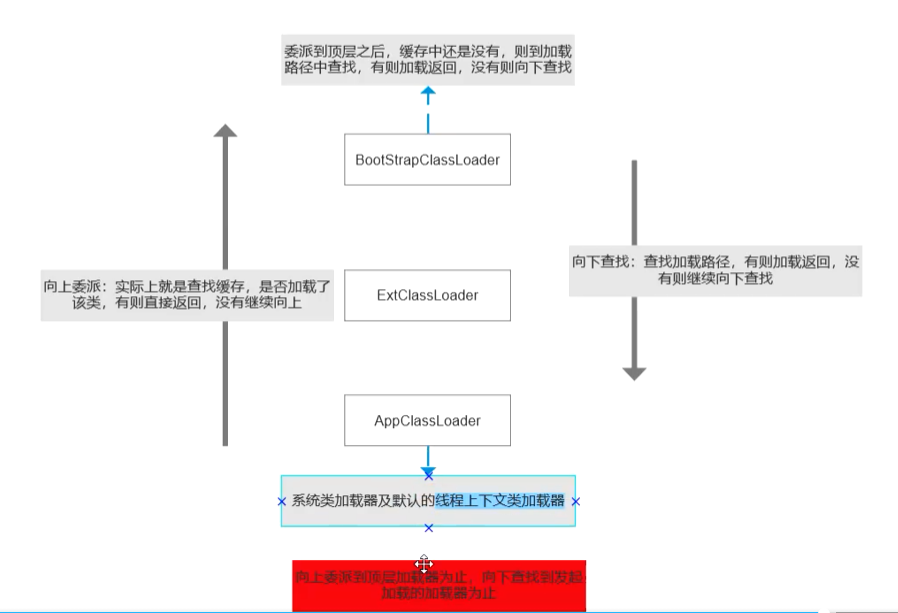
全盘委托:加载类的时候使用调用者的类加载器加载,但是也会走双亲委派。
------------恢复内容开始------------
首先要知道Class加载到jvm是延迟加载的,就是用到的时候才加载,而且类只加载一次。(这个一次是指同一个类只加载一次,而同一个类是指类加载器+类全限定名才能确定)。
为了让修改过后的.java文件生效,只能重新加载类,而为了重新加载只能改变类加载器。热部署的原理也就是更换类加载重新加载。也就是要自定义类加载器。
对于JVM中的类加载器,有个双亲委派机制。
全盘委托:加载类的时候使用调用者的类加载器加载,但是也会走双亲委派。
还有一点就是 jdk中的spi 是有打破双亲委派的时候。比如jdbc加载驱动, 就是通过spi机制实现的。因为 com.jdbc.mysql.Driver 是在mysql.jar中的。而DriverManager 是在rt.jar 包中,而这个包是由BootStrap类加载器加载的,而DriverManager 要想用 com.jdbc.mysql.Driver ,按照双亲委派是没办法加载到的,但是,因为根据全盘委托的原理,com.jdbc.mysql.Driver 也会用BootStrap 类加载器来加载,所以这里要打破双亲委派,使用了上下文加载器来加载:
Thread.currentThread().getContextClassLoader();
这个上下文加载器,是在jvm启动过程中赋值的,默认是Application加载器。
spirngboot中的热部署原理如下:
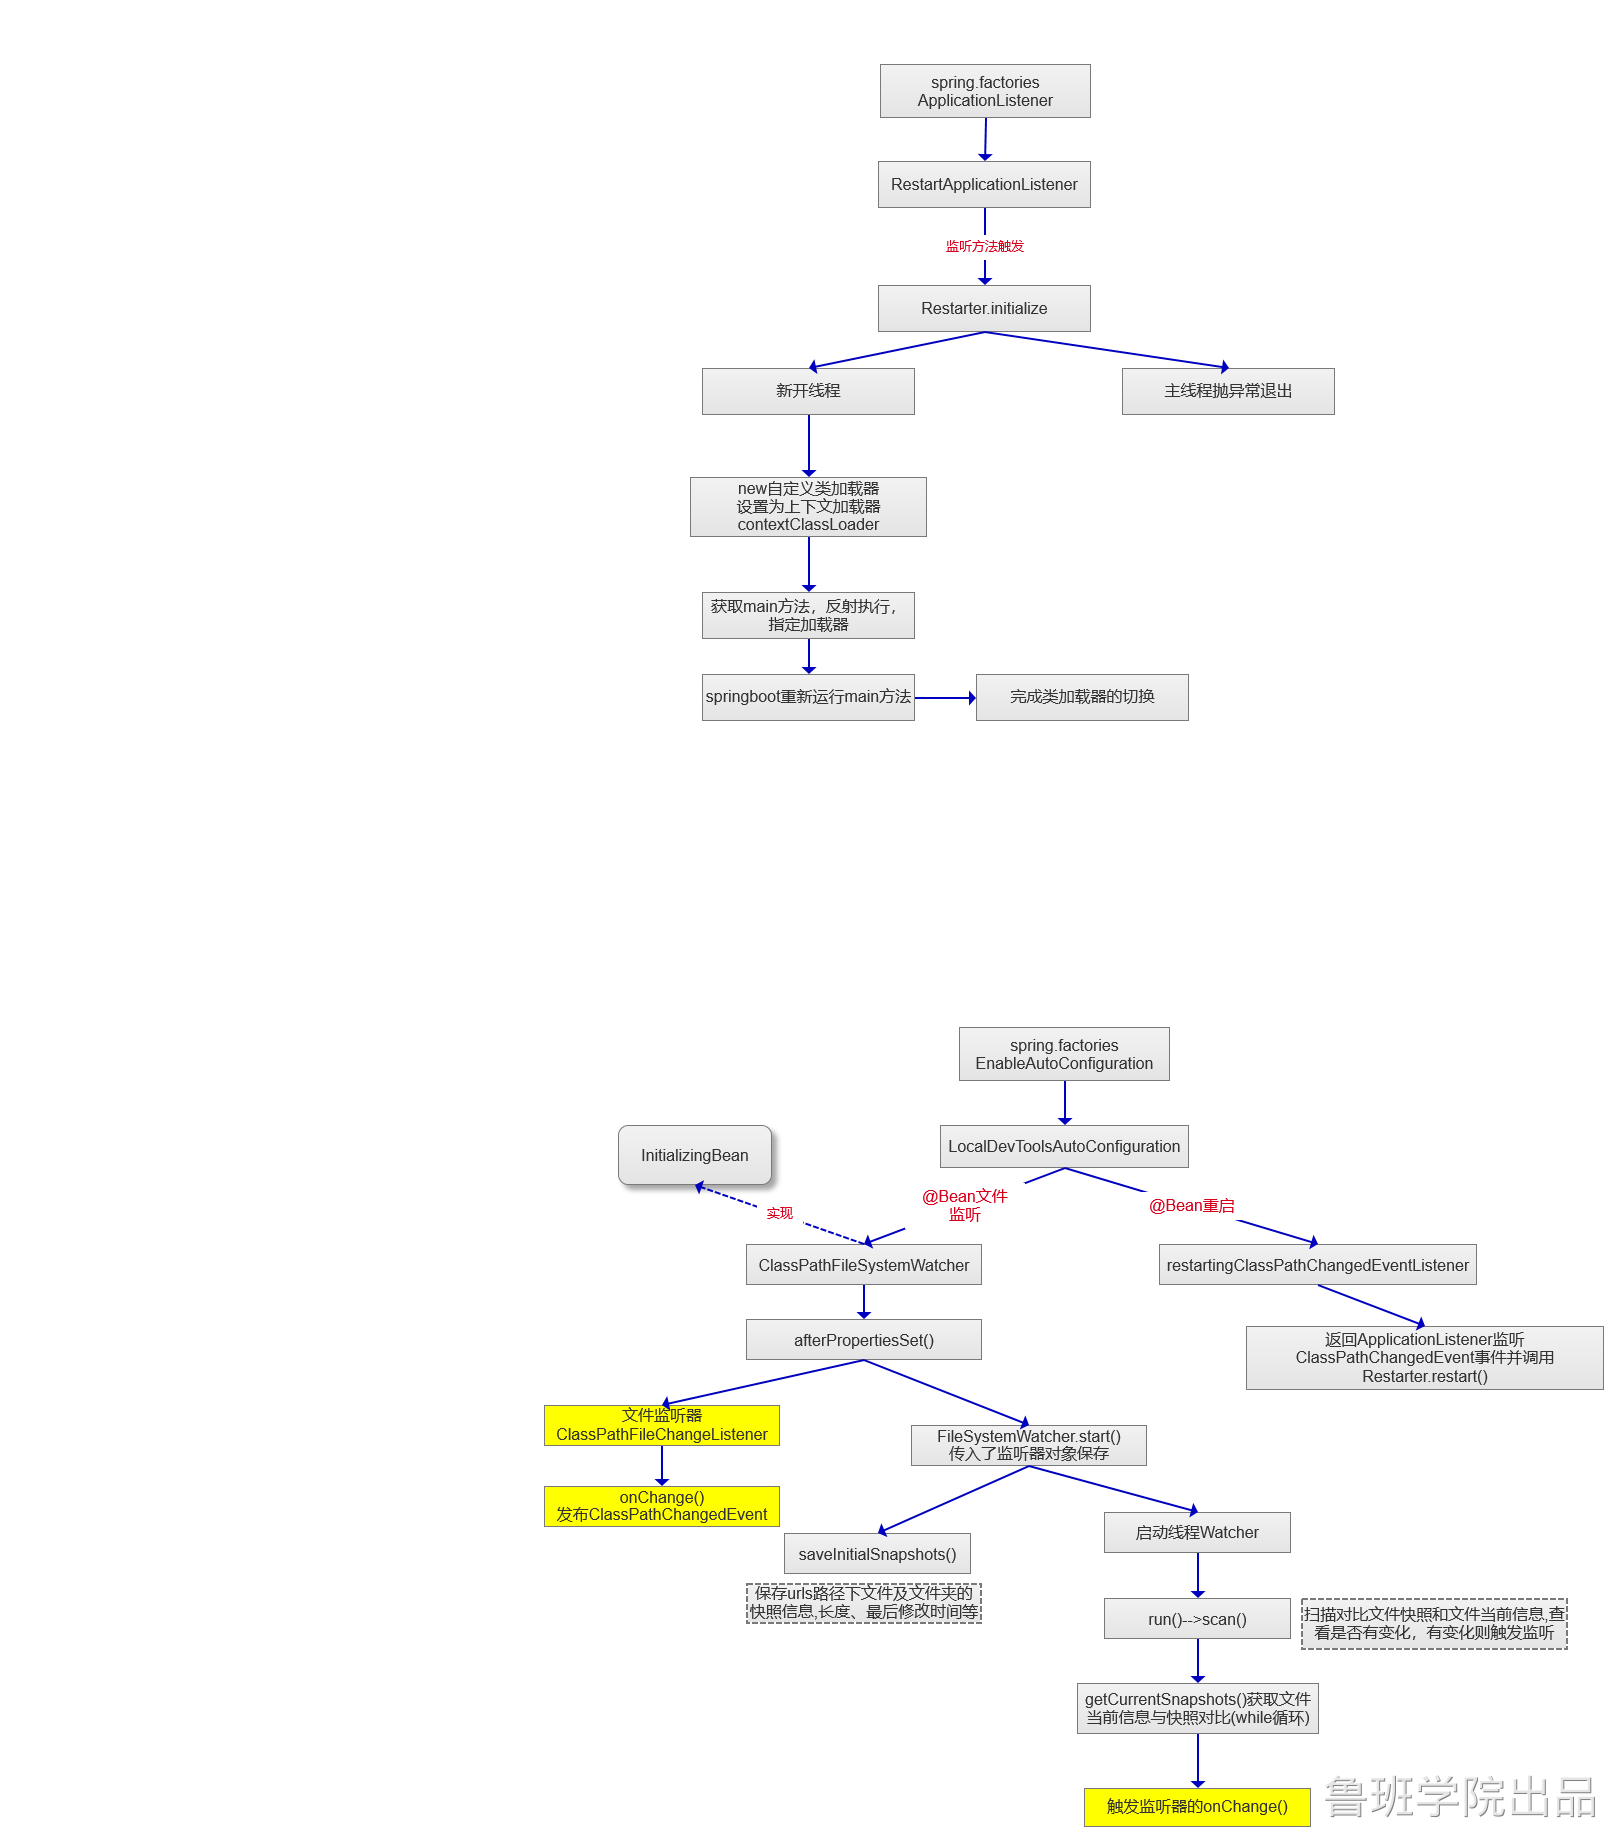
在项目代码里面想使用热部署的功能,需要引入一个jar,
 <dependency>
      <groupId>org.springframework.boot</groupId>
      <artifactId>spring-boot-devtools</artifactId>
    </dependency>
这个jar里面有一个 RestartApplicationListener 监听器,
  public void onApplicationEvent(ApplicationEvent event) {
        if (event instanceof ApplicationStartingEvent) {
             // 监听启动事件
            this.onApplicationStartingEvent((ApplicationStartingEvent)event);
        }

        if (event instanceof ApplicationPreparedEvent) {
            this.onApplicationPreparedEvent((ApplicationPreparedEvent)event);
        }

        if (event instanceof ApplicationReadyEvent || event instanceof ApplicationFailedEvent) {
            Restarter.getInstance().finish();
        }

        if (event instanceof ApplicationFailedEvent) {
            this.onApplicationFailedEvent((ApplicationFailedEvent)event);
        }

    }
this.onApplicationStartingEvent((ApplicationStartingEvent)event);
 private void onApplicationStartingEvent(ApplicationStartingEvent event) {
        String enabled = System.getProperty("spring.devtools.restart.enabled");
        if (enabled != null && !Boolean.parseBoolean(enabled)) {
            logger.info(LogMessage.format("Restart disabled due to System property '%s' being set to false", "spring.devtools.restart.enabled"));
            Restarter.disable();
        } else {
            String[] args = event.getArgs();
            DefaultRestartInitializer initializer = new DefaultRestartInitializer();
            boolean restartOnInitialize = !AgentReloader.isActive();
            if (!restartOnInitialize) {
                logger.info("Restart disabled due to an agent-based reloader being active");
            }
           // 主要就是这个方法
            Restarter.initialize(args, false, initializer, restartOnInitialize);
        }

    }
Restarter.initialize(args, false, initializer, restartOnInitialize);
  public static void initialize(String[] args, boolean forceReferenceCleanup, RestartInitializer initializer, boolean restartOnInitialize) {
        Restarter localInstance = null;
        synchronized(INSTANCE_MONITOR) {
            if (instance == null) {
               // 构造方法里会找到我们启动类入口,就是main方法入口
                localInstance = new Restarter(Thread.currentThread(), args, forceReferenceCleanup, initializer);
                instance = localInstance;
            }
        }

        if (localInstance != null) {
            // 在这里会启动一个异步线程
            localInstance.initialize(restartOnInitialize);
        }

    }
localInstance.initialize(restartOnInitialize);
 protected void initialize(boolean restartOnInitialize) {
        this.preInitializeLeakyClasses();
        if (this.initialUrls != null) {
            this.urls.addAll(Arrays.asList(this.initialUrls));
            if (restartOnInitialize) {
                this.logger.debug("Immediately restarting application");
                 // 主要是这个方法
                this.immediateRestart();
            }
        }

    }
 private void immediateRestart() {
        try {
              // 这里就是通过一个Thread子类启动一个线程
            this.getLeakSafeThread().callAndWait(() -> {
                this.start(FailureHandler.NONE);
                this.cleanupCaches();
                return null;
            });
        } catch (Exception var2) {
            this.logger.warn("Unable to initialize restarter", var2);
        }
        // 主线程中断  ,通过抛出了一个异常
        SilentExitExceptionHandler.exitCurrentThread();
    }
 static void exitCurrentThread() {
        throw new SilentExitExceptionHandler.SilentExitException();
    }
然后我们去看下新起的线程做了那些事情:
   protected void start(FailureHandler failureHandler) throws Exception {
        Throwable error;
        do {
            error = this.doStart();
            if (error == null) {
                return;
            }
        } while(failureHandler.handle(error) != Outcome.ABORT);

    }
 private Throwable doStart() throws Exception {
        Assert.notNull(this.mainClassName, "Unable to find the main class to restart");
        URL[] urls = (URL[])this.urls.toArray(new URL[0]);
        ClassLoaderFiles updatedFiles = new ClassLoaderFiles(this.classLoaderFiles);
        // 热部署的核心类加载器
        ClassLoader classLoader = new RestartClassLoader(this.applicationClassLoader, urls, updatedFiles, this.logger);
        if (this.logger.isDebugEnabled()) {
            this.logger.debug("Starting application " + this.mainClassName + " with URLs " + Arrays.asList(urls));
        }
        // 把新创建的类加载器传递进去
        return this.relaunch(classLoader);
    }
protected Throwable relaunch(ClassLoader classLoader) throws Exception {
        // 这也是一个线程类
        RestartLauncher launcher = new RestartLauncher(classLoader, this.mainClassName, this.args, this.exceptionHandler);
        // 启动线程
        launcher.start();
        // 等待完成
        launcher.join();
        return launcher.getError();
    }
直接看新线程的run方法:
public void run() {
        try {
            // 通过反射加载我们的主类  但是这个时候类加载器已经切换到我们自定义类加载器了
            Class<?> mainClass = Class.forName(this.mainClassName, false, this.getContextClassLoader());
           // 然后反射执行我们的main方法  相当于我们的程序又重新启动了。
            Method mainMethod = mainClass.getDeclaredMethod("main", String[].class);
            mainMethod.invoke((Object)null, this.args);
        } catch (Throwable var3) {
            this.error = var3;
            this.getUncaughtExceptionHandler().uncaughtException(this, var3);
        }

    }
为了让改了代码即时生效,需要一个文件监听器:监听文件的变动,还有文件的路径,间隔一定时间while循环
为了做比较,在初始化的时候要把文件信息保存起来,文件大小,修改时间等。
而且这个重新启动只是(RestartClassLoader加载器加载的类启动,也就是classpath路径下的lei重新加载) 而jvm是不需要重启的,就是rt.jar 包不需要重新加载,所以热部署启动很快。

 浙公网安备 33010602011771号