C# 最基础知识介绍(六)——接口、命名空间、预处理指令、正则表达式、异常处理、文件的输入与输出
接口、命名空间、预处理指令、正则表达式、异常处理、文件的输入与输出
接口(interface)🎉
接口定义了所有类继承接口时应遵循的语法合同。
接口定义了语法合同 “是什么” 部分,派生类定义了语法合同 “怎么做” 部分。
接口定义了属性、方法和事件,这些都是接口的成员。接口只包含了成员的声明。成员的定义是派生类的责任。接口提供了派生类应遵循的标准结构。
接口使得实现接口的类或结构在形式上保持一致。
抽象类在某种程度上与接口类似,但是,它们大多只是用在当只有少数方法由基类声明由派生类实现时。
定义接口: MyInterface.cs
接口使用 interface 关键字声明,它与类的声明类似。接口声明默认是 public 的。下面是一个接口声明的实例:
1 interface IMyInterface
2 {
3     void MethodToImplement();
4 }
以上代码定义了接口 IMyInterface。通常接口命令以 I 字母开头,这个接口只有一个方法 MethodToImplement(),没有参数和返回值,当然我们可以按照需求设置参数和返回值。
值得注意的是,该方法并没有具体的实现。
接下来我们来实现以上接口:InterfaceImplementer.cs
 1 实例
 2 using System;
 3
 4 interface IMyInterface
 5 {
 6         // 接口成员
 7     void MethodToImplement();
 8 }
 9
10 class InterfaceImplementer : IMyInterface
11 {
12     static void Main()
13     {
14         InterfaceImplementer iImp = new InterfaceImplementer();
15         iImp.MethodToImplement();
16     }
17
18     public void MethodToImplement()
19     {
20         Console.WriteLine("MethodToImplement() called.");
21     }
22 }
InterfaceImplementer 类实现了 IMyInterface 接口,接口的实现与类的继承语法格式类似:
class InterfaceImplementer : IMyInterface
继承接口后,我们需要实现接口的方法 MethodToImplement() , 方法名必须与接口定义的方法名一致。
接口继承: InterfaceInheritance.cs
以下实例定义了两个接口 IMyInterface 和 IParentInterface。
如果一个接口继承其他接口,那么实现类或结构就需要实现所有接口的成员。
以下实例 IMyInterface 继承了 IParentInterface 接口,因此接口实现类必须实现 MethodToImplement() 和 ParentInterfaceMethod() 方法:
 1 实例
 2 using System;
 3
 4 interface IParentInterface
 5 {
 6     void ParentInterfaceMethod();
 7 }
 8
 9 interface IMyInterface : IParentInterface
10 {
11     void MethodToImplement();
12 }
13
14 class InterfaceImplementer : IMyInterface
15 {
16     static void Main()
17     {
18         InterfaceImplementer iImp = new InterfaceImplementer();
19         iImp.MethodToImplement();
20         iImp.ParentInterfaceMethod();
21     }
22
23     public void MethodToImplement()
24     {
25         Console.WriteLine("MethodToImplement() called.");
26     }
27
28     public void ParentInterfaceMethod()
29     {
30         Console.WriteLine("ParentInterfaceMethod() called.");
31     }
32 }
实例输出结果为:
MethodToImplement() called.
ParentInterfaceMethod() called.
C# 命名空间(Namespace)🎈
命名空间的设计目的是提供一种让一组名称与其他名称分隔开的方式。在一个命名空间中声明的类的名称与另一个命名空间中声明的相同的类的名称不冲突。
我们举一个计算机系统中的例子,一个文件夹(目录)中可以包含多个文件夹,每个文件夹中不能有相同的文件名,但不同文件夹中的文件可以重名。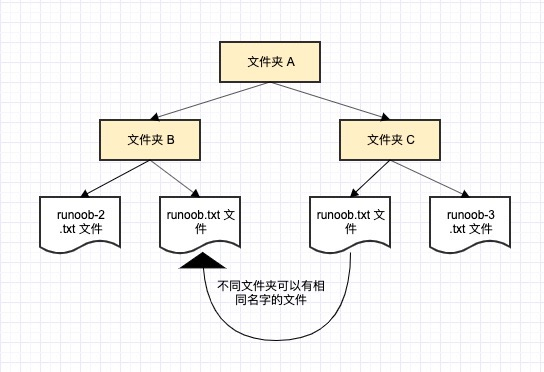
定义命名空间
命名空间的定义是以关键字 namespace 开始,后跟命名空间的名称,如下所示:
1 namespace namespace_name
2 {
3    // 代码声明
4 }
为了调用支持命名空间版本的函数或变量,会把命名空间的名称置于前面,如下所示:
namespace_name.item_name;
下面的程序演示了命名空间的用法:
 1 实例
 2 using System;
 3 namespace first_space
 4 {
 5    class namespace_cl
 6    {
 7       public void func()
 8       {
 9          Console.WriteLine("Inside first_space");
10       }
11    }
12 }
13 namespace second_space
14 {
15    class namespace_cl
16    {
17       public void func()
18       {
19          Console.WriteLine("Inside second_space");
20       }
21    }
22 }
23 class TestClass
24 {
25    static void Main(string[] args)
26    {
27       first_space.namespace_cl fc = new first_space.namespace_cl();
28       second_space.namespace_cl sc = new second_space.namespace_cl();
29       fc.func();
30       sc.func();
31       Console.ReadKey();
32    }
33 }
当上面的代码被编译和执行时,它会产生下列结果:
Inside first_space
Inside second_space
using 关键字
using 关键字表明程序使用的是给定命名空间中的名称。例如,我们在程序中使用 System 命名空间,其中定义了类 Console。我们可以只写:
1 Console.WriteLine ("Hello there");
我们可以写完全限定名称,如下:
1 System.Console.WriteLine("Hello there");
也可以使用 using 命名空间指令,这样在使用的时候就不用在前面加上命名空间名称。该指令告诉编译器随后的代码使用了指定命名空间中的名称。下面的代码演示了命名空间的应用。
让我们使用 using 指定重写上面的实例:
 1 实例
 2 using System;
 3 using first_space;
 4 using second_space;
 5
 6 namespace first_space
 7 {
 8    class abc
 9    {
10       public void func()
11       {
12          Console.WriteLine("Inside first_space");
13       }
14    }
15 }
16 namespace second_space
17 {
18    class efg
19    {
20       public void func()
21       {
22          Console.WriteLine("Inside second_space");
23       }
24    }
25 }
26 class TestClass
27 {
28    static void Main(string[] args)
29    {
30       abc fc = new abc();
31       efg sc = new efg();
32       fc.func();
33       sc.func();
34       Console.ReadKey();
35    }
36 }
当上面的代码被编译和执行时,它会产生下列结果:
Inside first_space
Inside second_space
嵌套命名空间
命名空间可以被嵌套,即您可以在一个命名空间内定义另一个命名空间,如下所示:
1 namespace namespace_name1
2 {
3    // 代码声明
4    namespace namespace_name2
5    {
6      // 代码声明
7    }
8 }
可以使用点(.)运算符访问嵌套的命名空间的成员,如下所示:
 1 实例
 2 using System;
 3 using SomeNameSpace;
 4 using SomeNameSpace.Nested;
 5
 6 namespace SomeNameSpace
 7 {
 8     public class MyClass
 9     {
10         static void Main()
11         {
12             Console.WriteLine("In SomeNameSpace");
13             Nested.NestedNameSpaceClass.SayHello();
14         }
15     }
16
17     // 内嵌命名空间
18     namespace Nested
19     {
20         public class NestedNameSpaceClass
21         {
22             public static void SayHello()
23             {
24                 Console.WriteLine("In Nested");
25             }
26         }
27     }
28 }
当上面的代码被编译和执行时,它会产生下列结果:
In SomeNameSpace
In Nested
C# 预处理器指令🎄
预处理器指令指导编译器在实际编译开始之前对信息进行预处理。
所有的预处理器指令都是以 # 开始。且在一行上,只有空白字符可以出现在预处理器指令之前。预处理器指令不是语句,所以它们不以分号(;)结束。
C# 编译器没有一个单独的预处理器,但是,指令被处理时就像是有一个单独的预处理器一样。在 C# 中,预处理器指令用于在条件编译中起作用。与 C 和 C++ 不同的是,它们不是用来创建宏。一个预处理器指令必须是该行上的唯一指令。
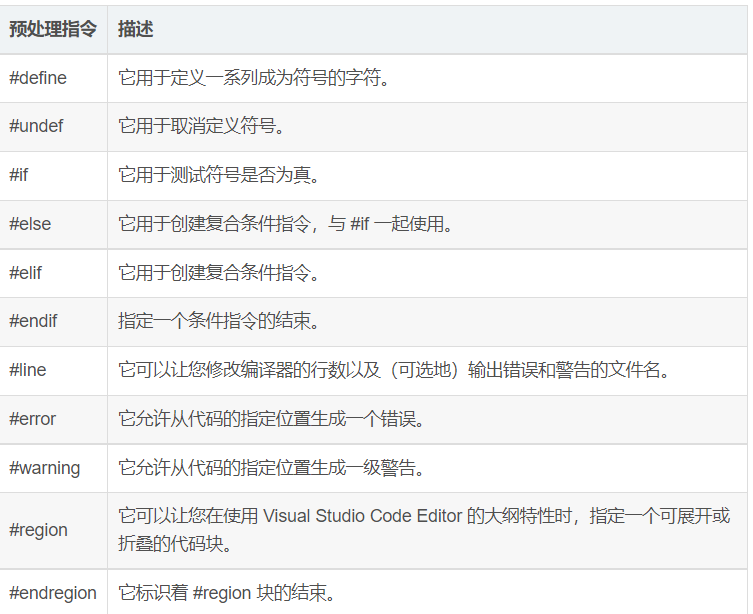
C# 预处理器指令列表
下表列出了 C# 中可用的预处理器指令:
#define 预处理器
#define 预处理器指令创建符号常量。
#define 允许定义一个符号,这样,通过使用符号作为传递给 #if 指令的表达式,表达式将返回 true。它的语法如下:
1 #define symbol
下面的程序说明了这点:
 1 实例
 2 #define PI
 3 using System;
 4 namespace PreprocessorDAppl
 5 {
 6    class Program
 7    {
 8       static void Main(string[] args)
 9       {
10          #if (PI)
11             Console.WriteLine("PI is defined");
12          #else
13             Console.WriteLine("PI is not defined");
14          #endif
15          Console.ReadKey();
16       }
17    }
18 }
当上面的代码被编译和执行时,它会产生下列结果:
PI is defined
条件指令
可以使用 #if 指令来创建一个条件指令。条件指令用于测试符号是否为真。如果为真,编译器会执行 #if 和下一个指令之间的代码。
条件指令的语法:
1 #if symbol [operator symbol]...
其中,symbol 是要测试的符号名称。也可以使用 true 和 false,或在符号前放置否定运算符。
常见运算符有:
- == (等于)
- != (不等于)
- && (与)
- || (或)
也可以用括号把符号和运算符进行分组。条件指令用于在调试版本或编译指定配置时编译代码。一个以 #if 指令开始的条件指令,必须显示地以一个 #endif 指令终止。
下面的程序演示了条件指令的用法:
 1 实例
 2 #define DEBUG
 3 #define VC_V10
 4 using System;
 5 public class TestClass
 6 {
 7    public static void Main()
 8    {
 9
10       #if (DEBUG && !VC_V10)
11          Console.WriteLine("DEBUG is defined");
12       #elif (!DEBUG && VC_V10)
13          Console.WriteLine("VC_V10 is defined");
14       #elif (DEBUG && VC_V10)
15          Console.WriteLine("DEBUG and VC_V10 are defined");
16       #else
17          Console.WriteLine("DEBUG and VC_V10 are not defined");
18       #endif
19       Console.ReadKey();
20    }
21 }
当上面的代码被编译和执行时,它会产生下列结果:
DEBUG and VC_V10 are defined
C# 正则表达式🔔
正则表达式 是一种匹配输入文本的模式。
.Net 框架提供了允许这种匹配的正则表达式引擎。
模式由一个或多个字符、运算符和结构组成。
如果还不理解正则表达式可以阅读正则表达式 - 教程。
定义正则表达式
下面列出了用于定义正则表达式的各种类别的字符、运算符和结构。
- 字符转义
- 字符类
- 定位点
- 分组构造
- 限定符
- 反向引用构造
- 备用构造
- 替换
- 杂项构造
字符转义
正则表达式中的反斜杠字符(\)指示其后跟的字符是特殊字符,或应按原义解释该字符。
下表列出了转义字符: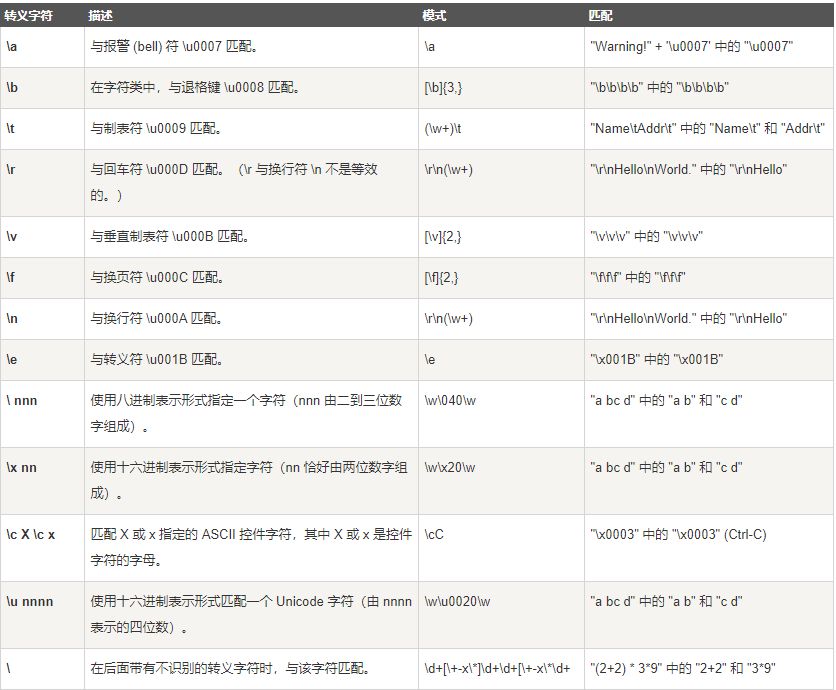
字符类
字符类与一组字符中的任何一个字符匹配。
下表列出了字符类:
分组构造
分组构造描述了正则表达式的子表达式,通常用于捕获输入字符串的子字符串。
这一部分比较难于理解,可以阅读 正则表达式-选择 、正则表达式的先行断言(lookahead)和后行断言(lookbehind) 帮助理解。
下表列出了分组构造: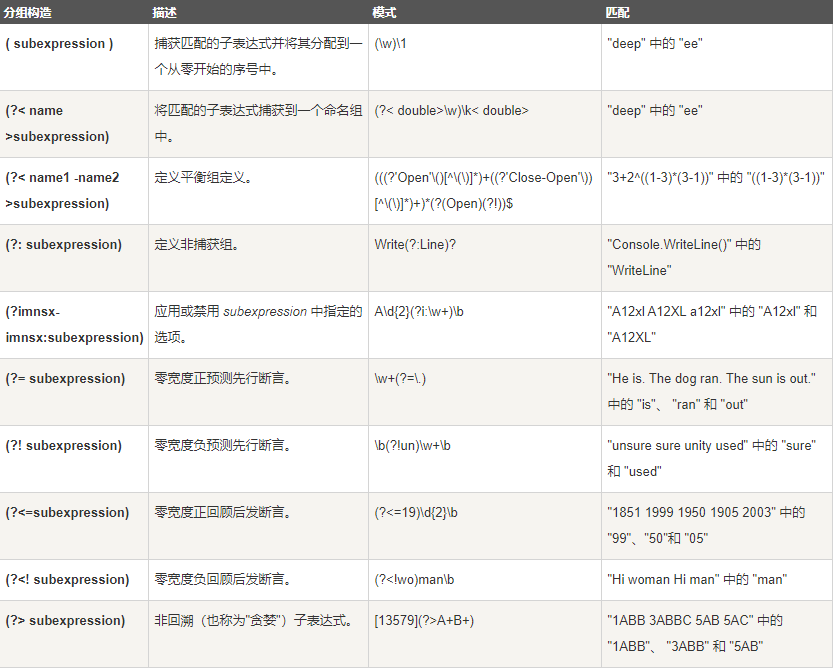
 1 实例
 2 using System;
 3 using System.Text.RegularExpressions;
 4
 5 public class Example
 6 {
 7    public static void Main()
 8    {
 9       string input = "1851 1999 1950 1905 2003";
10       string pattern = @"(?<=19)\d{2}\b";
11
12       foreach (Match match in Regex.Matches(input, pattern))
13          Console.WriteLine(match.Value);
14    }
15 }
限定符
限定符指定在输入字符串中必须存在上一个元素(可以是字符、组或字符类)的多少个实例才能出现匹配项。 限定符包括下表中列出的语言元素。
下表列出了限定符:

反向引用构造
反向引用允许在同一正则表达式中随后标识以前匹配的子表达式。
下表列出了反向引用构造:
备用构造
备用构造用于修改正则表达式以启用 either/or 匹配。
下表列出了备用构造: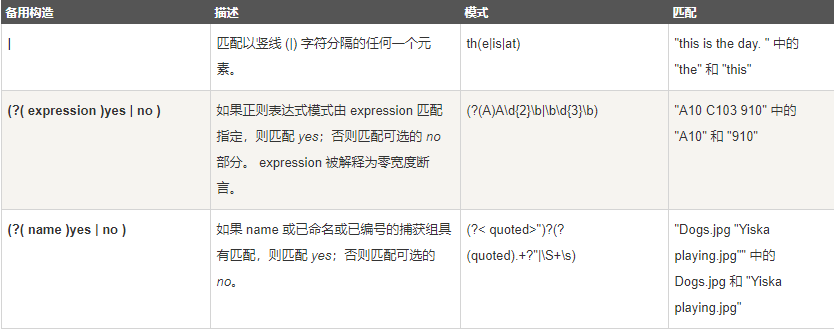
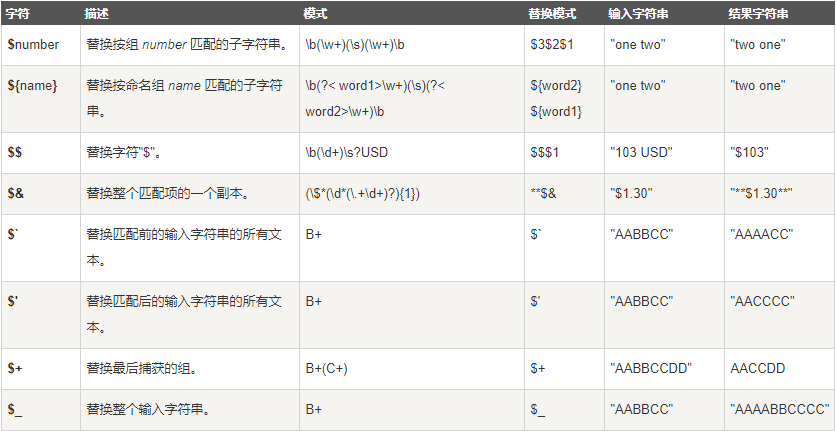
替换
替换是替换模式中使用的正则表达式。
下表列出了用于替换的字符:
杂项构造
下表列出了各种杂项构造: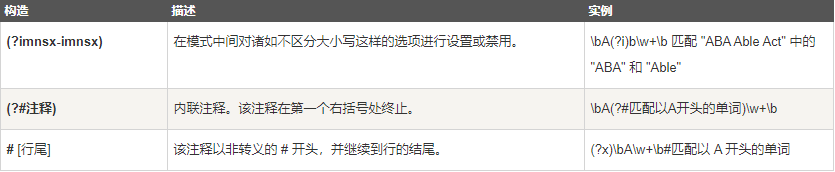
Regex 类
Regex 类用于表示一个正则表达式。
下表列出了 Regex 类中一些常用的方法: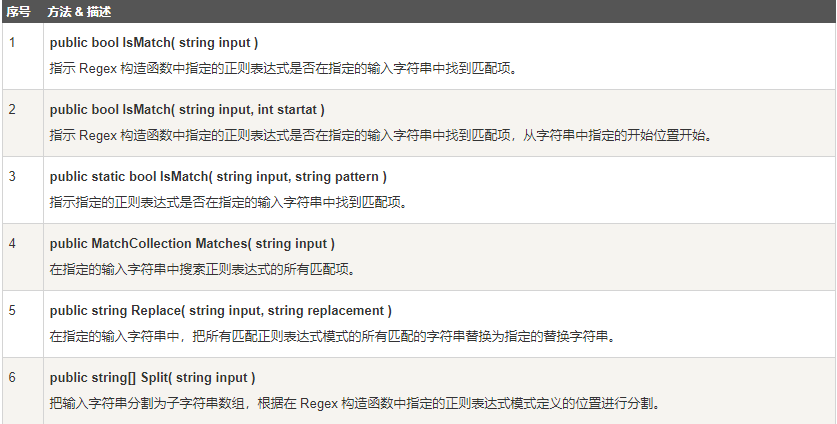
如需了解 Regex 类的完整的属性列表,请参阅微软的 C# 文档。
实例 1
下面的实例匹配了以 ‘S’ 开头的单词:
 1 实例
 2 using System;
 3 using System.Text.RegularExpressions;
 4
 5 namespace RegExApplication
 6 {
 7    class Program
 8    {
 9       private static void showMatch(string text, string expr)
10       {
11          Console.WriteLine("The Expression: " + expr);
12          MatchCollection mc = Regex.Matches(text, expr);
13          foreach (Match m in mc)
14          {
15             Console.WriteLine(m);
16          }
17       }
18       static void Main(string[] args)
19       {
20          string str = "A Thousand Splendid Suns";
21
22          Console.WriteLine("Matching words that start with 'S': ");
23          showMatch(str, @"\bS\S*");
24          Console.ReadKey();
25       }
26    }
27 }
当上面的代码被编译和执行时,它会产生下列结果:
Matching words that start with ‘S’:
The Expression: \bS\S*
Splendid
Suns
实例 2
下面的实例匹配了以 ‘m’ 开头以 ‘e’ 结尾的单词:
 1 实例
 2 using System;
 3 using System.Text.RegularExpressions;
 4
 5 namespace RegExApplication
 6 {
 7    class Program
 8    {
 9       private static void showMatch(string text, string expr)
10       {
11          Console.WriteLine("The Expression: " + expr);
12          MatchCollection mc = Regex.Matches(text, expr);
13          foreach (Match m in mc)
14          {
15             Console.WriteLine(m);
16          }
17       }
18       static void Main(string[] args)
19       {
20          string str = "make maze and manage to measure it";
21
22          Console.WriteLine("Matching words start with 'm' and ends with 'e':");
23          showMatch(str, @"\bm\S*e\b");
24          Console.ReadKey();
25       }
26    }
27 }
当上面的代码被编译和执行时,它会产生下列结果:
Matching words start with ‘m’ and ends with ‘e’:
The Expression: \bm\S*e\b
make
maze
manage
measure
实例 3
下面的实例替换掉多余的空格:
 1 实例
 2 using System;
 3 using System.Text.RegularExpressions;
 4
 5 namespace RegExApplication
 6 {
 7    class Program
 8    {
 9       static void Main(string[] args)
10       {
11          string input = "Hello   World   ";
12          string pattern = "\\s+";
13          string replacement = " ";
14          Regex rgx = new Regex(pattern);
15          string result = rgx.Replace(input, replacement);
16
17          Console.WriteLine("Original String: {0}", input);
18          Console.WriteLine("Replacement String: {0}", result);
19          Console.ReadKey();
20       }
21    }
22 }
当上面的代码被编译和执行时,它会产生下列结果:
Original String: Hello World
Replacement String: Hello World
C# 异常处理🎃
异常是在程序执行期间出现的问题。C# 中的异常是对程序运行时出现的特殊情况的一种响应,比如尝试除以零。
异常提供了一种把程序控制权从某个部分转移到另一个部分的方式。C# 异常处理时建立在四个关键词之上的:try、catch、finally 和 throw。
- try:一个 try 块标识了一个将被激活的特定的异常的代码块。后跟一个或多个 catch 块。
- catch:程序通过异常处理程序捕获异常。catch 关键字表示异常的捕获。
- finally:finally 块用于执行给定的语句,不管异常是否被抛出都会执行。例如,如果您打开一个文件,不管是否出现异常文件都要被关闭。
- throw:当问题出现时,程序抛出一个异常。使用 throw 关键字来完成。
语法
假设一个块将出现异常,一个方法使用 try 和 catch 关键字捕获异常。try/catch 块内的代码为受保护的代码,使用 try/catch 语法如下所示:
 1 try
 2 {
 3    // 引起异常的语句
 4 }
 5 catch( ExceptionName e1 )
 6 {
 7    // 错误处理代码
 8 }
 9 catch( ExceptionName e2 )
10 {
11    // 错误处理代码
12 }
13 catch( ExceptionName eN )
14 {
15    // 错误处理代码
16 }
17 finally
18 {
19    // 要执行的语句
20 }
可以列出多个 catch 语句捕获不同类型的异常,以防 try 块在不同的情况下生成多个异常。
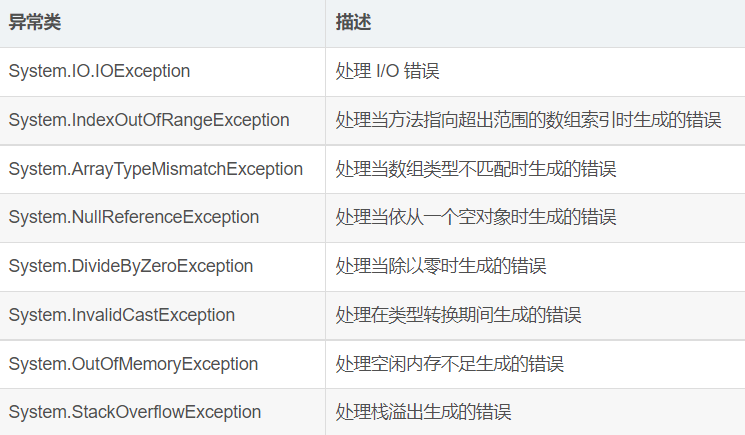
C# 中的异常类
C# 异常是使用类来表示的。C# 中的异常类主要是直接或间接地派生于 System.Exception 类。System.ApplicationException 和 System.SystemException 类是派生于 System.Exception 类的异常类。
System.ApplicationException 类支持由应用程序生成的异常。所以程序员定义的异常都应派生自该类。
System.SystemException 类是所有预定义的系统异常的基类。
下表列出了一些派生自 System.SystemException 类的预定义的异常类:
异常处理
C# 以 try 和 catch 块的形式提供了一种结构化的异常处理方案。使用这些块,把核心程序语句与错误处理语句分离开。
这些错误处理块是使用 try、catch 和 finally 关键字实现的。下面是一个当除以零时抛出异常的实例:
 1 实例
 2 using System;
 3 namespace ErrorHandlingApplication
 4 {
 5     class DivNumbers
 6     {
 7         int result;
 8         DivNumbers()
 9         {
10             result = 0;
11         }
12         public void division(int num1, int num2)
13         {
14             try
15             {
16                 result = num1 / num2;
17             }
18             catch (DivideByZeroException e)
19             {
20                 Console.WriteLine("Exception caught: {0}", e);
21             }
22             finally
23             {
24                 Console.WriteLine("Result: {0}", result);
25             }
26
27         }
28         static void Main(string[] args)
29         {
30             DivNumbers d = new DivNumbers();
31             d.division(25, 0);
32             Console.ReadKey();
33         }
34     }
35 }
当上面的代码被编译和执行时,它会产生下列结果:
Exception caught: System.DivideByZeroException: Attempted to divide by
zero.
at …
Result: 0
创建用户自定义异常
也可以定义自己的异常。用户自定义的异常类是派生自 ApplicationException 类。下面的实例演示了这点:
 1 实例
 2 using System;
 3 namespace UserDefinedException
 4 {
 5    class TestTemperature
 6    {
 7       static void Main(string[] args)
 8       {
 9          Temperature temp = new Temperature();
10          try
11          {
12             temp.showTemp();
13          }
14          catch(TempIsZeroException e)
15          {
16             Console.WriteLine("TempIsZeroException: {0}", e.Message);
17          }
18          Console.ReadKey();
19       }
20    }
21 }
22 public class TempIsZeroException: ApplicationException
23 {
24    public TempIsZeroException(string message): base(message)
25    {
26    }
27 }
28 public class Temperature
29 {
30    int temperature = 0;
31    public void showTemp()
32    {
33       if(temperature == 0)
34       {
35          throw (new TempIsZeroException("Zero Temperature found"));
36       }
37       else
38       {
39          Console.WriteLine("Temperature: {0}", temperature);
40       }
41    }
42 }
当上面的代码被编译和执行时,它会产生下列结果:
TempIsZeroException: Zero Temperature found
抛出对象
如果异常是直接或间接派生自 System.Exception 类,我们可以抛出一个对象。可以在 catch 块中使用 throw 语句来抛出当前的对象,如下所示:
1 Catch(Exception e)
2 {
3    ...
4    Throw e
5 }
C# 文件的输入与输出⛄️
一个 文件 是一个存储在磁盘中带有指定名称和目录路径的数据集合。当打开文件进行读写时,它变成一个 流。
从根本上说,流是通过通信路径传递的字节序列。有两个主要的流:输入流 和 输出流。输入流用于从文件读取数据(读操作),输出流用于向文件写入数据(写操作)。
C# I/O 类
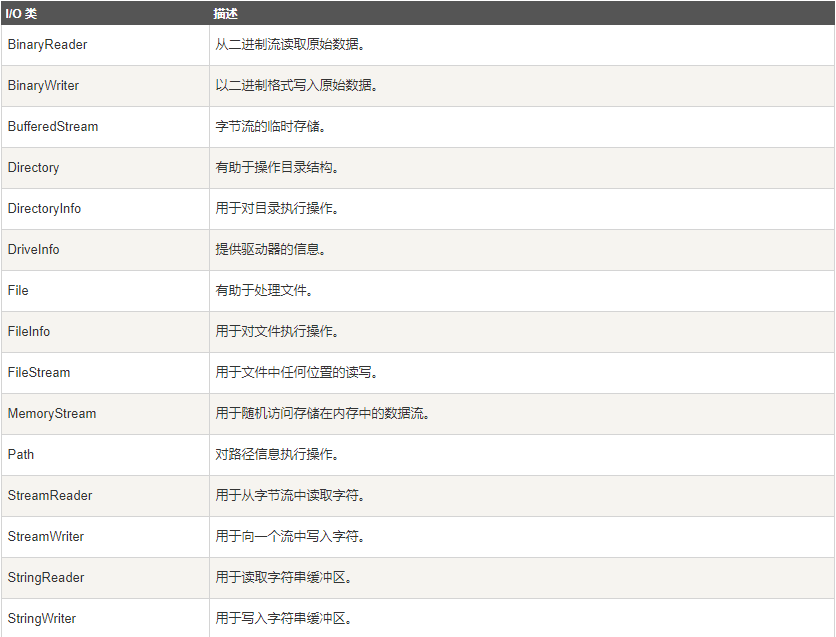
System.IO 命名空间有各种不同的类,用于执行各种文件操作,如创建和删除文件、读取或写入文件,关闭文件等。
下表列出了一些 System.IO 命名空间中常用的非抽象类:
FileStream 类
System.IO 命名空间中的 FileStream 类有助于文件的读写与关闭。该类派生自抽象类 Stream。
您需要创建一个 FileStream 对象来创建一个新的文件,或打开一个已有的文件。创建 FileStream 对象的语法如下:
1 FileStream <object_name> = new FileStream( <file_name>,
2 <FileMode Enumerator>, <FileAccess Enumerator>, <FileShare Enumerator>);
例如,创建一个 FileStream 对象 F 来读取名为 sample.txt 的文件:
FileStream F = new FileStream("sample.txt", FileMode.Open, FileAccess.Read, FileShare.Read);

实例
下面的程序演示了 FileStream 类的用法:
 1 实例
 2 using System;
 3 using System.IO;
 4
 5 namespace FileIOApplication
 6 {
 7     class Program
 8     {
 9         static void Main(string[] args)
10         {
11             FileStream F = new FileStream("test.dat",
12             FileMode.OpenOrCreate, FileAccess.ReadWrite);
13
14             for (int i = 1; i <= 20; i++)
15             {
16                 F.WriteByte((byte)i);
17             }
18
19             F.Position = 0;
20
21             for (int i = 0; i <= 20; i++)
22             {
23                 Console.Write(F.ReadByte() + " ");
24             }
25             F.Close();
26             Console.ReadKey();
27         }
28     }
29 }
当上面的代码被编译和执行时,它会产生下列结果:
1 2 3 4 5 6 7 8 9 10 11 12 13 14 15 16 17 18 19 20 -1
C# 高级文件操作
上面的实例演示了 C# 中简单的文件操作。但是,要充分利用 C# System.IO 类的强大功能,需要知道这些类常用的属性和方法。
我们将讨论这些类和它们执行的操作。请单击链接详细了解各个部分的知识:
C# 高级文件操作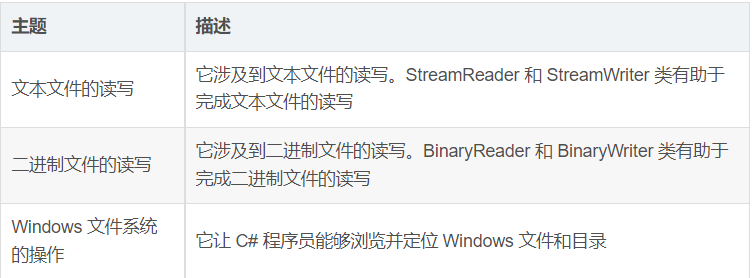

 浙公网安备 33010602011771号