MongoDB shard cluster 搭建
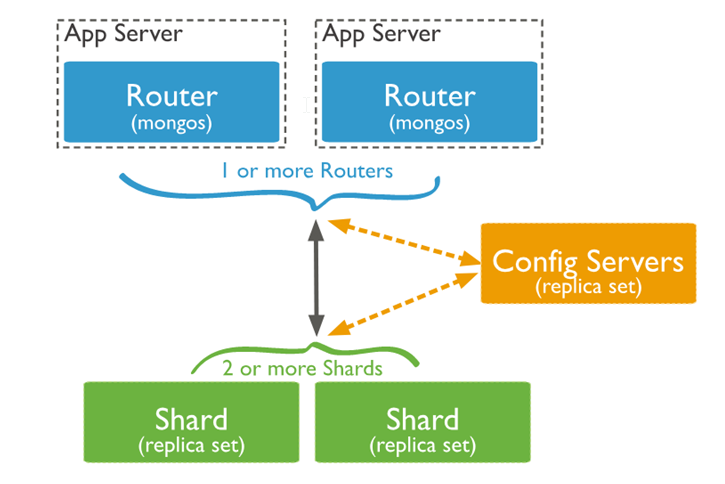
在Mongodb里面存在另一种集群,就是分片技术,可以满足MongoDB数据量大量增长的需求。 当MongoDB存储海量的数据时,一台机器可能不足以存储数据,也可能不足以提供可接受的读写吞吐量。这时,我们就可以通过在多台机器上分割数据,使得数据库系统能存储和处理更多的数据。
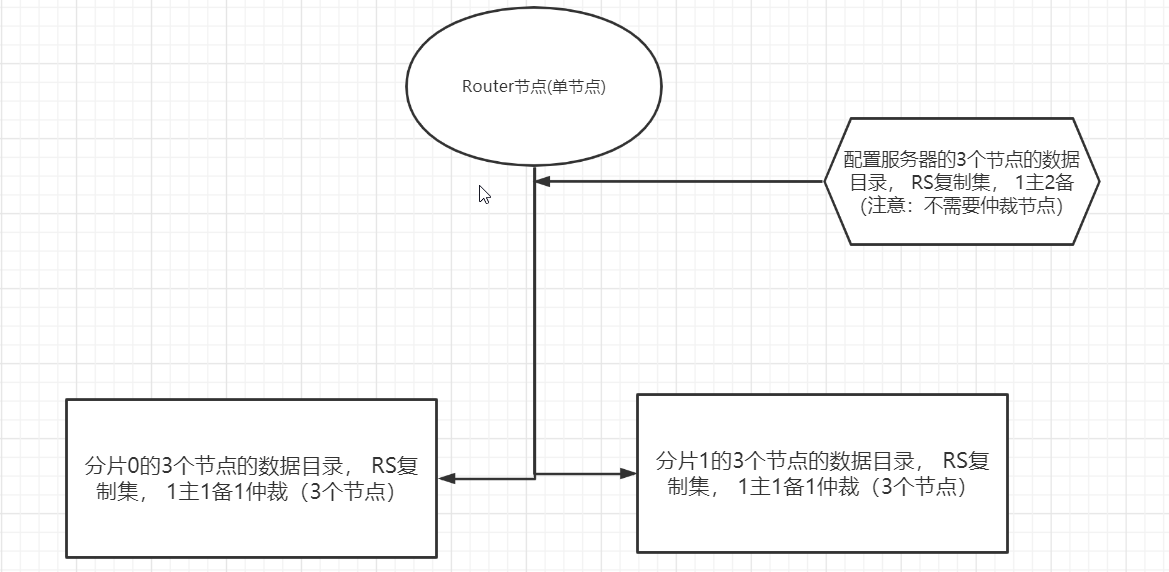
准备十个节点:
创建配置文件:
mkdir -p /opt/module/mongodb/cluster/conf
sh0-db0.conf
dbpath=/opt/module/mongodb/cluster/data/sh0/db0
logpath=/opt/module/mongodb/cluster/logs/sh0-db0.log

logappend=true
fork = true
port = 27217

noauth = true
#auth = true

#journal=true
nojournal=true

replSet=sh0

pidfilepath=/opt/module/mongodb/cluster/pids/sh0-db0.pid


oplogSize=100
directoryperdb=true
shardsvr=true
sh0-db1.conf
dbpath=/opt/module/mongodb/cluster/data/sh0/db1
logpath=/opt/module/mongodb/cluster/logs/sh0-db1.log

logappend=true
fork = true
port = 27218

noauth = true
#auth = true

#journal=true
nojournal=true

replSet=sh0

pidfilepath=/opt/module/mongodb/cluster/pids/sh0-db1.pid


oplogSize=100
directoryperdb=true
shardsvr=true
sh0-db2.conf
dbpath=/opt/module/mongodb/cluster/data/sh0/db2
logpath=/opt/module/mongodb/cluster/logs/sh0-db2.log

logappend=true
fork = true
port = 27219

noauth = true
#auth = true

#journal=true
nojournal=true

replSet=sh0

pidfilepath=/opt/module/mongodb/cluster/pids/sh0-db2.pid


oplogSize=100
directoryperdb=true
shardsvr=true
shard server配置是注意:
设置shardsvr=true,设置 replSet的值
dbpath目录文件要先创建,logpath文件也要先创建,
pidfilepath目录要先创建,文件没有必要创建.
启动 sh0;
bin/mongod -f /opt/module/mongodb/cluster/conf/sh0-db0.conf
bin/mongod -f /opt/module/mongodb/cluster/conf/sh0-db1.conf
bin/mongod -f /opt/module/mongodb/cluster/conf/sh0-db2.conf
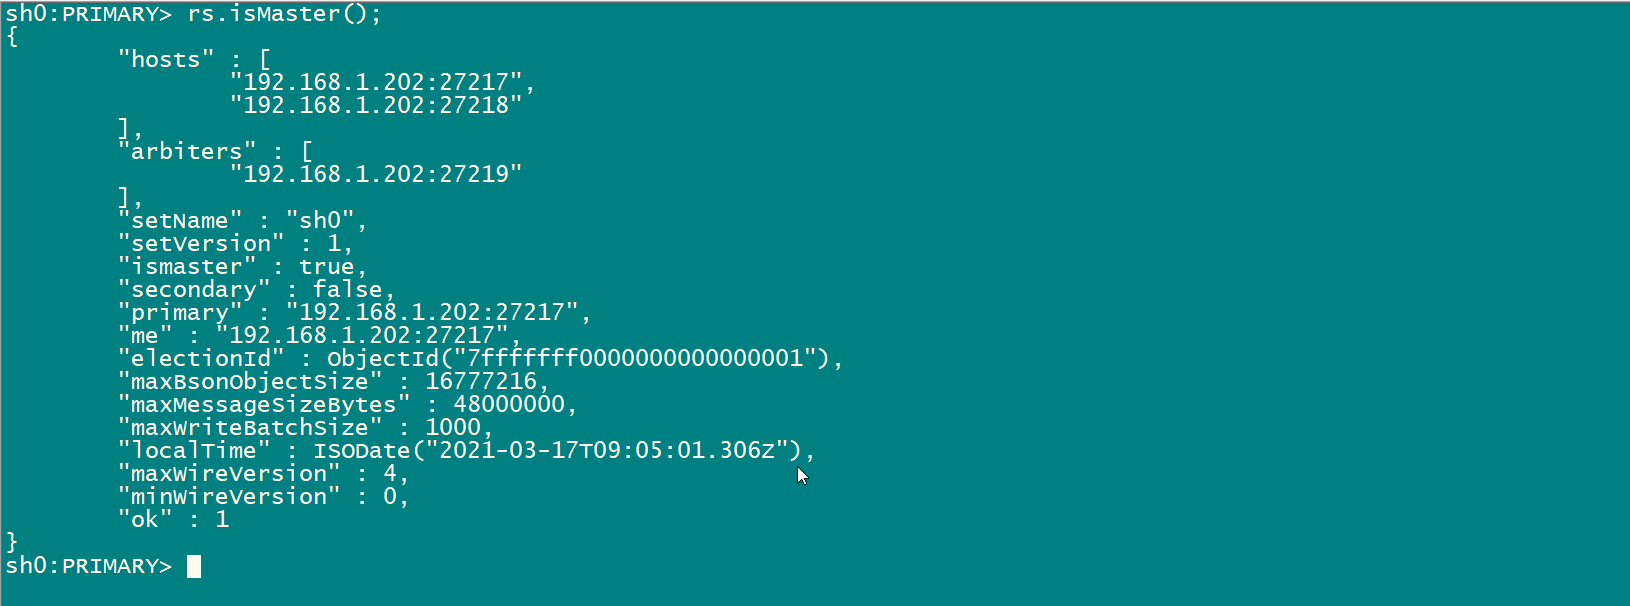
初始化sh0:
bin/mongo --port 27217
use admin;
rs.initiate(
   {
      _id: "sh0",
      members: [
         { _id: 0, host : "192.168.1.202:27217",priority:3 },
         { _id: 1, host : "192.168.1.202:27218",priority:1 },
         { _id: 2, host : "192.168.1.202:27219",arbiterOnly:true }
      ]
   }
)
同理创建sh1;
sh1-db0.conf
dbpath=/opt/module/mongodb/cluster/data/sh1/db0
logpath=/opt/module/mongodb/cluster/logs/sh1-db0.log

logappend=true
fork = true
port = 27317

noauth = true
#auth = true

#journal=true
nojournal=true

replSet=sh1

pidfilepath=/opt/module/mongodb/cluster/pids/sh1-db0.pid


oplogSize=100
directoryperdb=true
shardsvr=true
sh1-db1.conf
dbpath=/opt/module/mongodb/cluster/data/sh1/db1
logpath=/opt/module/mongodb/cluster/logs/sh1-db1.log

logappend=true
fork = true
port = 27318

noauth = true
#auth = true

#journal=true
nojournal=true

replSet=sh1

pidfilepath=/opt/module/mongodb/cluster/pids/sh1-db1.pid


oplogSize=100
directoryperdb=true
shardsvr=true
sh1-db2.conf
dbpath=/opt/module/mongodb/cluster/data/sh1/db2
logpath=/opt/module/mongodb/cluster/logs/sh1-db2.log

logappend=true
fork = true
port = 27319

noauth = true
#auth = true

#journal=true
nojournal=true

replSet=sh1

pidfilepath=/opt/module/mongodb/cluster/pids/sh1-db2.pid


oplogSize=100
directoryperdb=true
shardsvr=true
启动sh1:
bin/mongod -f /opt/module/mongodb/cluster/conf/sh1-db0.conf
bin/mongod -f /opt/module/mongodb/cluster/conf/sh1-db1.conf
bin/mongod -f /opt/module/mongodb/cluster/conf/sh1-db2.conf
初始化sh1:
mongo --port 27317
use admin;
rs.initiate(
   {
      _id: "sh1",
      members: [
         { _id: 0, host : "192.168.1.202:27317",priority:3 },
         { _id: 1, host : "192.168.1.202:27318",priority:1 },
         { _id: 2, host : "192.168.1.202:27319",arbiterOnly:true }
      ]
   }
)
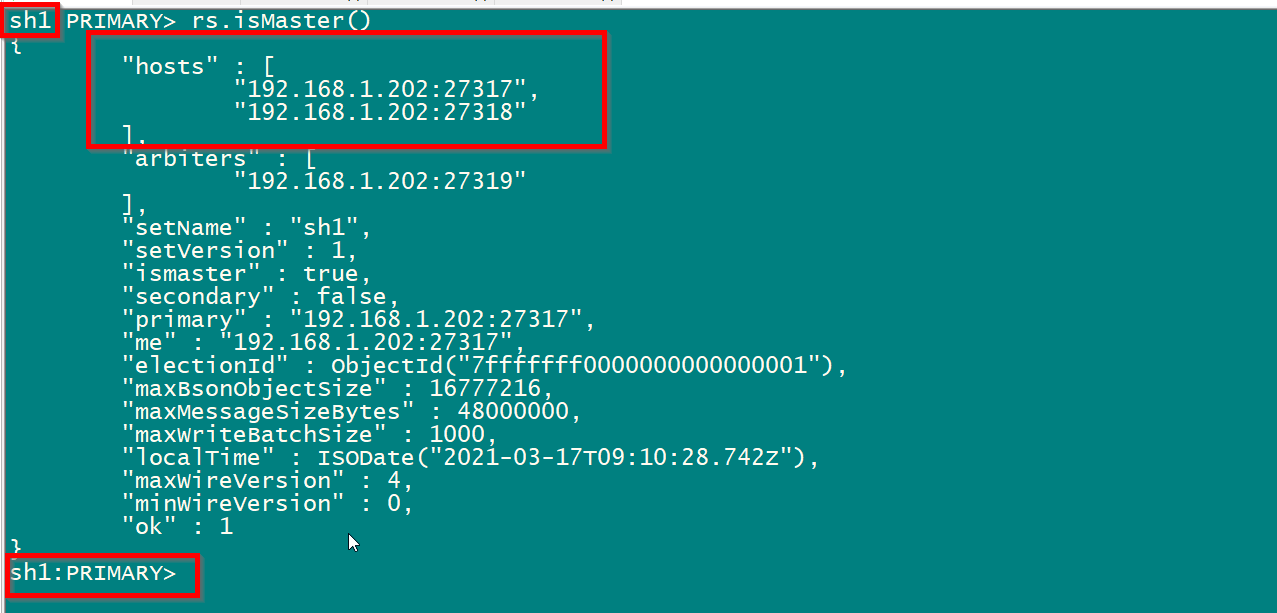
注意:裁判节点自动过滤掉了.
配置config 节点群:
cf-db0.conf
dbpath=/opt/module/mongodb/cluster/data/cf/db0
logpath=/opt/module/mongodb/cluster/logs/cf-db0.log

logappend=true
fork = true
port = 27417

noauth = true
#auth = true

#journal=true
#nojournal=true

replSet=cf

pidfilepath=/opt/module/mongodb/cluster/pids/cf-db0.pid


oplogSize=100
directoryperdb=true
configsvr=true
cf-db1.conf
dbpath=/opt/module/mongodb/cluster/data/cf/db1
logpath=/opt/module/mongodb/cluster/logs/cf-db1.log

logappend=true
fork = true
port = 27418

noauth = true
#auth = true

#journal=true
#nojournal=true

replSet=cf

pidfilepath=/opt/module/mongodb/cluster/pids/cf-db1.pid


oplogSize=100
directoryperdb=true
configsvr=true
cf-db2.conf
dbpath=/opt/module/mongodb/cluster/data/cf/db2
logpath=/opt/module/mongodb/cluster/logs/cf-db2.log

logappend=true
fork = true
port = 27419

noauth = true
#auth = true

#journal=true
#nojournal=true

replSet=cf

pidfilepath=/opt/module/mongodb/cluster/pids/cf-db2.pid


oplogSize=100
directoryperdb=true
configsvr=true
启动cf集群:
bin/mongod -f /opt/module/mongodb/cluster/conf/cf-db0.conf
bin/mongod -f /opt/module/mongodb/cluster/conf/cf-db1.conf
bin/mongod -f /opt/module/mongodb/cluster/conf/cf-db2.conf
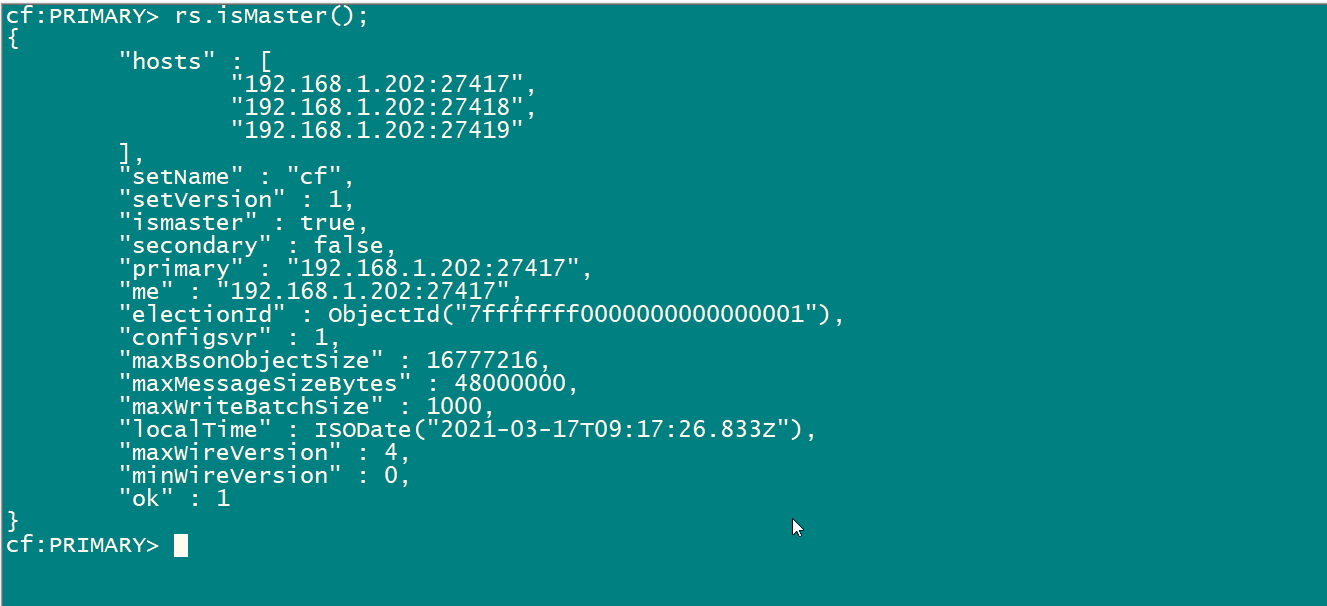
初始化cf集群:
bin/mongo --port 27417
use admin;
rs.initiate(
   {
      _id: "cf",
      members: [
         { _id: 0, host : "192.168.1.202:27417",priority:3 },
         { _id: 1, host : "192.168.1.202:27418",priority:1 },
         { _id: 2, host : "192.168.1.202:27419",priority:1 }
      ]
   }
)
注意:config server 集群 没有裁判节点.
配置: router节点(单节点)
#dbpath=/opt/module/mongodb/cluster/data/rt/db0
logpath=/opt/module/mongodb/cluster/logs/router.log

logappend=true
fork = true
port = 27517

noauth = true
#auth = true

#journal=true
#nojournal=true


pidfilepath=/opt/module/mongodb/cluster/pids/router.pid


#oplogSize=100
#directoryperdb=true
configdb=cf/192.168.1.202:27417,192.168.1.202:27418,192.168.1.202:27419
router节点配置注意点:
1:dppath 和oplogSize是不需要配置的。否则报错
2:由于router节点是用 bin/mongos 启动。所以相应的参数 可以用 bin/mongos --help查看。其他几个类型节点参数 用 bin/mongod --help查看
3:configdb=cf/192.168.1.202:27417,192.168.1.202:27418,192.168.1.202:27419 是配置router 节点的重点
启动router节点:
bin/mongos -f /opt/module/mongodb/cluster/conf/rt.conf

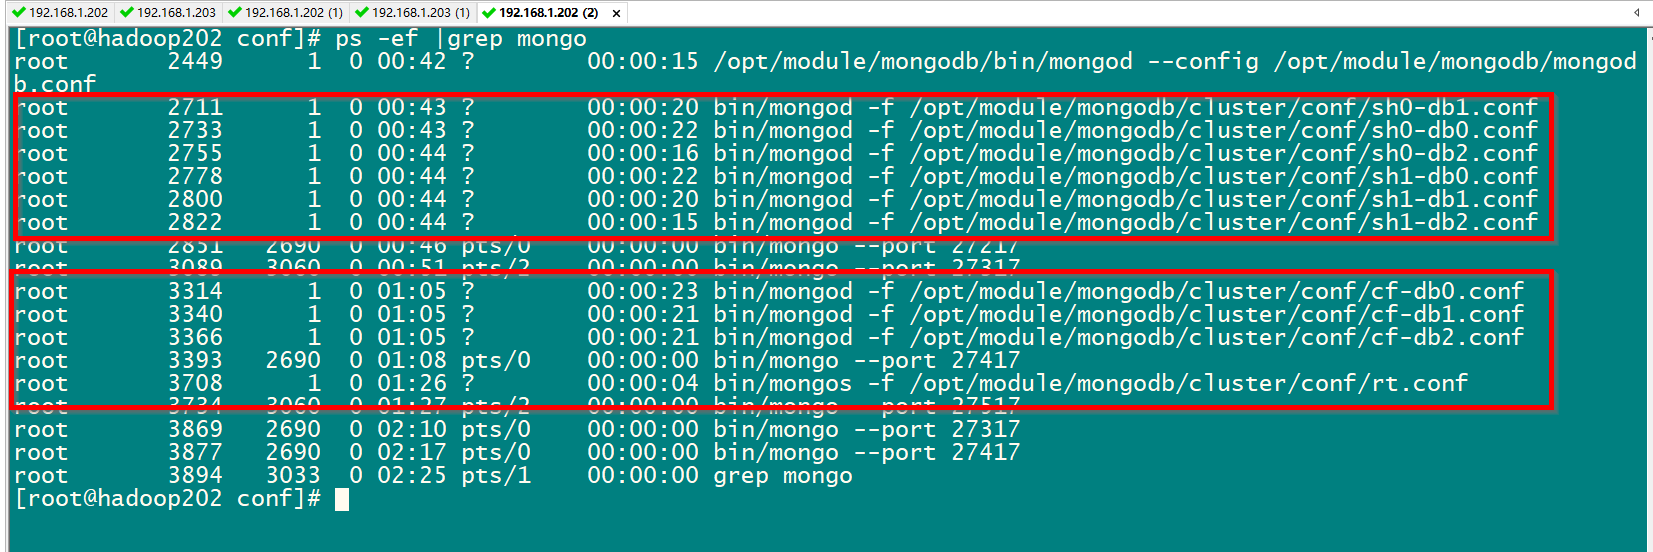
查看一下。十个节点启动完成。
添加shard server 到router节点
连接Router节点:
bin/mongo --port 27517
use admin;

db.runCommand({'addShard':'sh0/192.168.1.202:27217,192.168.1.202:27218,192.168.1.202:27219'});

db.runCommand({'addShard':'sh1/192.168.1.202:27317,192.168.1.202:27318,192.168.1.202:27319'});
开启shard:
首先需要将Database开启sharding,否则数据仍然无法在集群中分布,即数据库、collection默认为non-sharding。对于non-sharding的database或者collection均会保存在primary shard上,直到开启sharding才会在集群中分布。
创建测试库
use test
开启Shard,开启分片命令必须在admin库下运行。
db.runCommand({ enablesharding: 'test'})
此后我们可以对collection开启sharding,在此之前需要先指定shard key和建立“shard key索引”,我们根据application对数据访问的模式,来设定shard key。
需要切换进入到对应的库中:
use test
db.users.ensureIndex({'name':'hashed'});
设置集合为可分片集合的命令,必须在admin库中执行。
db.runCommand({ shardcollection: 'test.users', key: {'name': 'hashed'}})
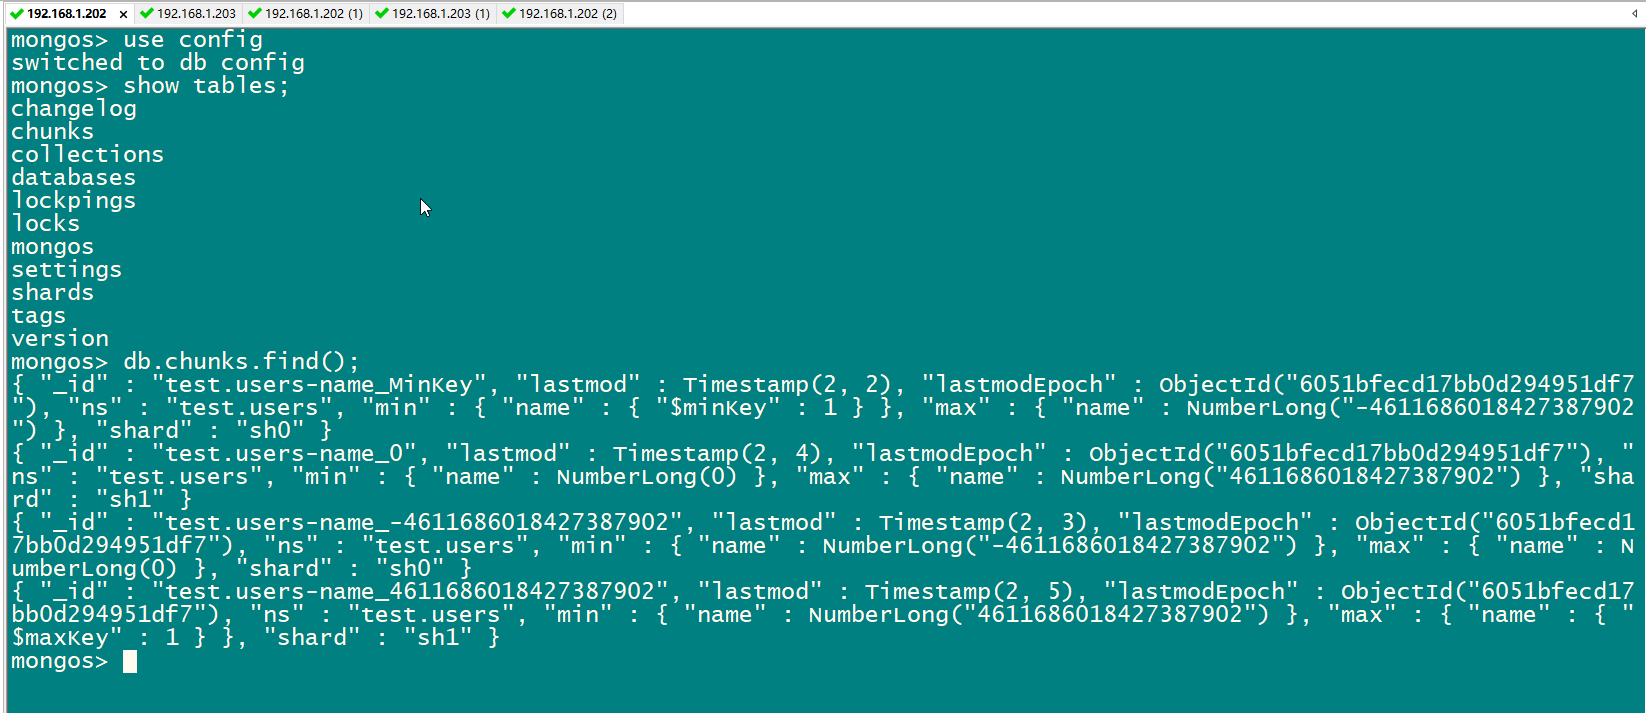
那么users集合将使用“alias”作为第一维shard key,采用hashed分区模式,将此chunk分裂成2个,我们可以通过sh.status()查看每个chunk的分裂区间。
bin/mongo --port 27517
use config;