Saltstack安装配置过程
一、安装配置
1、服务器配置情况
三台服务器,均需要关闭iptables和selinux(否则salt执行指令无效)
master:
    192.168.60.139 centos

slave:

    192.168.60.140 centos
    192.168.60.141 centos
2、配置hosts
# cat /etc/hosts
192.168.60.139 es01.com
192.168.60.140 es02.com
192.168.60.141 es03.com
3、设置hostname,所有服务器均配置
# cat /etc/sysconfig/network
NETWORKING=yes
HOSTNAME=es01.com
4、安装master端
# yum install epel-release
# yum install -y salt-master salt-minion
5、安slave端
# yum install epel-release
# yum install -y salt-minion
6、修改配置文件,所有服务器均是同一设置
# vi /etc/salt/minion   //在第16行添加,冒号后有一个空格
master: 192.168.60.139
7、启动master服务
[root@es01 ~]# /etc/init.d/salt-master start
Starting salt-master daemon:                               [确定]
[root@es01 ~]# /etc/init.d/salt-minion start
Starting salt-minion daemon:                               [确定]
8、启动所有客户端
[root@es03 ~]# /etc/init.d/salt-minion start
Starting salt-minion daemon:                               [确定]
9、配置master与slave的认证
[root@es01 ~]# salt-key -a es01.com
The following keys are going to be accepted:
Unaccepted Keys:
es01.com
Proceed? [n/Y] Y
Key for minion es01.com accepted.
[root@es01 ~]# salt-key -a es02.com
The following keys are going to be accepted:
Unaccepted Keys:
es02.com
Proceed? [n/Y] Y
Key for minion es02.com accepted.
[root@es01 ~]# salt-key -a es03.com
The following keys are going to be accepted:
Unaccepted Keys:
es03.com
Proceed? [n/Y] Y
Key for minion es03.com accepted.
10、查看master与salve的验证配置情况
[root@es01 ~]# salt-key
Accepted Keys:
es01.com
es02.com
es03.com
Denied Keys:
Unaccepted Keys:
Rejected Keys:


说明:-a :accept ,-A:accept-all,-d:delete,-D:delete-all。可以使用 salt-key 命令查看到已经签名的客户端
11、测试salt可用性

二、指令集
1、grains指令集(在slave端定义)
minion启动时会收集一次grains信息,查看grains收集到的所有信息项名
[root@es01 ~]# salt 'es02.com' grains.ls
es02.com:
    - SSDs
    - biosreleasedate
    - biosversion
    - cpu_flags
……
能否看到minion收到的所有信息项名称及其值呢?
[root@es01 ~]# salt 'es02.com' grains.items
es02.com:
    ----------
    SSDs:
    biosreleasedate:
        07/02/2015
    biosversion:
        6.00
    cpu_flags:
        - fpu
        - vme
……
2、grains是可以自定义配置的,可以增加一些配置项
[root@es02 ~]# cat /etc/salt/grains
role: nginx
env: test
myname: tpp
配置完后,重启minion
这些新的配置项是否生效了呢,能获取到它们吗?
[root@es01 ~]# salt 'es02.com' grains.item role env myname
es02.com:
    ----------
    env:
        test
    myname:
        tpp
    role:
        nginx
那能否得到这些配置项的值呢
[root@es01 ~]# salt 'es02.com' grains.get role
es02.com:
    nginx
好的,配置项和值都得到了,我们的grains配置成功了。
三、批量安装程序
1、在master上设置saltstack所有状态文件的根目录
[root@es01 ~]# vi /etc/salt/master

2、顶级配置文件,top是执行的入口,使用两个空格来代替tab
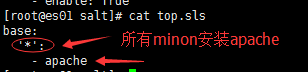
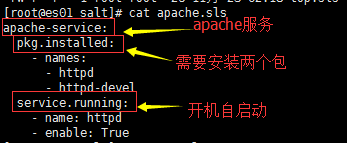
3、服务安装配置文件,配置具体的安装细节
4、重启master,加载配置
[root@es01 salt]# /etc/init.d/salt-master restart
5、执行安装吧
[root@es01 salt]# salt '*' state.highstate
四、文件及目录管理
我们看一下master如何分发文件到minion吧
1、配置一下顶级文件,指定需要翻译的配置文件名称
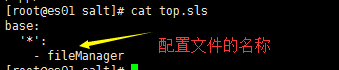
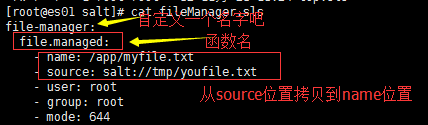
2、定义配置文件,salt:// 第一个/,表示master中定义的base目录,第二个/表示路径分隔符
3、开发执行文件分发
[root@es01 salt]# salt '*' state.highstate
es01.com:
----------
          ID: file-manager
    Function: file.managed
        Name: /app/myfile.txt
      Result: True
     Comment: File /app/myfile.txt is in the correct state
     Started: 18:28:47.523751
    Duration: 14.709 ms
     Changes:

Summary
------------
Succeeded: 1
Failed:    0
------------
Total states run:     1
es02.com:
----------
          ID: file-manager
    Function: file.managed
        Name: /app/myfile.txt
      Result: True
     Comment: File /app/myfile.txt updated
……
4、查看minion端被分发的文件
[root@es02 salt]# ls -l /app/
总用量 26736
drwxr-xr-x. 7 kzg  root     4096 10月 25 02:23 elasticsearch
-rwxr-xr-x. 1 kzg  root 27364449 10月 25 01:17 elasticsearch-2.4.0.tar.gz
-rw-r--r--  1 root root       15 11月 23 18:28 myfile.txt
drwxr-xr-x  3 root root     4096 11月 23 17:55 salt
实现了文件的分发,那么目录是不是也可以分发呢,我们来看一下。
1、还是先修改top.sls文件
[root@es01 salt]# vi top.sls

base:
  '*':
    - dirTest    //定义要测试的目录,位于/app/salt下
2、新建我们定义的dirTest.sls配置文件
[root@es01 salt]# vi dirTest.sls

dir-test:  // 自定义模块名称
  file.recurse:  // 功能函数(目录管理)
    - name: /app/myDirTest  // 目标位置
    - source: salt://testDir  // 源位置(master)
    - user: root
    - file_mode: 644
    - dir_mode: 755
    - mkdir: True  // 自动创建目录
    - clean: True  //源删除则目标跟着删除
3、测试一把
[root@es01 salt]# mkdir testDir
[root@es01 salt]# chmod 755 testDir/
[root@es01 salt]# touch testDir/1.txt
[root@es01 salt]# touch testDir/2.txt
[root@es01 salt]# touch testDir/3.txt
[root@es01 salt]# touch testDir/4.txt
[root@es01 testDir]# salt 'es02.com' state.highstate
es02.com:
----------
          ID: dir-test
    Function: file.recurse
        Name: /app/myDirTest
      Result: True
     Comment: Recursively updated /app/myDirTest
     Started: 19:02:12.144839
    Duration: 843.311 ms
     Changes:
              ----------
              /app/myDirTest/1.txt:
                  ----------
                  diff:
                      New file
                  mode:
                      0644
              /app/myDirTest/2.txt:
                  ----------
                  diff:
                      New file
                  mode:
                      0644
              /app/myDirTest/3.txt:
                  ----------
                  diff:
                      New file
                  mode:
                      0644
              /app/myDirTest/4.txt:
                  ----------
                  diff:
                      New file
                  mode:
                      0644

Summary
------------
Succeeded: 1 (changed=1)
Failed:    0
------------
Total states run:     1
看结果是执行成功了,到客户羰看一下吧
嗯,客户端确实已经有了,证明我们目录分发成功了。
[root@es02 app]# pwd
/app
[root@es02 app]# ls -l myDirTest/
总用量 0
-rw-r--r-- 1 root root 0 11月 23 19:02 1.txt
-rw-r--r-- 1 root root 0 11月 23 19:02 2.txt
-rw-r--r-- 1 root root 0 11月 23 19:02 3.txt
-rw-r--r-- 1 root root 0 11月 23 19:02 4.txt
那我在服务端testDir目录下删除两个文件,再发分一下会怎么样呢?
[root@es01 testDir]# rm -rf 1.txt
[root@es01 testDir]# rm -rf 2.txt
[root@es01 testDir]# salt 'es02.com' state.highstate
es02.com:
----------
          ID: dir-test
    Function: file.recurse
        Name: /app/myDirTest
      Result: True
     Comment: Recursively updated /app/myDirTest
     Started: 19:05:59.010513
    Duration: 774.468 ms
     Changes:
              ----------
              removed:
                  - /app/myDirTest/2.txt
                  - /app/myDirTest/1.txt

Summary
------------
Succeeded: 1 (changed=1)
Failed:    0
------------
Total states run:     1
在客户端看一下结果, 发现在master上删除了文件,经分发后,客户端也跟着自动删除了
[root@es02 myDirTest]# ll
总用量 0
-rw-r--r-- 1 root root 0 11月 23 19:02 3.txt
-rw-r--r-- 1 root root 0 11月 23 19:02 4.txt
五、远程执行操作
1、远程执行命令
老路子了,还是在master上,先设置一下top.sls吧
[root@es01 salt]# cat top.sls
base:
  '*':
    - cmdtest
然后创建一下cmdtest.sls文件
[root@es01 salt]# cat cmdtest.sls
cmd-test:
  cmd.run:
    - onlyif : test -f /app/tmp/123.txt
    - names:
      - touch /app/tmp/cmdtest.txt
      - mkdir /app/tmp/cmdtest
    - user: root
执行一下命令,试试看,
执行命令前,确保/app/tmp目录及/app/tmp/123.txt是存在在的,程序不会自动创建目录,onlyif 决定了只有存在123.txt时才会执行下面的命令
[root@es01 salt]# salt '*' state.highstate
……
----------
          ID: cmd-test
    Function: cmd.run
        Name: mkdir /app/tmp/cmdtest
      Result: True
     Comment: Command "mkdir /app/tmp/cmdtest" run
     Started: 23:08:59.181719
    Duration: 66.727 ms
     Changes:
              ----------
              pid:
                  5166
              retcode:
                  0
              stderr:
              stdout:

Summary
------------
Succeeded: 2 (changed=2)
Failed:    0
------------
Total states run:     2
到各节点检查一上程序执行情况吧。
远程执行命令我们做到了,那远程执行脚本,可以做到吗?
还是在master上先设置top.sls,
[root@es01 salt]# cat top.sls
base:
  '*':
    - pytest
再创建pytest.sls
[root@es01 salt]# cat top.sls
base:
  '*':
    - pytest
[root@es01 salt]# cat pytest.sls
py-test:
  cmd.script:
    - source: salt://tmp/abc.py
    - user: root
保证 /app/salt/tmp 目录下有abc.py脚本,内容如下
with open('/app/tmp/ccc.txt', 'w') as fp:
    fp.write("abcdef")

功能是:执行脚本就自动创建一个文件,内容为abcdef
执行一下看看吧:
[root@es01 salt]# salt '*' state.highstate
es02.com:
----------
          ID: py-test
    Function: cmd.script
      Result: True
     Comment: Command 'py-test' run
     Started: 00:04:18.424272
    Duration: 144.95 ms
     Changes:
              ----------
              pid:
                  5843
              retcode:
                  0
              stderr:
              stdout:

Summary
------------
Succeeded: 1 (changed=1)  # 表示脚本执行成功了
Failed:    0
------------
Total states run:     1
六、管理客户端的cron任务,不需要手动设置cron了
一、添加cront任务
1、 设置top.sls
base:
  '*':
    - crontest
2、创建文件crontest
[root@es01 salt]# cat crontest.sls
cron-test:
  cron.present:
    - name: /bin/touch /tmp/111.txt
    - user: root
    - minute: '*'
    - hour: 20
    - daymonth: 1-10
    - month: '3,5'
    - dayweek: '*'
3、执行
[root@es01 salt]# salt '*' state.highstate
4、检查
[root@es02 tmp]# crontab -l
# Lines below here are managed by Salt, do not edit
# SALT_CRON_IDENTIFIER:/bin/touch /tmp/111.txt
* 20 1-10 3,5 * /bin/touch /tmp/111.txt
二、删除添加的cront任务
只需要修改crontest.sls文件即可
[root@es01 salt]# cat crontest.sls
cron-test:
  cron.absent:
    - name: /bin/touch /tmp/111.txt
    - user: root
    - minute: '*'
    - hour: 20
    - daymonth: 1-10
    - month: '3,5'
    - dayweek: '*'
七、Saltstack常用命令
1、拷贝文件到客户端
[root@es01 salt]# salt '*' cp.get_file salt://apache.sls /app/tmp/copy.txt
2、拷贝目录到客户端
[root@es01 salt]# salt '*' cp.get_dir salt://testDir /app/tmp/
3、显示存活的客户端
[root@es01 salt]# salt-run manage.up
4、命令行下执行脚本(直接执行python命令无效????)
[root@es01 salt]# salt '*' cmd.script salt://tmp/abcd.sh

