05-蓝图 Blueprint
一、模块化
随着flask程序越来越复杂,我们需要对程序进行模块化的处理,之前学习过python的模块化管理,于是针对一个简单的flask程序进行模块化处理
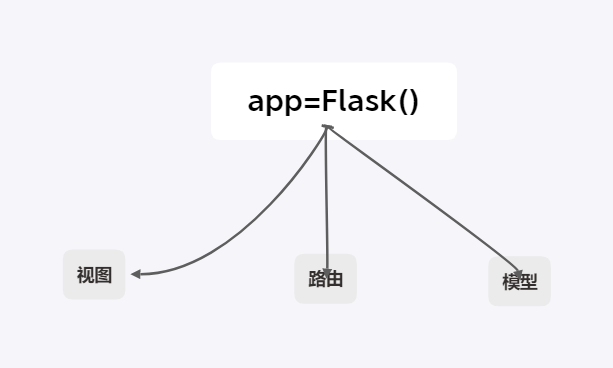
简单来说,Blueprint 是一个存储视图方法的容器,这些操作在这个Blueprint 被注册到一个应用之后就可以被调用,Flask 可以通过Blueprint来组织URL以及处理请求。
Flask使用Blueprint让应用实现模块化,在Flask中,Blueprint具有如下属性:
-
一个项目可以具有多个Blueprint
-
可以将一个Blueprint注册到任何一个未使用的URL下比如 “/”、“/sample”或者子域名
-
在一个应用中,一个模块可以注册多次
-
Blueprint可以单独具有自己的模板、静态文件或者其它的通用操作方法,它并不是必须要实现应用的视图和函数的
-
在一个应用初始化时,就应该要注册需要使用的Blueprint
但是一个Blueprint并不是一个完整的应用,它不能独立于应用运行,而必须要注册到某一个应用中。
Blueprint对象用起来和一个应用/Flask对象差不多,最大的区别在于一个 蓝图对象没有办法独立运行,必须将它注册到一个应用对象上才能生效
我们现在的Flask结构
使用蓝图
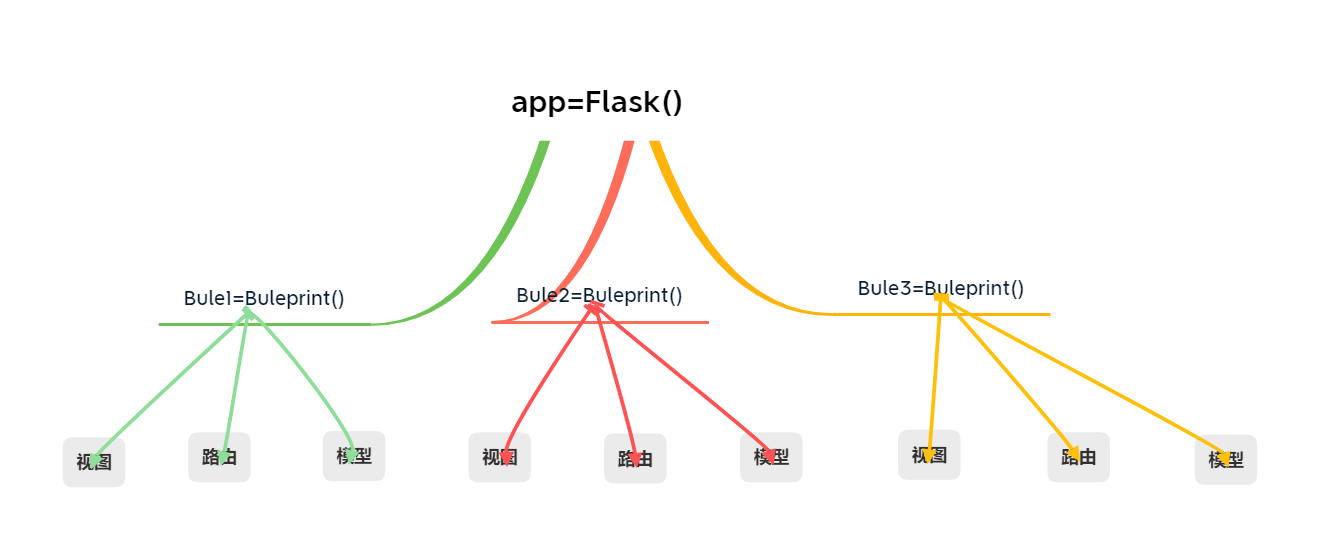
原始的flask是这样的

from flask import Flask
app = Flask(__name__)

@app.route("/")
def index():
    return "ok"

if __name__ == '__main__':
    app.run()
-
创建一个蓝图的包,例如users,并在
__init__.py文件中创建蓝图对象
from flask import Blueprint
# 1. 创建蓝图目录并对蓝图对象进行初始化
users_blue = Blueprint("users",__name__)
-
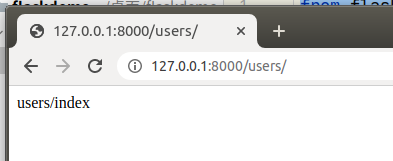
在这个蓝图目录下, 创建views.py文件,保存当前蓝图使用的视图函数
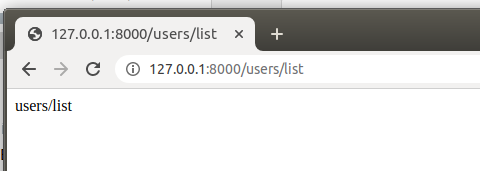
from . import users_blue
from flask import render_template
# 2. 编写视图
@users_blue.route("/")
def index():
    return "users/index"

@users_blue.route("/list")
def list():
    return "users/list"
-
在users/init.py中引入views.py中所有的视图函数
from flask import Blueprint
# 1. 创建蓝图目录并对蓝图对象进行初始化
# 等同于原来在 manage.py里面的 app = Flask()
users_blue = Blueprint("users",__name__)

# 3. 注册视图
from .views import *
-
在主应用main.py文件中的app对象上注册这个users蓝图对象
from flask import Flask
app = Flask(__name__)

# 4. 注册蓝图
from users import users_blue
app.register_blueprint(users_blue,url_prefix="/users")

if __name__ == '__main__':
    app.run(port=8000
目录结构:

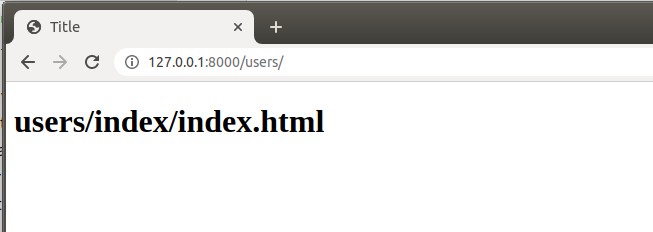
当这个应用启动后,通过/users/可以访问到蓝图中定义的视图函数
1、模型模板加入进去
新建一个文件database.py
from flask_sqlalchemy import SQLAlchemy
db = SQLAlchemy()
models.py就可以从database中引入了
from database import db
class Member(db.Model):
    __tablename__ = "tb_member"
    id = db.Column(db.Integer, primary_key=True,comment="主键ID")
    name = db.Column(db.String(250), comment="姓名")
    avatar = db.Column(db.String(250), comment="头像")
    age = db.Column(db.Integer, comment="年龄")
    sex = db.Column(db.Boolean, default=False, comment="性别")
    money = db.Column(db.DECIMAL(8,2), nullable=True, comment="钱包")
    achievement_list = db.relationship("Achievement",uselist=True, backref="student", lazy="select")
    # backref 反向引用,类似django的related,通过外键模型查询主模型数据时的关联属性
    info = db.relationship("StudentInfo", backref="own", uselist=False)
    def __repr__(self):
        return self.name
main.py
from flask import Flask
app = Flask(__name__)

class Config():
    # DEBUG调试模式
    DEBUG = True
    # json多字节转unicode编码
    JSON_AS_ASCII = False
    # 数据库链接配置
    # SQLALCHEMY_DATABASE_URI = "mysql://账号:密码@IP/数据库名?编码"
    SQLALCHEMY_DATABASE_URI = "mysql://root:123456@127.0.0.1:3306/students?charset=utf8mb4"
    # 动态追踪修改设置,如未设置只会提示警告
    SQLALCHEMY_TRACK_MODIFICATIONS = True
    # 查询时会显示原始SQL语句
    SQLALCHEMY_ECHO = True

app.config.from_object(Config)

from database import db
db.init_app(app)

# 4. 注册蓝图
from users import users_blue
from users.models import Member
app.register_blueprint(users_blue,url_prefix="/users")

if __name__ == '__main__':
    with app.app_context():
        db.create_all()
    app.run(port=8000)
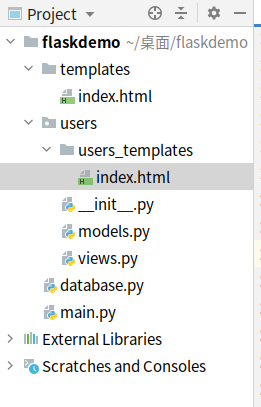
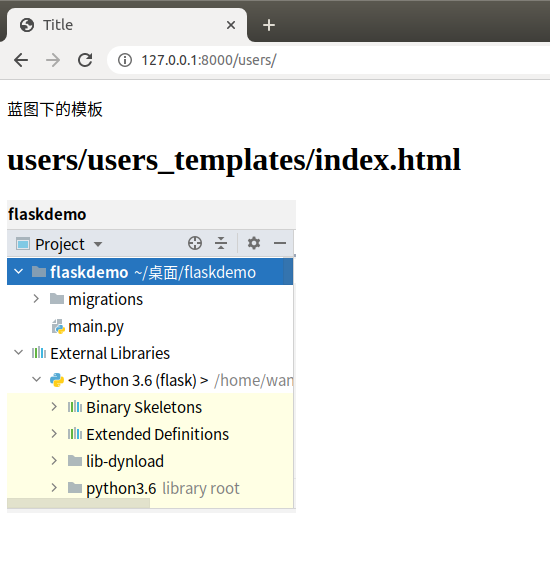
新建一个users_templates目录存放模板,在__init__.py文件加入
from flask import Blueprint
# 1. 创建蓝图目录并对蓝图对象进行初始化
users_blue = Blueprint("users",__name__,template_folder="users_templates")

# 3. 注册视图
from .views import *
在users_templates下新建一个index.html
<!DOCTYPE html>
<html lang="en">
<head>
    <meta charset="UTF-8">
    <title>Title</title>
</head>
<body>
    <h1>{{title}}</h1>
</body>
</html>
视图views.py
from . import users_blue
from flask import render_template
# 2. 编写视图
@users_blue.route("/")
def index():
    return render_template("index.html",title="users/index/index.html")

@users_blue.route("/list")
def list():
    return "users/list"
访问:
如果此时建一个公共模板,恰好也叫templates,里面也有一个index.html
users_templates/index.html
<!DOCTYPE html>
<html lang="en">
<head>
    <meta charset="UTF-8">
    <title>Title</title>
</head>
<body>
    <p>蓝图下的模板</p>
    <h1>{{title}}</h1>
</body>
</html>
templates/index.html
<!DOCTYPE html>
<html lang="en">
<head>
    <meta charset="UTF-8">
    <title>Title</title>
</head>
<body>
    <p>app对象注册的公共模板</p>
    <h1>{{title}}</h1>
</body>
</html>
此时目录结构
此时访问
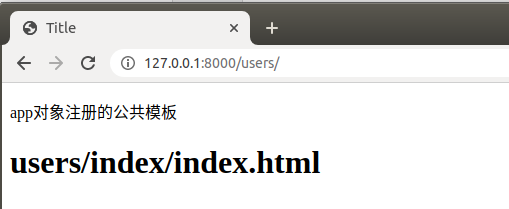
如果这样,永远也访问不到我们自己的模板,因为名字一样了
注:如果在 templates 中存在和 templates_users 有同名模板文件时, 则系统会优先使用 templates 中的文件
一般会把模板通过别名的方式,加个前缀区分,公共模板无非就是头部脚部,名字同名基本不会出现
加载蓝图相关的静态文件 __init__.py
from flask import Blueprint
# 1. 创建蓝图目录并对蓝图对象进行初始化
users_blue = Blueprint("users",__name__,template_folder="users_templates",static_folder='users_static')

# 3. 注册视图
from .views import *
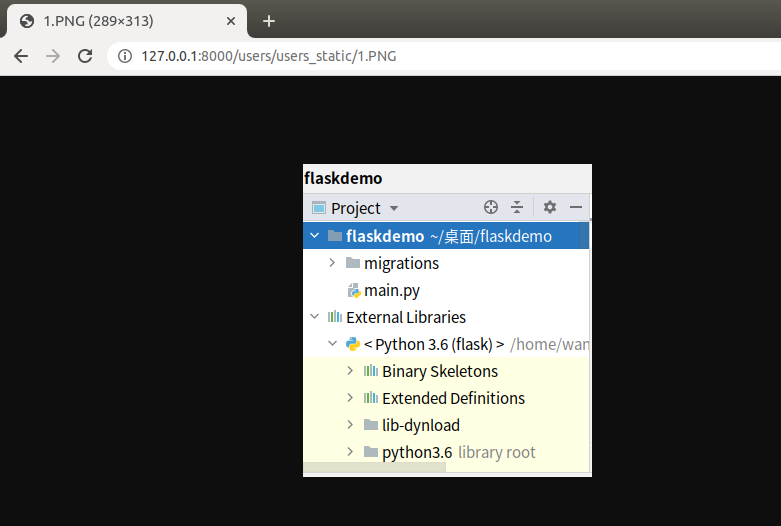
在users下新建目录users_static,放里一张图片
把公共模板的index.html改个名,header.html,防止进不去我们自己的模板
index.html
<!DOCTYPE html>
<html lang="en">
<head>
    <meta charset="UTF-8">
    <title>Title</title>
</head>
<body>
    <p>蓝图下的模板</p>
    <h1>{{title}}</h1>
    <p><img src="" alt=""></p>
</body>
</html>
__init.py__
from flask import Blueprint
# 1. 创建蓝图目录并对蓝图对象进行初始化
users_blue = Blueprint("users",__name__,template_folder="users_templates",static_folder='users_static',static_url_path="/libs")

# 3. 注册视图
from .views import *
这回再访问,就不能通过http://127.0.0.1:8000/users/users_static/1.PNG 了访问不到
index.html
<!DOCTYPE html>
<html lang="en">
<head>
    <meta charset="UTF-8">
    <title>Title</title>
</head>
<body>
    <p>蓝图下的模板</p>
    <h1>{{ title }}</h1>
    <p><img src="/users/libs/1.jpg" alt=""></p>
</body>
</html>
就可以这样访问了
模板\静态文件\视图\模型怎么被app对象所识别的呢
肯定是和
app.register_blueprint(users_blue,url_prefix="/users")
有关
我们这样写还是很乱
二、构建目录架构
1、蓝图运行原理

蓝图的对象users_blue.route 我们之前是app.route 怎么完成这个过程的
点击route,就进入了blueprints.py的route里面
def route(self, rule, **options):
        """Like :meth:`Flask.route` but for a blueprint.  The endpoint for the
        :func:`url_for` function is prefixed with the name of the blueprint.
        """
        def decorator(f):
            endpoint = options.pop("endpoint", f.__name__)
            self.add_url_rule(rule, endpoint, f, **options)
            return f
        return decorator
rule: 传过来的路由

endpoint = options.pop("endpoint", f.__name__) 把当前的函数名传进来了 就是endpoint就是视图函数名 index list

调用add_url_rule方法 这个方法就是收集路由信息的方法
当前方法现在是没有执行的,只是声明来了
作用就是创建一个用于将来被调用的路由收集函数
def decorator(f) 就是调用当前对象的添加路由方法add_url_rule
谁调用它,返回到哪
1.1、看一下add_url_rule
    def add_url_rule(self, rule, endpoint=None, view_func=None, **options):
    """
        rule: url地址
        endpoint: 函数名
    """
        """Like :meth:`Flask.add_url_rule` but for a blueprint.  The endpoint for
        the :func:`url_for` function is prefixed with the name of the blueprint.
        """
        if endpoint:
            assert '.' not in endpoint, "Blueprint endpoints should not contain dots"
        self.record(lambda s:
            s.add_url_rule(rule, endpoint, view_func, **options))
record方法就是记录方法,记录了一个lambda匿名函数,被当前蓝图对象的record记录路由的方法add_url_rule进行调用

匿名函数这里很明显,将来会被传入一个s,s是一个对象,这个对象里面也有一个添加路由的方法add_url_rule方法
1.2、record方法在哪
也是在blueprints.py文件,在add_url_rule方法的上面,
    def record(self, func):
        """Registers a function that is called when the blueprint is
        registered on the application.  This function is called with the
        state as argument as returned by the :meth:`make_setup_state`
        method.
        """
        if self._got_registered_once and self.warn_on_modifications:
            from warnings import warn
            warn(Warning('The blueprint was already registered once '
                         'but is getting modified now.  These changes '
                         'will not show up.'))
        self.deferred_functions.append(func)
当前对象调用了当前对象的record方法,里面就是判断了一下参数,调用了一下当前对象的方法deferred_functions.append

dferred_functions是一个属性,其实它就是一个列表,用于展示存放路由相关信息的,
本质上就是上面的lambda,匿名函数append是一个方法

dferred_functions属性在__init__方法中就有的,
self.dferred_functions = []

所以也就是说我们注册路由的时候,在视图上写的无非就是把所有信息放到这个列表里面而已
也就是注册路由的 @蓝图对象.route()完成的事情就是给这个self.dferred_functions添加保存路由信息
1.3、那列表给谁用呢
main.py中注册蓝图
from users import users_blue
from users.models import Member
# 把蓝图对象传进去,同时把url_prefix传进去,/users是路由前缀
app.register_blueprint(users_blue,url_prefix="/users")
点击register_blueprint
    def register_blueprint(self, blueprint, **options):
        """Registers a blueprint on the application.

        .. versionadded:: 0.7
        """
        first_registration = False
        if blueprint.name in self.blueprints:
            assert self.blueprints[blueprint.name] is blueprint, \
                'A blueprint\'s name collision occurred between %r and ' \
                '%r.  Both share the same name "%s".  Blueprints that ' \
                'are created on the fly need unique names.' % \
                (blueprint, self.blueprints[blueprint.name], blueprint.name)
        else:
            self.blueprints[blueprint.name] = blueprint
            self._blueprint_order.append(blueprint)
            first_registration = True
        blueprint.register(self, options, first_registration)
调用的虽然是app Flask对象
实际上是通过我们传过去的蓝图对象自己通过register挂载上去的
传的第二个参数 路由前缀传到了options
点击register会看到好多,因为调用的是蓝图对象,找到蓝图的那个点进去
    def register(self, app, options, first_registration=False):
        """Called by :meth:`Flask.register_blueprint` to register a blueprint
        on the application.  This can be overridden to customize the register
        behavior.  Keyword arguments from
        :func:`~flask.Flask.register_blueprint` are directly forwarded to this
        method in the `options` dictionary.
        """
        self._got_registered_once = True
        state = self.make_setup_state(app, options, first_registration)
        if self.has_static_folder:
            state.add_url_rule(self.static_url_path + '/<path:filename>',
                               view_func=self.send_static_file,
                               endpoint='static')

        for deferred in self.deferred_functions:
            deferred(state)
会看到一个循环,循环的deferred_functions就是当前蓝图对象暂存路由列表的lambda匿名函数
刚刚那个注册路由的列表
路由列表的每个成员就是一个lambda函数
把lambda执行了

传了一个state参数 就是lambda表达式的s对象,内部调用state对象的add_url_rule
看一下state
state = self.make_setup_state(app, options, first_registration)
点击make_setup_state
    def make_setup_state(self, app, options, first_registration=False):
        """Creates an instance of :meth:`~flask.blueprints.BlueprintSetupState`
        object that is later passed to the register callback functions.
        Subclasses can override this to return a subclass of the setup state.
        """
        """
        self: 蓝图对象
        app: Flask对象
        options: 路由前缀
        """
        return BlueprintSetupState(self, app, options, first_registration)
在上面没有直接调用BlueprintSetupState就是为了解耦,方便版本更新之类的
进入BlueprintSetupState
class BlueprintSetupState(object):
    """Temporary holder object for registering a blueprint with the
    application.  An instance of this class is created by the
    :meth:`~flask.Blueprint.make_setup_state` method and later passed
    to all register callback functions.
    """

    def __init__(self, blueprint, app, options, first_registration):
        #: a reference to the current application
        self.app = app

        #: a reference to the blueprint that created this setup state.
        self.blueprint = blueprint

        #: a dictionary with all options that were passed to the
        #: :meth:`~flask.Flask.register_blueprint` method.
        self.options = options

        #: as blueprints can be registered multiple times with the
        #: application and not everything wants to be registered
        #: multiple times on it, this attribute can be used to figure
        #: out if the blueprint was registered in the past already.
        self.first_registration = first_registration
蓝图的父级类,实例化
可以看出上面的state实际上就是类BlueprintSetupState示例出的对象
而前面的
        self.record(lambda s:
            s.add_url_rule(rule, endpoint, view_func, **options))
实际上就是
state.add_url_rule()
这个父级类下面有一个add_url_rule
    """
    rule: 视图url地址
    endpoint: 视图名称
    view_func: 视图函数本身
    **options: 路由前缀
    """
    def add_url_rule(self, rule, endpoint=None, view_func=None, **options):
        """A helper method to register a rule (and optionally a view function)
        to the application.  The endpoint is automatically prefixed with the
        blueprint's name.
        """
        if self.url_prefix:
            rule = self.url_prefix + rule
        options.setdefault('subdomain', self.subdomain)
        if endpoint is None:
            endpoint = _endpoint_from_view_func(view_func)
        defaults = self.url_defaults
        if 'defaults' in options:
            defaults = dict(defaults, **options.pop('defaults'))
        self.app.add_url_rule(rule, '%s.%s' % (self.blueprint.name, endpoint),
                              view_func, defaults=defaults, **options)
__init__初始化中
        url_prefix = self.options.get('url_prefix')
        if url_prefix is None:
            url_prefix = self.blueprint.url_prefix
add_url_rule
if self.url_prefix:
            rule = self.url_prefix + rule
蓝图路由前缀和视图路由url进行拼接,得到完整url路径

subdomain就是判断有没有子域名,没有就用默认的
self.app.add_url_rule(rule, '%s.%s' % (self.blueprint.name, endpoint),
                              view_func, defaults=defaults, **options)
当前蓝图对象调用了app对象也就是Flask对象的add_url_rule
那最终也就是调用的Flask对象的add_url_rule,点进去
也会有好几个让你点,我们店Flask对象的
    def add_url_rule(self, rule, endpoint=None, view_func=None, **options):
        """Connects a URL rule.  Works exactly like the :meth:`route`
        decorator.  If a view_func is provided it will be registered with the
        endpoint.

        Basically this example::

            @app.route('/')
            def index():
                pass
好熟悉^_^
具体看下
        # 这个东西就会帮我们实例化出url类
        rule = self.url_rule_class(rule, methods=methods, **options)
        rule.provide_automatic_options = provide_automatic_options
        # 把这个类放到url_map里,完成了所有路由的收集工作
        self.url_map.add(rule)
526行左右有一个
self.url_map = Map()
# 类里面就进行了对字典的一个追加
default_converters = ImmutableDict(DEFAULT_CONVERTERS)

def __init__(
        self,
        rules=None,
        default_subdomain="",
        charset="utf-8",
        strict_slashes=True,
        redirect_defaults=True,
        converters=None,
        sort_parameters=False,
        sort_key=None,
        encoding_errors="replace",
        host_matching=False,
    ):
        # 这里就是最终保存整个flask项目所有路由的地方
        self._rules = []
点一下self.url_map.add(rule) add
    def add(self, rulefactory):
        """Add a new rule or factory to the map and bind it.  Requires that the
        rule is not bound to another map.

        :param rulefactory: a :class:`Rule` or :class:`RuleFactory`
        """
        for rule in rulefactory.get_rules(self):
            rule.bind(self)
            self._rules.append(rule)
            self._rules_by_endpoint.setdefault(rule.endpoint, []).append(rule)
        self._remap = True
所有路由规则就添加了
三、基于flask仿照django进行项目架构
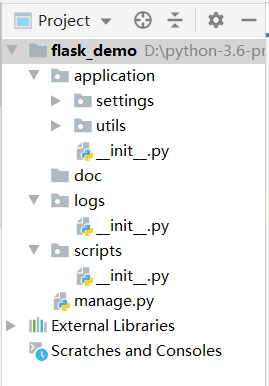
1、构建基本目录
- 在主项目新建一个manager.py文件
from flask import Flask

app = Flask(__name__)

if __name__ == '__main__':
    app.run()
- 现在是通过wsgi测试模块运行的,改版一下,创建一个主应用目录,是一个包application
- 日志相关的,创建一个logs的包
- 运维测试相关,创建一个脚本文件相关的包scripts
- 数据结构,接口文档相关包doc
- 配置文件包settings, dev.py测试配置文件,prod.py 线上配置文件
此时的目录结构就是这样
2、终端脚本模块初始化
在主应用目录application下的__init__代码如下
from flask import Flask
from flask_script import Manager
# 创建应用对象
app = Flask(__name__)
# 终端脚本管理对象
manager = Manager()

def init_app():
    # 挂载应用对象
    manager.app = app
    # 对外暴露终端管理对象
    return manager
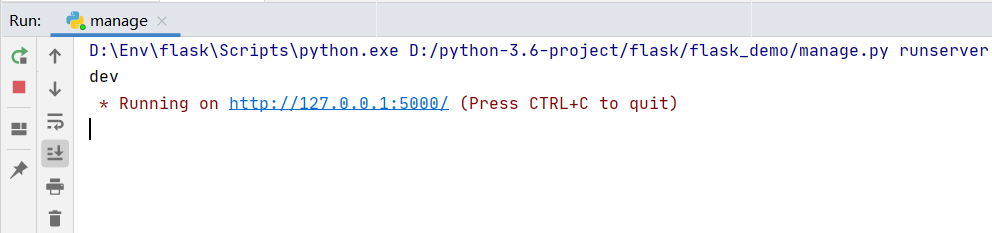
在manage.py中导包运行
from application import init_app
manager = init_app()

if __name__ == '__main__':
    manager.run()
3、线下线上加载不同的配置文件
配置文件公共配置下settings/__init__.py
class InitConfig():
    DEBUG = True
dev.py
from . import InitConfig
class Config(InitConfig):
    """本地开发配置文件"""
prod.py
from . import InitConfig
class Config(InitConfig):
    """线上运营配置文件"""
    DEBUG = False
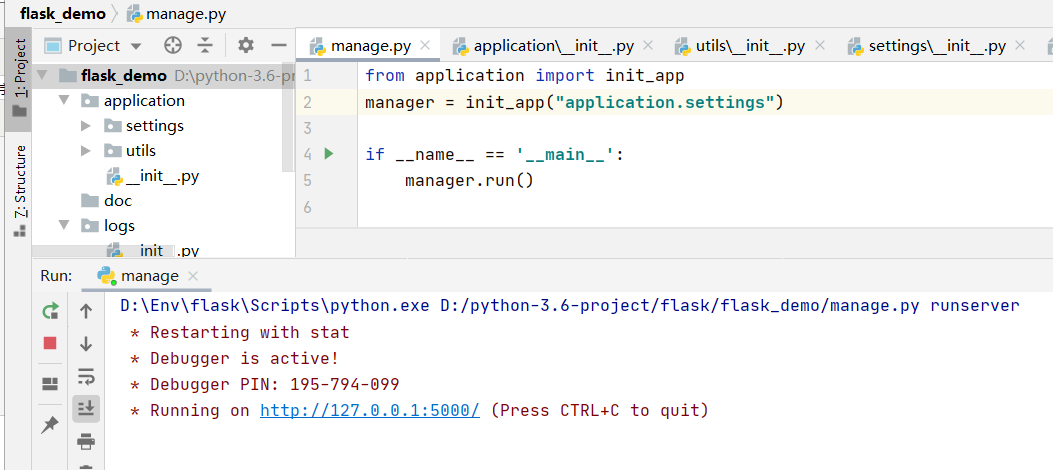
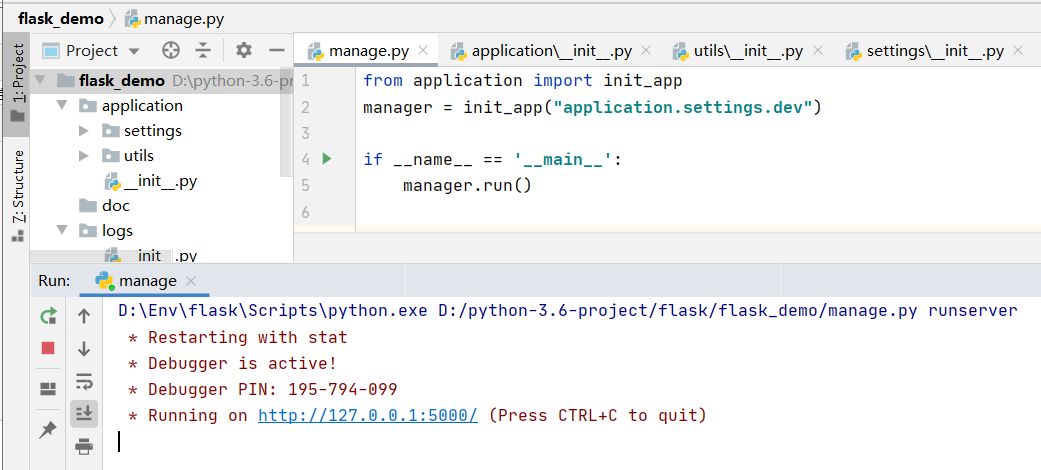
加载配置文件manage.py
from application import init_app
manager = init_app("application.settings")

if __name__ == '__main__':
    manager.run()
application/__init__.py
from flask import Flask
from flask_script import Manager
app = Flask(__name__)

manager = Manager()

def init_app(config_path):
    manager.app = app
    return manager
要根据传过来的路径自动识别配置信息
新建一个utils的包,是自己封装的一些类、方法、工具库,
utils/__init__.py
def load_config(config_path):
    print(config_path)
    return "ok"
上面只是先打印一下
application/__init__.py
from flask import Flask
from flask_script import Manager

from application.utils import load_config
app = Flask(__name__)

manager = Manager()

def init_app(config_path):
    load_config(config_path)
    manager.app = app
    return manager
执行时传入路径加载配置文件
manage.py
from application import init_app
manager = init_app("application.settings")

if __name__ == '__main__':
    manager.run()
运行结果

发现打印的是一个字符串
怎么与字符串里面的路径挂钩呢
引入一个模块import_module
from importlib import import_module
def load_config(config_path):
    # import_module 根据字符串路径直接进行模块导包,识别模块中的变量成员
    module = import_module(config_path)
    config_file_name = config_path.split(".")[-1]
    print(config_file_name)
    return "ok"
传application.settings.dev 就会 打印dev
此时application/__init__.py加载配置文件的函数init_app为
from flask import Flask
from flask_script import Manager

from application.utils import load_config
app = Flask(__name__)

manager = Manager()

def init_app(config_path):
    load_config(config_path)
    manager.app = app
    return manager
manage.py加载哪个配置文件就传入哪个参数
from application import init_app
manager = init_app("application.settings.dev")

if __name__ == '__main__':
    manager.run()
最终加载配置文件就是这样
utils/__init__.py
from importlib import import_module
def load_config(config_path):
    # import_module 根据字符串路径直接进行模块导包,识别模块中的变量成员
    module = import_module(config_path)
    config_file_name = config_path.split(".")[-1]
    # print(config_file_name)
    if config_file_name == "settings":
        # settings 加载 settings/__init__.py  公共配置
        return module.InitConfig
    # 否则dev就加载dev下的Config prod加载prod下的Config
    return module.Config
application/__init__.py
from flask import Flask
from flask_script import Manager

from application.utils import load_config
app = Flask(__name__)

manager = Manager()

def init_app(config_path):
    Config = load_config(config_path)
    app.config.from_object(Config)
    manager.app = app
    return manager
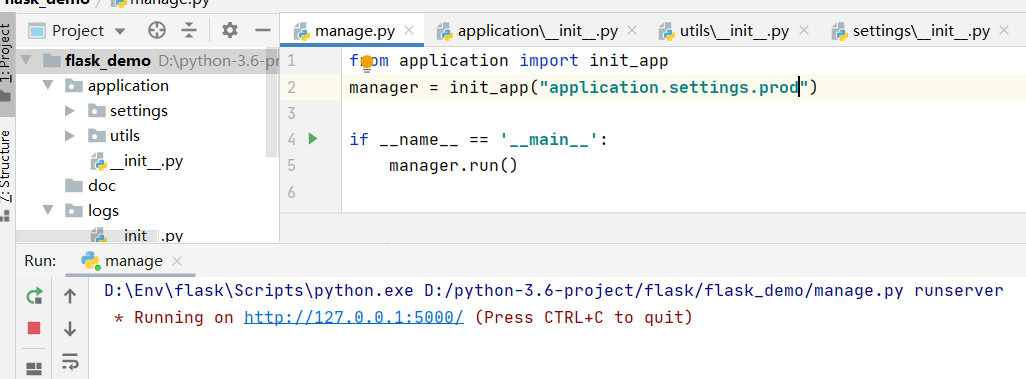
可以看的出来,当加载的是settings或dev的配置文件时,有DEBUG=True, 加载prod时没有
4、创建蓝图
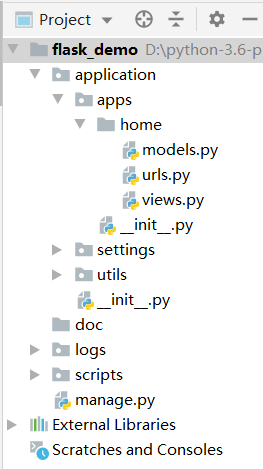
在application下新建一个apps,就是我们要存放的蓝图目录
添加命令,自动创建目录文件
4.1、加载终端命令
在utils目录下新建一个commands.py文件
from flask_script import Command, Option
import os
class BluePrintCommand(Command):

    name = "blue"  # 命令的调用别名
    option_list = [
        Option("--name","-n",help="蓝图名称")
    ]

    def run(self,name=None):
        if name is None:
            print("蓝图名称不能为空!")
            return
        if not os.path.isdir(name):
            os.mkdir(name)
        open("%s/views.py" % name,"w")
        open("%s/models.py" % name,"w")
        with open("%s/urls.py" % name,"w") as f:
            f.write("""from . import views
urlpatterns = [

]
""")
application/__init__.py
from flask import Flask
from flask_script import Manager

from application.utils import load_config
# 创建应用对象
app = Flask(__name__)
# 终端脚本管理对象
manager = Manager()

def init_app(config_path):
    # 自动加载配置
    Config = load_config(config_path)
    app.config.from_object(Config)
    # 挂载应用对象
    manager.app = app
    # 自动加载终端命令
    load_command(manager, "application.utils.commands")
    # 对外暴露终端管理对象
    return manager
如果是有多个命令呢?? 以后开发可能还会继续进行自定义终端命令,所以我们可以声明一个load_command的函数,让它自动帮我们完成加载注册自定义终端命令的过程
commands.py 命令类
from flask_script import Command, Option
import os
class BluePrintCommand(Command):

    name = "blue"  # 命令的调用别名
    option_list = [
        Option("--name","-n",help="蓝图名称")
    ]

    def run(self,name=None):
        if name is None:
            print("蓝图名称不能为空!")
            return
        if not os.path.isdir(name):
            os.mkdir(name)
        open("%s/views.py" % name,"w")
        open("%s/models.py" % name,"w")
        with open("%s/urls.py" % name,"w") as f:
            f.write("""from . import views
urlpatterns = [

]
""")

...其他命名
utils/__init__.py 加载终端命令函数
# 获取当前模块所有类
import inspect
from importlib import import_module
def load_config(config_path):
    """自动加载配置"""
    # import_module 根据字符串路径直接进行模块导包,识别模块中的变量成员
    module = import_module(config_path)
    config_file_name = config_path.split(".")[-1]
    # print(config_file_name)
    if config_file_name == "settings":
        # settings 加载 settings/__init__.py
        return module.InitConfig
    # 否则dev就加载dev下的Config prod加载prod下的Config
    return module.Config

from flask_script import Command
def load_command(manager, command_path):
    """自动加载命令"""
    module = import_module(command_path)
    # 搜索当前模块下的所有类
    """
        module: 模块
        第二个固定  inspect.isclass
    """
    class_list = inspect.getmembers(module,inspect.isclass)
    # inspect 遍历获取当前模块内部所有类
    for class_name,class_object in class_list:
        print(class_list,"----",Command)
        if issubclass(class_object,Command) and class_name != "Command":
            print(class_object)
            # .name 就是命令别名
            manager.add_command(class_object.name, class_object)

这就自动生成目录了
4.2、路由
思考:
我们最开始通过蓝图写视图是这样的
from flask import Blueprint
home_blue = Blueprint("home", __name__)
@home_blue.route(rule="/index")
def index():
    return "ok"
之前分析源码,蓝图对象就是调用的add_url_rule
那我们把装饰器拿掉
views
def index():
    return "ok"
urls
from . import views
# urlpatterns = [
#     path("/index", views.index),
# ]

from flask import Blueprint
home_blue = Blueprint("home",__name__)
home_blue.add_url_rule("/", view_func=views.index)
application/__init__.py全局注册蓝图对象
    # 注册蓝图对象
    from application.apps.home.urls import home_blue
    app.register_blueprint(home_blue, url_prefix="")
当然,路由如果这样写,后面每一个都要这样
from . import views
# urlpatterns = [
#     path("/index", views.index),
# ]

from flask import Blueprint
home_blue = Blueprint("home",__name__)
home_blue.add_url_rule("/", view_func=views.index)
home_blue.add_url_rule("/", view_func=views.index)
home_blue.add_url_rule("/", view_func=views.index)
home_blue.add_url_rule("/", view_func=views.index)
非常麻烦
把url 和视图变为
# urlpatterns = [
#     path("/index", views.index),
# ]
这样一个结构
这也就是path做的事情
需要导包
from . import views
from application.utils import path
urlpatterns = [
    path("/index",views.index),
]
utils/__init__.py path把这个字典构建出来就好了
def path(url,view_func):
    """注册路由"""
    return {"rule":url, "view_func":view_func}
返回之后注册蓝图
上面哪种注册蓝图的方式就不用了,写一个注册蓝图的方法
application/__init__.py
from flask import Flask
from flask_script import Manager
from application.utils import load_config,load_command,load_blueprint
from flask_sqlalchemy import SQLAlchemy
from flask_migrate import Migrate,MigrateCommand

# 创建应用对象
app = Flask(__name__)
# 终端脚本管理对象
manager = Manager()

# 创建应用对象
app = Flask(__name__)

# 创建数据库对象
db = SQLAlchemy()

def init_app(config_path):
    # 自动加载配置
    Config = load_config(config_path)
    app.config.from_object(Config)
    # 挂载应用对象
    manager.app = app
    # 自动加载终端命令
    load_command(manager, "application.utils.commands")

    # 注册蓝图对象
    load_blueprint(app,db)

    # 对外暴露终端管理对象
    return manager
settings dev.py
from . import InitConfig
class Config(InitConfig):
    """本地开发配置文件"""
    # 蓝图列表
    INSTALLED_APPS = [
        "application.apps.home",
    ]
application/utils/__init__.py 中
def load_blueprint(app):
    """自动加载蓝图"""
    # 在从配置中根据INSTALLED_APPS进行循环,在循环中进行蓝图的注册
    for blueprint_path in app.config.get("INSTALLED_APPS"):
        # 获取蓝图名称
        blueprint_name = blueprint_path.split(".")[-1]

        # 创建蓝图对象
        blue = Blueprint(blueprint_name,blueprint_path)

        # 蓝图对象自动注册路由
        # blue_urls_module = import_module(blueprint_path+".urls")
        # for urls_item in blue_urls_module.urlpatterns:
        #     blue.add_url_rule(**urls_item)

        # 注册蓝图
        app.register_blueprint(blue,url_prefix="")

        blue_urls_module = import_module(blueprint_path+".urls")
        print("******")
        # [{'rule': '/index', 'view_func': <function index at 0x000001F795D0F8C8>}]
        print(blue_urls_module.urlpatterns)
给每一个蓝图对象自动注册路由
def load_blueprint(app):
    """自动加载蓝图"""
    # 在从配置中根据INSTALLED_APPS进行循环,在循环中进行蓝图的注册
    for blueprint_path in app.config.get("INSTALLED_APPS"):
        # 获取蓝图名称
        blueprint_name = blueprint_path.split(".")[-1]

        # 创建蓝图对象
        blue = Blueprint(blueprint_name,blueprint_path)

        # 蓝图对象自动注册路由
        blue_urls_module = import_module(blueprint_path+".urls")
        for urls_item in blue_urls_module.urlpatterns:
            # print(urls_item) {'rule': '/index', 'view_func': <function index at 0x000001F795D0F8C8>}
       blue.add_url_rule(**urls_item)
        # 注册蓝图
        app.register_blueprint(blue,url_prefix="")
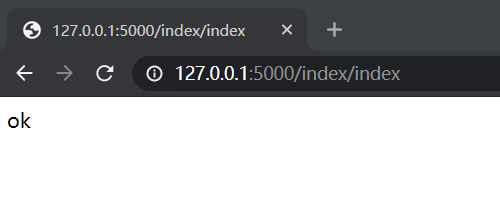
现在就可以访问了

以后url就写成这种格式就可以了
但是我们还是需要多个蓝图的,那每个蓝图下都有index,就有问题了,路由就会出现冲突,
解决:蓝图注册的过程中加载一个前缀
在application下加一个总路由urls.py
在settings/__init__.py 中加一个总路由的地址
class InitConfig():
    DEBUG = True
    # 总路由的地址
    URL_PATH = "application.urls"
    # 蓝图列表
    INSTALLED_APPS = [

    ]
配置总路由application/urls.py
# 总路由
# 自动识别include
from application.utils import include
urlpatterns = [
    include("/index", "application.apps.home.urls"),
    # 太长了
    include("/index", "home.urls"),
]
这就需要自动识别include,做的事情就是拼接路径
application.utils/__init__.py
def include(url, blueprint_path):
    return {"url_prefix":url, "path": blueprint_path}
def load_blueprint(app):
    """自动加载蓝图"""
    """
        app.config.get("URL_PATH"): 总路由路径
    """
    app_url_list = import_module(app.config.get("URL_PATH")).urlpatterns
    print(app_url_list) # [{'url_prefix': '/index', 'path': 'application.apps.home.urls'}, {'url_prefix': '/index', 'path': 'home.urls'}]

    # 在从配置中根据INSTALLED_APPS进行循环,在循环中进行蓝图的注册
    for blueprint_path in app.config.get("INSTALLED_APPS"):
        # 获取蓝图名称
        blueprint_name = blueprint_path.split(".")[-1]

        for blueprint_url in app_url_list:
            # 如果键path = 蓝图名home + .urls 就获取路径
            if blueprint_url.get("path") == blueprint_name+".urls":
                # 这就获取到了路由前缀
                url_prefix = blueprint_url.get("url_prefix")
                break

        # 创建蓝图对象
        blue = Blueprint(blueprint_name,blueprint_path)

        # 蓝图对象自动注册路由
        blue_urls_module = import_module(blueprint_path+".urls")
        for urls_item in blue_urls_module.urlpatterns:
            blue.add_url_rule(**urls_item)

        # 注册蓝图
        app.register_blueprint(blue,url_prefix=url_prefix)
访问一下
4.3、注册模型
/home/models
from application import db
class Student(db.Model):
    __tablename__ = "tb_student"
    id = db.Column(db.Integer, primary_key=True,comment="主键ID")
    name = db.Column(db.String(250), comment="姓名")
    avatar = db.Column(db.String(250), comment="头像")
    age = db.Column(db.Integer, comment="年龄")
    sex = db.Column(db.Boolean, default=False, comment="性别")
    money = db.Column(db.DECIMAL(8,2), nullable=True, comment="钱包")

    def __repr__(self):
        return self.name
application.py/__init__.py
from flask import Flask
from flask_script import Manager
from application.utils import load_config,load_command,load_blueprint
from flask_sqlalchemy import SQLAlchemy# 创建应用对象
app = Flask(__name__)
# 终端脚本管理对象
manager = Manager()

# 创建应用对象
app = Flask(__name__)

# 创建数据库对象
db = SQLAlchemy()

def init_app(config_path):
    # 自动加载配置
    Config = load_config(config_path)
    app.config.from_object(Config)
    # 挂载应用对象
    manager.app = app
    # 自动加载终端命令
    load_command(manager, "application.utils.commands")

    # 注册数据库
    db.init_app(app)

    # 注册蓝图对象
    load_blueprint(app)

    # 对外暴露终端管理对象
    return manager
报错
D:\Env\flask\lib\site-packages\flask_sqlalchemy\__init__.py:813: UserWarning: Neither SQLALCHEMY_DATABASE_URI nor SQLALCHEMY_BINDS is set. Defaulting SQLALCHEMY_DATABASE_URI to "sqlite:///:memory:".
  'Neither SQLALCHEMY_DATABASE_URI nor SQLALCHEMY_BINDS is set. '
D:\Env\flask\lib\site-packages\flask_sqlalchemy\__init__.py:834: FSADeprecationWarning: SQLALCHEMY_TRACK_MODIFICATIONS adds significant overhead and will be disabled by default in the future.  Set it to True or False to suppress this warning.
  'SQLALCHEMY_TRACK_MODIFICATIONS adds significant overhead and '
 * Restarting with stat
D:\Env\flask\lib\site-packages\flask_sqlalchemy\__init__.py:813: UserWarning: Neither SQLALCHEMY_DATABASE_URI nor SQLALCHEMY_BINDS is set. Defaulting SQLALCHEMY_DATABASE_URI to "sqlite:///:memory:".
  'Neither SQLALCHEMY_DATABASE_URI nor SQLALCHEMY_BINDS is set. '
D:\Env\flask\lib\site-packages\flask_sqlalchemy\__init__.py:834: FSADeprecationWarning: SQLALCHEMY_TRACK_MODIFICATIONS adds significant overhead and will be disabled by default in the future.  Set it to True or False to suppress this warning.
  'SQLALCHEMY_TRACK_MODIFICATIONS adds significant overhead and '
进行配置的加载
settings/__init__.py
class InitConfig():
    DEBUG = True
    # 总路由的地址
    URL_PATH = "application.urls"
    # 蓝图列表
    INSTALLED_APPS = [

    ]

    # 数据库链接配置
    # SQLALCHEMY_DATABASE_URI = "mysql://账号:密码@IP/数据库名?编码"
    SQLALCHEMY_DATABASE_URI = ""
    # 动态追踪修改设置,如未设置只会提示警告
    SQLALCHEMY_TRACK_MODIFICATIONS = True
    # 查询时会显示原始SQL语句
    SQLALCHEMY_ECHO = True
SQLALCHEMY_DATABASE_URI = "" 为空
在dev.py中具体配置哪一个数据库
from . import InitConfig
class Config(InitConfig):
    """本地开发配置文件"""
    INSTALLED_APPS = [
        "application.apps.home",
    ]
    # 数据库链接配置
    SQLALCHEMY_DATABASE_URI = "mysql://root:123456@127.0.0.1:3306/students?charset=utf8mb4"
现在models.py 引入 db就是正常的了
现在如果进行数据迁移是迁移不了的
application/__init__.py
from flask import Flask
from flask_script import Manager
from application.utils import load_config,load_command,load_blueprint
from flask_sqlalchemy import SQLAlchemy
from flask_migrate import Migrate,MigrateCommand

# 创建应用对象
app = Flask(__name__)
# 终端脚本管理对象
manager = Manager()

# 创建应用对象
app = Flask(__name__)

# 创建数据库对象
db = SQLAlchemy()

# 数据迁移
migrate = Migrate()

def init_app(config_path):
    # 自动加载配置
    Config = load_config(config_path)
    app.config.from_object(Config)
    # 挂载应用对象
    manager.app = app
    # 自动加载终端命令
    load_command(manager, "application.utils.commands")

    # 注册数据库
    db.init_app(app)
    # 数据迁移初始化
    migrate.init_app(app,db)
    manager.add_command("db", MigrateCommand)
    # 注册蓝图对象
    load_blueprint(app)

    # 对外暴露终端管理对象
    return manager
试一下数据迁移
(flask) D:\python-3.6-project\flask\flask_demo\application\apps>cd ../../
(flask) D:\python-3.6-project\flask\flask_demo>python manage.py db
"""
positional arguments:
  {init,revision,migrate,edit,merge,upgrade,downgrade,show,history,heads,branches,current,stamp}
    init                Creates a new migration repository
    revision            Create a new revision file.
    migrate             Alias for 'revision --autogenerate'
    edit                Edit current revision.
    merge               Merge two revisions together. Creates a new migration
                        file
    upgrade             Upgrade to a later version
    downgrade           Revert to a previous version
    show                Show the revision denoted by the given symbol.
    history             List changeset scripts in chronological order.
    heads               Show current available heads in the script directory
    branches            Show current branch points
    current             Display the current revision for each database.
    stamp               'stamp' the revision table with the given revision;
                        don't run any migrations

optional arguments:
  -?, --help            show this help message and exit
"""
(flask) D:\python-3.6-project\flask\flask_demo>python manage.py db init
"""
Creating directory D:\python-3.6-project\flask\flask_demo\migrations ...  done
Creating directory D:\python-3.6-project\flask\flask_demo\migrations\versions ...  done
Generating D:\python-3.6-project\flask\flask_demo\migrations\alembic.ini ...  done
Generating D:\python-3.6-project\flask\flask_demo\migrations\env.py ...  done
Generating D:\python-3.6-project\flask\flask_demo\migrations\README ...  done
Generating D:\python-3.6-project\flask\flask_demo\migrations\script.py.mako ...  done
Please edit configuration/connection/logging settings in 'D:\\python-3.6-project\\flask\\flask_demo\\migrations\\alembic.ini' befo
re proceeding.
"""

(flask) D:\python-3.6-project\flask\flask_demo>python manage.py db migrate -m "init database"

"""
INFO  [alembic.runtime.migration] Context impl MySQLImpl.
INFO  [alembic.runtime.migration] Will assume non-transactional DDL.
INFO  [alembic.env] No changes in schema detected.
"""
utils/__init__.py
加载模型
from flask import Blueprint
from importlib import import_module
from flask_script import Command
import inspect

def load_config(config_path):
    """自动加载配置"""
    # import_module 根据字符串路径直接进行模块导包,识别模块中的变量成员
    module = import_module(config_path)
    config_file_name = config_path.split(".")[-1]
    if config_file_name == "settings":
        return module.InitConfig
    return module.Config

def load_command(manager, command_path):
    """自动加载命令"""
    module = import_module(command_path)
    # 搜索当前模块下的所有类
    class_list = inspect.getmembers(module,inspect.isclass)
    for class_name,class_object in class_list:
        if issubclass(class_object,Command) and class_name != "Command":
            manager.add_command(class_object.name, class_object)

def path(url,view_func):
    """注册路由"""
    return {"rule":url, "view_func":view_func}

def include(url, blueprint_path):
    return {"url_prefix":url, "path": blueprint_path}

def load_blueprint(app,db):
    """自动加载蓝图"""
    app_url_list = import_module(app.config.get("URL_PATH")).urlpatterns
    # 在从配置中根据INSTALLED_APPS进行循环,在循环中进行蓝图的注册
    for blueprint_path in app.config.get("INSTALLED_APPS"):
        # 获取蓝图名称
        blueprint_name = blueprint_path.split(".")[-1]

        for blueprint_url in app_url_list:
            if blueprint_url.get("path") == blueprint_name+".urls":
                url_prefix = blueprint_url.get("url_prefix")
                break

        # 创建蓝图对象
        blue = Blueprint(blueprint_name,blueprint_path)

        # 蓝图对象自动注册路由
        blue_urls_module = import_module(blueprint_path+".urls")
        for urls_item in blue_urls_module.urlpatterns:
            blue.add_url_rule(**urls_item)

        # 注册蓝图
        app.register_blueprint(blue,url_prefix=url_prefix)

        # 加载当前蓝图下的模型
        import_module(blueprint_path+".models")
这样就可以数据迁移了
python manage.py db migrate -m "init database"

INFO  [alembic.runtime.migration] Context impl MySQLImpl.
INFO  [alembic.runtime.migration] Will assume non-transactional DDL.
INFO  [alembic.autogenerate.compare] Detected added table 'tb_student'
Generating D:\python-3.6-project\flask\flask_demo\migrations\versions\d8dd4cd6d808_init_database.py ...  done

问题在于模型里面不仅仅一个模型类,还要进行循环


【推荐】国内首个AI IDE,深度理解中文开发场景,立即下载体验Trae
【推荐】编程新体验,更懂你的AI,立即体验豆包MarsCode编程助手
【推荐】抖音旗下AI助手豆包,你的智能百科全书,全免费不限次数
【推荐】轻量又高性能的 SSH 工具 IShell:AI 加持,快人一步
· AI与.NET技术实操系列:基于图像分类模型对图像进行分类
· go语言实现终端里的倒计时
· 如何编写易于单元测试的代码
· 10年+ .NET Coder 心语,封装的思维:从隐藏、稳定开始理解其本质意义
· .NET Core 中如何实现缓存的预热?
· 分享一个免费、快速、无限量使用的满血 DeepSeek R1 模型,支持深度思考和联网搜索!
· 基于 Docker 搭建 FRP 内网穿透开源项目(很简单哒)
· ollama系列01:轻松3步本地部署deepseek,普通电脑可用
· 25岁的心里话
· 按钮权限的设计及实现