UIDynamic(简单介绍)/UIDynamic(重力行为+碰撞检测)/UIDynamic(捕捉行为)
2015-08-04 22:27 另十 阅读(288) 评论(0) 编辑 收藏 举报UIDynamic(简单介绍)
一、简单介绍
1.什么是UIDynamic
UIDynamic是从iOS 7开始引入的一种新技术,隶属于UIKit框架
可以认为是一种物理引擎,能模拟和仿真现实生活中的物理现象
如:重力、弹性碰撞等现象
2.物理引擎的价值
广泛用于游戏开发,经典成功案例是“愤怒的小鸟”
让开发人员可以在远离物理学公式的情况下,实现炫酷的物理仿真效果
提高了游戏开发效率,产生更多优秀好玩的物理仿真游戏
3.知名的2D物理引擎
Box2d
Chipmunk
二、使用步骤
要想使用UIDynamic来实现物理仿真效果,大致的步骤如下
(1)创建一个物理仿真器(顺便设置仿真范围)
(2)创建相应的物理仿真行为(顺便添加物理仿真元素)
(3)将物理仿真行为添加到物理仿真器中 开始仿真
三、相关说明
1.三个概念
(1)谁要进行物理仿真?
物理仿真元素(Dynamic Item)
(2)执行怎样的物理仿真效果?怎样的动画效果?
物理仿真行为(Dynamic Behavior)
(3)让物理仿真元素执行具体的物理仿真行为
物理仿真器(Dynamic Animator)
2.物理仿真元素
注意:
不是任何对象都能做物理仿真元素
不是任何对象都能进行物理仿真
物理仿真元素要素:
任何遵守了UIDynamicItem协议的对象
UIView默认已经遵守了UIDynamicItem协议,因此任何UI控件都能做物理仿真
UICollectionViewLayoutAttributes类默认也遵守UIDynamicItem协议
3.物理仿真行为
(1)UIDynamic提供了以下几种物理仿真行为
UIGravityBehavior:重力行为
UICollisionBehavior:碰撞行为
UISnapBehavior:捕捉行为
UIPushBehavior:推动行为
UIAttachmentBehavior:附着行为
UIDynamicItemBehavior:动力元素行为
(2)物理仿真行为须知
上述所有物理仿真行为都继承自UIDynamicBehavior
所有的UIDynamicBehavior都可以独立进行
组合使用多种行为时,可以实现一些比较复杂的效果
4.物理仿真器
(1)物理仿真器须知
它可以让物理仿真元素执行物理仿真行为
它是UIDynamicAnimator类型的对象
(2)UIDynamicAnimator的初始化
- (instancetype)initWithReferenceView:(UIView *)view;
view参数:是一个参照视图,表示物理仿真的范围
5.物理仿真器的说明
(1)UIDynamicAnimator的常见方法
- (void)addBehavior:(UIDynamicBehavior *)behavior; //添加1个物理仿真行为
- (void)removeBehavior:(UIDynamicBehavior *)behavior; //移除1个物理仿真行为
- (void)removeAllBehaviors; //移除之前添加过的所有物理仿真行为
(2)UIDynamicAnimator的常见属性
@property (nonatomic, readonly) UIView* referenceView; //参照视图
@property (nonatomic, readonly, copy) NSArray* behaviors;//添加到物理仿真器中的所有物理仿真行为
@property (nonatomic, readonly, getter = isRunning) BOOL running;//是否正在进行物理仿真
@property (nonatomic, assign) id <UIDynamicAnimatorDelegate> delegate;//代理对象(能监听物理仿真器的仿真过程,比如开始和结束)
UIDynamic(重力行为+碰撞检测)
一、重力行为
说明:给定重力方向、加速度,让物体朝着重力方向掉落
1.方法
(1)UIGravityBehavior的初始化
- (instancetype)initWithItems:(NSArray *)items;
item参数 :里面存放着物理仿真元素
(2)UIGravityBehavior常见方法
- (void)addItem:(id <UIDynamicItem>)item;
添加1个物理仿真元素
- (void)removeItem:(id <UIDynamicItem>)item;
移除1个物理仿真元素
2.UIGravityBehavior常见属性
@property (nonatomic, readonly, copy) NSArray* items;
添加到重力行为中的所有物理仿真元素
@property (readwrite, nonatomic) CGVector gravityDirection;
重力方向(是一个二维向量)
@property (readwrite, nonatomic) CGFloat angle;
重力方向(是一个角度,以x轴正方向为0°,顺时针正数,逆时针负数)
@property (readwrite, nonatomic) CGFloat magnitude;
量级(用来控制加速度,1.0代表加速度是1000 points /second²)
二、碰撞行为
1.简介
说明:可以让物体之间实现碰撞效果
可以通过添加边界(boundary),让物理碰撞局限在某个空间中
2.UICollisionBehavior边界相关的方法
- (void)addBoundaryWithIdentifier:(id <NSCopying>)identifier forPath:(UIBezierPath*)bezierPath;
- (void)addBoundaryWithIdentifier:(id <NSCopying>)identifier fromPoint:(CGPoint)p1 toPoint:(CGPoint)p2;
- (UIBezierPath*)boundaryWithIdentifier:(id <NSCopying>)identifier;
- (void)removeBoundaryWithIdentifier:(id <NSCopying>)identifier;
@property (nonatomic, readonly, copy) NSArray* boundaryIdentifiers;
- (void)removeAllBoundaries;
3.UICollisionBehavior常见用法
@property (nonatomic, readwrite) BOOL translatesReferenceBoundsIntoBoundary;
是否以参照视图的bounds为边界
- (void)setTranslatesReferenceBoundsIntoBoundaryWithInsets:(UIEdgeInsets)insets;
设置参照视图的bounds为边界,并且设置内边距
@property (nonatomic, readwrite) UICollisionBehaviorMode collisionMode;
碰撞模式(分为3种,元素碰撞、边界碰撞、全体碰撞)
@property (nonatomic, assign, readwrite) id <UICollisionBehaviorDelegate> collisionDelegate;
代理对象(可以监听元素的碰撞过程)
三、代码示例
在storyboard中拖拽几个控件,用于测试。
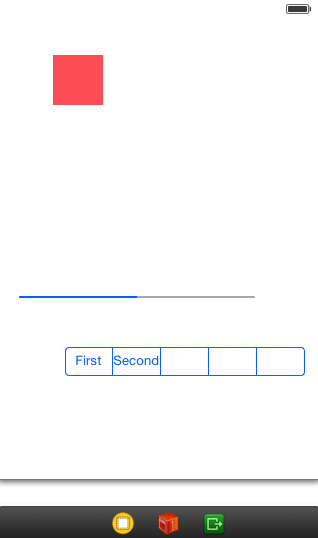
测试代码:
YYViewController.m文件

  1 //
  2 //  YYViewController.m
  3 //  12-重力行为和碰撞行为
  4 //
  5 //  Created by apple on 15-8-4.
  6 //  Copyright (c) 2015年 y. All rights reserved.
  7 //
  8
  9 #import "YYViewController.h"
 10
 11 @interface YYViewController ()
 12 @property (weak, nonatomic) IBOutlet UIView *redView;
 13
 14 @property (weak, nonatomic) IBOutlet UIProgressView *block1;
 15 @property (weak, nonatomic) IBOutlet UISegmentedControl *block2;
 16
 17 @property(nonatomic,strong)UIDynamicAnimator *animator;
 18 @end
 19
 20 @implementation YYViewController
 21 -(UIDynamicAnimator *)animator
 22 {
 23     if (_animator==nil) {
 24         //创建物理仿真器(ReferenceView:参照视图,设置仿真范围)
 25         self.animator=[[UIDynamicAnimator alloc]initWithReferenceView:self.view];
 26     }
 27     return _animator;
 28 }
 29 - (void)viewDidLoad
 30 {
 31     [super viewDidLoad];
 32
 33     //设置红色view的角度
 34     self.redView.transform=CGAffineTransformMakeRotation(M_PI_4);
 35 }
 36
 37 -(void)touchesBegan:(NSSet *)touches withEvent:(UIEvent *)event
 38 {
 39     //1.重力行为
 40 //    [self testGravity];
 41     //2.重力行为+碰撞检测
 42 //    [self testGravityAndCollsion];
 43     //3.测试重力的一些属性
 44     [self testGravityAndCollsion2];
 45     //用2根线作为边界
 46 //    [self testGravityAndCollision3];
 47     //4.用圆作为边界
 48 //    [self testGravityAndCollision4];
 49 }
 50
 51 /**
 52  *  重力行为
 53  */
 54 -(void)testGravity
 55 {
 56     //1.创建仿真行为(进行怎样的仿真效果?)
 57     //重力行为
 58     UIGravityBehavior *gravity=[[UIGravityBehavior alloc]init];
 59     //2.添加物理仿真元素
 60     [gravity addItem:self.redView];
 61     //3.执行仿真,让物理仿真元素执行仿真行为
 62     [self.animator addBehavior:gravity];
 63 }
 64 /**
 65  *  重力行为+碰撞检测
 66  */
 67 -(void)testGravityAndCollsion
 68 {
 69     //1.重力行为
 70     UIGravityBehavior *gravity=[[UIGravityBehavior alloc]init];
 71     [gravity addItem:self.redView];
 72
 73     //2碰撞检测行为
 74     UICollisionBehavior *collision=[[UICollisionBehavior alloc]init];
 75     [collision addItem:self.redView];
 76     [collision addItem:self.block1];
 77     [collision addItem:self.block2];
 78
 79     //让参照视图的边框成为碰撞检测的边界
 80     collision.translatesReferenceBoundsIntoBoundary=YES;
 81
 82     //3.执行仿真
 83     [self.animator addBehavior:gravity];
 84     [self.animator addBehavior:collision];
 85 }
 86
 87 /**
 88  *  测试重力行为的属性
 89  */
 90 -(void)testGravityAndCollsion2
 91 {
 92     //1.重力行为
 93     UIGravityBehavior *gravity=[[UIGravityBehavior alloc]init];
 94     //(1)设置重力的方向(是一个角度)
 95 //    gravity.angle=(M_PI_2-M_PI_4);
 96     //(2)设置重力的加速度,重力的加速度越大,碰撞就越厉害
 97     gravity.magnitude=100;
 98     //(3)设置重力的方向(是一个二维向量)
 99     gravity.gravityDirection=CGVectorMake(0, 1);
100     [gravity addItem:self.redView];
101
102     //2碰撞检测行为
103     UICollisionBehavior *collision=[[UICollisionBehavior alloc]init];
104     [collision addItem:self.redView];
105     [collision addItem:self.block1];
106     [collision addItem:self.block2];
107
108     //让参照视图的边框成为碰撞检测的边界
109     collision.translatesReferenceBoundsIntoBoundary=YES;
110
111     //3.执行仿真
112     [self.animator addBehavior:gravity];
113     [self.animator addBehavior:collision];
114
115 }
116
117 /**
118  *  用圆作为边界
119  */
120 - (void)testGravityAndCollision4
121 {
122     // 1.重力行为
123     UIGravityBehavior *gravity = [[UIGravityBehavior alloc] init];
124     [gravity addItem:self.redView];
125
126     // 2.碰撞检测行为
127     UICollisionBehavior *collision = [[UICollisionBehavior alloc] init];
128     [collision addItem:self.redView];
129
130     // 添加一个椭圆为碰撞边界
131     UIBezierPath *path = [UIBezierPath bezierPathWithOvalInRect:CGRectMake(0, 0, 320, 320)];
132     [collision addBoundaryWithIdentifier:@"circle" forPath:path];
133
134     // 3.开始仿真
135     [self.animator addBehavior:gravity];
136     [self.animator addBehavior:collision];
137 }
138
139 /**
140  *  用2根线作为边界
141  */
142 - (void)testGravityAndCollision3
143 {
144     // 1.重力行为
145     UIGravityBehavior *gravity = [[UIGravityBehavior alloc] init];
146     [gravity addItem:self.redView];
147
148     // 2.碰撞检测行为
149     UICollisionBehavior *collision = [[UICollisionBehavior alloc] init];
150     [collision addItem:self.redView];
151     CGPoint startP = CGPointMake(0, 160);
152     CGPoint endP = CGPointMake(320, 400);
153     [collision addBoundaryWithIdentifier:@"line1" fromPoint:startP toPoint:endP];
154     CGPoint startP1 = CGPointMake(320, 0);
155     [collision addBoundaryWithIdentifier:@"line2" fromPoint:startP1 toPoint:endP];
156 //    collision.translatesReferenceBoundsIntoBoundary = YES;
157
158     // 3.开始仿真
159     [self.animator addBehavior:gravity];
160     [self.animator addBehavior:collision];
161 }
162 @end
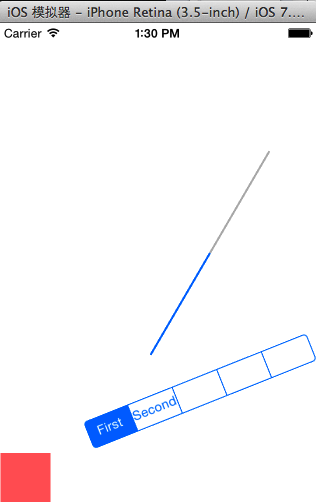
一些测试效果:
代码补充说明:
(1)加速度
速度:point/s
加速度:point/s²
1\2 * 加速度 * t²
gravity.magnitude = 1000; // 重力加速度越大,碰撞越厉害
(2)重力的方向
坐标如下:

重力方向(二维向量)
说明:给定坐标平面内的一个点。然后用原点(0,0)来连接它,就构成了一个向量。
注意:在IOS中以左上角为坐标原点,向右x增加,向下Y越大。

1     //(3)设置重力的方向(是一个二维向量)
2     gravity.gravityDirection=CGVectorMake(-1, 1);
重力方向为左下角(西南)方向
(3)碰撞检测行为
1  UICollisionBehavior *collision = [[UICollisionBehavior alloc] init];
2     [collision addItem:self.redView];
3     CGPoint startP = CGPointMake(0, 160);
4     CGPoint endP = CGPointMake(320, 400);
5     [collision addBoundaryWithIdentifier:@"line1" fromPoint:startP toPoint:endP];
6     CGPoint startP1 = CGPointMake(320, 0);
7     [collision addBoundaryWithIdentifier:@"line2" fromPoint:startP1 toPoint:endP];
注意:标识符不能写空。可以写字符串,因为需要标识符需要遵守NSCopying协议,而字符串满足要求。
(4)贝赛尔曲线

提示:这里的path是一个圆,设置宽高不一样,那么得出来的就是一个椭圆。
UIDynamic(捕捉行为)
一、简介
可以让物体迅速冲到某个位置(捕捉位置),捕捉到位置之后会带有一定的震动
UISnapBehavior的初始化
- (instancetype)initWithItem:(id <UIDynamicItem>)item snapToPoint:(CGPoint)point;
UISnapBehavior常见属性
@property (nonatomic, assign) CGFloat damping;
用于减幅、减震(取值范围是0.0 ~ 1.0,值越大,震动幅度越小)
UISnapBehavior使用注意
如果要进行连续的捕捉行为,需要先把前面的捕捉行为从物理仿真器中移除
二、代码说明

在storyboard中放一个view控件,作为演示用的仿真元素。
代码如下:
 1 //
 2 //  YYViewController.m
 3 //  13-捕捉行为
 4 //
 5 //  Created by apple on 15-8-4.
 6 //  Copyright (c) 2015年 yangyong. All rights reserved.
 7 //
 8
 9 #import "YYViewController.h"
10
11 @interface YYViewController ()
12 @property (weak, nonatomic) IBOutlet UIView *blueView;
13 @property(nonatomic,strong)UIDynamicAnimator *animator;
14 @end
15
16 @implementation YYViewController
17
18 -(UIDynamicAnimator *)animator
19 {
20     if (_animator==nil) {
21         //创建物理仿真器,设置仿真范围,ReferenceView为参照视图
22         _animator=[[UIDynamicAnimator alloc]initWithReferenceView:self.view];
23     }
24     return _animator;
25 }
26 - (void)viewDidLoad
27 {
28     [super viewDidLoad];
29 }
30 -(void)touchesBegan:(NSSet *)touches withEvent:(UIEvent *)event
31 {
32     //获取一个触摸点
33     UITouch *touch=[touches anyObject];
34     CGPoint point=[touch locationInView:touch.view];
35
36     //1.创建捕捉行为
37     //需要传入两个参数:一个物理仿真元素,一个捕捉点
38     UISnapBehavior *snap=[[UISnapBehavior alloc]initWithItem:self.blueView snapToPoint:point];
39     //设置防震系数(0~1,数值越大,震动的幅度越小)
40     snap.damping=arc4random_uniform(10)/10.0;
41
42     //2.执行捕捉行为
43     //注意:这个控件只能用在一个仿真行为上,如果要拥有持续的仿真行为,那么需要把之前的所有仿真行为删除
44     //删除之前的所有仿真行为
45     [self.animator removeAllBehaviors];
46     [self.animator addBehavior:snap];
47 }
48
49 @end
