分库分表ShardingSphere,一文带你搞透(建议收藏)
前言
ShardingSphere,大家多少都有听过吧,Apache顶级项目,国内大佬的巨作,Java中用的最多的一个分库分表框架,如果你们的系统中需要分库分表,强烈建议使用,完全可以满足你的所有需求。
本文并不会介绍什么是分库分表,而是通过大量案例,让你了解ShardingSphere可以做什么?如何做?以及SpringBoot中如何使用它等等。
废话不多说,开始干货分享。
1、git地址
https://github.com/apache/shardingsphere
2、关于版本
shardingsphere目前最新版本5.X了,大版本之间变化比较大。本次以4.1.1为例来介绍。
3、4.X 版本文档
https://shardingsphere.apache.org/document/legacy/4.x/document/cn/overview/
如果对分库分表没有概念的朋友,建议大家先去看看,然后再继续向下看。
4、纯java api代码案例
案例git地址:https://gitee.com/javacode2018/shardingsphere-demo
4.1、准备工作
1)创建一个springboot应用
2)引入shardingsphere的maven配置
<dependency>
    <groupId>org.apache.shardingsphere</groupId>
    <artifactId>sharding-jdbc-core</artifactId>
    <version>4.1.1</version>
</dependency>
3)完整的maven配置如下
<?xml version="1.0" encoding="UTF-8"?>
<project xmlns="http://maven.apache.org/POM/4.0.0" xmlns:xsi="http://www.w3.org/2001/XMLSchema-instance"
         xsi:schemaLocation="http://maven.apache.org/POM/4.0.0 https://maven.apache.org/xsd/maven-4.0.0.xsd">
    <modelVersion>4.0.0</modelVersion>
    <parent>
        <groupId>org.springframework.boot</groupId>
        <artifactId>spring-boot-starter-parent</artifactId>
        <version>2.7.1</version>
        <relativePath/> <!-- lookup parent from repository -->
    </parent>
    <groupId>com.itsoku</groupId>
    <artifactId>sj-demo1</artifactId>
    <version>0.0.1-SNAPSHOT</version>
    <name>sj-demo1</name>
    <description>Demo project for Spring Boot</description>
    <properties>
        <java.version>1.8</java.version>
    </properties>
    <dependencies>
        <dependency>
            <groupId>org.mybatis.spring.boot</groupId>
            <artifactId>mybatis-spring-boot-starter</artifactId>
            <version>2.2.2</version>
        </dependency>
        <dependency>
            <groupId>mysql</groupId>
            <artifactId>mysql-connector-java</artifactId>
        </dependency>
        <dependency>
            <groupId>org.projectlombok</groupId>
            <artifactId>lombok</artifactId>
            <optional>true</optional>
        </dependency>
        <dependency>
            <groupId>org.springframework.boot</groupId>
            <artifactId>spring-boot-starter-test</artifactId>
            <scope>test</scope>
        </dependency>
        <dependency>
            <groupId>org.apache.shardingsphere</groupId>
            <artifactId>sharding-jdbc-core</artifactId>
            <version>4.1.1</version>
        </dependency>
    </dependencies>

    <build>
        <plugins>
            <plugin>
                <groupId>org.springframework.boot</groupId>
                <artifactId>spring-boot-maven-plugin</artifactId>
                <configuration>
                    <excludes>
                        <exclude>
                            <groupId>org.projectlombok</groupId>
                            <artifactId>lombok</artifactId>
                        </exclude>
                    </excludes>
                </configuration>
            </plugin>
        </plugins>
    </build>

</project>
4.2、案例1:单库多表
需求
一个库中有2个订单表,按照订单id取模,将数据路由到指定的表。
sql脚本
drop database if exists sj_ds0;
create database sj_ds0;
use sj_ds0;
drop table if exists t_order_0;
create table t_order_0(
 order_id bigint not null primary key,
    user_id bigint not null,
 price bigint not null
);

drop table if exists t_order_1;
create table t_order_1(
 order_id bigint not null primary key,
    user_id bigint not null,
 price bigint not null
);

drop table if exists t_user;
create table t_user(
 id bigint not null primary key auto_increment,
 name varchar(128) not null
);
java代码
import com.zaxxer.hikari.HikariDataSource;
import org.apache.shardingsphere.api.config.sharding.ShardingRuleConfiguration;
import org.apache.shardingsphere.api.config.sharding.TableRuleConfiguration;
import org.apache.shardingsphere.api.config.sharding.strategy.InlineShardingStrategyConfiguration;
import org.apache.shardingsphere.shardingjdbc.api.ShardingDataSourceFactory;
import org.apache.shardingsphere.underlying.common.config.properties.ConfigurationPropertyKey;

import javax.sql.DataSource;
import java.sql.Connection;
import java.sql.PreparedStatement;
import java.sql.SQLException;
import java.util.HashMap;
import java.util.Map;
import java.util.Properties;

public class Demo1 {
    public static void main(String[] args) throws SQLException {
        /**
         * 1、配置真实数据源
         */
        Map<String, DataSource> dataSourceMap = new HashMap<>();
        dataSourceMap.put("ds0", dataSource1());

        /**
         * 2.配置表的规则
         */
        TableRuleConfiguration orderTableRuleConfig = new TableRuleConfiguration("t_order", "ds0.t_order_$->{0..1}");
        // 指定表的分片策略(分片字段+分片算法)
        orderTableRuleConfig.setTableShardingStrategyConfig(new InlineShardingStrategyConfiguration("order_id", "t_order_$->{order_id % 2}"));

        /**
         * 3、分片规则
         */
        ShardingRuleConfiguration shardingRuleConfig = new ShardingRuleConfiguration();
        //将表的分片规则加入到分片规则列表
        shardingRuleConfig.getTableRuleConfigs().add(orderTableRuleConfig);

        /**
         * 4、配置一些属性
         */
        Properties props = new Properties();
        //输出sql
        props.put(ConfigurationPropertyKey.SQL_SHOW.getKey(), true);

        /**
         * 5、创建数据源
         */
        DataSource dataSource = ShardingDataSourceFactory.
                createDataSource(dataSourceMap, shardingRuleConfig, props);

        /**
         * 6、获取连接,执行sql
         */
        Connection connection = dataSource.getConnection();
        connection.setAutoCommit(false);

        /**
         * 测试向t_order表插入8条数据,8条数据会分散到2个表
         */
        PreparedStatement ps = connection.prepareStatement("insert into t_order (order_id,user_id,price) values (?,?,?)");
        for (long i = 1; i <= 8; i++) {
            int j = 1;
            ps.setLong(j++, i);
            ps.setLong(j++, i);
            ps.setLong(j, 100 * i);
            System.out.println(ps.executeUpdate());
        }

        connection.commit();
        ps.close();
        connection.close();
    }


    private static DataSource dataSource1() {
        HikariDataSource dataSource1 = new HikariDataSource();
        dataSource1.setDriverClassName("com.mysql.jdbc.Driver");
        dataSource1.setJdbcUrl("jdbc:mysql://localhost:3306/sj_ds0?characterEncoding=UTF-8");
        dataSource1.setUsername("root");
        dataSource1.setPassword("root123");
        return dataSource1;
    }

}
运行输出
Logic SQL: insert into t_order (order_id,user_id,price) values (?,?,?)
Actual SQL: ds0 ::: insert into t_order_1 (order_id,user_id,price) values (?, ?, ?) ::: [1, 1, 100]
1
Logic SQL: insert into t_order (order_id,user_id,price) values (?,?,?)
Actual SQL: ds0 ::: insert into t_order_0 (order_id,user_id,price) values (?, ?, ?) ::: [2, 2, 200]
1
Logic SQL: insert into t_order (order_id,user_id,price) values (?,?,?)
Actual SQL: ds0 ::: insert into t_order_1 (order_id,user_id,price) values (?, ?, ?) ::: [3, 3, 300]
1
Logic SQL: insert into t_order (order_id,user_id,price) values (?,?,?)
Actual SQL: ds0 ::: insert into t_order_0 (order_id,user_id,price) values (?, ?, ?) ::: [4, 4, 400]
1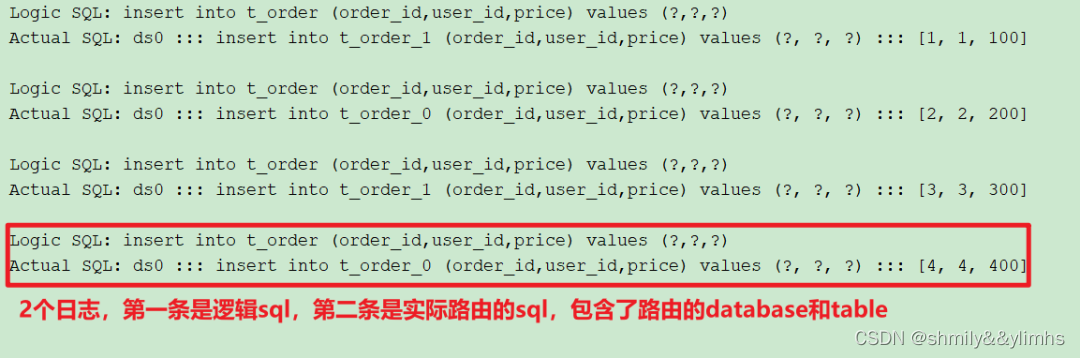
4.3、案例2:多库多表
需求
2个库:sj_ds0、sj_ds1
2个库中都包含2个表:t_order_0,t_order_1
根据 user_id%2 路由库,根据 order_id%2路由表。
执行sql
drop database if exists sj_ds0;
create database sj_ds0;
use sj_ds0;
drop table if exists t_order_0;
create table t_order_0(
 order_id bigint not null primary key,
    user_id bigint not null,
 price bigint not null
);

drop table if exists t_order_1;
create table t_order_1(
 order_id bigint not null primary key,
    user_id bigint not null,
 price bigint not null
);

drop database if exists sj_ds1;
create database sj_ds1;
use sj_ds1;
drop table if exists t_order_0;
create table t_order_0(
 order_id bigint not null primary key,
  user_id bigint not null,
 price bigint not null
);

drop table if exists t_order_1;
create table t_order_1(
 order_id bigint not null primary key,
  user_id bigint not null,
 price bigint not null
);
java代码
import com.zaxxer.hikari.HikariDataSource;
import org.apache.shardingsphere.api.config.sharding.ShardingRuleConfiguration;
import org.apache.shardingsphere.api.config.sharding.TableRuleConfiguration;
import org.apache.shardingsphere.api.config.sharding.strategy.InlineShardingStrategyConfiguration;
import org.apache.shardingsphere.shardingjdbc.api.ShardingDataSourceFactory;
import org.apache.shardingsphere.underlying.common.config.properties.ConfigurationPropertyKey;

import javax.sql.DataSource;
import java.sql.Connection;
import java.sql.PreparedStatement;
import java.sql.SQLException;
import java.util.HashMap;
import java.util.Map;
import java.util.Properties;

public class Demo2 {
    public static void main(String[] args) throws SQLException {
        // 配置真实数据源
        Map<String, DataSource> dataSourceMap = new HashMap<>();
        dataSourceMap.put("ds0", dataSource1());
        dataSourceMap.put("ds1", dataSource2());

        /**
         * 2.配置表的规则
         */
        TableRuleConfiguration orderTableRuleConfig = new TableRuleConfiguration("t_order", "ds$->{0..1}.t_order_$->{0..1}");
        // 指定db的分片策略(分片字段+分片算法)
        orderTableRuleConfig.setDatabaseShardingStrategyConfig(new InlineShardingStrategyConfiguration("user_id", "ds$->{user_id % 2}"));
        // 指定表的分片策略(分片字段+分片算法)
        orderTableRuleConfig.setTableShardingStrategyConfig(new InlineShardingStrategyConfiguration("order_id", "t_order_$->{order_id % 2}"));

        /**
         * 3、分片规则
         */
        ShardingRuleConfiguration shardingRuleConfig = new ShardingRuleConfiguration();
        //将表的分片规则加入到分片规则列表
        shardingRuleConfig.getTableRuleConfigs().add(orderTableRuleConfig);

        /**
         * 4、配置一些属性
         */
        Properties props = new Properties();
        //输出sql
        props.put(ConfigurationPropertyKey.SQL_SHOW.getKey(), true);

        /**
         * 5、创建数据源
         */
        DataSource dataSource = ShardingDataSourceFactory.
                createDataSource(dataSourceMap, shardingRuleConfig, props);

        /**
         * 6、获取连接,执行sql
         */
        Connection connection = dataSource.getConnection();
        connection.setAutoCommit(false);
        PreparedStatement ps = connection.prepareStatement("insert into t_order (order_id,user_id,price) values (?,?,?)");
        // 插入4条数据测试,每个表会落入1条数据
        for (long user_id = 1; user_id <= 2; user_id++) {
            for (long order_id = 1; order_id <= 2; order_id++) {
                int j = 1;
                ps.setLong(j++, order_id);
                ps.setLong(j++, user_id);
                ps.setLong(j, 100);
                System.out.println(ps.executeUpdate());
            }
        }

        connection.commit();
        ps.close();
        connection.close();
    }


    private static DataSource dataSource1() {
        HikariDataSource dataSource1 = new HikariDataSource();
        dataSource1.setDriverClassName("com.mysql.jdbc.Driver");
        dataSource1.setJdbcUrl("jdbc:mysql://localhost:3306/sj_ds0?characterEncoding=UTF-8");
        dataSource1.setUsername("root");
        dataSource1.setPassword("root123");
        return dataSource1;
    }

    private static DataSource dataSource2() {
        HikariDataSource dataSource1 = new HikariDataSource();
        dataSource1.setDriverClassName("com.mysql.jdbc.Driver");
        dataSource1.setJdbcUrl("jdbc:mysql://localhost:3306/sj_ds1?characterEncoding=UTF-8");
        dataSource1.setUsername("root");
        dataSource1.setPassword("root123");
        return dataSource1;
    }
}
3行关键代码

运行输出
Logic SQL: insert into t_order (order_id,user_id,price) values (?,?,?)
Actual SQL: ds1 ::: insert into t_order_1 (order_id,user_id,price) values (?, ?, ?) ::: [1, 1, 100]
1
Logic SQL: insert into t_order (order_id,user_id,price) values (?,?,?)
Actual SQL: ds1 ::: insert into t_order_0 (order_id,user_id,price) values (?, ?, ?) ::: [2, 1, 100]
1
Logic SQL: insert into t_order (order_id,user_id,price) values (?,?,?)
Actual SQL: ds0 ::: insert into t_order_1 (order_id,user_id,price) values (?, ?, ?) ::: [1, 2, 100]
1
Logic SQL: insert into t_order (order_id,user_id,price) values (?,?,?)
Actual SQL: ds0 ::: insert into t_order_0 (order_id,user_id,price) values (?, ?, ?) ::: [2, 2, 100]
1
4.4、案例3:单库无分表规则
若表未指定分片规则,则直接路由到对应的表。
sql脚本
sj_ds0 库中有 t_user 表

drop database if exists sj_ds0;
create database sj_ds0;
use sj_ds0;

drop table if exists t_user;
create table t_user(
 id bigint not null primary key auto_increment,
 name varchar(128) not null
);
代码
import com.zaxxer.hikari.HikariDataSource;
import org.apache.shardingsphere.api.config.sharding.ShardingRuleConfiguration;
import org.apache.shardingsphere.shardingjdbc.api.ShardingDataSourceFactory;
import org.apache.shardingsphere.underlying.common.config.properties.ConfigurationPropertyKey;

import javax.sql.DataSource;
import java.sql.Connection;
import java.sql.PreparedStatement;
import java.sql.SQLException;
import java.util.HashMap;
import java.util.Map;
import java.util.Properties;

public class Demo3 {
    public static void main(String[] args) throws SQLException {
        /**
         * 1.配置真实数据源
         */
        Map<String, DataSource> dataSourceMap = new HashMap<>();
        dataSourceMap.put("ds0", dataSource1());

        /**
         * 2、无分片规则
         */

        /**
         * 3、分片规则
         */
        ShardingRuleConfiguration shardingRuleConfig = new ShardingRuleConfiguration();

        /**
         * 4、配置一些属性
         */
        Properties props = new Properties();
        //输出sql
        props.put(ConfigurationPropertyKey.SQL_SHOW.getKey(), true);

        /**
         * 5、创建数据源
         */
        DataSource dataSource = ShardingDataSourceFactory.
                createDataSource(dataSourceMap, shardingRuleConfig, props);

        Connection connection = dataSource.getConnection();
        connection.setAutoCommit(false);

        PreparedStatement ps = connection.prepareStatement("insert into t_user (name) values (?)");
        ps.setString(1, "张三");
        System.out.println(ps.executeUpdate());

        connection.commit();
        ps.close();
        connection.close();
    }


    private static DataSource dataSource1() {
        HikariDataSource dataSource1 = new HikariDataSource();
        dataSource1.setDriverClassName("com.mysql.jdbc.Driver");
        dataSource1.setJdbcUrl("jdbc:mysql://localhost:3306/sj_ds0?characterEncoding=UTF-8");
        dataSource1.setUsername("root");
        dataSource1.setPassword("root123");
        return dataSource1;
    }


}
运行输出
Logic SQL: insert into t_user (name) values (?)
Actual SQL: ds0 ::: insert into t_user (name) values (?) ::: [张三]4.5、案例4:多库无分表规则
需求
2个库:sj_ds0、sj_ds1
2个库中都包含表:t_user
t_user表不指定路由规则的情况下,向t_user表写入数据会落入哪个库呢?来看下效果
sql

drop database if exists sj_ds0;
create database sj_ds0;
use sj_ds0;

drop table if exists t_user;
create table t_user(
 id bigint not null primary key auto_increment,
 name varchar(128) not null
);

drop database if exists sj_ds1;
create database sj_ds1;
use sj_ds1;

drop table if exists t_user;
create table t_user(
 id bigint not null primary key auto_increment,
 name varchar(128) not null
);
java代码
下面配置2个数据源,向t_user表插入数据,看看数据会落在哪个库?
import com.zaxxer.hikari.HikariDataSource;
import org.apache.shardingsphere.api.config.sharding.ShardingRuleConfiguration;
import org.apache.shardingsphere.shardingjdbc.api.ShardingDataSourceFactory;
import org.apache.shardingsphere.underlying.common.config.properties.ConfigurationPropertyKey;

import javax.sql.DataSource;
import java.sql.Connection;
import java.sql.PreparedStatement;
import java.sql.SQLException;
import java.util.HashMap;
import java.util.LinkedHashMap;
import java.util.Map;
import java.util.Properties;

public class Demo4 {
    public static void main(String[] args) throws SQLException {
        /**
         * 1.配置2个数据源
         */
        Map<String, DataSource> dataSourceMap = new LinkedHashMap<>();
        dataSourceMap.put("ds0", dataSource1());
        dataSourceMap.put("ds1", dataSource2());

        /**
         * 2、无分片规则
         */

        /**
         * 3、分片规则
         */
        ShardingRuleConfiguration shardingRuleConfig = new ShardingRuleConfiguration();

        /**
         * 4、配置一些属性
         */
        Properties props = new Properties();
        //输出sql
        props.put(ConfigurationPropertyKey.SQL_SHOW.getKey(), true);

        /**
         * 5、创建数据源
         */
        DataSource dataSource = ShardingDataSourceFactory.
                createDataSource(dataSourceMap, shardingRuleConfig, props);

        Connection connection = dataSource.getConnection();
        connection.setAutoCommit(false);

        //插入4条数据,测试效果
        for (int i = 0; i < 4; i++) {
            PreparedStatement ps = connection.prepareStatement("insert into t_user (name) values (?)");
            ps.setString(1, "张三");
            System.out.println(ps.executeUpdate());
        }

        connection.commit();
        connection.close();
    }


    private static DataSource dataSource1() {
        HikariDataSource dataSource1 = new HikariDataSource();
        dataSource1.setDriverClassName("com.mysql.jdbc.Driver");
        dataSource1.setJdbcUrl("jdbc:mysql://localhost:3306/sj_ds0?characterEncoding=UTF-8");
        dataSource1.setUsername("root");
        dataSource1.setPassword("root123");
        return dataSource1;
    }

    private static DataSource dataSource2() {
        HikariDataSource dataSource1 = new HikariDataSource();
        dataSource1.setDriverClassName("com.mysql.jdbc.Driver");
        dataSource1.setJdbcUrl("jdbc:mysql://localhost:3306/sj_ds1?characterEncoding=UTF-8");
        dataSource1.setUsername("root");
        dataSource1.setPassword("root123");
        return dataSource1;
    }
}
运行输出
输出如下,落入的库是不确定的。
Logic SQL: insert into t_user (name) values (?)
Actual SQL: ds1 ::: insert into t_user (name) values (?) ::: [张三]
1
Logic SQL: insert into t_user (name) values (?)
Actual SQL: ds1 ::: insert into t_user (name) values (?) ::: [张三]
1
Logic SQL: insert into t_user (name) values (?)
Actual SQL: ds0 ::: insert into t_user (name) values (?) ::: [张三]
1
Logic SQL: insert into t_user (name) values (?)
Actual SQL: ds1 ::: insert into t_user (name) values (?) ::: [张三]
15、分片问题?
上面介绍的案例,db的路由、表的路由都是采用取模的方式,这种方式存在一个问题:
当查询条件是>, <, >=, <=、BETWEEN AND的时候,就无能为力了,此时要用其他的分片策略来解决,下面来看看如何解决。
6、分片
6.1、分片键
用于分片的数据库字段,是将数据库(表)水平拆分的关键字段。例:将订单表中的订单主键的尾数取模分片,则订单主键为分片字段。SQL中如果无分片字段,将执行全路由,性能较差。除了对单分片字段的支持,ShardingSphere也支持根据多个字段进行分片。
6.2、分片算法
通过分片算法将数据分片,支持通过=、>=、<=、>、<、BETWEEN和IN分片。分片算法需要应用方开发者自行实现,可实现的灵活度非常高。
目前提供4种分片算法。由于分片算法和业务实现紧密相关,因此并未提供内置分片算法,而是通过分片策略将各种场景提炼出来,提供更高层级的抽象,并提供接口让应用开发者自行实现分片算法。
精确分片算法
对应PreciseShardingAlgorithm,用于处理使用单一键作为分片键的=与IN进行分片的场景。需要配合StandardShardingStrategy使用。
范围分片算法
对应RangeShardingAlgorithm,用于处理使用单一键作为分片键的BETWEEN AND、>、<、>=、<=进行分片的场景。需要配合StandardShardingStrategy使用。
复合分片算法
对应ComplexKeysShardingAlgorithm,用于处理使用多键作为分片键进行分片的场景,包含多个分片键的逻辑较复杂,需要应用开发者自行处理其中的复杂度。需要配合ComplexShardingStrategy使用。
Hint分片算法
对应HintShardingAlgorithm,用于处理使用Hint行分片的场景。需要配合HintShardingStrategy使用。
6.3、5种分片策略
包含分片键和分片算法,由于分片算法的独立性,将其独立抽离。真正可用于分片操作的是分片键 + 分片算法,也就是分片策略。目前提供5种分片策略。
行表达式分片策略(InlineShardingStrategy)
对应InlineShardingStrategy。使用Groovy的表达式,提供对SQL语句中的=和IN的分片操作支持,只支持单分片键。对于简单的分片算法,可以通过简单的配置使用,从而避免繁琐的Java代码开发,如: t_user_$->{u_id % 8} 表示t_user表根据u_id模8,而分成8张表,表名称为t_user_0到t_user_7。
标准分片策略(StandardShardingStrategy)
对应StandardShardingStrategy。提供对SQL语句中的=, >, <, >=, <=, IN和BETWEEN AND的分片操作支持。StandardShardingStrategy只支持单分片键,提供PreciseShardingAlgorithm和RangeShardingAlgorithm两个分片算法。PreciseShardingAlgorithm是必选的,用于处理=和IN的分片。RangeShardingAlgorithm是可选的,用于处理BETWEEN AND, >, <, >=, <=分片,如果不配置RangeShardingAlgorithm,SQL中的BETWEEN AND将按照全库路由处理。
复合分片策略(ComplexShardingStrategy)
对应ComplexShardingStrategy。复合分片策略。提供对SQL语句中的=, >, <, >=, <=, IN和BETWEEN AND的分片操作支持。ComplexShardingStrategy支持多分片键,由于多分片键之间的关系复杂,因此并未进行过多的封装,而是直接将分片键值组合以及分片操作符透传至分片算法,完全由应用开发者实现,提供最大的灵活度。
Hint分片策略(HintShardingStrategy)
对应HintShardingStrategy。通过Hint指定分片值而非从SQL中提取分片值的方式进行分片的策略。
不分片策略
对应NoneShardingStrategy。不分片的策略。
6.4、SQL Hint
对于分片字段非SQL决定,而由其他外置条件决定的场景,可使用SQL Hint灵活的注入分片字段。例:内部系统,按照员工登录主键分库,而数据库中并无此字段。SQL Hint支持通过Java API和SQL注释(待实现)两种方式使用。
下面通过案例来介绍每种分片策略的使用以及场景。
6.5、白话解释分片策略
当我们使用分库分表的时候,目标库和表都存在多个,此时执行sql,那么sql最后会落到哪个库?那个表呢?
这就是分片策略需要解决的问题,主要解决2个问题:
sql应该到哪个库去执行?这个就是数据库路由策略决定的
sql应该到哪个表去执行呢?这个就是表的路由策略决定的
所以如果要对某个表进行分库分表,需要指定则两个策略
db路由策略,通过TableRuleConfiguration#setDatabaseShardingStrategyConfig进行设置
table路由策略,通过TableRuleConfiguration#setTableShardingStrategyConfig进行设置
7、5种分片策略场景 & 案例详解
由于库的分片策略和表的分片在代码上基本上是一样的,为了更简洁,下面所有案例,只演示在一个库中分表的情况,掌握分表策略之后,库的分片代码自然就会了。
表的分片策略调用TableRuleConfiguration#setTableShardingStrategyConfig进行设置,而库的分片策略调用TableRuleConfiguration#setDatabaseShardingStrategyConfig进行设置,都是类似的,一通则通。
本章案例所有代码
https://gitee.com/javacode2018/shardingsphere-demo
7.1、行表达式分片策略(InlineShardingStrategy)
7.1.1、适合的场景
对应InlineShardingStrategy类
只支持单字段分片
通过分片字段查询,只支持=和in,不支持>=、<=、>、<、BETWEEN范围操作,否则报错
使用Groovy的表达式,对于简单的分片算法,可以通过简单的配置使用,从而避免繁琐的Java代码开发,如: t_user_$->{u_id % 8} 表示t_user表根据u_id模8,而分成8张表,表名称为t_user_0到t_user_7。
7.1.2、案例
1)需求
ds_iss库中含有2个用户表:t_user_0、t_user_1,t_user_0存放id为偶数的用户,另外一张表存放id为基数的用户。
2)sql脚本
drop database if exists ds_iss;
create database ds_iss;
use ds_iss;

drop table if exists t_user_0;
create table t_user_0(
 id bigint not null primary key,
 name varchar(64) not null
);

drop table if exists t_user_1;
create table t_user_1(
 id bigint not null primary key,
 name varchar(64) not null
);
3)创建测试类
关键代码都在下面的init方法中,重点关注InlineShardingStrategyConfiguration的配置。
public class InlineShardingStrategyTest {

    private static DataSource dataSource;

    @BeforeAll
    public static void init() throws SQLException {
        HikariDataSource ds = new HikariDataSource();
        ds.setDriverClassName("com.mysql.jdbc.Driver");
        ds.setJdbcUrl("jdbc:mysql://localhost:3306/ds_sss?characterEncoding=UTF-8");
        ds.setUsername("root");
        ds.setPassword("root123");

        /**
         * 1.配置真实数据源
         */
        Map<String, DataSource> dataSourceMap = new LinkedHashMap<>();
        dataSourceMap.put("ds", ds);

        /**
         * 2、配置t_user分片规则
         */
        TableRuleConfiguration userRuleConfiguration = new TableRuleConfiguration("t_user", "ds.t_user_$->{0..1}");
        //设置t_user表的分片规则
        final InlineShardingStrategyConfiguration userTableShardingStrategy = new InlineShardingStrategyConfiguration("id", "t_user_$->{id % 2}");
        userRuleConfiguration.setTableShardingStrategyConfig(userTableShardingStrategy);

        /**
         * 3、加入表的分片规则
         */
        ShardingRuleConfiguration shardingRuleConfig = new ShardingRuleConfiguration();
        shardingRuleConfig.getTableRuleConfigs().add(userRuleConfiguration);

        /**
         * 4、配置一些属性
         */
        Properties props = new Properties();
        //输出sql
        props.put(ConfigurationPropertyKey.SQL_SHOW.getKey(), true);

        /**
         * 5、创建数据源
         */
        dataSource = ShardingDataSourceFactory.createDataSource(dataSourceMap, shardingRuleConfig, props);
    }

    @Test
    public void test1() throws SQLException {
        String sql = "insert t_user (id,name) value (?,?)";
        try (Connection connection = dataSource.getConnection();
             PreparedStatement ps = connection.prepareStatement(sql);) {
            for (long id = 1; id <= 4; id++) {
                int parameterIndex = 1;
                ps.setLong(parameterIndex++, id);
                ps.setString(parameterIndex++, "路人-" + id);
                ps.executeUpdate();
            }
        }
    }

}
下面来上测试案例,所有测试案例代码都位于上面这个测试类中。
4)测试1:插入4条数据,看sql路由情况
先把上面的sql脚本执行一遍,清下数据,然后执行下面代码
@Test
public void test1() throws SQLException {
    String sql = "insert t_user (id,name) value (?,?)";
    try (Connection connection = dataSource.getConnection();
         PreparedStatement ps = connection.prepareStatement(sql);) {
        for (long id = 1; id <= 4; id++) {
            int parameterIndex = 1;
            ps.setLong(parameterIndex++, id);
            ps.setString(parameterIndex++, "路人-" + id);
            ps.executeUpdate();
        }
    }
}
输出,
Logic SQL: insert t_user (id,name) value (?,?)
Actual SQL: ds ::: insert t_user_1 (id,name) value (?, ?) ::: [1, 路人-1]
Logic SQL: insert t_user (id,name) value (?,?)
Actual SQL: ds ::: insert t_user_0 (id,name) value (?, ?) ::: [2, 路人-2]
Logic SQL: insert t_user (id,name) value (?,?)
Actual SQL: ds ::: insert t_user_1 (id,name) value (?, ?) ::: [3, 路人-3]
Logic SQL: insert t_user (id,name) value (?,?)
Actual SQL: ds ::: insert t_user_0 (id,name) value (?, ?) ::: [4, 路人-4]
5)测试2:批量插入数据,看sql路由情况
验证insert t_user (id,name) value (?,?), (?,?), (?,?), (?,?)插入效果。
先把上面的sql脚本执行一遍,清下数据,然后执行下面代码
@Test
public void test2() throws SQLException {
    String sql = "insert t_user (id,name) value (?,?), (?,?), (?,?), (?,?)";
    try (Connection connection = dataSource.getConnection();
         PreparedStatement ps = connection.prepareStatement(sql);) {
        int parameterIndex = 1;
        for (long id = 1; id <= 4; id++) {
            ps.setLong(parameterIndex++, id);
            ps.setString(parameterIndex++, "路人-" + id);
        }
        System.out.println("count:" + ps.executeUpdate());
    }
}
输出如下,注意看下,一条sql被拆分为2条sql,是不是很强大,count的值为4,成功插入4条记录
Logic SQL: insert t_user (id,name) value (?,?), (?,?), (?,?), (?,?)
Actual SQL: ds ::: insert t_user_1 (id,name) value (?, ?), (?, ?) ::: [1, 路人-1, 3, 路人-3]
Actual SQL: ds ::: insert t_user_0 (id,name) value (?, ?), (?, ?) ::: [2, 路人-2, 4, 路人-4]
count:4
6)测试3:查询所有数据
@Test
public void test3() throws SQLException {
    String sql = "select id,name from t_user";
    try (Connection connection = dataSource.getConnection();
         PreparedStatement ps = connection.prepareStatement(sql);
         ResultSet rs = ps.executeQuery();) {
        while (rs.next()) {
            final long id = rs.getLong("id");
            final String name = rs.getString("name");
            System.out.println(String.format("id:%s,name:%s",id,name));
        }
    }
}
运行输出
Logic SQL: select id,name from t_user
Actual SQL: ds ::: select id,name from t_user_0
Actual SQL: ds ::: select id,name from t_user_1
id:2,name:路人-2
id:4,name:路人-4
id:1,name:路人-1
id:3,name:路人-3
7)测试4:查询id为1的用户
@Test
public void test4() throws SQLException {
    String sql = "select id,name from t_user where id = 1";
    try (Connection connection = dataSource.getConnection();
         PreparedStatement ps = connection.prepareStatement(sql);
         ResultSet rs = ps.executeQuery();) {
        while (rs.next()) {
            final long id = rs.getLong("id");
            final String name = rs.getString("name");
            System.out.println(String.format("id:%s,name:%s",id,name));
        }
    }
}
运行输出
Logic SQL: select id,name from t_user where id = 1
Actual SQL: ds ::: select id,name from t_user_1 where id = 1
id:1,name:路人-1
8)测试5:in 查询多个用户
@Test
public void test5() throws SQLException {
    String sql = "select id,name from t_user where id in (1,2)";
    try (Connection connection = dataSource.getConnection();
         PreparedStatement ps = connection.prepareStatement(sql);
         ResultSet rs = ps.executeQuery();) {
        while (rs.next()) {
            final long id = rs.getLong("id");
            final String name = rs.getString("name");
            System.out.println(String.format("id:%s,name:%s", id, name));
        }
    }
}
运行输出
Logic SQL: select id,name from t_user where id in (1,2)
Actual SQL: ds ::: select id,name from t_user_0 where id in (1,2)
Actual SQL: ds ::: select id,name from t_user_1 where id in (1,2)
id:2,name:路人-2
id:1,name:路人-1
9)测试6:!=查询
!=,not in,<>,这种类型的,由于分片规则不知道查询的数据具体在哪个库哪个表,所以会路由到所有表。
下面查询id不等于1的用户
@Test
public void test6() throws SQLException {
    String sql = "select id,name from t_user where id != 1";
    try (Connection connection = dataSource.getConnection();
         PreparedStatement ps = connection.prepareStatement(sql);
         ResultSet rs = ps.executeQuery();) {
        while (rs.next()) {
            final long id = rs.getLong("id");
            final String name = rs.getString("name");
            System.out.println(String.format("id:%s,name:%s", id, name));
        }
    }
}
运行输出
Logic SQL: select id,name from t_user where id != 1
Actual SQL: ds ::: select id,name from t_user_0 where id != 1
Actual SQL: ds ::: select id,name from t_user_1 where id != 1
id:2,name:路人-2
id:4,name:路人-4
id:3,name:路人-3
10)测试7:不支持范围查询,报错
InlineShardingStrategy策略不支持对分片字段采用>=、<=、>、<、BETWEEN查询
下面案例将报错
@Test
public void test7() throws SQLException {
    String sql = "select id,name from t_user where id between 1 and 10";
    try (Connection connection = dataSource.getConnection();
         PreparedStatement ps = connection.prepareStatement(sql);
         ResultSet rs = ps.executeQuery();) {
        while (rs.next()) {
            final long id = rs.getLong("id");
            final String name = rs.getString("name");
            System.out.println(String.format("id:%s,name:%s", id, name));
        }
    }
}
运行报错啦

7.1.3、InlineShardingStrategyTest完整代码
package com.itsoku.shardingstrategy;

import com.zaxxer.hikari.HikariDataSource;
import lombok.extern.slf4j.Slf4j;
import org.apache.shardingsphere.api.config.sharding.ShardingRuleConfiguration;
import org.apache.shardingsphere.api.config.sharding.TableRuleConfiguration;
import org.apache.shardingsphere.api.config.sharding.strategy.InlineShardingStrategyConfiguration;
import org.apache.shardingsphere.shardingjdbc.api.ShardingDataSourceFactory;
import org.apache.shardingsphere.underlying.common.config.properties.ConfigurationPropertyKey;
import org.junit.jupiter.api.BeforeAll;
import org.junit.jupiter.api.Test;

import javax.sql.DataSource;
import java.sql.Connection;
import java.sql.PreparedStatement;
import java.sql.ResultSet;
import java.sql.SQLException;
import java.util.LinkedHashMap;
import java.util.Map;
import java.util.Properties;

@Slf4j
public class InlineShardingStrategyTest {

    private static DataSource dataSource;

    @BeforeAll
    public static void init() throws SQLException {
        HikariDataSource ds = new HikariDataSource();
        ds.setDriverClassName("com.mysql.jdbc.Driver");
        ds.setJdbcUrl("jdbc:mysql://localhost:3306/ds_iss?characterEncoding=UTF-8");
        ds.setUsername("root");
        ds.setPassword("root123");

        /**
         * 1.配置真实数据源
         */
        Map<String, DataSource> dataSourceMap = new LinkedHashMap<>();
        dataSourceMap.put("ds", ds);

        /**
         * 2、配置t_user分片规则
         */
        TableRuleConfiguration userRuleConfiguration = new TableRuleConfiguration("t_user", "ds.t_user_$->{0..1}");
        //设置t_user表的分片规则
        final InlineShardingStrategyConfiguration userTableShardingStrategy = new InlineShardingStrategyConfiguration("id", "t_user_$->{id % 2}");
        userRuleConfiguration.setTableShardingStrategyConfig(userTableShardingStrategy);

        /**
         * 3、加入表的分片规则
         */
        ShardingRuleConfiguration shardingRuleConfig = new ShardingRuleConfiguration();
        shardingRuleConfig.getTableRuleConfigs().add(userRuleConfiguration);

        /**
         * 4、配置一些属性
         */
        Properties props = new Properties();
        //输出sql
        props.put(ConfigurationPropertyKey.SQL_SHOW.getKey(), true);

        /**
         * 5、创建数据源
         */
        dataSource = ShardingDataSourceFactory.createDataSource(dataSourceMap, shardingRuleConfig, props);
    }

    @Test
    public void test1() throws SQLException {
        String sql = "insert t_user (id,name) value (?,?)";
        try (Connection connection = dataSource.getConnection();
             PreparedStatement ps = connection.prepareStatement(sql);) {
            for (long id = 1; id <= 4; id++) {
                int parameterIndex = 1;
                ps.setLong(parameterIndex++, id);
                ps.setString(parameterIndex++, "路人-" + id);
                ps.executeUpdate();
            }
        }
    }

    @Test
    public void test2() throws SQLException {
        String sql = "insert t_user (id,name) value (?,?), (?,?), (?,?), (?,?)";
        try (Connection connection = dataSource.getConnection();
             PreparedStatement ps = connection.prepareStatement(sql);) {
            int parameterIndex = 1;
            for (long id = 1; id <= 4; id++) {
                ps.setLong(parameterIndex++, id);
                ps.setString(parameterIndex++, "路人-" + id);
            }
            System.out.println("count:" + ps.executeUpdate());
        }
    }

    @Test
    public void test3() throws SQLException {
        String sql = "select id,name from t_user";
        try (Connection connection = dataSource.getConnection();
             PreparedStatement ps = connection.prepareStatement(sql);
             ResultSet rs = ps.executeQuery();) {
            while (rs.next()) {
                final long id = rs.getLong("id");
                final String name = rs.getString("name");
                System.out.println(String.format("id:%s,name:%s", id, name));
            }
        }
    }

    @Test
    public void test4() throws SQLException {
        String sql = "select id,name from t_user where id = 1";
        try (Connection connection = dataSource.getConnection();
             PreparedStatement ps = connection.prepareStatement(sql);
             ResultSet rs = ps.executeQuery();) {
            while (rs.next()) {
                final long id = rs.getLong("id");
                final String name = rs.getString("name");
                System.out.println(String.format("id:%s,name:%s", id, name));
            }
        }
    }

    @Test
    public void test5() throws SQLException {
        String sql = "select id,name from t_user where id in (1,2)";
        try (Connection connection = dataSource.getConnection();
             PreparedStatement ps = connection.prepareStatement(sql);
             ResultSet rs = ps.executeQuery();) {
            while (rs.next()) {
                final long id = rs.getLong("id");
                final String name = rs.getString("name");
                System.out.println(String.format("id:%s,name:%s", id, name));
            }
        }
    }

    @Test
    public void test6() throws SQLException {
        String sql = "select id,name from t_user where id != 1";
        try (Connection connection = dataSource.getConnection();
             PreparedStatement ps = connection.prepareStatement(sql);
             ResultSet rs = ps.executeQuery();) {
            while (rs.next()) {
                final long id = rs.getLong("id");
                final String name = rs.getString("name");
                System.out.println(String.format("id:%s,name:%s", id, name));
            }
        }
    }

    @Test
    public void test7() throws SQLException {
        String sql = "select id,name from t_user where id between 1 and 10";
        try (Connection connection = dataSource.getConnection();
             PreparedStatement ps = connection.prepareStatement(sql);
             ResultSet rs = ps.executeQuery();) {
            while (rs.next()) {
                final long id = rs.getLong("id");
                final String name = rs.getString("name");
                System.out.println(String.format("id:%s,name:%s", id, name));
            }
        }
    }

}7.2、标准分片策略(StandardShardingStrategy)
7.2.1、适合的场景
对应StandardShardingStrategy类
提供对SQL语句中的=, >, <, >=, <=, IN和BETWEEN AND的分片操作支持
StandardShardingStrategy只支持单分片键,提供PreciseShardingAlgorithm和RangeShardingAlgorithm两个分片算法
PreciseShardingAlgorithm是必选的,用于处理=和IN的分片
RangeShardingAlgorithm是可选的,用于处理BETWEEN AND, >, <, >=, <=分片,如果不配置RangeShardingAlgorithm,SQL中的BETWEEN AND将按照全库路由处理
7.2.2、案例
1)需求
ds_sss库中含有2个用户表:t_user_0、t_user_1
每个表有2个字段(id,name),id>0
t_user_0:存放id范围在[1,3]内的数据,为了测试方便,范围设置的比较小,重点在于能够掌握用法
t_user_1:存放id位于[4,+∞)范围内的数据
2)sql脚本
drop database if exists ds_sss;
create database ds_sss;
use ds_sss;

drop table if exists t_user_0;
create table t_user_0(
 id bigint not null primary key,
 name varchar(64) not null
);

drop table if exists t_user_1;
create table t_user_1(
 id bigint not null primary key,
 name varchar(64) not null
);
3)创建测试类
代码如下,重点关注策略的配置。
public class StandardShardingStrategyTest {
    private static DataSource dataSource;

    @BeforeAll
    public static void init() throws SQLException {
        HikariDataSource ds = new HikariDataSource();
        ds.setDriverClassName("com.mysql.jdbc.Driver");
        ds.setJdbcUrl("jdbc:mysql://localhost:3306/ds_sss?characterEncoding=UTF-8");
        ds.setUsername("root");
        ds.setPassword("root123");

        /**
         * 1.配置真实数据源
         */
        Map<String, DataSource> dataSourceMap = new LinkedHashMap<>();
        dataSourceMap.put("ds", ds);

        //创建一个Map用来存放:id范围和表名映射关系,路由的时候会根据这个信息来找到目标表
        Map<Range<Comparable>, String> idRangeTableNameMap = new HashMap<>();
        idRangeTableNameMap.put(Range.closed(1, 3), "t_user_0");
        idRangeTableNameMap.put(Range.atLeast(4), "t_user_1");
        System.out.println(idRangeTableNameMap);

        /**
         * 2、配置t_user分片规则
         */
        TableRuleConfiguration userRuleConfiguration = new TableRuleConfiguration("t_user", "ds.t_user_$->{0..1}");
        //设置 =,in 的算法策略
        PreciseShardingAlgorithm preciseShardingAlgorithm = new PreciseShardingAlgorithm() {
            @Override
            public String doSharding(Collection availableTargetNames, PreciseShardingValue shardingValue) {
                for (Map.Entry<Range<Comparable>, String> idRangeTableNameEntity : idRangeTableNameMap.entrySet()) {
                    final Range<Comparable> idRange = idRangeTableNameEntity.getKey();
                    final String tableName = idRangeTableNameEntity.getValue();
                    final Comparable id = shardingValue.getValue();
                    if (idRange.contains(id)) {
                        System.out.println(String.format("准确路由,id:%s, tableName:%s", id, tableName));
                        return tableName;
                    }
                }
                return null;
            }
        };
        //设置 BETWEEN AND, >, <, >=, <= 范围算法策略
        RangeShardingAlgorithm rangeShardingAlgorithm = new RangeShardingAlgorithm() {
            @Override
            public Collection<String> doSharding(Collection availableTargetNames, RangeShardingValue shardingValue) {
                List<String> tableNameList = new ArrayList<>();
                for (Map.Entry<Range<Comparable>, String> idRangeTableNameEntity : idRangeTableNameMap.entrySet()) {
                    final Range<Comparable> idRange = idRangeTableNameEntity.getKey();
                    final String tableName = idRangeTableNameEntity.getValue();
                    final Range valueRange = shardingValue.getValueRange();
                    //判断2个区间是否有交集
                    if (idRange.isConnected(valueRange)) {
                        tableNameList.add(tableName);
                    }
                }
                System.out.println(String.format("范围路由,id:%s, tableNameList:%s", shardingValue, tableNameList));
                return tableNameList;
            }
        };
        //配置标注路由策略
        final StandardShardingStrategyConfiguration userTableShardingStrategy =
                new StandardShardingStrategyConfiguration("id",
                        preciseShardingAlgorithm,
                        rangeShardingAlgorithm);
        //设置表的路由策略
        userRuleConfiguration.setTableShardingStrategyConfig(userTableShardingStrategy);

        /**
         * 3、加入表的分片规则
         */
        ShardingRuleConfiguration shardingRuleConfig = new ShardingRuleConfiguration();
        shardingRuleConfig.getTableRuleConfigs().add(userRuleConfiguration);

        /**
         * 4、配置一些属性
         */
        Properties props = new Properties();
        //输出sql
        props.put(ConfigurationPropertyKey.SQL_SHOW.getKey(), true);

        /**
         * 5、创建数据源
         */
        dataSource = ShardingDataSourceFactory.createDataSource(dataSourceMap, shardingRuleConfig, props);
    }

}
4)重点代码
上面中重点代码如下,重点在于分片策略StandardShardingStrategyConfiguration的配置,需要指定2个算法策略
PreciseShardingAlgorithm:用来支持=、in的算法策略
RangeShardingAlgorithm:用来支持BETWEEN AND, >, <, >=, <= 范围的算法策略
代码中用到了shardingsphere中为我们提供的一个表示区间的工具类:Range,其内部提供了很多方法来处理区间的问题,如:创建区间、判断区间是否有交集等等。
//创建一个Map用来存放:id范围和表名映射关系,路由的时候会根据这个信息来找到目标表
Map<Range<Comparable>, String> idRangeTableNameMap = new HashMap<>();
idRangeTableNameMap.put(Range.closed(1, 3), "t_user_0");
idRangeTableNameMap.put(Range.atLeast(4), "t_user_1");
System.out.println(idRangeTableNameMap);

/**
 * 2、配置t_user分片规则
 */
TableRuleConfiguration userRuleConfiguration = new TableRuleConfiguration("t_user", "ds.t_user_$->{0..1}");
//设置 =,in 的算法策略
PreciseShardingAlgorithm preciseShardingAlgorithm = new PreciseShardingAlgorithm() {
    @Override
    public String doSharding(Collection availableTargetNames, PreciseShardingValue shardingValue) {
        for (Map.Entry<Range<Comparable>, String> idRangeTableNameEntity : idRangeTableNameMap.entrySet()) {
            final Range<Comparable> idRange = idRangeTableNameEntity.getKey();
            final String tableName = idRangeTableNameEntity.getValue();
            final Comparable id = shardingValue.getValue();
            if (idRange.contains(id)) {
                System.out.println(String.format("准确路由,id:%s, tableName:%s", id, tableName));
                return tableName;
            }
        }
        return null;
    }
};
//设置 BETWEEN AND, >, <, >=, <= 范围算法策略
RangeShardingAlgorithm rangeShardingAlgorithm = new RangeShardingAlgorithm() {
    @Override
    public Collection<String> doSharding(Collection availableTargetNames, RangeShardingValue shardingValue) {
        List<String> tableNameList = new ArrayList<>();
        for (Map.Entry<Range<Comparable>, String> idRangeTableNameEntity : idRangeTableNameMap.entrySet()) {
            final Range<Comparable> idRange = idRangeTableNameEntity.getKey();
            final String tableName = idRangeTableNameEntity.getValue();
            final Range valueRange = shardingValue.getValueRange();
            //判断2个区间是否有交集
            if (idRange.isConnected(valueRange)) {
                tableNameList.add(tableName);
            }
        }
        System.out.println(String.format("范围路由,id:%s, tableNameList:%s", shardingValue, tableNameList));
        return tableNameList;
    }
};
//配置标注路由策略
final StandardShardingStrategyConfiguration userTableShardingStrategy =
        new StandardShardingStrategyConfiguration("id",
                preciseShardingAlgorithm,
                rangeShardingAlgorithm);
下面来8个测试案例,代码都位于上面StandardShardingStrategyTest类中
5)测试1:插入4条数据,看sql路由情况
先把上面的sql脚本执行一遍,清下数据,然后执行下面代码
@Test
public void test1() throws SQLException {
    String sql = "insert t_user (id,name) value (?,?)";
    try (Connection connection = dataSource.getConnection();
         PreparedStatement ps = connection.prepareStatement(sql);) {
        for (long id = 1; id <= 4; id++) {
            int parameterIndex = 1;
            ps.setLong(parameterIndex++, id);
            ps.setString(parameterIndex++, "路人-" + id);
            ps.executeUpdate();
        }
    }
}
输出如下,注意看日志,前3个id位于[1,3]区间,被路由到t_user_0了,4倍路由到t_user_1了,强大
准确路由,id:1, tableName:t_user_0
Logic SQL: insert t_user (id,name) value (?,?)
Actual SQL: ds ::: insert t_user_0 (id,name) value (?, ?) ::: [1, 路人-1]

准确路由,id:2, tableName:t_user_0
Logic SQL: insert t_user (id,name) value (?,?)
Actual SQL: ds ::: insert t_user_0 (id,name) value (?, ?) ::: [2, 路人-2]

准确路由,id:3, tableName:t_user_0
Logic SQL: insert t_user (id,name) value (?,?)
Actual SQL: ds ::: insert t_user_0 (id,name) value (?, ?) ::: [3, 路人-3]

准确路由,id:4, tableName:t_user_1
Logic SQL: insert t_user (id,name) value (?,?)
Actual SQL: ds ::: insert t_user_1 (id,name) value (?, ?) ::: [4, 路人-4]
6)测试2:批量插入数据,看sql路由情况
验证insert t_user (id,name) value (?,?), (?,?), (?,?), (?,?)插入效果。
先把上面的sql脚本执行一遍,清下数据,然后执行下面代码
@Test
public void test2() throws SQLException {
    String sql = "insert t_user (id,name) value (?,?), (?,?), (?,?), (?,?)";
    try (Connection connection = dataSource.getConnection();
         PreparedStatement ps = connection.prepareStatement(sql);) {
        int parameterIndex = 1;
        for (long id = 1; id <= 4; id++) {
            ps.setLong(parameterIndex++, id);
            ps.setString(parameterIndex++, "路人-" + id);
        }
        System.out.println("count:" + ps.executeUpdate());
    }
}
输出如下,注意看代码和下面的日志,不多解释,路由很ok
准确路由,id:1, tableName:t_user_0
准确路由,id:2, tableName:t_user_0
准确路由,id:3, tableName:t_user_0
准确路由,id:4, tableName:t_user_1
Logic SQL: insert t_user (id,name) value (?,?), (?,?), (?,?), (?,?)
Actual SQL: ds ::: insert t_user_0 (id,name) value (?, ?), (?, ?), (?, ?) ::: [1, 路人-1, 2, 路人-2, 3, 路人-3]
Actual SQL: ds ::: insert t_user_1 (id,name) value (?, ?) ::: [4, 路人-4]
count:4
7)测试3:查询所有数据
@Test
public void test3() throws SQLException {
    String sql = "select id,name from t_user";
    try (Connection connection = dataSource.getConnection();
         PreparedStatement ps = connection.prepareStatement(sql);
         ResultSet rs = ps.executeQuery();) {
        while (rs.next()) {
            final long id = rs.getLong("id");
            final String name = rs.getString("name");
            System.out.println(String.format("id:%s,name:%s",id,name));
        }
    }
}
运行输出如下,全表查询,没有走路由算法,直接走所有的表
Logic SQL: select id,name from t_user
Actual SQL: ds ::: select id,name from t_user_0
Actual SQL: ds ::: select id,name from t_user_1
id:1,name:路人-1
id:2,name:路人-2
id:3,name:路人-3
id:4,name:路人-4
8)测试4:查询id为1的用户
@Test
public void test4() throws SQLException {
    String sql = "select id,name from t_user where id = 1";
    try (Connection connection = dataSource.getConnection();
         PreparedStatement ps = connection.prepareStatement(sql);
         ResultSet rs = ps.executeQuery();) {
        while (rs.next()) {
            final long id = rs.getLong("id");
            final String name = rs.getString("name");
            System.out.println(String.format("id:%s,name:%s",id,name));
        }
    }
}
运行输出如下,路由ok
准确路由,id:1, tableName:t_user_0
Logic SQL: select id,name from t_user where id = 1
Actual SQL: ds ::: select id,name from t_user_0 where id = 1
id:1,name:路人-1
9)测试5:in 查询多个用户
@Test
public void test5() throws SQLException {
    String sql = "select id,name from t_user where id in (1,2,4)";
    try (Connection connection = dataSource.getConnection();
         PreparedStatement ps = connection.prepareStatement(sql);
         ResultSet rs = ps.executeQuery();) {
        while (rs.next()) {
            final long id = rs.getLong("id");
            final String name = rs.getString("name");
            System.out.println(String.format("id:%s,name:%s", id, name));
        }
    }
}
运行输出如下,3条记录,被路由到了2个表,强啊
准确路由,id:1, tableName:t_user_0
准确路由,id:2, tableName:t_user_0
准确路由,id:4, tableName:t_user_1
Logic SQL: select id,name from t_user where id in (1,2,4)
Actual SQL: ds ::: select id,name from t_user_0 where id in (1,2,4)
Actual SQL: ds ::: select id,name from t_user_1 where id in (1,2,4)
id:1,name:路人-1
id:2,name:路人-2
id:4,name:路人-4
10)测试6:!=查询
!=,not in,<>,这种类型的,由于分片规则不知道查询的数据具体在哪个库哪个表,所以会路由到所有表。
下面查询id不等于1的用户
@Test
public void test6() throws SQLException {
    String sql = "select id,name from t_user where id != 1";
    try (Connection connection = dataSource.getConnection();
         PreparedStatement ps = connection.prepareStatement(sql);
         ResultSet rs = ps.executeQuery();) {
        while (rs.next()) {
            final long id = rs.getLong("id");
            final String name = rs.getString("name");
            System.out.println(String.format("id:%s,name:%s", id, name));
        }
    }
}
运行输出如下,被路由到了所有表
Logic SQL: select id,name from t_user where id != 1
Actual SQL: ds ::: select id,name from t_user_0 where id != 1
Actual SQL: ds ::: select id,name from t_user_1 where id != 1
id:2,name:路人-2
id:3,name:路人-3
id:4,name:路人-4
11)测试7:支持范围查询
InlineShardingStrategy策略不支持对分片字段采用>=、<=、>、<、BETWEEN查询
下面案例将报错
@Test
public void test7() throws SQLException {
    String sql = "select id,name from t_user where id between 1 and 2";
    try (Connection connection = dataSource.getConnection();
         PreparedStatement ps = connection.prepareStatement(sql);
         ResultSet rs = ps.executeQuery();) {
        while (rs.next()) {
            final long id = rs.getLong("id");
            final String name = rs.getString("name");
            System.out.println(String.format("id:%s,name:%s", id, name));
        }
    }
}
运行输出如下,走了范围路由,路由结果ok
范围路由,id:RangeShardingValue(logicTableName=t_user, columnName=id, valueRange=[1‥2]), tableNameList:[t_user_0]
Logic SQL: select id,name from t_user where id between 1 and 2
Actual SQL: ds ::: select id,name from t_user_0 where id between 1 and 2
id:1,name:路人-1
id:2,name:路人-2
12)测试8:复合条件(between & or)
@Test
public void test8() throws SQLException {
    String sql = "select id,name from t_user where id between 1 and 2 or id>=4";
    try (Connection connection = dataSource.getConnection();
         PreparedStatement ps = connection.prepareStatement(sql);
         ResultSet rs = ps.executeQuery();) {
        while (rs.next()) {
            final long id = rs.getLong("id");
            final String name = rs.getString("name");
            System.out.println(String.format("id:%s,name:%s", id, name));
        }
    }
}
运行输出
范围路由,id:RangeShardingValue(logicTableName=t_user, columnName=id, valueRange=[1‥2]), tableNameList:[t_user_0]
范围路由,id:RangeShardingValue(logicTableName=t_user, columnName=id, valueRange=[4‥+∞)), tableNameList:[t_user_1]
Logic SQL: select id,name from t_user where id between 1 and 2 or id>=4
Actual SQL: ds ::: select id,name from t_user_0 where id between 1 and 2 or id>=4
Actual SQL: ds ::: select id,name from t_user_1 where id between 1 and 2 or id>=4
id:1,name:路人-1
id:2,name:路人-2
id:4,name:路人-4
7.2.3、StandardShardingStrategyTest完整代码
package com.itsoku.shardingstrategy;

import com.google.common.collect.Range;
import com.zaxxer.hikari.HikariDataSource;
import org.apache.shardingsphere.api.config.sharding.ShardingRuleConfiguration;
import org.apache.shardingsphere.api.config.sharding.TableRuleConfiguration;
import org.apache.shardingsphere.api.config.sharding.strategy.StandardShardingStrategyConfiguration;
import org.apache.shardingsphere.api.sharding.standard.PreciseShardingAlgorithm;
import org.apache.shardingsphere.api.sharding.standard.PreciseShardingValue;
import org.apache.shardingsphere.api.sharding.standard.RangeShardingAlgorithm;
import org.apache.shardingsphere.api.sharding.standard.RangeShardingValue;
import org.apache.shardingsphere.shardingjdbc.api.ShardingDataSourceFactory;
import org.apache.shardingsphere.underlying.common.config.properties.ConfigurationPropertyKey;
import org.junit.jupiter.api.BeforeAll;
import org.junit.jupiter.api.Test;

import javax.sql.DataSource;
import java.sql.Connection;
import java.sql.PreparedStatement;
import java.sql.ResultSet;
import java.sql.SQLException;
import java.util.*;

public class StandardShardingStrategyTest {
    private static DataSource dataSource;

    @BeforeAll
    public static void init() throws SQLException {
        HikariDataSource ds = new HikariDataSource();
        ds.setDriverClassName("com.mysql.jdbc.Driver");
        ds.setJdbcUrl("jdbc:mysql://localhost:3306/ds_sss?characterEncoding=UTF-8");
        ds.setUsername("root");
        ds.setPassword("root123");

        /**
         * 1.配置真实数据源
         */
        Map<String, DataSource> dataSourceMap = new LinkedHashMap<>();
        dataSourceMap.put("ds", ds);

        //创建一个Map用来存放:id范围和表名映射关系,路由的时候会根据这个信息来找到目标表
        Map<Range<Comparable>, String> idRangeTableNameMap = new HashMap<>();
        idRangeTableNameMap.put(Range.closed(1, 3), "t_user_0");
        idRangeTableNameMap.put(Range.atLeast(4), "t_user_1");
        System.out.println(idRangeTableNameMap);

        /**
         * 2、配置t_user分片规则
         */
        TableRuleConfiguration userRuleConfiguration = new TableRuleConfiguration("t_user", "ds.t_user_$->{0..1}");
        //设置 =,in 的算法策略
        PreciseShardingAlgorithm preciseShardingAlgorithm = new PreciseShardingAlgorithm() {
            @Override
            public String doSharding(Collection availableTargetNames, PreciseShardingValue shardingValue) {
                for (Map.Entry<Range<Comparable>, String> idRangeTableNameEntity : idRangeTableNameMap.entrySet()) {
                    final Range<Comparable> idRange = idRangeTableNameEntity.getKey();
                    final String tableName = idRangeTableNameEntity.getValue();
                    final Comparable id = shardingValue.getValue();
                    if (idRange.contains(id)) {
                        System.out.println(String.format("准确路由,id:%s, tableName:%s", id, tableName));
                        return tableName;
                    }
                }
                return null;
            }
        };
        //设置 BETWEEN AND, >, <, >=, <= 范围算法策略
        RangeShardingAlgorithm rangeShardingAlgorithm = new RangeShardingAlgorithm() {
            @Override
            public Collection<String> doSharding(Collection availableTargetNames, RangeShardingValue shardingValue) {
                List<String> tableNameList = new ArrayList<>();
                for (Map.Entry<Range<Comparable>, String> idRangeTableNameEntity : idRangeTableNameMap.entrySet()) {
                    final Range<Comparable> idRange = idRangeTableNameEntity.getKey();
                    final String tableName = idRangeTableNameEntity.getValue();
                    final Range valueRange = shardingValue.getValueRange();
                    //判断2个区间是否有交集
                    if (idRange.isConnected(valueRange)) {
                        tableNameList.add(tableName);
                    }
                }
                System.out.println(String.format("范围路由,id:%s, tableNameList:%s", shardingValue, tableNameList));
                return tableNameList;
            }
        };
        //配置标注路由策略
        final StandardShardingStrategyConfiguration userTableShardingStrategy =
                new StandardShardingStrategyConfiguration("id",
                        preciseShardingAlgorithm,
                        rangeShardingAlgorithm);
        //设置表的路由策略
        userRuleConfiguration.setTableShardingStrategyConfig(userTableShardingStrategy);

        /**
         * 3、加入表的分片规则
         */
        ShardingRuleConfiguration shardingRuleConfig = new ShardingRuleConfiguration();
        shardingRuleConfig.getTableRuleConfigs().add(userRuleConfiguration);

        /**
         * 4、配置一些属性
         */
        Properties props = new Properties();
        //输出sql
        props.put(ConfigurationPropertyKey.SQL_SHOW.getKey(), true);

        /**
         * 5、创建数据源
         */
        dataSource = ShardingDataSourceFactory.createDataSource(dataSourceMap, shardingRuleConfig, props);
    }

    @Test
    public void test1() throws SQLException {
        String sql = "insert t_user (id,name) value (?,?)";
        try (Connection connection = dataSource.getConnection();
             PreparedStatement ps = connection.prepareStatement(sql);) {
            for (long id = 1; id <= 4; id++) {
                int parameterIndex = 1;
                ps.setLong(parameterIndex++, id);
                ps.setString(parameterIndex++, "路人-" + id);
                ps.executeUpdate();
            }
        }
    }

    @Test
    public void test2() throws SQLException {
        String sql = "insert t_user (id,name) value (?,?), (?,?), (?,?), (?,?)";
        try (Connection connection = dataSource.getConnection();
             PreparedStatement ps = connection.prepareStatement(sql);) {
            int parameterIndex = 1;
            for (long id = 1; id <= 4; id++) {
                ps.setLong(parameterIndex++, id);
                ps.setString(parameterIndex++, "路人-" + id);
            }
            System.out.println("count:" + ps.executeUpdate());
        }
    }

    @Test
    public void test3() throws SQLException {
        String sql = "select id,name from t_user";
        try (Connection connection = dataSource.getConnection();
             PreparedStatement ps = connection.prepareStatement(sql);
             ResultSet rs = ps.executeQuery();) {
            while (rs.next()) {
                final long id = rs.getLong("id");
                final String name = rs.getString("name");
                System.out.println(String.format("id:%s,name:%s", id, name));
            }
        }
    }

    @Test
    public void test4() throws SQLException {
        String sql = "select id,name from t_user where id = 1";
        try (Connection connection = dataSource.getConnection();
             PreparedStatement ps = connection.prepareStatement(sql);
             ResultSet rs = ps.executeQuery();) {
            while (rs.next()) {
                final long id = rs.getLong("id");
                final String name = rs.getString("name");
                System.out.println(String.format("id:%s,name:%s", id, name));
            }
        }
    }

    @Test
    public void test5() throws SQLException {
        String sql = "select id,name from t_user where id in (1,2,4)";
        try (Connection connection = dataSource.getConnection();
             PreparedStatement ps = connection.prepareStatement(sql);
             ResultSet rs = ps.executeQuery();) {
            while (rs.next()) {
                final long id = rs.getLong("id");
                final String name = rs.getString("name");
                System.out.println(String.format("id:%s,name:%s", id, name));
            }
        }
    }

    @Test
    public void test6() throws SQLException {
        String sql = "select id,name from t_user where id != 1";
        try (Connection connection = dataSource.getConnection();
             PreparedStatement ps = connection.prepareStatement(sql);
             ResultSet rs = ps.executeQuery();) {
            while (rs.next()) {
                final long id = rs.getLong("id");
                final String name = rs.getString("name");
                System.out.println(String.format("id:%s,name:%s", id, name));
            }
        }
    }

    @Test
    public void test7() throws SQLException {
        String sql = "select id,name from t_user where id between 1 and 2";
        try (Connection connection = dataSource.getConnection();
             PreparedStatement ps = connection.prepareStatement(sql);
             ResultSet rs = ps.executeQuery();) {
            while (rs.next()) {
                final long id = rs.getLong("id");
                final String name = rs.getString("name");
                System.out.println(String.format("id:%s,name:%s", id, name));
            }
        }
    }

    @Test
    public void test8() throws SQLException {
        String sql = "select id,name from t_user where id between 1 and 2 or id>=4";
        try (Connection connection = dataSource.getConnection();
             PreparedStatement ps = connection.prepareStatement(sql);
             ResultSet rs = ps.executeQuery();) {
            while (rs.next()) {
                final long id = rs.getLong("id");
                final String name = rs.getString("name");
                System.out.println(String.format("id:%s,name:%s", id, name));
            }
        }
    }
}7.3、复合分片策略(ComplexShardingStrategy)
7.3.1、适合的场景
对应ComplexShardingStrategy类
提供对SQL语句中的=, >, <, >=, <=, IN和BETWEEN AND的分片操作支持
ComplexShardingStrategy支持多分片键,由于多分片键之间的关系复杂,因此并未进行过多的封装,而是直接将分片键值组合以及分片操作符透传至分片算法,完全由应用开发者实现,提供最大的灵活度。
7.3.2、案例
1)需求
ds_sss 库中含有 1 个文件表:t_file_0,t_file_1,t_file_2
每个表有 2 个字段(id,storage_type,file_name)
storage_type:表示存储在哪里,0:存储在阿里云 oss 上,1:表示存储在本地磁盘
数据存分配规则
storage_type 为 0 的,数据量比较大,我们用前 2 张表来存储,规则如下
t_file_0:存储 storage_type 为 0 的,且 id 为偶数的
t_file_1:存储 storage_type 为 0 的,且 id 为基数的
t_file_3:存储 storage_type 为 1 的所有文件
2)分析需求
此需求有 2 个分片字段:id 和 storage_type,对于多字段的分片需要用到 StandardShardingStrategy
3)sql 脚本
drop database if exists ds_css;
create database ds_css;
use ds_css;

drop table if exists t_file_0;
create table t_file_0(
 id bigint not null primary key comment 'id',
  storage_type smallint(1) not null comment '表示存储在哪里?0:存储在oss上,1:存储在本地磁盘',
 name varchar(64) not null comment '文件名称'
);

drop table if exists t_file_1;
create table t_file_1(
 id bigint not null primary key comment 'id',
  storage_type smallint(1) not null comment '表示存储在哪里?0:存储在oss上,1:存储在本地磁盘',
 name varchar(64) not null comment '文件名称'
);

drop table if exists t_file_2;
create table t_file_2(
 id bigint not null primary key comment 'id',
  storage_type smallint(1) not null comment '表示存储在哪里?0:存储在oss上,1:存储在本地磁盘',
 name varchar(64) not null comment '文件名称'
);
3)创建测试类
public class ComplexShardingStrategyTest {
    private static DataSource dataSource;

    @BeforeAll
    public static void init() throws SQLException {
        HikariDataSource ds = new HikariDataSource();
        ds.setDriverClassName("com.mysql.jdbc.Driver");
        ds.setJdbcUrl("jdbc:mysql://localhost:3306/ds_css?characterEncoding=UTF-8");
        ds.setUsername("root");
        ds.setPassword("root123");

        /**
         * 1.配置真实数据源
         */
        Map<String, DataSource> dataSourceMap = new LinkedHashMap<>();
        dataSourceMap.put("ds", ds);

        /**
         * 2、配置 t_file分片规则
         */
        //逻辑表名
        final String logicTable = "t_file";
        //对应的实际表(3张)
        final String actualDataNodes = "ds.t_file_0,ds.t_file_1,ds.t_file_2";
        TableRuleConfiguration tableRuleConfiguration = new TableRuleConfiguration(logicTable, actualDataNodes);

        //混合分片策略配置
        ComplexShardingStrategyConfiguration complexShardingStrategyConfiguration = new ComplexShardingStrategyConfiguration(
                "id,storage_type", //2个分片字段(最终落到那个表,由这两个字段的值决定)
                new ComplexKeysShardingAlgorithm() { //混合分片算法
                    @Override
                    public Collection<String> doSharding(Collection availableTargetNames, ComplexKeysShardingValue shardingValue) {
                        List<String> tableNames = new ArrayList<>();
                        //=、in 走这里
                        final Map columnNameAndShardingValuesMap = shardingValue.getColumnNameAndShardingValuesMap();
                        Collection<Integer> storage_types = (Collection<Integer>) columnNameAndShardingValuesMap.get("storage_type");
                        Collection<Long> ids = (Collection<Long>) columnNameAndShardingValuesMap.get("id");
                        if (storage_types != null) {
                            for (Integer storage_type : storage_types) {
                                if (storage_type == 0) {
                                    if (ids != null) {
                                        for (Long id : ids) {
                                            if (id % 2 == 0) {
                                                tableNames.add("t_file_0");
                                            } else {
                                                tableNames.add("t_file_1");
                                            }
                                        }
                                    } else {
                                        tableNames.add("t_file_0");
                                        tableNames.add("t_file_1");
                                    }
                                } else if (storage_type == 1) {
                                    tableNames.add("t_file_2");
                                }
                            }
                        }
                        // 范围的走这里,留给大家自己实现
                        final Map<String, Range<Comparable>> columnNameAndRangeValuesMap = shardingValue.getColumnNameAndRangeValuesMap();

                        System.out.println(String.format("路由信息,tableNames:%s, id值:%s, storage_type值:%s", tableNames, ids, storage_types));

                        return tableNames.isEmpty() ? availableTargetNames : tableNames;
                    }
                });
        tableRuleConfiguration.setTableShardingStrategyConfig(complexShardingStrategyConfiguration);
        /**
         * 3、加入表的分片规则
         */
        ShardingRuleConfiguration shardingRuleConfig = new ShardingRuleConfiguration();
        shardingRuleConfig.getTableRuleConfigs().add(tableRuleConfiguration);

        /**
         * 4、配置一些属性
         */
        Properties props = new Properties();
        //输出sql
        props.put(ConfigurationPropertyKey.SQL_SHOW.getKey(), true);

        /**
         * 5、创建数据源
         */
        dataSource = ShardingDataSourceFactory.createDataSource(dataSourceMap, shardingRuleConfig, props);
    }

}
4)重点代码
上面中重点代码如下,重点在于分片策略 StandardShardingStrategyConfiguration 的配置,需要指定 2 个算法策略
/**
 * 2、配置 t_file分片规则
 */
//逻辑表名
final String logicTable = "t_file";
//对应的实际表(3张)
final String actualDataNodes = "ds.t_file_0,ds.t_file_1,ds.t_file_2";
TableRuleConfiguration tableRuleConfiguration = new TableRuleConfiguration(logicTable, actualDataNodes);

//混合分片策略配置
ComplexShardingStrategyConfiguration complexShardingStrategyConfiguration = new ComplexShardingStrategyConfiguration(
        "id,storage_type", //2个分片字段(最终落到那个表,由这两个字段的值决定)
        new ComplexKeysShardingAlgorithm() { //混合分片算法
            @Override
            public Collection<String> doSharding(Collection availableTargetNames, ComplexKeysShardingValue shardingValue) {
                List<String> tableNames = new ArrayList<>();
                //=、in 走这里
                final Map columnNameAndShardingValuesMap = shardingValue.getColumnNameAndShardingValuesMap();
                Collection<Integer> storage_types = (Collection<Integer>) columnNameAndShardingValuesMap.get("storage_type");
                Collection<Long> ids = (Collection<Long>) columnNameAndShardingValuesMap.get("id");
                if (storage_types != null) {
                    for (Integer storage_type : storage_types) {
                        if (storage_type == 0) {
                            if (ids != null) {
                                for (Long id : ids) {
                                    if (id % 2 == 0) {
                                        tableNames.add("t_file_0");
                                    } else {
                                        tableNames.add("t_file_1");
                                    }
                                }
                            } else {
                                tableNames.add("t_file_0");
                                tableNames.add("t_file_1");
                            }
                        } else if (storage_type == 1) {
                            tableNames.add("t_file_2");
                        }
                    }
                }
                // 范围的走这里,留给大家自己实现
                final Map<String, Range<Comparable>> columnNameAndRangeValuesMap = shardingValue.getColumnNameAndRangeValuesMap();

                System.out.println(String.format("路由信息,tableNames:%s, id值:%s, storage_type值:%s", tableNames, ids, storage_types));

                return tableNames.isEmpty() ? availableTargetNames : tableNames;
            }
        });
tableRuleConfiguration.setTableShardingStrategyConfig(complexShardingStrategyConfiguration);
下面上测试案例,代码都位于上面 StandardShardingStrategyTest 类中
5)测试 1:插入 4 条数据,看 sql 路由情况
先把上面的 sql 脚本执行一遍,清下数据,然后执行下面代码
下面 storage_type 为 0 和 1 的,各插入 2 条数据
@Test
public void test1() throws SQLException {
    String sql = "insert t_file (id,storage_type,name) value (?,?,?)";
    try (Connection connection = dataSource.getConnection();
         PreparedStatement ps = connection.prepareStatement(sql);) {
        long id = 1;
        for (int storage_type = 0; storage_type <= 1; storage_type++) {
            for (; id <= storage_type * 2 + 2; id++) {
                int parameterIndex = 1;
                ps.setLong(parameterIndex++, id);
                ps.setInt(parameterIndex++, storage_type);
                ps.setString(parameterIndex++, "ShardingSphere高手笔记-" + id);
                ps.executeUpdate();
            }
        }
    }
}
运行输出如下,t_file_0 和 t_file_1 分别落入了 1 条数据,t_file_2 落入了 2 条数据
路由信息,tableNames:[t_file_1], id值:[1], storage_type值:[0]
Logic SQL: insert t_file (id,storage_type,name) value (?,?,?)
Actual SQL: ds ::: insert t_file_1 (id,storage_type,name) value (?, ?, ?) ::: [1, 0, ShardingSphere高手笔记-1]

路由信息,tableNames:[t_file_0], id值:[2], storage_type值:[0]
Logic SQL: insert t_file (id,storage_type,name) value (?,?,?)
Actual SQL: ds ::: insert t_file_0 (id,storage_type,name) value (?, ?, ?) ::: [2, 0, ShardingSphere高手笔记-2]

路由信息,tableNames:[t_file_2], id值:[3], storage_type值:[1]
Logic SQL: insert t_file (id,storage_type,name) value (?,?,?)
Actual SQL: ds ::: insert t_file_2 (id,storage_type,name) value (?, ?, ?) ::: [3, 1, ShardingSphere高手笔记-3]

路由信息,tableNames:[t_file_2], id值:[4], storage_type值:[1]
Logic SQL: insert t_file (id,storage_type,name) value (?,?,?)
Actual SQL: ds ::: insert t_file_2 (id,storage_type,name) value (?, ?, ?) ::: [4, 1, ShardingSphere高手笔记-4]
6)测试 2:批量插入
先把上面的 sql 脚本执行一遍,清下数据,然后执行下面代码
@Test
public void test2() throws SQLException {
    String sql = "insert t_file (id,storage_type,name) value (?,?,?), (?,?,?), (?,?,?), (?,?,?)";
    try (Connection connection = dataSource.getConnection();
         PreparedStatement ps = connection.prepareStatement(sql);) {
        int parameterIndex = 1;
        for (long id = 1; id <= 4; id++) {
            ps.setLong(parameterIndex++, id);
            ps.setInt(parameterIndex++, (int) (id % 2));
            ps.setString(parameterIndex++, "Spring高手系列-" + id);
        }
        System.out.println("count:" + ps.executeUpdate());
    }
}
运行输出
路由信息,tableNames:[t_file_2], id值:[1], storage_type值:[1]
路由信息,tableNames:[t_file_0], id值:[2], storage_type值:[0]
路由信息,tableNames:[t_file_2], id值:[3], storage_type值:[1]
路由信息,tableNames:[t_file_0], id值:[4], storage_type值:[0]
Logic SQL: insert t_file (id,storage_type,name) value (?,?,?), (?,?,?), (?,?,?), (?,?,?)
Actual SQL: ds ::: insert t_file_2 (id,storage_type,name) value (?, ?, ?), (?, ?, ?) ::: [1, 1, Spring高手系列-1, 3, 1, Spring高手系列-3]
Actual SQL: ds ::: insert t_file_0 (id,storage_type,name) value (?, ?, ?), (?, ?, ?) ::: [2, 0, Spring高手系列-2, 4, 0, Spring高手系列-4]
count:4
7)其他案例
还有 6 个案例,就不一一给大家演示效果了,都在下面完整的代码中,大家自己跑跑感受下。
package com.itsoku.shardingstrategy;

import com.google.common.collect.Range;
import com.zaxxer.hikari.HikariDataSource;
import org.apache.shardingsphere.api.config.sharding.ShardingRuleConfiguration;
import org.apache.shardingsphere.api.config.sharding.TableRuleConfiguration;
import org.apache.shardingsphere.api.config.sharding.strategy.ComplexShardingStrategyConfiguration;
import org.apache.shardingsphere.api.sharding.complex.ComplexKeysShardingAlgorithm;
import org.apache.shardingsphere.api.sharding.complex.ComplexKeysShardingValue;
import org.apache.shardingsphere.shardingjdbc.api.ShardingDataSourceFactory;
import org.apache.shardingsphere.underlying.common.config.properties.ConfigurationPropertyKey;
import org.junit.jupiter.api.BeforeAll;
import org.junit.jupiter.api.Test;

import javax.sql.DataSource;
import java.sql.Connection;
import java.sql.PreparedStatement;
import java.sql.ResultSet;
import java.sql.SQLException;
import java.util.*;

public class ComplexShardingStrategyTest {
    private static DataSource dataSource;

    @BeforeAll
    public static void init() throws SQLException {
        HikariDataSource ds = new HikariDataSource();
        ds.setDriverClassName("com.mysql.jdbc.Driver");
        ds.setJdbcUrl("jdbc:mysql://localhost:3306/ds_css?characterEncoding=UTF-8");
        ds.setUsername("root");
        ds.setPassword("root123");

        /**
         * 1.配置真实数据源
         */
        Map<String, DataSource> dataSourceMap = new LinkedHashMap<>();
        dataSourceMap.put("ds", ds);

        /**
         * 2、配置 t_file分片规则
         */
        //逻辑表名
        final String logicTable = "t_file";
        //对应的实际表(3张)
        final String actualDataNodes = "ds.t_file_0,ds.t_file_1,ds.t_file_2";
        TableRuleConfiguration tableRuleConfiguration = new TableRuleConfiguration(logicTable, actualDataNodes);

        //混合分片策略配置
        ComplexShardingStrategyConfiguration complexShardingStrategyConfiguration = new ComplexShardingStrategyConfiguration(
                "id,storage_type", //2个分片字段(最终落到那个表,由这两个字段的值决定)
                new ComplexKeysShardingAlgorithm() { //混合分片算法
                    @Override
                    public Collection<String> doSharding(Collection availableTargetNames, ComplexKeysShardingValue shardingValue) {
                        List<String> tableNames = new ArrayList<>();
                        //=、in 走这里
                        final Map columnNameAndShardingValuesMap = shardingValue.getColumnNameAndShardingValuesMap();
                        Collection<Integer> storage_types = (Collection<Integer>) columnNameAndShardingValuesMap.get("storage_type");
                        Collection<Long> ids = (Collection<Long>) columnNameAndShardingValuesMap.get("id");
                        if (storage_types != null) {
                            for (Integer storage_type : storage_types) {
                                if (storage_type == 0) {
                                    if (ids != null) {
                                        for (Long id : ids) {
                                            if (id % 2 == 0) {
                                                tableNames.add("t_file_0");
                                            } else {
                                                tableNames.add("t_file_1");
                                            }
                                        }
                                    } else {
                                        tableNames.add("t_file_0");
                                        tableNames.add("t_file_1");
                                    }
                                } else if (storage_type == 1) {
                                    tableNames.add("t_file_2");
                                }
                            }
                        }
                        // 范围的走这里,留给大家自己实现
                        final Map<String, Range<Comparable>> columnNameAndRangeValuesMap = shardingValue.getColumnNameAndRangeValuesMap();

                        System.out.println(String.format("路由信息,tableNames:%s, id值:%s, storage_type值:%s", tableNames, ids, storage_types));

                        return tableNames.isEmpty() ? availableTargetNames : tableNames;
                    }
                });
        tableRuleConfiguration.setTableShardingStrategyConfig(complexShardingStrategyConfiguration);
        /**
         * 3、加入表的分片规则
         */
        ShardingRuleConfiguration shardingRuleConfig = new ShardingRuleConfiguration();
        shardingRuleConfig.getTableRuleConfigs().add(tableRuleConfiguration);

        /**
         * 4、配置一些属性
         */
        Properties props = new Properties();
        //输出sql
        props.put(ConfigurationPropertyKey.SQL_SHOW.getKey(), true);

        /**
         * 5、创建数据源
         */
        dataSource = ShardingDataSourceFactory.createDataSource(dataSourceMap, shardingRuleConfig, props);
    }

    @Test
    public void test1() throws SQLException {
        String sql = "insert t_file (id,storage_type,name) value (?,?,?)";
        try (Connection connection = dataSource.getConnection();
             PreparedStatement ps = connection.prepareStatement(sql);) {
            long id = 1;
            for (int storage_type = 0; storage_type <= 1; storage_type++) {
                for (; id <= storage_type * 2 + 2; id++) {
                    int parameterIndex = 1;
                    ps.setLong(parameterIndex++, id);
                    ps.setInt(parameterIndex++, storage_type);
                    ps.setString(parameterIndex++, "ShardingSphere高手笔记-" + id);
                    ps.executeUpdate();
                }
            }
        }
    }

    @Test
    public void test2() throws SQLException {
        String sql = "insert t_file (id,storage_type,name) value (?,?,?), (?,?,?), (?,?,?), (?,?,?)";
        try (Connection connection = dataSource.getConnection();
             PreparedStatement ps = connection.prepareStatement(sql);) {
            int parameterIndex = 1;
            for (long id = 1; id <= 4; id++) {
                ps.setLong(parameterIndex++, id);
                ps.setInt(parameterIndex++, (int) (id % 2));
                ps.setString(parameterIndex++, "Spring高手系列-" + id);
            }
            System.out.println("count:" + ps.executeUpdate());
        }
    }

    @Test
    public void test3() throws SQLException {
        String sql = "select id,storage_type,name from t_file";
        try (Connection connection = dataSource.getConnection();
             PreparedStatement ps = connection.prepareStatement(sql);
             ResultSet rs = ps.executeQuery();) {
            while (rs.next()) {
                final long id = rs.getLong("id");
                final String name = rs.getString("name");
                final String storage_type = rs.getString("storage_type");
                System.out.println(String.format("id:%s,storage_type:%s,name:%s", id, storage_type, name));
            }
        }
    }

    @Test
    public void test4() throws SQLException {
        String sql = "select id,storage_type,name from t_file where storage_type = 0";
        try (Connection connection = dataSource.getConnection();
             PreparedStatement ps = connection.prepareStatement(sql);
             ResultSet rs = ps.executeQuery();) {
            while (rs.next()) {
                final long id = rs.getLong("id");
                final String name = rs.getString("name");
                final String storage_type = rs.getString("storage_type");
                System.out.println(String.format("id:%s,storage_type:%s,name:%s", id, storage_type, name));
            }
        }
    }

    @Test
    public void test5() throws SQLException {
        String sql = "select id,storage_type,name from t_file where id in (1,2,4)";
        try (Connection connection = dataSource.getConnection();
             PreparedStatement ps = connection.prepareStatement(sql);
             ResultSet rs = ps.executeQuery();) {
            while (rs.next()) {
                final long id = rs.getLong("id");
                final String name = rs.getString("name");
                final String storage_type = rs.getString("storage_type");
                System.out.println(String.format("id:%s,storage_type:%s,name:%s", id, storage_type, name));
            }
        }
    }

    @Test
    public void test6() throws SQLException {
        String sql = "select id,storage_type,name from t_file where id != 1";
        try (Connection connection = dataSource.getConnection();
             PreparedStatement ps = connection.prepareStatement(sql);
             ResultSet rs = ps.executeQuery();) {
            while (rs.next()) {
                final long id = rs.getLong("id");
                final String name = rs.getString("name");
                final String storage_type = rs.getString("storage_type");
                System.out.println(String.format("id:%s,storage_type:%s,name:%s", id, storage_type, name));
            }
        }
    }

    @Test
    public void test7() throws SQLException {
        String sql = "select id,storage_type,name from t_file where id between 1 and 2";
        try (Connection connection = dataSource.getConnection();
             PreparedStatement ps = connection.prepareStatement(sql);
             ResultSet rs = ps.executeQuery();) {
            while (rs.next()) {
                final long id = rs.getLong("id");
                final String name = rs.getString("name");
                final String storage_type = rs.getString("storage_type");
                System.out.println(String.format("id:%s,storage_type:%s,name:%s", id, storage_type, name));
            }
        }
    }

    @Test
    public void test8() throws SQLException {
        String sql = "select id,storage_type,name from t_file where id between 1 and 20 or storage_type=0";
        try (Connection connection = dataSource.getConnection();
             PreparedStatement ps = connection.prepareStatement(sql);
             ResultSet rs = ps.executeQuery();) {
            while (rs.next()) {
                final long id = rs.getLong("id");
                final String name = rs.getString("name");
                final String storage_type = rs.getString("storage_type");
                System.out.println(String.format("id:%s,storage_type:%s,name:%s", id, storage_type, name));
            }
        }
    }
}7.4、强制路由策略(HintShardingStrategy)
ShardingSphere 使用 ThreadLocal 管理分片键值进行 Hint 强制路由。可以通过编程的方式向 HintManager 中添加分片值,该分片值仅在当前线程内生效。
7.4.1、适合的场景
分片字段不存在 SQL 中、数据库表结构中
强制在主库进行某些数据操作
7.4.2、用法
Hint 分片算法需要用户实现org.apache.shardingsphere.api.sharding.hint.HintShardingAlgorithm接口。ShardingSphere 在进行 Routing 时,如果发现 LogicTable 的TableRule采用了 Hint 的分片算法,将会从HintManager中获取分片值进行路由操作。
获取 HintManager
HintManager hintManager = HintManager.getInstance();
添加分片键值
使用 hintManager.addDatabaseShardingValue 来添加数据源分片键值。
使用 hintManager.addTableShardingValue 来添加表分片键值。
分库不分表情况下,强制路由至某一个分库时,可使用hintManager.setDatabaseShardingValue方式添加分片。通过此方式添加分片键值后,将跳过 SQL 解析和改写阶段,从而提高整体执行效率。
清除分片键值
分片键值保存在 ThreadLocal 中,所以需要在操作结束时调用 hintManager.close()来清除 ThreadLocal 中的内容。
hintManager 实现了 AutoCloseable 接口,可推荐使用 try with resource 自动关闭。
7.4.3、案例
1)需求
ds_hss 中有 2 张用户表 t_user_0、t_user_1,具体查哪张表的数据,我们通过外部条件来控制。
2)sql 脚本
drop database if exists ds_hss;
create database ds_hss;
use ds_hss;

drop table if exists t_user_0;
create table t_user_0(
 id bigint not null primary key,
 name varchar(64) not null
);

insert into t_user_0 VALUES (1,'我是t_user_0');

drop table if exists t_user_1;
create table t_user_1(
 id bigint not null primary key,
 name varchar(64) not null
);

insert into t_user_1 VALUES (2,'我是t_user_1');
3)创建测试类
public class HintShardingStrategyTest {
    private static DataSource dataSource;

    @BeforeAll
    public static void init() throws SQLException {
        HikariDataSource ds = new HikariDataSource();
        ds.setDriverClassName("com.mysql.jdbc.Driver");
        ds.setJdbcUrl("jdbc:mysql://localhost:3306/ds_hss?characterEncoding=UTF-8");
        ds.setUsername("root");
        ds.setPassword("root123");

        /**
         * 1.配置真实数据源
         */
        Map<String, DataSource> dataSourceMap = new LinkedHashMap<>();
        dataSourceMap.put("ds", ds);

        /**
         * 2、配置 t_file分片规则
         */
        //逻辑表名
        final String logicTable = "t_user";
        //对应的实际表(3张)
        final String actualDataNodes = "ds.t_user_0,ds.t_user_1";
        TableRuleConfiguration tableRuleConfiguration = new TableRuleConfiguration(logicTable, actualDataNodes);

        //混合分片策略配置
        HintShardingStrategyConfiguration hintShardingStrategyConfiguration = new HintShardingStrategyConfiguration(
                new HintShardingAlgorithm<Integer>() {
                    @Override
                    public Collection<String> doSharding(Collection<String> availableTargetNames, HintShardingValue<Integer> shardingValue) {
                        final Object[] tables = availableTargetNames.toArray();

                        List<String> result = new ArrayList<>();
                        //HintManager.getInstance().addTableShardingValue放入的值都在shardingValue里面
                        final Collection<Integer> tableIndexList = shardingValue.getValues();
                        for (Integer tableIndex : tableIndexList) {
                            result.add((String) tables[tableIndex]);
                        }
                        return result;
                    }
                });
        tableRuleConfiguration.setTableShardingStrategyConfig(hintShardingStrategyConfiguration);
        /**
         * 3、加入表的分片规则
         */
        ShardingRuleConfiguration shardingRuleConfig = new ShardingRuleConfiguration();
        shardingRuleConfig.getTableRuleConfigs().add(tableRuleConfiguration);

        /**
         * 4、配置一些属性
         */
        Properties props = new Properties();
        //输出sql
        props.put(ConfigurationPropertyKey.SQL_SHOW.getKey(), true);

        /**
         * 5、创建数据源
         */
        dataSource = ShardingDataSourceFactory.createDataSource(dataSourceMap, shardingRuleConfig, props);
    }

}
下面上测试案例,代码都位于上面 HintShardingStrategyTest 类中
4)测试 1:获取第 1 个 user 表的数据
@Test
public void test1() throws SQLException {
    String sql = "select id,name,name from t_user";
    try (HintManager instance = HintManager.getInstance();) {
        //设置查询表的索引,addTableShardingValue(逻辑表名,值)
        instance.addTableShardingValue("t_user", 0);
        try (
            Connection connection = dataSource.getConnection();
            PreparedStatement ps = connection.prepareStatement(sql);
            ResultSet rs = ps.executeQuery();) {
            while (rs.next()) {
                final long id = rs.getLong("id");
                final String name = rs.getString("name");
                System.out.println(String.format("id:%s,name:%s", id, name));
            }
        }
    }
}- 1
- 2
- 3
- 4
- 5
- 6
- 7
- 8
- 9
- 10
- 11
- 12
- 13
- 14
- 15
- 16
- 17
- 18
运行输出,如下,被路由到 t_user_0 了
Logic SQL: select id,name,name from t_user
Actual SQL: ds ::: select id,name,name from t_user_0
id:1,name:我是t_user_0- 1
- 2
- 3
5)测试 2:获取第 2 个 user 表的数据
下面将上面代码调整下,将instance.addTableShardingValue(“t_user”, 0);中的值改为 1,则会路由到第 2 个 user 表,代码如下
@Test
public void test2() throws SQLException {
    String sql = "select id,name,name from t_user";
    try (HintManager instance = HintManager.getInstance();) {
       //设置查询表的索引,addTableShardingValue(逻辑表名,值)
        instance.addTableShardingValue("t_user", 1);
        try (
            Connection connection = dataSource.getConnection();
            PreparedStatement ps = connection.prepareStatement(sql);
            ResultSet rs = ps.executeQuery();) {
            while (rs.next()) {
                final long id = rs.getLong("id");
                final String name = rs.getString("name");
                System.out.println(String.format("id:%s,name:%s", id, name));
            }
        }
    }
}
运行输出,如下,被路由到了 t_user_1 表了
Logic SQL: select id,name,name from t_user
Actual SQL: ds ::: select id,name,name from t_user_1
id:2,name:我是t_user_1
6)测试 3:获取 2 个 user 表所有数据
下面再把代码调整下,改成下面这样
instance.addTableShardingValue("t_user", 0);
instance.addTableShardingValue("t_user", 1);
完整版如下
@Test
public void test3() throws SQLException {
    String sql = "select id,name,name from t_user";
    try (HintManager instance = HintManager.getInstance();) {
        //设置查询表的索引,addTableShardingValue(逻辑表名,值)
        instance.addTableShardingValue("t_user", 0);
        instance.addTableShardingValue("t_user", 1);
        try (
            Connection connection = dataSource.getConnection();
            PreparedStatement ps = connection.prepareStatement(sql);
            ResultSet rs = ps.executeQuery();) {
            while (rs.next()) {
                final long id = rs.getLong("id");
                final String name = rs.getString("name");
                System.out.println(String.format("id:%s,name:%s", id, name));
            }
        }
    }
}
运行输出如下,这次被路由到了 2 张用户表
Logic SQL: select id,name,name from t_user
Actual SQL: ds ::: select id,name,name from t_user_0
Actual SQL: ds ::: select id,name,name from t_user_1
id:1,name:我是t_user_0
id:2,name:我是t_user_1
7.4.4、HintShardingStrategyTest 完整代码
package com.itsoku.shardingstrategy;

import com.zaxxer.hikari.HikariDataSource;
import org.apache.shardingsphere.api.config.sharding.ShardingRuleConfiguration;
import org.apache.shardingsphere.api.config.sharding.TableRuleConfiguration;
import org.apache.shardingsphere.api.config.sharding.strategy.HintShardingStrategyConfiguration;
import org.apache.shardingsphere.api.hint.HintManager;
import org.apache.shardingsphere.api.sharding.hint.HintShardingAlgorithm;
import org.apache.shardingsphere.api.sharding.hint.HintShardingValue;
import org.apache.shardingsphere.shardingjdbc.api.ShardingDataSourceFactory;
import org.apache.shardingsphere.underlying.common.config.properties.ConfigurationPropertyKey;
import org.junit.jupiter.api.BeforeAll;
import org.junit.jupiter.api.Test;

import javax.sql.DataSource;
import java.sql.Connection;
import java.sql.PreparedStatement;
import java.sql.ResultSet;
import java.sql.SQLException;
import java.util.*;

public class HintShardingStrategyTest {
    private static DataSource dataSource;

    @BeforeAll
    public static void init() throws SQLException {
        HikariDataSource ds = new HikariDataSource();
        ds.setDriverClassName("com.mysql.jdbc.Driver");
        ds.setJdbcUrl("jdbc:mysql://localhost:3306/ds_hss?characterEncoding=UTF-8");
        ds.setUsername("root");
        ds.setPassword("root123");

        /**
         * 1.配置真实数据源
         */
        Map<String, DataSource> dataSourceMap = new LinkedHashMap<>();
        dataSourceMap.put("ds", ds);

        /**
         * 2、配置 t_file分片规则
         */
        //逻辑表名
        final String logicTable = "t_user";
        //对应的实际表(3张)
        final String actualDataNodes = "ds.t_user_0,ds.t_user_1";
        TableRuleConfiguration tableRuleConfiguration = new TableRuleConfiguration(logicTable, actualDataNodes);

        //混合分片策略配置
        HintShardingStrategyConfiguration hintShardingStrategyConfiguration = new HintShardingStrategyConfiguration(
                new HintShardingAlgorithm<Integer>() {
                    @Override
                    public Collection<String> doSharding(Collection<String> availableTargetNames, HintShardingValue<Integer> shardingValue) {
                        final Object[] tables = availableTargetNames.toArray();

                        List<String> result = new ArrayList<>();
                        //HintManager.getInstance().addTableShardingValue放入的值都在shardingValue里面
                        final Collection<Integer> tableIndexList = shardingValue.getValues();
                        for (Integer tableIndex : tableIndexList) {
                            result.add((String) tables[tableIndex]);
                        }
                        return result;
                    }
                });
        tableRuleConfiguration.setTableShardingStrategyConfig(hintShardingStrategyConfiguration);
        /**
         * 3、加入表的分片规则
         */
        ShardingRuleConfiguration shardingRuleConfig = new ShardingRuleConfiguration();
        shardingRuleConfig.getTableRuleConfigs().add(tableRuleConfiguration);

        /**
         * 4、配置一些属性
         */
        Properties props = new Properties();
        //输出sql
        props.put(ConfigurationPropertyKey.SQL_SHOW.getKey(), true);

        /**
         * 5、创建数据源
         */
        dataSource = ShardingDataSourceFactory.createDataSource(dataSourceMap, shardingRuleConfig, props);
    }

    @Test
    public void test1() throws SQLException {
        String sql = "select id,name,name from t_user";
        try (HintManager instance = HintManager.getInstance();) {
            //设置查询表的索引,addTableShardingValue(逻辑表名,值)
            instance.addTableShardingValue("t_user", 0);
            try (
                    Connection connection = dataSource.getConnection();
                    PreparedStatement ps = connection.prepareStatement(sql);
                    ResultSet rs = ps.executeQuery();) {
                while (rs.next()) {
                    final long id = rs.getLong("id");
                    final String name = rs.getString("name");
                    System.out.println(String.format("id:%s,name:%s", id, name));
                }
            }
        }
    }

    @Test
    public void test2() throws SQLException {
        String sql = "select id,name,name from t_user";
        try (HintManager instance = HintManager.getInstance();) {
            //设置查询表的索引,addTableShardingValue(逻辑表名,值)
            instance.addTableShardingValue("t_user", 1);
            try (
                    Connection connection = dataSource.getConnection();
                    PreparedStatement ps = connection.prepareStatement(sql);
                    ResultSet rs = ps.executeQuery();) {
                while (rs.next()) {
                    final long id = rs.getLong("id");
                    final String name = rs.getString("name");
                    System.out.println(String.format("id:%s,name:%s", id, name));
                }
            }
        }
    }

    @Test
    public void test3() throws SQLException {
        String sql = "select id,name,name from t_user";
        try (HintManager instance = HintManager.getInstance();) {
            //设置查询表的索引,addTableShardingValue(逻辑表名,值)
            instance.addTableShardingValue("t_user", 0);
            instance.addTableShardingValue("t_user", 1);
            try (
                    Connection connection = dataSource.getConnection();
                    PreparedStatement ps = connection.prepareStatement(sql);
                    ResultSet rs = ps.executeQuery();) {
                while (rs.next()) {
                    final long id = rs.getLong("id");
                    final String name = rs.getString("name");
                    System.out.println(String.format("id:%s,name:%s", id, name));
                }
            }
        }
    }

}8、广播表
8.1、是什么?
有时候,某些表需要在所有库中都有一个,且数据是一样的,比如字典表,这种表,插入表,所有表都会写入数据,而查询时,选择一个就可以了,这种场景需要用到 shardingsphere 中的广播表。
8.2、如何使用?
需要广播的表,需要调用shardingRuleConfig.setBroadcastTable进行设置。
代码如下,广播的表,插入数据会同时落到所有的库,查询只会落到一个库。
ShardingRuleConfiguration shardingRuleConfig = new ShardingRuleConfiguration();
// 这里需要指定t_dict为广播模式
shardingRuleConfig.setBroadcastTables(Arrays.asList("t_dict"));8.3、示例
1)需求
准备 2 个 db:sj_ds0,sj_ds1
2 个 db 中都包含字典表:t_dict
要求向 t_dict 写入数据的时候,将数据同时写 2 个库中的 t_dict 表,查询的时候随便选择一个即可
2)sql 脚本
drop database if exists sj_ds0;
create database sj_ds0;
use sj_ds0;

drop table if exists t_dict;
create table t_dict(
 id bigint not null primary key auto_increment,
 code varchar(64),
 k varchar(64) not null,
 v varchar(16) not null
);

drop database if exists sj_ds1;
create database sj_ds1;
use sj_ds1;

drop table if exists t_dict;
create table t_dict(
 id bigint not null primary key auto_increment,
 code varchar(64),
 k varchar(64) not null,
 v varchar(16) not null
);
3)java 代码
import com.zaxxer.hikari.HikariDataSource;
import org.apache.shardingsphere.api.config.sharding.ShardingRuleConfiguration;
import org.apache.shardingsphere.shardingjdbc.api.ShardingDataSourceFactory;
import org.apache.shardingsphere.underlying.common.config.properties.ConfigurationPropertyKey;

import javax.sql.DataSource;
import java.sql.Connection;
import java.sql.PreparedStatement;
import java.sql.ResultSet;
import java.sql.SQLException;
import java.util.Arrays;
import java.util.LinkedHashMap;
import java.util.Map;
import java.util.Properties;

public class Demo5 {
    public static void main(String[] args) throws SQLException {
        /**
         * 1.配置真实数据源
         */
        Map<String, DataSource> dataSourceMap = new LinkedHashMap<>();
        dataSourceMap.put("ds0", dataSource1());
        dataSourceMap.put("ds1", dataSource2());

        /**
         * 2、无分片规则
         */
        ShardingRuleConfiguration shardingRuleConfig = new ShardingRuleConfiguration();
        // 这里需要指定t_dict为广播模式
        shardingRuleConfig.setBroadcastTables(Arrays.asList("t_dict"));
        /**
         * 4、配置一些属性
         */
        Properties props = new Properties();
        //输出sql
        props.put(ConfigurationPropertyKey.SQL_SHOW.getKey(), true);

        /**
         * 5、创建数据源
         */
        props.put(ConfigurationPropertyKey.SQL_SHOW.getKey(), true);
        DataSource dataSource = ShardingDataSourceFactory.createDataSource(dataSourceMap, shardingRuleConfig, props);
        Connection connection = dataSource.getConnection();

        System.out.println("测试插入数据:");
        String sql = "insert into t_dict (code,k,v) values ('gender','男','1'),('gender','女','2')";
        PreparedStatement ps = connection.prepareStatement(sql);
        System.out.println("插入记录数:" + ps.executeUpdate());

        System.out.println("测试查询数据:");
        ps = connection.prepareStatement("select count(*) from t_dict");
        ResultSet rs = ps.executeQuery();
        while (rs.next()) {
            System.out.println("count:" + rs.getInt(1));
        }

        ps.close();
        connection.close();
    }


    private static DataSource dataSource1() {
        HikariDataSource dataSource1 = new HikariDataSource();
        dataSource1.setDriverClassName("com.mysql.jdbc.Driver");
        dataSource1.setJdbcUrl("jdbc:mysql://localhost:3306/sj_ds0?characterEncoding=UTF-8");
        dataSource1.setUsername("root");
        dataSource1.setPassword("root123");
        return dataSource1;
    }

    private static DataSource dataSource2() {
        HikariDataSource dataSource1 = new HikariDataSource();
        dataSource1.setDriverClassName("com.mysql.jdbc.Driver");
        dataSource1.setJdbcUrl("jdbc:mysql://localhost:3306/sj_ds1?characterEncoding=UTF-8");
        dataSource1.setUsername("root");
        dataSource1.setPassword("root123");
        return dataSource1;
    }
}
4)运行输出
广播的表,插入数据会同时落到所有的库,查询只会落到一个库
测试插入数据:
Logic SQL: insert into t_dict (code,k,v) values ('gender','男','1'),('gender','女','2')
Actual SQL: ds0 ::: insert into t_dict (code,k,v) values ('gender', '男', '1'), ('gender', '女', '2')
Actual SQL: ds1 ::: insert into t_dict (code,k,v) values ('gender', '男', '1'), ('gender', '女', '2')


插入记录数:2
测试查询数据:
Logic SQL: select count(*) from t_dict
Actual SQL: ds0 ::: select count(*) from t_dict
count:28.4、本章案例完整代码
https://gitee.com/javacode2018/shardingsphere-demo/blob/master/java-api-demo/src/test/java/com/itsoku/javaapidemo/Demo5.java
9、关联表
9.1、是什么?
指分片规则一致的主表和子表。例如:t_order表和t_order_item表,均按照order_id分片,则此两张表互为绑定表关系。绑定表之间的多表关联查询不会出现笛卡尔积关联,关联查询效率将大大提升。举例说明,如果 SQL 为:
SELECT i.* FROM t_order o JOIN t_order_item i ON o.order_id=i.order_id WHERE o.order_id in (10, 11);在不配置绑定表关系时,假设分片键order_id将数值 10 路由至第 0 片,将数值 11 路由至第 1 片,那么路由后的 SQL 应该为 4 条,它们呈现为笛卡尔积:
SELECT i.* FROM t_order_0 o JOIN t_order_item_0 i ON o.order_id=i.order_id WHERE o.order_id in (10, 11);

SELECT i.* FROM t_order_0 o JOIN t_order_item_1 i ON o.order_id=i.order_id WHERE o.order_id in (10, 11);

SELECT i.* FROM t_order_1 o JOIN t_order_item_0 i ON o.order_id=i.order_id WHERE o.order_id in (10, 11);

SELECT i.* FROM t_order_1 o JOIN t_order_item_1 i ON o.order_id=i.order_id WHERE o.order_id in (10, 11);
在配置绑定表关系后,路由的 SQL 应该为 2 条:
SELECT i.* FROM t_order_0 o JOIN t_order_item_0 i ON o.order_id=i.order_id WHERE o.order_id in (10, 11);

SELECT i.* FROM t_order_1 o JOIN t_order_item_1 i ON o.order_id=i.order_id WHERE o.order_id in (10, 11);
其中t_order在 FROM 的最左侧,ShardingSphere 将会以它作为整个绑定表的主表。所有路由计算将会只使用主表的策略,那么t_order_item表的分片计算将会使用t_order的条件。故绑定表之间的分区键要完全相同。
9.2、案例
1)需求
ds_order 库有 4 张表,2 张订单表,2 张订单明细表
2 张订单表:t_order_0(存放 id 为奇数的数据)、t_order_1(存放 id 为偶数的数据)
2 张订单明细表:t_order_0(存放 order_id 为奇数的数据,和 t_order_0 分片规则一致)、t_order_1(存放 order_id 为偶数的数据,和 t_order_1 分片规则一致)
2)sql 脚本
drop database if exists ds_order;
create database ds_order;
use ds_order;

drop table if exists t_order_0;
create table t_order_0(
 order_id bigint not null primary key,
 price int not null
);


drop table if exists t_order_1;
create table t_order_1(
 order_id bigint not null primary key,
 price int not null
);


drop table if exists t_order_item_0;
create table t_order_item_0(
 id bigint not null primary key,
  order_id bigint not null,
 price int not null
);

create index idx_order_id on t_order_item_0(order_id);


drop table if exists t_order_item_1;
create table t_order_item_1(
 id bigint not null primary key,
 order_id bigint not null,
 price int not null
);

create index idx_order_id on t_order_item_1(order_id);

insert into t_order_0 values (1,20);
insert into t_order_1 values (2,30);

insert into t_order_item_0 values (1,1,5),(2,1,15);
insert into t_order_item_1 values (3,2,10),(4,2,20);
3)java 代码:BindingTableGroupsTest
代码如下,关键代码就是配置了 2 张表(t_order、t_order_item)的分片策略
@Slf4j
public class BindingTableGroupsTest {
    private static DataSource dataSource;

    @BeforeAll
    public static void init() throws SQLException {
        HikariDataSource ds = new HikariDataSource();
        ds.setDriverClassName("com.mysql.jdbc.Driver");
        ds.setJdbcUrl("jdbc:mysql://localhost:3306/ds_order?characterEncoding=UTF-8");
        ds.setUsername("root");
        ds.setPassword("root123");

        /**
         * 1.配置真实数据源
         */
        Map<String, DataSource> dataSourceMap = new LinkedHashMap<>();
        dataSourceMap.put("ds", ds);

        /**
         * 2、配置2个表的分片规则
         */
        //t_order分片规则
        TableRuleConfiguration orderRuleConfiguration =
                new TableRuleConfiguration("t_order", "ds.t_order_$->{0..1}");
        InlineShardingStrategyConfiguration orderTableShardingStrategy =
                new InlineShardingStrategyConfiguration("order_id", "t_order_$->{(order_id + 1) % 2}");
        orderRuleConfiguration.setTableShardingStrategyConfig(orderTableShardingStrategy);

        //t_order_item分片规则
        TableRuleConfiguration orderItemRuleConfiguration =
                new TableRuleConfiguration("t_order_item", "ds.t_order_item_$->{0..1}");
        InlineShardingStrategyConfiguration orderItemTableShardingStrategy =
                new InlineShardingStrategyConfiguration("order_id", "t_order_item_$->{(order_id + 1) % 2}");
        orderItemRuleConfiguration.setTableShardingStrategyConfig(orderItemTableShardingStrategy);

        /**
         * 3、加入表的分片规则
         */
        ShardingRuleConfiguration shardingRuleConfig = new ShardingRuleConfiguration();
        shardingRuleConfig.getTableRuleConfigs().add(orderRuleConfiguration);
        shardingRuleConfig.getTableRuleConfigs().add(orderItemRuleConfiguration);

        /**
         * 4、配置一些属性
         */
        Properties props = new Properties();
        //输出sql
        props.put(ConfigurationPropertyKey.SQL_SHOW.getKey(), true);

        /**
         * 5、创建数据源
         */
        dataSource = ShardingDataSourceFactory.createDataSource(dataSourceMap, shardingRuleConfig, props);
    }

}
4)重点代码
上面代码中重点代码就下面这些,不要搞错了

5)测试:查询
BindingTableGroupsTest 中添加下面,用来查询 order_id 为 1 的订单明细,order_id 为 1 的数据,实际上是在 t_order_0 和 t_order_item_0 表中,稍后大家注意看实际的 sql
@Test
public void test1() throws SQLException {
    String sql = "select a.order_id,b.id as order_item_id,b.price " +
        "from t_order a,t_order_item b " +
        "where a.order_id = b.order_id and a.order_id = 1";
    try (Connection connection = dataSource.getConnection();
         PreparedStatement ps = connection.prepareStatement(sql);
         ResultSet rs = ps.executeQuery();) {
        while (rs.next()) {
            Long order_id = rs.getLong("order_id");
            Long order_item_id = rs.getLong("order_item_id");
            Integer price = rs.getInt("price");
            System.out.println(String.format("order_id:%s,order_item_id:%s, price:%s", order_id, order_item_id, price));
        }
    }
}
运行输出,如下,产生了 2 条 sql,路由了 3 张表:t_order_0、t_order_item_0、t_order_item_1,实际上 t_order_item_1 表中是没有数据的,没必要路由,如何解决这个问题?设置表关联。
Logic SQL: select a.order_id,b.id as order_item_id,b.price from t_order a,t_order_item b where a.order_id = b.order_id and a.order_id = 1
Actual SQL: ds ::: select a.order_id,b.id as order_item_id,b.price from t_order_0 a,t_order_item_1 b where a.order_id = b.order_id and a.order_id = 1
Actual SQL: ds ::: select a.order_id,b.id as order_item_id,b.price from t_order_0 a,t_order_item_0 b where a.order_id = b.order_id and a.order_id = 1
order_id:1,order_item_id:1, price:5
order_id:1,order_item_id:2, price:15
6)设置 2 个表关联
当 2 个表的路由字段相同的时候,可以设置表关联,可以避免笛卡尔积查询,下面设置 t_order 和 t_order_item 关联
shardingRuleConfig.setBindingTableGroups(Arrays.asList("t_order","t_order_item"));图片
7)再次运行测试用例
输出如下,这次只有一条 sql 了,查询被路由到 t_order_0 和 t_order_item_1 了,符合预期。
Logic SQL: select a.order_id,b.id as order_item_id,b.price from t_order a,t_order_item b where a.order_id = b.order_id and a.order_id = 1
Actual SQL: ds ::: select a.order_id,b.id as order_item_id,b.price from t_order_0 a,t_order_item_0 b where a.order_id = b.order_id and a.order_id = 1
order_id:1,order_item_id:1, price:5
order_id:1,order_item_id:2, price:159.3、本章案例完整代码
https://gitee.com/javacode2018/shardingsphere-demo
10、读写分离+分片
10.1、背景
面对日益增加的系统访问量,数据库的吞吐量面临着巨大瓶颈。对于同一时刻有大量并发读操作和较少写操作类型的应用系统来说,将数据库拆分为主库和从库,主库负责处理事务性的增删改操作,从库负责处理查询操作,能够有效的避免由数据更新导致的行锁,使得整个系统的查询性能得到极大的改善。
通过一主多从的配置方式,可以将查询请求均匀的分散到多个数据副本,能够进一步的提升系统的处理能力。使用多主多从的方式,不但能够提升系统的吞吐量,还能够提升系统的可用性,可以达到在任何一个数据库宕机,甚至磁盘物理损坏的情况下仍然不影响系统的正常运行。
与将数据根据分片键打散至各个数据节点的水平分片不同,读写分离则是根据 SQL 语义的分析,将读操作和写操作分别路由至主库与从库。

读写分离的数据节点中的数据内容是一致的,而水平分片的每个数据节点的数据内容却并不相同。将水平分片和读写分离联合使用,能够更加有效的提升系统性能。
读写分离虽然可以提升系统的吞吐量和可用性,但同时也带来了数据不一致的问题。这包括多个主库之间的数据一致性,以及主库与从库之间的数据一致性的问题。并且,读写分离也带来了与数据分片同样的问题,它同样会使得应用开发和运维人员对数据库的操作和运维变得更加复杂。下图展现了将分库分表与读写分离一同使用时,应用程序与数据库集群之间的复杂拓扑关系。

10.2、案例:实现 2 主 2 从
1)需求
2 个主库:ds_master_0,ds_master_1
2 个从库:ds_slave_0,ds_slave_1,分别是上面 2 个主库的从库
4 个库中都有一个 t_user 表(id,name)
ds_master_0 和其从库 ds_slave_0 存放 t_user 表 id 为偶数的数据,ds_master_1 和其从库 ds_slave_1 存放 t_user 表 id 为基数的数据
稍后会演示常见的使用场景:写入数据的场景、无事务读取数据的场景、有事务读取的场景、强制将读路由到主库的场景,大家一定要注意观察 sql 路由情况
本案例不介绍主从如何同步,需要了解的朋友自行查找相关资料
2)准备 sql
drop database if exists ds_master_0;
create database ds_master_0;
drop database if exists ds_master_1;
create database ds_master_1;
drop database if exists ds_slave_0;
create database ds_slave_0;
drop database if exists ds_slave_1;
create database ds_slave_1;

use ds_master_0;
drop table if exists t_user;
create table t_user(
 id bigint not null primary key,
 name varchar(64) not null
);
insert into t_user VALUES (1,'我是ds_master_0');

use ds_master_1;
drop table if exists t_user;
create table t_user(
 id bigint not null primary key,
 name varchar(64) not null
);
insert into t_user VALUES (2,'我是ds_master_1');

use ds_slave_0;
drop table if exists t_user;
create table t_user(
 id bigint not null primary key,
 name varchar(64) not null
);
insert into t_user VALUES (1,'我是ds_slave_0');

use ds_slave_1;
drop table if exists t_user;
create table t_user(
 id bigint not null primary key,
 name varchar(64) not null
);
insert into t_user VALUES (2,'我是ds_slave_1');
3)创建测试类
public class MasterSlaveTests {

    private static DataSource dataSource;

    @BeforeAll
    public static void init() throws SQLException {
        /**
         * 1、配置真实数据源
         */
        HikariDataSource ds_master_0 = new HikariDataSource();
        ds_master_0.setDriverClassName("com.mysql.jdbc.Driver");
        ds_master_0.setJdbcUrl("jdbc:mysql://localhost:3306/ds_master_0?characterEncoding=UTF-8");
        ds_master_0.setUsername("root");
        ds_master_0.setPassword("root123");

        HikariDataSource ds_slave_0 = new HikariDataSource();
        ds_slave_0.setDriverClassName("com.mysql.jdbc.Driver");
        ds_slave_0.setJdbcUrl("jdbc:mysql://localhost:3306/ds_slave_0?characterEncoding=UTF-8");
        ds_slave_0.setUsername("root");
        ds_slave_0.setPassword("root123");

        HikariDataSource ds_master_1 = new HikariDataSource();
        ds_master_1.setDriverClassName("com.mysql.jdbc.Driver");
        ds_master_1.setJdbcUrl("jdbc:mysql://localhost:3306/ds_master_1?characterEncoding=UTF-8");
        ds_master_1.setUsername("root");
        ds_master_1.setPassword("root123");

        HikariDataSource ds_slave_1 = new HikariDataSource();
        ds_slave_1.setDriverClassName("com.mysql.jdbc.Driver");
        ds_slave_1.setJdbcUrl("jdbc:mysql://localhost:3306/ds_slave_1?characterEncoding=UTF-8");
        ds_slave_1.setUsername("root");
        ds_slave_1.setPassword("root123");

        // 将4个数据源加入 dataSourceMap
        Map<String, DataSource> dataSourceMap = new HashMap<>();
        dataSourceMap.put("ds_master_0", ds_master_0);
        dataSourceMap.put("ds_slave_0", ds_slave_0);
        dataSourceMap.put("ds_master_1", ds_master_1);
        dataSourceMap.put("ds_slave_1", ds_slave_1);

        // 主从规则配置,就是配置主从关系,让系统知道哪个库是主库、他的从库列表是哪些?
        MasterSlaveRuleConfiguration master0SlaveRuleConfig =
                new MasterSlaveRuleConfiguration(
                        "ds0",
                        "ds_master_0",  //dataSourceMap中主库的key
                        Arrays.asList("ds_slave_0")); // dataSourceMap中ds_master_0从库的key
        // 配置读写分离规则
        MasterSlaveRuleConfiguration master1SlaveRuleConfig =
                new MasterSlaveRuleConfiguration(
                        "ds1",
                        "ds_master_1",  //dataSourceMap中主库的key
                        Arrays.asList("ds_slave_1")); // dataSourceMap中ds_master_1从库的key

        /**
         * 2、配置t_user分片规则
         */
        TableRuleConfiguration userTableRuleConfiguration =
                new TableRuleConfiguration("t_user", "ds$->{0..1}.t_user");
        //设置t_user表的分库规则
        final InlineShardingStrategyConfiguration userTableShardingStrategy =
                new InlineShardingStrategyConfiguration("id", "ds$->{(id+1) % 2}");
        userTableRuleConfiguration.setDatabaseShardingStrategyConfig(userTableShardingStrategy);

        /**
         * 3、创建分片配置对象ShardingRuleConfiguration
         */
        ShardingRuleConfiguration shardingRuleConfig = new ShardingRuleConfiguration();
        //将userTableRuleConfiguration放入表规则配置列表
        shardingRuleConfig.getTableRuleConfigs().add(userTableRuleConfiguration);
        //设置主从规则配置
        shardingRuleConfig.setMasterSlaveRuleConfigs(Arrays.asList(master0SlaveRuleConfig, master1SlaveRuleConfig));

        /**
         * 4、配置一些属性
         */
        Properties props = new Properties();
        //输出sql
        props.put(ConfigurationPropertyKey.SQL_SHOW.getKey(), true);


        /**
         * 5、创建数据源
         */
        dataSource = ShardingDataSourceFactory.createDataSource(dataSourceMap, shardingRuleConfig, props);
    }

}
4)关键代码
下图配置了 4 个数据源,以及配置了数据源之间的主从关系,要让 shardingsphere 知道他们的主从关系

下图中配置了表的分片规则

还有一行关键代码,如下图

下面上测试案例,案例都位于上面这个类中,一定要注意看案例了。
5)案例 1:无事务读取落入从库
/**
 * 无事务查询
 *
 * @throws SQLException
 */
@Test
public void test1() throws SQLException {
    String sql = "select id,name from t_user where id = 1";
    try (Connection connection = dataSource.getConnection();
         PreparedStatement ps = connection.prepareStatement(sql);
         ResultSet rs = ps.executeQuery();) {
        while (rs.next()) {
            final long id = rs.getLong("id");
            final String name = rs.getString("name");
            System.out.println(String.format("id:%s,name:%s", id, name));
        }
    }
}
运行输出,如下
Logic SQL: select id,name from t_user where id = 1
Actual SQL: ds_slave_0 ::: select id,name from t_user where id = 1
id:1,name:我是ds_slave_0
结论:无事务查询,会落入从库。
6)案例 2:事务中直接读取落入从库
下面将连接设置为手动提交,然后读取 id 为 2 的记录
/**
 * 有事务查询
 *
 * @throws SQLException
 */
@Test
public void test2() throws SQLException {
    try (Connection connection = dataSource.getConnection();) {
        //手动开启事务
        connection.setAutoCommit(false);
        String sql = "select id,name from t_user where id = 2";
        PreparedStatement ps = connection.prepareStatement(sql);
        ResultSet rs = ps.executeQuery();
        while (rs.next()) {
            final long id = rs.getLong("id");
            final String name = rs.getString("name");
            System.out.println(String.format("id:%s,name:%s", id, name));
        }
        connection.commit();
    }
}
运行输出,如下,落入从库 ds_slave_1 了
Logic SQL: select id,name from t_user where id = 2
Actual SQL: ds_slave_1 ::: select id,name from t_user where id = 2
id:2,name:我是ds_slave_1
结论:开启事务,直接读取数据,会落入从库。
7)案例 3:事务中写入之后读取落入主库
开启事务,然后写入 id 为 3 的数据,然后读取这条数据,然后读取已经存在的一条 id 为 2 的数据,看看效果
/**
 * 有事务,写入数据,然后查询,(写入 & 查询都落入主库)
 *
 * @throws SQLException
 */
@Test
public void test3() throws SQLException {
    try (Connection connection = dataSource.getConnection();) {
        connection.setAutoCommit(false);
        System.out.println("-----------插入id为3数据-----------");
        String sql = "insert into t_user values (3,'张三')";
        PreparedStatement ps = connection.prepareStatement(sql);
        ps.executeUpdate();

        System.out.println("-----------查询刚插入的数据-----------");
        sql = "select id,name from t_user where id = 3";
        ps = connection.prepareStatement(sql);
        ResultSet rs = ps.executeQuery();
        while (rs.next()) {
            final long id = rs.getLong("id");
            final String name = rs.getString("name");
            System.out.println(String.format("id:%s,name:%s", id, name));
        }

        System.out.println("上面id为3的在t_master_0,下面来看看读取id为2的,看看会读取主库还是从库?");
        System.out.println("-----------查询id为2的数据-----------");

        sql = "select id,name from t_user where id = 2";
        ps = connection.prepareStatement(sql);
        rs = ps.executeQuery();
        while (rs.next()) {
            final long id = rs.getLong("id");
            final String name = rs.getString("name");
            System.out.println(String.format("id:%s,name:%s", id, name));
        }
        connection.commit();
    }
}
运行输出,结果如下,3 个 sql 都落入了主库。
-----------插入id为3数据-----------
Logic SQL: insert into t_user values (3,'张三')
Actual SQL: ds_master_0 ::: insert into t_user values (3, '张三')

-----------查询刚插入的数据-----------
Logic SQL: select id,name from t_user where id = 3
Actual SQL: ds_master_0 ::: select id,name from t_user where id = 3
id:3,name:张三

上面id为3的在t_master_0,下面来看看读取id为2的,看看会读取主库还是从库?
-----------查询id为2的数据-----------
Logic SQL: select id,name from t_user where id = 2
Actual SQL: ds_master_1 ::: select id,name from t_user where id = 2
id:2,name:我是ds_master_1- 1
- 2
- 3
- 4
- 5
- 6
- 7
- 8
- 9
- 10
- 11
- 12
- 13
- 14
结论:只要开启了手动事务,且第一个 sql 为 insert,后面的不管路由到哪个库,都会落入主库
8)案例 4:通过 HintManager 强制查询走主库
可以通过 hintManager.setMasterRouteOnly()强制走主库,代码如下
/**
 * 通过hintManager.setMasterRouteOnly()强制走主库
 *
 * @throws SQLException
 */
@Test
public void test4() throws SQLException {
    String sql = "select id,name from t_user where id = 1";
    try (Connection connection = dataSource.getConnection();
         PreparedStatement ps = connection.prepareStatement(sql);) {

        HintManager hintManager = null;
        try {
            //通过HintManager.setMasterRouteOnly()强制走主库,注意在finally中释放HintManager.close();
            hintManager = HintManager.getInstance();
            hintManager.setMasterRouteOnly();

            ResultSet rs = ps.executeQuery();
            while (rs.next()) {
                final long id = rs.getLong("id");
                final String name = rs.getString("name");
                System.out.println(String.format("id:%s,name:%s", id, name));
            }
        } finally {
            if (hintManager != null) {
                hintManager.close();
            }
        }
    }
}
运行输出,如下,走主库了
Logic SQL: select id,name from t_user where id = 1
Actual SQL: ds_master_0 ::: select id,name from t_user where id = 1
id:1,name:我是ds_master_0- 1
- 2
- 3
11、yml 方式
纯 java api 的方式,写起来比较繁琐,shardingsphere 为我们提供了更简单的方式:yml 配置文件的方式。
11.1、使用步骤
创建一个 yml 格式的文件,将分库分表信息配置到 yml 中
通过 yml 文件创建 DataSource
使用 DataSource 执行 db 操作
下面整个案例感受下效果。
11.2、需求
2 个库:sj_ds0、sj_ds1
2 个库中都包含 2 个表:t_order_0,t_order_1
根据 user_id%2 路由库,根据 order_id%2 路由表。
11.3、执行 sql
drop database if exists sj_ds0;
create database sj_ds0;
use sj_ds0;
drop table if exists t_order_0;
create table t_order_0(
 order_id bigint not null primary key,
    user_id bigint not null,
 price bigint not null
);

drop table if exists t_order_1;
create table t_order_1(
 order_id bigint not null primary key,
    user_id bigint not null,
 price bigint not null
);

drop database if exists sj_ds1;
create database sj_ds1;
use sj_ds1;
drop table if exists t_order_0;
create table t_order_0(
 order_id bigint not null primary key,
  user_id bigint not null,
 price bigint not null
);

drop table if exists t_order_1;
create table t_order_1(
 order_id bigint not null primary key,
  user_id bigint not null,
 price bigint not null
);11.4、test.yml
resource 目录创建 test.yml,和 SpringBoot 项目的 application.properties 同一个目录,内容如下,将所有分库分表信息都丢到这个文件中
dataSources:
  ds0: !!com.zaxxer.hikari.HikariDataSource
    driverClassName: com.mysql.jdbc.Driver
    jdbcUrl: jdbc:mysql://localhost:3306/sj_ds0?characterEncoding=UTF-8
    username: root
    password: root123
  ds1: !!com.zaxxer.hikari.HikariDataSource
    driverClassName: com.mysql.jdbc.Driver
    jdbcUrl: jdbc:mysql://localhost:3306/sj_ds1?characterEncoding=UTF-8
    username: root
    password: root123
shardingRule:
  tables:
    t_order:
      actualDataNodes: ds$->{0..1}.t_order_$->{0..1}
      databaseStrategy:
        inline:
          algorithmExpression: ds$->{user_id % 2}
          shardingColumn: user_id
      logicTable: t_order
      tableStrategy:
        inline:
          algorithmExpression: t_order_$->{order_id % 2}
shardingColumn: order_id11.5、java 代码
代码如下,通过 test.yml 来创建 dataSource,是不是方便了很多。
import org.apache.shardingsphere.shardingjdbc.api.yaml.YamlShardingDataSourceFactory;

import javax.sql.DataSource;
import java.io.IOException;
import java.io.InputStream;
import java.sql.Connection;
import java.sql.PreparedStatement;
import java.sql.SQLException;

public class YmlShardingTest {

    public static void main(String[] args) throws IOException, SQLException {
        //1.读取demo2.yml文件
        InputStream inputStream = ClassLoader.getSystemResourceAsStream("test.yml");
        byte[] bytes = new byte[inputStream.available()];
        inputStream.read(bytes);

        //2.创建数据源
        DataSource dataSource = YamlShardingDataSourceFactory.createDataSource(bytes);

        /**
         * 3、获取连接,执行sql
         */
        String sql = "insert into t_order (order_id,user_id,price) values (?,?,?)";
        try (Connection connection = dataSource.getConnection();
             PreparedStatement ps = connection.prepareStatement(sql);) {
            // 插入4条数据测试,每个表会落入1条数据
            for (long user_id = 1; user_id <= 2; user_id++) {
                for (long order_id = 1; order_id <= 2; order_id++) {
                    int j = 1;
                    ps.setLong(j++, order_id);
                    ps.setLong(j++, user_id);
                    ps.setLong(j, 100);
                    System.out.println(ps.executeUpdate());
                }
            }
        }
    }
}11.6、运行输出
Logic SQL: insert into t_order (order_id,user_id,price) values (?,?,?)
Actual SQL: ds1 ::: insert into t_order_1 (order_id,user_id,price) values (?, ?, ?) ::: [1, 1, 100]
1
Logic SQL: insert into t_order (order_id,user_id,price) values (?,?,?)
Actual SQL: ds1 ::: insert into t_order_0 (order_id,user_id,price) values (?, ?, ?) ::: [2, 1, 100]
1
Logic SQL: insert into t_order (order_id,user_id,price) values (?,?,?)
Actual SQL: ds0 ::: insert into t_order_1 (order_id,user_id,price) values (?, ?, ?) ::: [1, 2, 100]
1
Logic SQL: insert into t_order (order_id,user_id,price) values (?,?,?)
Actual SQL: ds0 ::: insert into t_order_0 (order_id,user_id,price) values (?, ?, ?) ::: [2, 2, 100]
111.7、yml 中可以配置哪些?
有 2 种方法可以知道。
1)方法 1:官方文档
https://shardingsphere.apache.org/document/legacy/4.x/document/cn/manual/sharding-jdbc/configuration/config-yaml/
2)方法 2:看源码
yml 配置的方式主要在下面代码中

进入org.apache.shardingsphere.shardingjdbc.api.yaml.YamlShardingDataSourceFactory#createDataSource(byte[])源码,如下,这个类,会读取 yaml 配置,将其转换为YamlRootShardingConfiguration,那么我们看这个类就知道 yaml 中如何配置了。

进入YamlRootShardingConfiguration中看看,如下,就是普通的 javabean,这个类中有的属性,都是 yaml 中可以配置的类容,很简单,大家自行摸索摸索。

11.8、本章案例完整代码
https://gitee.com/javacode2018/shardingsphere-demo
12、SpringBoot 的方式
12.1、需求
SpringBoot 中使用 shardingsphere 实现下面功能
2 个库:sj_ds0、sj_ds1
2 个库中都包含 2 个表:t_order_0,t_order_1
根据 user_id%2 路由库,根据 order_id%2 路由表
drop database if exists sj_ds0;
create database sj_ds0;
use sj_ds0;
drop table if exists t_order_0;
create table t_order_0(
 order_id bigint not null primary key,
    user_id bigint not null,
 price bigint not null
);

drop table if exists t_order_1;
create table t_order_1(
 order_id bigint not null primary key,
    user_id bigint not null,
 price bigint not null
);

drop database if exists sj_ds1;
create database sj_ds1;
use sj_ds1;
drop table if exists t_order_0;
create table t_order_0(
 order_id bigint not null primary key,
  user_id bigint not null,
 price bigint not null
);

drop table if exists t_order_1;
create table t_order_1(
 order_id bigint not null primary key,
  user_id bigint not null,
 price bigint not null
);
12.3、创建 SpringBoot 项目
<groupId>com.itsoku</groupId>
<artifactId>springboot-demo</artifactId>
<version>0.0.1-SNAPSHOT</version>12.4、引入 shardingsphere maven 配置
<dependency>
    <groupId>org.apache.shardingsphere</groupId>
    <artifactId>sharding-jdbc-spring-boot-starter</artifactId>
    <version>4.1.1</version>
</dependency>12.5、application.properties 中配置分库分表信息
# 配置2个数据源 ds0 和 ds1


spring.shardingsphere.datasource.names=ds0,ds1


# ds0 数据源信息


spring.shardingsphere.datasource.ds0.type=com.zaxxer.hikari.HikariDataSource
spring.shardingsphere.datasource.ds0.driver-class-name=com.mysql.jdbc.Driver
spring.shardingsphere.datasource.ds0.jdbc-url=jdbc:mysql://localhost:3306/sj_ds0?characterEncoding=UTF-8
spring.shardingsphere.datasource.ds0.username=root
spring.shardingsphere.datasource.ds0.password=root123


# ds1 数据源信息


spring.shardingsphere.datasource.ds1.type=com.zaxxer.hikari.HikariDataSource
spring.shardingsphere.datasource.ds1.driver-class-name=com.mysql.jdbc.Driver
spring.shardingsphere.datasource.ds1.jdbc-url=jdbc:mysql://localhost:3306/sj_ds1?characterEncoding=UTF-8
spring.shardingsphere.datasource.ds1.username=root
spring.shardingsphere.datasource.ds1.password=root123


# 配置t_order分片策略
# t_order实际数据节点


spring.shardingsphere.sharding.tables.t_order.actual-data-nodes=ds$->{0..1}.t_order_$->{0..1}


# t_order表db分片策略

spring.shardingsphere.sharding.tables.t_order.database-strategy.inline.sharding-column=user_id
spring.shardingsphere.sharding.tables.t_order.database-strategy.inline.algorithm-expression=ds$->{user_id % 2}


# t_order表分片策略


spring.shardingsphere.sharding.tables.t_order.table-strategy.inline.sharding-column=order_id
spring.shardingsphere.sharding.tables.t_order.table-strategy.inline.algorithm-expression=t_order_$->{order_id % 2}


# 输出sql


spring.shardingsphere.props.sql.show: true12.6、测试效果
1)创建测试类
import lombok.extern.slf4j.Slf4j;
import org.junit.jupiter.api.Test;
import org.springframework.beans.factory.annotation.Autowired;
import org.springframework.boot.test.context.SpringBootTest;

import javax.sql.DataSource;
import java.sql.Connection;
import java.sql.PreparedStatement;
import java.sql.ResultSet;
import java.sql.SQLException;

@SpringBootTest
@Slf4j
class SpringbootDemoApplicationTests {

    @Autowired
    private DataSource dataSource;

}
下面来测试 5 种场景,注意观察每种场景的输出,观察 sql 路由的 db 和表。
每个测试方法均放入上面的测试类中。
2)测试 1:插入数据
下面插入 4 个表,根据路由规则,2 个库 4 张表中每个表会落入一条数据。
@Test
void test1() throws Exception {
    String sql = "insert into t_order (order_id,user_id,price) values (?,?,?)";
    try (Connection connection = this.dataSource.getConnection();
         PreparedStatement ps = connection.prepareStatement(sql);) {
        // 插入4条数据测试,每个表会落入1条数据
        for (long user_id = 1; user_id <= 2; user_id++) {
            for (long order_id = 1; order_id <= 2; order_id++) {
                int j = 1;
                ps.setLong(j++, order_id);
                ps.setLong(j++, user_id);
                ps.setLong(j, 100);
                log.info("count:{}", ps.executeUpdate());
            }
        }
    }
}
运行输出如下,可以详细看到每条 sql 路由信息(路由到哪个库的哪张表),Logic SQL表示逻辑 sql,Actual SQL表示实际执行的 sql
Logic SQL: insert into t_order (order_id,user_id,price) values (?,?,?)
Actual SQL: ds1 ::: insert into t_order_1 (order_id,user_id,price) values (?, ?, ?) ::: [1, 1, 100]
count:1
Logic SQL: insert into t_order (order_id,user_id,price) values (?,?,?)
Actual SQL: ds1 ::: insert into t_order_0 (order_id,user_id,price) values (?, ?, ?) ::: [2, 1, 100]
count:1
Logic SQL: insert into t_order (order_id,user_id,price) values (?,?,?)
Actual SQL: ds0 ::: insert into t_order_1 (order_id,user_id,price) values (?, ?, ?) ::: [1, 2, 100]
count:1
Logic SQL: insert into t_order (order_id,user_id,price) values (?,?,?)
Actual SQL: ds0 ::: insert into t_order_0 (order_id,user_id,price) values (?, ?, ?) ::: [2, 2, 100]
count:1
3)测试 2:无条件查询
下面查询 t_order 表所有记录数,没有查询条件查询会被路由到所有 db 中所有表。
shardingsphere 会对 4 个表进行查询,最后将结果汇总。
@Test
void test2() throws SQLException {
    String sql = "select count(*) from t_order";
    try (Connection connection = this.dataSource.getConnection();
         PreparedStatement ps = connection.prepareStatement(sql);) {
        long st = System.currentTimeMillis();
        final ResultSet rs = ps.executeQuery();
        while (rs.next()) {
            log.info("记录数:{}", rs.getInt(1));
        }
    }
}
运行输出
Logic SQL: select count(*) from t_order
Actual SQL: ds0 ::: select count(*) from t_order_0
Actual SQL: ds0 ::: select count(*) from t_order_1
Actual SQL: ds1 ::: select count(*) from t_order_0
Actual SQL: ds1 ::: select count(*) from t_order_1
记录数:4
4)测试 3:查询某个用户的订单量
由于 user_id 是 db 路由的字段,order_id 是表的路由字段,若条件中只有 user_id,则会路由到对应库的所有表。
@Test
void test3() throws SQLException {
    String sql = "select count(*) from t_order where user_id = 1";
    try (Connection connection = this.dataSource.getConnection();
         PreparedStatement ps = connection.prepareStatement(sql);) {
        long st = System.currentTimeMillis();
        final ResultSet rs = ps.executeQuery();
        while (rs.next()) {
            log.info("记录数:{}", rs.getInt(1));
        }
    }
}
运行输出,如下,sql 被路由到 ds1 中的 2 个 t_order 表
Logic SQL: select count(*) from t_order where user_id = 1
Actual SQL: ds1 ::: select count(*) from t_order_0 where user_id = 1
Actual SQL: ds1 ::: select count(*) from t_order_1 where user_id = 1
记录数:2
5)测试 4:查询某个用户的某个订单
若查询条件中同时含有 db 路由字段 user_id,以及表的路由字段 order_id,那么可以确定最后被路由的表。
@Test
void test4() throws SQLException {
    String sql = "select count(*) from t_order where user_id = 1 and order_id = 1";
    try (Connection connection = this.dataSource.getConnection();
         PreparedStatement ps = connection.prepareStatement(sql);) {
        long st = System.currentTimeMillis();
        final ResultSet rs = ps.executeQuery();
        while (rs.next()) {
            log.info("记录数:{}", rs.getInt(1));
        }
    }
}
运行输出
Logic SQL: select count(*) from t_order where user_id = 1 and order_id = 1
Actual SQL: ds1 ::: select count(*) from t_order_1 where user_id = 1 and order_id = 1
记录数:1
6)测试 5:in 查询
@Test
void test5() throws SQLException {
    String sql = "select count(*) from t_order where user_id = 1 and order_id in (1,2)";
    try (Connection connection = this.dataSource.getConnection();
         PreparedStatement ps = connection.prepareStatement(sql);) {
        long st = System.currentTimeMillis();
        final ResultSet rs = ps.executeQuery();
        while (rs.next()) {
            log.info("记录数:{}", rs.getInt(1));
        }
    }
}
运行输出
Logic SQL: select count(*) from t_order where user_id = 1 and order_id in (1,2)
Actual SQL: ds1 ::: select count(*) from t_order_0 where user_id = 1 and order_id in (1,2)
Actual SQL: ds1 ::: select count(*) from t_order_1 where user_id = 1 and order_id in (1,2)
记录数:212.7、其他的用法
其他用法,参看前几篇,使用不同的分片策略,进行改造。
12.8、配置文件如何配置?
有 2 种方法可以知道。
1)方法 1:官方文档
https://shardingsphere.apache.org/document/legacy/4.x/document/cn/manual/sharding-jdbc/configuration/config-spring-boot/
2)方法 2:看源码

主要 2 部分:
第 1 部分:数据源的配置,你用的哪种类型的数据源,他的内部有哪些数据,就可以配置那些信息
第 2 部分:分片规则的一些配置,分片规则的配置对应org.apache.shardingsphere.shardingjdbc.spring.boot.sharding.SpringBootShardingRuleConfigurationProperties这个类,可以进去看源码,有哪些属性就有哪些配置。
