配置中心(十)Config:环境搭建
背景
当一个系统中的配置文件发生改变的时候,我们需要重新启动该服务,才能使得新的配置文件生效,spring cloud config可以实现微服务中的所有系统的配置文件的统一管理,而且还可以实现当配置文件发生变化的时候,系统会自动更新获取新的配置。
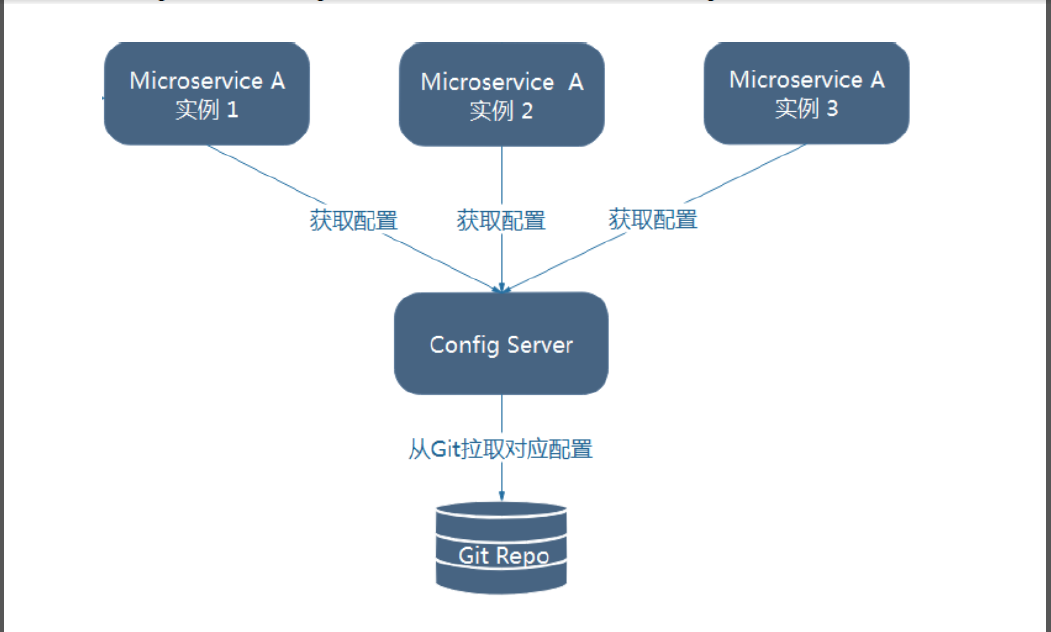
工作原理
Spring Cloud Config为分布式系统外部化配置提供了服务器端和客户端的支持,它包括Config Server和Config Client两部分。Config Server是一个可横向扩展、集中式的配置服务器,它用于集中管理应用程序各个环境下的配置,默认使用Git存储配置内容(也可使用Subversion、本地文件系统或Vault存储配置),因此可以方便的实现对配置的版本控制与内容审计。Config Client 是Config Server的客户端,用于操作存储在Config Server中的配置属性。
环境搭建
示例代码
建立config-bus-server子工程,启动注册中心Eureka:7001,这里只演示git,其余的不多讲
git仓库配置中心
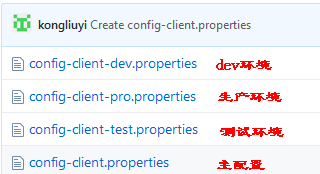
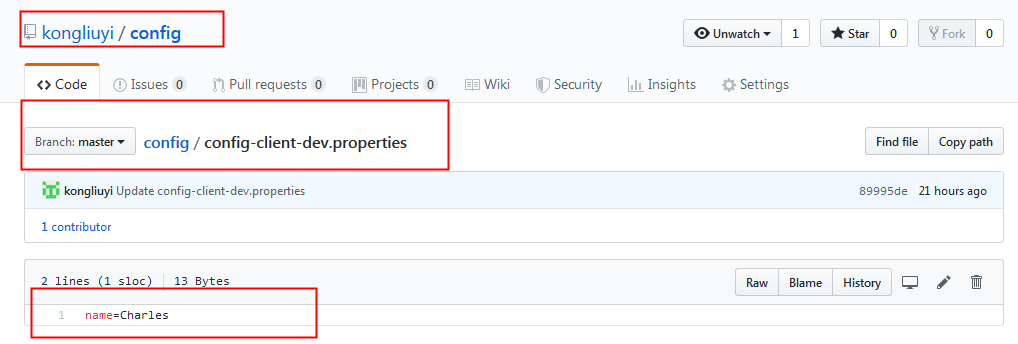
新增git仓库配置中心,地址为:https://github.com/kongliuyi/config.git,在仓库中新增加如下配置文件:
以上端点都可以映射到{application}-{profile}.properties这个配置文件,{application}表示微服务的名称,{label}对应Git仓库的分支,默认是 master
其中config-client-dev.properties文件信息如下:
配置中心服务端(Config-server)
新增项目config-server
1.添加依赖
    <dependency>
        <groupId>org.springframework.cloud</groupId>
        <artifactId>spring-cloud-config-server</artifactId>
    </dependency>
2.application.yml 配置文件
#端口号
server:
  port: 7010

###服务注册到eureka地址
eureka:
  client:
    service-url:
      defaultZone: http://eureka7001:7001/eureka
spring:
  application:
    #注册中心应用名称
    name: config-server
  cloud:
    config:
      server:
        git:
          #git环境地址
          uri: https://github.com/kongliuyi/config.git
          ##搜索目录
          search-paths: /
3.启动ConfigServerApplication服务
package net.riking.springcloud.configserver;

import org.springframework.boot.SpringApplication;
import org.springframework.boot.autoconfigure.SpringBootApplication;
import org.springframework.cloud.client.discovery.EnableDiscoveryClient;
import org.springframework.cloud.config.server.EnableConfigServer;

@SpringBootApplication
@EnableDiscoveryClient
@EnableConfigServer //开启配置中心服务端
public class ConfigServerApplication {
    public static void main(String[] args) {
        SpringApplication.run(ConfigServerApplication.class, args);
    }
}
启动工程后,访问:http://localhost:7010/config-client-dev.properties,可以看到如下页面:

配置中心客户端(Config-client)
新增项目config-client,怕你们把配置中心客户端服务理解错,所以这里解释一下。配置中心客户端就是需要用到配置文件的服务,任何微服务都可以称为配置中心客户端(注册中心除外)
1.添加依赖
    <dependency>
        <groupId>org.springframework.cloud</groupId>
        <artifactId>spring-cloud-config-client</artifactId>
    </dependency>
2.bootstrap.yml 配置文件
除了默认的application.yml配置文件,还需增加一个bootstrap.yml的配置文件,内容如下:
#服务启动端口号
server:
  port: 9010

#服务名称(服务注册到eureka名称)
spring:
  application:
    name: config-client   #对应config-server所获取的配置文件的{application}
  cloud:
    config:
      #读取后缀  对应config-server所获取的配置文件的{profile}
      profile: dev
      label: master #读取git仓库分支 对应config-server所获取的配置文件的{label}
      #读取config-server注册地址
      discovery:
        service-id: config-server
        enabled: true


#客户端注册进eureka服务列表内
eureka:
  client:
    service-url:
      defaultZone: http://eureka7001:7001/eureka
注:spring cloud有一个“引导上下文"的概念,这是主应用程序的父上下文。引导上下文负责从配置服务器加载配置属性,以及解密外部配置文件中的属性。和主应用程序加载
application.*(yml或 properties)中的属性不同,引导上下文加载(bootstrap.*)中的属性。配置在 bootstrap.*中的属性有更高的优先级,因此默认情况下它们不能被本地配置覆盖。
3.服务接口调用
package net.riking.springcloud.configclient.controller;

import org.springframework.beans.factory.annotation.Value;
import org.springframework.web.bind.annotation.GetMapping;
import org.springframework.web.bind.annotation.RequestMapping;
import org.springframework.web.bind.annotation.RestController;

@RestController
@RequestMapping("/config/client")
public class ConfigClientController {

    @Value("${name}")
    private String  name;

    @GetMapping
    public String name() {
        return  name ;
    }

}
4.启动ConfigClientApplication服务
package net.riking.springcloud.configclient;

import org.springframework.boot.SpringApplication;
import org.springframework.boot.autoconfigure.SpringBootApplication;
import org.springframework.cloud.netflix.eureka.EnableEurekaClient;

@SpringBootApplication
@EnableEurekaClient  ///开启对EurekaClient的支持,即:作为Eureka客户端,高版本可省略
public class ConfigClientApplication {
    public static void main(String[] args) {
        SpringApplication.run(ConfigClientApplication.class, args);
    }

}
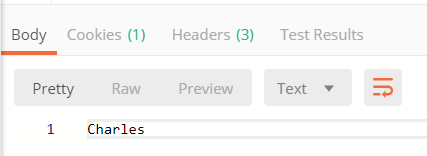
5.验证
启动工程后,访问:http://localhost:9010//config/client,可以看到如下页面:

动态刷新数据
很多场景下,需要在运行期间动态调整配置。如果配置发生了修改,微服务还会不会刷新呢?
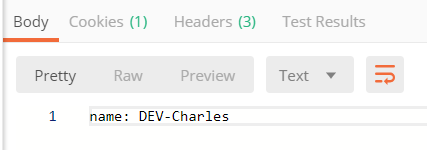
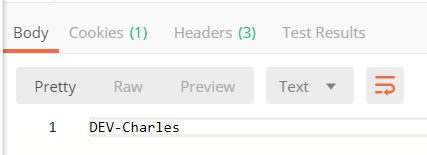
1.修改git仓库config-client-dev.properties配置文件
name=DEV-Charles
2.访问http://localhost:7010/config-client-dev.properties,输出如下
3.访问http://localhost:9010/config/client,输出如下
答案显而易见是不会实时刷新,所以在SpringCloud中提供有两种刷新数据方式,手动刷新配置文件和实时刷新配置文件两种方式。其中手动方式采用actuator端点刷新数据,而实时刷新采用SpringCloud Bus消息总线
手动刷新
Config-client修改
1.Maven依赖信息新增
       <!--自省和监控的集成功能,这里的作用是为配置信息手动刷新做监控-->
        <dependency>
            <groupId>org.springframework.boot</groupId>
            <artifactId>spring-boot-starter-actuator</artifactId>
        </dependency>
2.Bootstrap.xml新增
#开启监控断点
management:
  endpoints:
    web:
      exposure:
        include: "*"
3.@RefreshScope注解新增
在Controller上添加注解@RefreshScope,添加这个注解的类会在配置更改时得到特殊的处理
package net.riking.springcloud.configclient.controller;

import org.springframework.beans.factory.annotation.Value;
import org.springframework.cloud.context.config.annotation.RefreshScope;
import org.springframework.web.bind.annotation.GetMapping;
import org.springframework.web.bind.annotation.RequestMapping;
import org.springframework.web.bind.annotation.RestController;

@RestController
@RequestMapping("/config/client")
@RefreshScope//手动刷新配置文件信息
public class ConfigClientController {

    @Value("${name}")
    private String  name;

    @GetMapping
    public String name() {
        return  name ;
    }

}
启动工程后,访问:http://localhost:9010//config/client,可以看到如下页面:
4.验证
1.修改git仓库config-client-dev.properties配置文件
name=Charles
2.访问http://localhost:7010/config-client-dev.properties,输出如下
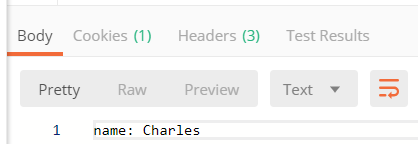
3.访问http://localhost:9010/config/client,输出如下

4.发送post请求:http://localhost:9010/refresh 进行手动刷新数据,输出如下

5.再次访问http://localhost:9010/config/client,输出如下
自动刷新
自动刷新我放入下篇文章,点击进入
源码分析
以后有时间整理
总结
作为格式以后在总结。
配置中心技术有很多种,目前我只用过两种,一种是携程的阿波罗(apollo),另一种就是本篇文章中得springCloud config,我将两种对比一下,对于springCloud config,我推荐微服务少得小公司使用,而对一般微服务多的大公司,我推荐使用携程的阿波罗,至于原因,我会在往后开一篇apollo篇中讲解
