python 学习笔记十二 CSS基础(进阶篇)
1.CSS 简介
- CSS 指层叠样式表 (Cascading Style Sheets)
- 样式定义如何显示 HTML 元素
- 样式通常存储在样式表中
- 把样式添加到 HTML 4.0 中,是为了解决内容与表现分离的问题
- 外部样式表可以极大提高工作效率
- 外部样式表通常存储在 CSS 文件中
- 多个样式定义可层叠为一
css存在方式:
- 元素内联
- 页面嵌入
- 外部引入
语法:style = 'key1:value1;key2:value2;'
1.元素内联(在标签中使用css)
<!--在标签使用-->
<div style="color: green;font-size: 18px">llllllllllllllv</div>
2.页面嵌入
<!DOCTYPE html>
<html lang="en">
<head>
    <meta charset="UTF-8">
    <title>Title</title>
    <!--在页面中嵌入 class选择器-->
    <style type="text/css">
        .cc{
            color: red;
            font-size: 19px;
        }
        .dd{
           color: purple;
        }
  </style>
</head>
<body>
        <!--页面嵌入-->
    <div  class="cc">rrrrrrrrrred</div>
</body>
</html>
3.外部导入
<!DOCTYPE html>
<html lang="en">
<head>
    <meta charset="UTF-8">
    <!--外部导入css-->
    <link rel="stylesheet" type="text/css" href="common.css">
</head>
<body>
    <!--引用外部-->
    <div  class="bb">bbbbbbbbblue</div>
</body>
</html>
优先级: 标签内使用->页面嵌入->引用外部 同时调用页面中定义的css时按定义的顺序靠后的优先
2.css选择器
1.标签选择器
/*定义所有a标签样式
a,div span select input
*/
a{
    color: red;
}
span{
    color: blue;
}
2.class选择器(.开头)
类选择器允许以一种独立于文档元素的方式来指定样式。
.cc{
     color: red;
     font-size: 19px;
}
.dd{
     color: purple;
}
3.属性选择器
根据元素的属性及属性值来选择元素。
input[type='text']{
    color: black;
}
4.ID选择器(#开头)
与类选择器一样,ID 选择器中可以忽略通配选择器;
ID 选择器不引用 class 属性的值,毫无疑问,它要引用 id 属性中的值。
#uu{
    color:yellow;
    font-size: 20px;
}
5.组合选择器(,分割)
定义的样式同时应用到分组中的选择器中
input,div,p{
     color: blue;
}
所有的input, div, p标签应用样式字体颜色蓝色
6.层级选择器(空格分割)
/*只对 h1 元素中的 em 元素应用样式 层级选择器有一个易被忽视的方面,即两个元素之间的层次间隔可以是无限的。*/
h1 em {color:red;}
3.常用属性
background

background-color
    <div style="background-color: red">
        刷屏模式
        <p>刷屏啦</p>
        <p>刷屏啦</p>
        <p>刷屏啦</p>
        <p>刷屏啦</p>
        <p>刷屏啦</p>
    </div>
效果如下:

background-img
.b1{
  background-image:  url("aaa.jpg");
   //指定宽度和高度
  width: 350px;
  height: 1000px;
   /*background-repeat repeat-x repeat-y 默认横轴复制 background-repeat no-repeat 只显示一次 inherit 复制*/
  background-repeat: repeat-y;   //纵轴赋值
}
效果如下:
background-position
默认值为(0%|px),0(%|px)
第一个值是水平位置,第二个值是垂直位置。
左上角是 0 0。单位是像素 (0px 0px) 或任何其他的 CSS 单位。
如果您仅规定了一个值,另一个值将是50%。
您可以混合使用 % 和 position 值。
示例挖洞看我
.ci-left {
    top: 9px;
    left: 18px;
    width: 18px;
    height: 16px;
    background: url(shop.png) 0 -88px no-repeat;  //可以只写一个background后面接参数 第一个为img,第二个为position,第三个为repeate
    /通过调节0 和 -88px可以改变图片的位置 显示仅width 18px,height 16px 的一个小窗口
}
效果图如下:
border
元素的边框 (border) 是围绕元素内容和内边距的一条或多条线。
CSS border 属性允许你规定元素边框的样式、宽度和颜色。
<!--边框样式solid实心 dotted点心 dashed虚线-->
<div style="border:2px solid red; height: 20px;width: 1000px;"></div>
<br/>
<div style="border:2px dotted red; height: 20px; width: 1000px"></div>
<br/>
<div style="border:2px dashed red; height: 20px; width: 1000px"></div>
效果如下:
可以自定义设置上下左右边框
<h4>borded-bottom</h4>
<div style="border-bottom:2px solid red;"></div>
cursor鼠标显示样式
<h3>cursor鼠标显示样式</h3>
    <p>
        <li>css提供的cursor值</li>
        <span style="cursor:pointer;">显示手指</span> ||
        <span style="cursor:help;">显示?</span> ||
        <span style="cursor:wait;">显示等待转圈</span> ||
        <span style="cursor:move;">显示可移动标识</span> ||
        <span style="cursor:crosshair;">定位标识</span>
    </p>
float浮动
浮动的框可以向左或向右移动,直到它的外边缘碰到包含框或另一个浮动框的边框为止。
示例1
<html>
<head>
<style type="text/css">
ul
{
float:left;
width:100%;
padding:0;
margin:0;
list-style-type:none;
}
a
{
float:left;
width:7em;
text-decoration:none;
color:white;
background-color:purple;
padding:0.2em 0.6em;
border-right:1px solid white;
}
a:hover {background-color:#ff3300}
li {display:inline}
</style>
</head>

<body>
<ul>
<li><a href="#">Link one</a></li>
<li><a href="#">Link two</a></li>
<li><a href="#">Link three</a></li>
<li><a href="#">Link four</a></li>
</ul>

<p>
在上面的例子中,我们把 ul 元素和 a 元素浮向左浮动。li 元素显示为行内元素(元素前后没有换行)。这样就可以使列表排列成一行。
ul 元素的宽度是 100%,列表中的每个超链接的宽度是 7em(当前字体尺寸的 7 倍)。我们添加了颜色和边框,以使其更漂亮。
</p>

</body>
</html>
效果如下
示例2
<html>
<head>
<style type="text/css">
div
{
float:right;
width:120px;
margin:0 0 15px 20px;
padding:15px;
border:1px solid black;
text-align:center;
}
</style>
</head>

<body>
<div>
<img src="/i/eg_cute.gif" /><br />
CSS is fun!
</div>
<p>
This is some text. This is some text. This is some text.
This is some text. This is some text. This is some text.
This is some text. This is some text. This is some text.
This is some text. This is some text. This is some text.
This is some text. This is some text. This is some text.
This is some text. This is some text. This is some text.
</p>

<p>
在上面的段落中,div 元素的宽度是 120 像素,它其中包含图像。div 元素浮动到右侧。
我们向 div 元素添加了外边距,这样就可以把 div 推离文本。同时,我们还向 div 添加了边框和内边距。
</p>
</body>

</html>
效果如下:
示例3
<!--当div下遇到子div有float时,子标签飘动,父类会被子div覆盖-->
<div style="width: 800px;background-color: blue;">
     asd
  <p>asda</p>
  <div style="background-color: red;float: left;width: 20%;">123</div>
  <div style="background-color: yellow;float: left;width: 50%;">123</div>
  <div style="background-color: pink;float: right;width: 10%;">123</div>
  <!--添加clear both后子标签后被拉回来,可以撑起父标签 效果为:默认背景色蓝色不可见,添加后蓝色可见-->
    <!--<div style="clear: both"></div>-->
</div>
效果如下:
<div style="clear: both"></div> //添加清理浮动元素
效果如下:
clear
规定元素的哪一侧不允许其他浮动元素
<html>

<head>
<style type="text/css">
img
  {
  float:left;
  clear:both;  //清理浮动
  }
</style>
</head>

<body>
<img src="/i/eg_smile.gif" />
<img src="/i/eg_smile.gif" />
</body>

</html>
效果图如下:
//clear:both; //注释清理浮动
效果如下:
更多内容请见:http://www.w3school.com.cn/css/css_positioning_floating.asp
display

<h4>displary显示属性</h4>
<!--改变显示属性:block inline none-->
<span style="display: block">我是block</span> //内联变为块级标签
<span>我是span</span>
<span style="display: none">你看不见我</span>   //隐藏
<div style="display: inline">我是div inline</div> //块级显示内联标签
效果如下:
内外边距
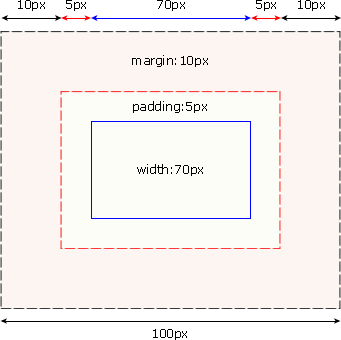
CSS 框模型 (Box Model) 规定了元素框处理元素内容、内边距、边框 和 外边距 的方式。
元素框的最内部分是实际的内容,直接包围内容的是内边距。内边距呈现了元素的背景。内边距的边缘是边框。边框以外是外边距,外边距默认是透明的,因此不会遮挡其后的任何元素。
在 CSS 中,width 和 height 指的是内容区域的宽度和高度。增加内边距、边框和外边距不会影响内容区域的尺寸,但是会增加元素框的总尺寸。
假设框的每个边上有 10 个像素的外边距和 5 个像素的内边距。如果希望这个元素框达到 100 个像素,就需要将内容的宽度设置为 70 像素,请看下图:

提示:内边距、边框和外边距可以应用于一个元素的所有边,也可以应用于单独的边。
提示:外边距可以是负值,而且在很多情况下都要使用负值的外边距。
    <!--设置各边上外边距的宽度-->
    <div style="border:1px solid red; height: 70px; width: 980px;">
        <div style="background-color: green; height: 50px; margin-top:10px;"></div>
    </div>
    <!--设置各边上内边距的宽度-->
    <div style="border:1px solid red; height: 70px;width: 980px">
        <div style="background-color: green; height: 50px; padding-top: 10px;"></div>
    </div>
外边距效果图:
外边距增长的是外边边框的距离
内边距效果图:
内边距增长的是自身边框
position
CSS 定位 (Positioning) 属性允许你对元素进行定位。
CSS 为定位和浮动提供了一些属性,利用这些属性,可以建立列式布局,将布局的一部分与另一部分重叠
定位的基本思想很简单,它允许你定义元素框相对于其正常位置应该出现的位置,或者相对于父元素、另一个元素甚至浏览器窗口本身的位置。
CSS 定位机制
CSS 有三种基本的定位机制:普通流、浮动和绝对定位。
除非专门指定,否则所有框都在普通流中定位。也就是说,普通流中的元素的位置由元素在 (X)HTML 中的位置决定。
块级框从上到下一个接一个地排列,框之间的垂直距离是由框的垂直外边距计算出来。
行内框在一行中水平布置。可以使用水平内边距、边框和外边距调整它们的间距。但是,垂直内边距、边框和外边距不影响行内框的高度。由一行形成的水平框称为行框(Line Box),行框的高度总是足以容纳它包含的所有行内框。不过,设置行高可以增加这个框的高度。
CSS 相对定位
相对定位是一个非常容易掌握的概念。如果对一个元素进行相对定位,它将出现在它所在的位置上。然后,可以通过设置垂直或水平位置,让这个元素“相对于”它的起点进行移动。
如果将 top 设置为 20px,那么框将在原位置顶部下面 20 像素的地方。如果 left 设置为 30 像素,那么会在元素左边创建 30 像素的空间,也就是将元素向右移动。
#box_relative {
  position: relative;
  left: 30px;
  top: 20px;
}
效果如下:

fixed是特殊的absolute,即fixed总是以body为定位对象的,按照浏览器的窗口进行定位。
<!--position:fixed 固定 底部:40 右边:30 针对窗口-->
<div style="background-color: blue;position: fixed;bottom: 40px;right: 30px;">返回顶部</div>
效果如下:
绝对定位使元素的位置与文档流无关,因此不占据空间。这一点与相对定位不同,相对定位实际上被看作普通流定位模型的一部分,因为元素的位置相对于它在普通流中的位置。
绝对定位的元素的位置相对于最近的已定位祖先元素,如果元素没有已定位的祖先元素,那么它的位置相对于最初的包含块。
<!--position:relative一般搭配absolute使用-->
<div style="position: relative;background-color: green;height: 400px;width: 500px;">
    <!--absolute一次固定-->
    <div style="position: absolute;bottom: 30px;right: 30px;">定位</div>
</div>
效果如下:
z-index堆叠属性
<!DOCTYPE html>
<html lang="en">
<head>
    <meta charset="UTF-8">
    <title>Title</title>
    <style>
        p input{
            padding: 10px;
            line-height: 18px;
            height: 18px;
        }
    </style>
</head>
<body>
    //最底层
    <div>Home Page</div>
    //遮盖层,设置当前层优先级10 透明度0.5 位置固定  上下左右0距离 即铺满整个页面 背景颜色黑色
    <div style="z-index:10;opacity: 0.5; position: fixed;top:0;left:0;right: 0;bottom: 0;background-color: black;"></div>
    //对话框层 优先级高于遮盖层和最底层 处于最上层 居中显示 左移框体一半的距离 上移框体一半的距离
    <div style="z-index:11;position: fixed;top:50%;left:50%;margin-left: -150px;margin-top: -100px">
        <div style="height: 300px;width: 200px;background-color: white;">
            <p>主机名:<input type="text"></p>
            <p>端口:  <input type="text"></p>
            <p>用户名:<input type="text"></p>
            <p>密码:<input type="text"></p>
        </div>
    </div>
</body>
</html>
效果如下:
overflow 当元素的内容溢出区域后采取的动作
<div style="height: 2000px;background-color: #9a9a9a">
    <div style="height: 500px;background-color: red;overflow: auto">
        <p>p</p>
        <p>p</p>
        <p>p</p>
        <p>p</p>
        <p>p</p>
        <p>p</p>
        <p>p</p>
        <p>p</p>
        <p>p</p>
        <p>p</p>
        <p>p</p>
        <p>p</p>
        <p>p</p>
        <p>p</p>
        <p>p</p>
        <p>p</p>
        <p>p</p>
        <p>p</p>
        <p>p</p>
        <p>p</p>
        <p>p</p>
        <p>p</p>
        <p>p</p>
        <p>p</p>
        <p>p</p>
        <p>p</p>
        <p>p</p>
        <p>p</p>
        <p>p</p>
    </div>
</div>
效果如下:
文本
CSS 文本属性可定义文本的外观。
通过文本属性,您可以改变文本的颜色、字符间距,对齐文本,装饰文本,对文本进行缩进,等等。
字体
CSS 字体属性定义文本的字体系列、大小、加粗、风格(如斜体)和变形(如小型大写字母)。
使用通用字体系列
body {font-family: sans-serif;}
指定字体
h1 {font-family: Georgia;}
字体风格
font-style 属性最常用于规定斜体文本。
该属性有三个值:
normal - 文本正常显示
italic - 文本斜体显示
oblique - 文本倾斜显示
字体加粗
font-weight 属性设置文本的粗细。
使用 bold 关键字可以将文本设置为粗体。
关键字 100 ~ 900 为字体指定了 9 级加粗度。如果一个字体内置了这些加粗级别,
那么这些数字就直接映射到预定义的级别,100 对应最细的字体变形,
900 对应最粗的字体变形。数字 400 等价于 normal,而 700 等价于 bold。
字体大小
font-size 属性设置文本的大小。
更多详细的CSS内容见:http://www.w3school.com.cn/css/


· PostgreSQL 和 SQL Server 在统计信息维护中的关键差异
· C++代码改造为UTF-8编码问题的总结
· DeepSeek 解答了困扰我五年的技术问题
· 为什么说在企业级应用开发中,后端往往是效率杀手?
· 用 C# 插值字符串处理器写一个 sscanf
· [翻译] 为什么 Tracebit 用 C# 开发
· 腾讯ima接入deepseek-r1,借用别人脑子用用成真了~
· Deepseek官网太卡,教你白嫖阿里云的Deepseek-R1满血版
· DeepSeek崛起:程序员“饭碗”被抢,还是职业进化新起点?
· RFID实践——.NET IoT程序读取高频RFID卡/标签