Tensorrt环境安装及yolov5模型转换以及量化部署INT8
Tensorrt的运行需要环境中有Opencv的编译环境,所以首先要opencv的编译
一.opencv 编译
1. 安装依赖项
    sudo apt-get install cmake
    sudo apt-get install build-essential libgtk2.0-dev libavcodec-dev libavformat-dev libjpeg-dev libswscale-dev libtiff5-dev
    sudo apt-get install libgtk2.0-dev
2. 下载自己需要的版本
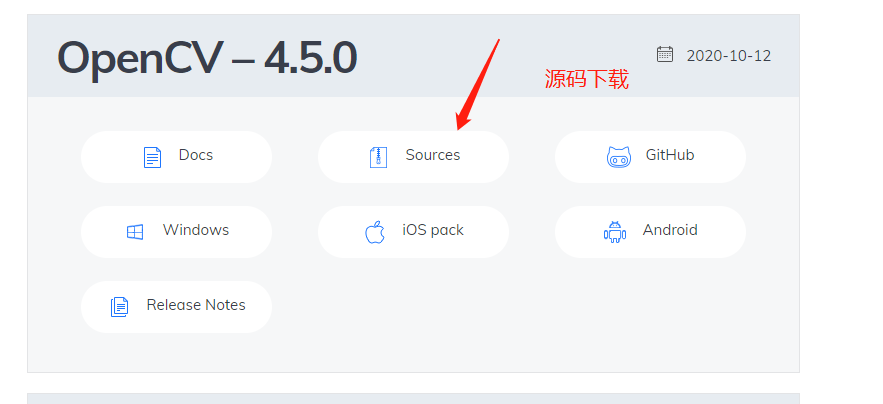
解压后放在自己想放的目录下,在opencv-4.5.0目录下 建立build 文件夹, 进入 build 文件夹下,打开终端
    unzip opencv-4.5.0.zip
    cd opencv-4.5.0/
    mkdir build
    cd build/
3.编译cmake
3.1.安装cmake以及依赖库
    sudo apt-get install cmake
    $ sudo apt-get install build-essential libgtk2.0-dev libavcodec-dev libavformat-dev libjpeg.dev libtiff4.dev libswscale-dev libjasper1 libjasper-dev
错误:E: 无法定位软件包 libjasper-dev
sudo add-apt-repository "deb http://security.ubuntu.com/ubuntu xenial-security main"
sudo apt update
sudo apt install libjasper1 libjasper-dev
成功的解决了问题,其中libjasper1是libjasper-dev的依赖包
3.2.安装cmake
$ cmake .. || cmake -D CMAKE_BUILD_TYPE=Release -D CMAKE_INSTALL_PREFIX=/usr/local ..
使用网友的后面加一堆配置就会遇到各种报错,这种编译一直用的很顺手,没有报错
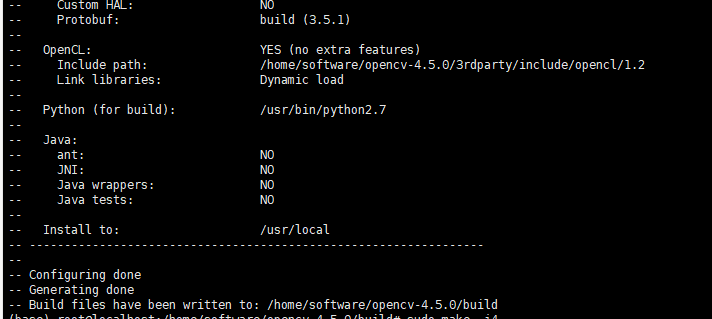
然后就等待安装完成,最后输出如下,没有报错就说成功了一半
3.3 编译
$ sudo make 或者 sudo make -j4
这里需要耐心的等待编译
3.4 安装
$ sudo make install
对应卸载就是 :
$ sudo make uninstall
测试 opencv 版本的。
opencv_version 或者 pkg-config --modversion opencv

到此opencv源码编译成功。
二.TensorRT下载安装
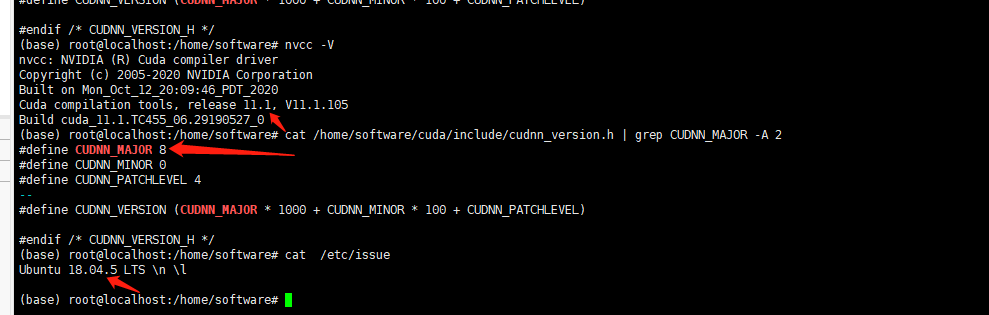
1.对应自己的Cuda 和Cudnn以及系统的版本
$ nvcc -V 												   #查看cuda的版本
$ cat /usr/local/cuda/include/cudnn.h | grep CUDNN_MAJOR -A 2  #查看cudnn的版本
$ cat  /etc/issue                                              #查看ubuntu系统版本
我的版本信息如下 :
2.下载
TensorRT链接
直接点击下载进入选项

这里选择一般选择相对用户比较多的版本。
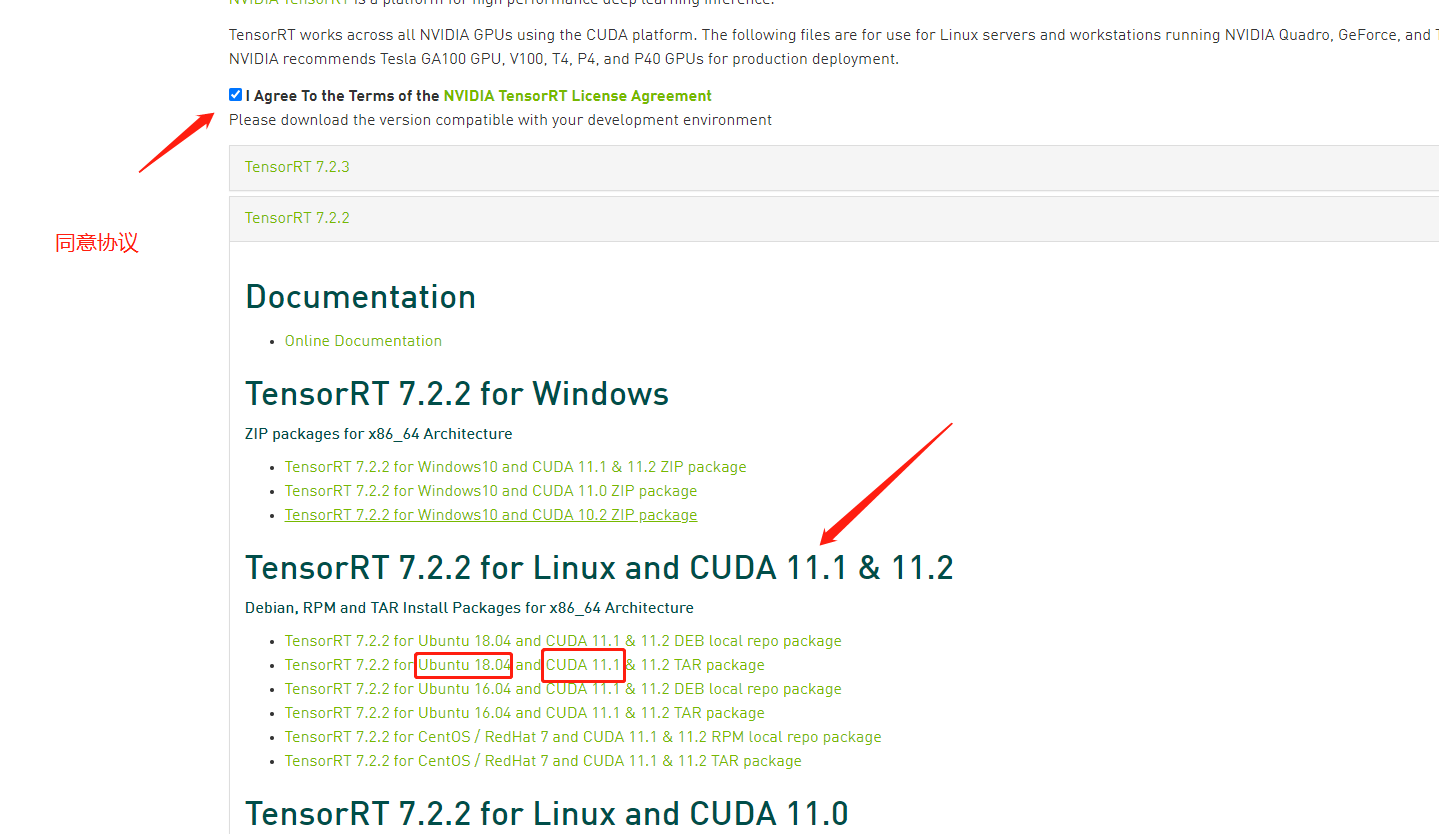
注意:这里要注意选择与自己cuda和操作系统的版本相适应的下载,否则兄弟你会怀疑人生的(千万不要不符合,也不要比你的环境高也不要低,不然很麻烦,博主自己第一次按的时候没注意看,导致一直报错) 。
3.安装TensorRT
(1)将下载的压缩文件进行解压:
$ tar zxvf TensorRT-7.2.2.3.Ubuntu-18.04.x86_64-gnu.cuda-11.1.cudnn8.0.tar.gz
(2)环境配置:
解压得到TensorRT的文件夹,将里边的lib绝对路径添加到环境变量中
vim ~/.bashrc
export LD_LIBRARY_PATH=$LD_LIBRARY_PATH:/home/software/TensorRT-7.2.2.3/lib
刷新配置:source ~/.bashrc
(3) 安装TensorRT
$ cd TensorRT-7.2.2.3/python/
$ pip install tensorrt-7.2.2.3-cp37-none-linux_x86_64.whl
博主亲测,这里你的python环境并没有限制,py35,py36,py37都可 ,一般安装与自己python版本对应的最稳。

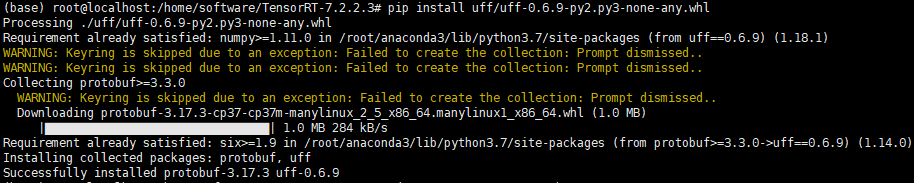
#安装UFF,支持tensorflow模型转化
$ cd TensorRT-7.2.2.3/uff/
$ pip install uff-0.6.9-py2.py3-none-any.whl
#安装graphsurgeon,支持自定义结构
cd TensorRT-7.2.2.3/graphsurgeon
pip install graphsurgeon-0.4.5-py2.py3-none-any.whl

以上,我们就成功的将tensorRT安装完了,试着执行一下python,然后看能不能导入这些模块。 如果成功的import tensorrt,那么就算安装成功咯。
ps:import uff的时候,需要提前install tensorflow模块。
pip install tensorflow-gpu==2.4.0
(4)安装PyCUDA
PyCUDA是Python使用NVIDIA CUDA的API,在Python中映射了所有CUDA的API
安装:
pip3 install pycuda==2021.1
三.tensorrt部署yolov5s(v5.0)
参考地址: https://blog.csdn.net/xingtianyao/article/details/111353568
最终实现的是yolovs 中默认的fp16的engine部署,测试通过yolov5_trt.py就可以看到效果,改造一下就可以视屏测试了
改造代码列:
"""
An example that uses TensorRT's Python api to make inferences.
"""
import ctypes
import os
import shutil
import random
import sys
import threading
import time
import cv2
import numpy as np
import pycuda.autoinit
import pycuda.driver as cuda
import tensorrt as trt
import torch
import torchvision
import argparse

CONF_THRESH = 0.5
IOU_THRESHOLD = 0.4


def get_img_path_batches(batch_size, img_dir):
    ret = []
    batch = []
    for root, dirs, files in os.walk(img_dir):
        for name in files:
            if len(batch) == batch_size:
                ret.append(batch)
                batch = []
            batch.append(os.path.join(root, name))
    if len(batch) > 0:
        ret.append(batch)
    return ret

def plot_one_box(x, img, color=None, label=None, line_thickness=None):
    """
    description: Plots one bounding box on image img,
                 this function comes from YoLov5 project.
    param:
        x:      a box likes [x1,y1,x2,y2]
        img:    a opencv image object
        color:  color to draw rectangle, such as (0,255,0)
        label:  str
        line_thickness: int
    return:
        no return
    """
    tl = (
        line_thickness or round(0.002 * (img.shape[0] + img.shape[1]) / 2) + 1
    )  # line/font thickness
    color = color or [random.randint(0, 255) for _ in range(3)]
    c1, c2 = (int(x[0]), int(x[1])), (int(x[2]), int(x[3]))
    cv2.rectangle(img, c1, c2, color, thickness=tl, lineType=cv2.LINE_AA)
    if label:
        tf = max(tl - 1, 1)  # font thickness
        t_size = cv2.getTextSize(label, 0, fontScale=tl / 3, thickness=tf)[0]
        c2 = c1[0] + t_size[0], c1[1] - t_size[1] - 3
        cv2.rectangle(img, c1, c2, color, -1, cv2.LINE_AA)  # filled
        cv2.putText(
            img,
            label,
            (c1[0], c1[1] - 2),
            0,
            tl / 3,
            [225, 255, 255],
            thickness=tf,
            lineType=cv2.LINE_AA,
        )


class YoLov5TRT(object):
    """
    description: A YOLOv5 class that warps TensorRT ops, preprocess and postprocess ops.
    """

    def __init__(self, engine_file_path):
        # Create a Context on this device,
        self.ctx = cuda.Device(0).make_context()
        stream = cuda.Stream()
        TRT_LOGGER = trt.Logger(trt.Logger.INFO)
        runtime = trt.Runtime(TRT_LOGGER)

        # Deserialize the engine from file
        with open(engine_file_path, "rb") as f:
            engine = runtime.deserialize_cuda_engine(f.read())
        context = engine.create_execution_context()

        host_inputs = []
        cuda_inputs = []
        host_outputs = []
        cuda_outputs = []
        bindings = []

        for binding in engine:
            print('bingding:', binding, engine.get_binding_shape(binding))
            size = trt.volume(engine.get_binding_shape(binding)) * engine.max_batch_size
            dtype = trt.nptype(engine.get_binding_dtype(binding))
            # Allocate host and device buffers
            host_mem = cuda.pagelocked_empty(size, dtype)
            cuda_mem = cuda.mem_alloc(host_mem.nbytes)
            # Append the device buffer to device bindings.
            bindings.append(int(cuda_mem))
            # Append to the appropriate list.
            if engine.binding_is_input(binding):
                self.input_w = engine.get_binding_shape(binding)[-1]
                self.input_h = engine.get_binding_shape(binding)[-2]
                host_inputs.append(host_mem)
                cuda_inputs.append(cuda_mem)
            else:
                host_outputs.append(host_mem)
                cuda_outputs.append(cuda_mem)

        # Store
        self.stream = stream
        self.context = context
        self.engine = engine
        self.host_inputs = host_inputs
        self.cuda_inputs = cuda_inputs
        self.host_outputs = host_outputs
        self.cuda_outputs = cuda_outputs
        self.bindings = bindings
        self.batch_size = engine.max_batch_size

    def infer(self, input_image_path):
        threading.Thread.__init__(self)
        # Make self the active context, pushing it on top of the context stack.
        self.ctx.push()
        self.input_image_path = input_image_path
        # Restore
        stream = self.stream
        context = self.context
        engine = self.engine
        host_inputs = self.host_inputs
        cuda_inputs = self.cuda_inputs
        host_outputs = self.host_outputs
        cuda_outputs = self.cuda_outputs
        bindings = self.bindings
        # Do image preprocess
        batch_image_raw = []
        batch_origin_h = []
        batch_origin_w = []
        batch_input_image = np.empty(shape=[self.batch_size, 3, self.input_h, self.input_w])

        input_image, image_raw, origin_h, origin_w = self.preprocess_image(input_image_path
                                                                           )


        batch_origin_h.append(origin_h)
        batch_origin_w.append(origin_w)
        np.copyto(batch_input_image, input_image)
        batch_input_image = np.ascontiguousarray(batch_input_image)

        # Copy input image to host buffer
        np.copyto(host_inputs[0], batch_input_image.ravel())
        start = time.time()
        # Transfer input data  to the GPU.
        cuda.memcpy_htod_async(cuda_inputs[0], host_inputs[0], stream)
        # Run inference.
        context.execute_async(batch_size=self.batch_size, bindings=bindings, stream_handle=stream.handle)
        # Transfer predictions back from the GPU.
        cuda.memcpy_dtoh_async(host_outputs[0], cuda_outputs[0], stream)
        # Synchronize the stream
        stream.synchronize()
        end = time.time()
        # Remove any context from the top of the context stack, deactivating it.
        self.ctx.pop()
        # Here we use the first row of output in that batch_size = 1
        output = host_outputs[0]
        # Do postprocess
        result_boxes, result_scores, result_classid = self.post_process(
            output, origin_h, origin_w)
        # Draw rectangles and labels on the original image
        for j in range(len(result_boxes)):
            box = result_boxes[j]
            plot_one_box(
                box,
                image_raw,
                label="{}:{:.2f}".format(
                    categories[int(result_classid[j])], result_scores[j]
                ),
            )
        return image_raw, end - start

    def destroy(self):
        # Remove any context from the top of the context stack, deactivating it.
        self.ctx.pop()

    def get_raw_image(self, image_path_batch):
        """
        description: Read an image from image path
        """
        for img_path in image_path_batch:
            yield cv2.imread(img_path)

    def get_raw_image_zeros(self, image_path_batch=None):
        """
        description: Ready data for warmup
        """
        for _ in range(self.batch_size):
            yield np.zeros([self.input_h, self.input_w, 3], dtype=np.uint8)

    def preprocess_image(self, input_image_path):
        """
        description: Convert BGR image to RGB,
                     resize and pad it to target size, normalize to [0,1],
                     transform to NCHW format.
        param:
            input_image_path: str, image path
        return:
            image:  the processed image
            image_raw: the original image
            h: original height
            w: original width
        """
        image_raw = input_image_path
        h, w, c = image_raw.shape
        image = cv2.cvtColor(image_raw, cv2.COLOR_BGR2RGB)
        # Calculate widht and height and paddings
        r_w = self.input_w / w
        r_h = self.input_h / h
        if r_h > r_w:
            tw = self.input_w
            th = int(r_w * h)
            tx1 = tx2 = 0
            ty1 = int((self.input_h - th) / 2)
            ty2 = self.input_h - th - ty1
        else:
            tw = int(r_h * w)
            th = self.input_h
            tx1 = int((self.input_w - tw) / 2)
            tx2 = self.input_w - tw - tx1
            ty1 = ty2 = 0
        # Resize the image with long side while maintaining ratio
        image = cv2.resize(image, (tw, th))
        # Pad the short side with (128,128,128)
        image = cv2.copyMakeBorder(
            image, ty1, ty2, tx1, tx2, cv2.BORDER_CONSTANT, (128, 128, 128)
        )
        image = image.astype(np.float32)
        # Normalize to [0,1]
        image /= 255.0
        # HWC to CHW format:
        image = np.transpose(image, [2, 0, 1])
        # CHW to NCHW format
        image = np.expand_dims(image, axis=0)
        # Convert the image to row-major order, also known as "C order":
        image = np.ascontiguousarray(image)
        return image, image_raw, h, w

    def xywh2xyxy(self, origin_h, origin_w, x):
        """
        description:    Convert nx4 boxes from [x, y, w, h] to [x1, y1, x2, y2] where xy1=top-left, xy2=bottom-right
        param:
            origin_h:   height of original image
            origin_w:   width of original image
            x:          A boxes tensor, each row is a box [center_x, center_y, w, h]
        return:
            y:          A boxes tensor, each row is a box [x1, y1, x2, y2]
        """
        y = torch.zeros_like(x) if isinstance(x, torch.Tensor) else np.zeros_like(x)
        r_w = self.input_w / origin_w
        r_h = self.input_h / origin_h
        if r_h > r_w:
            y[:, 0] = x[:, 0] - x[:, 2] / 2
            y[:, 2] = x[:, 0] + x[:, 2] / 2
            y[:, 1] = x[:, 1] - x[:, 3] / 2 - (self.input_h - r_w * origin_h) / 2
            y[:, 3] = x[:, 1] + x[:, 3] / 2 - (self.input_h - r_w * origin_h) / 2
            y /= r_w
        else:
            y[:, 0] = x[:, 0] - x[:, 2] / 2 - (self.input_w - r_h * origin_w) / 2
            y[:, 2] = x[:, 0] + x[:, 2] / 2 - (self.input_w - r_h * origin_w) / 2
            y[:, 1] = x[:, 1] - x[:, 3] / 2
            y[:, 3] = x[:, 1] + x[:, 3] / 2
            y /= r_h

        return y

    def post_process(self, output, origin_h, origin_w):
        """
        description: postprocess the prediction
        param:
            output:     A tensor likes [num_boxes,cx,cy,w,h,conf,cls_id, cx,cy,w,h,conf,cls_id, ...]
            origin_h:   height of original image
            origin_w:   width of original image
        return:
            result_boxes: finally boxes, a boxes tensor, each row is a box [x1, y1, x2, y2]
            result_scores: finally scores, a tensor, each element is the score correspoing to box
            result_classid: finally classid, a tensor, each element is the classid correspoing to box
        """
        # Get the num of boxes detected
        num = int(output[0])
        # Reshape to a two dimentional ndarray
        pred = np.reshape(output[1:], (-1, 6))[:num, :]
        # to a torch Tensor
        pred = torch.Tensor(pred).cuda()
        # Get the boxes
        boxes = pred[:, :4]
        # Get the scores
        scores = pred[:, 4]
        # Get the classid
        classid = pred[:, 5]
        # Choose those boxes that score > CONF_THRESH
        si = scores > CONF_THRESH
        boxes = boxes[si, :]
        scores = scores[si]
        classid = classid[si]
        # Trandform bbox from [center_x, center_y, w, h] to [x1, y1, x2, y2]
        boxes = self.xywh2xyxy(origin_h, origin_w, boxes)
        # Do nms
        indices = torchvision.ops.nms(boxes, scores, iou_threshold=IOU_THRESHOLD).cpu()
        result_boxes = boxes[indices, :].cpu()
        result_scores = scores[indices].cpu()
        result_classid = classid[indices].cpu()
        return result_boxes, result_scores, result_classid


class inferThread(threading.Thread):
    def __init__(self, yolov5_wrapper):
        threading.Thread.__init__(self)
        self.yolov5_wrapper = yolov5_wrapper
    def infer(self , frame):
        batch_image_raw, use_time = self.yolov5_wrapper.infer(frame)
        # for i, img_path in enumerate(self.image_path_batch):
        #     parent, filename = os.path.split(img_path)
        #     save_name = os.path.join('output', filename)
        #     # Save image
        #     cv2.imwrite(save_name, batch_image_raw[i])
        # print('input->{}, time->{:.2f}ms, saving into output/'.format(self.image_path_batch, use_time * 1000))
        return batch_image_raw,use_time*1000

class warmUpThread(threading.Thread):
    def __init__(self, yolov5_wrapper):
        threading.Thread.__init__(self)
        self.yolov5_wrapper = yolov5_wrapper

    def run(self):
        batch_image_raw, use_time = self.yolov5_wrapper.infer(self.yolov5_wrapper.get_raw_image_zeros())
        print('warm_up->{}, time->{:.2f}ms'.format(batch_image_raw[0].shape, use_time * 1000))


if __name__ == "__main__":
    # load custom plugins
    PLUGIN_LIBRARY = "/home/module/TR/yolov5-5.0/yolov5/build/libmyplugins.so"
    engine_file_path = "/home/module/TR/yolov5-5.0/yolov5/build/yolov5s.engine"

    if len(sys.argv) > 1:
        engine_file_path = sys.argv[1]
    if len(sys.argv) > 2:
        PLUGIN_LIBRARY = sys.argv[2]

    ctypes.CDLL(PLUGIN_LIBRARY)

    # load coco labels

    categories = ["bus", "truck", "car", ]
    # categories = ["person", "bicycle", "car", "motorcycle", "airplane", "bus", "train", "truck", "boat", "traffic light",
    #         "fire hydrant", "stop sign", "parking meter", "bench", "bird", "cat", "dog", "horse", "sheep", "cow",
    #         "elephant", "bear", "zebra", "giraffe", "backpack", "umbrella", "handbag", "tie", "suitcase", "frisbee",
    #         "skis", "snowboard", "sports ball", "kite", "baseball bat", "baseball glove", "skateboard", "surfboard",
    #         "tennis racket", "bottle", "wine glass", "cup", "fork", "knife", "spoon", "bowl", "banana", "apple",
    #         "sandwich", "orange", "broccoli", "carrot", "hot dog", "pizza", "donut", "cake", "chair", "couch",
    #         "potted plant", "bed", "dining table", "toilet", "tv", "laptop", "mouse", "remote", "keyboard", "cell phone",
    #         "microwave", "oven", "toaster", "sink", "refrigerator", "book", "clock", "vase", "scissors", "teddy bear",
    #         "hair drier", "toothbrush"]
    # a YoLov5TRT instance
    yolov5_wrapper = YoLov5TRT(engine_file_path)
    url="/opt/nvidia/deepstream/deepstream-5.1/samples/streams/test6.mp4"
    cap = cv2.VideoCapture(url)
    try:
        thread1 = inferThread(yolov5_wrapper)
        thread1.start()
        thread1.join()
        while 1:
            st=time.time()
            _,frame = cap.read()
            img,t=thread1.infer(frame)
            cv2.imshow("result", img)
            cv2.waitKey(1)
            print("time->{:.2f}ms",t)
            if cv2.waitKey(1) & 0XFF == ord('q'):  # 1 millisecond
                break
            if time.time()-st>0:
                print("====fps",1/(time.time()-st))

    finally:
        # destroy the instance
        cap.release()            #释放资源
        cv2.destroyAllWindows()  #destroyWindow()或destroyAllWindows()来关闭窗口并取消分配任何相关的内存使用。
        yolov5_wrapper.destroy() #释放堆栈资源
四.TensorRT量化INT8部署
因为很多小伙伴都怎样再提升帧率和识别速度等,手段就是通过INT8的模型去部署,但是网上关于量化INT8的模型方法千奇白怪,搞得不知如何下手,这里就就记录我趟坑之后的一个最简单的实践方式,虽然最后的检测效果不是很理想,可能是我自己的校准数据集比较少,但是流程是没有问题的,如有开发过程中的问题,可以邮箱找我,我看到就会回复你。
注意:在这之前请一定要保证你的上一步的Tensorrt.wts转.engine是成功的,这样就能保证你前面环境的正常,那么后面的量化INT8就会很简单。
1.打开yolov5.cpp
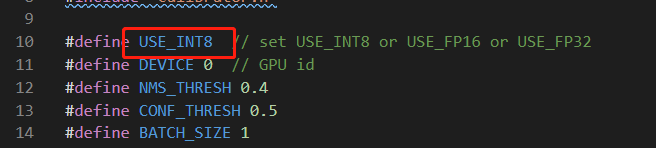
这里默认是USE_FP16,你要做的就是手动把USE_FP16替换成USE_INT8
2.指定INT校准图片
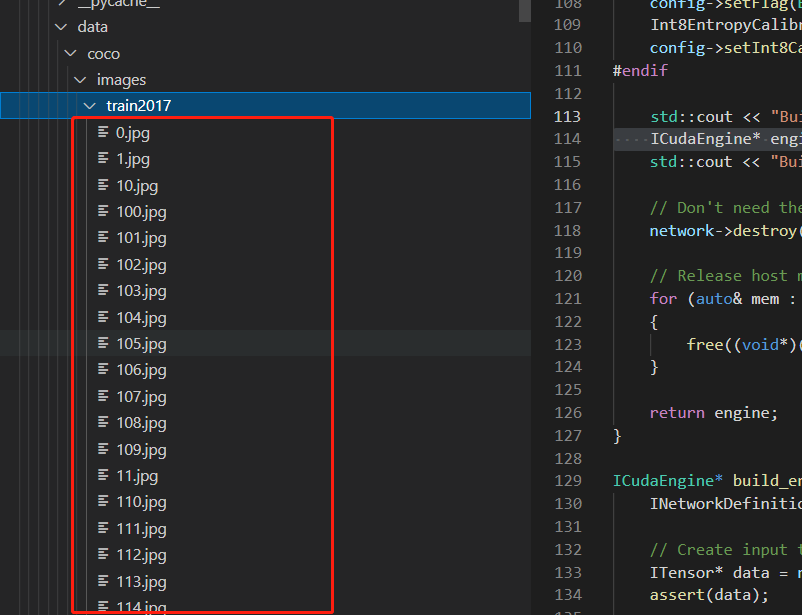
第一步:创建build目录然后在build目录中创建coco_calib文件夹,具体名字可参考你的yolov5.cpp的第109行

第二步:把你的数据集图片拷贝到coco_calib目录下,这些图片就是校准需要用到的
第三步:就是编译效准的过程了
cmake ..

make

./yolov5 -s  yolov5s.wts  yolov5s.engine s
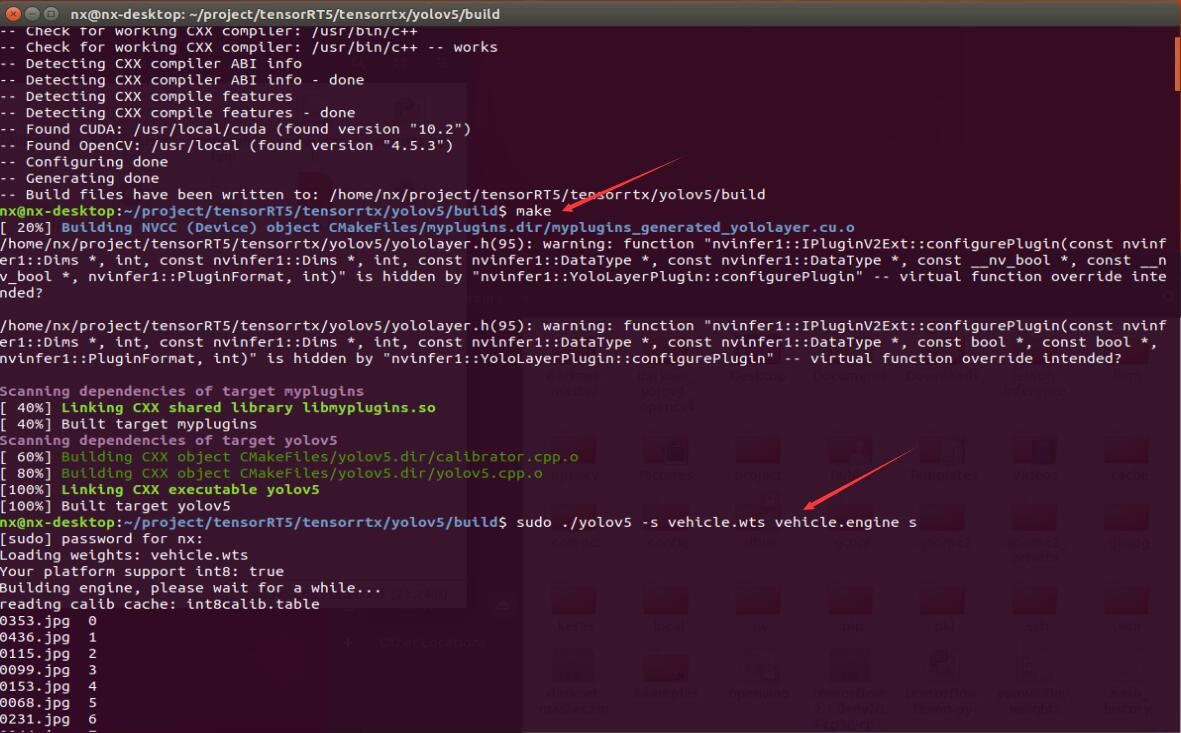
最后就会生成一个int8calib.table和yolov5s.engine文件,在yolov5_trt.py中替换模型后即可测试,到此本篇完成。
如果小伙伴们发现我哪里写的不好,或者有错误的地方请帮忙指出来,我再改进

 浙公网安备 33010602011771号