基于OpenVINO 2022.1 C++ API部署YOLOv7预训练模型
任务背景
作为视觉应用中最常见的任务之一,目标检测一直是各类新模型刷榜的必争之地,其中就以YOLO系列的网络结构最为突出。YOLO的全称是you only look once,指只通过one-stage的方式需要“浏览一次”就可以识别出图中的物体的类别和位置。近期YOLO官方团队又放出新版本——YOLOv7,速度、精度都超越其他变体。本文将分享如何基于OpenVINO™ 2022.1工具套件部署YOLOv7官方提供的预训练模型。附C++/Python源码及使用方法。
代码仓库:https://github.com/OpenVINO-dev-contest/YOLOv7_OpenVINO_cpp-python
OpenVINO简介
用于高性能深度学习的英特尔发行版OpenVINO™工具套件基于oneAPI而开发,以期在从边缘到云的各种英特尔平台上,帮助用户更快地将更准确的真实世界结果部署到生产系统中。通过简化的开发工作流程,OpenVINO™可赋能开发者在现实世界中部署高性能应用程序和算法。
在推理后端,得益于 OpenVINO™ 工具套件提供的“一次编写,随处部署”特性,转换后的模型能够在不同的英特尔硬件平台上运行,无需重新构建,有效简化了构建与迁移过程。此外,为了支持更多的异构加速单元,OpenVINO™的runtime api底层采用了插件式的开发架构,基于oneAPI中的MKL-DNN、oneDNN等函数计算加速库,针对AVX-512等通用指令集进行优化,为不同的硬件执行单元分别实现了一套完整的高性能算子库,提升模型在推理运行时的整体性能表现。
YOLOv7简介
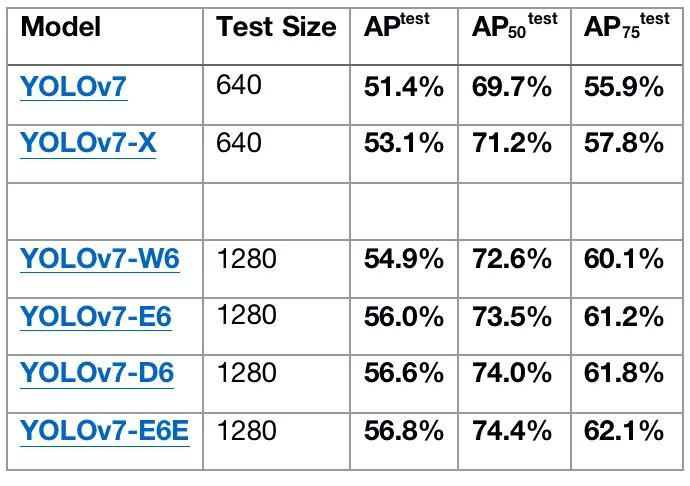
官方版的YOLOv7相同体量下比YOLOv5精度更高,速度快120%(FPS),比 YOLOX 快180%(FPS),比 Dual-Swin-T 快1200%(FPS),比 ConvNext 快550%(FPS),比 SWIN-L快500%(FPS)。在5FPS到160FPS的范围内,无论是速度或是精度,YOLOv7都超过了目前已知的检测器,并且在GPU V100上进行测试, 精度为56.8% AP的模型可达到30 FPS(batch=1)以上的检测速率,与此同时,这是目前唯一一款在如此高精度下仍能超过30FPS的检测器。
任务开发流程
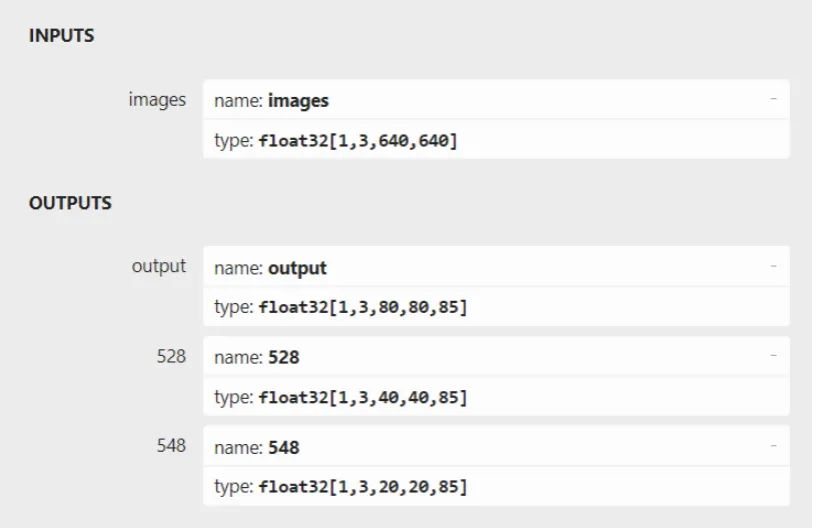
我们先整体来看下 YOLOv7的输入输出结构,首先对输入的图片 resize 为 640x640 大小,输入到 backbone 网络中,然后经 head 层网络输出三层不同 size 大小的 feature map,并输出预测结果,这里以 coco 为例子,输出为 80 个类别,然后每个输出(x ,y, w, h, o) 即坐标位置和是否存在物体的置信度,3 是指的 anchor 数量,因此每一层的输出为 (80+5) x 3 = 255再乘上 feature map 的大小就是最终的输出了。整个开发流程可以分为数据处理模块定义、前处理任务、推理任务、后处理任务四部分组成。

图:YOLOv7官方预训练模型的输入输出结构
1.数据处理模块
定义Object结构体用来存放模型的输出数据,包含bounding box信息,类别标签,以及是否存在物体和类别的累计置信度。
定义class_names向量,用于存放coco数据集的所有标签。
-
struct Object
-
{
-
cv::Rect_<float> rect;
-
int label;
-
float prob;
-
};
-
-
const std::vector<std::string> class_names = {
-
"person", "bicycle", "car", "motorcycle", "airplane", "bus", "train", "truck", "boat", "traffic light",
-
"fire hydrant", "stop sign", "parking meter", "bench", "bird", "cat", "dog", "horse", "sheep", "cow",
-
"elephant", "bear", "zebra", "giraffe", "backpack", "umbrella", "handbag", "tie", "suitcase", "frisbee",
-
"skis", "snowboard", "sports ball", "kite", "baseball bat", "baseball glove", "skateboard", "surfboard",
-
"tennis racket", "bottle", "wine glass", "cup", "fork", "knife", "spoon", "bowl", "banana", "apple",
-
"sandwich", "orange", "broccoli", "carrot", "hot dog", "pizza", "donut", "cake", "chair", "couch",
-
"potted plant", "bed", "dining table", "toilet", "tv", "laptop", "mouse", "remote", "keyboard", "cell phone",
-
"microwave", "oven", "toaster", "sink", "refrigerator", "book", "clock", "vase", "scissors", "teddy bear",
-
"hair drier", "toothbrush"};
定义letterbox与scale_box模块,分别用于在图像前处理任务中为输入数据添加letterbox,以及在后处理任务还原letterbox带来坐标位置变换。这里特别值得注意的是我们增加了一个padd向量,用于存放在添加letterbox过程中letterbox的size信息以及相较原始图片的缩放比例信息,该组数据会用于在后处理任务中还原删除letterbox以后的结果。
-
cv::Mat letterbox(cv::Mat &src, int h, int w, std::vector<float> &padd)
-
{
-
// Resize and pad image while meeting stride-multiple constraints
-
int in_w = src.cols;
-
int in_h = src.rows;
-
int tar_w = w;
-
int tar_h = h;
-
float r = min(float(tar_h) / in_h, float(tar_w) / in_w);
-
int inside_w = round(in_w * r);
-
int inside_h = round(in_h * r);
-
int padd_w = tar_w - inside_w;
-
int padd_h = tar_h - inside_h;
-
cv::Mat resize_img;
-
-
// resize
-
resize(src, resize_img, cv::Size(inside_w, inside_h));
-
-
// divide padding into 2 sides
-
padd_w = padd_w / 2;
-
padd_h = padd_h / 2;
-
padd.push_back(padd_w);
-
padd.push_back(padd_h);
-
-
// store the ratio
-
padd.push_back(r);
-
int top = int(round(padd_h - 0.1));
-
int bottom = int(round(padd_h + 0.1));
-
int left = int(round(padd_w - 0.1));
-
int right = int(round(padd_w + 0.1));
-
-
// add border
-
copyMakeBorder(resize_img, resize_img, top, bottom, left, right, 0, cv::Scalar(114, 114, 114));
-
return resize_img;
-
}
-
-
cv::Rect scale_box(cv::Rect box, std::vector<float> &padd)
-
{
-
// remove the padding area
-
cv::Rect scaled_box;
-
scaled_box.x = box.x - padd[0];
-
scaled_box.y = box.y - padd[1];
-
scaled_box.width = box.width;
-
scaled_box.height = box.height;
-
return scaled_box;
-
}
定义generate_proposals模块,该模块具体有以下几个功能:
-
根据预定义的anchors,在输入图像中生成各类feature map的先验框;
-
根据输出结果调整先验框位置和大小,并将其作为bounding box还原到输入图像的坐标系中;
-
过滤置信度较低的分类结果,获取类别结果;
-
static void generate_proposals(int stride, const float *feat, float prob_threshold, std::vector<Object> &objects)
-
{
-
// get the results from proposals
-
float anchors[18] = {12, 16, 19, 36, 40, 28, 36, 75, 76, 55, 72, 146, 142, 110, 192, 243, 459, 401};
-
int anchor_num = 3;
-
int feat_w = 640 / stride;
-
int feat_h = 640 / stride;
-
int cls_num = 80;
-
int anchor_group = 0;
-
if (stride == 8)
-
anchor_group = 0;
-
if (stride == 16)
-
anchor_group = 1;
-
if (stride == 32)
-
anchor_group = 2;
-
-
// 3 x h x w x (80 + 5)
-
for (int anchor = 0; anchor <= anchor_num - 1; anchor++)
-
{
-
for (int i = 0; i <= feat_h - 1; i++)
-
{
-
for (int j = 0; j <= feat_w - 1; j++)
-
{
-
float box_prob = feat[anchor * feat_h * feat_w * (cls_num + 5) + i * feat_w * (cls_num + 5) + j * (cls_num + 5) + 4];
-
box_prob = sigmoid(box_prob);
-
-
// filter the bounding box with low confidence
-
if (box_prob < prob_threshold)
-
continue;
-
float x = feat[anchor * feat_h * feat_w * (cls_num + 5) + i * feat_w * (cls_num + 5) + j * (cls_num + 5) + 0];
-
float y = feat[anchor * feat_h * feat_w * (cls_num + 5) + i * feat_w * (cls_num + 5) + j * (cls_num + 5) + 1];
-
float w = feat[anchor * feat_h * feat_w * (cls_num + 5) + i * feat_w * (cls_num + 5) + j * (cls_num + 5) + 2];
-
float h = feat[anchor * feat_h * feat_w * (cls_num + 5) + i * feat_w * (cls_num + 5) + j * (cls_num + 5) + 3];
-
-
double max_prob = 0;
-
int idx = 0;
-
-
// get the class id with maximum confidence
-
for (int t = 5; t < 85; ++t)
-
{
-
double tp = feat[anchor * feat_h * feat_w * (cls_num + 5) + i * feat_w * (cls_num + 5) + j * (cls_num + 5) + t];
-
tp = sigmoid(tp);
-
if (tp > max_prob)
-
{
-
max_prob = tp;
-
idx = t;
-
}
-
}
-
-
// filter the class with low confidence
-
float cof = box_prob * max_prob;
-
if (cof < prob_threshold)
-
continue;
-
-
// convert results to xywh
-
x = (sigmoid(x) * 2 - 0.5 + j) * stride;
-
y = (sigmoid(y) * 2 - 0.5 + i) * stride;
-
w = pow(sigmoid(w) * 2, 2) * anchors[anchor_group * 6 + anchor * 2];
-
h = pow(sigmoid(h) * 2, 2) * anchors[anchor_group * 6 + anchor * 2 + 1];
-
-
float r_x = x - w / 2;
-
float r_y = y - h / 2;
-
-
// store the results
-
Object obj;
-
obj.rect.x = r_x;
-
obj.rect.y = r_y;
-
obj.rect.width = w;
-
obj.rect.height = h;
-
obj.label = idx - 5;
-
obj.prob = cof;
-
objects.push_back(obj);
-
}
-
}
-
}
-
}
2.前处理任务
前处理主要包含以下几个步骤
-
使用OpenCV读取图片文件;
-
对于原始图片进行resize并添加letterbox;
-
将色彩通道从BGR转化为RGB;
-
将输入数据进行layout转置(NHWC=>NCHW),与归一化操作 (见模型推理部分代码);
-
cv::Mat src_img = cv::imread(image_path);
-
cv::Mat img;
-
-
std::vector<float> padd;
-
cv::Mat boxed = letterbox(src_img, img_h, img_w, padd);
-
cv::cvtColor(boxed, img, cv::COLOR_BGR2RGB);
3.推理任务

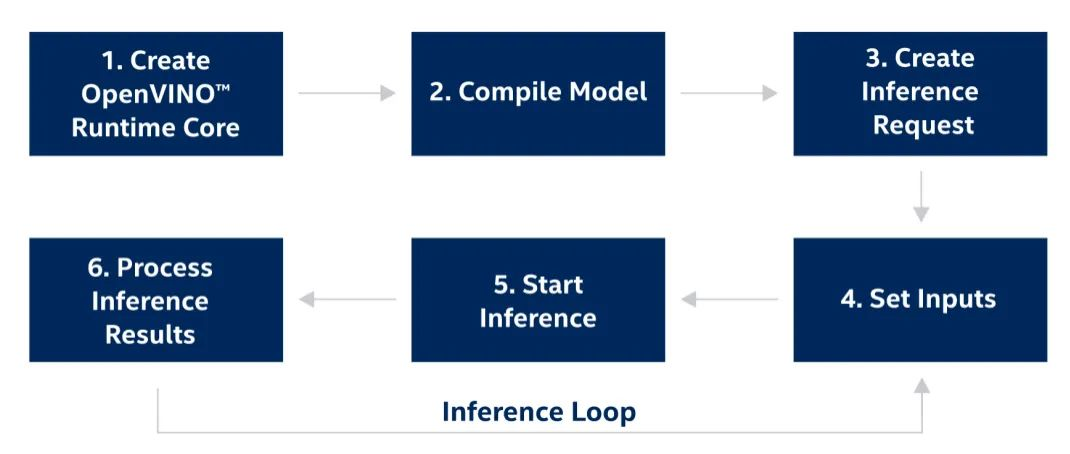
图:OpenVINOTM工具套件runtime开发流程
模型推理部分主要调用OpenVINO™ 的C++ API进行实现,OpenVINO™ 推理接口的调用流程如上图所示(可参考官方说明:https://docs.openvino.ai/latest/openvino_docs_OV_UG_Integrate_OV_with_your_application.html),在这里第2步 Complie Model亦可分为模型读取与模型编译两个步骤执行,同时可以发现相较2021.4之前的版本,OpenVINO™ 2022.1在输入以及输出数据的接口调用方式上有了极大的简化,可以通过Tensor相关的构造函数,轻松实现模型数据的载入和读取。在整个过程中开发者需要将输入数据进行layout转置(NHWC=>NCHW),并填充到input tensor所对应的数据指针地址中。在结果数据提取部分,由于该模型有3个不同尺度feature map output,因此我们需要逐一获取他们结果数据指针。
-
// -------- Step 1. Initialize OpenVINO Runtime Core --------
-
ov::Core core;
-
-
// -------- Step 2. Read a model --------
-
std::shared_ptr<ov::Model> model = core.read_model(model_path);
-
-
// -------- Step 3. Loading a model to the device --------
-
ov::CompiledModel compiled_model = core.compile_model(model, device_name);
-
-
// Get input port for model with one input
-
auto input_port = compiled_model.input();
-
// Create tensor from external memory
-
// ov::Tensor input_tensor(input_port.get_element_type(), input_port.get_shape(), input_data.data());
-
// -------- Step 4. Create an infer request --------
-
ov::InferRequest infer_request = compiled_model.create_infer_request();
-
-
// -------- Step 5. Prepare input --------
-
ov::Tensor input_tensor1 = infer_request.get_input_tensor(0);
-
// NHWC => NCHW
-
auto data1 = input_tensor1.data<float>();
-
for (int h = 0; h < img_h; h++)
-
{
-
for (int w = 0; w < img_w; w++)
-
{
-
for (int c = 0; c < 3; c++)
-
{
-
// int in_index = h * img_w * 3 + w * 3 + c;
-
int out_index = c * img_h * img_w + h * img_w + w;
-
data1[out_index] = float(img.at<cv::Vec3b>(h, w)[c]) / 255.0f;
-
}
-
}
-
}
-
-
// -------- Step 6. Start inference --------
-
infer_request.infer();
-
-
// -------- Step 7. Process output --------
-
auto output_tensor_p8 = infer_request.get_output_tensor(0);
-
const float *result_p8 = output_tensor_p8.data<const float>();
-
auto output_tensor_p16 = infer_request.get_output_tensor(1);
-
const float *result_p16 = output_tensor_p16.data<const float>();
-
auto output_tensor_p32 = infer_request.get_output_tensor(2);
-
const float *result_p32 = output_tensor_p32.data<const float>();
4.后处理任务
后处理部分需要调用我们之前定义的generate_proposals用于还原每一个feature map的结果数据,并进行堆叠,最后使用OpenCV DNN模块中自带的NMS方法,完成对结果bounding box的非极大抑制过滤,获取我们在原始input image中的目标位置与类别信息。
-
generate_proposals(8, result_p8, prob_threshold, objects8);
-
proposals.insert(proposals.end(), objects8.begin(), objects8.end());
-
generate_proposals(16, result_p16, prob_threshold, objects16);
-
proposals.insert(proposals.end(), objects16.begin(), objects16.end());
-
generate_proposals(32, result_p32, prob_threshold, objects32);
-
proposals.insert(proposals.end(), objects32.begin(), objects32.end());
-
-
std::vector<int> classIds;
-
std::vector<float> confidences;
-
std::vector<cv::Rect> boxes;
-
-
for (size_t i = 0; i < proposals.size(); i++)
-
{
-
classIds.push_back(proposals[i].label);
-
confidences.push_back(proposals[i].prob);
-
boxes.push_back(proposals[i].rect);
-
}
-
-
std::vector<int> picked;
-
-
// do non maximum suppression for each bounding boxx
-
cv::dnn::NMSBoxes(boxes, confidences, prob_threshold, nms_threshold, picked);
此外,我们还需要进一步调整模型input data对应的结果数据,将其还原到原始尺寸的图片上进行展示。
-
int idx = picked[i];
-
cv::Rect box = boxes[idx];
-
cv::Rect scaled_box = scale_box(box, padd);
-
drawPred(classIds[idx], confidences[idx], scaled_box, padd[2], raw_h, raw_w, src_img, class_names);
参考示例使用方法
该示例分别提供了C++和Python的参考实现,具体使用方法如下:
-
# 下载示例仓库
-
$ git clone https://github.com/OpenVINO-dev-contest/YOLOv7_OpenVINO_cpp-python.git
1.依赖安装
C++ 环境依赖
由于本示例的C++版本只依赖OpenVINO™ 和OpenCV的运行库,所以需要开发者提前完成对这两个工具组件的安装:
OpenVINO™ C++ runtime:https://docs.openvino.ai/latest/openvino_docs_install_guides_installing_openvino_linux.html#install-openvino
OpenCV环境:https://docs.opencv.org/4.x/d7/d9f/tutorial_linux_install.html
注:由于该示例中提供的CMakeList使用OpenCV的默认路径,因此需要在完成OpenCV的编译后,执行make install命令。
Python环境依赖
Python环境的安装相对简单,只需通过pip命令行工具进行依赖安装
$ pip install -r python/requirements2.预训练模型下载
可以从官方github仓库提供的链接中下载基于COCO数据集的YOLOv7预训练模型权重 https://github.com/WongKinYiu/yolov7

3.模型转换
目前 OpenVINO™ runtime可以直接支持onnx格式的模型部署,所以我们在得到.pt权重文件后,只需使用官方自带export.py脚本,就可将其导出为onnx格式模型,具体过程如下:
-
# 下载YOLOv7官方仓库:
-
$ git clone git@github.com:WongKinYiu/yolov7.git
-
$ cd yolov7/models
-
$ python export.py --weights yolov7.pt
4.测试运行
C++示例
编译C++示例源码,编译完成后会在build目录下生成yolov7可执行文件:
-
$ cd cpp
-
$ mkdir build && cd build
-
$ source '~/intel/openvino_2022.1.0.643/bin/setupvars.sh'
-
$ cmake ..
执行推理任务:
$ yolov7 yolov7.onnx data/horses.jpg 'CPU'Python示例
执行推理任务:
$ python python/main.py -m yolov7.onnx -i data/horse.jpg5.测试结果
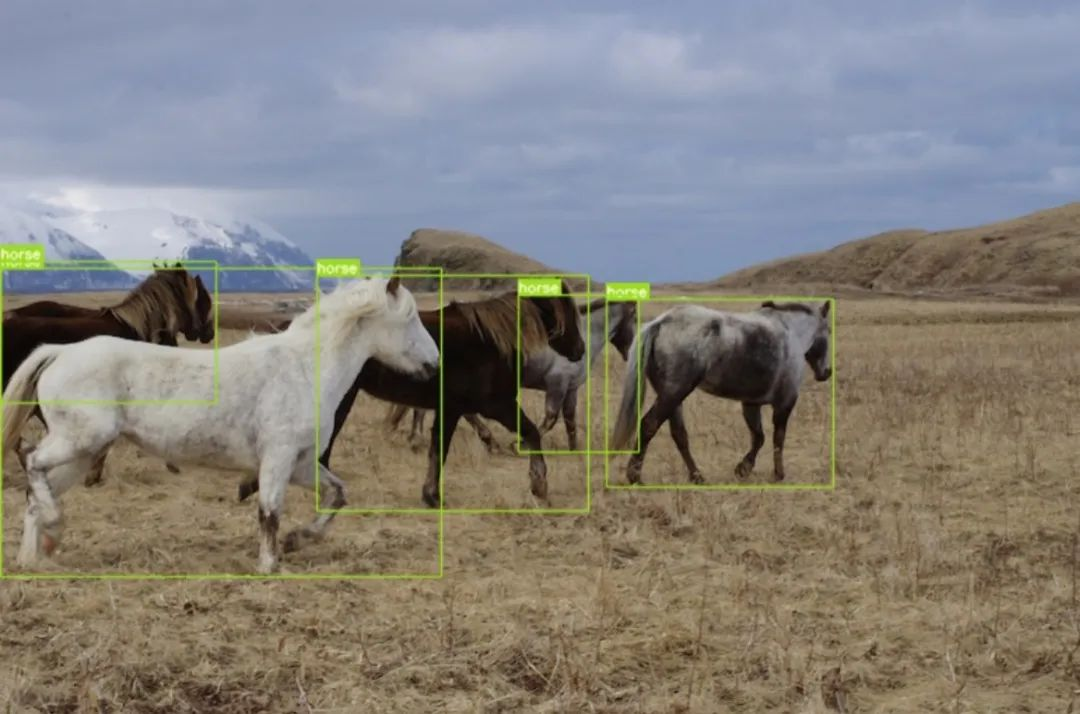
运行推理示例后,会在本地目录下生成代bounding box以及label的图片,这里我们用到官方仓库中附带的马匹数据进行测试,具体结果如下:

图:推理运行结果
Benchmark App 介绍
OpenVINO™ 提供了性能测试工具 Benchmark App ,方便开发者快速测试 OpenVINO™ 模型在不同的硬件平台上的性能。我们以下面的例子,简单介绍 benchmark app 的使用方法和相关参数,更多内容请参考 Benchmark App 官方文档。
$ benchmark_app -m yolov7.onnx -hint throughput-
m: 指定模型路径。由于目前OpenVINO™ runtime是支持直接读取onnx格式文件的,所以这里我们设置为导出以后onnx模型。
-
hint: 指定性能测试的优先策略,以自动选择底层性能优化相关参数。这里我们选择 throughput 模式来提升系统整体吞吐量。如果应用对延迟比较敏感,推荐使用 latency 模式来减少推理延迟。
结论
YOLOv7由于其出色的精度和性能表现,在推出第一时就受到了极大的关注,目前github上的star已超过5K。本示例通过OpenVINO™ 2022.1新版本的C++ API接口,实现对YOLOv7官方预训练模型的部署。最后使用OpenVINO™ 自带的benchmark_app工具进一步对模型的性能进行验证测试。
参考文献
-
YOLOv7官方仓库:https://github.com/WongKinYiu/yolov7
-
OpenVINO™ 开发文档:https://docs.openvino.ai/latest/openvino_docs_OV_UG_Integrate_OV_with_your_application.html


