Java教程_002
final关键字
final 关键字是最终的意思,可以修饰(类、方法、变量)
修饰类:该类被称为最终类,特点是不能被继承了。
修饰方法:该方法被称为最终方法,特点是不能被重写了。
修饰变量:该变量只能被赋值一次。
final修饰的变量必须赋值,要么在定义时赋值,要么在构造器中赋值
final修饰变量的注意点
final修饰基本类型的变量,变量存储的数据不能被改变。
final修饰引用类型的变量,变量存储的地址不能被改变,但地址所指向对象的内容是可以被改变的。
// 注意final修饰引用类型变量,是指这个变量不能再指向其他对象,但是可以修改它指向的字段值

// final修饰数组不能重新赋值,但数组中的元素可以被更改
final int[] arr1 = {10, 20, 30};
// arr1 = null; // 第二次赋值
arr1[1] = 222;
System.out.println(arr1[1]);
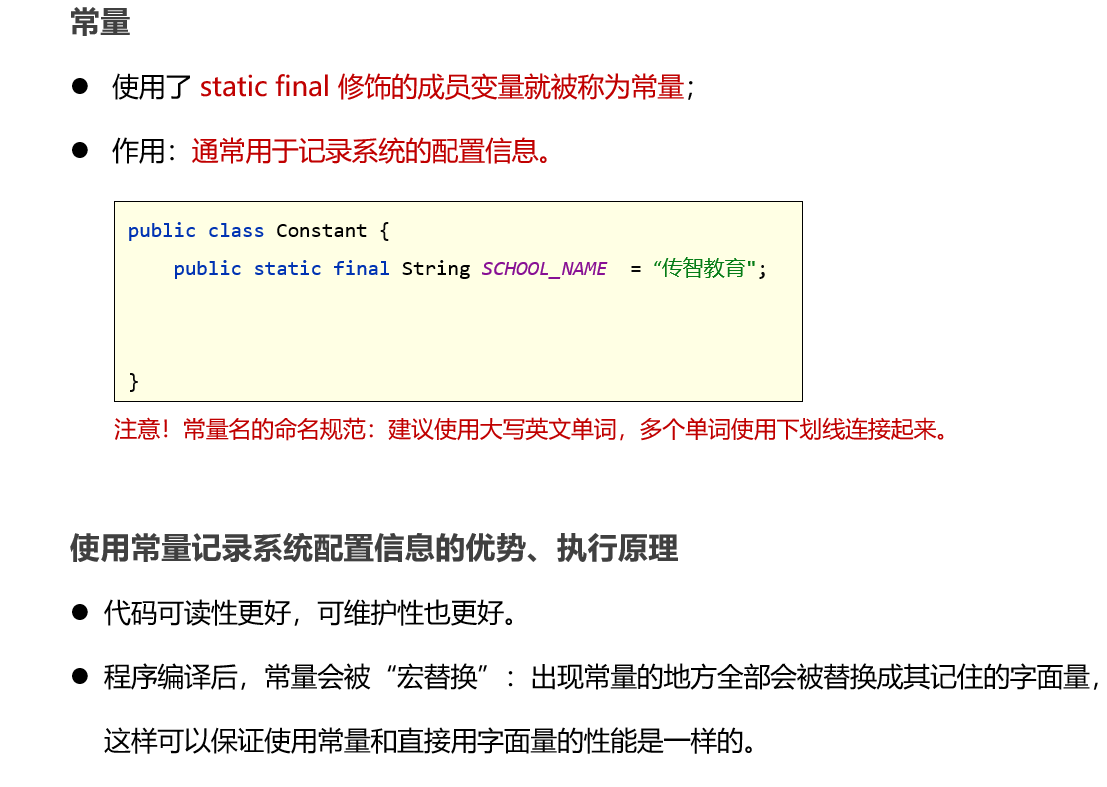
常量
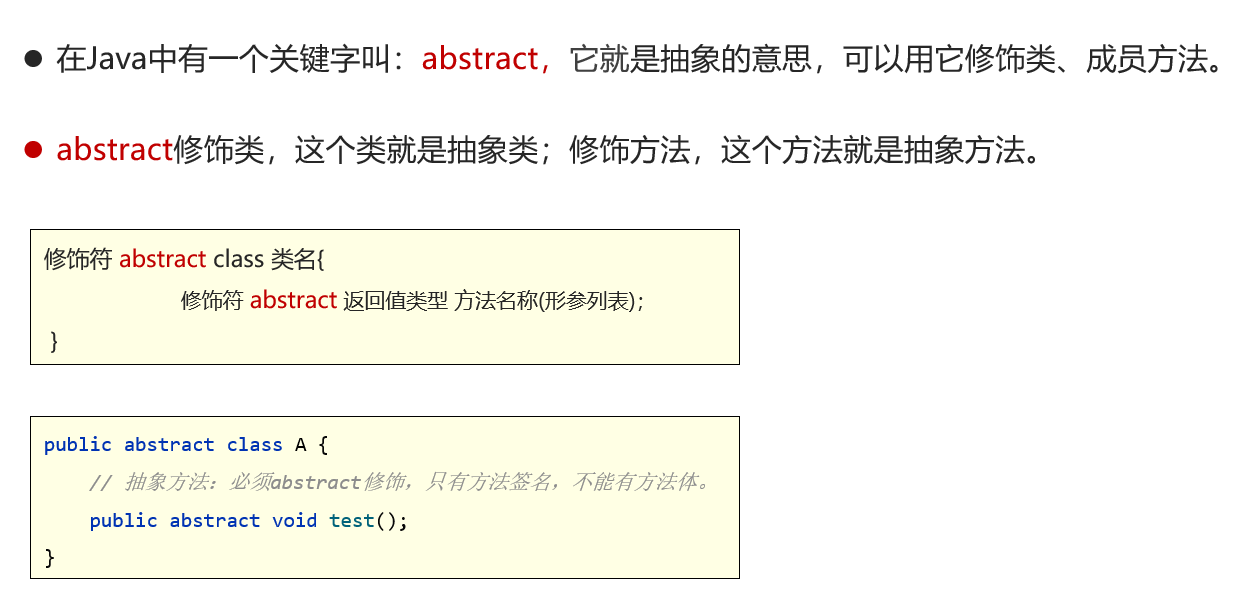
抽象类
被abstract修饰的类,就是抽象类
被abstract修饰的方法,就是抽象方法(不允许有方法体)
注意事项
抽象类中不一定有抽象方法,有抽象方法的类一定是抽象类。
类该有的成员(成员变量、方法、构造器),抽象类都可以有。
抽象类最主要的特点:
抽象类不能创建对象,仅作为一种特殊的父类,让子类继承并实现。
一个类继承抽象类,必须重写完抽象类的全部抽象方法,否则这个类也必须定义成抽象类。
抽象类中不能有静态方法,因为抽象类中的方法是需要被子类重写的,而静态方法是无法被重写的
抽象类肯定含有构造方法, 子类创建对象时调用子类构造方法,子类构造方法体执行前会先执行父类的构造方法
abstract与final不能同时使用
抽象类不能被实例化
抽象类不能被实例化的主要原因是抽象类本身存在抽象方法,而抽象方法没有具体的实现代码。因此,实例化一个抽象类没有意义,因为你无法为抽象方法提供具体的实现。
抽象类的主要作用是为其子类提供一个通用的模板和一组共享的方法签名,以便子类必须提供这些方法的具体实现。这些子类在提供具体实现之前不能被实例化。
当你创建一个抽象类时,你可以在其中定义一些抽象方法,然后让具体的子类来继承这个抽象类并实现这些抽象方法。子类必须提供这些方法的具体实现才能创建对象。
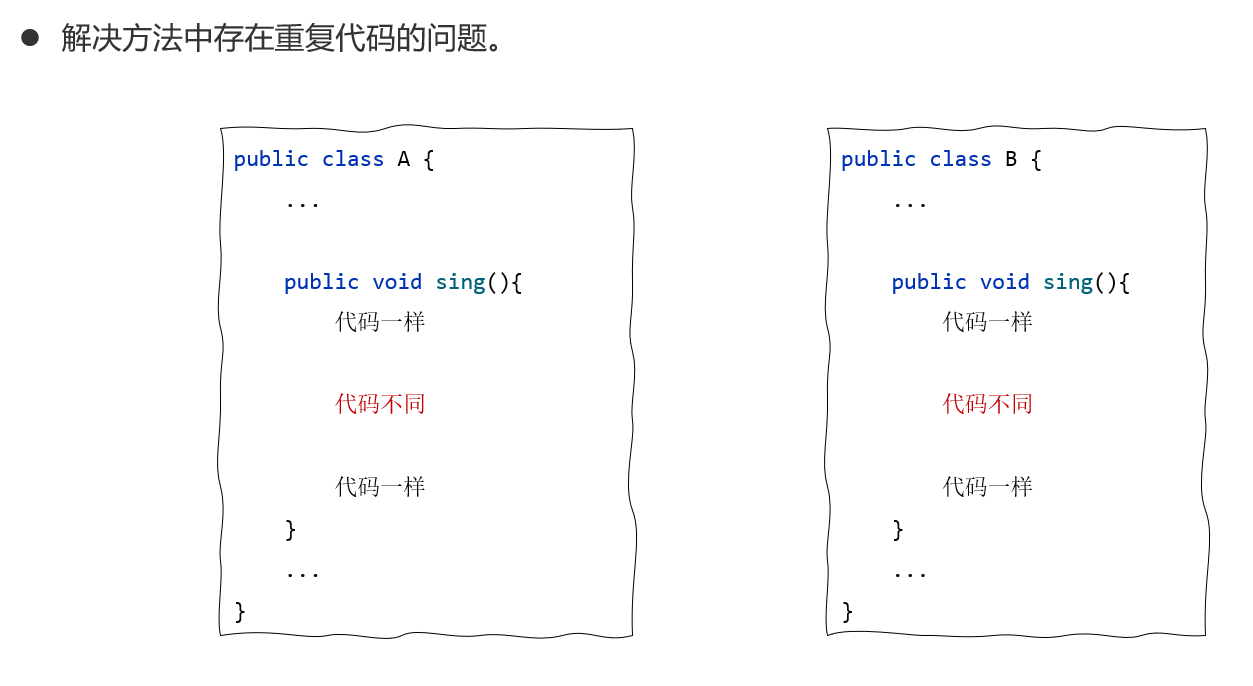
抽象类的好处
-
用抽象类可以把父类中相同的代码,包括方法声明都抽取到父类,这样能更好的支持多态,提高代码的灵活性。
-
反过来用,我们不知道系统未来具体的业务实现时,我们可以先定义抽象类,将来让子类去实现,以方便系统的扩展。
模板方法设计模式
模板方法设计模式的写法
1、定义一个抽象类
2、抽象类中定义2个方法
- 一个是模板方法:把相同的代码放到模板方法里面
- 一个是抽象方法:具体的方法实现交给子类完成
建议使用final关键字修饰模板方法,因为模板方法是对象直接使用的,不能被子类重写,一旦子类重写了模板方法,模板方法就失效了
package com.itheima.d4_abstract_template_method;
// 模板方法设计模式
public abstract class C {
    // 模板方法
    public final void sing(){
        System.out.println("唱一首你喜欢的歌:");

        doSing();

        System.out.println("唱完了!");
    }

    public abstract void doSing();
}
------------------------------------------------------
package com.itheima.d4_abstract_template_method;

public class B extends C{
    @Override
    public void doSing() {
        System.out.println("我们一起学猫叫,喵喵喵喵喵喵喵~~");
    }
}
--------------------------------------------------------
package com.itheima.d4_abstract_template_method;

import java.text.DateFormat;

public class Test {
    public static void main(String[] args) {
        // 目标:搞清楚模板方法设计模式能解决什么问题,以及怎么写。
        B b = new B();
        b.sing();
    }
}
接口(实现类)
什么是接口(实现类)
Java提供了一个关键字interface,用这个关键字来定义接口这种特殊结构。格式如下
public interface 接口名{
    //成员变量(常量)
    //成员方法(抽象方法)
}
按照接口的格式,我们定义一个接口看看
public interface A{
    //这里public static final可以加,可以不加。
    // public static final String SCHOOL_NAME = "黑马程序员";

    //这里的public abstract可以加,可以不加。
    // public abstract void test();
}

public interface A {
    // 成员变量(常量)
    String SCHOOL_NAME = "黑马程序员";

    // 成员方法(抽象方法)
    void test();

}
写好A接口之后,在写一个测试类,用一下
public class Test{
    public static void main(String[] args){
        //打印A接口中的常量
        System.out.println(A.SCHOOL_NAME);

        //接口是不能创建对象的
        A a = new A();
    }
}
接口注意事项
我们发现定义好接口之后,是不能创建对象的。那接口到底什么使用呢?需要我注意下面两点
- 接口是用来被类实现(implements)的,我们称之为实现类。
- 一个类是可以实现多个接口的(接口可以理解成干爹),类实现接口必须重写所有接口的全部抽象方法,否则这个类也必须是抽象类
接口的好处
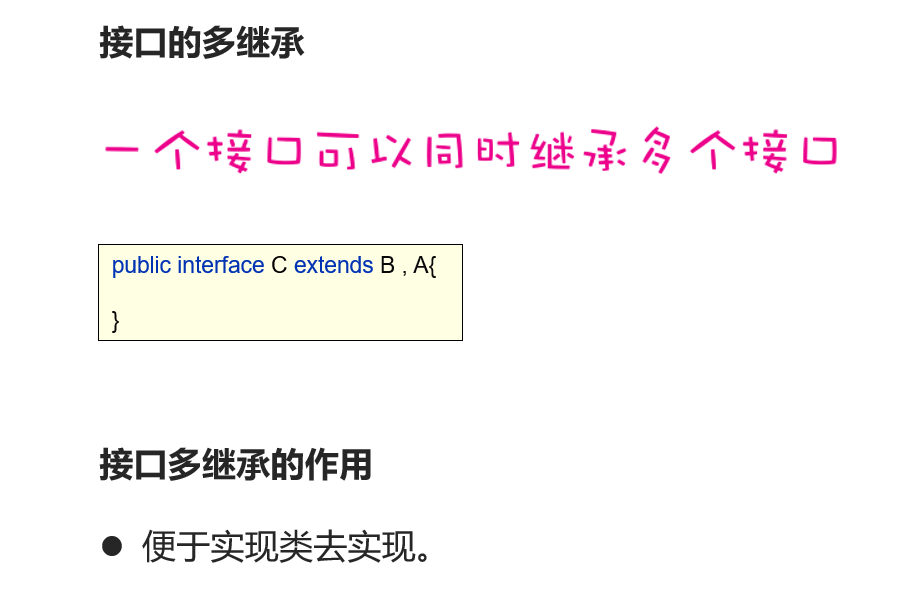
- 弥补了类单继承的不足,一个类同时可以实现多个接口。
- 让程序可以面向接口编程,这样程序员可以灵活方便的切换各种业务实现。
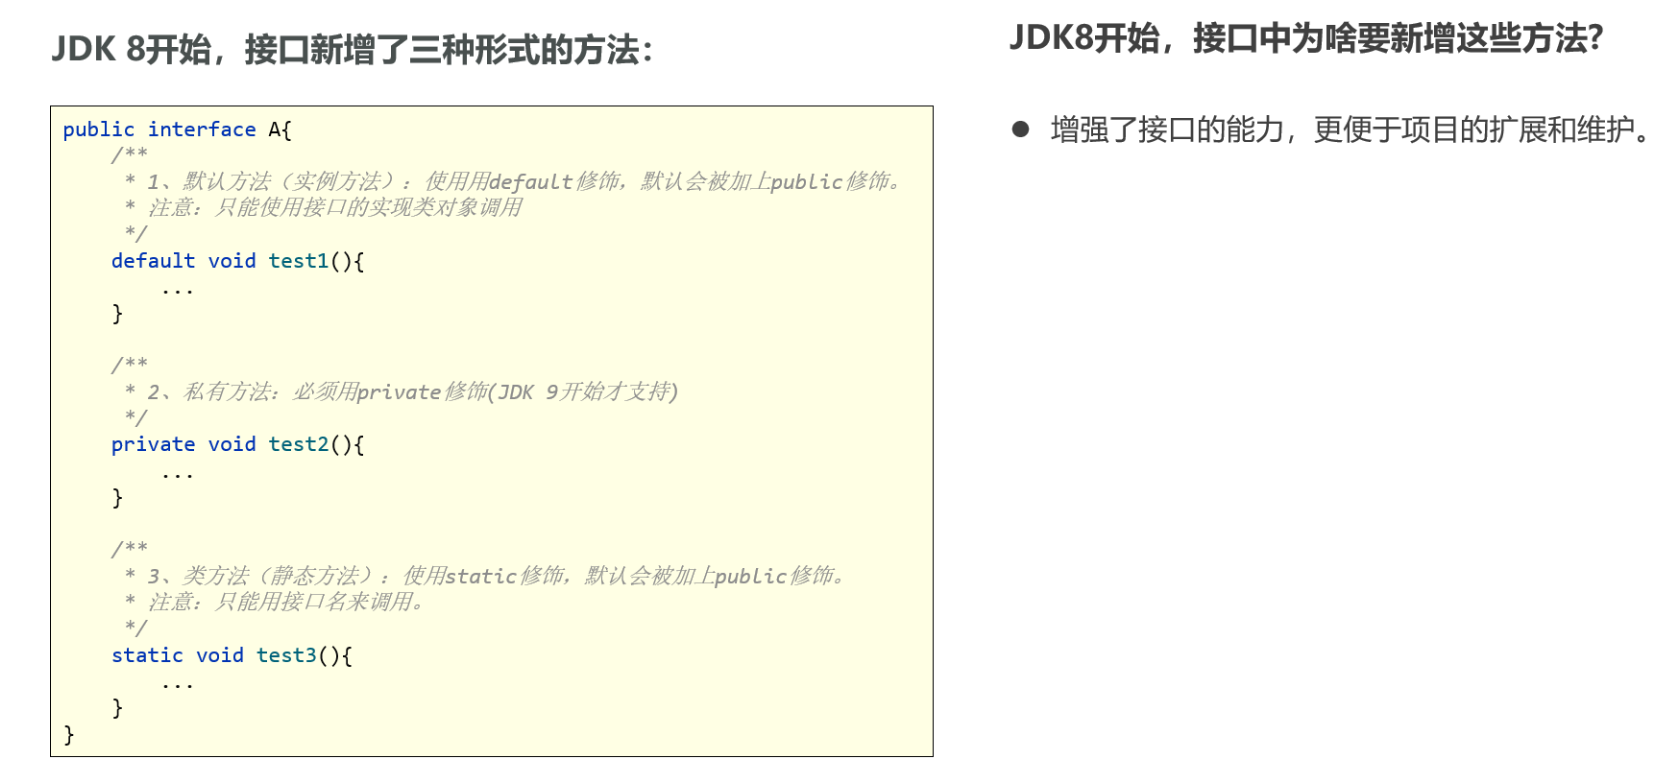
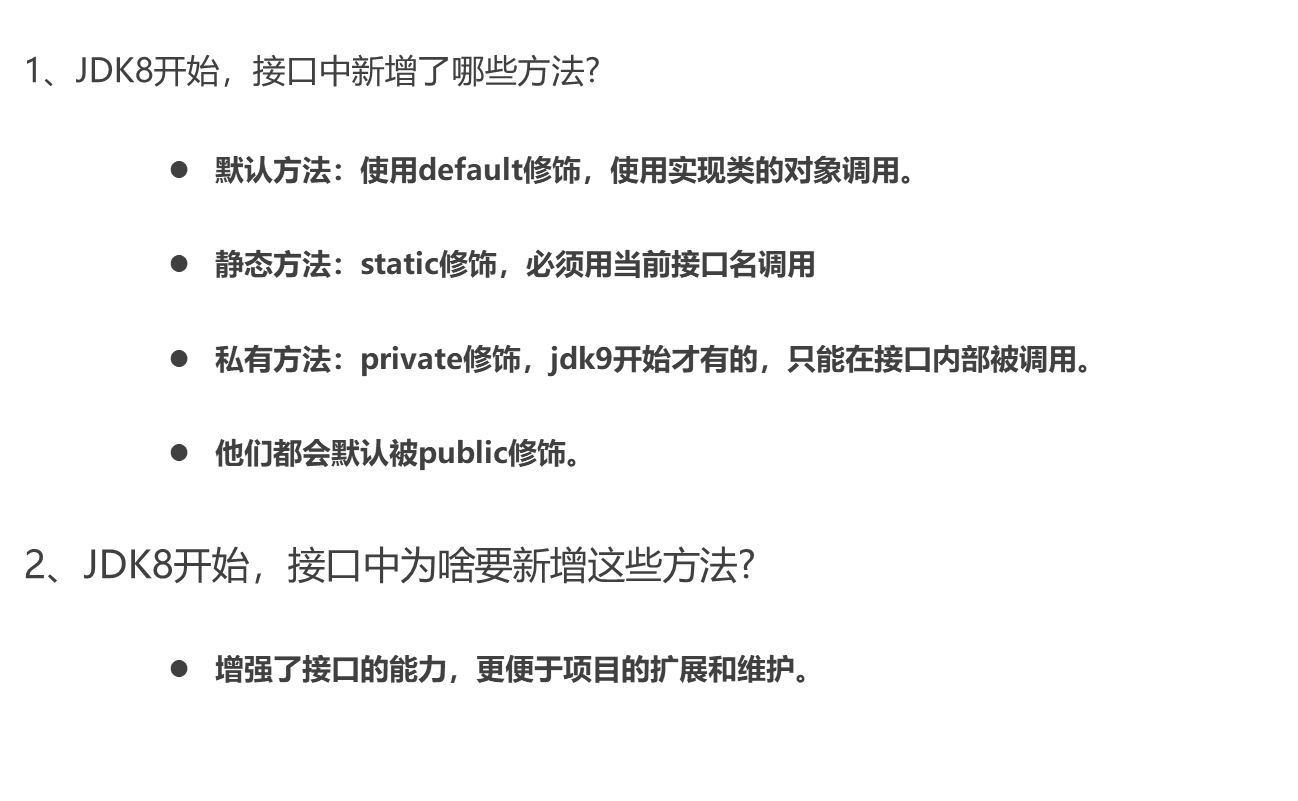
jdk8后接口新增的方法
default方法(只能通过接口的实现类调用)、静态方法(接口名调用)、私有方法(jdk9之后,只能在接口内部使用)
接口的多继承
package com.itheima.d8_interface_jdk8;

public interface A {
    /**
     * 1、默认方法:必须使用default修饰,默认会被public修饰
     * 实例方法:对象的方法,必须使用实现类的对象来访问。
     */
    default void test1(){
        System.out.println("===默认方法==");
        test2();
    }

    /**
     * 2、私有方法:必须使用private修饰。(JDK 9开始才支持的)
     *   实例方法:对象的方法。
     */
    private void test2(){
        System.out.println("===私有方法==");
    }

    /**
     * 3、静态方法:必须使用static修饰,默认会被public修饰
     */
     static void test3(){
        System.out.println("==静态方法==");
     }

     void test4();
     void test5();
     default void test6(){

     }
}
接口的注意事项
1.一个接口继承多个接口,如果多个接口中存在相同的方法声明,则此时不支持多继承
2.一个类实现多个接口,如果多个接口中存在相同的方法声明,则此时不支持多实现
3.一个类继承了父类,又同时实现了接口,父类中和接口中有同名的默认方法,实现类会优先使用父类的方法
4.一个类实现多个接口,多个接口中有同名的默认方法,则这个类必须重写该方法。
package com.itheima.d9_interface_attention;

import java.util.Calendar;
import java.util.Date;

public class Test2 {
    public static void main(String[] args) {
        // 目标:了解使用接口的几点注意事项。

//        Zi zi = new Zi();
//        zi.run();

    }
}

//// 1、一个接口继承多个接口,如果多个接口中存在方法签名冲突,则此时不支持多继承。
//interface I{
//    void test1();
//}
//interface J{
//    String test1();
//}
////interface K extends I, J{
////
////}

//// 2、一个类实现多个接口,如果多个接口中存在方法签名冲突,则此时不支持多实现。
////class E implements I, J{
////
////}

//// 3、一个类继承了父类,又同时实现了接口,父类中和接口中有同名的默认方法,实现类会优先用父类的。
//class Fu{
//    public void run(){
//        System.out.println("===父类的run方法执行了===");
//    }
//}
//interface IT{
//    default void run(){
//        System.out.println("===接口IT中的run方法执行了===");
//    }
//}
//class Zi extends Fu implements IT {
//
//}

//// 4、一个类实现了多个接口,多个接口中存在同名的默认方法,可以不冲突,这个类重写该方法即可。
//interface It1{
//    default void test(){
//        System.out.println("IT1");
//    }
//}
//
//interface IT2{
//    default void test(){
//        System.out.println("IT2");
//    }
//}
//
//class N implements It1, IT2{
//    @Override
//    public void test() {
//        System.out.println("自己的");
//    }
//}
接口和抽象类的异同
不同点
● 抽象类中可以定义构造器,接口不能;
● 抽象类可以有抽象方法和具体方法,接口不能有具体方法;
● 接口中的成员全都是 public 的,抽象类中的成员可以使用private、public、protected、默认等修饰;
接口方法在JDK8之前只有public abstract,在JDK8可以有default方法和static方法,在JDK9中允许有private方法(只能在接口内部调用)
● 抽象类中可以定义成员变量,接口中只能是常量;
● 有抽象方法的类必须被声明为抽象类,而抽象类未必要有抽象方法;
● 抽象类中可以包含静态方法,接口中不能有静态方法(jdk8之前);
● 一个类只能继承一个抽象类,一个类可以实现多个接口;
相同点
● 不能够实例化;
● 可以将抽象类和接口类型作为引用类型;
● 一个类如果继承了某个抽象类或者实现了某个接口都需要对其中的抽象方法全部进行实现,否则该类仍然需要被声明为抽象类;
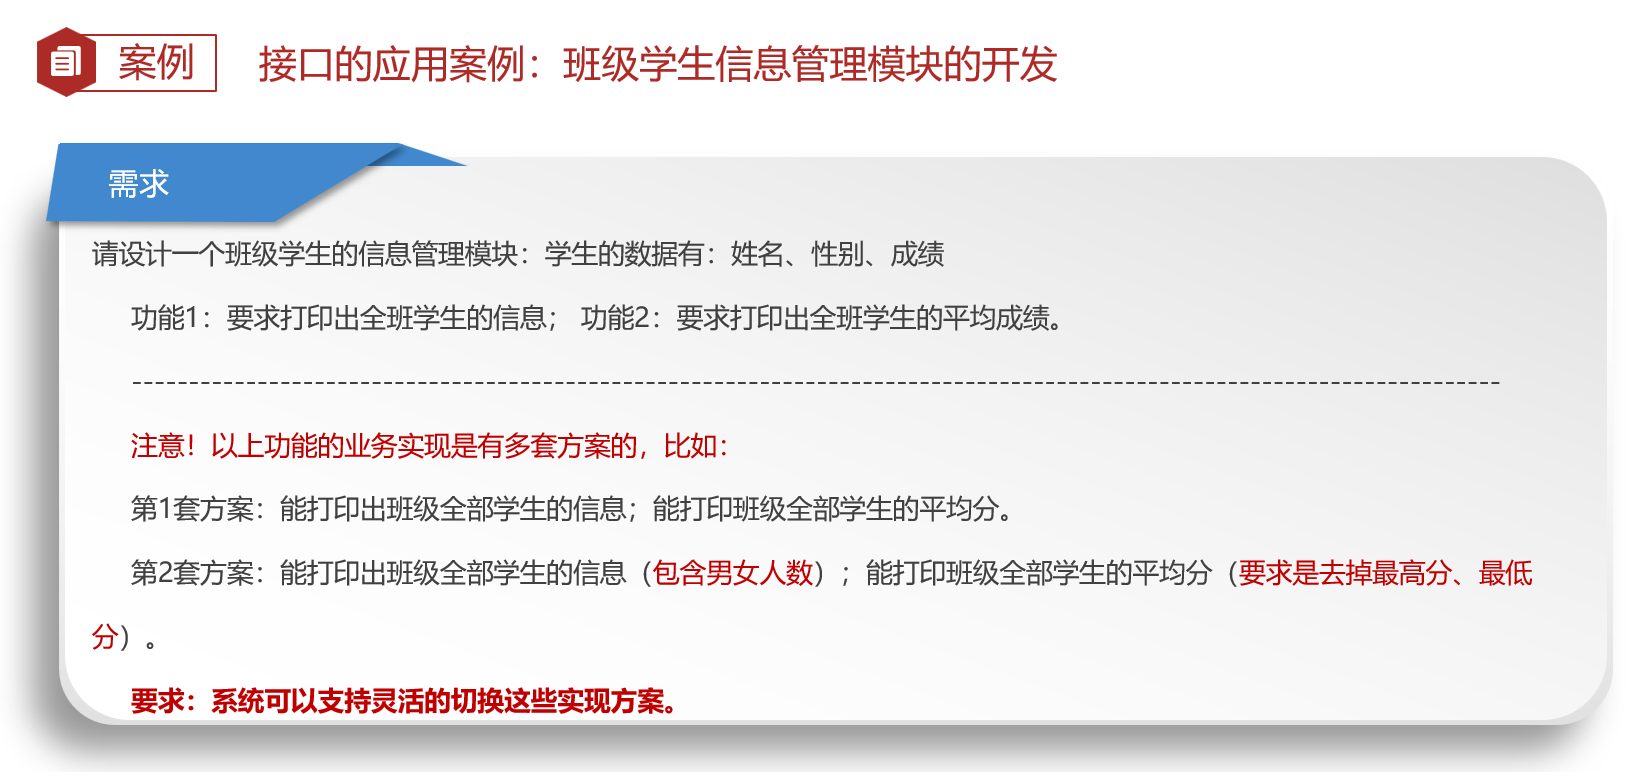
接口的综合案例
各位同学,关于接口的特点以及接口的好处我们都已经学习完了。接下来我们做一个案例,先来看一下案例需求
首先我们写一个学生类,用来描述学生的相关信息
public class Student {
    private String name;
    private char sex;
    private double score;

    public Student() {
    }

    public Student(String name, char sex, double score) {
        this.name = name;
        this.sex = sex;
        this.score = score;
    }

    public String getName() {
        return name;
    }

    public void setName(String name) {
        this.name = name;
    }

    public char getSex() {
        return sex;
    }

    public void setSex(char sex) {
        this.sex = sex;
    }

    public double getScore() {
        return score;
    }

    public void setScore(double score) {
        this.score = score;
    }
}
接着,写一个StudentOperator接口,表示学生信息管理系统的两个功能。
public interface StudentOperator {
    void printAllInfo(ArrayList<Student> students);
    void printAverageScore(ArrayList<Student> students);
}
然后,写一个StudentOperator接口的实现类StudentOperatorImpl1,采用第1套方案对业务进行实现。
public class StudentOperatorImpl1 implements StudentOperator{

    // 打印全部的学生信息
    @Override
    public void printAllInfo(ArrayList<Student> students) {
        System.out.println("----------全班全部学生信息如下--------------");
        for (int i = 0; i < students.size(); i++) {
            Student s = students.get(i);
            System.out.println("姓名:" + s.getName() + ", 性别:" + s.getSex() + ", 成绩:" + s.getScore());
        }
        System.out.println("-----------------------------------------");
    }

    // 打印所有学生的平均分
    @Override
    public void printAverageScore(ArrayList<Student> students) {
        double allScore = 0.0;
        for (int i = 0; i < students.size(); i++) {
            Student s = students.get(i);
            allScore += s.getScore();
        }
        System.out.println("平均分:" + (allScore) / students.size());
    }
}
接着,再写一个StudentOperator接口的实现类StudentOperatorImpl2,采用第2套方案对业务进行实现。
public class StudentOperatorImpl2 implements StudentOperator{

    // 打印所有的学生信息,并打印男女生人数
    @Override
    public void printAllInfo(ArrayList<Student> students) {
        System.out.println("----------全班全部学生信息如下--------------");
        int count1 = 0;
        int count2 = 0;
        for (int i = 0; i < students.size(); i++) {
            Student s = students.get(i);
            System.out.println("姓名:" + s.getName() + ", 性别:" + s.getSex() + ", 成绩:" + s.getScore());
            if(s.getSex() == '男'){
                count1++;
            }else {
                count2 ++;
            }
        }
        System.out.println("男生人数是:" + count1  + ", 女士人数是:" + count2);
        System.out.println("班级总人数是:" + students.size());
        System.out.println("-----------------------------------------");
    }

    // 打印去掉最高份和最低分的学生信息
    @Override
    public void printAverageScore(ArrayList<Student> students) {
        double allScore = 0.0;
        double max = students.get(0).getScore();
        double min = students.get(0).getScore();
        for (int i = 0; i < students.size(); i++) {
            Student s = students.get(i);
            if(s.getScore() > max) max = s.getScore();
            if(s.getScore() < min) min = s.getScore();
            allScore += s.getScore();
        }
        System.out.println("学生的最高分是:" + max);
        System.out.println("学生的最低分是:" + min);
        System.out.println("平均分:" + (allScore - max - min) / (students.size() - 2));
    }
}
再写一个班级管理类ClassManager,在班级管理类中使用StudentOperator的实现类StudentOperatorImpl1对学生进行操作
public class ClassManager {
    private ArrayList<Student> students = new ArrayList<>();
    private StudentOperator studentOperator = new StudentOperatorImpl1();

    public ClassManager(){
        students.add(new Student("迪丽热巴", '女', 99));
        students.add(new Student("古力娜扎", '女', 100));
        students.add(new Student("马尔扎哈", '男', 80));
        students.add(new Student("卡尔扎巴", '男', 60));
    }

    // 打印全班全部学生的信息
    public void printInfo(){
        studentOperator.printAllInfo(students);
    }

    // 打印全班全部学生的平均分
    public void printScore(){
        studentOperator.printAverageScore(students);
    }
}
最后,再写一个测试类Test,在测试类中使用ClassMananger完成班级学生信息的管理。
public class Test {
    public static void main(String[] args) {
        // 目标:完成班级学生信息管理的案例。
        ClassManager clazz = new ClassManager();
        clazz.printInfo();
        clazz.printScore();
    }
}
注意:如果想切换班级管理系统的业务功能,随时可以将StudentOperatorImpl1切换为StudentOperatorImpl2。自己试试
内部类
什么是内部类
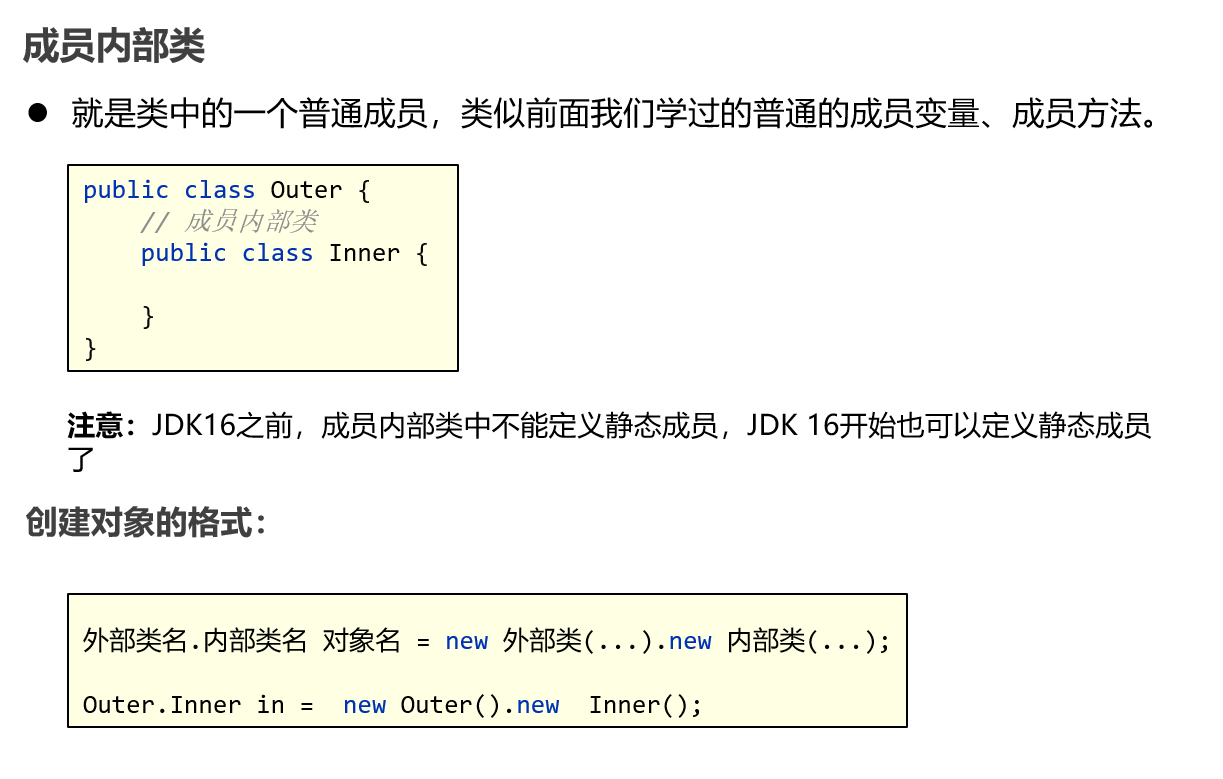
内部类是类中的五大成分之一(成员变量、方法、构造器、内部类、代码块),如果一个类定义在另一个类的内部,这个类就是内部类。
当一个类的内部,包含一个完整的事物,且这个事物没有必要单独设计时,就可以把这个事物设计成内部类。
成员内部类
内部类访问成员的特点
- 既可以访问内部类成员、也可以访问外部类成员
- 如果内部类成员和外部类成员同名,可以使用类名.this.成员区分
package com.itheima.d1_inner_class1;

public class Outer {
    private int age = 99;
    public static String a;
    // 成员内部类
    public class Inner{
        private String name;
        public static String schoolName; // JDK 16开始才支持定义静态成员的
        private int age = 88;

        public void test(){
            System.out.println(age);
            System.out.println(a);

            int age = 66;
            System.out.println(age);// 66
            System.out.println(this.age);// 88
            System.out.println(Outer.this.age);// 99
        }

        public String getName() {
            return name;
        }

        public void setName(String name) {
            this.name = name;
        }
    }

    public void test2(){
        System.out.println(age);
        System.out.println(a);
    }
}
静态内部类
静态内部类,其实就是在成员内部类的前面加了一个static关键字。静态内部类属于外部类自己持有。
静态内部类访问成员的特点
可以直接访问外部类的静态成员(属于类),不可以直接访问外部类的实例成员(属于对象实例,必须创建对象实例才能访问)。
public class Outer {
    private int age = 99;
    public static String schoolName="黑马";

    // 静态内部类
    public static class Inner{
        //静态内部类访问外部类的静态变量,是可以的;
        //静态内部类访问外部类的实例变量,是不行的
        public void test(){
            System.out.println(schoolName); //99
            //System.out.println(age);   //报错
        }
    }
}
静态内部类创建对象时,需要使用外部类的类名调用。
//格式:外部类.内部类 变量名 = new 外部类.内部类();
Outer.Inner in = new Outer.Inner();
in.test();
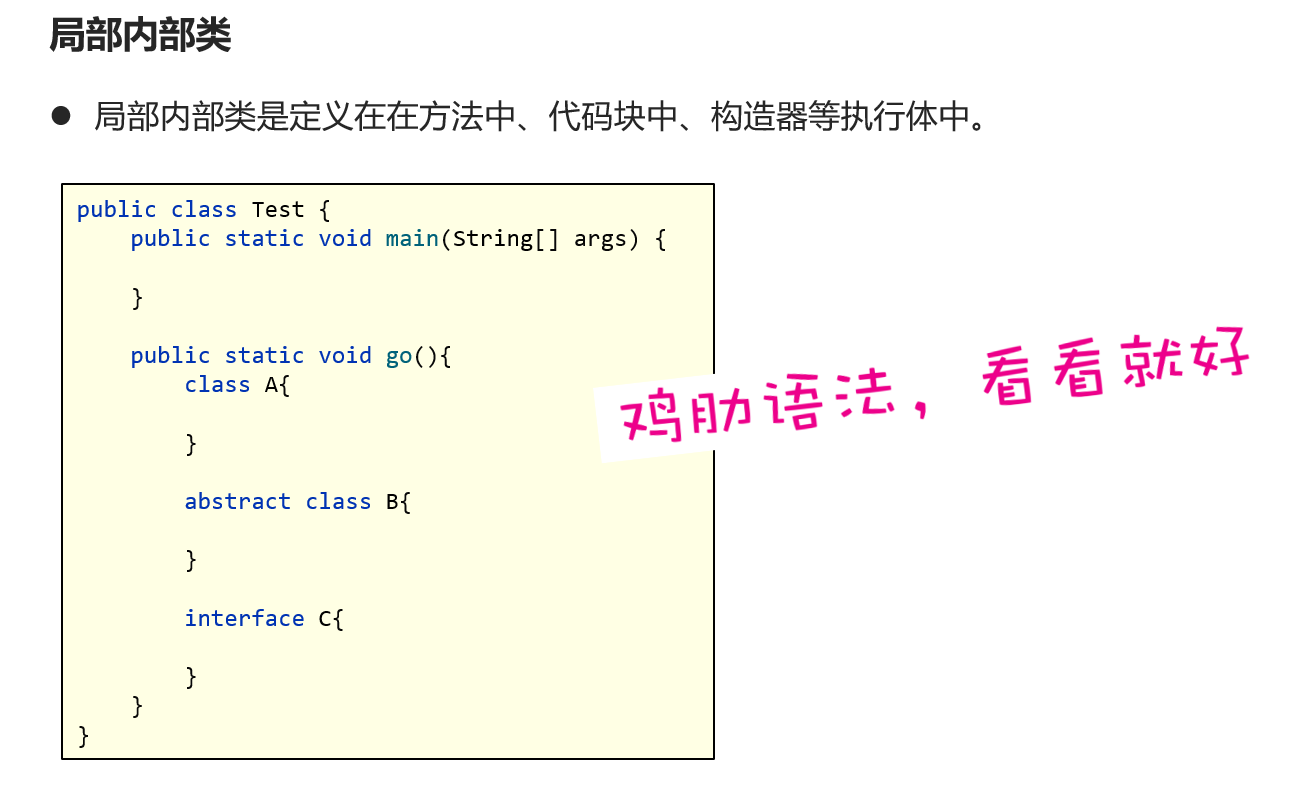
局部内部类
匿名内部类!!!
为什么要使用匿名内部类
在实际开发中,我们常常遇到这样的情况:一个接口/类的方法的某个实现方式在程序中只会执行一次,但为了使用它,我们需要创建它的实现类/子类去实现/重写。此时可以使用匿名内部类的方式,可以无需创建新的类,减少代码。
匿名内部类是一种特殊的局部内部类;所谓匿名,指的是程序员不需要为这个类声明名字。
下面就是匿名内部类的格式:
new 父类/接口(参数值){
@Override
重写父类/接口的方法;
}
匿名内部类本质上是一个没有名字的子类对象、或者接口的实现类对象。
比如,先定义一个Animal抽象类,里面定义一个cry()方法,表示所有的动物有叫的行为,但是因为动物还不具体,cry()这个行为并不能具体化,所以写成抽象方法。
public abstract class Animal{
    public abstract void cry();
}
接下来,我想要在不定义子类的情况下创建Animal的子类对象,就可以使用匿名内部类
public class Test{
    public static void main(String[] args){
        //这里后面new 的部分,其实就是一个Animal的子类对象
        //这里隐含的有多态的特性: Animal a = Animal子类对象;
        Animal a = new Animal(){
            @Override
            public void cry(){
                System.out.println("猫喵喵喵的叫~~~");
            }
        }
        a.cry(); //直线上面重写的cry()方法
    }
}
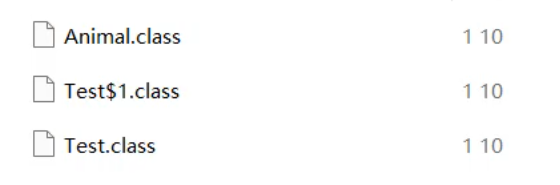
需要注意的是,匿名内部类在编写代码时没有名字,编译后系统会为自动为匿名内部类生产字节码,字节码的名称会以 外部类$1.class的方法命名
匿名内部类的使用场景
在调用方法时,当方法的形参是一个接口或者抽象类,为了简化代码书写,而直接传递匿名内部类对象给方法。这样就可以少写一个类。
package com.itheima.d3_inner_class3;

public class Test2 {
    public static void main(String[] args) {
        // 目标:掌握匿名的常见使用场景。
//        Swimming s1 = new Swimming(){
//            @Override
//            public void swim() {
//                System.out.println("狗swim飞快~~~~");
//            }
//        };
//        go(s1);

        go(new Swimming(){
            @Override
            public void swim() {
                System.out.println("狗swim飞快~~~~");
            }
        });

    }

    // 设计一个方法,可以接收swimming接口的一切实现类对象进来参加游泳比赛。
    public static void go(Swimming s){
        System.out.println("开始-----------------------");
        s.swim();
    }
}


// 猫和狗都要参加游泳比赛
interface Swimming{
    void swim();
}
内部类的注意事项
局部内部类和匿名内部类访问局部变量时,为什么变量必须加上final?
为什么这里的局部变量不能修改
追究其根本原因就是作用域中变量的生命周期导致的;
首先需要知道的一点是:
内部类和外部类是处于同一个级别的(都是类),内部类不会因为定义在方法中,就会随着方法的执行完毕被销毁。
这样就会产生问题:
当外部类的方法结束时,局部变量就会被销毁了,但是内部类对象可能还存在(只有没有人再引用它时,才会死亡)。
这样就会出现了一个矛盾:
内部类对象访问了一个不存在的变量。
为了解决这个问题,就将局部变量复制了一份作为内部类的成员变量
这样当局部变量死亡后,内部类仍可以访问它,实际访问的是局部变量的"copy"。这样就好像延长了局部变量的生命周期。
枚举类
什么是枚举类
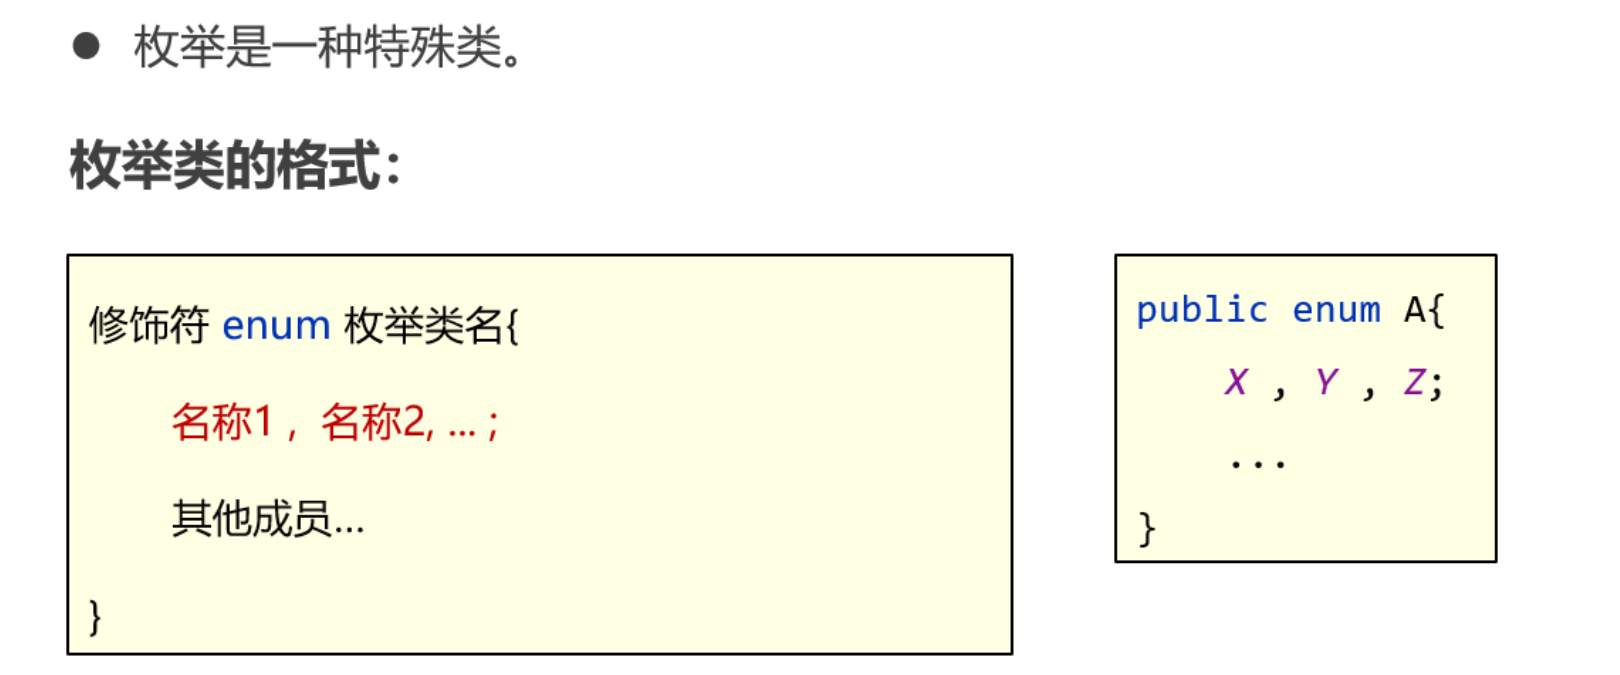
枚举类中的第一行,只能写一些合法的标识符(名称),多个名称用逗号隔开。
这些名称,本质是常量,每个常量都会记住枚举类的一个对象。
刚才说,枚举项实际上是枚举类的对象,这一点其实可以通过反编译的形式来验证(需要用到反编译的命令,这里不能直接将字节码拖进idea反编译)
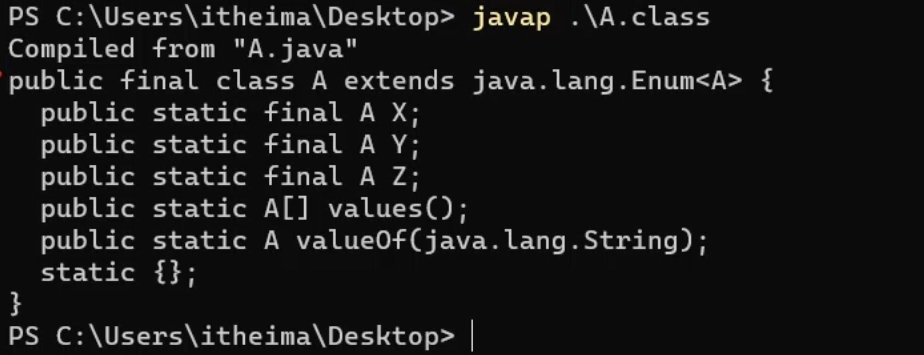
我们会看到,枚举类A是用class定义的,说明枚举确实是一个类,而且X,Y,Z都是A类的对象;而且每一个枚举项都是被public static final 修饰,所以被可以类名调用,而且不能更改。
枚举类的特点
- 枚举类的第一行只能罗列一些名称,这些名称都是常量,并且每个常量记住的都是枚举类的一个对象。
- 枚举类的构造器都是私有的(写不写都只能是私有的),因此,枚举类对外不能创建对象。
- 枚举都是最终类,不可以被继承。
- 枚举类中,从第二行开始,可以定义类的其他各种成员。
- 编译器为枚举类新增了几个方法,并且枚举类都是继承:java.lang.Enum类的,从enum类也会继承到一些方法。
package com.itheima.d4_enum;
// 枚举类
public enum A {
    // 常量,每个常量都是记住枚举类的一个对象的。
    X, Y, Z;

    // 私有的private
    A(){
    }

    // private
    A(String name){
    }
    private String name;

    public String getName() {
        return name;
    }

    public void setName(String name) {
        this.name = name;
    }
}
枚举类有参构造:
public enum A{
    //定义枚举项
    X,Y,Z("张三"); //枚举项后面加括号,就是在执行枚举类的带参数构造方法。

    //定义空构造器
    A(){

    }

    //成员变量
    private String name;
    //定义带参数构造器
    A(String name){
        this.name=name;
    }

    //成员方法
    public String getName(){
        return name;
    }
    ...
}
枚举的使用场景
枚举的应用场景是这样的:枚举一般表示一组信息,然后作为参数进行传输。

这里我们就可以先定义一个枚举类,用来表示男生、或者女生
public enum Constant{
    BOY,GRIL
}
再定义一个测试类,完成用户进入系统后的选择
public class Test{
    public static void main(String[] args){
        //调用方法,传递男生
        provideInfo(Constant.BOY);
    }

    public static void provideInfo(Constant c){
        switch(c){
            case BOY:
                System.out.println("展示一些信息给男生看");
                break;
            case GRIL:
                System.out.println("展示一些信息给女生看");
                break;
        }
    }
}
最终再总结一下枚举的应用场景:枚举一般表示几个固定的值,然后作为参数进行传输。
泛型
泛型的作用、本质
在Java中,泛型有助于创建可与不同类型的对象(数据)一起使用的类,接口和方法。因此,允许我们重用我们的代码。
注意:泛型不适用于基本类型(int,float,char等)。必须使用包装类
- 泛型的好处:在编译阶段约束数据类型,并自动检查,可以避免强制类型转换以其可能出现的异常。
- 泛型的本质:把具体的数据类型传递给类型变量。
泛型类
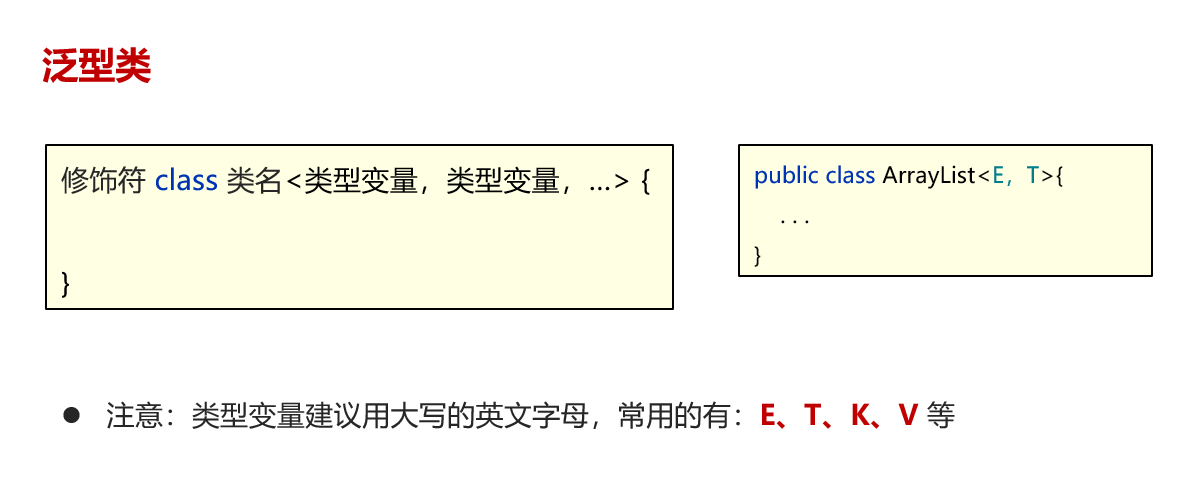
package com.itheima.d6_generics_class;
// 写法一,简单泛型类
public class MyArrayList<E> {
    private Object[] arr = new Object[10];
    private int size; // 记录当前位置的

    public boolean add(E e){
        arr[size++] = e;
        return true;
    }

    public E get(int index){
        return (E) arr[index];
    }
}


// 写法二,多元泛型类
package com.itheima.d6_generics_class;

public class MyClass2<E, T> {
    public void put(E e, T t){

    }
}


// 写法三,泛型类继承
package com.itheima.d6_generics_class;

public class MyClass3<E extends Animal> {

}
泛型类示例
简单泛型类:
class Point<T>{         // 此处可以随便写标识符号,T是type的简称
    private T var ;     // var的类型由T指定,即:由外部指定
    public T getVar(){  // 返回值的类型由外部决定
        return var ;
    }
    public void setVar(T var){  // 设置的类型也由外部决定
        this.var = var ;
    }
}
public class GenericsDemo06{
    public static void main(String args[]){
        Point<String> p = new Point<String>() ;     // 里面的var类型为String类型
        p.setVar("it") ;                            // 设置字符串
        System.out.println(p.getVar().length()) ;   // 取得字符串的长度
    }
}


多元泛型类:
class Notepad<K,V>{       // 此处指定了两个泛型类型
    private K key ;     // 此变量的类型由外部决定
    private V value ;   // 此变量的类型由外部决定
    public K getKey(){
        return this.key ;
    }
    public V getValue(){
        return this.value ;
    }
    public void setKey(K key){
        this.key = key ;
    }
    public void setValue(V value){
        this.value = value ;
    }
}
public class GenericsDemo09{
    public static void main(String args[]){
        Notepad<String,Integer> t = new Notepad<String,Integer>(); // 里面的key为String,value为Integer
        t.setKey("汤姆") ;        // 设置第一个内容
        t.setValue(20) ;            // 设置第二个内容
        System.out.print("姓名;" + t.getKey()) ;      // 取得信息
        System.out.print(",年龄;" + t.getValue()) ;       // 取得信息

    }
}
泛型接口
在上一节中,我们已经学习了自定义泛型类,接下来我们学习一下泛型接口。泛型接口其实指的是在接口中把不确定的数据类型用<类型变量>表示。定义格式如下:
//这里的类型变量,一般是一个字母,比如<E>
public interface 接口名<类型变量>{

}
比如,我们现在要做一个系统要处理学生和老师的数据,需要提供2个功能,保存对象数据、根据名称查询数据,要求:这两个功能处理的数据既能是老师对象,也能是学生对象。
首先我们得有一个学生类和老师类
public class Teacher{

}
public class Student{

}
我们定义一个Data
public interface Data<T>{
    public void add(T t);

    public ArrayList<T> getByName(String name);
}
接下来,我们写一个处理Teacher对象的接口实现类
//此时确定Data<E>中的E为Teacher类型,
//接口中add和getByName方法上的T也都会变成Teacher类型
public class TeacherData implements Data<Teacher>{
    public void add(Teacher t){

    }

    public ArrayList<Teacher> getByName(String name){

    }
}
接下来,我们写一个处理Student对象的接口实现类
//此时确定Data<E>中的E为Student类型,
//接口中add和getByName方法上的T也都会变成Student类型
public class StudentData implements Data<Student>{
    public void add(Student t){

    }

    public ArrayList<Student> getByName(String name){

    }
}
再啰嗦几句,在实际工作中,一般也都是框架底层源代码把泛型接口写好,我们实现泛型接口就可以了。
泛型接口示例
interface Info<T>{        // 在接口上定义泛型
    public T getVar() ; // 定义抽象方法,抽象方法的返回值就是泛型类型
}
class InfoImpl<T> implements Info<T>{   // 定义泛型接口的子类
    private T var ;             // 定义属性
    public InfoImpl(T var){     // 通过构造方法设置属性内容
        this.setVar(var) ;
    }
    public void setVar(T var){
        this.var = var ;
    }
    public T getVar(){
        return this.var ;
    }
}
public class GenericsDemo24{
    public static void main(String arsg[]){
        Info<String> i = new InfoImpl<String>("汤姆") ;  // 通过子类实例化对象  多态写法
        System.out.println("内容:" + i.getVar()) ;
    }
}
泛型方法
泛型方法示例
package com.itheima.test;

public class Demo {
    public static void main(String[] args) {

        //使用Integer数据初始化类
        DemoClass demo = new DemoClass();
        demo.genericsMethod("Java Programming");
    }
}

class DemoClass {

    //泛型方法
    public <T> void genericsMethod(T data) {
        System.out.println("这是一个泛型方法。");
        System.out.println("传递给方法的数据是 " + data);
    }
}
package com.itheima.test;

import java.util.Arrays;
import java.util.Date;

public class Test {
    public static void main(String[] args) {
        System.out.println(test(1));
        System.out.println(test1("hello"));
        System.out.println(test1(true));
        test2(1);
        test2("hello");
        test2(true);
    }

    public static <T extends Number> T test(T t) {
        return t;
    }
    public static <T> T test1(T t) {
        return t;
    }

    public static <T> void test2(T t) {
        System.out.println(t);
    }


}
通配符(泛型限定)
? 可以在”使用泛型“的时候代表一切类型; E T K V 是在”定义泛型“的时候使用。
接着,我们来学习一个泛型的特殊用法,叫做泛型限定。泛型限定的意思是对泛型的数据类型进行范围的限制。有如下的三种格式
- 表示任意类型
- 表示指定类型或者指定类型的子类(上限)
- 表示指定类型或者指定类型的父类(下限)
package com.itheima.d8_generics_method;

import java.util.ArrayList;

public class Test {
    public static void main(String[] args) {
        // 目标:掌握泛型方法的定义和使用。
        String rs = test("java");
        System.out.println(rs);

        Dog d = test(new Dog());
        System.out.println(d);

        // 需求:所有的汽车可以一起参加比赛。
        ArrayList<Car> cars = new ArrayList<>();
        cars.add(new BMW());
        cars.add(new BENZ());
        go(cars);

        ArrayList<BMW> bmws = new ArrayList<>();
        bmws.add(new BMW());
        bmws.add(new BMW());
        go(bmws);

        ArrayList<BENZ> benzs = new ArrayList<>();
        benzs.add(new BENZ());
        benzs.add(new BENZ());
        go(benzs);

//        ArrayList<Dog> dogs = new ArrayList<>();
//        dogs.add(new Dog());
//        dogs.add(new Dog());
//        go(dogs);
    }

    // ? 通配符,在使用泛型的时候可以代表一切类型   ? extends Car(上限)   ? super Car(下限)
    public static void go(ArrayList<? extends Car> cars){

    }

//    public static <T extends Car> void go(ArrayList<T> cars){
//
//    }

    // 泛型方法
    public static <T> T test(T t){
        return t;
    }
}
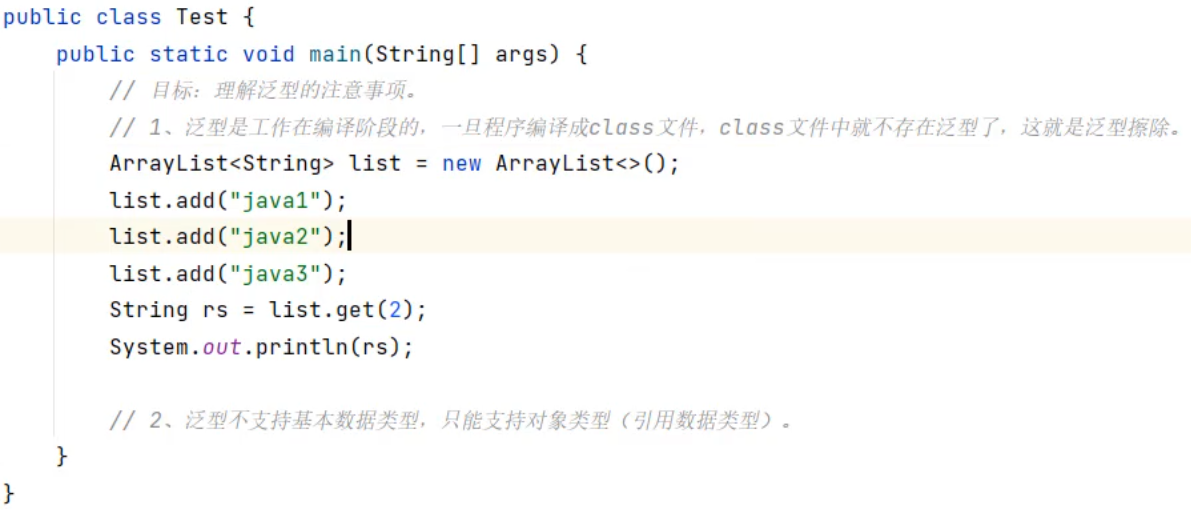
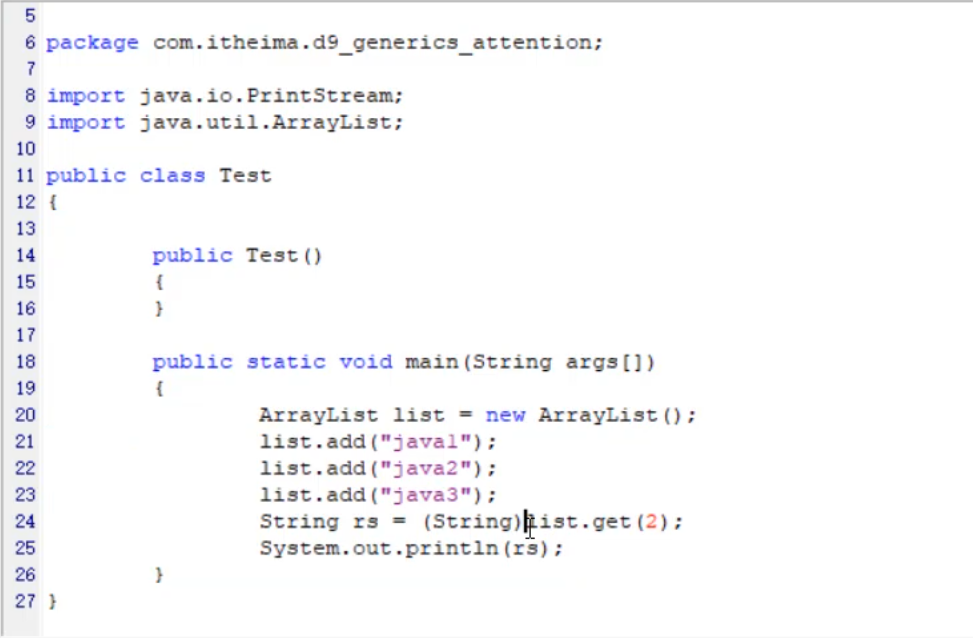
泛型擦除
也就是说泛型只能编译阶段有效,一旦编译成字节码,字节码中是不包含泛型的。而且泛型只支持引用数据类型,不支持基本数据类型。
package com.itheima.d9_generics_attention;

import java.math.BigDecimal;
import java.util.ArrayList;
public class Test {
    public static void main(String[] args) {
        // 目标:理解泛型的注意事项。
        // 1、泛型是工作在编译阶段的,一旦程序编译成class文件,class文件中就不存在泛型了,这就是泛型擦除。
        ArrayList<String> list = new ArrayList<>();
        list.add("java1");
        list.add("java2");
        list.add("java3");
        String rs = list.get(2);
        System.out.println(rs);

        // 2、泛型不支持基本数据类型,只能支持对象类型(引用数据类型)。
//        ArrayList<int> list1 = new ArrayList<>();
//        ArrayList<double> list2 = new ArrayList<>();
        ArrayList<Integer> list1 = new ArrayList<>();
        list1.add(12);

        ArrayList<Double> list2 = new ArrayList<>();
        list2.add(23.3);

        double a = 0.1;
        double b = 0.2;
        double c = a + b;
        System.out.println(a);
        BigDecimal a1 = new BigDecimal(0.1);
    }
}
为什么没有<T super XXX>
因为泛型在编译称class字节码文件时被擦除了,使用Object父类替代,Object是所有类的父类,所以使用super没有意义
泛型方法练习题
【多选题】对于泛型类class A
A. T x;
B. T m1() {return null;}
C. static T y;
D. void m2(T i) {}
E. static T s1() {return null;}
F. static void s2(T i) {}
G. static <T1> void s3(T1 i, T1 j){}
package com.itheima.practice.test;

public class Test2<T> {
    T x;

    T m1() {
        return null;
    }
//    static T y;

    void m2(T i) {
    }

    // 错误 静态的泛型方法必须前面加上<T>,因为静态方法不依赖于类对象,类上的泛型是在new对象时确定的
    // 静态方法不需要依靠对象调用,所以必须提前给出泛型声明
//    static T s1() {return null;}
//    static void s2(T i){}
    static <T> T s1() {
        return null;
    }

    static <T> void s2(T i) {
    }

    static <T1> void s3(T1 i, T1 j) {
    }


}
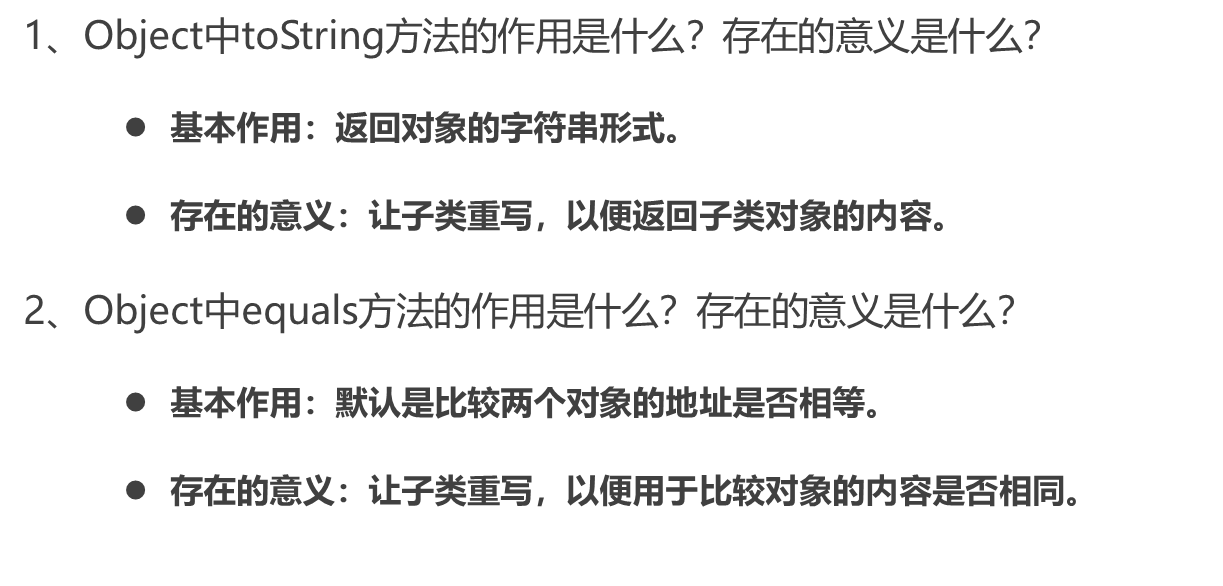
API
Object类
| 方法名 | 说明 |
|---|---|
| public String toString() | 返回对象的字符串表示形式。 |
| public boolean equals(Object o) | 判断两个对象是否相等。 |
| protected Object clone() | 对象克隆 |
public class Test{
	public static void main(String[] args){
        Student s1 = new Student("赵薇",23);
        Student s2 = new Student("赵薇",23);

        //equals本身也是比较对象的地址,和"=="没有区别
        System.out.println(s1.equals(s2)); //false
         //"=="比较对象的地址
        System.out.println(s1==s2); //false
    }
}
toString()和equals()
package com.itheima.d10_api_object;

import java.util.Objects;

public class Student { // extends Object{
    private String name;
    private int age;

    public Student() {
    }

    public Student(String name, int age) {
        this.name = name;
        this.age = age;
    }

    // 重写equals方法,比较两个对象的内容一样就返回true.
    // 比较者:s2 == this
    // 被比较者:s1 == o
    @Override
    public boolean equals(Object o) {
        // 1、判断两个对象是否地址一样,一样直接返回true.
        if (this == o) return true;
        // 2、判断o是null直接返回false, 或者比较者的类型与被比较者的类型不一样,返回false
        //               Student.class !=  Pig.class
        if (o == null || this.getClass() != o.getClass()) return false;
        // 3、o不是null,且o一定是学生类型的对象。开始比较内容了!
        Student student = (Student) o;
        return Objects.equals(this.age, student.age) && Objects.equals(this.name, student.name);
    }

    @Override
    public String toString() {
        return "Student{" +
                "name='" + name + '\'' +
                ", age=" + age +
                '}';
    }

    public String getName() {
        return name;
    }

    public void setName(String name) {
        this.name = name;
    }

    public int getAge() {
        return age;
    }

    public void setAge(int age) {
        this.age = age;
    }
}
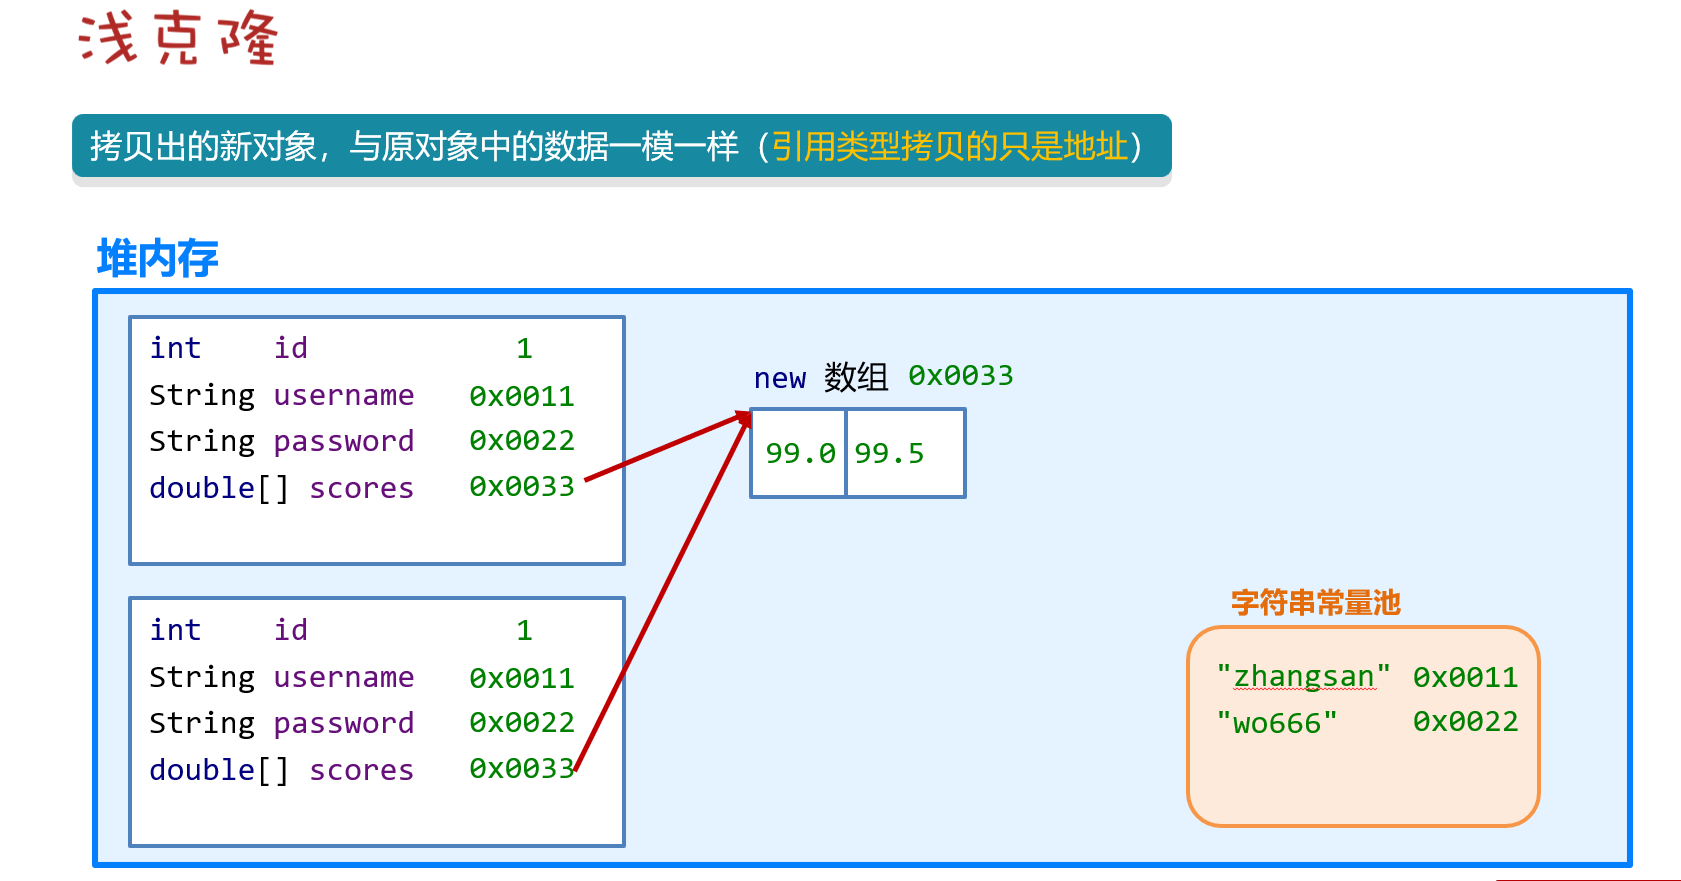
clone()
浅克隆
@Override
    protected Object clone() throws CloneNotSupportedException {
        return super.clone();
    }
}
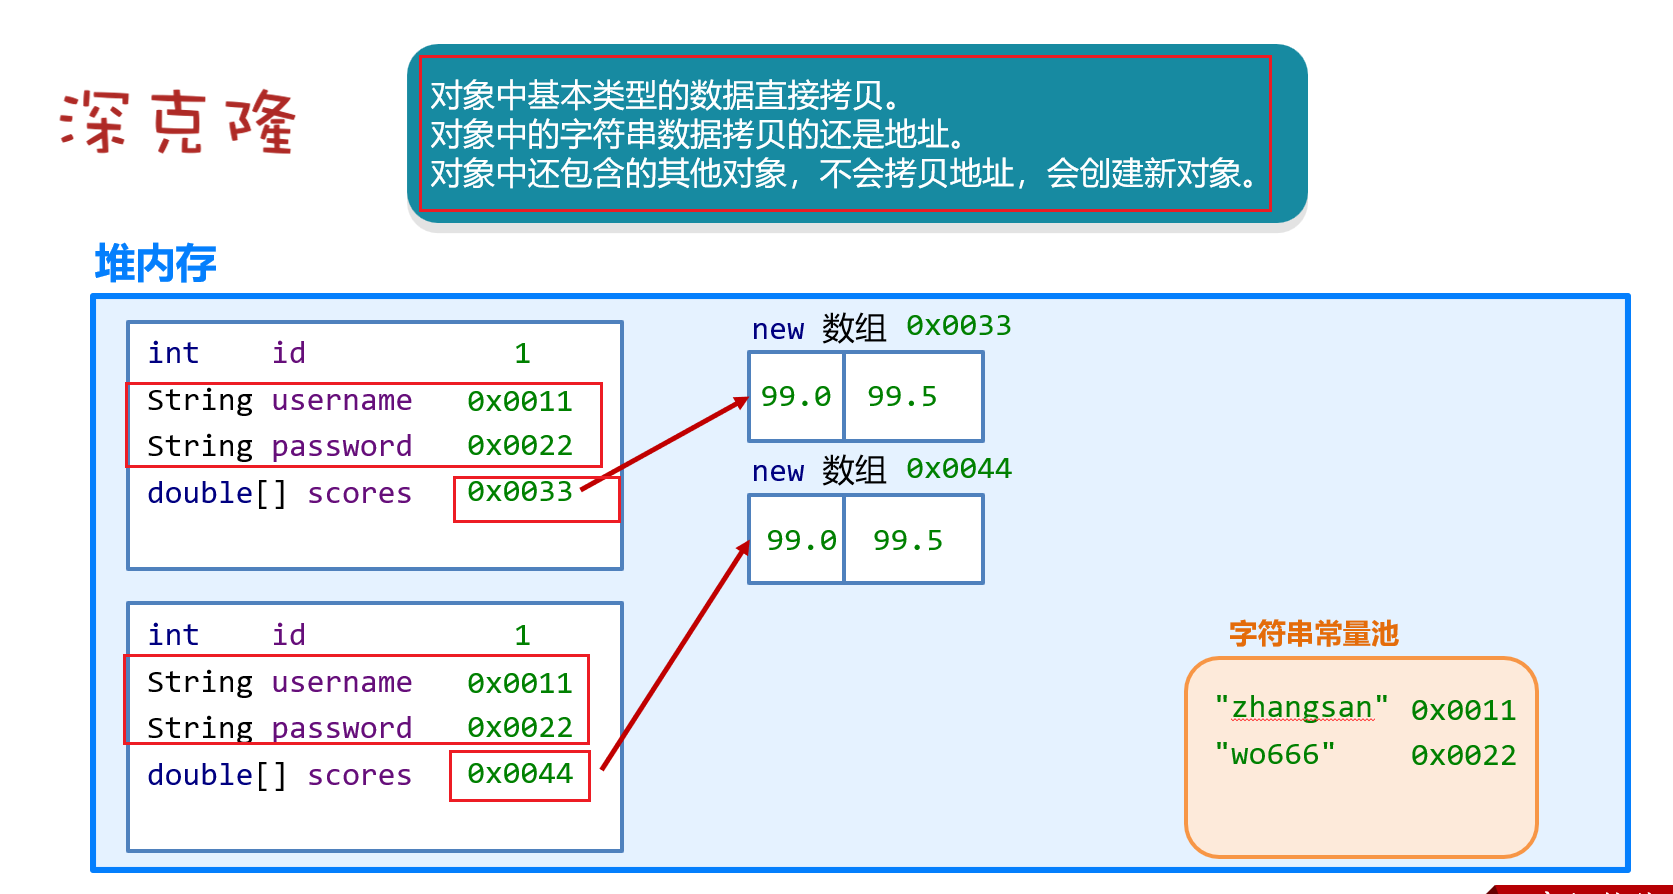
深克隆
    private double[] scores; // 分数

    @Override
    protected Object clone() throws CloneNotSupportedException {
        // super去调用父类Object中的clone方法。
        User clone = (User) super.clone();
        clone.scores = this.scores.clone();
        return clone;
    }
想要调用clone()方法,必须让被克隆的类实现Cloneable接口。
public class User implements Cloneable{

}
两者区别就在于,浅拷贝只是简单的复制,对对象里面的对象属性和数组属性只是复制了地址,并没有创建新的相同对象或者数组。而深拷贝是完完全全的复制一份,空间大小占用一样但是位置不同!浅拷贝是拷贝了对象的引用,当原对象发生变化的时候,拷贝对象也跟着变化;深拷贝是另外申请了一块内存,内容和原对象一样,更改原对象,拷贝对象不会发生变化。
浅拷贝和深拷贝的实例
由于字符串是不可变的(immutable),即使进行浅拷贝,也不会导致两个引用指向同一个可变对象的问题。每次对字符串的修改都会产生一个新的字符串对象。
对于对象和数组引用类型的属性,浅拷贝只是赋值了地址,所以当拷贝对象或者原对象的对应属性发生改变时,另外一个也会改变
浅拷贝
package com.itheima.myapi;

public class Origin implements  Cloneable{
    public int[] arr;

    public Origin(int[] arr) {
        this.arr = arr;
    }

    public Origin() {
    }

    @Override
    protected Object clone() throws CloneNotSupportedException {
        // 浅拷贝
        return super.clone();
    }
}


package com.itheima.myapi;

import java.util.Arrays;

public class Test {
    public static void main(String[] args) throws Exception {
        Origin origin = new Origin();
        origin.arr = new int[]{1, 2, 3};
        System.out.println(Arrays.toString(origin.arr)); // [1,2,3]


        Origin clone = (Origin) origin.clone();
        clone.arr[1] = 3;
        System.out.println(Arrays.toString(origin.arr)); // 输出[1,3,3]
        System.out.println(origin.arr == clone.arr); // true


        origin.arr[1] = 4;
        System.out.println(Arrays.toString(clone.arr));

    }
}
浅拷贝中关于字符串的处理
package com.itheima.myapi;

public class Origin implements Cloneable {
    public String str;
    public int[] arr;

    public Origin(int[] arr) {
        this.arr = arr;
    }

    public Origin() {
    }

    @Override
    protected Object clone() throws CloneNotSupportedException {
        return super.clone();
    }
}


package com.itheima.myapi;

import java.util.Arrays;

public class Test {
    public static void main(String[] args) throws Exception {

        Origin origin = new Origin();
        origin.str = "123";
        origin.arr = new int[]{1, 2, 3};
        Origin clone = (Origin) origin.clone();
		// 指向一样的地址
        System.out.println(origin.str.hashCode()); // 48690
        System.out.println(clone.str.hashCode()); // 48690


        // 修改字符串会创建新的字符串对象,字符串不可变
        clone.str = "345";
        System.out.println(origin.str.hashCode()); // 48690
        System.out.println(clone.str.hashCode());  // 50676

    }
}
深拷贝
深拷贝关于字符串拷贝的仍是地址值,但是字符串不可变,所以修改原始或拷贝对象的字符串属性会创建新的字符串对象
package com.itheima.myapi;

public class Origin implements Cloneable {
    public int[] arr;

    public Origin(int[] arr) {
        this.arr = arr;
    }

    public Origin() {
    }

    @Override
    protected Object clone() throws CloneNotSupportedException {
        // 浅拷贝基础信息
        Origin clone = (Origin) super.clone();
        // 深拷贝地址信息
        clone.arr = this.arr.clone();
        return clone;
    }
}


package com.itheima.myapi;

import java.util.Arrays;

public class Test {
    public static void main(String[] args) throws Exception {
        Origin origin = new Origin();
        origin.arr = new int[]{1, 2, 3};
        System.out.println(Arrays.toString(origin.arr)); // [1,2,3]


        Origin clone = (Origin) origin.clone();
        clone.arr[1] = 3;
        System.out.println(Arrays.toString(origin.arr)); // 输出[1,2,3]
        System.out.println(origin.arr == clone.arr); // false


        origin.arr[1] = 4;
        System.out.println(Arrays.toString(clone.arr)); // [1,3,3]
        System.out.println(Arrays.toString(origin.arr)); // [1,4,3]

    }
}
阿里面试题(!!!)
一个实现Cloneable的类中,clone()后的String类型数据,是深拷贝还是浅拷贝?
String类型有点特殊,它本身没有实现Cloneable接口,故根本无法克隆,只能传递引用(注意:Java只有值传递,只是这里传递是原来引用地址值)。在clone()后,克隆后的对象开始也是指向的原来引用地址值,但是一旦String的值发生改变(String作为不可更改的类immutable class,在重新赋值的时候,会创建一个新的对象)就改变了克隆后对象指向的地址,让它指向了一个新的String地址,,不会影响原对象的指向和值,原来的String对象还是指向的它自己的的地址。这样String在拷贝的时候就表现出了深拷贝的特点;
Objects类
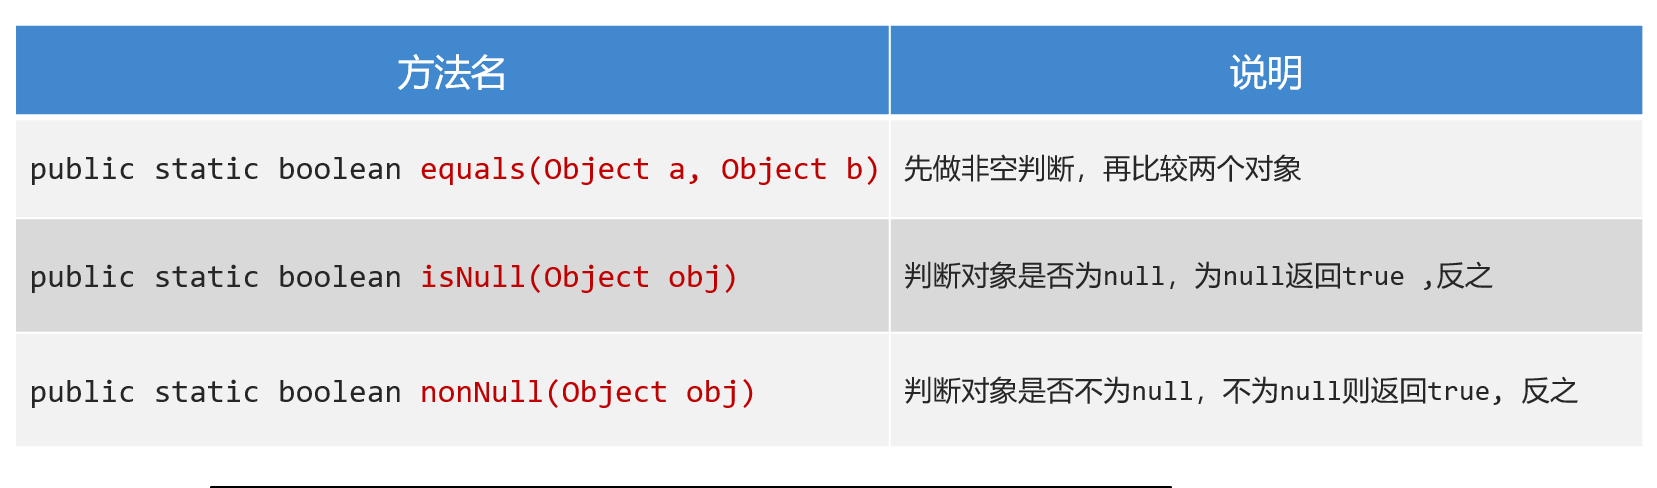
Objects类的equal方法,回判断是否为null,不会报空指针异常
public static boolean equals(Object a, Object b) {
        return (a == b) || (a != null && a.equals(b));
    }
public class Test{
    public static void main(String[] args){
        String s1 = null;
        String s2 = "itheima";

        //这里会出现NullPointerException异常,调用者不能为null
        // System.out.println(s1.equals(s2));
        //此时不会有NullPointerException异常,底层会自动先判断空
        System.out.println(Objects.equals(s1,s2));

        //判断对象是否为null,等价于==
        System.out.println(Objects.isNull(s1)); //true
        System.out.println(s1==null); //true

        //判断对象是否不为null,等价于!=
        System.out.println(Objects.nonNull(s2)); //true
        System.out.println(s2!=null); //true
    }
}
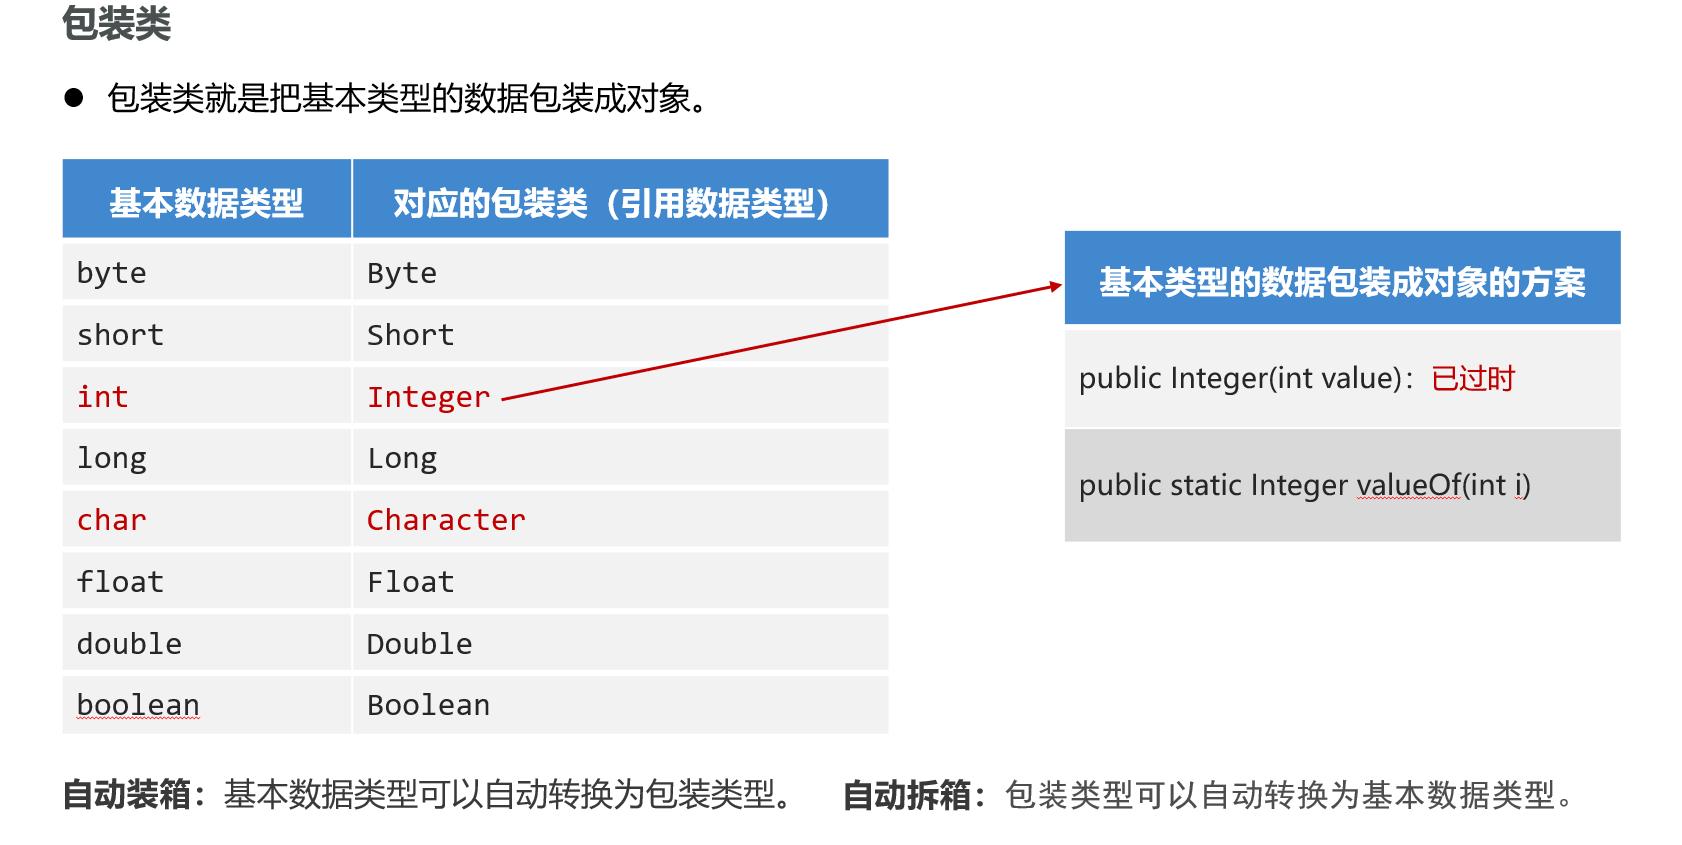
包装类
什么是包装类
装箱和拆箱
自动装箱:可以自动把基本类型的数据转换成对象。
自动拆箱:可以自动把包装类型的对象转换成对应的基本数据类型。
        Integer a2 = Integer.valueOf(12);
        System.out.println(a2);

        // 自动装箱:可以自动把基本类型的数据转换成对象。
        Integer a3 = 12;

        // 自动拆箱:可以自动把包装类型的对象转换成对应的基本数据类型。
        int a4 = a3;

        // 泛型和集合不支持基本数据类型,只能支持引用数据类型。
        // ArrayList<int> list = new ArrayList<>();
        ArrayList<Integer> list = new ArrayList<>();
        list.add(12); // 自动装箱
        list.add(13); // 自动装箱

        int rs = list.get(1); // 自动拆箱
包装类型的缓冲池
new Integer(123) 与 Integer.valueOf(123) 的区别在于:
- new Integer(123) 每次都会新建一个对象
- Integer.valueOf(123) 会使用缓存池中的对象,多次调用会取得同一个对象的引用。
Integer x = new Integer(123);
Integer y = new Integer(123);
System.out.println(x == y);    // false
Integer z = Integer.valueOf(123);
Integer k = Integer.valueOf(123);
System.out.println(z == k);   // true
在 Java 8 中,Integer 缓存池的大小默认为 -128~127。
编译器会在缓冲池范围内的基本类型自动装箱过程调用 valueOf() 方法,因此多个 Integer 实例使用自动装箱来创建并且值相同,那么就会引用相同的对象。
Integer m = 123;
Integer n = 123;
System.out.println(m == n); // true
基本类型对应的缓冲池如下:
- Byte:-128~127,也就是所有的 byte 值
- Short:-128~127
- Long:-128~127
- Character:\u0000 - \u007F
- Boolean:true 和 false
在使用这些基本类型对应的包装类型时,就可以直接使用缓冲池中的对象。
如果在缓冲池之外:
Integer m = 323;
Integer n = 323;
System.out.println(m == n); // false
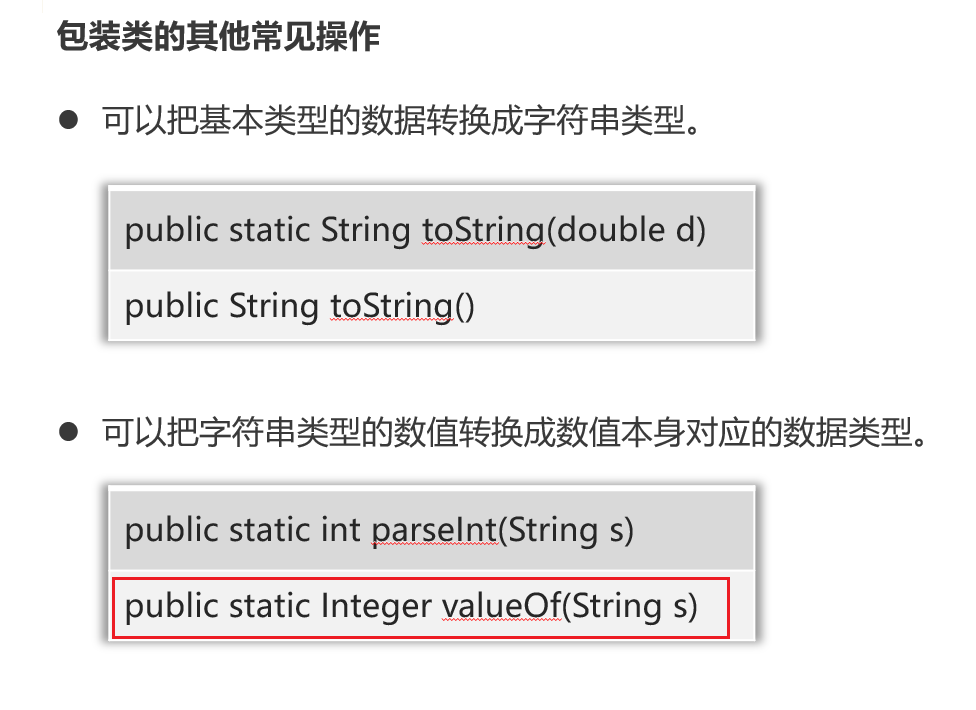
// 1、把基本类型的数据转换成字符串
        Integer a = 23;
        String rs1 = Integer.toString(a); // "23"
        System.out.println(rs1 + 1); // 231

        String rs2 =  a.toString(); // "23"
        System.out.println(rs2 + 1);

        String rs3 = a + "";
        System.out.println(rs3 + 1);

        // 2、把字符串类型的数值转换成对应的基本类型。
        String ageStr = "29";
        int ageI = Integer.parseInt(ageStr); // 29

        // int ageI = Integer.valueOf(ageStr); // 29
        System.out.println(ageI + 1); // 30

        String scoreStr = "99.5";
        double score = Double.parseDouble(scoreStr); // 99.5

		// 多了拆箱的操作
        // double score = Double.valueOf(scoreStr); // 99.5
        System.out.println(score + 0.5); // 100.0
字符串
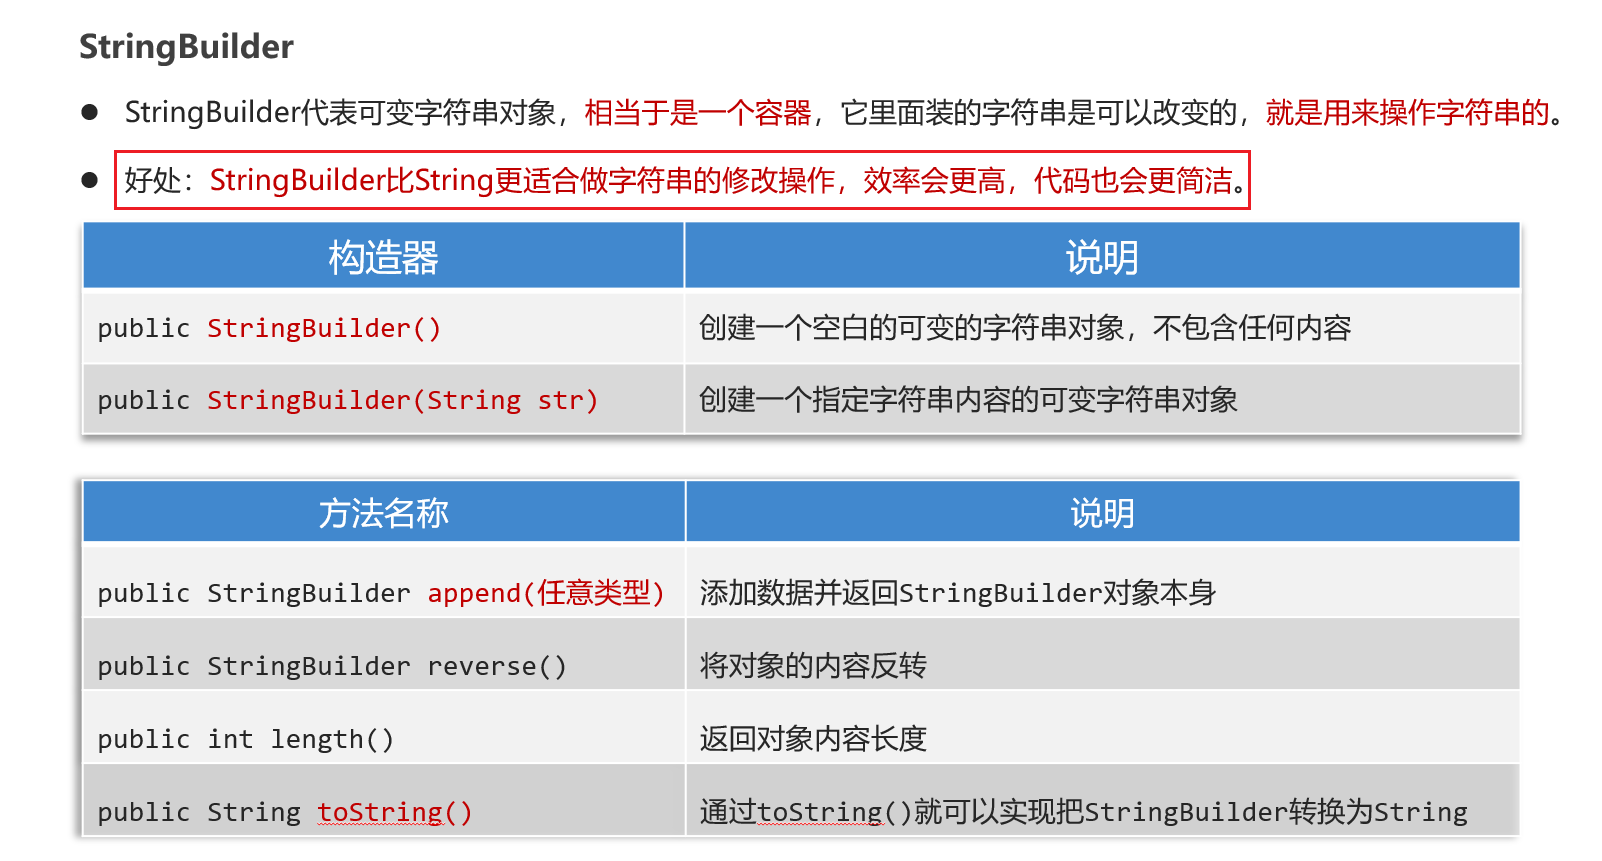
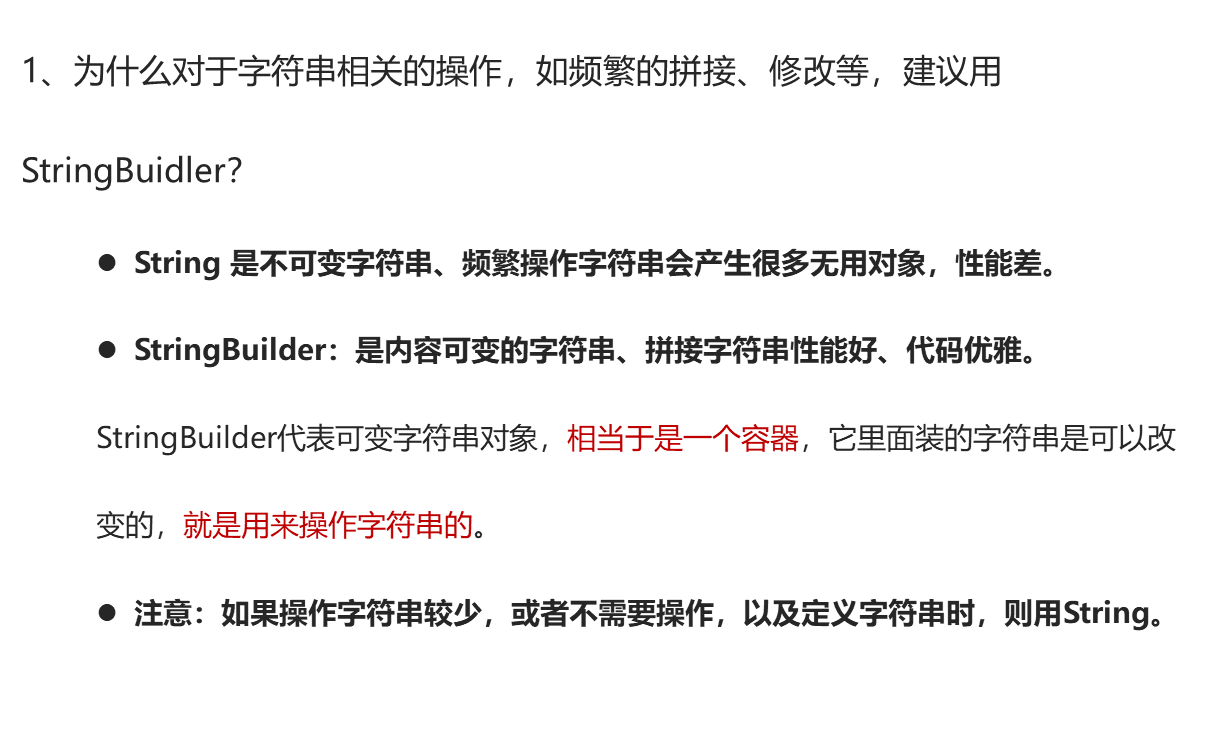
StringBuilder类
package com.itheima.d13_stringBuilder;

public class Test1 {
    public static void main(String[] args) {
        // 目标:搞清楚StringBuilder的用法和作用。
        // StringBuilder s = new StringBuilder(); // s ""
        StringBuilder s = new StringBuilder("itheima"); // s "itheima"

        // 1、拼接内容
        s.append(12);
        s.append("黑马");
        s.append(true);

        // 支持链式编程
        s.append(666).append("黑马2").append(666);
        System.out.println(s);

        // 2、反转操作
        s.reverse();
        System.out.println(s);

        // 3、返回字符串的长度
        System.out.println(s.length());

        // 4、把StringBuilder对象又转换成String类型。
        String rs = s.toString();
        System.out.println(rs);
    }
}
StringBuilder的好处
package com.itheima.d13_stringBuilder;

public class Test2 {
    public static void main(String[] args) {
        // 目标:掌握StringBuilder的好处。
        // 需求:要拼接100万次abc
        // 先用String测试看看性能
        // 效率很低,执行超慢
//        String rs = "";
//        for (int i = 1; i <= 1000000 ; i++) {
//            rs = rs + "abc";
//        }
//        System.out.println(rs);

        // 使用StringBuilder演示
        StringBuilder sb = new StringBuilder();
        for (int i = 1; i <= 1000000; i++) {
            sb.append("abc");
        }
        System.out.println(sb);
    }
}
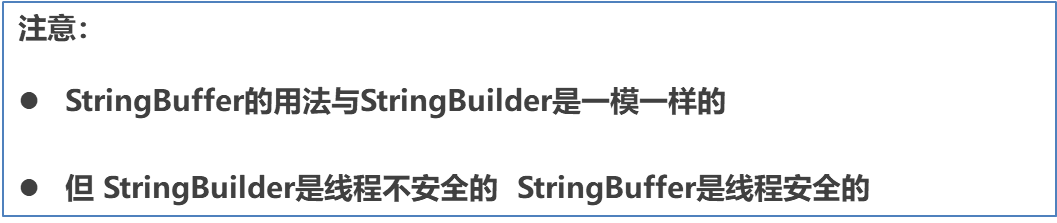
StringBuffer类
String、StringBuffer和StringBuilder区别
1. 可变性
- String 不可变
- StringBuffer 和 StringBuilder 可变
2. 线程安全
- String 不可变,因此是线程安全的
- StringBuilder 不是线程安全的
- StringBuffer 是线程安全的,内部使用 synchronized 进行同步
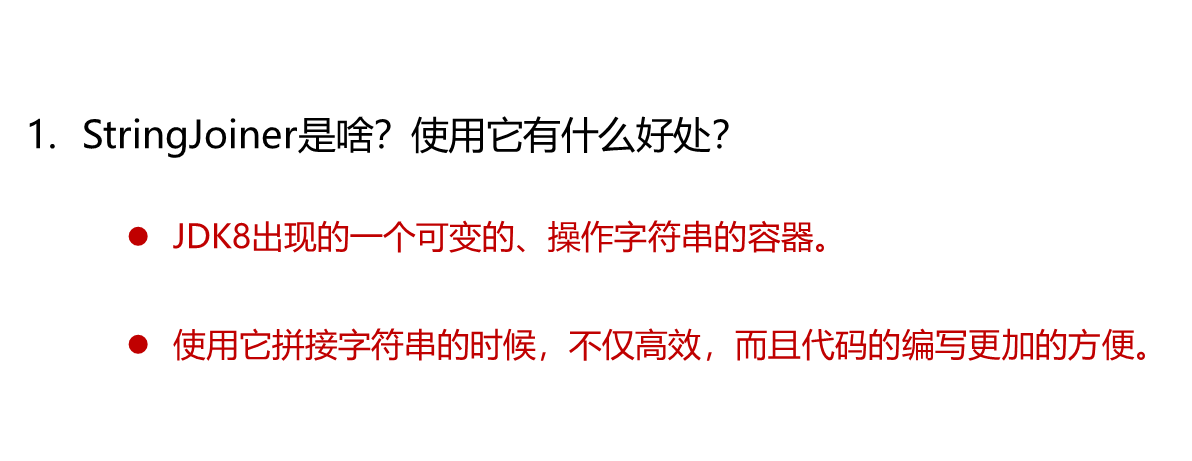
StringJoiner类
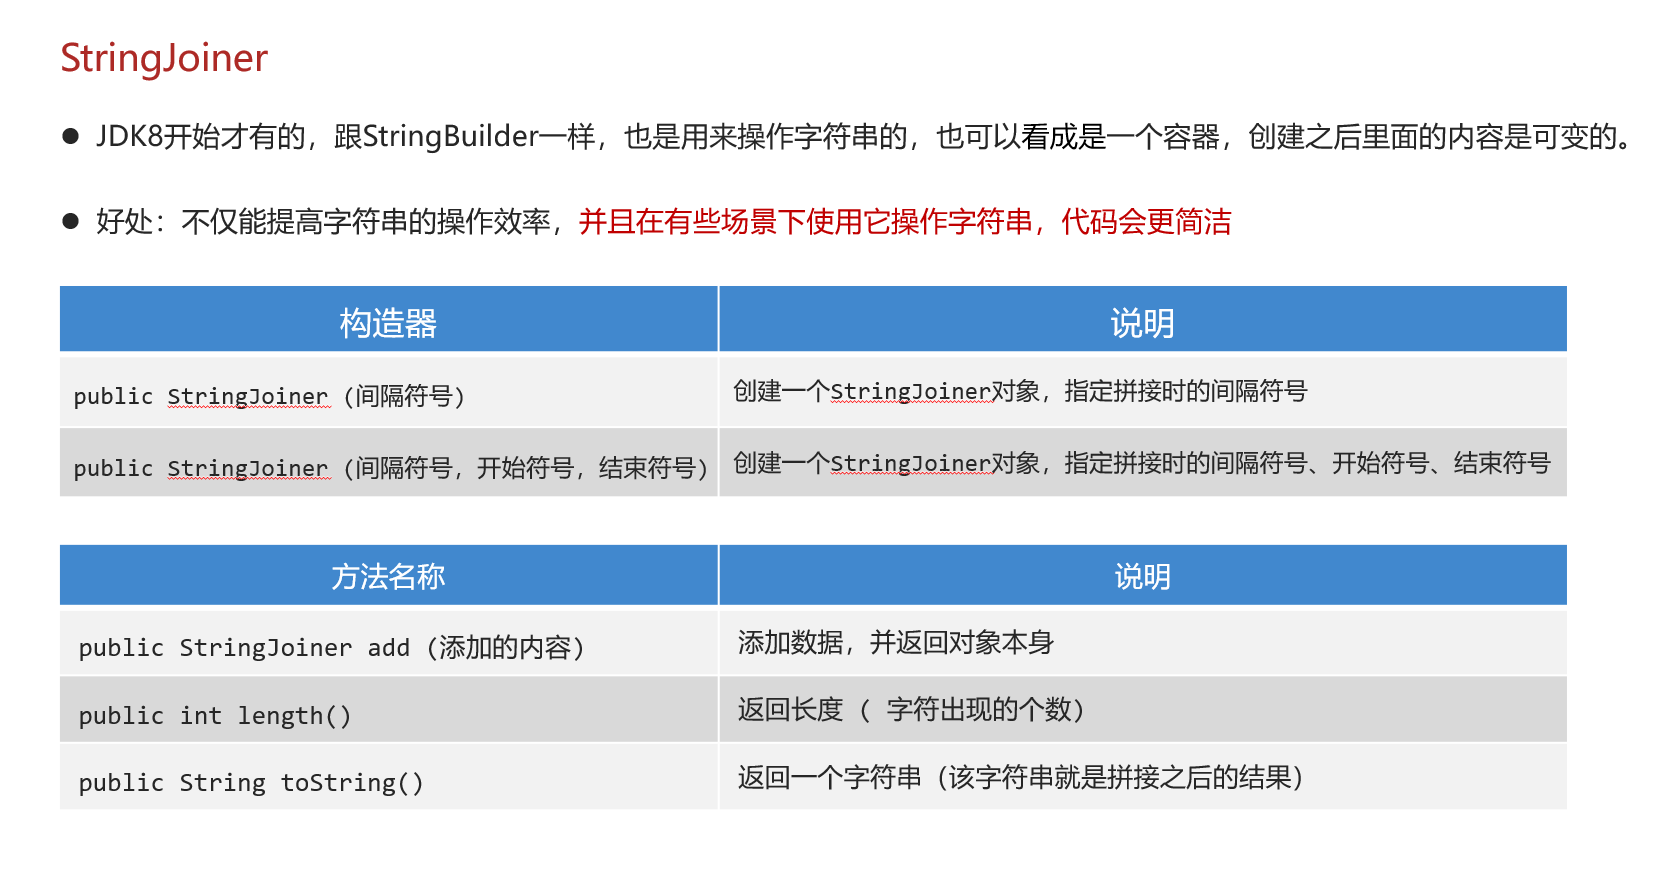
package com.itheima.d14_stringjoiner;

import java.util.StringJoiner;

public class Test {
    public static void main(String[] args) {
        // 目标:掌握StringJoiner的使用。
        // StringJoiner s = new StringJoiner(", "); // 间隔符!
        StringJoiner s = new StringJoiner(", ", "[", "]"); // 间隔符!
        s.add("java1");
        s.add("java2");
        s.add("java3");
        System.out.println(s); // [java1, java2, java3]

        System.out.println(getArrayData(new int[]{11, 22, 33}));
    }

    public static String getArrayData(int[] arr){
        // 1、判断arr是否为null
        if(arr == null){
            return null;
        }
        // 2、arr数组对象存在。 arr = [11, 22, 33]
        StringJoiner s = new StringJoiner(", ", "[", "]");
        for (int i = 0; i < arr.length; i++) {
            s.add(arr[i] + "");
        }
        return s.toString();
    }
}
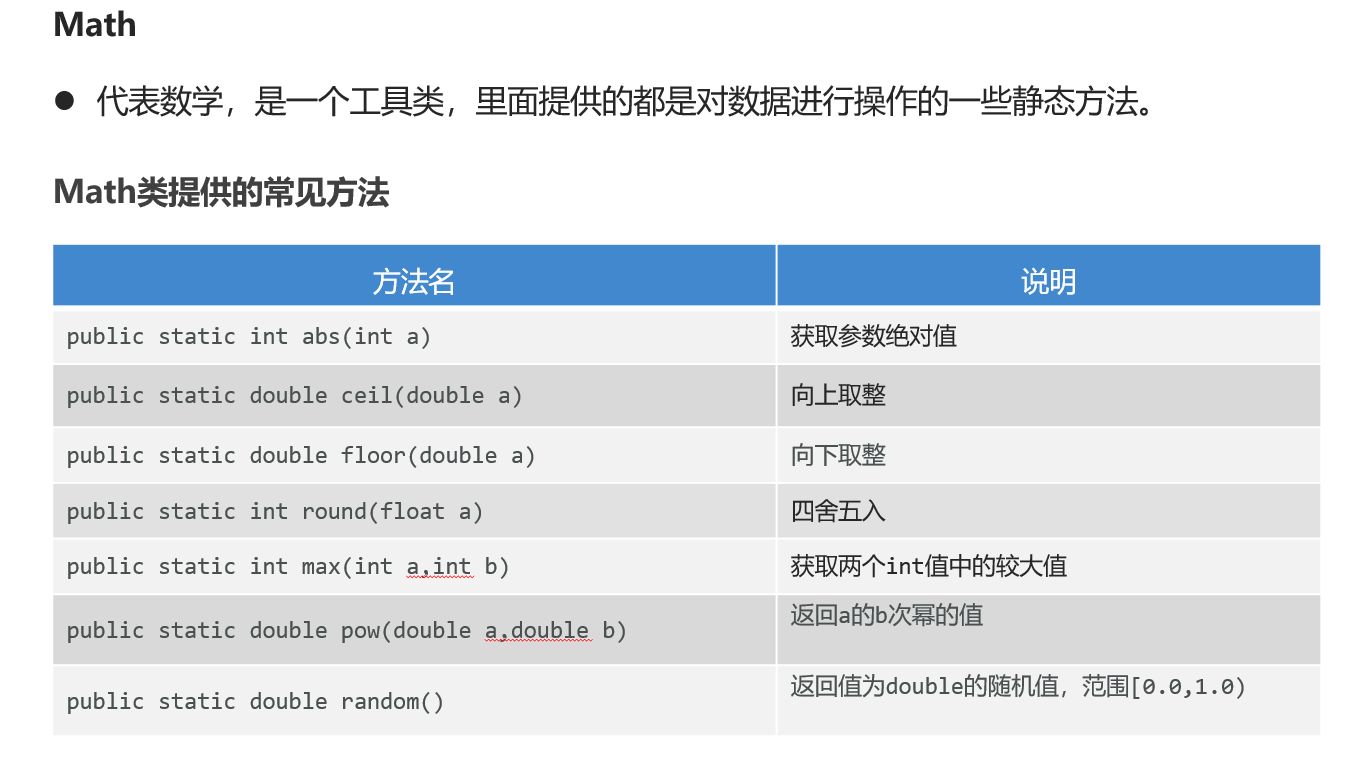
Math类
package com.itheima.d1_math;

public class MathTest {
    publiac static void main(String[] args) {
        // 目标:了解下Math类提供的常见方法。
        // 1、public static int abs(int a):取绝对值(拿到的结果一定是正数)
        //    public static double abs(double a)
        System.out.println(Math.abs(-12)); // 12
        System.out.println(Math.abs(123)); // 123
        System.out.println(Math.abs(-3.14)); // 3.14

        // 2、public static double ceil(double a): 向上取整
        System.out.println(Math.ceil(4.0000001)); // 5.0
        System.out.println(Math.ceil(4.0)); // 4.0

        // 3、public static double floor(double a): 向下取整
        System.out.println(Math.floor(4.999999)); // 4.0
        System.out.println(Math.floor(4.0)); // 4.0

        // 4、public static long round(double a):四舍五入
        System.out.println(Math.round(3.4999)); // 3
        System.out.println(Math.round(3.50001)); // 4

        // 5、public static int max(int a, int b):取较大值
        //   public static int min(int a, int b):取较小值
        System.out.println(Math.max(10, 20)); // 20
        System.out.println(Math.min(10, 20)); // 10

        // 6、 public static double pow(double a, double b):取次方
        System.out.println(Math.pow(2, 3)); // 2的3次方   8.0
        System.out.println(Math.pow(3, 2)); // 3的2次方   9.0

        // 7、public static double random(): 取随机数 [0.0 , 1.0) (包前不包后)
        System.out.println(Math.random());
    }
}
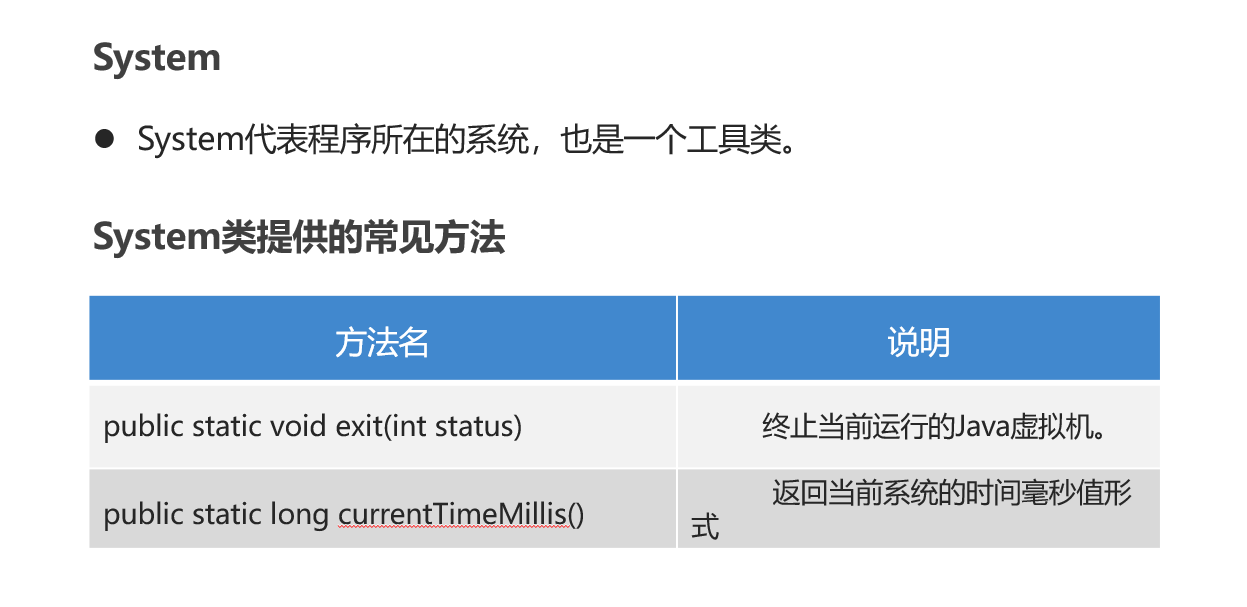
System类
package com.itheima.d1_math;

/**
 * 目标:了解下System类的常见方法。
 */
public class SystemTest {
    public static void main(String[] args) {

        // 1、public static void exit(int status):
        //   终止当前运行的Java虚拟机。
        //   该参数用作状态代码; 按照惯例,非零状态代码表示异常终止。
         System.exit(0); // 人为的终止虚拟机。(不要使用)

        // 2、public static long currentTimeMillis():
        //    获取当前系统的时间
        //    返回的是long类型的时间毫秒值:指的是从1970-1-1 0:0:0开始走到此刻的总的毫秒值,1s = 1000ms
        long time = System.currentTimeMillis();
        System.out.println(time);

        for (int i = 0; i < 1000000; i++) {
            System.out.println("输出了:" + i);
        }

        long time2 = System.currentTimeMillis();
        System.out.println((time2 - time) / 1000.0 + "s");
    }
}
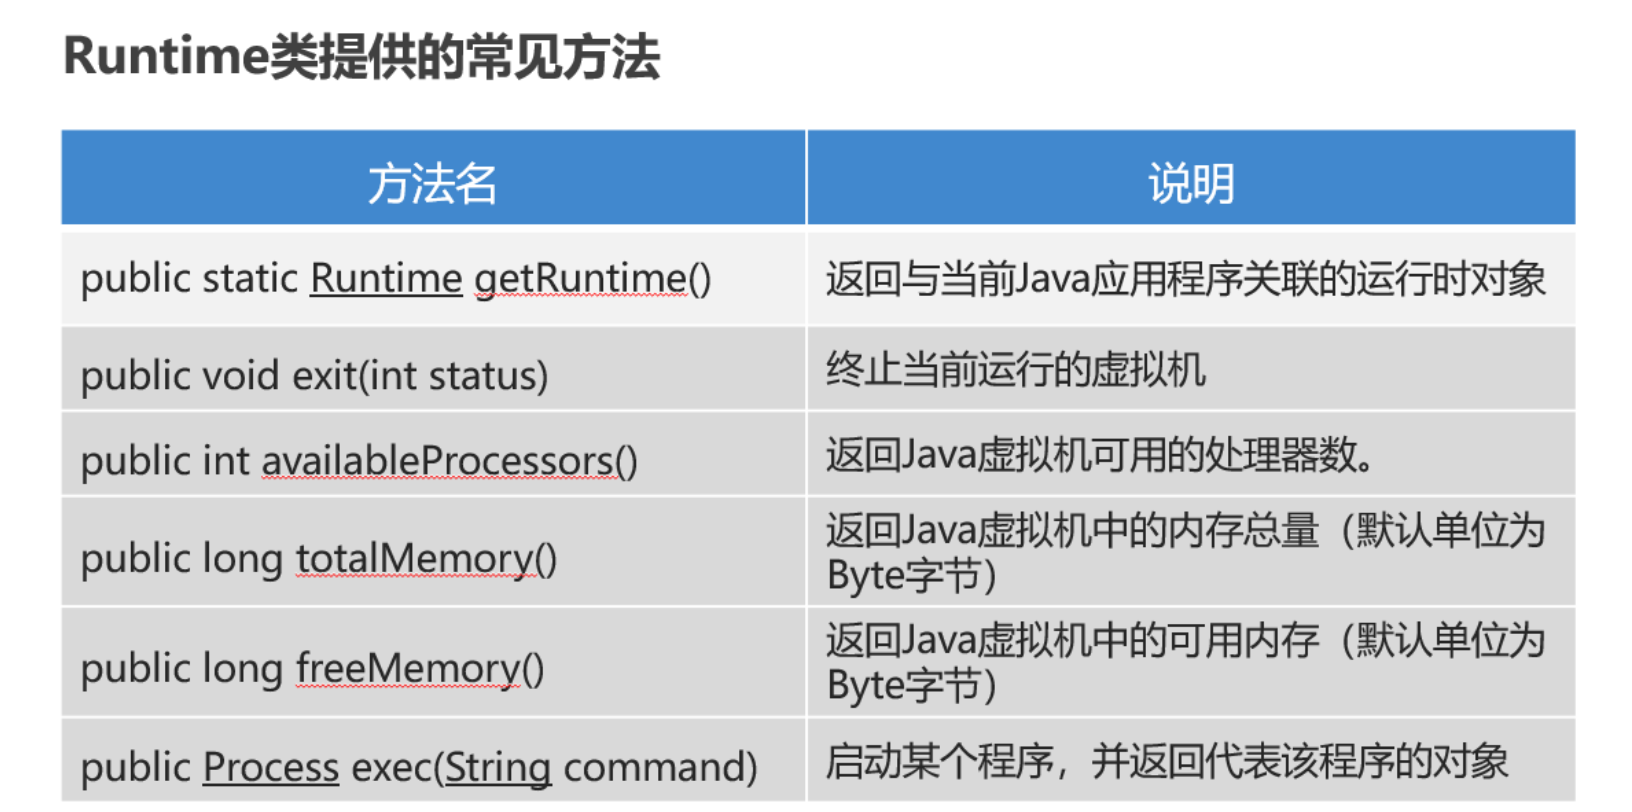
Runtime类
代表程序所在的运行环境。
Runtime是一个单例类。
package com.itheima.d1_math;

import java.io.IOException;

/**
 *  目标:了解下Runtime的几个常见方法。
 */
public class RuntimeTest {
    public static void main(String[] args) throws IOException, InterruptedException{

        // 1、public static Runtime getRuntime() 返回与当前Java应用程序关联的运行时对象。
        Runtime r = Runtime.getRuntime();

        // 2、public void exit(int status) 终止当前运行的虚拟机,该参数用作状态代码; 按照惯例,非零状态代码表示异常终止。
        // r.exit(0);

        // 3、public int availableProcessors(): 获取虚拟机能够使用的处理器数。
        System.out.println(r.availableProcessors());

        // 4、public long totalMemory() 返回Java虚拟机中的内存总量。
        System.out.println(r.totalMemory()/1024.0/1024.0 + "MB"); // 1024 = 1K     1024 * 1024 = 1M

        // 5、public long freeMemory() 返回Java虚拟机中的可用内存量
        System.out.println(r.freeMemory()/1024.0/1024.0 + "MB");

        // 6、public Process exec(String command) 启动某个程序,并返回代表该程序的对象。
        // r.exec("D:\\soft\\XMind\\XMind.exe");
        // Process p = r.exec("QQ");
        Process p = r.exec("D:/xitong/XMind2021 (64bit)/XMind 2021/XMind.exe");
        Thread.sleep(5000); // 让程序在这里暂停5s后继续往下走!!
        p.destroy(); // 销毁!关闭程序!
    }
}
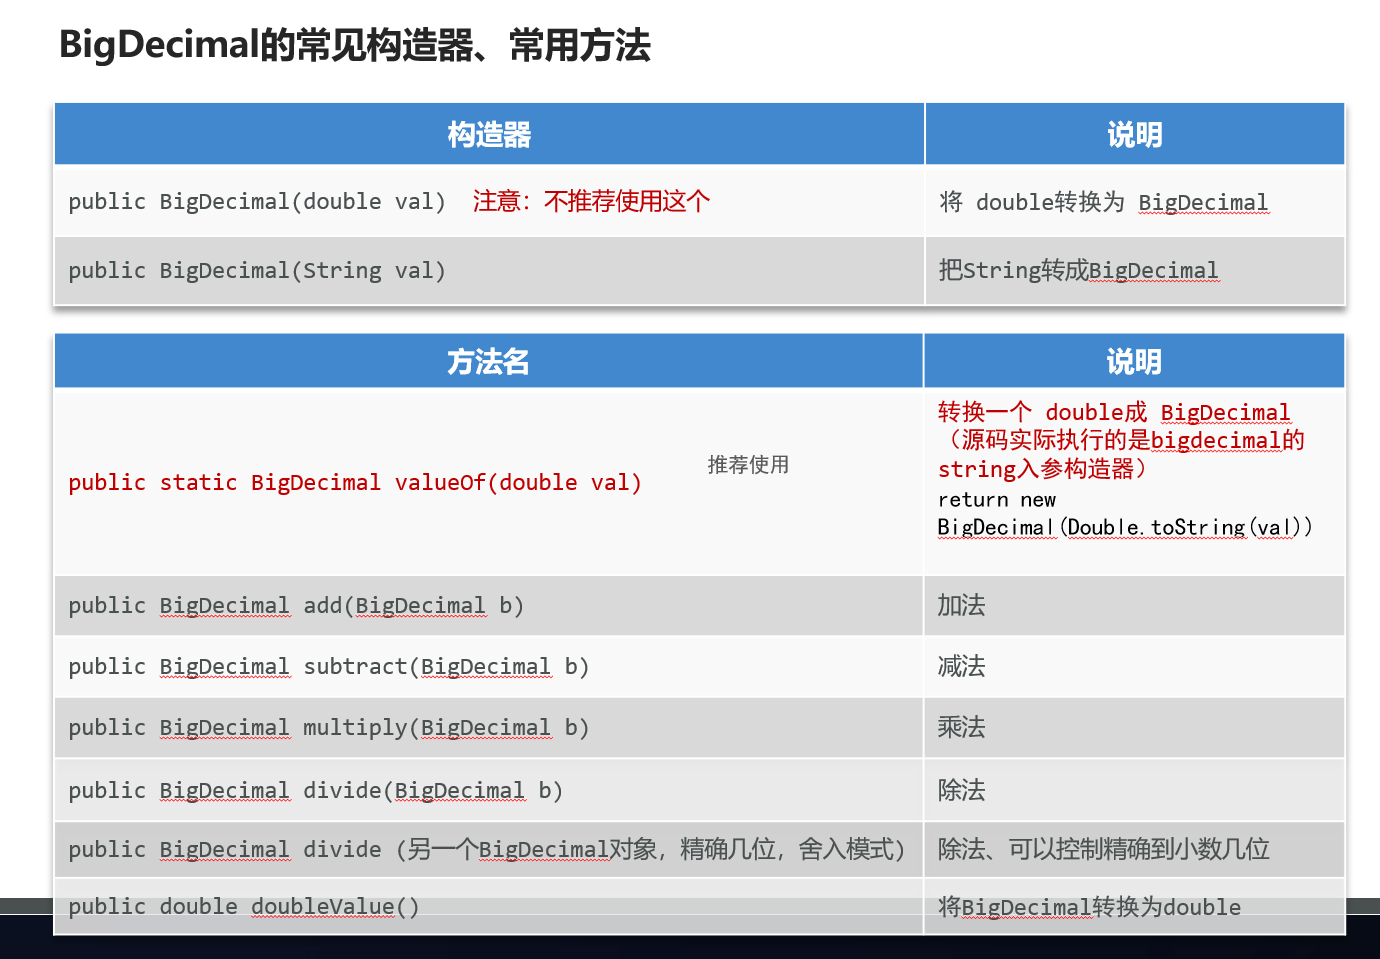
BigDecimal类
package com.itheima.d2_bigdecimal;

import java.math.BigDecimal;
import java.math.RoundingMode;

public class Test2 {
    public static void main(String[] args) {
        // 目标:掌握BigDecimal进行精确运算的方案。
        double a = 0.1;
        double b = 0.2;

        // 1、把浮点型数据封装成BigDecimal对象,再来参与运算。
        // a、public BigDecimal(double val) 得到的BigDecimal对象是无法精确计算浮点型数据的。 注意:不推荐使用这个,
        // b、public BigDecimal(String val)  得到的BigDecimal对象是可以精确计算浮点型数据的。 可以使用。
        // c、public static BigDecimal valueOf(double val): 通过这个静态方法得到的BigDecimal对象是可以精确运算的。是最好的方案。
        BigDecimal a1 = BigDecimal.valueOf(a);
        BigDecimal b1 = BigDecimal.valueOf(b);

        // 2、public BigDecimal add(BigDecimal b): 加法
        BigDecimal c1 = a1.add(b1);
        System.out.println("0.1+0.2=" + c1);

        // 3、public BigDecimal subtract(BigDecimal b): 减法
        BigDecimal c2 = a1.subtract(b1);
        System.out.println("0.1-0.2=" + c2);

        // 4、public BigDecimal multiply(BigDecimal b): 乘法
        BigDecimal c3 = a1.multiply(b1);
        System.out.println("0.1*0.2=" + c3);

        // 5、public BigDecimal divide(BigDecimal b): 除法
        BigDecimal c4 = a1.divide(b1,RoundingMode.HALF_UP);
        System.out.println("0.1/0.2=" + c4);

//        BigDecimal d1 = BigDecimal.valueOf(0.1);
//        BigDecimal d2 = BigDecimal.valueOf(0.3);
//        BigDecimal d3 = d1.divide(d2);
//        System.out.println(d3);

        // 6、public BigDecimal divide(另一个BigDecimal对象,精确几位,舍入模式) : 除法,可以设置精确几位。
        BigDecimal d1 = BigDecimal.valueOf(0.1);
        BigDecimal d2 = BigDecimal.valueOf(0.3);
        BigDecimal d3 = d1.divide(d2, 2, RoundingMode.HALF_UP); // 0.33
        System.out.println("0.1/0.3=" + d3);

        // 7、public double doubleValue() : 把BigDecimal对象又转换成double类型的数据。
        //print(d3);
        //print(c1);
        double db1 = d3.doubleValue();
        double db2 = c1.doubleValue();
        print(db1);
        print(db2);
    }


    public static void print(double a) {
        System.out.println(a);
    }
}
jdk8之前的时间(不推荐)
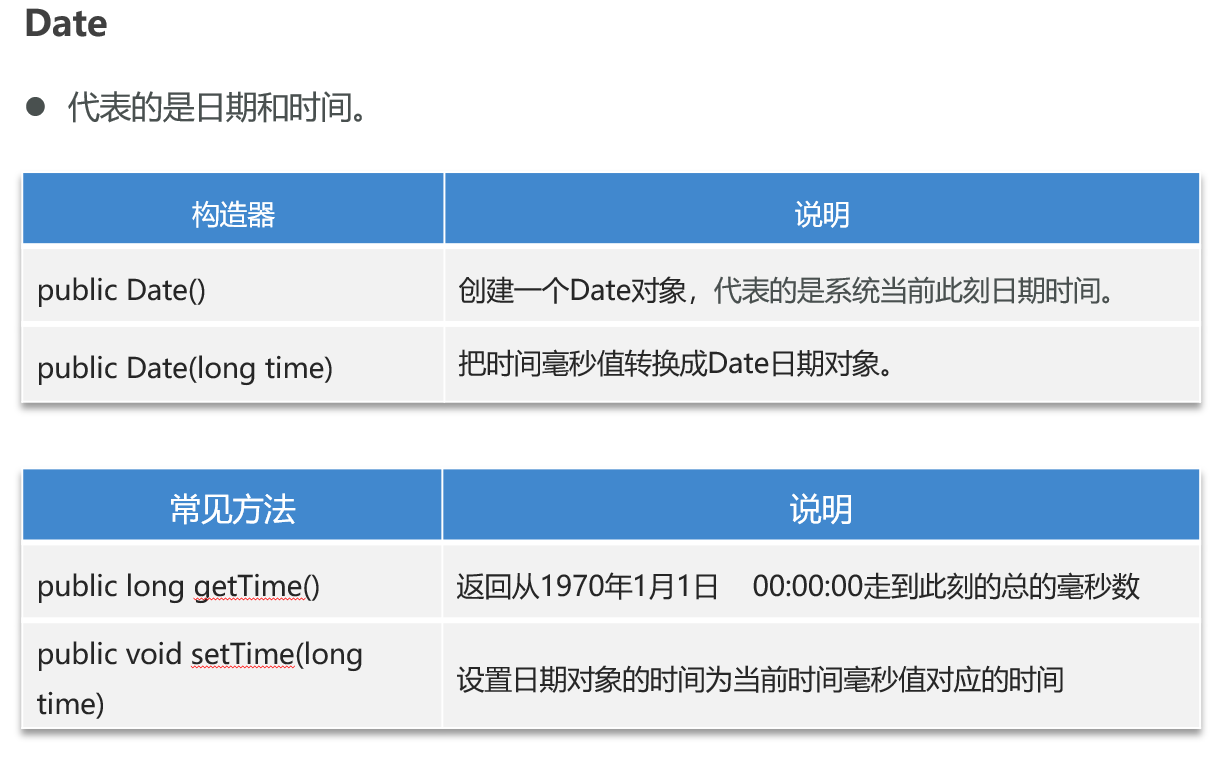
Date类
package com.itheima.d3_time;

import java.util.Date;

public class Test1Date {
    public static void main(String[] args) {
        // 目标:掌握Date日期类的使用。
        // 1、创建一个Date的对象:代表系统当前时间信息的。
        Date d = new Date();
        System.out.println(d);

        // 2、拿到时间毫秒值。
        long time = d.getTime();
        System.out.println(time);

        // 3、把时间毫秒值转换成日期对象: 2s之后的时间是多少。
        time += 2 * 1000;
        Date d2 = new Date(time);
        System.out.println(d2);

        // 4、直接把日期对象的时间通过setTime方法进行修改
        Date d3 = new Date();
        d3.setTime(time);
        System.out.println(d3);
    }
}
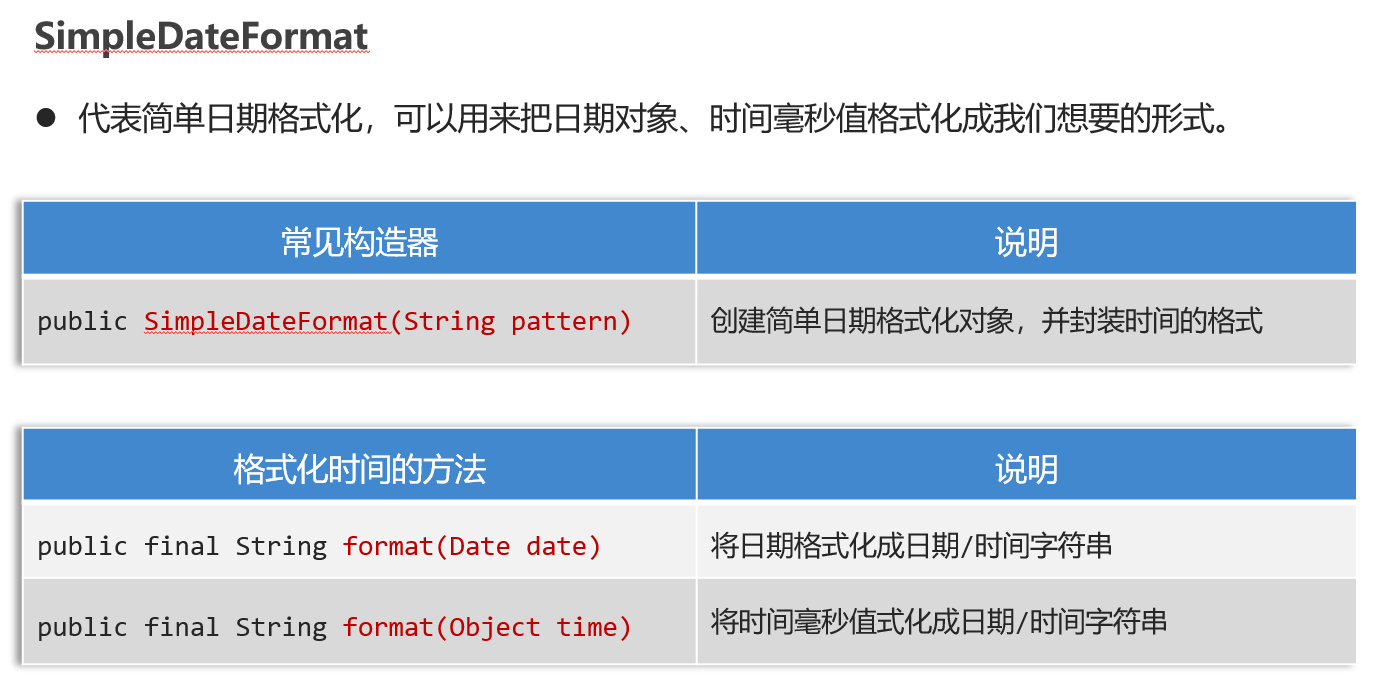
SimpleDateFormat类
package com.itheima.d3_time;
import java.text.ParseException;
import java.text.SimpleDateFormat;
import java.util.Date;
public class Test2SimpleDateFormat {
public static void main(String[] args) throws ParseException {
// 目标:掌握SimpleDateFormat的使用。
// 1、准备一些时间
Date d = new Date();
System.out.println(d);
long time = d.getTime();
System.out.println(time);
// 2、格式化日期对象,和时间 毫秒值。大写的HH是二十四小时制
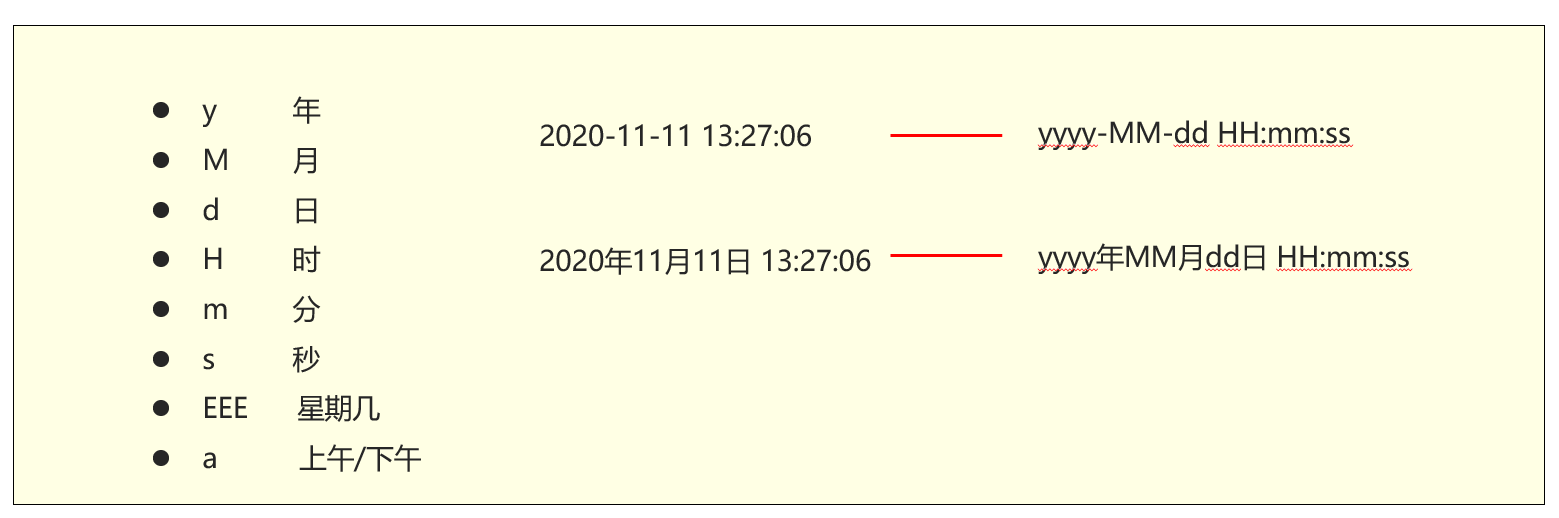
SimpleDateFormat sdf = new SimpleDateFormat("yyyy年MM月dd日 HH:mm:ss EEE a");
// SimpleDateFormat sdf = new SimpleDateFormat("yyyy年MM月dd日 hh:mm:ss EEE a");
String rs = sdf.format(d);
String rs2 = sdf.format(time);
System.out.println(rs);
System.out.println(rs2);
System.out.println("-------------------------------------------------------------------");
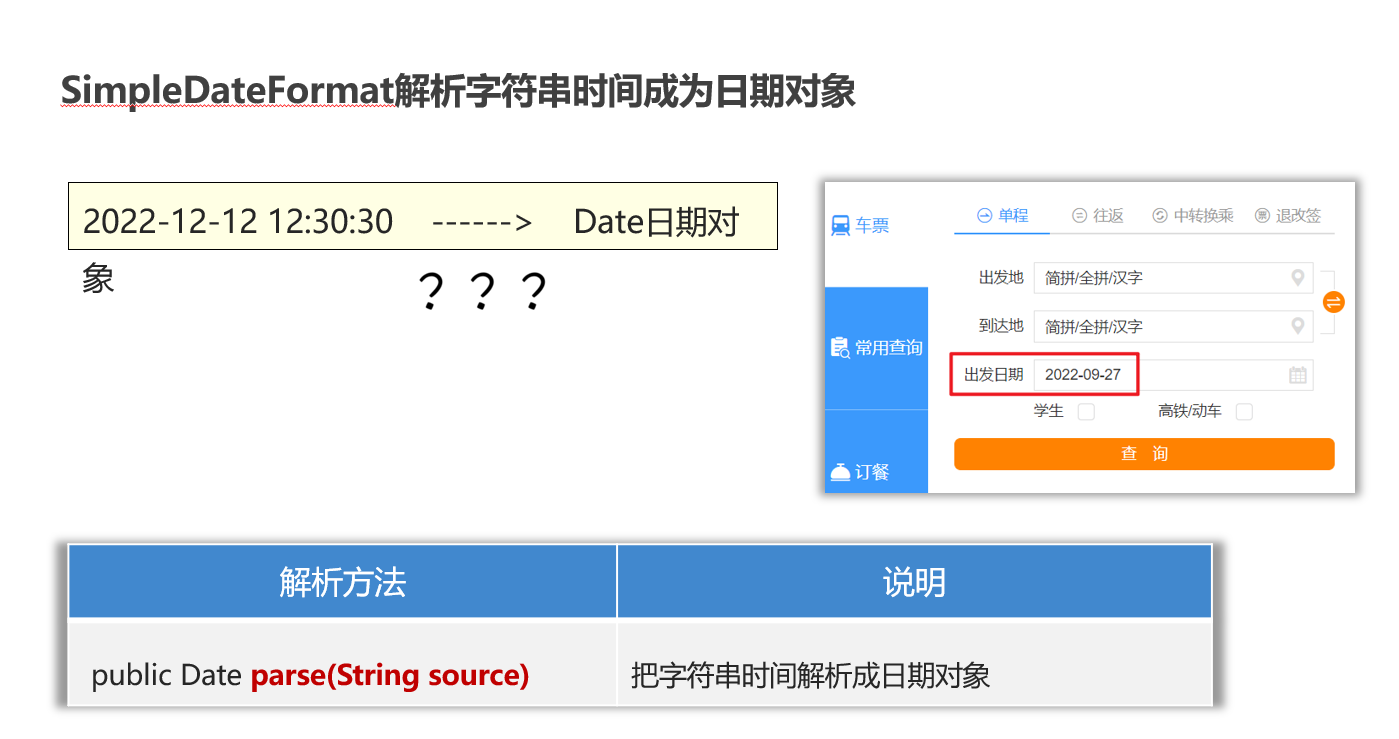
// 目标:掌握SimpleDateFormat解析字符串时间 成为日期对象。
String dateStr = "2022-12-12 12:12:11";
// 1、创建简单日期格式化对象 , 指定的时间格式必须与被解析的时间格式一模一样,否则程序会出bug.
SimpleDateFormat sdf2 = new SimpleDateFormat("yyyy-MM-dd HH:mm:ss");
Date d2 = sdf2.parse(dateStr);
System.out.println(d2);
}
}
Calendar类
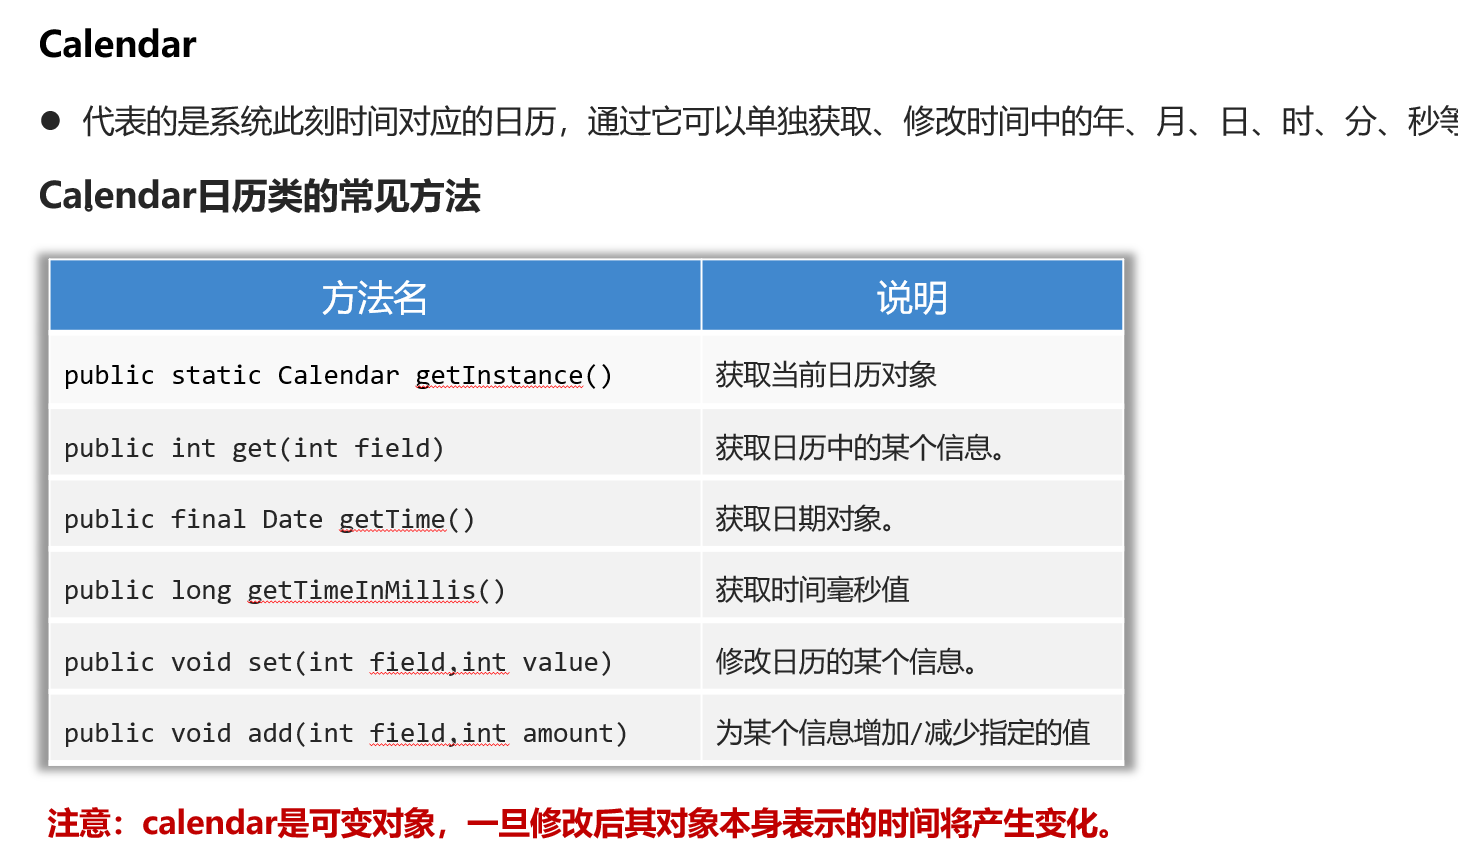
java.util.Calendar 是日历类,在Date后出现,替换掉了许多Date的方法。该类将所有可能用到的时间信息封装为静态成员变量,方便获取。日历类就是方便获取各个时间属性的。Calendar类(抽象类)无法直接创建对象使用,里边有一个静态方法getInstance(),该方法返回了Calendar类的子类对象。Calendar类中提供很多成员常量,代表给定的日历字段
package com.itheima.d3_time;

import java.util.Calendar;
import java.util.Date;

public class Test4Calendar {
    public static void main(String[] args) {
        // 目标:掌握Calendar的使用和特点。
        // 1、得到系统此刻时间对应的日历对象。
        Calendar now = Calendar.getInstance();
        System.out.println(now);

        // 2、获取日历中的某个信息
        int year = now.get(Calendar.YEAR);
        System.out.println(year);

        int days = now.get(Calendar.DAY_OF_YEAR);
        System.out.println(days);

        // 3、拿到日历中记录的日期对象。
        Date d = now.getTime();
        System.out.println(d);

        // 4、拿到时间毫秒值
        long time = now.getTimeInMillis();
        System.out.println(time);

        // 5、修改日历中的某个信息
        now.set(Calendar.MONTH, 9); // 修改月份成为10月份。
//        now.set(Calendar.DAY_OF_YEAR, 125); // 修改成一年中的第125天。
        System.out.println(now.getTime());

        // 6、为某个信息增加或者减少多少
        now.add(Calendar.DAY_OF_YEAR, 100);
        now.add(Calendar.DAY_OF_YEAR, -10);
        now.add(Calendar.DAY_OF_MONTH, 6);
        now.add(Calendar.HOUR, 12);
        now.set(2026, Calendar.DECEMBER, 22);
        System.out.println(now.getTime());
    }
}
秒杀案例

package com.itheima.d3_time;

import java.text.ParseException;
import java.text.SimpleDateFormat;
import java.util.Date;

public class Test3 {
    public static void main(String[] args) throws ParseException {
        // 目标:完成秒杀案例。
        // 1、把开始时间、结束时间、小贾下单时间、小皮下单时间拿到程序中来。
        String start = "2023年11月11日 0:0:0";
        String end = "2023年11月11日 0:10:0";
        String xj = "2023年11月11日 0:01:18";
        String xp = "2023年11月11日 0:10:57";

        // 2、把字符串的时间解析成日期对象。
        SimpleDateFormat sdf = new SimpleDateFormat("yyyy年MM月dd日 HH:mm:ss");
        Date startDt = sdf.parse(start);
        Date endDt = sdf.parse(end);
        Date xjDt = sdf.parse(xj);
        Date xpDt = sdf.parse(xp);

        // 3、开始判断小皮和小贾是否秒杀成功了。
        // 把日期对象转换成时间毫秒值来判断
        long startTime = startDt.getTime();
        long endTime = endDt.getTime();
        long xjTime = xjDt.getTime();
        long xpTime = xpDt.getTime();

        if(xjTime >= startTime && xjTime <= endTime){
            System.out.println("小贾您秒杀成功了~~");
        }else {
            System.out.println("小贾您秒杀失败了~~");
        }

        if(xpTime >= startTime && xpTime <= endTime){
            System.out.println("小皮您秒杀成功了~~");
        }else {
            System.out.println("小皮您秒杀失败了~~");
        }
    }
}
jdk8之后的时间(推荐)
为什么使用jdk8之后的时间
package com.itheima.d4_jdk8_time;
import java.util.Calendar;
import java.util.Date;
/**
* 目标:搞清楚为什么要用JDK 8开始新增的时间类。
*/
public class Test {
public static void main(String[] args) {
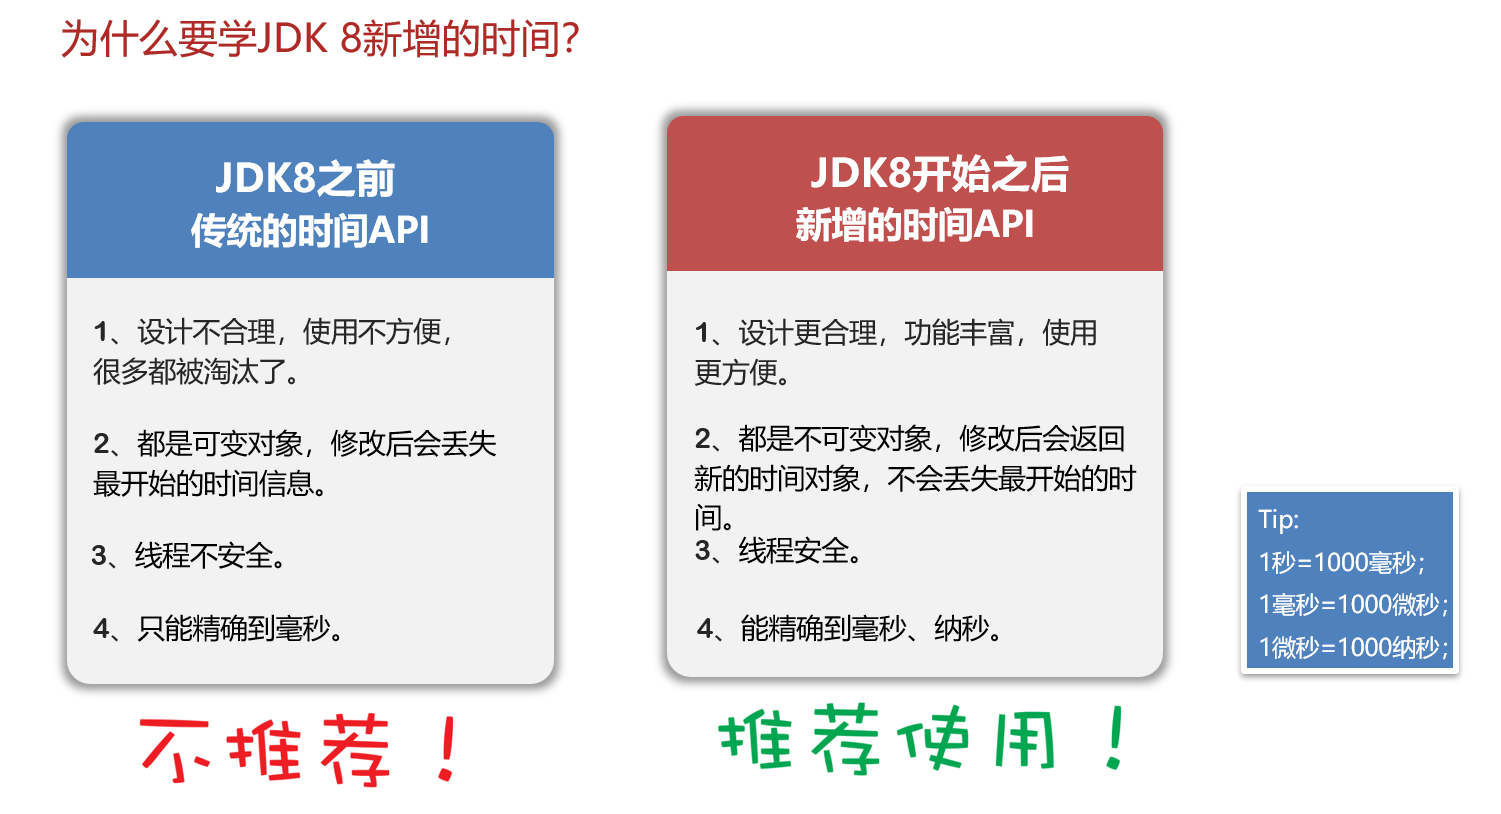
// 传统的时间类(Date、SimpleDateFormat、Calendar)存在如下问题:
// 1、设计不合理,使用不方便,很多都被淘汰了。
Date d = new Date();
// 必须自己手动加上
// System.out.println(d.getYear() + 1900);
// 要记住字段,最好有个getYear的方法
Calendar c = Calendar.getInstance();
int year = c.get(Calendar.YEAR);
System.out.println(year);
// 2、都是可变对象,修改后会丢失最开始的时间信息。
// 3、线程不安全。
// 4、不能精确到纳秒,只能精确到毫秒。
// 1秒 = 1000毫秒
// 1毫秒 = 1000微妙
// 1微妙 = 1000纳秒
}
}
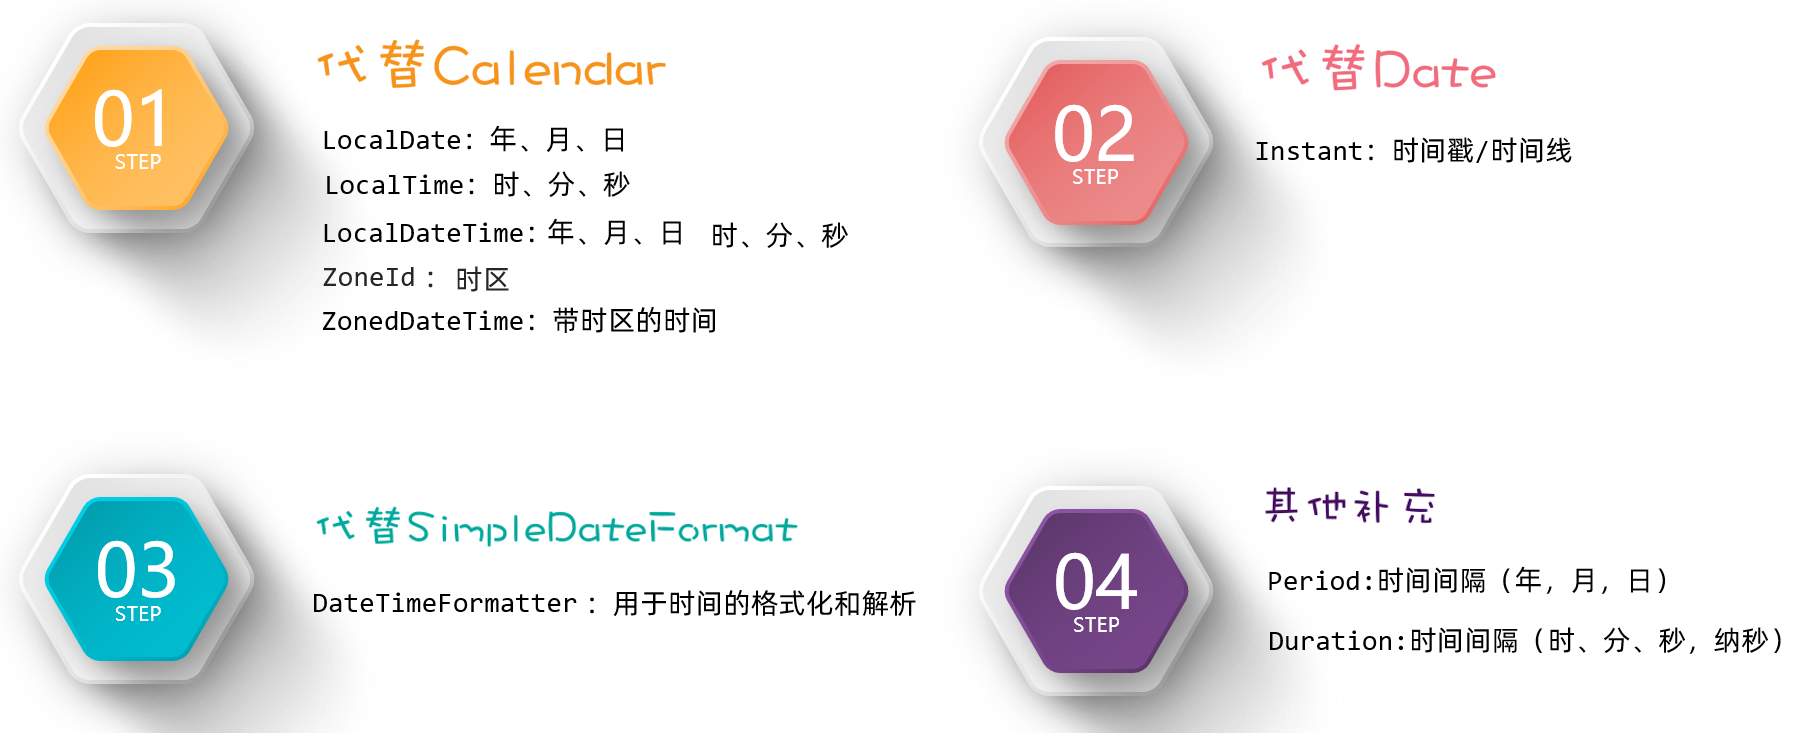
LocalDate类
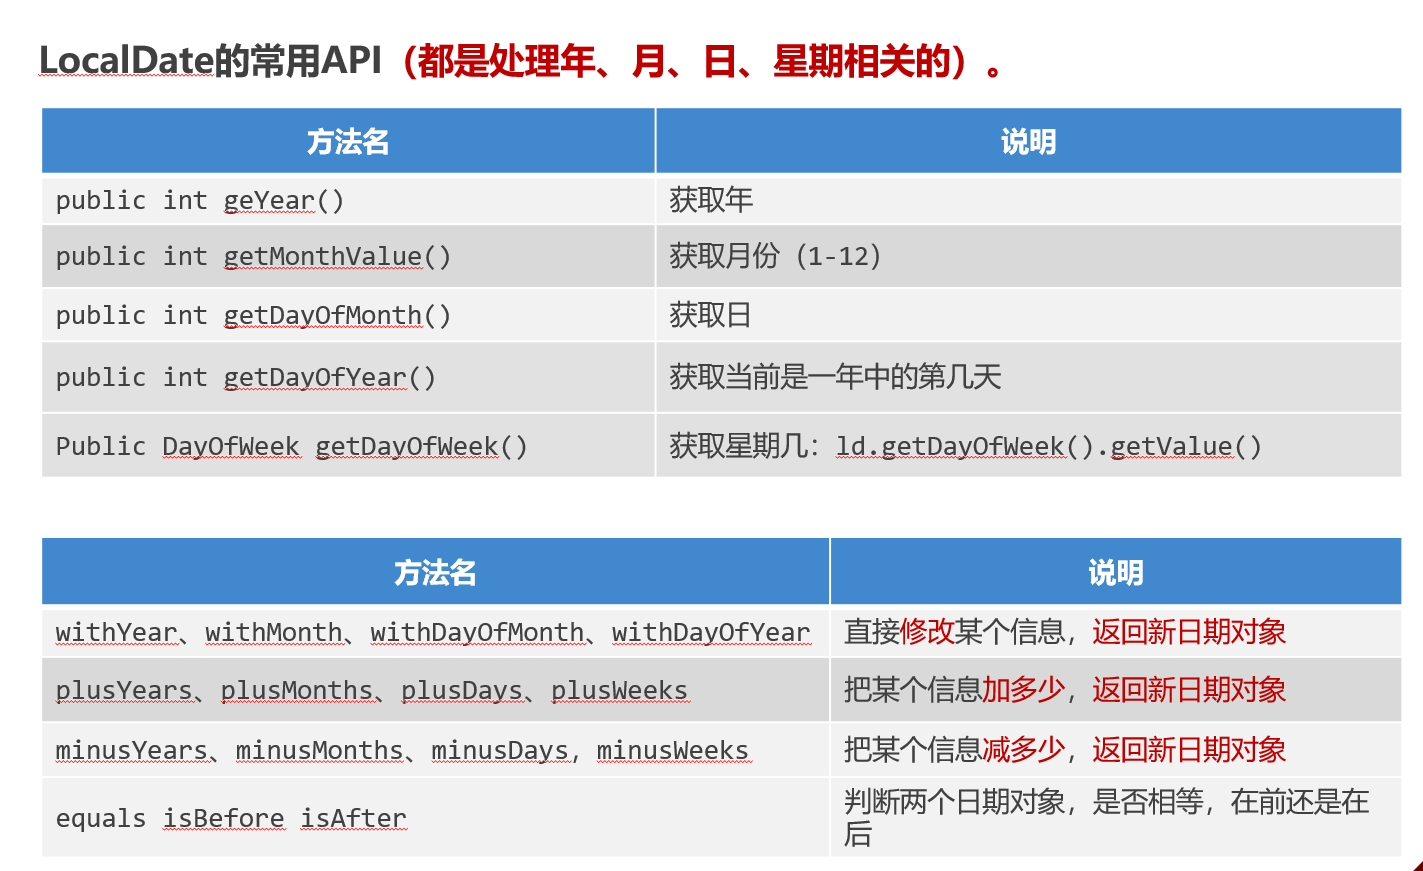
package com.itheima.d4_jdk8_time;
import java.time.LocalDate;
import java.util.Calendar;

public class Test1_LocalDate {
    public static void main(String[] args) {
        // 0、获取本地日期对象(不可变对象)
        LocalDate ld = LocalDate.now(); // 年 月 日
        System.out.println(ld);

        // 1、获取日期对象中的信息
        int year = ld.getYear(); // 年
        int month = ld.getMonthValue(); // 月(1-12)
        int day = ld.getDayOfMonth(); // 日
        int dayOfYear = ld.getDayOfYear();  // 一年中的第几天
        int dayOfWeek = ld.getDayOfWeek().getValue(); // 星期几
        System.out.println(year);
        System.out.println(day);
        System.out.println(dayOfWeek);

        // 2、直接修改某个信息: withYear、withMonth、withDayOfMonth、withDayOfYear
        LocalDate ld2 = ld.withYear(2099);
        LocalDate ld3 = ld.withMonth(12);
        System.out.println(ld2);
        System.out.println(ld3);
        System.out.println(ld);

        // 3、把某个信息加多少: plusYears、plusMonths、plusDays、plusWeeks
        LocalDate ld4 = ld.plusYears(2);
        LocalDate ld5 = ld.plusMonths(2);

        // 4、把某个信息减多少:minusYears、minusMonths、minusDays、minusWeeks
        LocalDate ld6 = ld.minusYears(2);
        LocalDate ld7 = ld.minusMonths(2);

        // 5、获取指定日期的LocalDate对象: public static LocalDate of(int year, int month, int dayOfMonth)
        LocalDate ld8 = LocalDate.of(2099, 12, 12);
        LocalDate ld9 = LocalDate.of(2099, 12, 12);

        // 6、判断2个日期对象,是否相等,在前还是在后: equals isBefore isAfter
        System.out.println(ld8.equals(ld9));// true
        System.out.println(ld8.isAfter(ld)); // true
        System.out.println(ld8.isBefore(ld)); // false
    }
}
LocalTime类
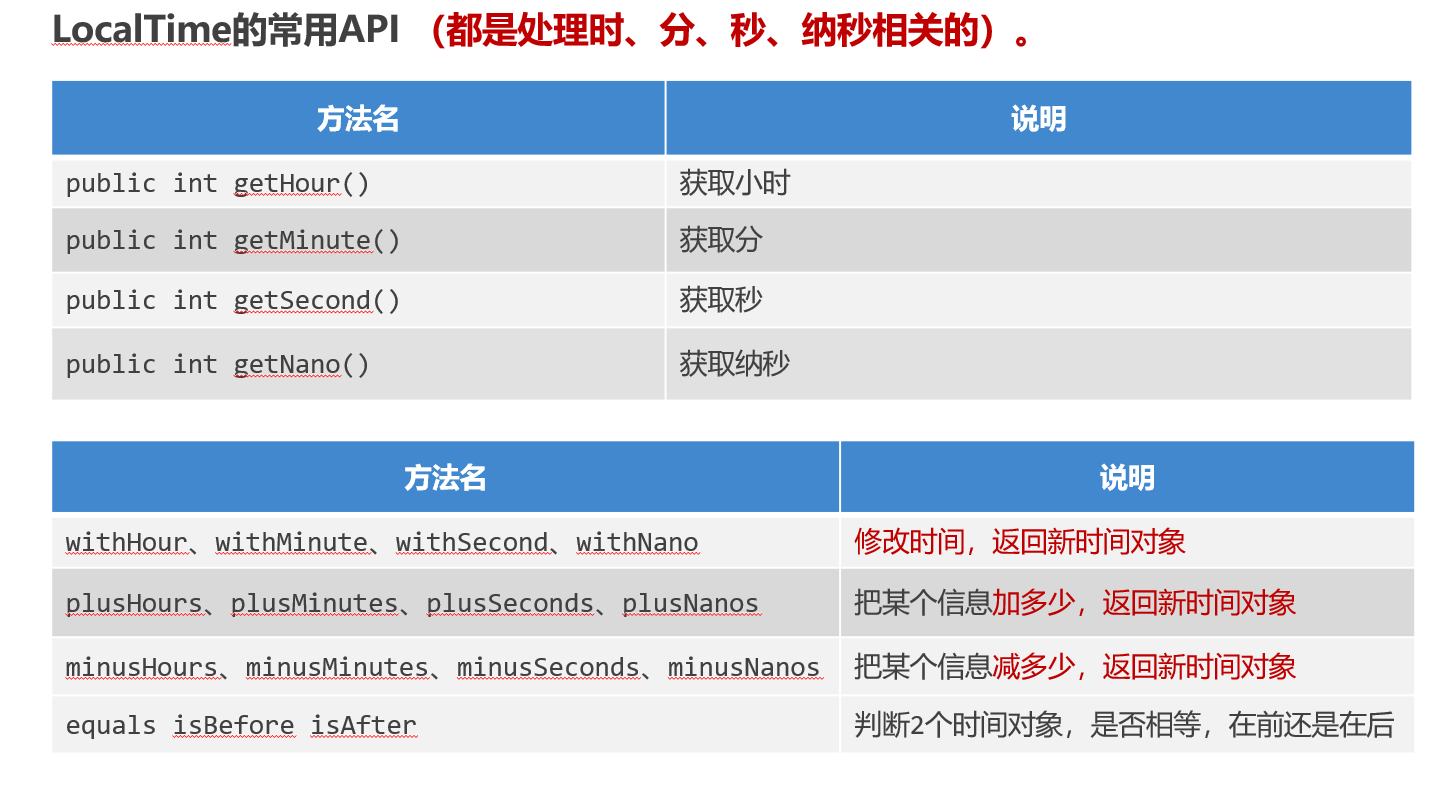
package com.itheima.d4_jdk8_time;
import java.time.LocalTime;

public class Test2_LocalTime {
    public static void main(String[] args) {
        // 0、获取本地时间对象
        LocalTime lt = LocalTime.now(); // 时 分 秒 纳秒 不可变的
        System.out.println(lt);

        // 1、获取时间中的信息
        int hour = lt.getHour(); //时
        int minute = lt.getMinute(); //分
        int second = lt.getSecond(); //秒
        int nano = lt.getNano(); //纳秒

        // 2、修改时间:withHour、withMinute、withSecond、withNano
        LocalTime lt3 = lt.withHour(10);
        LocalTime lt4 = lt.withMinute(10);
        LocalTime lt5 = lt.withSecond(10);
        LocalTime lt6 = lt.withNano(10);

        // 3、加多少:plusHours、plusMinutes、plusSeconds、plusNanos
        LocalTime lt7 = lt.plusHours(10);
        LocalTime lt8 = lt.plusMinutes(10);
        LocalTime lt9 = lt.plusSeconds(10);
        LocalTime lt10 = lt.plusNanos(10);

        // 4、减多少:minusHours、minusMinutes、minusSeconds、minusNanos
        LocalTime lt11 = lt.minusHours(10);
        LocalTime lt12 = lt.minusMinutes(10);
        LocalTime lt13 = lt.minusSeconds(10);
        LocalTime lt14 = lt.minusNanos(10);

        // 5、获取指定时间的LocalTime对象:
        // public static LocalTime of(int hour, int minute, int second)
        LocalTime lt15 = LocalTime.of(12, 12, 12);
        LocalTime lt16 = LocalTime.of(12, 12, 12);

        // 6、判断2个时间对象,是否相等,在前还是在后: equals isBefore isAfter
        System.out.println(lt15.equals(lt16)); // true
        System.out.println(lt15.isAfter(lt)); // false
        System.out.println(lt15.isBefore(lt)); // true

    }
}
LocalDateTime类
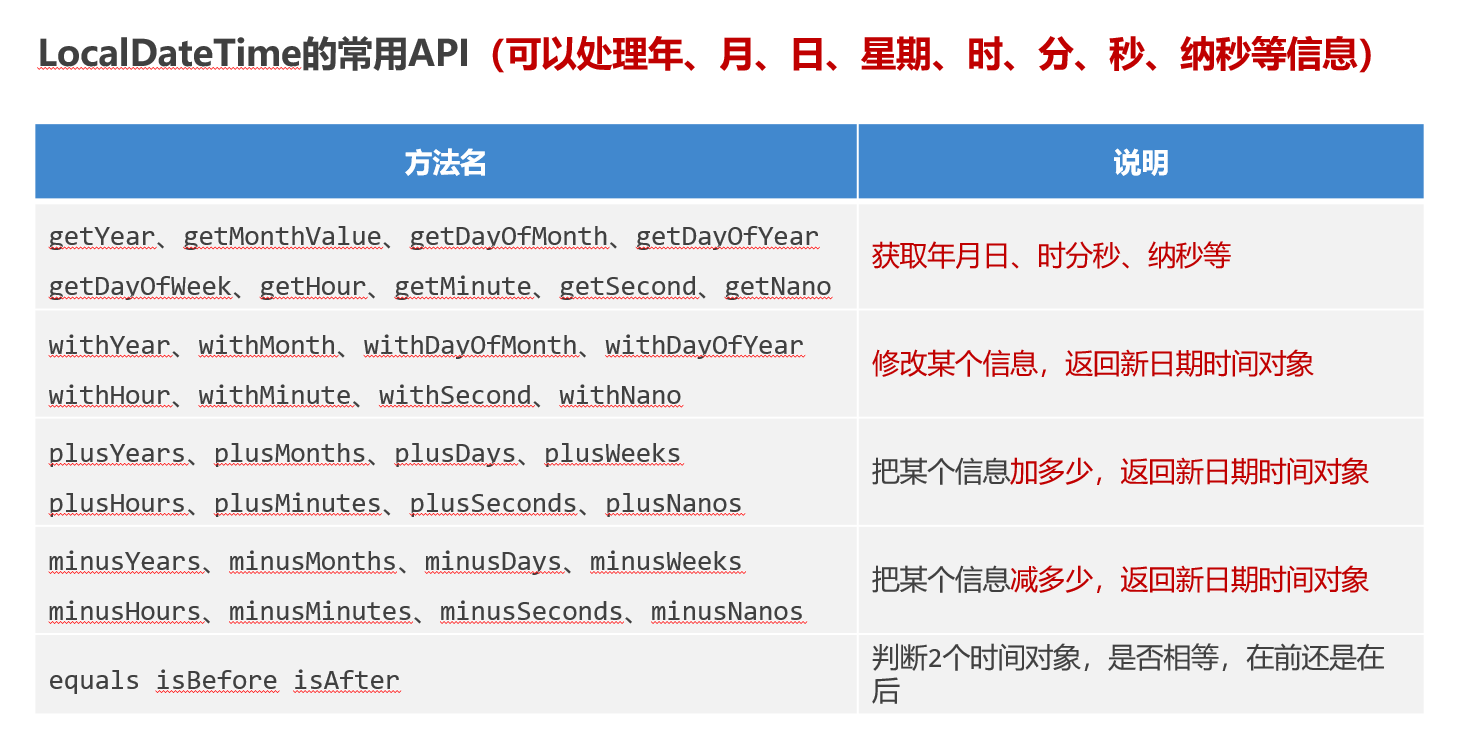
package com.itheima.d4_jdk8_time;
import java.time.LocalDate;
import java.time.LocalDateTime;
import java.time.LocalTime;
public class Test3_LocalDateTime {
public static void main(String[] args) {
// 0、获取本地日期和时间对象。
LocalDateTime ldt = LocalDateTime.now(); // 年 月 日 时 分 秒 纳秒
System.out.println(ldt);
// 1、可以获取日期和时间的全部信息
int year = ldt.getYear(); // 年
int month = ldt.getMonthValue(); // 月
int day = ldt.getDayOfMonth(); // 日
int dayOfYear = ldt.getDayOfYear(); // 一年中的第几天
int dayOfWeek = ldt.getDayOfWeek().getValue(); // 获取是周几
int hour = ldt.getHour(); //时
int minute = ldt.getMinute(); //分
int second = ldt.getSecond(); //秒
int nano = ldt.getNano(); //纳秒
// 2、修改时间信息:
// withYear withMonth withDayOfMonth withDayOfYear withHour
// withMinute withSecond withNano
LocalDateTime ldt2 = ldt.withYear(2029);
LocalDateTime ldt3 = ldt.withMinute(59);
// 3、加多少:
// plusYears plusMonths plusDays plusWeeks plusHours plusMinutes plusSeconds plusNanos
LocalDateTime ldt4 = ldt.plusYears(2);
LocalDateTime ldt5 = ldt.plusMinutes(3);
// 4、减多少:
// minusDays minusYears minusMonths minusWeeks minusHours minusMinutes minusSeconds minusNanos
LocalDateTime ldt6 = ldt.minusYears(2);
LocalDateTime ldt7 = ldt.minusMinutes(3);
// 5、获取指定日期和时间的LocalDateTime对象:
// public static LocalDateTime of(int year, Month month, int dayOfMonth, int hour,
// int minute, int second, int nanoOfSecond)
LocalDateTime ldt8 = LocalDateTime.of(2029, 12, 12, 12, 12, 12, 1222);
LocalDateTime ldt9 = LocalDateTime.of(2029, 12, 12, 12, 12, 12, 1222);
// 6、 判断2个日期、时间对象,是否相等,在前还是在后: equals、isBefore、isAfter
System.out.println(ldt9.equals(ldt8));
System.out.println(ldt9.isAfter(ldt));
System.out.println(ldt9.isBefore(ldt));
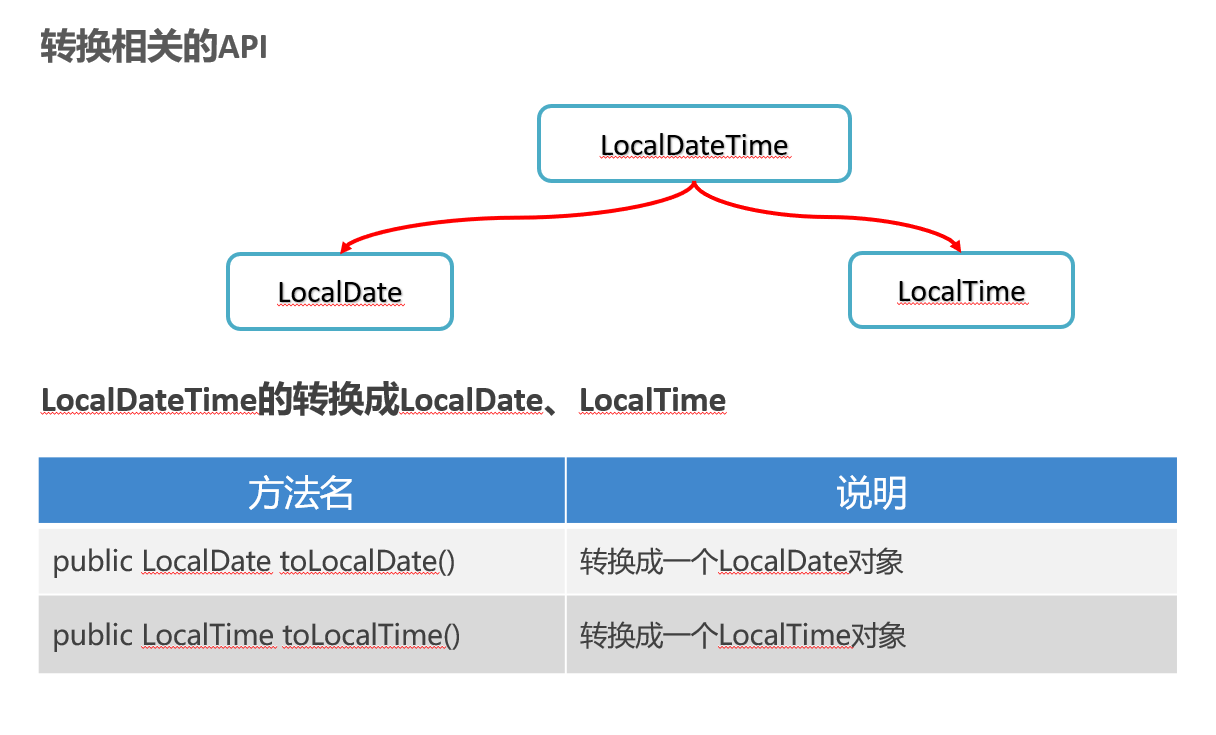
// 7、可以把LocalDateTime转换成LocalDate和LocalTime
// public LocalDate toLocalDate()
// public LocalTime toLocalTime()
// public static LocalDateTime of(LocalDate date, LocalTime time)
LocalDate ld = ldt.toLocalDate();
LocalTime lt = ldt.toLocalTime();
LocalDateTime ldt10 = LocalDateTime.of(ld, lt);
}
}
时区类
什么是时区

ZoneId类和ZonedDateTime类
package com.itheima.d4_jdk8_time;
import java.time.Clock;
import java.time.ZoneId;
import java.time.ZonedDateTime;
import java.util.Calendar;
import java.util.TimeZone;
public class Test4_ZoneId_ZonedDateTime {
public static void main(String[] args) {
// 目标:了解时区和带时区的时间。
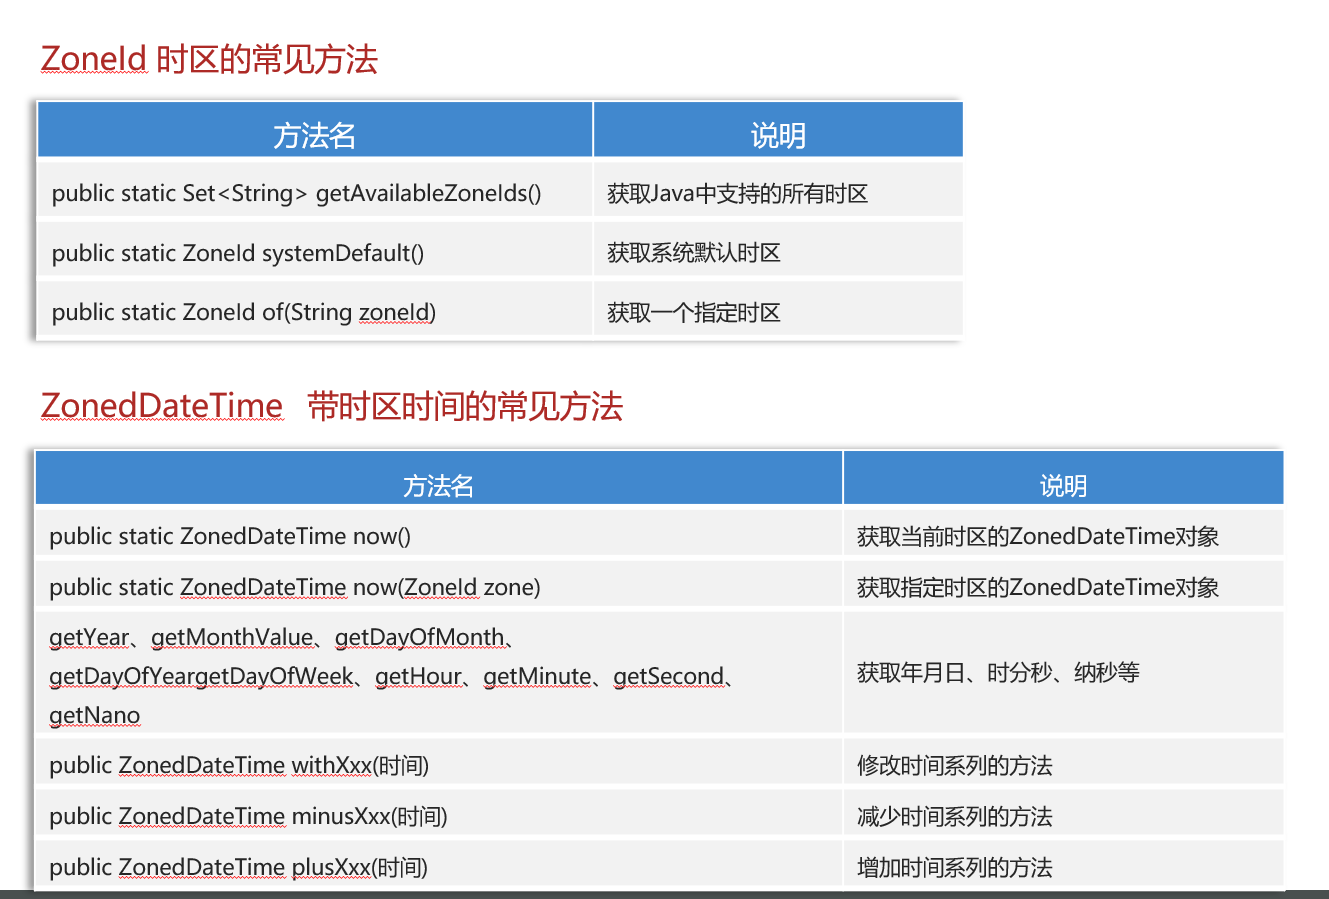
// 1、ZoneId的常见方法:
// public static ZoneId systemDefault(): 获取系统默认的时区
ZoneId zoneId = ZoneId.systemDefault();
System.out.println(zoneId.getId());
System.out.println(zoneId);
// public static Set<String> getAvailableZoneIds(): 获取Java支持的全部时区Id
System.out.println(ZoneId.getAvailableZoneIds());
// public static ZoneId of(String zoneId) : 把某个时区id封装成ZoneId对象。
ZoneId zoneId1 = ZoneId.of("America/New_York");
// 2、ZonedDateTime:带时区的时间。
// public static ZonedDateTime now(ZoneId zone): 获取某个时区的ZonedDateTime对象。
ZonedDateTime now = ZonedDateTime.now(zoneId1);
System.out.println(now);
// 世界标准时间了
ZonedDateTime now1 = ZonedDateTime.now(Clock.systemUTC());
System.out.println(now1);
// public static ZonedDateTime now():获取系统默认时区的ZonedDateTime对象
ZonedDateTime now2 = ZonedDateTime.now();
System.out.println(now2);
// Calendar instance = Calendar.getInstance(TimeZone.getTimeZone(zoneId1));
}
}
Instant类
package com.itheima.d4_jdk8_time;
import java.time.Instant;
import java.time.LocalDateTime;
/**
* 目标:掌握Instant的使用。
*/
public class Test5_Instant {
public static void main(String[] args) {
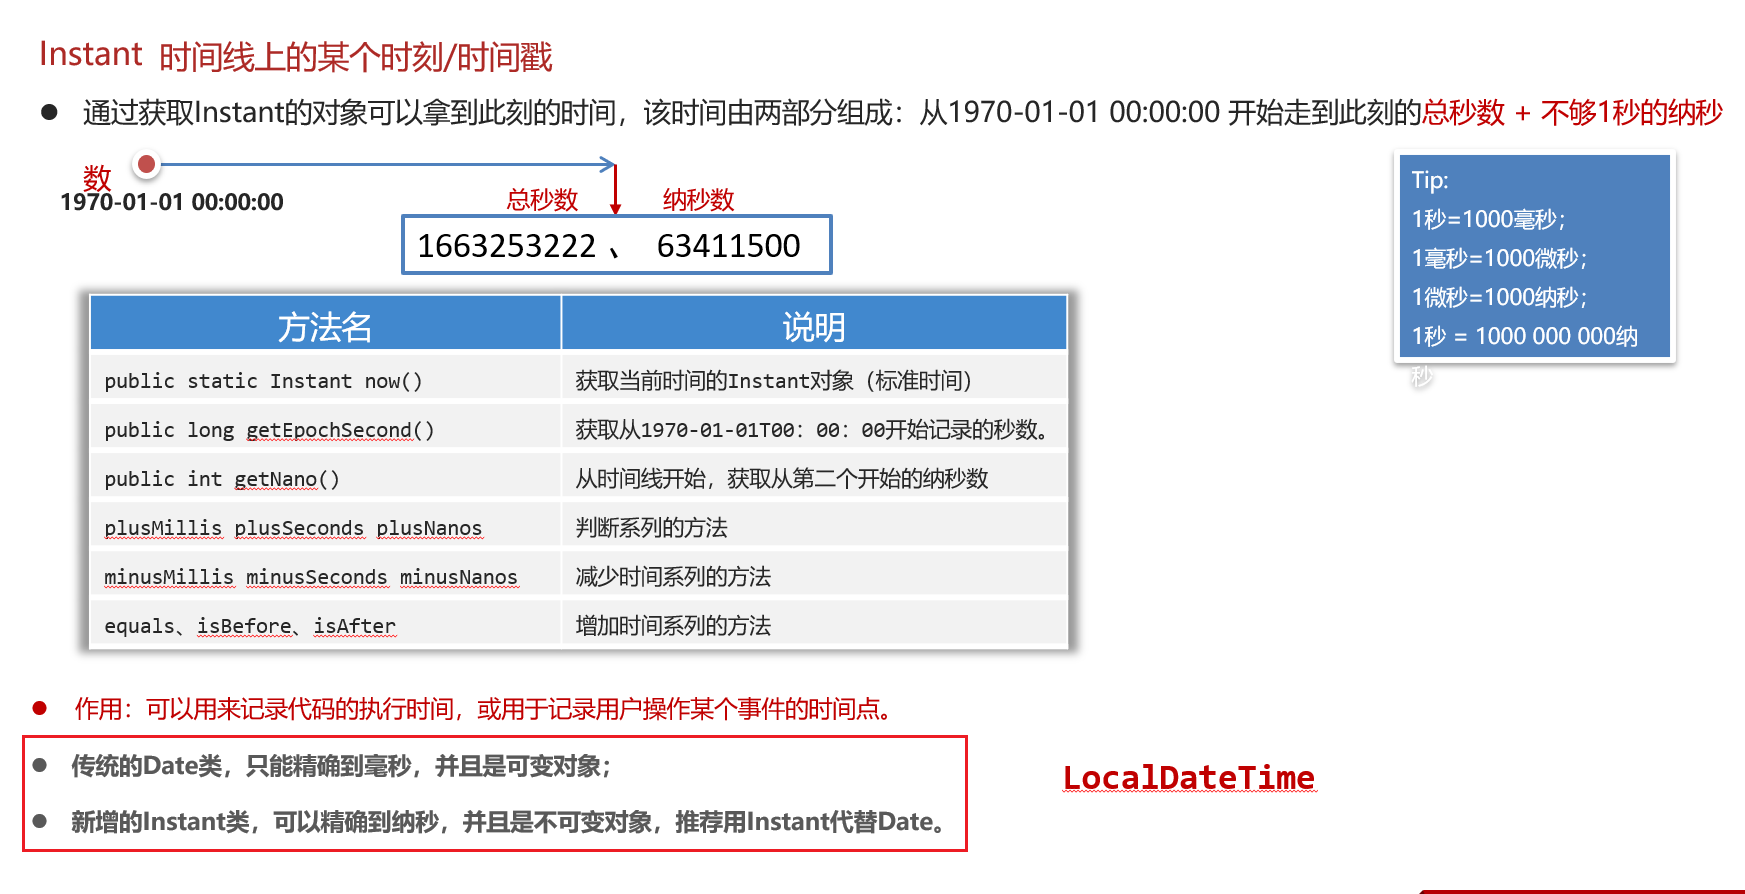
// 1、创建Instant的对象,获取此刻时间信息
Instant now = Instant.now(); // 不可变对象
// 2、获取总秒数
long second = now.getEpochSecond();
System.out.println(second);
// 3、不够1秒的纳秒数
int nano = now.getNano();
System.out.println(nano);
System.out.println(now);
Instant instant = now.plusNanos(111);
// Instant对象的作用:做代码的性能分析,或者记录用户的操作时间点
Instant now1 = Instant.now();
// 代码执行。。。。
Instant now2 = Instant.now();
LocalDateTime l = LocalDateTime.now();
}
}
DateTimeFormatter类
package com.itheima.d4_jdk8_time;
import java.time.Instant;
import java.time.LocalDateTime;
import java.time.ZonedDateTime;
import java.time.format.DateTimeFormatter;
/**
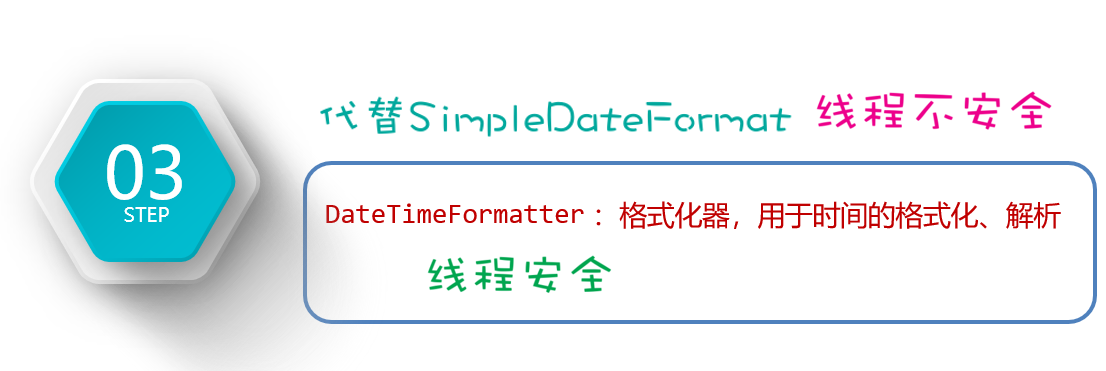
* 目标:掌握JDK 8新增的DateTimeFormatter格式化器的用法。
*/
public class Test6_DateTimeFormatter {
public static void main(String[] args) {
// 1、创建一个日期时间格式化器对象出来。
DateTimeFormatter formatter = DateTimeFormatter.ofPattern("yyyy年MM月dd日 HH:mm:ss");
// 2、对时间进行格式化
LocalDateTime now = LocalDateTime.now();
System.out.println(now);
String rs = formatter.format(now); // 正向格式化
System.out.println(rs);
// 3、格式化时间,其实还有一种方案。
String rs2 = now.format(formatter); // 反向格式化
System.out.println(rs2);
// 4、解析时间:解析时间一般使用LocalDateTime提供的解析方法来解析。
String dateStr = "2029年12月12日 12:12:11";
LocalDateTime ldt = LocalDateTime.parse(dateStr, formatter);
System.out.println(ldt);
}
}
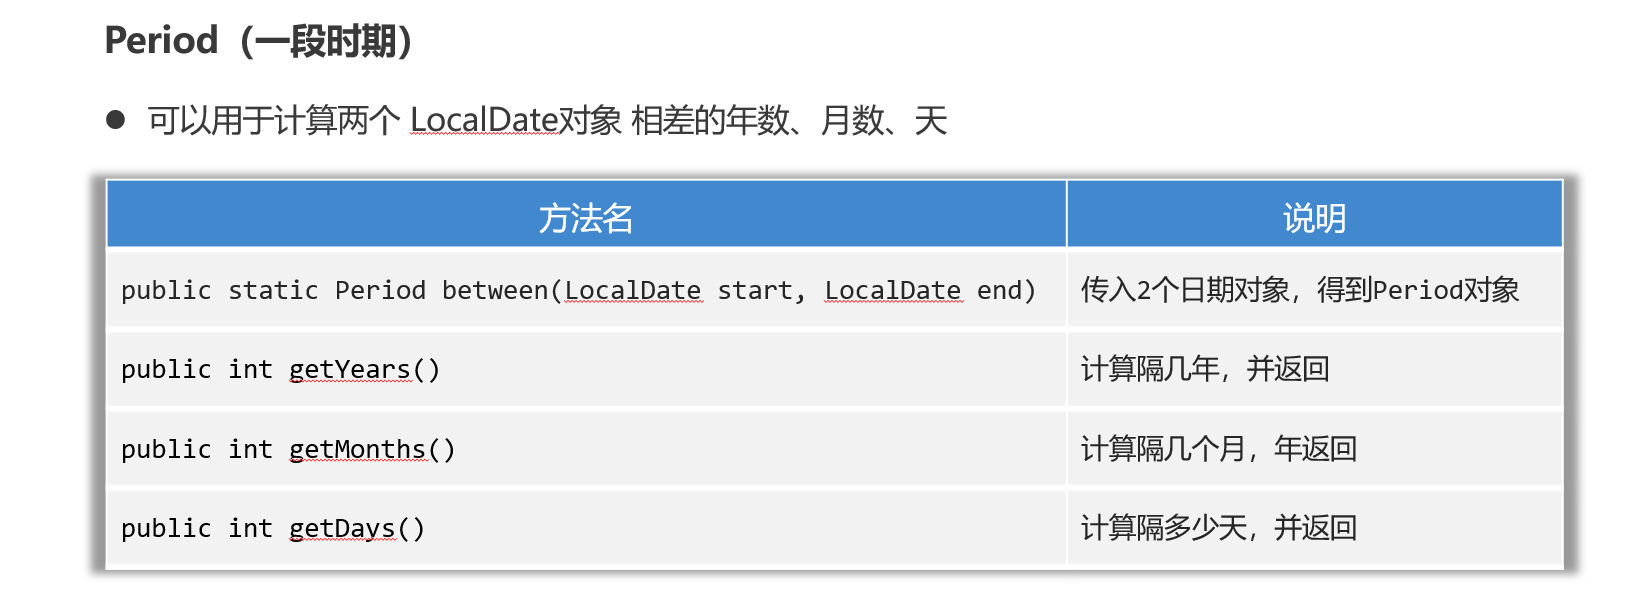
时间间隔类
package com.itheima.d4_jdk8_time;

import java.time.LocalDate;
import java.time.Period;

/**
 * 目标:掌握Period的作用:计算机两个日期相差的年数,月数、天数。
 */
public class Test7_Period {
    public static void main(String[] args) {
        LocalDate start = LocalDate.of(2029, 8, 10);
        LocalDate end = LocalDate.of(2029, 12, 15);

        // 1、创建Period对象,封装两个日期对象。
        Period period = Period.between(start, end);

        // 2、通过period对象获取两个日期对象相差的信息。
        System.out.println(period.getYears());
        System.out.println(period.getMonths());
        System.out.println(period.getDays());
    }
}
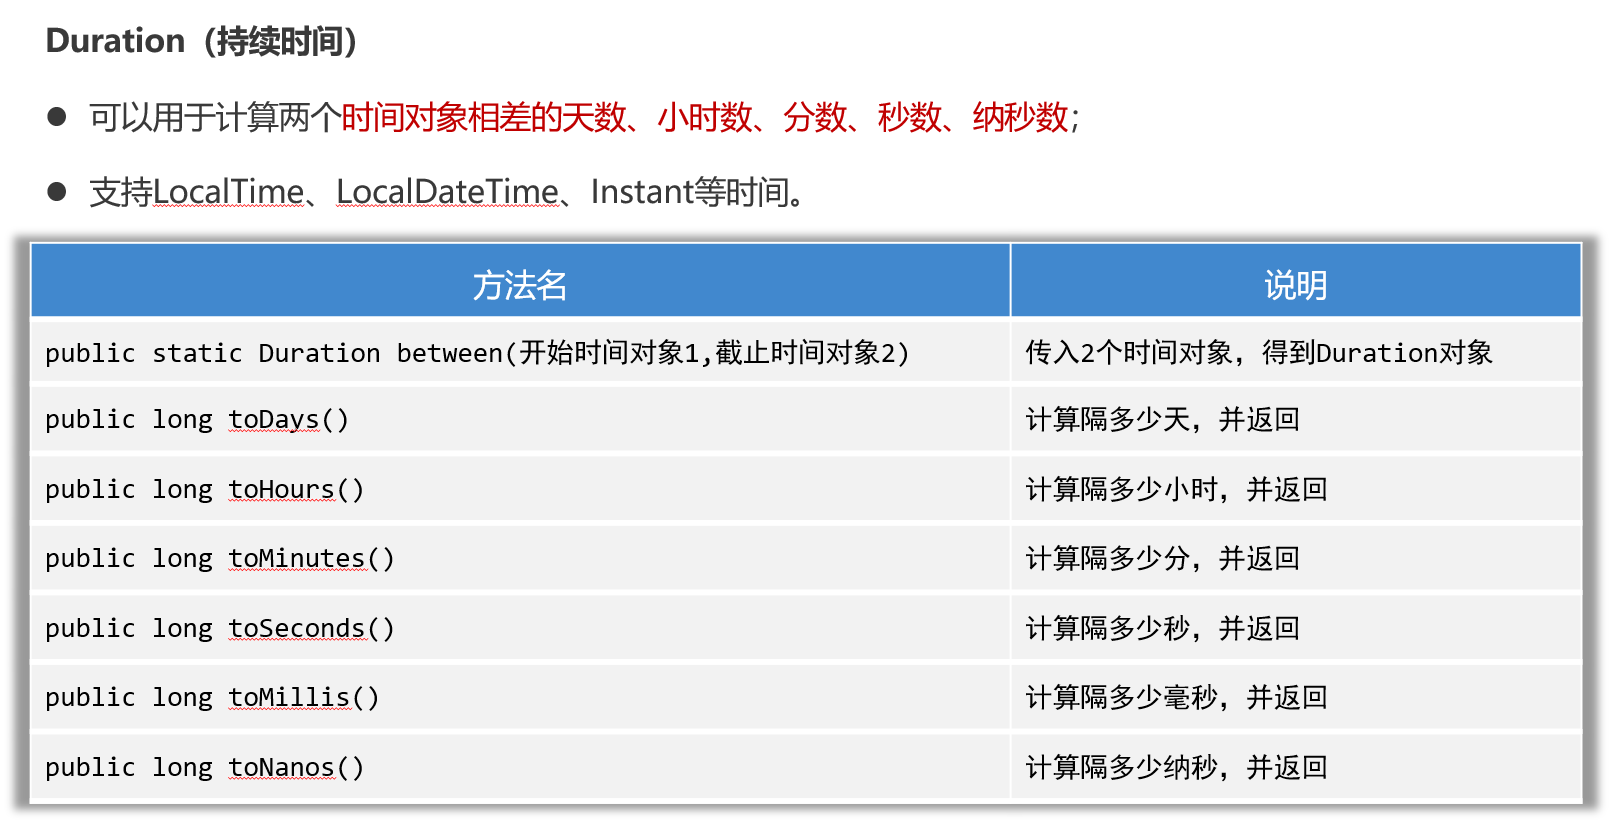
package com.itheima.d4_jdk8_time;

import java.time.Duration;
import java.time.LocalDateTime;
import java.util.ArrayList;
import java.util.Arrays;

public class Test8_Duration {
    public static void main(String[] args) {
        LocalDateTime start = LocalDateTime.of(2025, 11, 11, 11, 10, 10);
        LocalDateTime end = LocalDateTime.of(2025, 11, 11, 11, 11, 11);
        // 1、得到Duration对象
        Duration duration = Duration.between(start, end);

        // 2、获取两个时间对象间隔的信息
        System.out.println(duration.toDays());// 间隔多少天
        System.out.println(duration.toHours());// 间隔多少小时
        System.out.println(duration.toMinutes());// 间隔多少分
        System.out.println(duration.toSeconds());// 间隔多少秒
        System.out.println(duration.toMillis());// 间隔多少毫秒
        System.out.println(duration.toNanos());// 间隔多少纳秒

    }
}
1.8之前和1.8之后的时间日期对比
使用方式:
- 1.0:new 对象
- 1.8:类名.方法
使用用途:
-
获取当前时间
- 1.0:new Date() -> getTime()
- 1.8:类名.now()
-
时间日期格式化
- 把时间转成字符串(format)
- 1.0:new SDF("pattern")
- 1.8:DTF.方法
- 把字符串转成时间对象(parse)
- 把时间转成字符串(format)
-
如何获取时间戳
- 1.0:new Date() -> getTime() / System.currentTimeMillis()
- 1.8:类名.now() -> toInstant(ZoneOffSet.UTC) -> toEpochMilli();
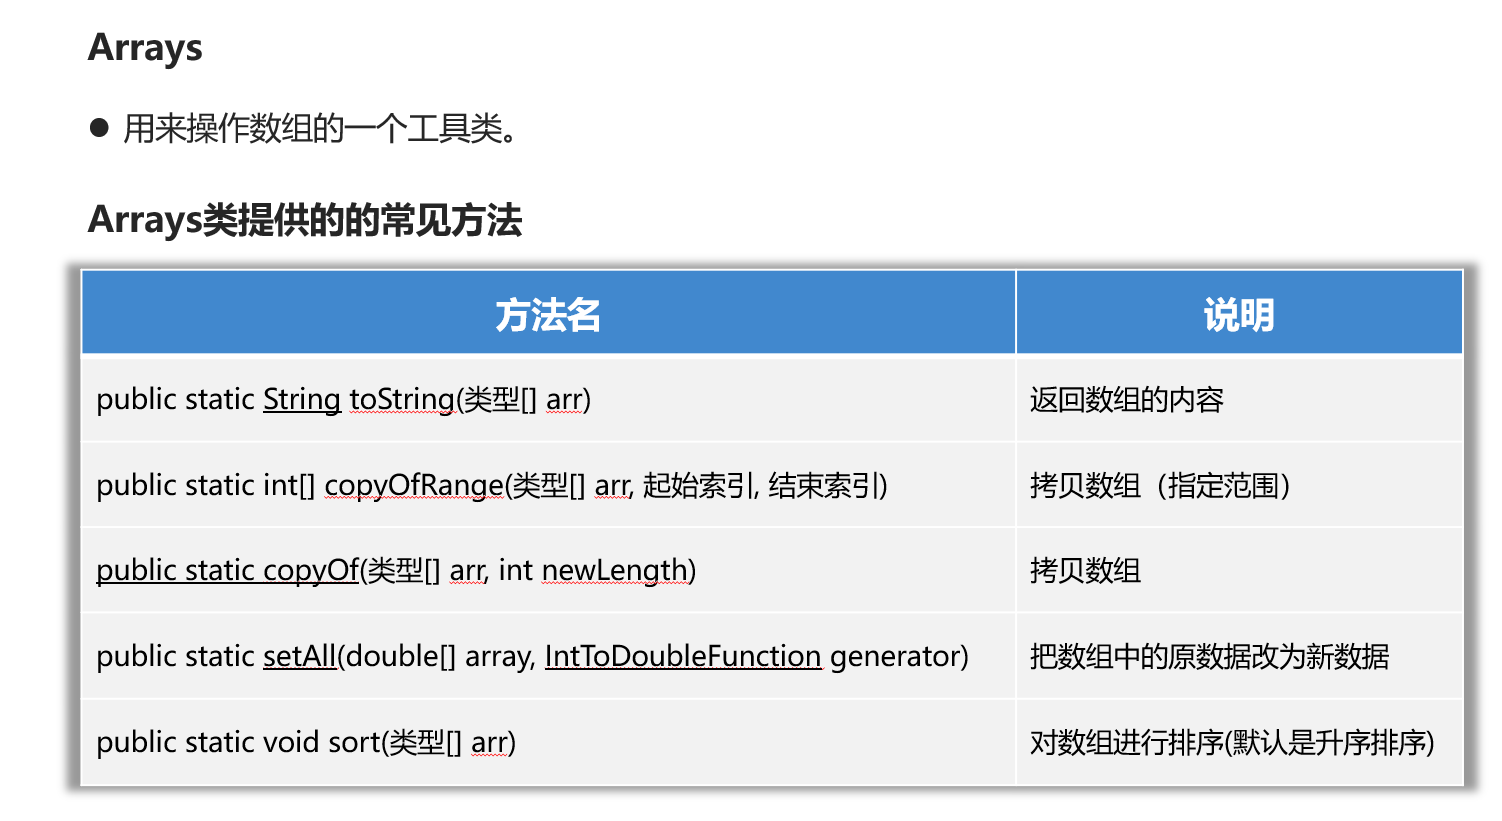
Arrays类
package com.itheima.arrays;

import java.math.BigDecimal;
import java.math.RoundingMode;
import java.util.Arrays;
import java.util.Comparator;
import java.util.function.IntToDoubleFunction;

public class ArraysTest {
    public static void main(String[] args) {
        int[] arr = {1, 2, 3, 4, 5, 6};

        System.out.println(Arrays.toString(arr));

        int[] arr1 = Arrays.copyOfRange(arr, 0, 5);
        System.out.println(Arrays.toString(arr1));

        int[] arr3 = Arrays.copyOf(arr, 3);
        System.out.println(Arrays.toString(arr3));


        Integer[] arr4 = {1, 2, 3, 4, 5, 6};
        Arrays.sort(arr4, new Comparator<Integer>() {
            @Override
            public int compare(Integer o1, Integer o2) {
                return o2 - o1;
            }
        });
        System.out.println(Arrays.toString(arr4));


        Student[] students = initStu();
        Arrays.sort(students, new Comparator<Student>() {
            @Override
            public int compare(Student o1, Student o2) {
                // 降序
                return o2.getAge() - o1.getAge();
            }
        });
        System.out.println(Arrays.toString(students));


        double[] arr5 = {1, 2, 3, 4, 5, 6};
        Arrays.setAll(arr5, new IntToDoubleFunction() {
            @Override
            public double applyAsDouble(int value) {
                // value: 0 1 2 3...
                BigDecimal res = BigDecimal.valueOf(arr5[value])
                        .divide(BigDecimal.valueOf(0.8), 2, RoundingMode.HALF_UP);
                return res.doubleValue();
            }
        });
        System.out.println(Arrays.toString(arr5));


    }

    public static Student[] initStu() {
        Student[] stuArr = new Student[3];
        stuArr[0] = new Student(19, 188);
        stuArr[1] = new Student(35, 175);
        stuArr[2] = new Student(17, 183);
        return stuArr;
    }
}
Arrays类自定义排序规则---对象排序
刚才我们使用Arrays操作数组时,数组中存储存储的元素是int类型、double类型,是可以直接排序的,而且默认是升序排列。
如果数组中存储的元素类型是自定义的对象,如何排序呢?接下来,我们就学习一下Arrays如何对对象数组进行排序。
首先我们要准备一个Student类,代码如下:
public class Student implements Comparable<Student>{
    private String name;
    private double height;
    private int age;

    public Student(String name, double height, int age) {
        this.name = name;
        this.height = height;
        this.age = age;
    }

    @Override
    public String toString() {
        return "Student{" +
        "name='" + name + '\'' +
        ", height=" + height +
        ", age=" + age +
        '}';
    }
}
然后再写一个测试类,往数组中存储4个学生对象,代码如下。此时,运行代码你会发现是会报错的。
public class ArraysTest2 {
    public static void main(String[] args) {
        // 目标:掌握如何对数组中的对象进行排序。
        Student[] students = new Student[4];
        students[0] = new Student("蜘蛛精", 169.5, 23);
        students[1] = new Student("紫霞", 163.8, 26);
        students[2] = new Student("紫霞", 163.8, 26);
        students[3] = new Student("至尊宝", 167.5, 24);

        // 1、public static void sort(类型[] arr):对数组进行排序。
        Arrays.sort(students);
        System.out.println(Arrays.toString(students));
    }
}
上面的代码为什么会报错呢?因为Arrays根本就不知道按照什么规则进行排序。为了让Arrays知道按照什么规则排序,我们有如下的两种办法。
排序方式1
- 让Student类实现Comparable接口,同时重写compareTo方法。Arrays的sort方法底层会根据compareTo方法的返回值是正数、负数、还是0来确定谁大、谁小、谁相等。代码如下:
public class Student implements Comparable<Student>{
    private String name;
    private double height;
    private int age;

    //...get、set、空参数构造方法、有参数构造方法...自己补全

    // 指定比较规则
    // this  o
    @Override
    public int compareTo(Student o) {
        // 约定1:认为左边对象 大于 右边对象 请您返回正整数
        // 约定2:认为左边对象 小于 右边对象 请您返回负整数
        // 约定3:认为左边对象 等于 右边对象 请您一定返回0
        /* if(this.age > o.age){
            return 1;
        }else if(this.age < o.age){
            return -1;
        }
        return 0;*/

        //上面的if语句,也可以简化为下面的一行代码
        return this.age - o.age; // 按照年龄升序排列
        // return o.age - this.age; // 按照年龄降序排列
    }

    @Override
    public String toString() {
        return "Student{" +
        "name='" + name + '\'' +
        ", height=" + height +
        ", age=" + age +
        '}';
    }
}
排序方式2
- 在调用Arrays.sort(数组,Comparator比较器);时,除了传递数组之外,传递一个Comparator比较器对象。Arrays的sort方法底层会根据Comparator比较器对象的compare方法方法的返回值是正数、负数、还是0来确定谁大、谁小、谁相等。代码如下
public class ArraysTest2 {
    public static void main(String[] args) {
        // 目标:掌握如何对数组中的对象进行排序。
        Student[] students = new Student[4];
        students[0] = new Student("蜘蛛精", 169.5, 23);
        students[1] = new Student("紫霞", 163.8, 26);
        students[2] = new Student("紫霞", 163.8, 26);
        students[3] = new Student("至尊宝", 167.5, 24);

        // 2、public static <T> void sort(T[] arr, Comparator<? super T> c)
        // 参数一:需要排序的数组
        // 参数二:Comparator比较器对象(用来制定对象的比较规则)
        Arrays.sort(students, new Comparator<Student>() {
            @Override
            public int compare(Student o1, Student o2) {
                // 制定比较规则了:左边对象 o1   右边对象 o2
                // 约定1:认为左边对象 大于 右边对象 请您返回正整数
                // 约定2:认为左边对象 小于 右边对象 请您返回负整数
                // 约定3:认为左边对象 等于 右边对象 请您一定返回0
                //                if(o1.getHeight() > o2.getHeight()){
                //                    return 1;
                //                }else if(o1.getHeight() < o2.getHeight()){
                //                    return -1;
                //                }
                //                return 0; // 升序
                return Double.compare(o1.getHeight(), o2.getHeight()); // 升序
                // return Double.compare(o2.getHeight(), o1.getHeight()); // 降序
            }
        });
        System.out.println(Arrays.toString(students));
    }
}
jdk8新特性
lambda表达式
Lambda 表达式描述了一个代码块(或者叫匿名方法),可以将其作为参数传递给构造方法或者普通方法以便后续执行。
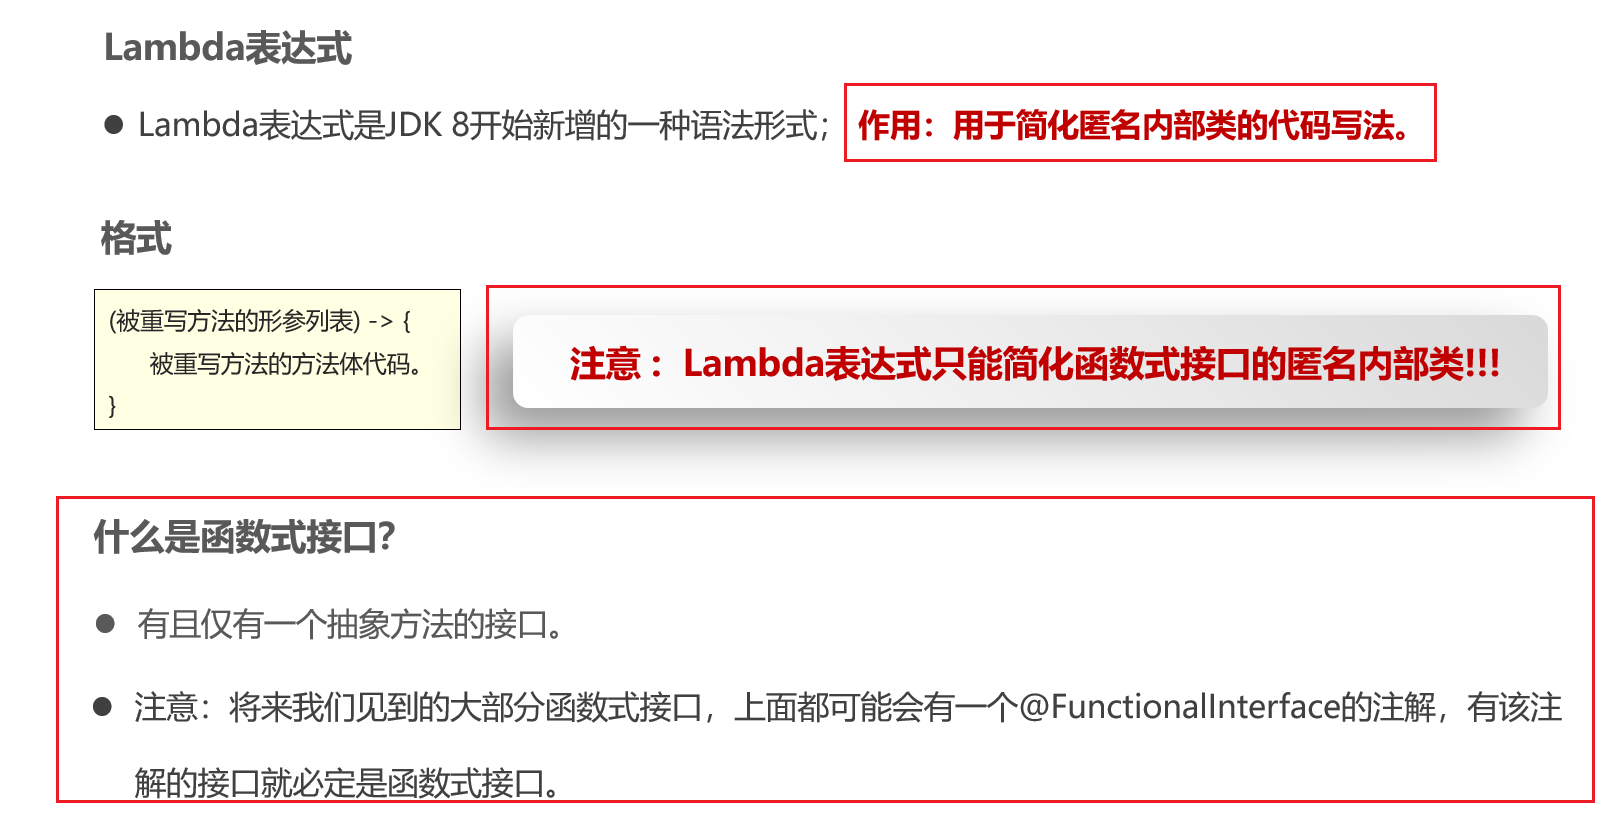
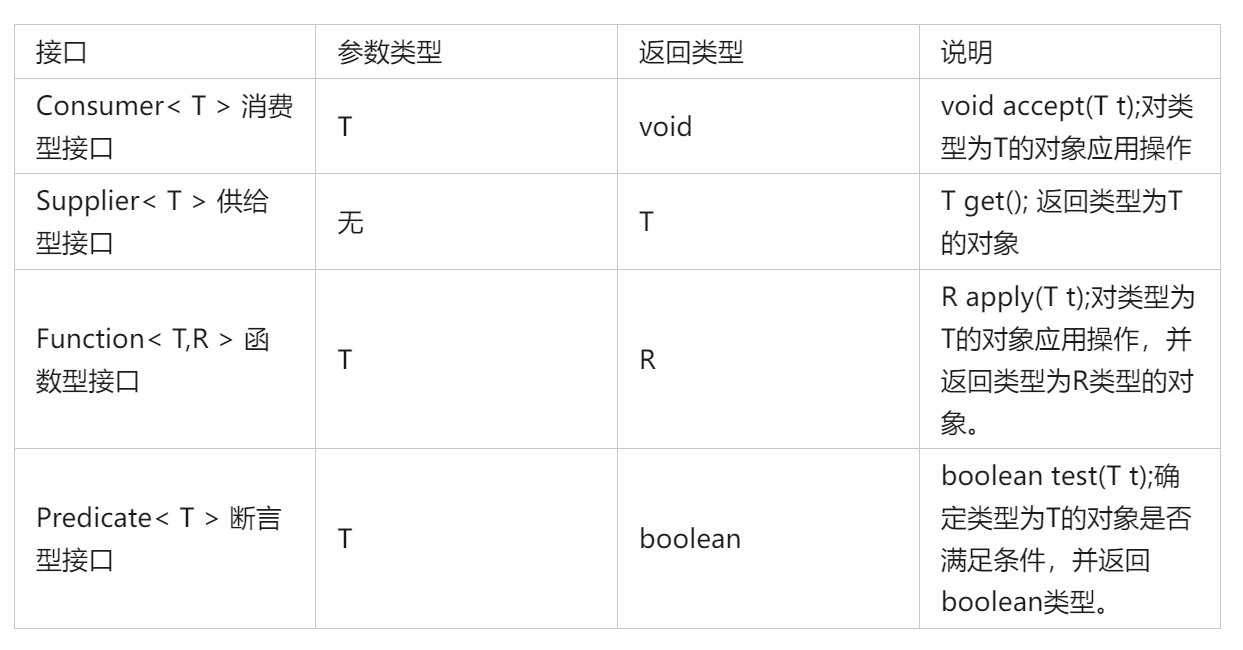
函数式接口的分类
根据应用场景不同,函数式接口又分成了以下几种:
package com.itheima.d6_lambda;

public class LambdaTest1 {
    public static void main(String[] args) {
        // 目标:认识Lambda表达式.
        //        Animal a = new Animal(){
        //            @Override
        //            public void run() {
        //                System.out.println("狗跑的贼快~~");
        //            }
        //        };
        //        a.run();

        // 注意:Lambda表达式并不是说能简化全部匿名内部类的写法,只能简化函数式接口的匿名内部类。
        // 函数式接口:接口 + 接口内部只有一个抽象方法
        //  错误的代码!


        //        Animal a = () -> {
        //            System.out.println("狗跑的贼快~~");
        //        };
        //        a.run();

        //         Swimming s = new Swimming(){
        //             @Override
        //             public void swim() {
        //                 System.out.println("学生快乐的游泳~~~~");
        //             }
        //         };
        //         s.swim();

        Swimming s = () -> {
            System.out.println("学生快乐的游泳~~~~");
        };
        s.swim();
    }
}

interface Swimming{
    void swim();
}

abstract class Animal{
    public abstract void run();
}
lambda表达式写法简化

package com.itheima.d6_lambda;

import com.itheima.d5_arrays.Student;
import java.util.Arrays;

public class LambdaTest2 {
    public static void main(String[] args) {
        // 目标:使用Lambda简化函数式接口。
        double[] prices = {99.8, 128, 100};

//        Arrays.setAll(prices, new IntToDoubleFunction() {
//            @Override
//            public double applyAsDouble(int value) {
//                // value = 0  1  2
//                return prices[value] * 0.8;
//            }
//        });

//        Arrays.setAll(prices, (int value) -> {
//                return prices[value] * 0.8;
//        });

//        Arrays.setAll(prices, (value) -> {
//            return prices[value] * 0.8;
//        });

//        Arrays.setAll(prices, value -> {
//            return prices[value] * 0.8;
//        });

        Arrays.setAll(prices, value -> prices[value] * 0.8 );

        System.out.println(Arrays.toString(prices));
        System.out.println("----------------------------------------------------------");

        Student[] students = new Student[4];
        students[0] = new Student("蜘蛛精", 169.5, 23);
        students[1] = new Student("紫霞", 163.8, 26);
        students[2] = new Student("紫霞", 163.8, 26);
        students[3] = new Student("至尊宝", 167.5, 24);

//        Arrays.sort(students, new Comparator<Student>() {
//            @Override
//            public int compare(Student o1, Student o2) {
//                return Double.compare(o1.getHeight(), o2.getHeight()); // 升序
//            }
//        });

//        Arrays.sort(students, (Student o1, Student o2) -> {
//                return Double.compare(o1.getHeight(), o2.getHeight()); // 升序
//        });

//        Arrays.sort(students, ( o1,  o2) -> {
//            return Double.compare(o1.getHeight(), o2.getHeight()); // 升序
//        });

        Arrays.sort(students, ( o1,  o2) -> Double.compare(o1.getHeight(), o2.getHeight()));


        System.out.println(Arrays.toString(students));
    }
}
方法引用
我们知道Lambda是用来简化匿名代码的书写格式的,而方法引用是用来进一步简化Lambda表达式的,它简化的更加过分。
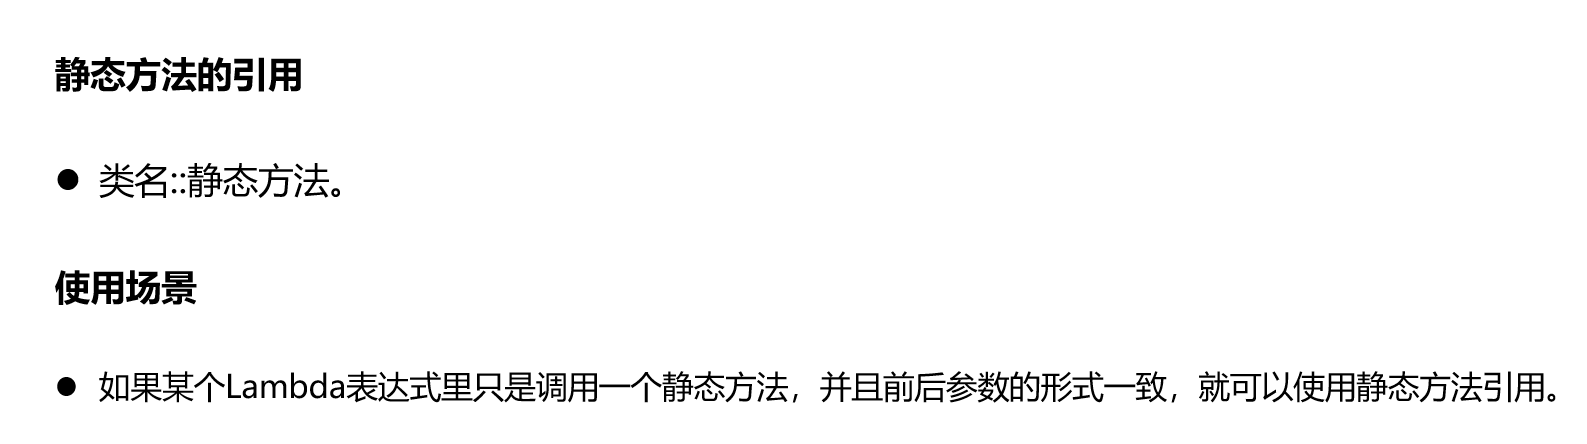
静态方法引用
我们先学习静态方法的引用,还是用之前Arrays代码来做演示。现在准备好下面的代码
public class Test1 {
    public static void main(String[] args) {
        Student[] students = new Student[4];
        students[0] = new Student("蜘蛛精", 169.5, 23);
        students[1] = new Student("紫霞", 163.8, 26);
        students[2] = new Student("紫霞", 163.8, 26);
        students[3] = new Student("至尊宝", 167.5, 24);

        // 原始写法:对数组中的学生对象,按照年龄升序排序
        Arrays.sort(students, new Comparator<Student>() {
            @Override
            public int compare(Student o1, Student o2) {
                return o1.getAge() - o2.getAge(); // 按照年龄升序排序
            }
        });

        // 使用Lambda简化后的形式
        Arrays.sort(students, (o1, o2) -> o1.getAge() - o2.getAge());
    }
}
现在,我想要把下图中Lambda表达式的方法体,用一个静态方法代替
准备另外一个类CompareByData类,用于封装Lambda表达式的方法体代码;
public class CompareByData {
    public static int compareByAge(Student o1, Student o2){
        return o1.getAge() - o2.getAge(); // 升序排序的规则
    }
}
现在我们就可以把Lambda表达式的方法体代码,改为下面的样子
Arrays.sort(students, (o1, o2) -> CompareByData.compareByAge(o1, o2));
Java为了简化上面Lambda表达式的写法,利用方法引用可以改进为下面的样子。实际上就是用类名调用方法,但是把参数给省略了。这就是静态方法引用
//静态方法引用:类名::方法名
Arrays.sort(students, CompareByData::compareByAge);
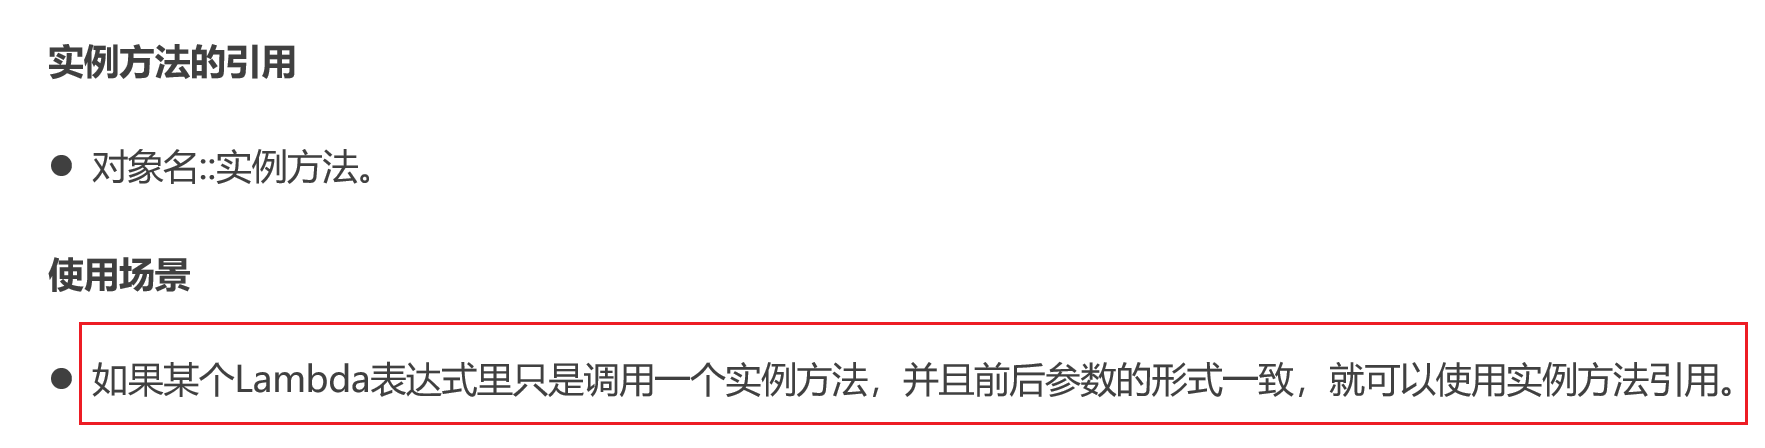
实例方法引用
还是基于上面的案例,我们现在来学习一下实例方法的引用。现在,我想要把下图中Lambda表达式的方法体,用一个实例方法代替。
在CompareByData类中,再添加一个实例方法,用于封装Lambda表达式的方法体
接下来,我们把Lambda表达式的方法体,改用对象调用方法
CompareByData compare = new CompareByData();
Arrays.sort(students, (o1, o2) -> compare.compareByAgeDesc(o1, o2)); // 降序
最后,再将Lambda表达式的方法体,直接改成方法引用写法。实际上就是用类实例调用方法,但是省略参数。这就是实例方法引用
CompareByData compare = new CompareByData();
Arrays.sort(students, compare::compareByAgeDesc); // 降序
特定类型方法的引用
各位小伙伴,我们继续学习特定类型的方法引用。在学习之前还是需要给大家说明一下,这种特定类型的方法引用是没有什么道理的,只是语法的一种约定,遇到这种场景,就可以这样用。
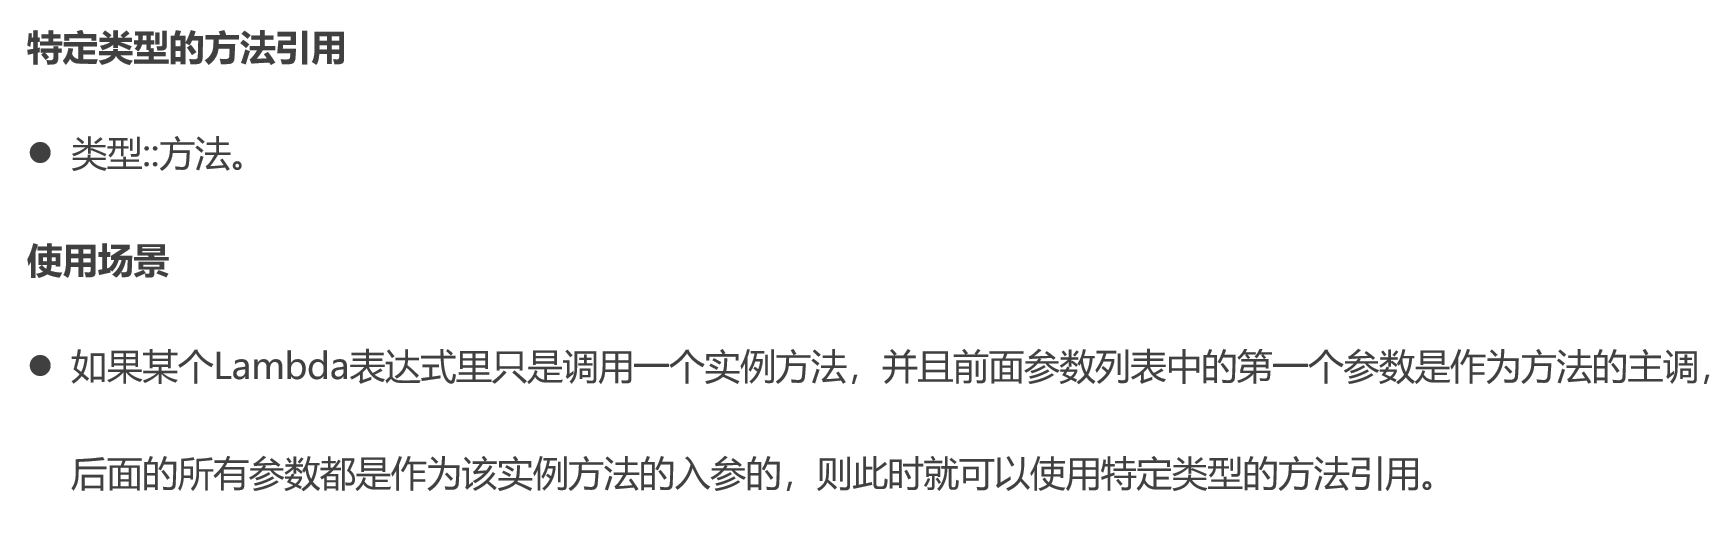
如果某个Lambda表达式里只是调用一个实例方法,并且前面参数列表中的第一个参数作为方法的主调,后面的所有参数都是作为该实例方法的入参时,则就可以使用特定类型的方法引用。
格式:
类型::方法名
public class Test2 {
    public static void main(String[] args) {
        String[] names = {"boby", "angela", "Andy" ,"dlei", "caocao", "Babo", "jack", "Cici"};

        // 要求忽略首字符大小写进行排序。
        Arrays.sort(names, new Comparator<String>() {
            @Override
            public int compare(String o1, String o2) {
                // 制定比较规则。o1 = "Andy"  o2 = "angela"
                return o1.compareToIgnoreCase(o2);
            }
        });

        //lambda表达式写法
        Arrays.sort(names, ( o1,  o2) -> o1.compareToIgnoreCase(o2) );
        //特定类型的方法引用!
        Arrays.sort(names, String::compareToIgnoreCase);

        System.out.println(Arrays.toString(names));
    }
}
构造器引用(几乎不使用)
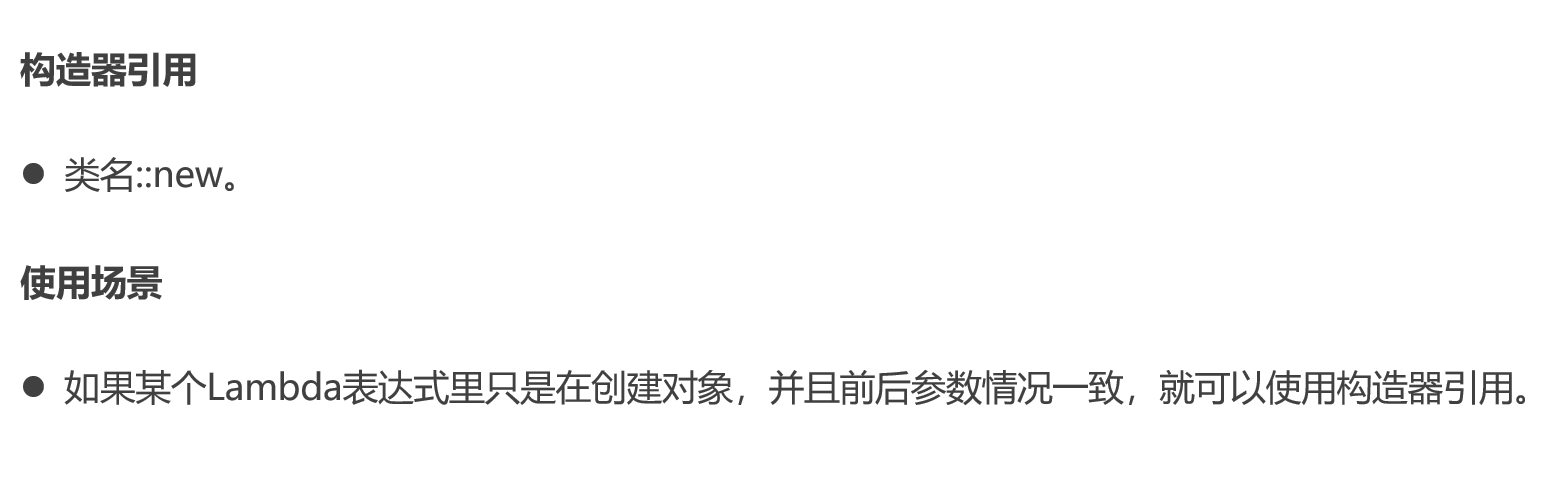
各位小伙伴,我们学习最后一种方法引用的形式,叫做构造器引用。还是先说明一下,构造器引用在实际开发中应用的并不多,目前还没有找到构造器的应用场景。所以大家在学习的时候,也只是关注语法就可以了。
现在,我们准备一个JavaBean类,Car类
public class Car {
    private String name;
    private double price;

    public Car() {

    }

    public Car(String name, double price) {
        this.name = name;
        this.price = price;
    }

    public String getName() {
        return name;
    }

    public void setName(String name) {
        this.name = name;
    }

    public double getPrice() {
        return price;
    }

    public void setPrice(double price) {
        this.price = price;
    }

    @Override
    public String toString() {
        return "Car{" +
        "name='" + name + '\'' +
        ", price=" + price +
        '}';
    }
}
因为方法引用是基于Lamdba表达式简化的,所以也要按照Lamdba表达式的使用前提来用,需要一个函数式接口,接口中代码的返回值类型是Car类型
interface CreateCar{
    Car create(String name, double price);
}
最后,再准备一个测试类,在测试类中创建CreateCar接口的实现类对象,先用匿名内部类创建、再用Lambda表达式创建,最后改用方法引用创建。同学们只关注格式就可以,不要去想为什么(语法就是这么设计的)。
public class Test3 {
    public static void main(String[] args) {
        // 1、创建这个接口的匿名内部类对象。
        CreateCar cc1 = new CreateCar(){
            @Override
            public Car create(String name, double price) {
                return new Car(name, price);
            }
        };
        //2、使用lambda表达式改进
        CreateCar cc2 = (name,  price) -> new Car(name, price);

        //3、使用方法引用改进:构造器引用
        CreateCar cc3 = Car::new;

        //注意:以上是创建CreateCar接口实现类对象的几种形式而已,语法一步一步简化。

        //4、对象调用方法
        Car car = cc3.create("奔驰", 49.9);
        System.out.println(car);
    }
}
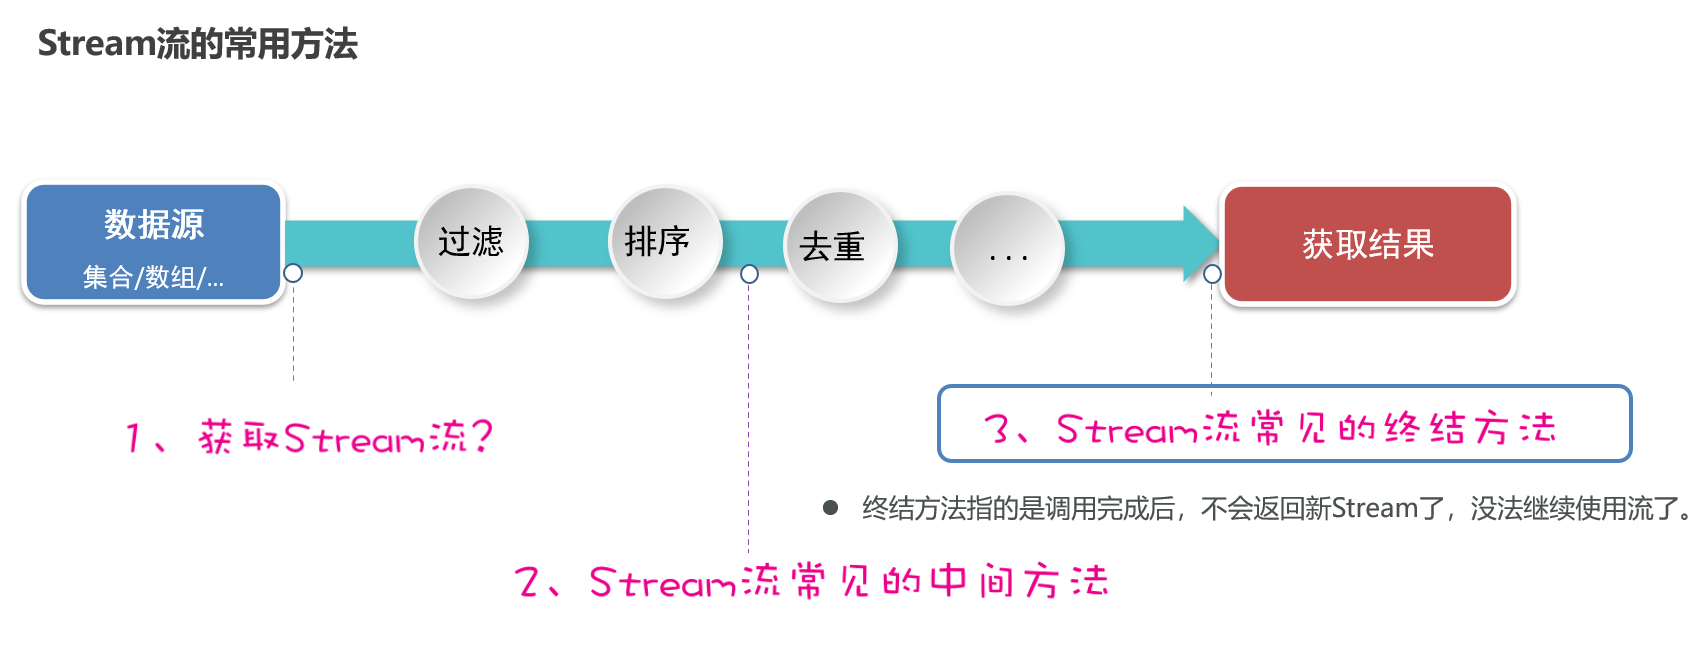
Stream流
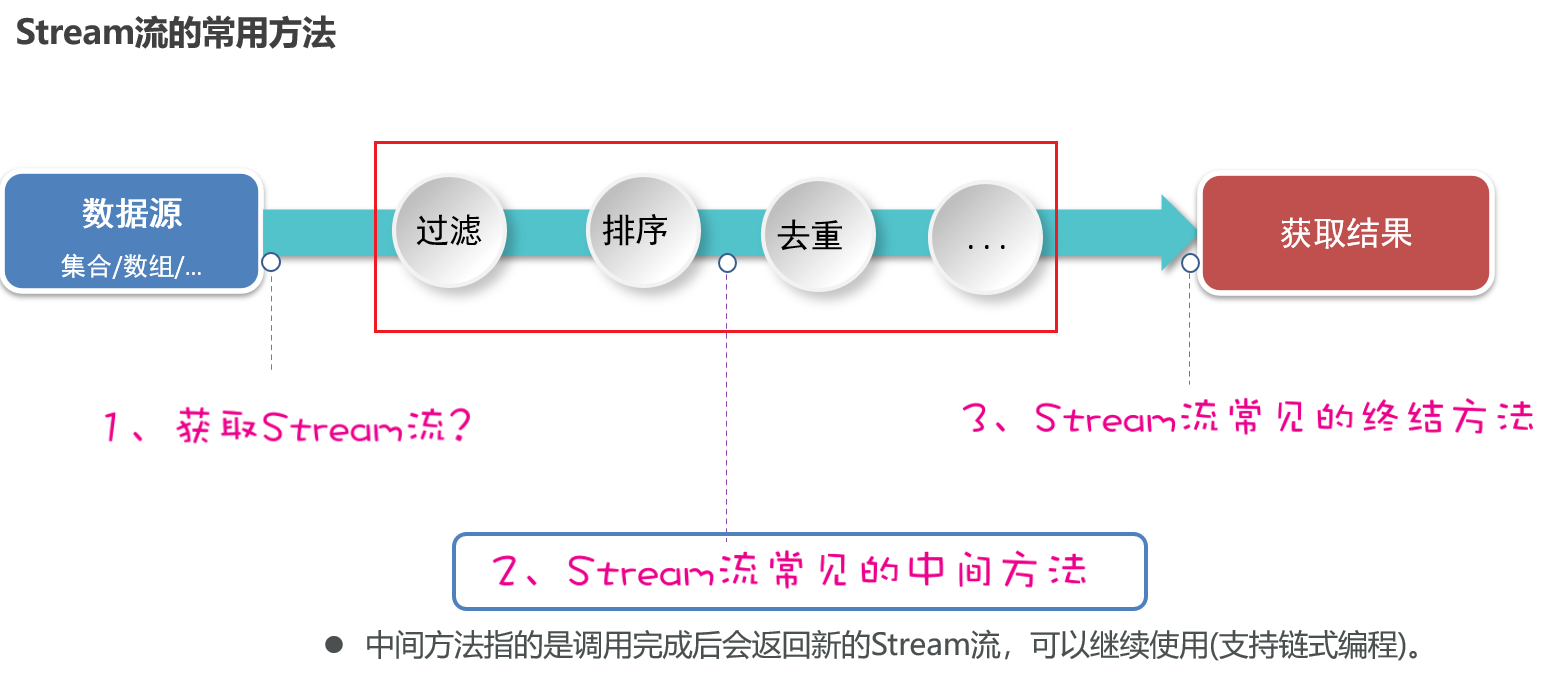
Stream流(也叫Stream API)。它是从JDK8以后才有的一个新特性,是专业用于对集合或者数组进行便捷操作的。
案例需求:有一个List集合,元素有"张三丰","张无忌","周芷若","赵敏","张强",找出姓张,且是3个字的名字,存入到一个新集合中去。
List<String> names = new ArrayList<>();
Collections.addAll(names, "张三丰","张无忌","周芷若","赵敏","张强");
System.out.println(names);
- 用传统方式来做,代码是这样的
// 找出姓张,且是3个字的名字,存入到一个新集合中去。
List<String> list = new ArrayList<>();
for (String name : names) {
    if(name.startsWith("张") && name.length() == 3){
        list.add(name);
    }
}
System.out.println(list);
- 用Stream流来做,代码是这样的(ps: 是不是想流水线一样,一句话就写完了)
List<String> list2 = names.stream().filter(s -> s.startsWith("张")).filter(a -> a.length()==3).collect(Collectors.toList());
System.out.println(list2);
先不用知道这里面每一句话是什么意思,具体每一句话的含义,待会再一步步学习。现在只是体验一下。
学习Stream流我们接下来,会按照下面的步骤来学习。
stream流的使用步骤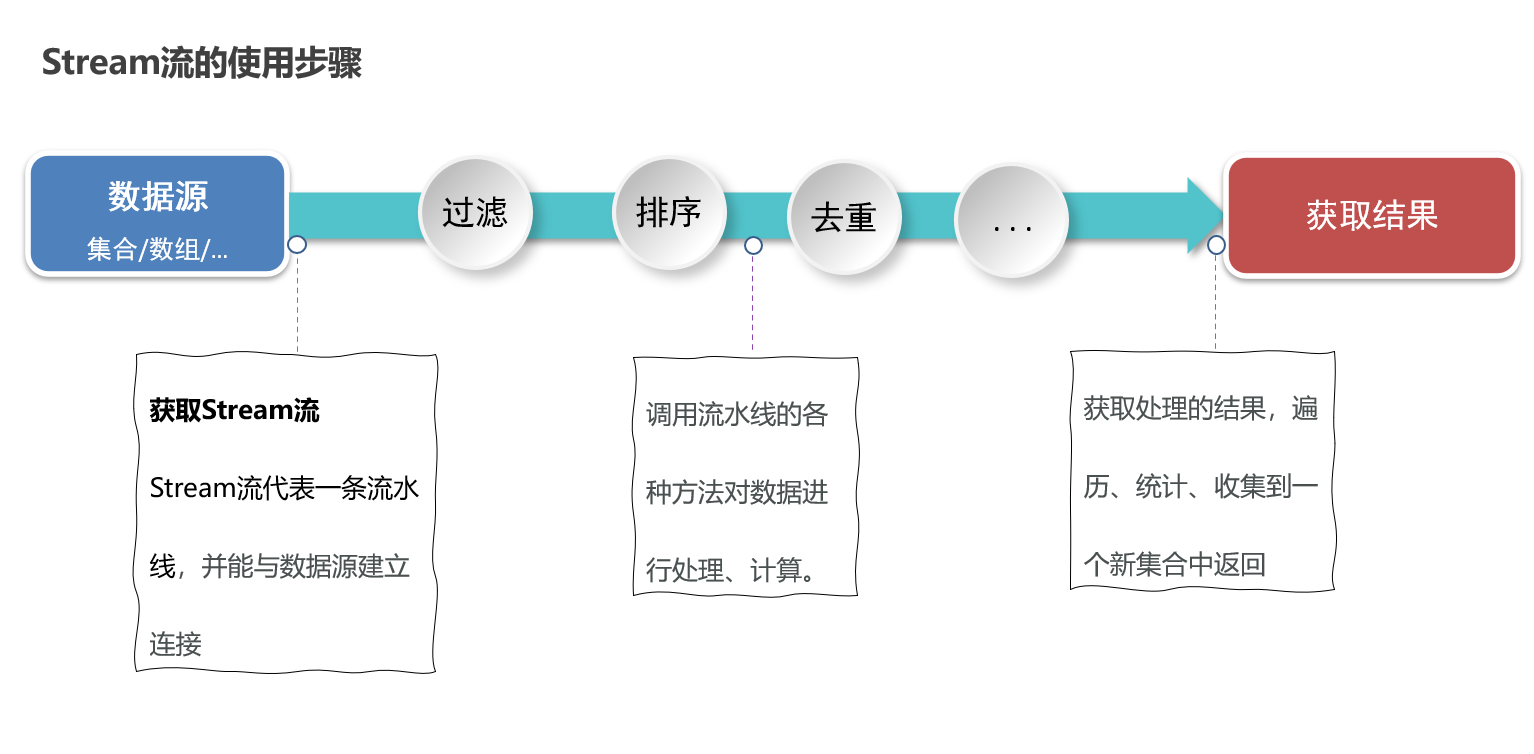
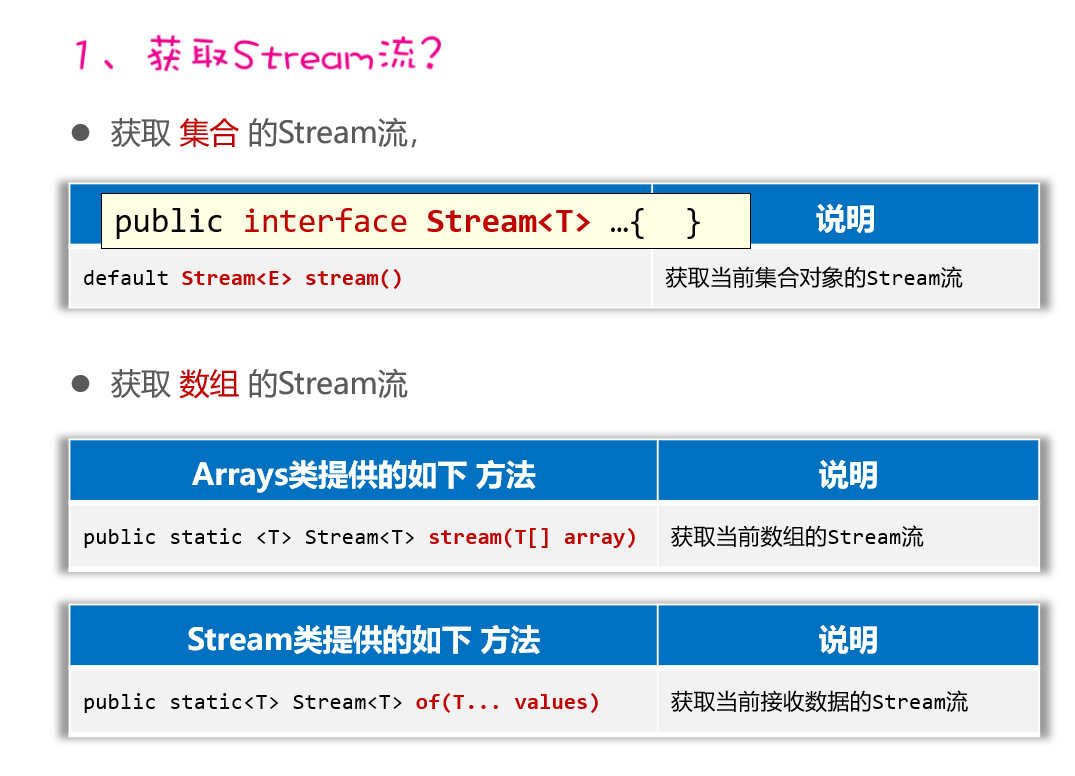
获取集合和数组的Stream流
package com.itheima.d8_stream;

import java.util.*;
import java.util.stream.Stream;

/**
 * 目标:掌握Stream流的创建。
 */
public class StreamTest2 {
    public static void main(String[] args) {
        // 1、如何获取List集合的Stream流?
        List<String> names = new ArrayList<>();
        Collections.addAll(names, "张三丰","张无忌","周芷若","赵敏","张强");
        Stream<String> stream = names.stream();

        // 2、如何获取Set集合的Stream流?
        Set<String> set = new HashSet<>();
        Collections.addAll(set, "刘德华","张曼玉","蜘蛛精","马德","德玛西亚");
        Stream<String> stream1 = set.stream();
        stream1.filter(s -> s.contains("德")).forEach(s -> System.out.println(s));

        // 3、如何获取Map集合的Stream流?
        Map<String, Double> map = new HashMap<>();
        map.put("古力娜扎", 172.3);
        map.put("迪丽热巴", 168.3);
        map.put("马尔扎哈", 166.3);
        map.put("卡尔扎巴", 168.3);

        Set<String> keys = map.keySet();
        Stream<String> ks = keys.stream();

        Collection<Double> values = map.values();
        Stream<Double> vs = values.stream();

        Set<Map.Entry<String, Double>> entries = map.entrySet();
        Stream<Map.Entry<String, Double>> kvs = entries.stream();
        kvs.filter(e -> e.getKey().contains("巴"))
        .forEach(e -> System.out.println(e.getKey()+ "-->" + e.getValue()));

        // 简化写法
        map.entrySet().stream().filter(e -> e.getKey().contains("巴"))
        .forEach(s -> System.out.println(s.getKey() + "-->" + s.getValue()));
        // 4、如何获取数组的Stream流?
        String[] names2 = {"张翠山", "东方不败", "唐大山", "独孤求败"};
        Stream<String> s1 = Arrays.stream(names2);
        Stream<String> s2 = Stream.of(names2);
    }
}
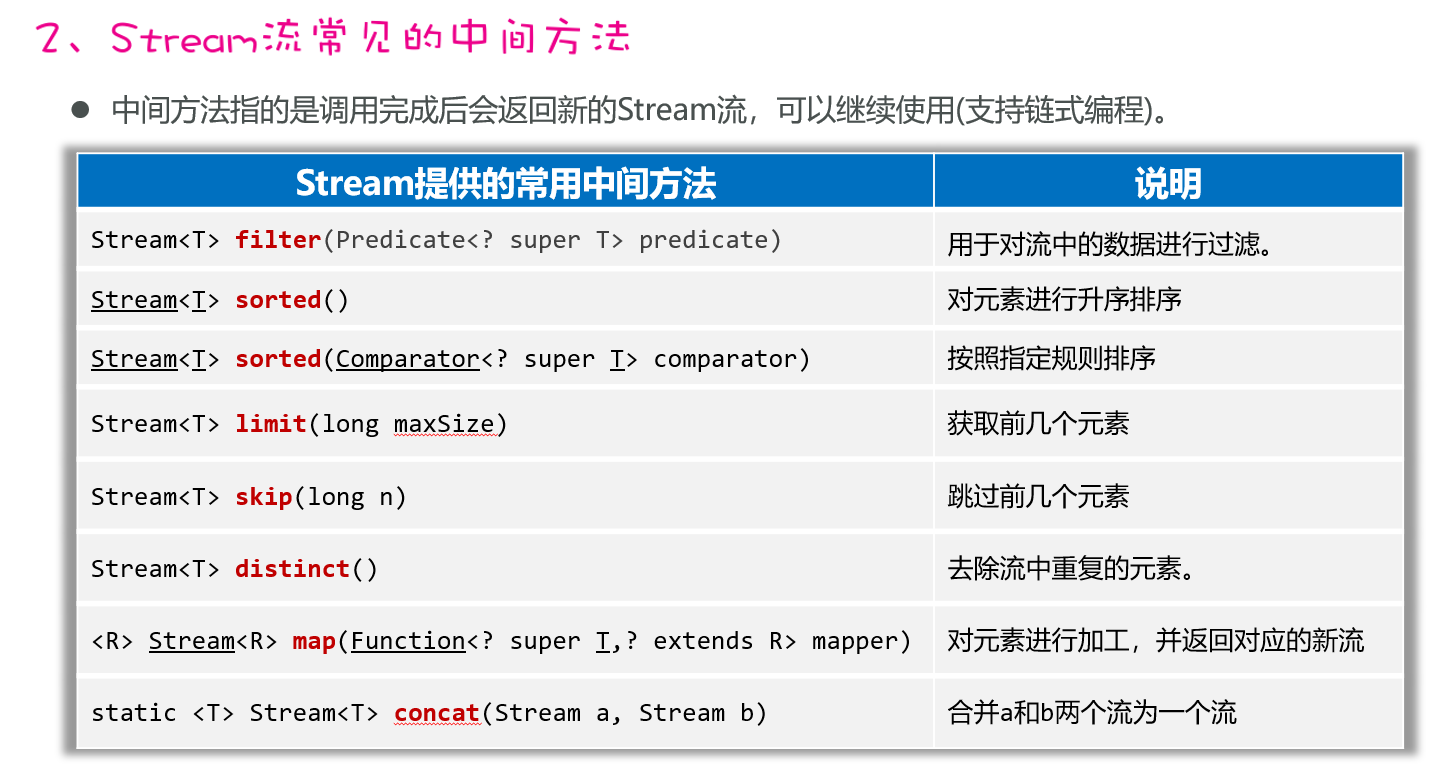
Stream流的中间方法
处理数据还会返回新的Stream流
// distinct去重复,自定义类型的对象(希望内容一样就认为重复,重写hashCode,equals)
map:
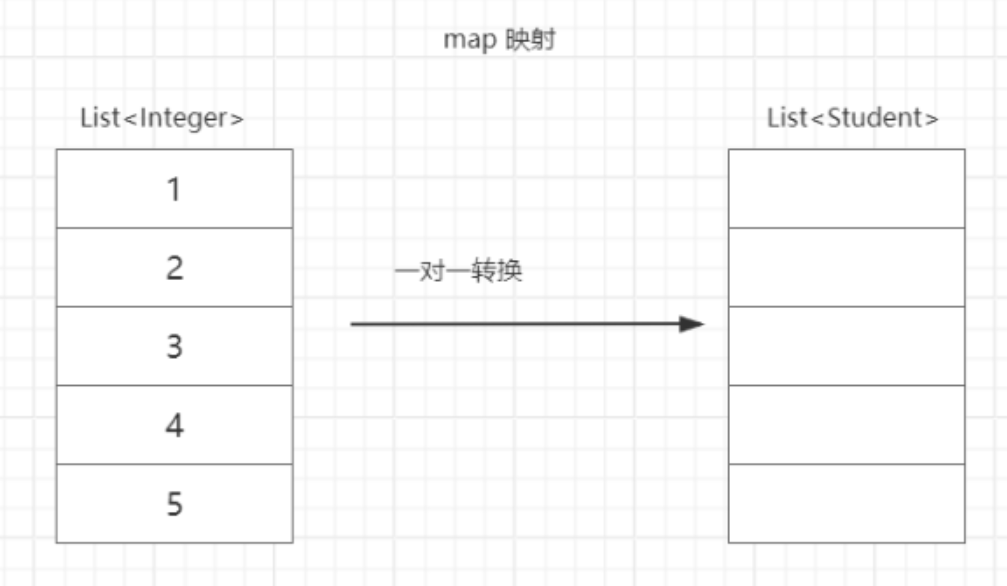
map映射
统计map键出现的次数
Map<Integer, Integer> map = list.stream()
                .collect(Collectors.toMap(k -> k, v -> 1, (oldValue, newValue) -> oldValue + newValue));
        System.out.println(map);
reduce:
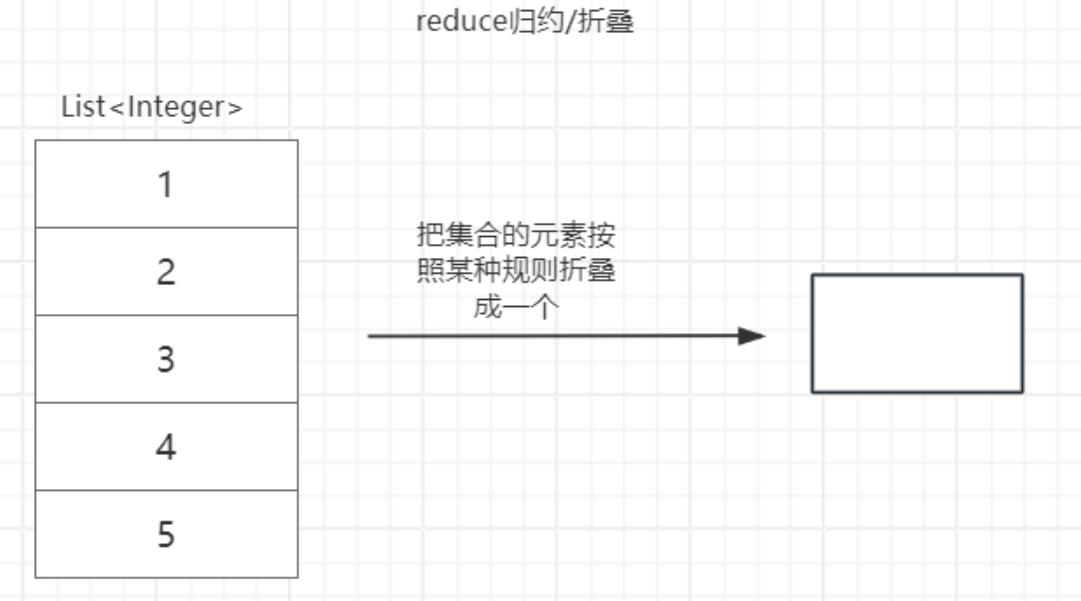
reduce归约
public class ReduceStreamDemo {
    public static void main(String[] args) {
        Integer[] ints = {0, 1, 2, 3};
        List<Integer> list = Arrays.asList(ints);

        Optional<Integer> optional = list.stream().reduce((a, b) -> a + b);
        Optional<Integer> optional1 = list.stream().reduce(Integer::sum);
        System.out.println(optional.orElse(0));
        System.out.println(optional1.orElse(0));

        int reduce = list.stream().reduce(6, (a, b) -> a + b);
        System.out.println(reduce);
        int reduce1 = list.stream().reduce(6, Integer::sum);
        System.out.println(reduce1);
    }
}
package com.itheima.d8_stream;
import java.util.*;
import java.util.stream.Stream;

/**
 * 目标:掌握Stream流提供的常见中间方法。
 */
public class StreamTest3 {
    public static void main(String[] args) {
        List<Double> scores = new ArrayList<>();
        Collections.addAll(scores, 88.5, 100.0, 60.0, 99.0, 9.5, 99.6, 25.0);
        // 需求1:找出成绩大于等于60分的数据,并升序后,再输出。
        scores.stream().filter(s -> s >= 60).sorted().forEach(s -> System.out.println(s));
        // 降序
        scores.stream().filter(s -> s >= 60)
        .sorted((o1, o2) -> Double.compare(o2, o1))
        // .forEach(s -> System.out.println(s));
        .forEach(System.out::println);

        List<Student> students = new ArrayList<>();
        Student s1 = new Student("蜘蛛精", 26, 172.5);
        Student s2 = new Student("蜘蛛精", 26, 172.5);
        Student s3 = new Student("紫霞", 23, 167.6);
        Student s4 = new Student("白晶晶", 25, 169.0);
        Student s5 = new Student("牛魔王", 35, 183.3);
        Student s6 = new Student("牛夫人", 34, 168.5);
        Collections.addAll(students, s1, s2, s3, s4, s5, s6);
        // 需求2:找出年龄大于等于23,且年龄小于等于30岁的学生,并按照年龄降序输出.
        students.stream().filter(s -> s.getAge() >= 23 && s.getAge() <= 30)
        .sorted((o1, o2) -> o2.getAge() - o1.getAge())
        .forEach(s -> System.out.println(s));

        // 需求3:取出身高最高的前3名学生,并输出。
        students.stream().sorted((o1, o2) -> Double.compare(o2.getHeight(), o1.getHeight()))
        .limit(3).forEach(System.out::println);
        System.out.println("----------------------------------------------------------------");

        // 需求4:取出身高倒数的2名学生,并输出。   s1 s2 s3 s4 s5 s6
        students.stream().sorted((o1, o2) -> Double.compare(o2.getHeight(), o1.getHeight()))
        .skip(students.size() - 2).forEach(System.out::println);

        // 需求5:找出身高超过168的学生叫什么名字,要求去除重复的名字,再输出。
        students.stream().filter(s -> s.getHeight() > 168)
        // .map(s -> s.getName()) // 可以使用特定类型的方法引用简化
        .map(Student::getName)
        .distinct().forEach(System.out::println);

        // distinct去重复,自定义类型的对象(希望内容一样就认为重复,重写hashCode,equals)
        students.stream().filter(s -> s.getHeight() > 168)
        .distinct().forEach(System.out::println);

        Stream<String> st1 = Stream.of("张三", "李四");
        Stream<String> st2 = Stream.of("张三2", "李四2", "王五");
        Stream<String> allSt = Stream.concat(st1, st2);
        allSt.forEach(System.out::println);
    }
}
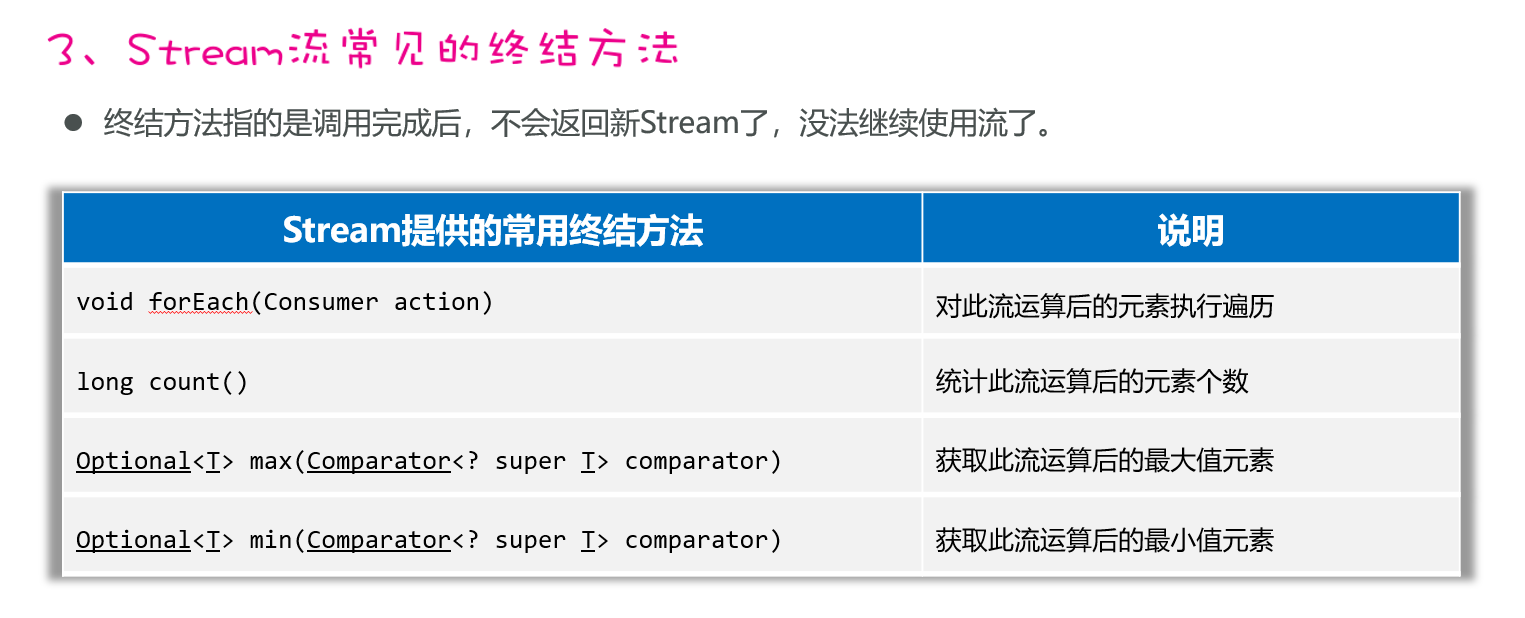
Stream流的终结方法
调用完不会返回新的Stream流了
package com.itheima.d8_stream;
import java.util.*;
import java.util.stream.Collectors;

/**
 * 目标:Stream流的终结方法
 */
public class StreamTest4 {
    public static void main(String[] args) {
        List<Student> students = new ArrayList<>();
        Student s1 = new Student("蜘蛛精", 26, 172.5);
        Student s2 = new Student("蜘蛛精", 26, 172.5);
        Student s3 = new Student("紫霞", 23, 167.6);
        Student s4 = new Student("白晶晶", 25, 169.0);
        Student s5 = new Student("牛魔王", 35, 183.3);
        Student s6 = new Student("牛夫人", 34, 168.5);
        Collections.addAll(students, s1, s2, s3, s4, s5, s6);
        // 需求1:请计算出身高超过168的学生有几人。
        long size = students.stream().filter(s -> s.getHeight() > 168).count();
        System.out.println(size);

        // 需求2:请找出身高最高的学生对象,并输出。
        Student s = students.stream().max((o1, o2) -> Double.compare(o1.getHeight(), o2.getHeight())).get();
        System.out.println(s);

        // 需求3:请找出身高最矮的学生对象,并输出。
        Student ss = students.stream().min((o1, o2) -> Double.compare(o1.getHeight(), o2.getHeight())).get();
        System.out.println(ss);

        // 需求4:请找出身高超过170的学生对象,并放到一个新集合中去返回。
        // 流只能收集一次。
        List<Student> students1 = students.stream().filter(a -> a.getHeight() > 170).collect(Collectors.toList());
        System.out.println(students1);

        Set<Student> students2 = students.stream().filter(a -> a.getHeight() > 170).collect(Collectors.toSet());
        System.out.println(students2);

        // 需求5:请找出身高超过170的学生对象,并把学生对象的名字和身高,存入到一个Map集合返回。
        Map<String, Double> map =
        students.stream().filter(a -> a.getHeight() > 170)
        .distinct().collect(Collectors.toMap(a -> a.getName(), a -> a.getHeight()));
        System.out.println(map);

        // Object[] arr = students.stream().filter(a -> a.getHeight() > 170).toArray();
        Student[] arr = students.stream().filter(a -> a.getHeight() > 170).toArray(len -> new Student[len]);
        System.out.println(Arrays.toString(arr));
    }
}
Stream流只能收集一次,下面这种代码是错误的,因为前面studentStream的流收集完成后已经被关闭了,下面再次执行students4会报错
// 流只能收集一次。
Stream<Student> studentStream = students.stream().filter(a -> a.getHeight() > 170);
List<Student> students3 = studentStream.collect(Collectors.toList());
System.out.println(students3);

Set<Student> students4 = studentStream.collect(Collectors.toSet());
System.out.println(students4);

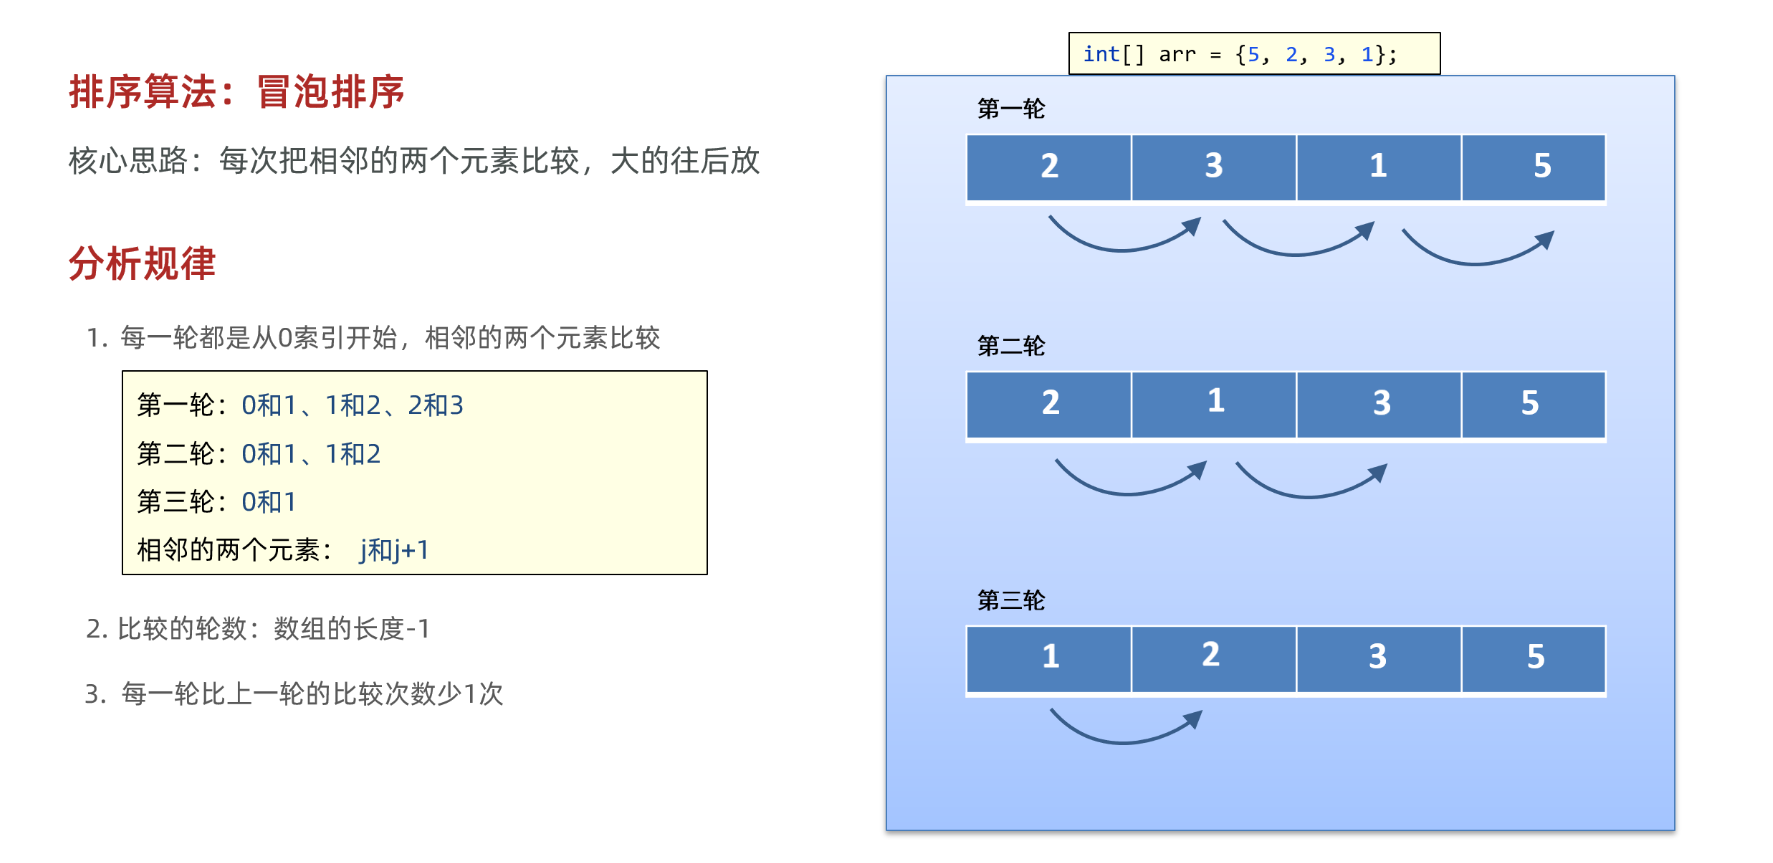
排序算法
冒泡排序
package com.itheima.d1_algorithm;

import java.util.Arrays;

/**
 * 目标:掌握冒泡排序的编写。
 */
public class Test1 {
    public static void main(String[] args) {
        // 1、准备一个数组
        int[] arr = {5, 2, 3, 1};

        // 2、定义一个循环控制排几轮
        for (int i = 0; i < arr.length - 1; i++) {
            // i = 0  1  2           【5, 2, 3, 1】    次数
            // i = 0 第一轮            0   1   2         3
            // i = 1 第二轮            0   1             2
            // i = 2 第三轮            0                 1

            // 3、定义一个循环控制每轮比较几次。
            for (int j = 0; j < arr.length - i - 1; j++) {
                // 判断当前位置的元素值,是否大于后一个位置处的元素值,如果大则交换。
                if(arr[j] > arr[j+1]){
                    int temp = arr[j + 1];
                    arr[j + 1] = arr[j];
                    arr[j] = temp;
                }
            }
        }
        System.out.println(Arrays.toString(arr));
    }
}
选择排序
选择排序的核心思路是,每一轮选择当前比较数据的最小值,将最小值传递到最前面

package com.itheima.d1_algorithm;

import java.util.Arrays;

/**
 *  目标:掌握选择排序。
 */
public class Test2 {
    public static void main(String[] args) {
        // 1、准备好一个数组
        int[] arr = {5, 1, 3, 2};
        //           0  1  2  3

        // 2、控制选择几轮
        for (int i = 0; i < arr.length - 1; i++) {
            // i = 0 第一轮    j = 1 2 3
            // i = 1 第二轮    j = 2 3
            // i = 2 第三轮    j = 3
            int minIndex = i;
            // 3、控制每轮选择几次。
            for (int j = i + 1; j < arr.length; j++) {
                // 判断当前位置是否大于后面位置处的元素值,若大于则交换。
                if(arr[minIndex] > arr[j]){
                    minIndex = j;
                }
            }
            // 决定是否交换。
            if(i != minIndex) {
                int temp = arr[i];
                arr[i] = arr[minIndex];
                arr[minIndex] = temp;
            }
        }
        System.out.println(Arrays.toString(arr));
    }
}
查找算法
二分查找
第1步:先定义两个变量,分别记录开始索引(left)和结束索引(right)
第2步:计算中间位置的索引,mid = (left+right)/2;
第3步:每次查找中间mid位置的元素,和目标元素key进行比较
如果中间位置元素比目标元素小,那就说明mid前面的元素都比目标元素小
此时:left = mid+1
如果中间位置元素比目标元素大,那说明mid后面的元素都比目标元素大
此时:right = mid-1
如果中间位置元素和目标元素相等,那说明mid就是我们要找的位置
此时:把mid返回
注意:一般查找一次肯定是不够的,所以需要把第1步和第2步循环来做,只到left>end就结束,如果最后还没有找到目标元素,就返回-1.
package com.itheima.d1_algorithm;

import java.util.Arrays;

/**
 * 目标:掌握二分查找算法。
 */
public class Test3 {
    public static void main(String[] args) {
        // 1、准备好一个数组。
        int[] arr = {7, 23, 79, 81, 103, 127, 131, 147};

        System.out.println(binarySearch(arr, 150));

        System.out.println(Arrays.binarySearch(arr, 81));
    }

    public static int binarySearch(int[] arr, int data){
        // 1、定义两个变量,一个站在左边位置,一个站在右边位置
        int left = 0;
        int right = arr.length - 1;

        // 2、定义一个循环控制折半。
        while (left <= right){
            // 3、每次折半,都算出中间位置处的索引
            int middle = (left + right) / 2;
            // 4、判断当前要找的元素值,与中间位置处的元素值的大小情况。
            if(data < arr[middle]){
                // 往左边找,截止位置(右边位置) = 中间位置 - 1
                right = middle - 1;
            }else if(data > arr[middle]){
                // 往右边找,起始位置(左边位置) = 中间位置 + 1
                left = middle + 1;
            }else {
                // 中间位置处的元素值,正好等于我们要找的元素值
                return middle;
            }
        }
        return -1; // -1特殊结果,就代表没有找到数据!数组中不存在该数据!
    }
}
正则表达式
重要!!!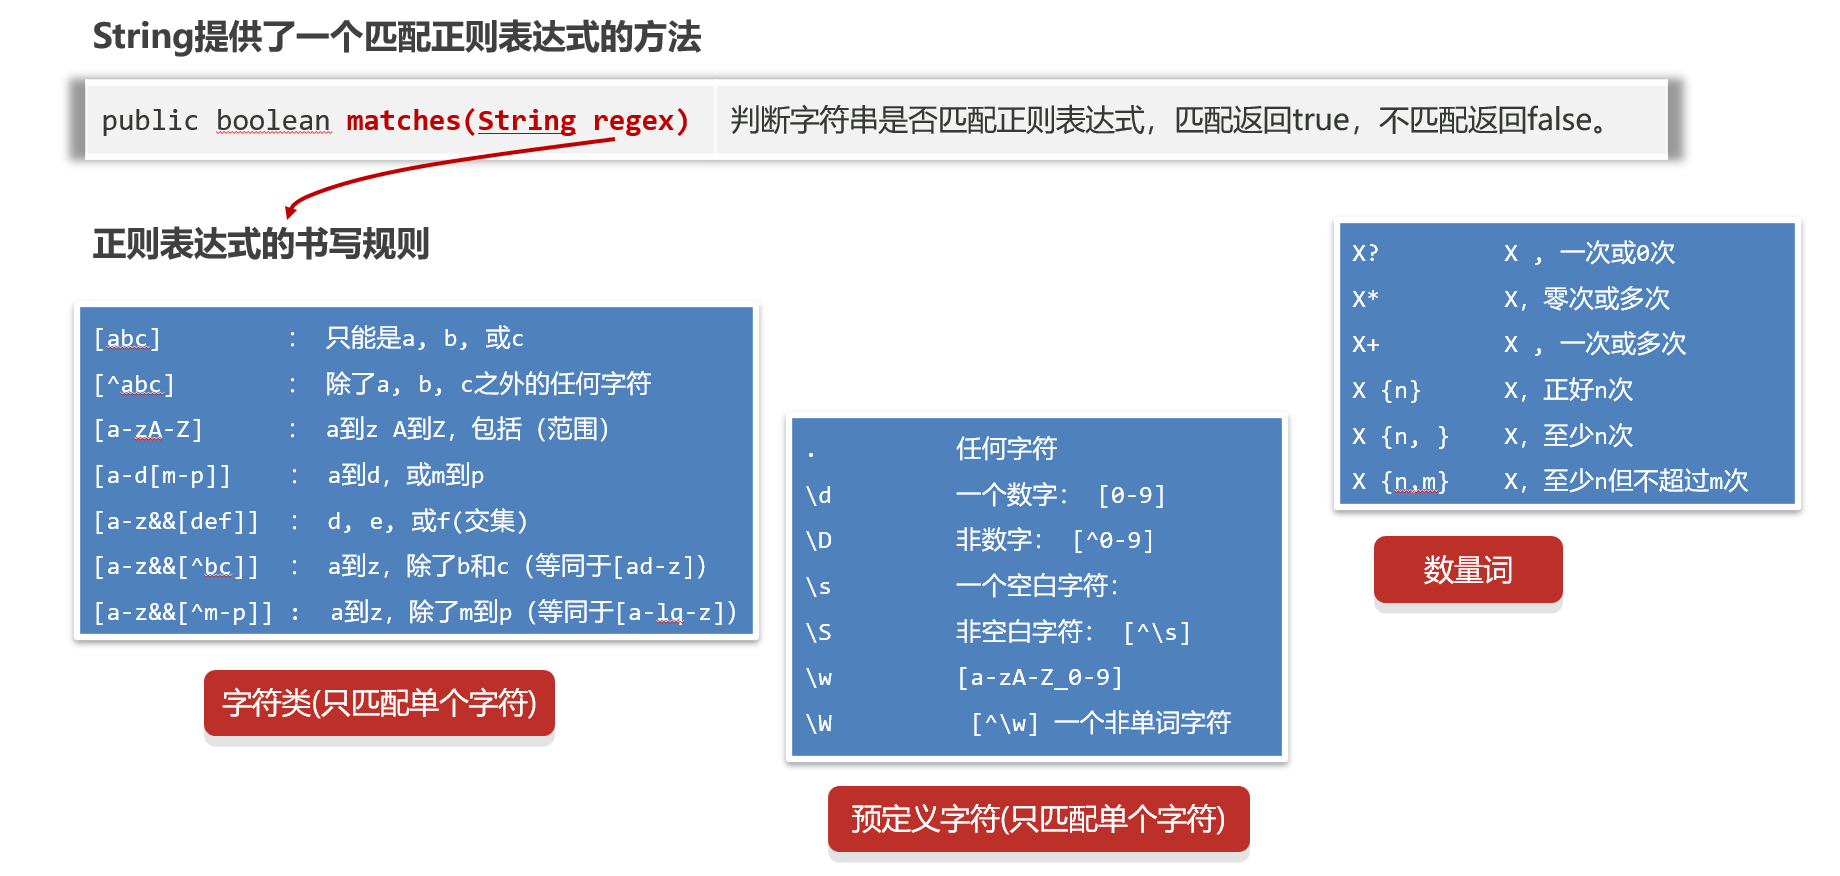

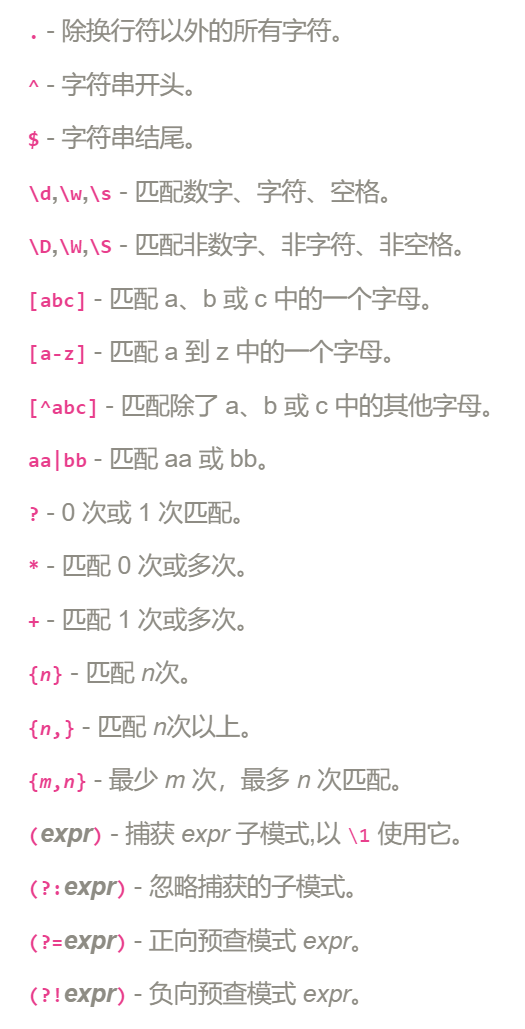
package com.itheima.d2_regex;

/**
 * 目标:掌握正则表达式的书写规则
 */
public class RegexTest2 {
    public static void main(String[] args) {
        // 1、字符类(只能匹配单个字符)
        System.out.println("a".matches("[abc]"));    // [abc]只能匹配a、b、c
        System.out.println("e".matches("[abcd]")); // false

        System.out.println("d".matches("[^abc]"));   // [^abc] 不能是abc
        System.out.println("a".matches("[^abc]"));  // false

        System.out.println("b".matches("[a-zA-Z]")); // [a-zA-Z] 只能是a-z A-Z的字符
        System.out.println("2".matches("[a-zA-Z]")); // false

        System.out.println("k".matches("[a-z&&[^bc]]")); // : a到z,除了b和c
        System.out.println("b".matches("[a-z&&[^bc]]")); // false

        System.out.println("ab".matches("[a-zA-Z0-9]")); // false 注意:以上带 [内容] 的规则都只能用于匹配单个字符

        // 2、预定义字符(只能匹配单个字符)  .  \d  \D   \s  \S  \w  \W
        System.out.println("徐".matches(".")); // .可以匹配任意字符
        System.out.println("徐徐".matches(".")); // false

        // \转义
        System.out.println("\"");
        // \n \t
        System.out.println("3".matches("\\d"));  // \d: 0-9
        System.out.println("a".matches("\\d"));  //false

        System.out.println(" ".matches("\\s"));   // \s: 代表一个空白字符
        System.out.println("a".matches("\\s")); // false

        System.out.println("a".matches("\\S"));  // \S: 代表一个非空白字符
        System.out.println(" ".matches("\\S")); // false
		// \w 小写 匹配一个字符(字母数组下划线,不包含汉字)
        System.out.println("a".matches("\\w"));  // \w: [a-zA-Z_0-9]
        System.out.println("_".matches("\\w")); // true
        System.out.println("徐".matches("\\w")); // false
		// \W 大写 匹配非字符
        System.out.println("徐".matches("\\W"));  // [^\w]不能是a-zA-Z_0-9
        System.out.println("a".matches("\\W"));  // false

        System.out.println("23232".matches("\\d")); // false 注意:以上预定义字符都只能匹配单个字符。

        // 3、数量词: ?   *   +   {n}   {n, }  {n, m}
        System.out.println("a".matches("\\w?"));   // ? 代表0次或1次
        System.out.println("".matches("\\w?"));    // true
        System.out.println("abc".matches("\\w?")); // false

        System.out.println("abc12".matches("\\w*"));   // * 代表0次或多次
        System.out.println("".matches("\\w*"));        // true
        System.out.println("abc12张".matches("\\w*")); // false

        System.out.println("abc12".matches("\\w+"));   // + 代表1次或多次
        System.out.println("".matches("\\w+"));       // false
        System.out.println("abc12张".matches("\\w+")); // false

        System.out.println("a3c".matches("\\w{3}"));   // {3} 代表要正好是n次
        System.out.println("abcd".matches("\\w{3}"));  // false
        System.out.println("abcd".matches("\\w{3,}"));     // {3,} 代表是>=3次
        System.out.println("ab".matches("\\w{3,}"));     // false
        System.out.println("abcde徐".matches("\\w{3,}"));     // false
        System.out.println("abc232d".matches("\\w{3,9}"));     // {3, 9} 代表是  大于等于3次,小于等于9次

        // 4、其他几个常用的符号:(?i)忽略大小写 、 或:| 、  分组:()
        System.out.println("abc".matches("(?i)abc")); // true
        System.out.println("ABC".matches("(?i)abc")); // true
        System.out.println("aBc".matches("a((?i)b)c")); // true
        System.out.println("ABc".matches("a((?i)b)c")); // false

        // 需求1:要求要么是3个小写字母,要么是3个数字。
        System.out.println("abc".matches("[a-z]{3}|\\d{3}")); // true
        System.out.println("ABC".matches("[a-z]{3}|\\d{3}")); // false
        System.out.println("123".matches("[a-z]{3}|\\d{3}")); // true
        System.out.println("A12".matches("[a-z]{3}|\\d{3}")); // false

        // 需求2:必须是”我爱“开头,中间可以是至少一个”编程“,最后至少是1个”666“
        System.out.println("我爱编程编程666666".matches("我爱(编程)+(666)+"));	// true
        System.out.println("我爱编程编程66666".matches("我爱(编程)+(666)+"));		// false
    }
}
Pattern类
package com.itheima.d2_regex;

import java.util.regex.Matcher;
import java.util.regex.Pattern;

/**
 * 目标:掌握使用正则表达式查找内容。
 */
public class RegexTest4 {
    public static void main(String[] args) {
        method1();
    }

    // 需求1:从以下内容中爬取出,手机,邮箱,座机、400电话等信息。
    public static void method1(){
        String data = " 来黑马程序员学习Java,\n" +
        "        电话:1866668888,18699997777\n" +
        "        或者联系邮箱:boniu@itcast.cn,\n" +
        "        座机电话:01036517895,010-98951256\n" +
        "        邮箱:bozai@itcast.cn,\n" +
        "        邮箱:dlei0009@163.com,\n" +
        "        热线电话:400-618-9090 ,400-618-4000,4006184000,4006189090";
        // 1、定义爬取规则
        String regex = "(1[3-9]\\d{9})|(0\\d{2,7}-?[1-9]\\d{4,19})|(\\w{2,}@\\w{2,20}(\\.\\w{2,10}){1,2})"
        + "|(400-?\\d{3,7}-?\\d{3,7})";
        // 2、把正则表达式封装成一个Pattern对象
        Pattern pattern = Pattern.compile(regex);
        // 3、通过pattern对象去获取查找内容的匹配器对象。
        Matcher matcher = pattern.matcher(data);
        // 4、定义一个循环开始爬取信息
        while (matcher.find()){
            String rs = matcher.group(); // 获取到了找到的内容了。
            System.out.println(rs);
        }
    }
}
贪婪模式和非贪婪模式
在贪婪模式下,匹配器尽可能多地匹配符合要求的字符,直到不能再匹配为止。例如,正则表达式 a.*b 在匹配字符串 "abbcab" 时,会匹配整个字符串 "abbcab",而不是期望的 "ab"。
在非贪婪模式下,匹配器尽可能少地匹配符合要求的字符,直到满足要求为止。例如,正则表达式 a.*?b 在匹配字符串 "abbcab" 时,只会匹配到第一个 "ab",而不是整个字符串。
package com.itheima.d2_regex;

import java.util.regex.Matcher;
import java.util.regex.Pattern;

public class RegexTest5 {
    public static void main(String[] args) {
        method1();
        System.out.println("--------------------");
        method2();
    }

    // 需求2:把全部邮箱的账户名找出来。
    public static void method1(){
        String data = " 来黑马程序员学习Java,\n" +
        "        电话:1866668888,18699997777\n" +
        "        或者联系邮箱:boniu@itcast.cn,\n" +
        "        座机电话:01036517895,010-98951256\n" +
        "        邮箱:bozai@itcast.cn,\n" +
        "        邮箱:dlei0009@163.com,\n" +
        "        热线电话:400-618-9090 ,heima, 400-618-4000,4006184000,4006189090";
        // 1、定义爬取规则
        String regex = "(\\w{2,})@(\\w{2,20})(\\.\\w{2,10}){1,2}";
        // 2、把正则表达式封装成一个Pattern对象
        Pattern pattern = Pattern.compile(regex);
        // 3、通过pattern对象去获取查找内容的匹配器对象。
        Matcher matcher = pattern.matcher(data);
        // 4、定义一个循环开始爬取信息
        while (matcher.find()){
            System.out.println("group = " + matcher.group());
            System.out.println("group1 = " + matcher.group(1)); // 指定获取正则表达式匹配后的第一组内容
            System.out.println("group2 = " + matcher.group(2)); // 指定获取正则表达式匹配后的第二组内容
        }
    }


    // 需求3:某系统的日志文件记录了当天进入系统的全部用户信息,需要把这些用户的名字爬取出来另作他用。
    public static void method2(){
        String data = "欢迎张全蛋光临本系统!他删库并跑路,欢迎李二狗子光临本系统!" +
        "欢迎马六子光临本系统!它浏览了很多好看的照片!欢迎夏洛光临本系统!他在六点钟购买了一台拖拉机!";
        // 1、定义爬取规则
        // String regex = "欢迎(.+)光临"; // 贪婪匹配
        String regex = "欢迎(.+?)光临"; // +? 非贪婪匹配
        // 2、把正则表达式封装成一个Pattern对象
        Pattern pattern = Pattern.compile(regex);
        // 3、通过pattern对象去获取查找内容的匹配器对象。
        Matcher matcher = pattern.matcher(data);
        // 4、定义一个循环开始爬取信息
        while (matcher.find()){
            System.out.println("group = " + matcher.group());
            System.out.println("group1 = " + matcher.group(1));
        }
    }
}
练习:搜索替换,内容分割
package com.itheima.d2_regex;

import java.util.Arrays;

/**
 * 目标:掌握使用正则表达式做搜索替换,内容分割。
 */
public class RegexTest6 {
    public static void main(String[] args) {
        // 1、public String replaceAll(String regex , String newStr):按照正则表达式匹配的内容进行替换
        // 需求1:请把 古力娜扎ai8888迪丽热巴999aa5566马尔扎哈fbbfsfs42425卡尔扎巴,中间的非中文字符替换成 “-”
        String s1 = "古力娜扎ai8888迪丽热巴999aa5566马尔扎哈fbbfsfs42425卡尔扎巴";
        System.out.println(s1.replaceAll("\\w+", "-"));

        // 需求2(拓展):某语音系统,收到一个口吃的人说的“我我我喜欢编编编编编编编编编编编编程程程!”,需要优化成“我喜欢编程!”。
        String s2 = "我我我喜欢编编编编编编编编编编编编程程程";
        /**
         * (.)一组:.匹配任意字符的。
         * \\1 :为这个组声明一个组号:1号
         * +:声明必须是重复的字
         * $1可以去取到第1组代表的那个重复的字
         */
        System.out.println(s2.replaceAll("(.)\\1+", "$1"));

        // 2、public String[] split(String regex):按照正则表达式匹配的内容进行分割字符串,反回一个字符串数组。
        // 需求1:请把 古力娜扎ai8888迪丽热巴999aa5566马尔扎哈fbbfsfs42425卡尔扎巴,中的人名获取出来。
        String s3 = "古力娜扎ai8888迪丽热巴999aa5566马尔扎哈fbbfsfs42425卡尔扎巴";
        String[] names = s3.split("\\w+");
        System.out.println(Arrays.toString(names));
    }
}
(.)\1+ 在java中的正则含义
表示匹配连续的多个相同的任意字符,只要找到字符串里面存在连续的两个或者以上的相同字符即匹配。
括号中的点表示任意字符,后面的\1表示取第一个括号匹配的内容,后面的加号表示匹配1次或1次以上,二者加在一起就是某个字符重复两次或两次以上。
/**
     * 1.将下面的国家重叠的字符替换成 竖线 |
     * ChinaqqqAmericahhhhhEnglandaaaaaaMexica
     */
@Test
public void test1()
{
    String str="ChinaqqqAmericahhhhhEnglandaaaaaaMexica";

    //(.)\\1+:表示匹配连续的多个相同的任意字符,只要找到字符串里面存在连续的两个或者以上的相同字符即匹配。
    System.out.println(str.replaceAll("(.)\\1+", "|"));//China|America|England|Mexica
}

/**
     * 2.将下面的国家重叠的字符替换成 一个, 也就是去掉重复的分隔符
     * China|||||America::::::England&&&&&&&Mexica
     */
@Test
public void test2()
{
    String str="China|||||America::::::England&&&&&&&Mexica";

    //(.)\\1+:表示匹配连续的多个相同的任意字符,只要找到字符串里面存在连续的两个或者以上的相同字符即匹配。
    System.out.println(str.replaceAll("(.)\\1+","$1"));//China|America:England&Mexica
}
异常
异常体系
运行时异常、编译时异常
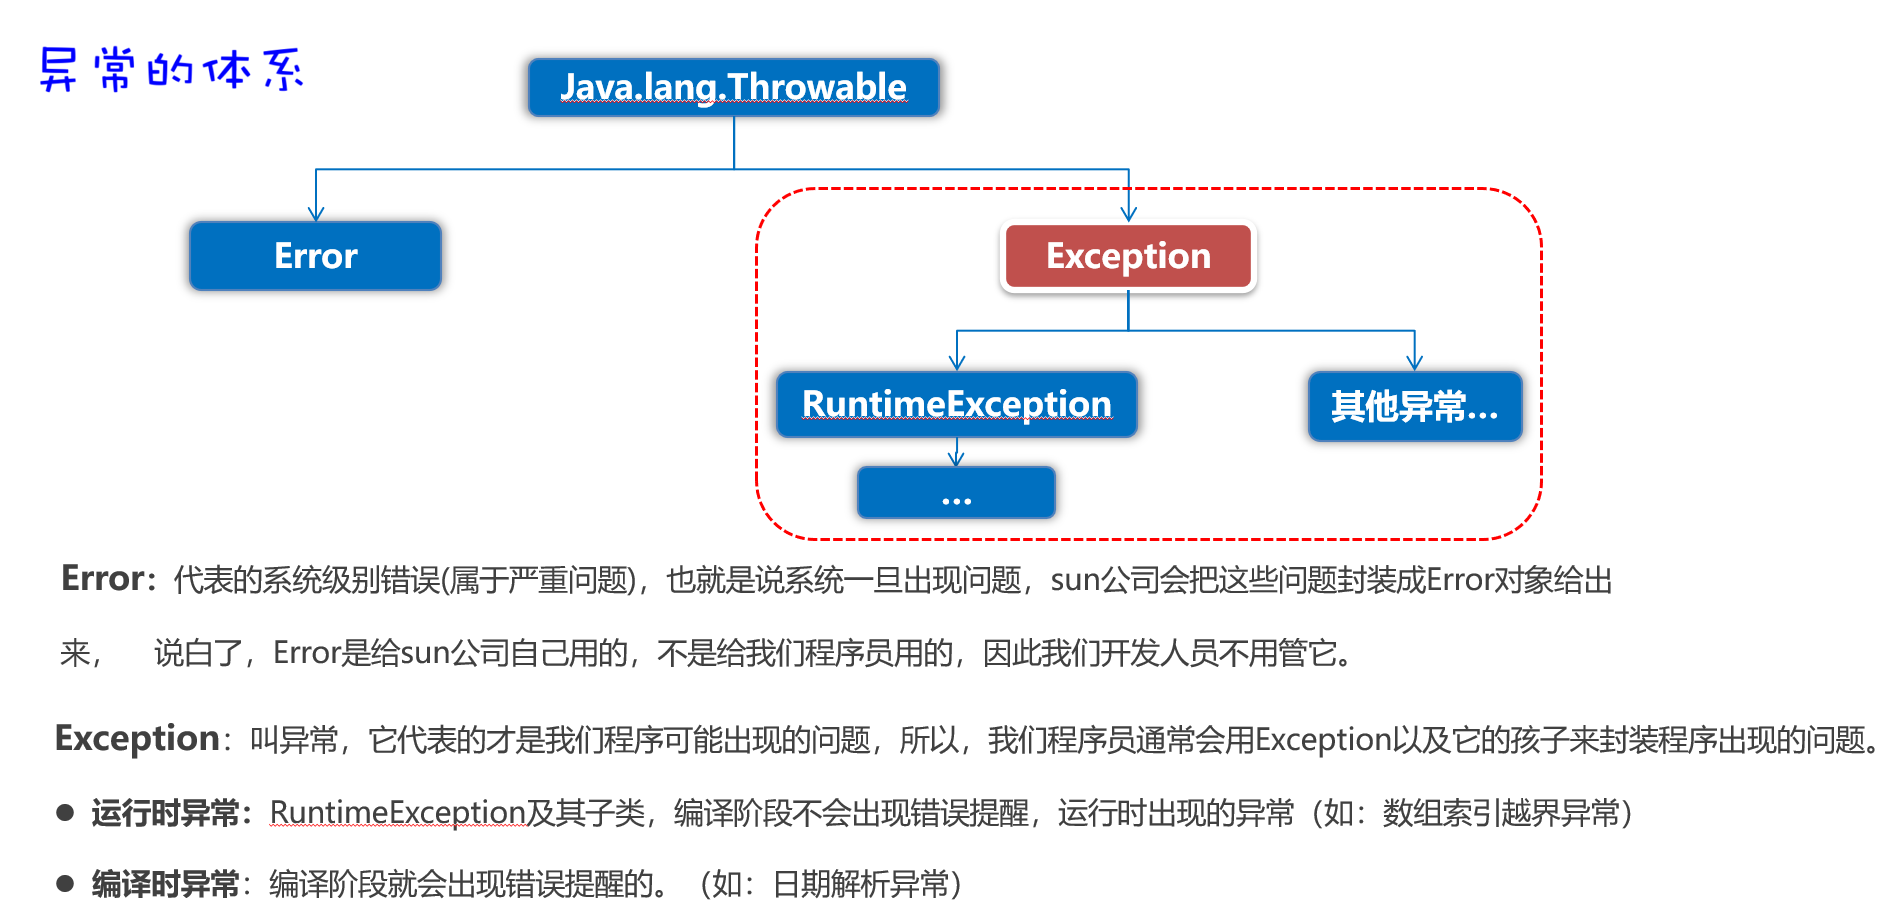
常见的运行时异常和编译时异常
运行时异常:
-
NullPointerException(空指针异常)
-
ArrayIndexOutOfBoundsException(数组越界异常)
-
ClassCastException(类转换异常)
-
ArithmeticException(算术异常)
-
IllegalArgumentException(非法参数异常)
编译时异常:
-
IOException(输入输出异常)
-
SQLException(SQL异常)
-
FileNotFoundException(文件未找到异常)
-
ClassNotFoundException(类未找到异常)
-
InterruptedException(线程中断异常)
-
日期解析异常
抛出异常和捕获异常
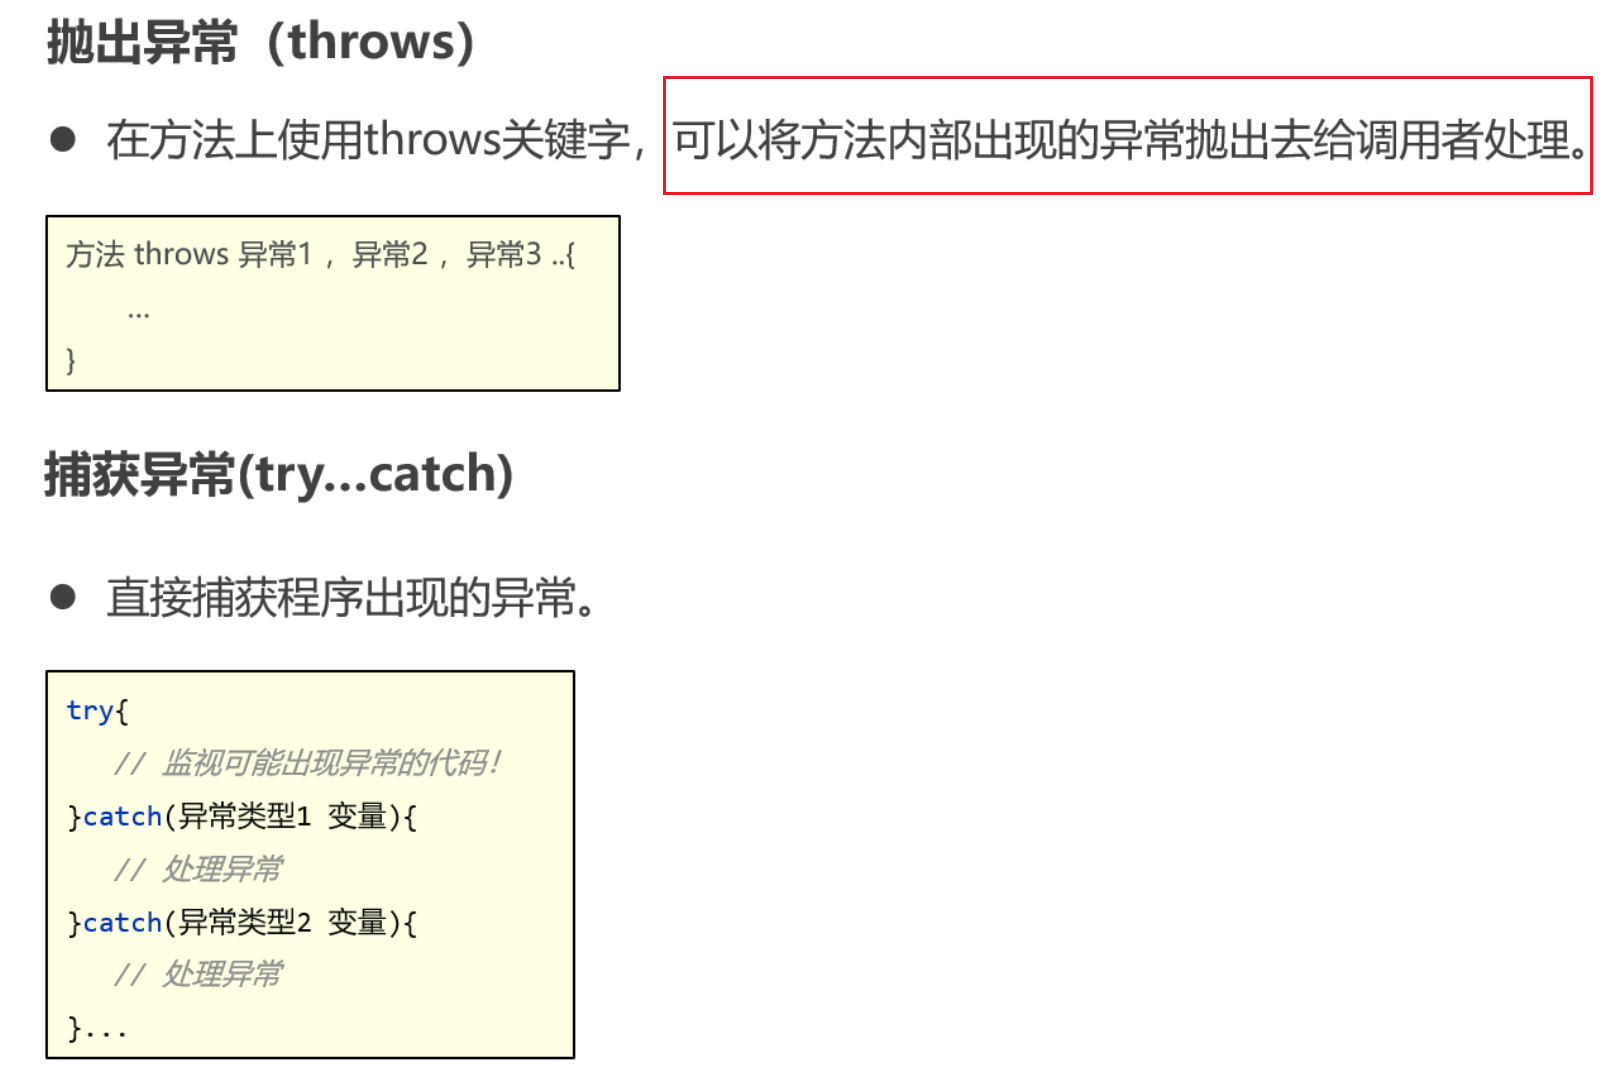
自定义异常
自定义运行时异常和自定义编译时异常
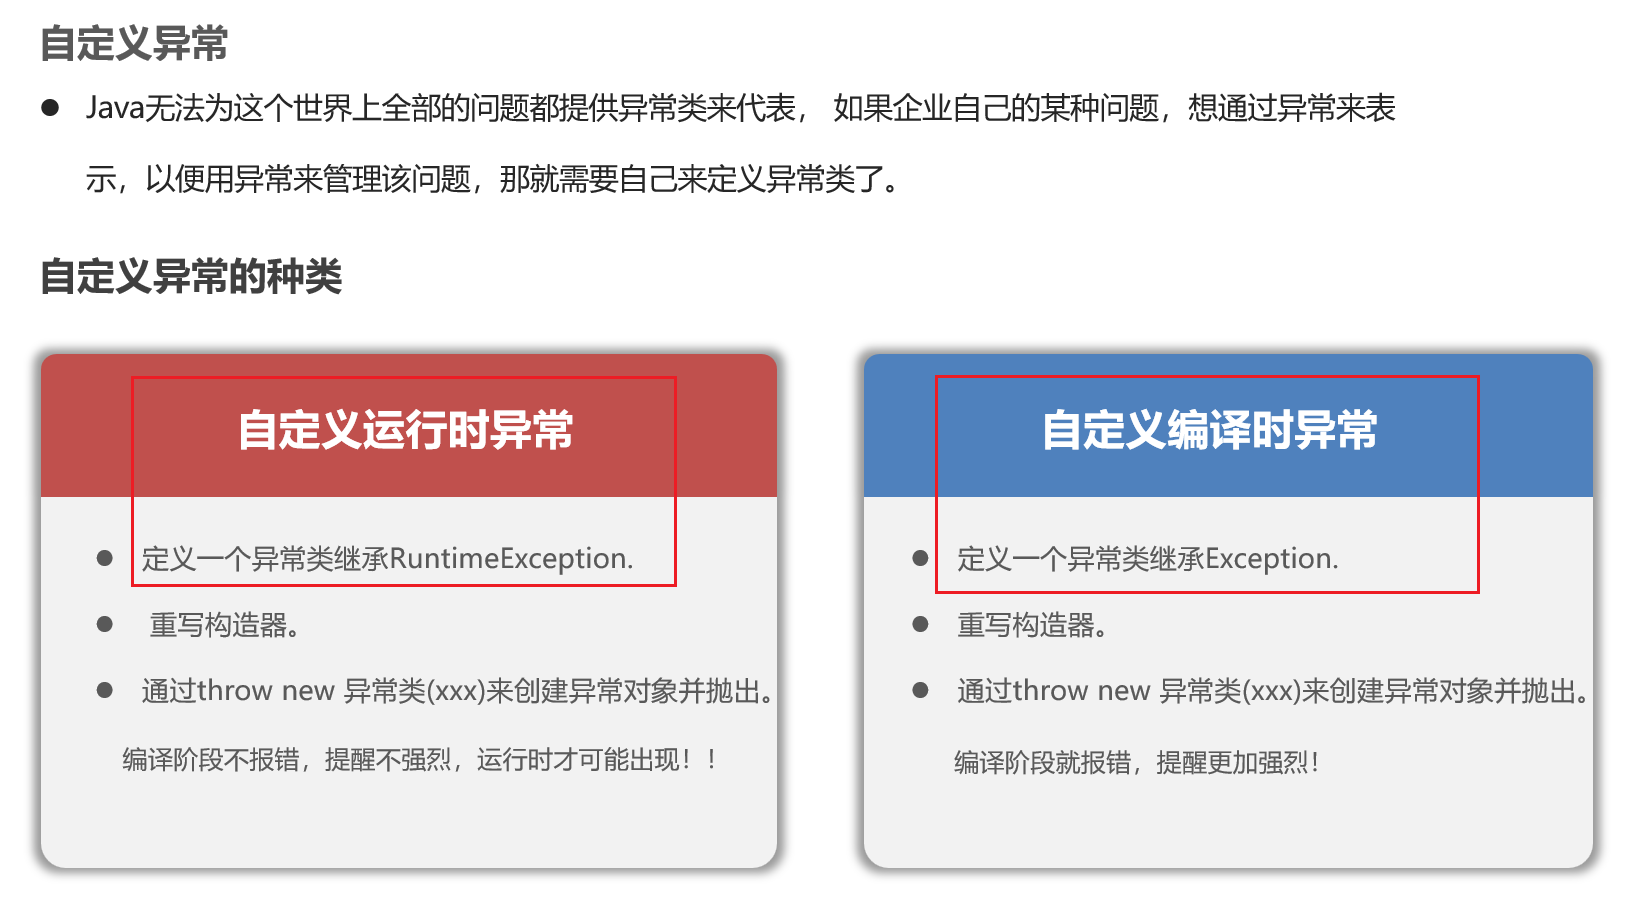
package com.itheima.d3_exception;
// 1、必须让这个类继承自RuntimeException,才能成为一个运行时异常类。
public class AgeIllegalRuntimeException extends RuntimeException{
    public AgeIllegalRuntimeException() {
    }

    public AgeIllegalRuntimeException(String message) {
        super(message);
    }
}


package com.itheima.d3_exception;
// 1、必须让这个类继承自Exception,才能成为一个编译时异常类。
public class AgeIllegalException extends Exception{
    public AgeIllegalException() {
    }

    public AgeIllegalException(String message) {
        super(message);
    }
}


package com.itheima.d3_exception;

/**
 * 目标:掌握自定义异常,以及异常的作用。
 */
public class ExceptionTest2 {
    public static void main(String[] args) {
        // 需求:保存一个合法的年龄
        //        try {
        //            saveAge(223);
        //            System.out.println("底层执行成功的!");
        //        } catch (Exception e) {
        //            e.printStackTrace();
        //            System.out.println("底层出现了bug!");
        //        }

        try {
            saveAge2(225);
            System.out.println("saveAge2底层执行是成功的!");
        } catch (AgeIllegalException e) {
            e.printStackTrace();
            System.out.println("saveAge2底层执行是出现bug的!");
        }
    }

    // 编译时异常
    public static void saveAge2(int age) throws AgeIllegalException{
        if(age > 0 && age < 150){
            System.out.println("年龄被成功保存: " + age);
        }else {
            // 用一个异常对象封装这个问题
            // throw 抛出去这个异常对象
            // throws 用在方法上,抛出方法内部的异常
            throw new AgeIllegalException("/age is illegal, your age is " + age);
        }
    }


    // 运行时异常
    public static void saveAge(int age){
        if(age > 0 && age < 150){
            System.out.println("年龄被成功保存: " + age);
        }else {
            // 用一个异常对象封装这个问题
            // throw 抛出去这个异常对象
            throw new AgeIllegalRuntimeException("/age is illegal, your age is " + age);
        }
    }
}
异常的处理
在开发中异常的常见处理方式是:底层的异常抛出去给最外层,最外层集中捕获处理。
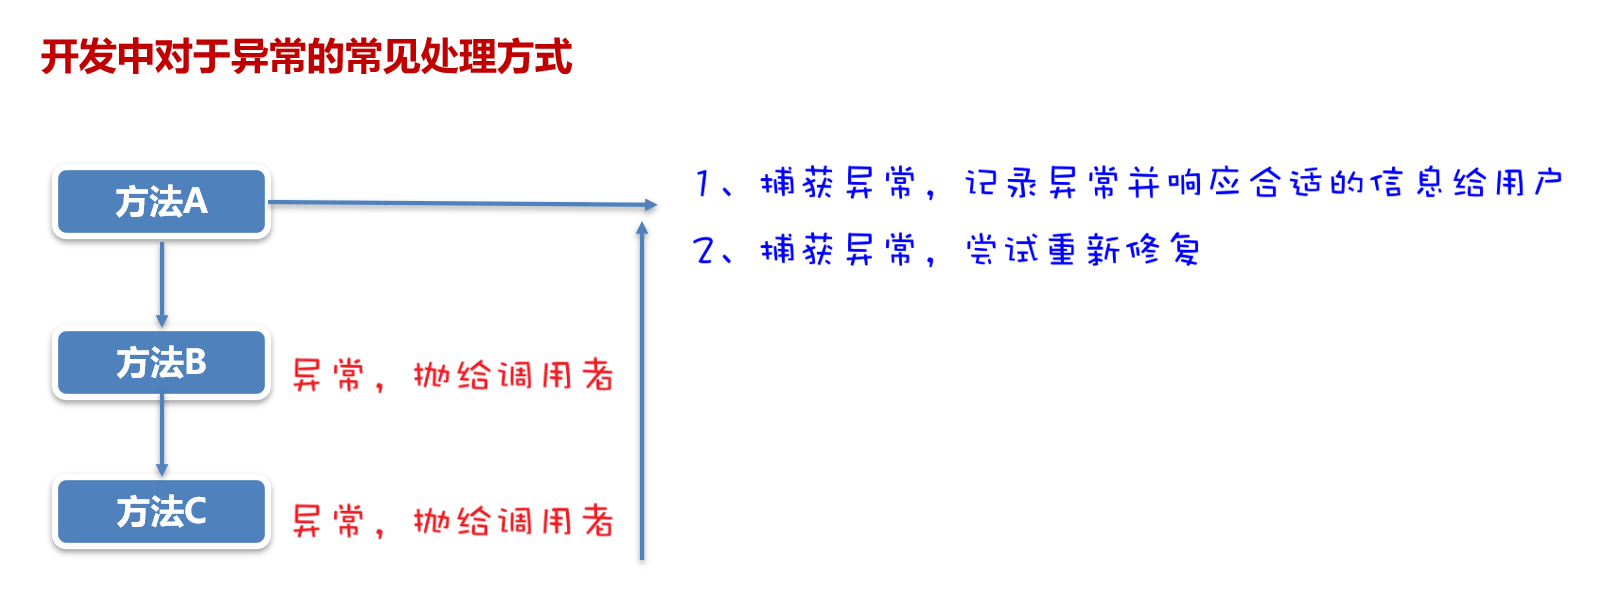
1.将异常捕获,将比较友好的信息显示给用户看;2.尝试重新执行,看是是否能修复这个问题。
- 第一种处理方式是,在main方法中对异常进行try...catch捕获处理了,给出友好提示。
public class ExceptionTest3 {
    public static void main(String[] args)  {
        try {
            test1();
        } catch (FileNotFoundException e) {
            System.out.println("您要找的文件不存在!!");
            e.printStackTrace(); // 打印出这个异常对象的信息。记录下来。
        } catch (ParseException e) {
            System.out.println("您要解析的时间有问题了!");
            e.printStackTrace(); // 打印出这个异常对象的信息。记录下来。
        }
    }

    public static void test1() throws FileNotFoundException, ParseException {
        SimpleDateFormat sdf = new SimpleDateFormat("yyyy-MM-dd HH:mm:ss");
        Date d = sdf.parse("2028-11-11 10:24:11");
        System.out.println(d);
        test2();
    }

    public static void test2() throws FileNotFoundException {
        // 读取文件的。
        InputStream is = new FileInputStream("D:/meinv.png");
    }
}
- 第二种处理方式是:在main方法中对异常进行捕获,并尝试修复
/**
 * 目标:掌握异常的处理方式:捕获异常,尝试修复。
 */
public class ExceptionTest4 {
    public static void main(String[] args) {
        // 需求:调用一个方法,让用户输入一个合适的价格返回为止。
        // 尝试修复
        while (true) {
            try {
                System.out.println(getMoney());
                break;
            } catch (Exception e) {
                System.out.println("请您输入合法的数字!!");
            }
        }
    }

    public static double getMoney(){
        Scanner sc = new Scanner(System.in);
        while (true) {
            System.out.println("请您输入合适的价格:");
            double money = sc.nextDouble();
            if(money >= 0){
                return money;
            }else {
                System.out.println("您输入的价格是不合适的!");
            }
        }
    }
}
异常关键字
-
try – 用于监听。将要被监听的代码(可能抛出异常的代码)放在try语句块之内,当try语句块内发生异常时,异常就被抛出。
-
catch – 用于捕获异常。catch用来捕获try语句块中发生的异常。
-
finally – finally语句块总是会被执行。它主要用于回收在try块里打开的资源(如数据库连接、网络连接和磁盘文件)。只有finally块,执行完成之后,才会回来执行try或者catch块中的return或者throw语句,如果finally中使用了return或者throw等终止方法的语句,则就不会跳回执行,直接停止。
-
throw – 用于方法内部,用于主动抛出异常。
-
throws – 用在方法签名中,用于声明该方法可能抛出的异常。
-
throws 关键字在声明异常的时候可以跟多个,用逗号隔开;而 throw 关键字每次只能抛出一个异常。
package com.itheima.test;

public class Test {
    public static void main(String[] args) {
        System.out.println(test());
    }
    public static int test() {
        try {
            System.out.println(123);
            return 1;
        } catch (Exception e) {
            e.printStackTrace();
        } finally {
            System.out.println(456);
        }
        return 0;
    }
}


// 运行结果
123
456
1
finally注意事项
try {
            System.out.println(111);
            System.exit(0);
        }catch (Exception e){
            e.printStackTrace();
        }finally {
        // 此处不执行了
            System.out.println(123);
        }
- 在前面的代码中用了System.exit()退出程序。
- finally语句块中发生了异常。
- 程序所在的线程死亡。
- 关闭CPU。
不要在finally中使用return语句
try块中的return语句执行成功后,并不马上返回,而是继续执行finally块中的语句,如果此处存在return语句,则在此直接返回,无情丢弃掉try块中的返回点。
如下是一个反例:
private int x = 0;
public int checkReturn() {
    try {
        // x等于1,此处不返回
        return ++x;
    } finally {
        // 返回的结果是2
        return ++x;
    }
}
throw和throws的区别
- throws 关键字用于声明异常,它的作用和 try-catch 相似;而 throw 关键字用于显式的抛出异常。
- throws 关键字后面跟的是异常的名字;而 throw 关键字后面跟的是异常的对象。
示例。
throws ArithmeticException;
throw new ArithmeticException("算术异常");
- throws 关键字出现在方法签名上,而 throw 关键字出现在方法体里。
- throws 关键字在声明异常的时候可以跟多个,用逗号隔开;而 throw 关键字每次只能抛出一个异常。


【推荐】国内首个AI IDE,深度理解中文开发场景,立即下载体验Trae
【推荐】编程新体验,更懂你的AI,立即体验豆包MarsCode编程助手
【推荐】抖音旗下AI助手豆包,你的智能百科全书,全免费不限次数
【推荐】轻量又高性能的 SSH 工具 IShell:AI 加持,快人一步
· 分享4款.NET开源、免费、实用的商城系统
· 全程不用写代码,我用AI程序员写了一个飞机大战
· MongoDB 8.0这个新功能碉堡了,比商业数据库还牛
· 白话解读 Dapr 1.15:你的「微服务管家」又秀新绝活了
· 上周热点回顾(2.24-3.2)