SpringMVC
学习过程代码已上传Github ,供参考
1 初始 SpringMVC
1.1 SpringMVC 特点
- 轻量级,简单易学
- 高效,基于请求响应的MVC框架
- 与Spring兼容性好,无缝结合
- 约定优于配置
- 功能强大:RESTful、数据验证、格式化、本地化、主题等
- 简洁灵活
MVC框架要做哪些事情
-
将url映射到java类或java类的方法
-
封装用户提交的数据
-
处理请求---调用相关的业务处理---封装响应数据
-
将响应的数据进行渲染,jsp/html等表示层数据
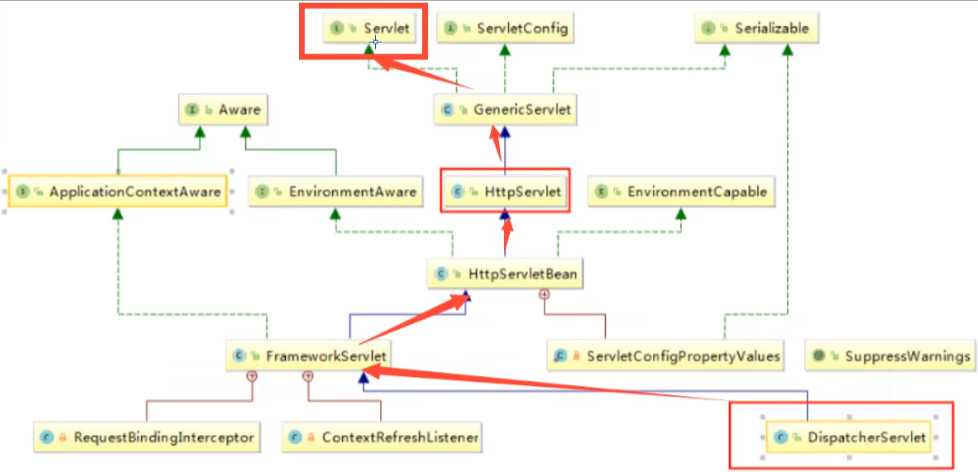
Spring的web框架围绕DispatcherServlet[调度Servlet]设计
DispatcherServlet的作用是将请求分发到不同的处理器。从Spring 2.5开始,使用Java 5或者以上版本的用户可以采用基于注解形式进行开发,十分简洁;
正因为SpringlMVC好,简单,便捷,易学,天生和Spring无缝集成(使用SpringloC和Aop),使用约定优于配置.能够进行简单junit 测试。支持Restful风格,异常处理,本地化,国际化,数据验证,类型转换,拦截器等等……
1.2 简单流程
hellomvc 配置
新建一个maven 普通 moudle, 添加 web 支持
导入依赖
配置 web.xml, 注册 dispatcherServlet
<?xml version="1.0" encoding="UTF-8"?>
<web-app xmlns="http://xmlns.jcp.org/xml/ns/javaee"
         xmlns:xsi="http://www.w3.org/2001/XMLSchema-instance"
         xsi:schemaLocation="http://xmlns.jcp.org/xml/ns/javaee http://xmlns.jcp.org/xml/ns/javaee/web-app_4_0.xsd"
         version="4.0">

    <!--  注册 DispatcherServlet  -->
    <servlet>
        <servlet-name>springmvc</servlet-name>
        <servlet-class>org.springframework.web.servlet.DispatcherServlet</servlet-class>
        <!--  关联一个 springMVC 的配置文件  -->
        <init-param>
            <param-name>contextConfigLocation</param-name>
            <param-value>classpath:springmvc-servlet.xml</param-value>
        </init-param>
        <!--  启动级别 -1  -->
        <load-on-startup>1</load-on-startup>
    </servlet>
    <servlet-mapping>
        <servlet-name>springmvc</servlet-name>
        <url-pattern>/</url-pattern>
    </servlet-mapping>

</web-app>
配置注册 DispatcherServlet时关联的文件: springmvc-servlet.xml
<?xml version="1.0" encoding="UTF-8"?>
<beans xmlns="http://www.springframework.org/schema/beans"
       xmlns:xsi="http://www.w3.org/2001/XMLSchema-instance"
       xsi:schemaLocation="http://www.springframework.org/schema/beans http://www.springframework.org/schema/beans/spring-beans.xsd">

    <!--  添加处理映射器  -->
    <bean class="org.springframework.web.servlet.handler.BeanNameUrlHandlerMapping"/>
    <!--  添加处理适配器  -->
    <bean class="org.springframework.web.servlet.mvc.SimpleControllerHandlerAdapter"/>

    <!--  视图解析器 DispatcherServlet  ModelAndView  -->
    <bean class="org.springframework.web.servlet.view.InternalResourceViewResolver" id="internalResourceViewResolver">
        <!--  前缀  -->
        <property name="prefix" value="/WEB-INF/jsp/"/>
        <!--  后缀  -->
        <property name="suffix" value=".jsp"/>
    </bean>
</beans>
编写 controller
- implements Controller
public class HelloController implements Controller {

    @Override
    public ModelAndView handleRequest(HttpServletRequest request, HttpServletResponse response) throws Exception {

        // ModelAndView 模型和视图
        ModelAndView mv = new ModelAndView();
        // 封装对象
        mv.addObject("msg", "HelloSpringMVC");

        // 因为已经在配置中添加了前缀 "WEB-INF/jsp/" 后缀".jsp"  所以下式等价于 WEB-INF/jsp/hello.jsp
        mv.setViewName("hello");

        return mv;
    }
}
注册bean
- id="/hello" 没问题
<!--  Handler  -->
<bean id="/hello" class="com.lee.controller.HelloController"/>
在 WEB-INF/jsp 文件下新建 hello.jsp
内容中添加 ${msg}
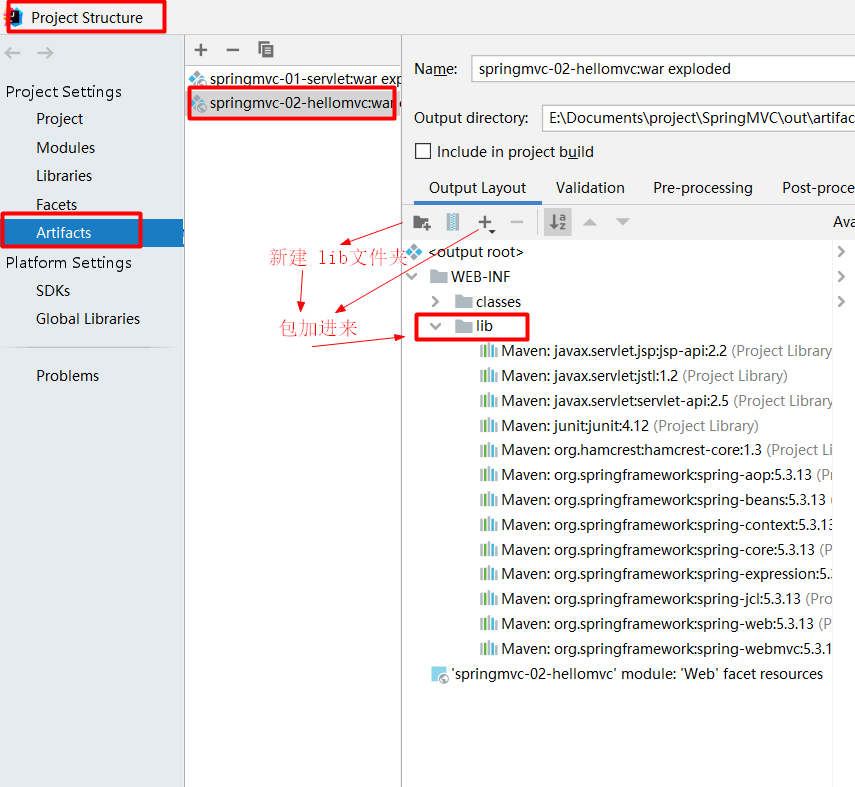
如果 404 报错,查看out/.../lib文件夹下有没有 jar包 ,没有 则
打开文件配置
修改代码之后的操作
- 修改了 java 代码 就 Redeploy
- 修改了 配置文件 就 Restart
- 修改了 前端 就 Update
1.3 简要分析执行流程
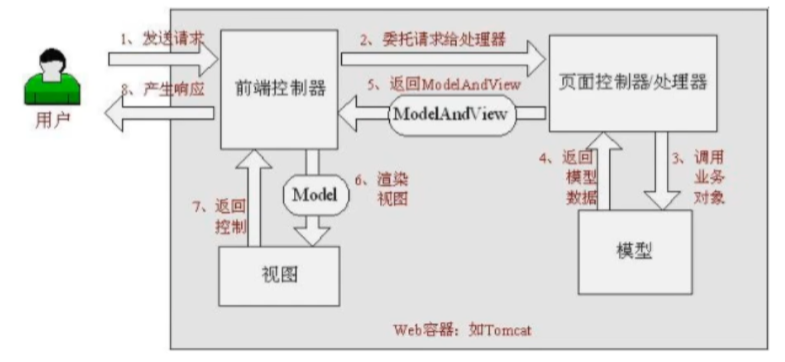
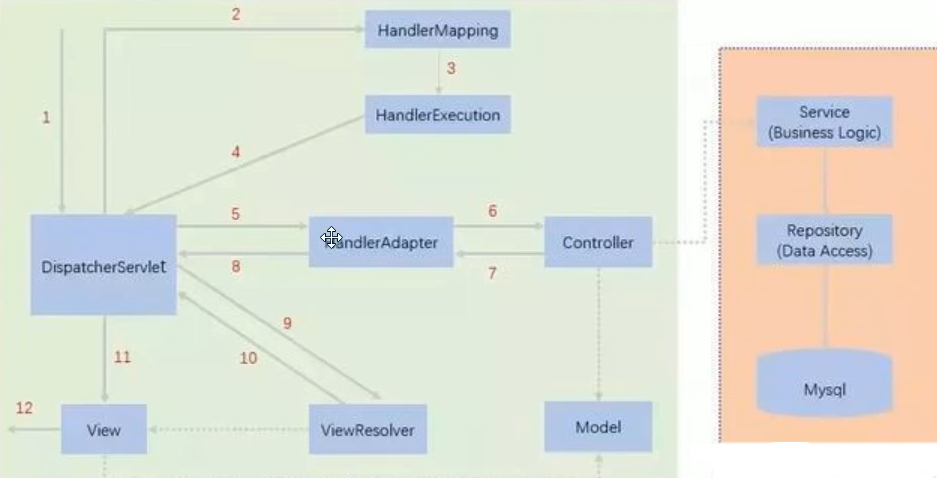
- DispatcherServlet表示前置控制器,是整个Spring MVC的控制中心。用户发出请求,DispatcherServlet接收请求井拦截请求。
- 我们假设请求的url为:
http://localmost:8080/SpringMVC/hello- 如上url拆分成三部分:
http://localhost:8080服务器域名- SpringMVC部署在服务器上的web站点
- hello表示控制器
- 通过分析,如上url表示为:请求位于服务器localhost:8080上的SpringMVC站点的hello控制器
- HandlerMapping为处理器映射。DispatcherServlet调用HandlerMapping,HandlerMapping根据请求url查找Handler
- HandlerExecution表示具体的Handler,其主要作用是根据url查找控制器,如上url被查找控制器为:hello
- HandlerExecution将解析后的信息传递给DispatcherServlet,如解析控制器映射等
- HandlerAdapter表示处理器适配器,其按照特定的规则去执行Handler
- Handler让具体的Controller执行
- Controller将具体的执行信息返回给HandlerAdapter,如ModelAndView.
- HandlerAdapter将视图逻组名或模型传递给DispatcherServlet
- DispatcherServlet调用视图解析器(ViewResolver)来解析HandlerAdapter传递的逻组视图名
- 视图解析器将解析的逻辑视图名传给DispatcherServlet
- DispatcherServlet根据视图解析器解析的视图结果,调用具体的视图
- 最终视图呈现给用户
在SpringMVC中
/:只匹配所有的请求,不会去匹配jsp页面/*:匹配所有的请求,包括jsp页面
2 注解开发SpringMVC
实现步骤 :
- 新建一个web项目
- 导入相关jar包
- 编写web.xml,注册DispatcherServlet
- 编写springmvc配置文件
- 接下来就是去创建对应的控制类,controller
- 最后完善前端Ắ图和controller之间的对应
- 测试运行调试
注册 DispatcherServlet (模板)
<!--  注册 DispatcherServlet  -->
<servlet>
    <servlet-name>springmvc</servlet-name>
    <servlet-class>org.springframework.web.servlet.DispatcherServlet</servlet-class>
    <!--  关联一个 springMVC 的配置文件  -->
    <init-param>
        <param-name>contextConfigLocation</param-name>
        <param-value>classpath:springmvc-servlet.xml</param-value>
    </init-param>
    <!--  启动级别 -1  -->
    <load-on-startup>1</load-on-startup>
</servlet>
<servlet-mapping>
    <servlet-name>springmvc</servlet-name>
    <url-pattern>/</url-pattern>
</servlet-mapping>
配置 pom 文件 (防止加载不了resources 目录下的配置文件)
<build>
    <resources>
        <resource>
            <directory>src/main/resources</directory>
            <includes>
                <include>**/*.properties</include>
                <include>**/*.xml</include>
            </includes>
            <filtering>true</filtering>
        </resource>
        <resource>
            <directory>src/main/java</directory>
            <includes>
                <include>**/*.properties</include>
                <include>**/*.xml</include>
            </includes>
            <filtering>true</filtering>
        </resource>
    </resources>
</build>
配置 springmvc-servlet.xml(模板,基本不变)
<?xml version="1.0" encoding="UTF-8"?>
<beans xmlns="http://www.springframework.org/schema/beans"
       xmlns:xsi="http://www.w3.org/2001/XMLSchema-instance"
       xmlns:context="http://www.springframework.org/schema/context"
       xmlns:mvc="http://www.springframework.org/schema/mvc"
       xsi:schemaLocation="http://www.springframework.org/schema/beans
       http://www.springframework.org/schema/beans/spring-beans.xsd
       http://www.springframework.org/schema/context
       https://www.springframework.org/schema/context/spring-context.xsd
       http://www.springframework.org/schema/mvc
       https://www.springframework.org/schema/mvc/spring-mvc.xsd">

    <!--  自动扫描包 (让指定包下的注解生效,由 IOC 统一管理)  -->
    <context:component-scan base-package="com.lee.controller"/>

    <!--  让 SpringMVC 不处理静态资源 (.css .js .html .mp3 .mp4)  -->
    <mvc:default-servlet-handler/>

        <!--
        支持mvc注解驱动
            在spring中一般采用 @RequestMapping 注解来完成映射关系
            要想使 @RequestMapping 注解生效
            必须向上下文中注册 DefaultAnnotationHandlerMapping
            和一个AnnotationMethodHandlerAdapter 实例
            这两个实例分别在类级别和方法级别处理

            annotation-driven 配置帮助我们自动完成上述两个实例的注入。
        -->
    <mvc:annotation-driven/>
        <!--  处理器映射器 (hander.BNUHandlerMapping)  -->
        <!--  处理器适配器 (mvc.SimpleCHA)  -->

    <!--  视图解析器  -->
    <bean class="org.springframework.web.servlet.view.InternalResourceViewResolver" id="internalResourceViewResolver">
        <property name="prefix" value="/WEB-INF/jsp/"/>
        <property name="suffix" value=".jsp"/>
    </bean>

</beans>
在 WEB-INF文件夹下新建 jsp/hello.jsp
${msg}
编写 HelloController
@Controller
//@RequestMapping("/hello")
public class HelloController {

//    @RequestMapping("/h1")      // localhost .../hello/h1
    @RequestMapping("/hello")
    public String hello(Model model) {
        // 封装
        model.addAttribute("msg", "SpringMVC Annotation");

        return "hello"; // 会被视图解析器处理
    }

//    @RequestMapping("/h2")      // localhost .../hello/h2
    public String hello2(Model model) {
        // 封装
        model.addAttribute("msg", "SpringMVC Annotation");
        return "hello"; // 会被视图解析器处理
    }
}
使用springMVC必须配置的三大件:
处理器映射器、处理器适配器、视图解析器通常,我们只需要手动配置视图解析器,而处理器映射器和处理器适配器只需要开启注解驱动
<mvc:annotation-driven/>即可,而省去了大段的xml配置
3 Controller
配置 web.xml
<servlet>
    <servlet-name>springmvc</servlet-name>
    <servlet-class>org.springframework.web.servlet.DispatcherServlet</servlet-class>
    <init-param>
        <param-name>contextConfigLocation</param-name>
        <param-value>classpath:springmvc-servlet.xml</param-value>
    </init-param>
    <load-on-startup>1</load-on-startup>
</servlet>
<servlet-mapping>
    <servlet-name>springmvc</servlet-name>
    <url-pattern>/</url-pattern>
</servlet-mapping>
springmvc-servlet.xml
<?xml version="1.0" encoding="UTF-8"?>
<beans xmlns="http://www.springframework.org/schema/beans"
       xmlns:xsi="http://www.w3.org/2001/XMLSchema-instance"
       xmlns:context="http://www.springframework.org/schema/context"
       xmlns:mvc="http://www.springframework.org/schema/mvc"
       xsi:schemaLocation="http://www.springframework.org/schema/beans http://www.springframework.org/schema/beans/spring-beans.xsd http://www.springframework.org/schema/context https://www.springframework.org/schema/context/spring-context.xsd http://www.springframework.org/schema/mvc https://www.springframework.org/schema/mvc/spring-mvc.xsd">

    <!--  扫描包  -->
    <context:component-scan base-package="com.lee.controller"/>
    <!--  不处理静态资源  -->
	<!--    <mvc:default-servlet-handler/>-->
    <!--  驱动 (处理器映射器 处理器适配器)  -->
	<!--    <mvc:annotation-driven/>-->

    <!--  视图解析器  -->
    <bean class="org.springframework.web.servlet.view.InternalResourceViewResolver" id="internalResourceViewResolver">
        <property name="prefix" value="/WEB-INF/jsp/"/>
        <property name="suffix" value=".jsp"/>
    </bean>
    <!--  handler  -->
    <bean id="/test" class="com.lee.controller.ControllerTest01"/>


<!--  实现 Controller 接口的控制器 至少只需要配置 视图解析器和 handler  -->
<!--  注解控制器 至少需要配置 扫描包和视图解析器  -->

</beans>
实现 Controller 接口的 控制器
// 实现 Controller 接口定义控制器 (方法较老, 不能定义多个)
public class ControllerTest01 implements Controller {
    @Override
    public ModelAndView handleRequest(HttpServletRequest request, HttpServletResponse response) throws Exception {

        ModelAndView mv = new ModelAndView();

        mv.addObject("msg", "Test from implements Controller");

        mv.setViewName("test");

        return mv;
    }
}
注解控制器
@Controller
public class ControllerTest02 {
    @RequestMapping("at1")
    public String AnnoTest01(Model model) {
        model.addAttribute("msg", "AnnoTest01 发来贺电");
        return "test";      // 待跳转的页面
    }
    @RequestMapping("at2")
    public String AnnoTest02(Model model) {
        model.addAttribute("msg", "AnnoTest02 发来贺电");
        return "test";      // 待跳转的页面
    }
}
实现 Controller 接口的控制器 至少只需要配置 视图解析器和 handler (方法较老, 不能定义多个控制器)
注解控制器 至少需要配置 扫描包和视图解析器
@RequestMapping() 嵌套
@Controller
@RequestMapping("/c")
public class ControllerTest03 {

    @RequestMapping("at3")
    public String annoTest(Model model) {

        model.addAttribute("msg", "Double RequestMapping AnnoTest03");

        return "test";
    }
}
RestFul
- 传统方式:
http://localhost:8080/add?a=1&b=2 - RestFul :
http://localhost:8080/add/1/2
RestFul 风格特点: 简介、高效、安全
@Controller
public class RestFulController {

    @RequestMapping("/add")
    public String restFulTest(int a, int b, Model model) {
        int res = a + b;
        model.addAttribute("msg", "not restful - - > res = " + res);
        return "test";
    }
    // http://localhost:8080/add?a=1&b=2 //     not restful - > res = 3

    @RequestMapping("/add/{a}/{b}")
    public String restFulTest2(@PathVariable int a, @PathVariable int b, Model model) {
        int res = a + b;
        model.addAttribute("msg", "restful - - > res = " + res);
        return "test";
    }
    // http://localhost:8080/add/1/2 //     not restful - > res = 3
RequestMapping的参数
public enum RequestMethod {
    GET,
    HEAD,
    POST,
    PUT,
    PATCH,
    DELETE,
    OPTIONS,
    TRACE;
}
@Controller
public class RestFulController {
@RequestMapping("/add")
public String restFulTest(int a, int b, Model model) {
int res = a + b;
model.addAttribute("msg", "not restful - - > res = " + res);
return "test";
}
// http://localhost:8080/add?a=1&b=2 // not restful - > res = 3
@RequestMapping("/add/{a}/{b}")
public String restFulTest2(@PathVariable int a, @PathVariable int b, Model model) {
int res = a + b;
model.addAttribute("msg", "restful - - > res = " + res);
return "test";
}
// http://localhost:8080/add/1/2 // not restful - > res = 3
@RequestMapping(value="/add/{a}/{b}",method=RequestMethod.GET)
public String restFulTest3(@PathVariable int a, @PathVariable int b, Model model) {
int res = a + b;
model.addAttribute("msg", "RequestMapping GET restful - - > res = " + res);
return "test";
}
@RequestMapping(value="/add/{a}/{b}",method=RequestMethod.POST)
public String restFulTest4(@PathVariable int a, @PathVariable int b, Model model) {
int res = a + b;
model.addAttribute("msg", "RequestMapping POST restful - - > res = " + res);
return "test";
}
// Request method 'GET' not supported
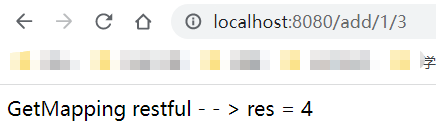
@GetMapping("/add/{a}/{b}")
public String restFulTest5(@PathVariable int a, @PathVariable int b, Model model) {
int res = a + b;
model.addAttribute("msg", "GetMapping restful - - > res = " + res);
return "test";
}
}
@GetMapping()与@RequestMapping(value="",method=RequestMethod.GET)不可共存如果只保留
@PostMapping()会报错: Request method 'GET' not supported@RequestMapping()路径的参数 value 和 path 都可以
测试 @PostMapping()
在 web目录下新建 postMappingTest.jsp
<form action="/add/1/3" method="post">
    <input type="submit">
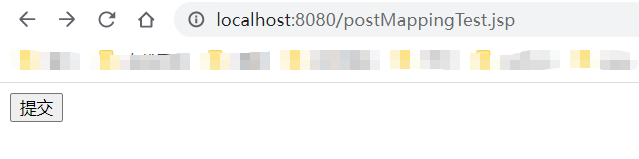

直接访问 http://localhost:8080/add/1/3
4 重定向和转发
servlet
package com.lee.controller;

import org.springframework.stereotype.Controller;
import org.springframework.web.bind.annotation.RequestMapping;

import javax.servlet.ServletException;
import javax.servlet.http.HttpServletRequest;
import javax.servlet.http.HttpServletResponse;
import javax.servlet.http.HttpSession;
import java.io.IOException;

@Controller
public class ModelTest {

    @RequestMapping("/mt1")
    public String test1(HttpServletRequest request, HttpServletResponse response) {

        HttpSession session = request.getSession();
        System.out.println(session.getId());    // 获取 id

        return "test";
    }

    @RequestMapping("/mt2")
    public void test2(HttpServletRequest request, HttpServletResponse response) throws ServletException, IOException {
        // 转发 (URL不变)
        request.getRequestDispatcher("/postMappingTest.jsp").forward(request, response);
    }

    @RequestMapping("/mt3")
    public void test3(HttpServletRequest request, HttpServletResponse response) throws ServletException, IOException {
        // 重定向 (URL改变)
        response.sendRedirect("/postMappingTest.jsp");

    }
}
SpringMVC
关闭 视图解析器的情况下:
<!--  视图解析器  -->
<bean class="org.springframework.web.servlet.view.InternalResourceViewResolver" id="internalResourceViewResolver">
    <property name="prefix" value="/WEB-INF/jsp/"/>
    <property name="suffix" value=".jsp"/>
</bean>
@Controller
public class ModelTest02 {

    @RequestMapping("/mvc")
    public String test2(Model model) {
        model.addAttribute("msg", "ModelTest02");
        return "/WEB-INF/jsp/test.jsp";     // 转发(仅关闭视图解析器可以)
        return "test"						// 转发(仅打开视图解析器可以)
        return "forward:/WEB-INF/jsp/test.jsp";     // 转发 (开关视图解析器都可以)

    }
    @RequestMapping("/mvc2")
    public String test2(Model model) {
        model.addAttribute("msg", "ModelTest02");

        return "redirect:/index.jsp";   // 重定向(开关视图解析器都可以)
    }
}
5 接收请求参数及数据回显
导入 lombok 依赖
<dependencies>
    <dependency>
        <groupId>org.projectlombok</groupId>
        <artifactId>lombok</artifactId>
        <version>1.18.22</version>
    </dependency>
</dependencies>
配置视图解析器
新建实体类 User
@Data
@AllArgsConstructor
@NoArgsConstructor
public class User {

    private int id;
    private String name;
    private int age;

}
UserController
package com.lee.controller;

import com.lee.pojo.User;
import org.springframework.stereotype.Controller;
import org.springframework.ui.Model;
import org.springframework.web.bind.annotation.*;

@Controller
@RequestMapping("/user")
public class UserController {

    // localhost:8080/user/t1?name=
    @GetMapping("/t1")
    public String test01(String name, Model model) {

        // 1. 接收前端参数
        System.out.println("接收前端的参数为: " + name);
        // 2. 将返回的结果传递给前端
        model.addAttribute("msg", name);
        // 3. 视图跳转
        return "test";
    }

    // localhost:8080/user/t1?username=         // name 不行
    @GetMapping("/t2")
    public String test02(@RequestParam("username") String name, Model model) {

        // 1. 接收前端参数
        System.out.println("接收前端的参数为: " + name);
        // 2. 将返回的结果传递给前端
        model.addAttribute("msg", name);
        // 3. 视图跳转
        return "test";
    }

    // --------------------------------------------------------------------
    // 接收对象
    @GetMapping("/t3")
    public String test03(User user) {
        System.out.println(user);
        return "test";
    }
    // User(id=1, name=kite, age=10)

}
- Model只有寥寥几个方法只适合用于储存数据,简化了新手对于Model对象的操作和理解:
- ModelMap继承了LinkedMap,除了实现了自身的一些方法,同样的维承LinkedMap的方法和特性;
- ModelAndView可以在储存数据的同时,可以进行设置返回的逻辑视图,进行控制展示层的跳转。
6 乱码过滤
手写乱码过滤
在 web 目录下新建 form.jsp
<form action="/e/table" method="post">
    <input type="text" name="name">
    <input type="submit">
</form>
EncodingFilter implements Filter
public class EncodingFilter implements Filter {

    @Override
    public void init(FilterConfig filterConfig) throws ServletException {

    }

    @Override
    public void doFilter(ServletRequest servletRequest, ServletResponse servletResponse, FilterChain filterChain) throws IOException, ServletException {
        servletRequest.setCharacterEncoding("utf-8");
        servletResponse.setCharacterEncoding("utf-8");

        filterChain.doFilter(servletRequest, servletResponse);

    }

    @Override
    public void destroy() {

    }
}
EncodingController
@Controller
public class EncodingController {

    // 过滤器解决乱码
    @PostMapping("/e/table")
    public String test01(String name, Model model) {
        model.addAttribute("msg", name);
        System.out.println(name);
        return "test";
    }
}
在 web.xml 中 注册
<!--  手写过滤器 乱码过滤  -->
<filter>
    <filter-name>encoding2</filter-name>
    <filter-class>com.lee.filter.EncodingFilter</filter-class>
</filter>
<filter-mapping>
    <filter-name>encoding2</filter-name>
    <url-pattern>/*</url-pattern>
</filter-mapping>
直接使用 springframework 的乱码过滤
<!--  配置 SpringMVC 乱码过滤  -->
<filter>
    <filter-name>encoding</filter-name>
    <filter-class>org.springframework.web.filter.CharacterEncodingFilter</filter-class>
    <init-param>
        <param-name>encoding</param-name>
        <param-value>utf-8</param-value>
    </init-param>
</filter>
<filter-mapping>
    <filter-name>encoding</filter-name>
    <url-pattern>/*</url-pattern>
</filter-mapping>
7 JSON
简介
什么是JSON?
- JSON(JavaScript Object Notation,JS对象标记)是一种轻量级的数据交换格式,目前使用特别广泛。
- 采用完全独立于编程语言的文本格式来存储和表示数据。
- 简洁和清晰的层次结构使得JSON成为理想的数据交换语言。
- 易于人阅读和编写,同时也易于机器解析和生成,并有效地提升网络传输效率。
在JavaScript语言中,一切都是对象。因此,任何JavaScript支持的类型都可以通过JSON来表示,例如字符串、数字、对象、数组等。看看他的要求和语法格式:
- 对象表示为键值对,数据由逗号分隔
- 花括号保存对象
- 方括号保存数组
JSON键值对是用来保存JavaScript对象的一种方式,和JavaScript对象的写法也大同小异,键/值对组合中的键名写在前面并用双引号“包裹,使用冒号:分隔,然后紧接着值:{"name", "Kite"}
JSON和JavaScript对象的关系可以这么理解:
JSON是JavaScript对象的字符串表示法,它使用文本表示一个JS对象的信息,本质是一个字符串。
var obj={a:'Hello',b:'world'};			//这是一个对象,注意键名也是可以使用引号包裹的
varjson='{"a":"Hello","b":"World"]';	//这是一个 JsoN字符串,本质是一个字符串
JSON和JavaScript对象互转
要实现从JSON字符串转换为JavaScript对象,使用JSON.parse()方法:
var obj = JSON.parse('{"a": "Hello", "b": "world"}'); //结果是{a:'Hello',b:'world'}
要实现从JavaScript对象转换为JSON字符串,使用JSON.stringify()方法:
var json = JSON.stringify({a: 'Hello',b: 'World'}); //结果是'{"a": "Hello", "b": "world"}'
js 与 json 相互转化
<script type="text/javascript">
    // 编写 JavaScript 对象 ES6

    var user = {
        name: "Kite",
        age: 15,
        sex: '男'
    };

    var user_json = JSON.stringify(user);
    console.log(user_json);   //      {"name":"Kite","age":15,"sex":"男"}

    var user_js = JSON.parse(user_json)
    console.log(user_js);     //     {name: 'Kite', age: 15, sex: '男'}

</script>
jackson
导入依赖
<dependencies>
    <dependency>
        <groupId>com.fasterxml.jackson.core</groupId>
        <artifactId>jackson-databind</artifactId>
        <version>2.13.2.2</version>
    </dependency>
    <dependency>
        <groupId>org.projectlombok</groupId>
        <artifactId>lombok</artifactId>
        <version>1.18.22</version>
    </dependency>
</dependencies>
User
@Data
@AllArgsConstructor
@NoArgsConstructor
public class User {

    private String name;
    private int age;
    private String sex;
}
UserController
ObjectMapper.writeValueAsString()
package com.lee.controller;

import com.fasterxml.jackson.core.JsonProcessingException;
import com.fasterxml.jackson.databind.ObjectMapper;
import com.lee.pojo.User;
import com.lee.utils.JsonUtils;
import org.springframework.stereotype.Controller;
import org.springframework.web.bind.annotation.RequestMapping;
import org.springframework.web.bind.annotation.ResponseBody;
import org.springframework.web.bind.annotation.RestController;

import java.text.SimpleDateFormat;
import java.util.ArrayList;
import java.util.Date;
import java.util.List;

//@Controller
@RestController     // 注解后不会走视图解析器,会直接返回字符串
public class UserController {

    // 解决乱码问题
    // @RequestMapping(value = "/j1", produces = "application/json;charset=utf-8")

    @RequestMapping("/j1")
//    @ResponseBody   // 注解后不会走 视图解析器,会直接返回字符串
    public String json01() throws JsonProcessingException {
        // jackson ObjectMapper
        ObjectMapper mapper = new ObjectMapper();

        // 创建一个对象
        User user = new User("Kite", 25, "男");

        String str = mapper.writeValueAsString(user);

        System.out.println(str);

        // {"name":"Kite","age":25,"sex":"男"}
        return str;

    }

    @RequestMapping("/j2")
    public String json02() throws JsonProcessingException {
        // jackson ObjectMapper
        ObjectMapper mapper = new ObjectMapper();

        List<User> userList = new ArrayList<>();
        // 创建一个对象
        User user1 = new User("Kite", 25, "男");
        User user2 = new User("Kite", 25, "男");
        User user3 = new User("Kite", 25, "男");
        User user4 = new User("Kite", 25, "男");

        userList.add(user1);
        userList.add(user2);
        userList.add(user3);
        userList.add(user4);
        String str = mapper.writeValueAsString(userList);

        System.out.println(str);
        return str;
        /*
            [
            {"name":"Kite","age":25,"sex":"男"},
            {"name":"Kite","age":25,"sex":"男"},
            {"name":"Kite","age":25,"sex":"男"},
            {"name":"Kite","age":25,"sex":"男"}
            ]
        */
    }


    /*
           java 基本方法修改时间输出格式
     */
    @RequestMapping("/j3")
    public String json03() throws JsonProcessingException {
        // jackson ObjectMapper
        ObjectMapper mapper = new ObjectMapper();

        // 时间戳
        Date date = new Date();

        SimpleDateFormat simpleDateFormat = new SimpleDateFormat("yyyy-MM-dd HH:mm:ss");

        // yyyy-MM-dd HH:mm:ss
        return mapper.writeValueAsString(simpleDateFormat.format(date));
    }

    /*
           修改 mapper 时间输出格式
     */
    @RequestMapping("/j4")
    public String json04() throws JsonProcessingException {
        ObjectMapper mapper = new ObjectMapper();

        // 时间戳
        Date date = new Date();

        // 时间输出格式
        SimpleDateFormat simpleDateFormat = new SimpleDateFormat("yyyy-MM-dd HH:mm:ss");

        // 修改 mapper 时间输出格式
        mapper.setDateFormat(simpleDateFormat);

        // yyyy-MM-dd HH:mm:ss
        return mapper.writeValueAsString(date);

    }

    @RequestMapping("/j5")
    public String json05() throws JsonProcessingException {

        ObjectMapper mapper = new ObjectMapper();

        // 时间戳
        Date date = new Date();

        return JsonUtils.getJson(date);
        // 自定义 输出时间格式
        // return JsonUtils.getJson(date,"yyyy-MM-dd HH:mm:ss");
    }

    @RequestMapping("/j22")
    public String json06() throws JsonProcessingException {

        List<User> userList = new ArrayList<>();
        // 创建一个对象
        User user1 = new User("Kite", 25, "男");
        User user2 = new User("Kite", 25, "男");
        User user3 = new User("Kite", 25, "男");
        User user4 = new User("Kite", 25, "男");

        userList.add(user1);
        userList.add(user2);
        userList.add(user3);
        userList.add(user4);

        return JsonUtils.getJson(userList);
    }
}
JsonUtils
package com.lee.utils;

import com.fasterxml.jackson.core.JsonProcessingException;
import com.fasterxml.jackson.databind.ObjectMapper;
import com.fasterxml.jackson.databind.SerializationFeature;

import java.text.SimpleDateFormat;

public class JsonUtils {

    // 仅传入一个参数  时间格式 默认为 "yyyy-MM-dd HH:mm:ss"
    public static String getJson(Object object) {
        return getJson(object, "yyyy-MM-dd HH:mm:ss");
    }


    public static String getJson(Object object, String dateFormat) {
        ObjectMapper mapper = new ObjectMapper();

        // 不使用时间戳的方式
        mapper.configure(SerializationFeature.WRITE_DATES_AS_TIMESTAMPS, false);

        // 自定义日期的格式
        SimpleDateFormat simpleDateFormat = new SimpleDateFormat(dateFormat);
        mapper.setDateFormat(simpleDateFormat);

        // return
        try {
            return mapper.writeValueAsString(object);
        } catch (JsonProcessingException e) {
            e.printStackTrace();
        }
        return null;
    }

}
@ResponseBody // 注解后不会走 视图解析器,会直接返回字符串(作用在方法上)
@RestController // 注解后不会走视图解析器,会直接返回字符串(作用在类上)
解决 JSON 乱码问题(配置在 springmvc-servlet.xml)
<!--  解决 JSON 乱码问题  -->
<mvc:annotation-driven>
    <mvc:message-converters register-defaults="true">
        <bean class="org.springframework.http.converter.StringHttpMessageConverter">
            <constructor-arg value="UTF-8"/>
        </bean>
        <bean class="org.springframework.http.converter.json.MappingJackson2HttpMessageConverter">
            <property name="objectMapper">
                <bean class="org.springframework.http.converter.json.Jackson2ObjectMapperFactoryBean">
                    <property name="failOnEmptyBeans" value="false"/>
                </bean>
            </property>
        </bean>
    </mvc:message-converters>
</mvc:annotation-driven>
@RequestMapping(value = "/j1", produces = "application/json;charset=utf-8")解决乱码问题(单个方法中有效)
Fastjson
- JSONObject代表json对象
- JSONObject实现了Map接口,猜想JSONObject底层操作是由Map实现的
- JSONObject对应json对象,通过各种形式的get()方法可以获取json对象中的数据,也可利用诸如size(),isEmpty()等方法获取“键:值“对的个数和判断是否为空。其本质是通过实现Map接口并调用接口中的方法完成的
- JSONArray 代表json对象数组
- 内部是有List接口中的方法来完成操作的
- JSON代表JSONObject和JSONArray的转化
- JSON类源码分析与使用
- 仔细观察这些方法,主要是实现json对象,json对象数组,javabean对象,json字符串之间的相互转化
导入依赖
<dependency>
    <groupId>com.alibaba</groupId>
    <artifactId>fastjson</artifactId>
    <version>1.2.80</version>
</dependency>
@RequestMapping("/j7")
public String json07() throws JsonProcessingException {

    List<User> userList = new ArrayList<>();
    // 创建一个对象
    User user1 = new User("Kite", 25, "男");
    User user2 = new User("Kite", 25, "男");
    User user3 = new User("Kite", 25, "男");
    User user4 = new User("Kite", 25, "男");

    userList.add(user1);
    userList.add(user2);
    userList.add(user3);
    userList.add(user4);
    String string = JSON.toJSONString(userList);
    return string;
}
8 Ajax
简介
- AJAX=Asynchronous JavaScript and XML(异步的JavaScript和XML)。
- AJAX是一种在无需重新加载整个网页的情况下,能够更新部分网页的技术。
- Ajax不是一种新的编程语言,而是一种用于创建更好更快以及交互性更强的Web应用程序的技术。
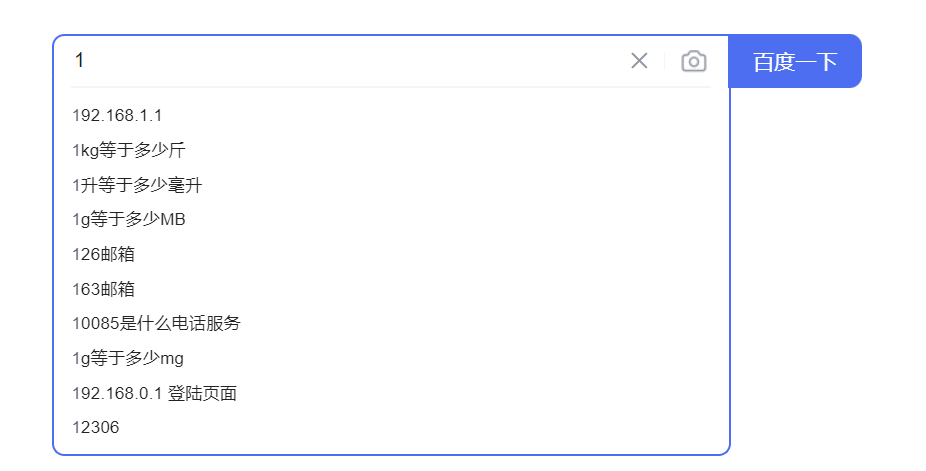
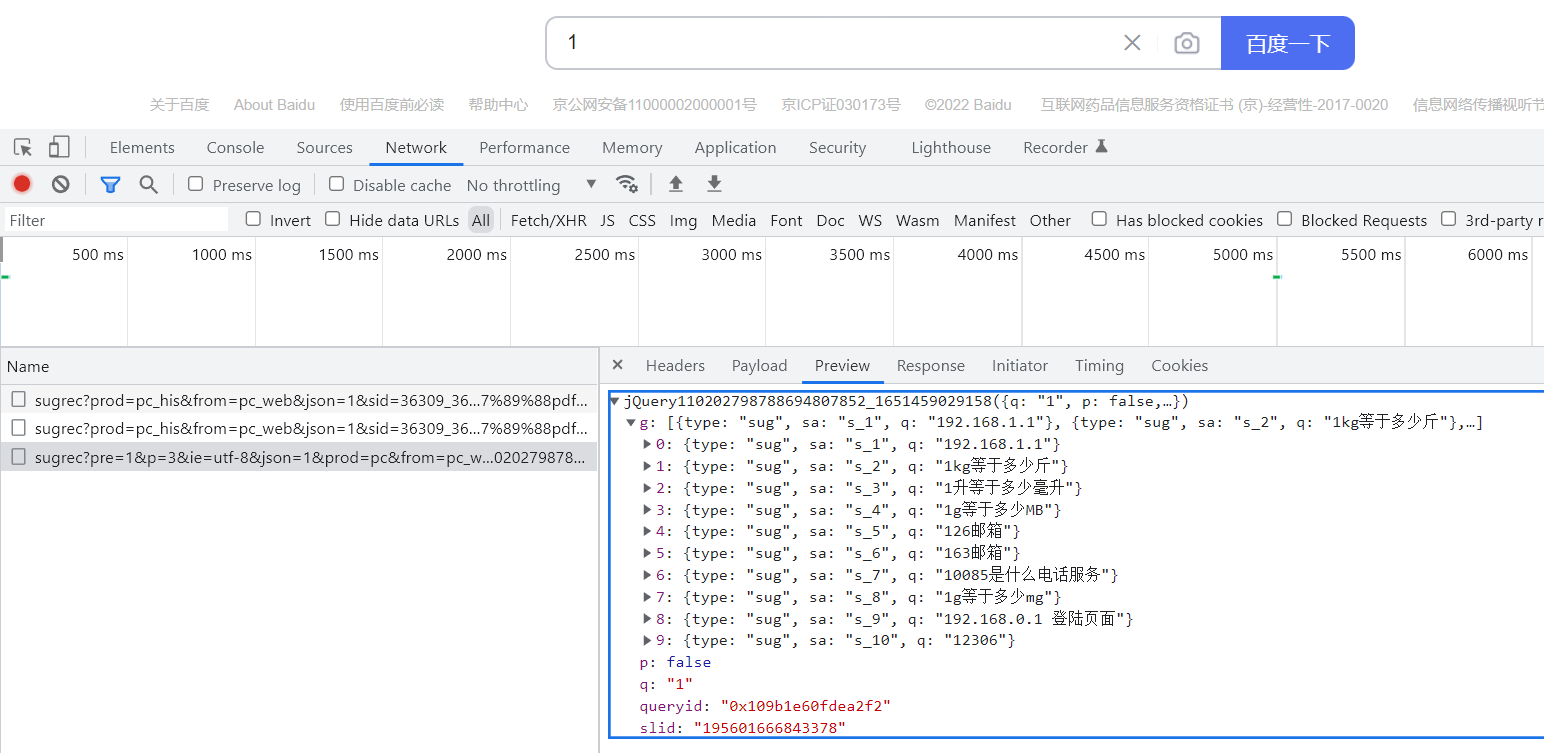
- 在2005年,Google通过其Google Suggest使AJAX变得流行起来。Google Suggest能够自动帮你完成搜索单词。
- Google Suggest使用AJAX创造出动态性极强的web界面:当您在谷歌的搜索框输入关键字时,JavaScript会把这些字符发送到服务器,然后服务器会返回一个搜索建议的列表。
- 就和国内百度的搜索框一样(下图)
- 传统的网页(即不用ajax技术的网页),想要更新内容或者提交一个表单,都需要重新加载整个网页。
- 使用ajax技术的网页,通过在后台服务器进行少量的数据交换,就可以实现异步局部更新。
- 使用Ajax,用户可以创建接近本地桌面应用的直接、高可用、更丰富、更动态的Web用户界面。
 |
 |
|---|
jQuery.ajax
- 纯JS原生实现Ajax我们不去讲解这里,直接使用jquery提供的,方便学习和使用,避免重复造轮子,有兴趣的同学可以去了解下JS原生XMLHttpRequest!
- Ajax的核心是XMLHt·Reques对象(XHR)。XHR为向服务器发送请求和解析服务器响应提供了接口。能够以异步方式从服务器获取新数据。
- jQuery提供多个与AJAX有关的方法。
- 通过jQuery AJAX方法,您能够使用HTTP Get和HTTP Post从远程服务器上请求文本、HTML、XML或JSON-同时您能够把这些外部数据直接载入网页的被选元素中。
- jQuery不是生产者,而是大自然搬运工。
- jQuery Ajax本质就是XMLHttpRequest,对他进行了封装,方便调用!
示例
web.xml 配置DispatcherServlet 和 乱码过滤
<?xml version="1.0" encoding="UTF-8"?>
<web-app xmlns="http://xmlns.jcp.org/xml/ns/javaee"
         xmlns:xsi="http://www.w3.org/2001/XMLSchema-instance"
         xsi:schemaLocation="http://xmlns.jcp.org/xml/ns/javaee http://xmlns.jcp.org/xml/ns/javaee/web-app_4_0.xsd"
         version="4.0">


    <servlet>
        <servlet-name>springmvc</servlet-name>
        <servlet-class>org.springframework.web.servlet.DispatcherServlet</servlet-class>
        <init-param>
            <param-name>contextConfigLocation</param-name>
            <param-value>classpath:applicationContext.xml</param-value>
        </init-param>
        <load-on-startup>1</load-on-startup>
    </servlet>
    <servlet-mapping>
        <servlet-name>springmvc</servlet-name>
        <url-pattern>/</url-pattern>
    </servlet-mapping>

    <filter>
        <filter-name>encoding</filter-name>
        <filter-class>org.springframework.web.filter.CharacterEncodingFilter</filter-class>
        <init-param>
            <param-name>encoding</param-name>
            <param-value>utf-8</param-value>
        </init-param>
    </filter>
    <filter-mapping>
        <filter-name>encoding</filter-name>
        <url-pattern>/*</url-pattern>
    </filter-mapping>
</web-app>
applicationContext.xml
<?xml version="1.0" encoding="UTF-8"?>
<beans xmlns="http://www.springframework.org/schema/beans"
xmlns:xsi="http://www.w3.org/2001/XMLSchema-instance"
xmlns:context="http://www.springframework.org/schema/context"
xmlns:mvc="http://www.springframework.org/schema/mvc"
xsi:schemaLocation="http://www.springframework.org/schema/beans http://www.springframework.org/schema/beans/spring-beans.xsd http://www.springframework.org/schema/context https://www.springframework.org/schema/context/spring-context.xsd http://www.springframework.org/schema/mvc https://www.springframework.org/schema/mvc/spring-mvc.xsd">
<!--扫描包-->
<context:component-scan base-package="com.lee.controller"/>
<mvc:default-servlet-handler/>
<mvc:annotation-driven/>
<!-- <!– 解决 JSON 乱码问题 –>-->
<!-- <mvc:annotation-driven>-->
<!-- <mvc:message-converters register-defaults="true">-->
<!-- <bean class="org.springframework.http.converter.StringHttpMessageConverter">-->
<!-- <constructor-arg value="UTF-8"/>-->
<!-- </bean>-->
<!-- <bean class="org.springframework.http.converter.json.MappingJackson2HttpMessageConverter">-->
<!-- <property name="objectMapper">-->
<!-- <bean class="org.springframework.http.converter.json.Jackson2ObjectMapperFactoryBean">-->
<!-- <property name="failOnEmptyBeans" value="false"/>-->
<!-- </bean>-->
<!-- </property>-->
<!-- </bean>-->
<!-- </mvc:message-converters>-->
<!-- </mvc:annotation-driven>-->
<bean class="org.springframework.web.servlet.view.InternalResourceViewResolver" id="internalResourceViewResolver">
<property name="prefix" value="/WEB-INF/jsp"/>
<property name="suffix" value=".jsp"/>
</bean>
</beans>
AjaxController
package com.lee.controller;
import org.springframework.web.bind.annotation.RequestMapping;
import org.springframework.web.bind.annotation.RestController;
import javax.servlet.http.HttpServletResponse;
import java.io.IOException;
@RestController
public class AjaxController {
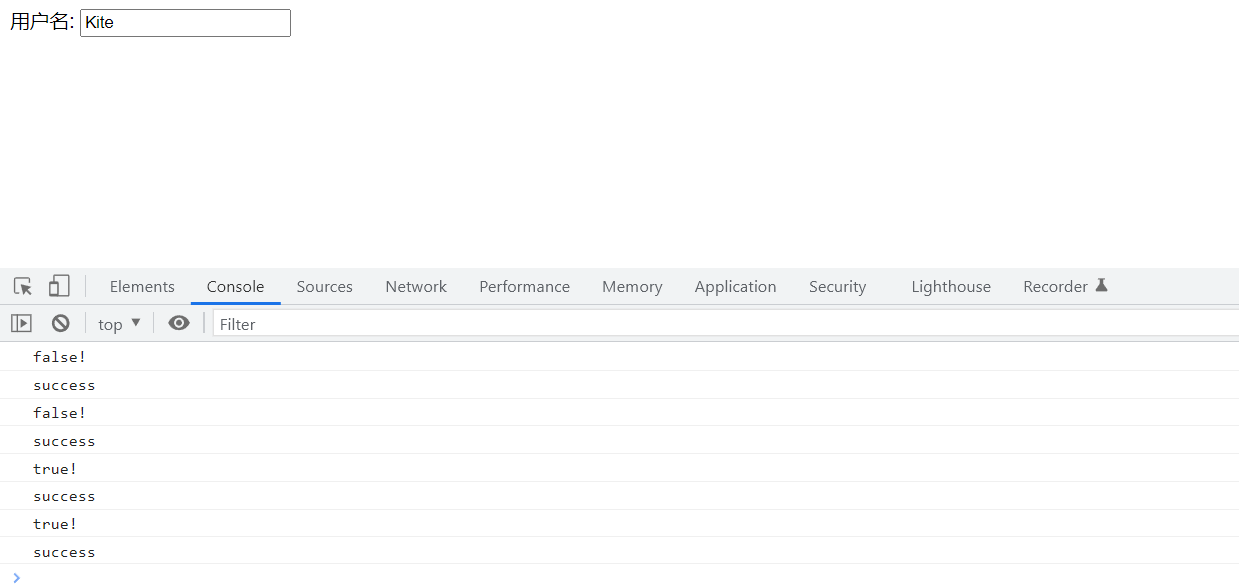
@RequestMapping("/a1")
public void test02(String name, HttpServletResponse resp) throws IOException {
System.out.println("a1.name - - > " + name);
if (name.equals("Kite")) {
resp.getWriter().println("true!");
} else {
resp.getWriter().println("false!");
}
}
}
index.jsp
<%@ page contentType="text/html;charset=UTF-8" language="java" %>
<html>
<head>
    <title>$Title$</title>
    <script src="${pageContext.request.contextPath}/statics/js/jquery-3.6.0.js"></script>

    <script>
        function a() {
            $.post({
                url: "${pageContext.request.contextPath}/a1",
                data: {"name": $("#username").val()},
                success: function (data, status) {

                    console.log(data);      // false!
                    console.log(status);    // success
                },
                // error: function (status) {
                // },
            });
        }
    </script>
</head>
<body>

<%--  失去焦点的时候,发起一个请求到后台  --%>
用户名: <input type="text" id="username" onblur="a()"/>

</body>
</html>
实体类 User
import lombok.AllArgsConstructor;
import lombok.Data;
import lombok.NoArgsConstructor;

@Data
@AllArgsConstructor
@NoArgsConstructor
public class User {

    private String name;
    private int age;
    private String sex;


}
AjaxController
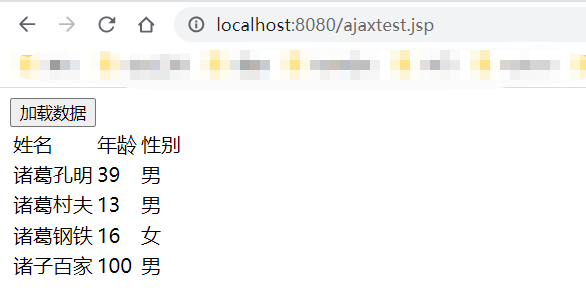
@RequestMapping("a2")
public List<User> test03() {
    List<User> userList = new ArrayList<>();

    // 添加数据
    userList.add(new User("诸葛孔明", 39, "男"));
    userList.add(new User("诸葛村夫", 13, "男"));
    userList.add(new User("诸葛钢铁", 16, "女"));
    userList.add(new User("诸子百家", 100, "男"));

    return userList;
}

ajaxtest.jsp
<%@ page contentType="text/html;charset=UTF-8" language="java" %>
<html>
<head>
    <title>$Title$</title>
    <script src="${pageContext.request.contextPath}/statics/js/jquery-3.6.0.js"></script>
    <script>
        $(function () {
            $("#btn").click(function () {
               /*
                    $.post(url, param[可省略], success)
                */
                $.post("${pageContext.request.contextPath}/a2", function (data) {
                    var html = "";
                    for (let i = 0; i < data.length; i++) {
                        html += "<tr>" +
                            "<td>" + data[i].name + "</td>" +
                            "<td>" + data[i].age + "</td>" +
                            "<td>" + data[i].sex + "</td>" +
                            "</tr>"
                    }
                    $("#content").html(html);
                });
            });
        });

    </script>
</head>
<body>
<input type="button" value="加载数据" id="btn">

<table>
    <tr>
        <td>姓名</td>
        <td>年龄</td>
        <td>性别</td>
    </tr>
    <tbody id="content">

    </tbody>
</table>
</body>
</html>
账号密码即时反馈
AjaxController
@RequestMapping("/a3")
public String test04(String name, String pwd) {
    String msg = "";
    if (name != null) {
        // 这些数据应该在数据库中查
        if ("admin".equals(name)) {
            msg = "ok";
        } else {
            msg = "用户名有误";
        }
    }
    if (pwd != null) {
        // 这些数据应该在数据库中查
        if ("123456".equals(pwd)) {
            msg = "ok";
        } else {
            msg = "密码有误";
        }
    }
    return msg;
}
login.jsp
<%@ page contentType="text/html;charset=UTF-8" language="java" %>
<html>
<head>
    <title>Title</title>
    <script src="${pageContext.request.contextPath}/statics/js/jquery-3.6.0.js"></script>
<script>

    function a1() {
        $.post({
            url: "${pageContext.request.contextPath}/a3",
            data: {"name":$("#name").val()},
            success: function (data) {
                if (data === 'ok') {
                    $("#userInfo").css("color","green")
                } else {
                    $("#userInfo").css("color","red")
                }
                $("#userInfo").html(data);
            }
        });
    }

    function a2() {
        $.post({
            url: "${pageContext.request.contextPath}/a3",
            data: {"pwd":$("#pwd").val()},
            success: function (data) {
                if (data === 'ok') {
                    $("#pwdInfo").css("color","green")
                }else {
                    $("#pwdInfo").css("color","red")
                }
                $("#pwdInfo").html(data);
            }
        });
    }

</script>
</head>
<body>

<p>
    用户名:<input type="text" id="name" onblur="a1()"/>
    <span id="userInfo"></span>
</p>
<p>
    密  码:<input type="text" id="pwd" onblur="a2()"/>
    <span id="pwdInfo"></span>
</p>

</body>
</html>
applicationContext.xml 解决 JSON 乱码问题
<!--  解决 JSON 乱码问题  -->
<mvc:annotation-driven>
    <mvc:message-converters register-defaults="true">
        <bean class="org.springframework.http.converter.StringHttpMessageConverter">
            <constructor-arg value="UTF-8"/>
        </bean>
        <bean class="org.springframework.http.converter.json.MappingJackson2HttpMessageConverter">
            <property name="objectMapper">
                <bean class="org.springframework.http.converter.json.Jackson2ObjectMapperFactoryBean">
                    <property name="failOnEmptyBeans" value="false"/>
                </bean>
            </property>
        </bean>
    </mvc:message-converters>
</mvc:annotation-driven>
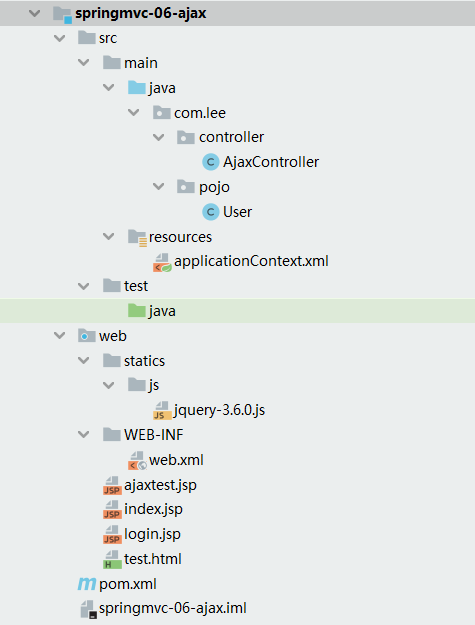
包结构
9 拦截器
概述
SpringMVC的处理器拦截器类似于Servlet开发中的过滤器Filter,用于对处理器进行预处理和后处理。开发者可以自己定义一些拦截器来实现特定的功能。
过滤器与拦截器的区别:拦截器是AOP思想的具体应用
- 过滤器
- servlet规范中的一部分,任何java web工程都可以使用
- 在url-pattern中配置了
/*之后,可以对所有要访问的资源进行拦截
- 拦截器
- 拦截器是SpringMVC框架自己的,只有使用了SpringMVC框架的工程才能使用
- 拦截器只会拦截访问的控制器方法,如果访问的是jsp/html/css/image/js是不会进行拦截的
想要自定义拦截器,必须实现Handlerlnterceptor接口
- 新建一个Moudule,springmvc-07-Interceptor,添加web支持
- 配置web.xml和springmvc-servlet.xml文件
- 编写一个拦截器
web.xml
DispatcherServlet/CharacterEncodingFilter
<?xml version="1.0" encoding="UTF-8"?>
<web-app xmlns="http://xmlns.jcp.org/xml/ns/javaee"
         xmlns:xsi="http://www.w3.org/2001/XMLSchema-instance"
         xsi:schemaLocation="http://xmlns.jcp.org/xml/ns/javaee http://xmlns.jcp.org/xml/ns/javaee/web-app_4_0.xsd"
         version="4.0">

    <servlet>
        <servlet-name>SpringMVC</servlet-name>
        <servlet-class>org.springframework.web.servlet.DispatcherServlet</servlet-class>
        <init-param>
            <param-name>contextConfigLocation</param-name>
            <param-value>classpath:applicationContext.xml</param-value>
        </init-param>
    </servlet>
    <servlet-mapping>
        <servlet-name>SpringMVC</servlet-name>
        <url-pattern>/</url-pattern>
    </servlet-mapping>

    <filter>
        <filter-name>encoding</filter-name>
        <filter-class>org.springframework.web.filter.CharacterEncodingFilter</filter-class>
        <init-param>
            <param-name>encoding</param-name>
            <param-value>utf-8</param-value>
        </init-param>
    </filter>
    <filter-mapping>
        <filter-name>encoding</filter-name>
        <url-pattern>/*</url-pattern>
    </filter-mapping>

</web-app>
applicationContext.xml
<?xml version="1.0" encoding="UTF-8"?>
<beans xmlns="http://www.springframework.org/schema/beans"
       xmlns:xsi="http://www.w3.org/2001/XMLSchema-instance"
       xmlns:context="http://www.springframework.org/schema/context"
       xmlns:mvc="http://www.springframework.org/schema/mvc"
       xsi:schemaLocation="http://www.springframework.org/schema/beans http://www.springframework.org/schema/beans/spring-beans.xsd http://www.springframework.org/schema/context https://www.springframework.org/schema/context/spring-context.xsd http://www.springframework.org/schema/mvc https://www.springframework.org/schema/mvc/spring-mvc.xsd">

    <context:component-scan base-package="com.lee.controller"/>
    <mvc:default-servlet-handler/>
    <mvc:annotation-driven>
        <mvc:message-converters register-defaults="true">
            <bean class="org.springframework.http.converter.StringHttpMessageConverter">
                <constructor-arg value="UTF-8"/>
            </bean>
            <bean class="org.springframework.http.converter.json.MappingJackson2HttpMessageConverter">
                <property name="objectMapper">
                    <bean class="org.springframework.http.converter.json.Jackson2ObjectMapperFactoryBean">
                        <property name="failOnEmptyBeans" value="false"/>
                    </bean>
                </property>
            </bean>
        </mvc:message-converters>
    </mvc:annotation-driven>

    <bean class="org.springframework.web.servlet.view.InternalResourceViewResolver" id="internalResourceViewResolver">
        <property name="prefix" value="/WEB-INF/jsp/"/>
        <property name="suffix" value=".jsp"/>
    </bean>

    <!--  拦截器  -->
    <mvc:interceptors>
        <mvc:interceptor>
            <!--  包括这个请求下面的所有请求  -->
            <mvc:mapping path="/**"/>
            <bean class="com.lee.config.MyInterceptor"/>
        </mvc:interceptor>
    </mvc:interceptors>
</beans>
MyInterceptor
package com.lee.config;
import org.springframework.web.servlet.HandlerInterceptor;
import org.springframework.web.servlet.ModelAndView;
import javax.servlet.http.HttpServletRequest;
import javax.servlet.http.HttpServletResponse;
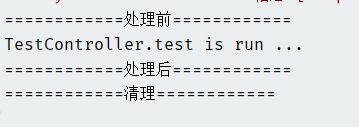
public class MyInterceptor implements HandlerInterceptor {
@Override
public boolean preHandle(HttpServletRequest request, HttpServletResponse response, Object handler) throws Exception {
System.out.println("============处理前============");
return true; // return true 执行下一个拦截器 return false 不执行下一个拦截器
}
@Override
public void postHandle(HttpServletRequest request, HttpServletResponse response, Object handler, ModelAndView modelAndView) throws Exception {
System.out.println("============处理后============");
}
@Override
public void afterCompletion(HttpServletRequest request, HttpServletResponse response, Object handler, Exception ex) throws Exception {
System.out.println("============清理============");
}
}
return false 不执行下一个拦截器
案例
MyInterceptor 暂时只保留第一个方法 preHandle
@Override
public boolean preHandle(HttpServletRequest request, HttpServletResponse response, Object handler) throws Exception {
    System.out.println("============处理前============");
    return true;    // return true 执行下一个拦截器     return false 不执行下一个拦截器

}
新建 main login页面
<%@ page contentType="text/html;charset=UTF-8" language="java" %>
<html>
<head>
    <title>Title</title>
</head>
<body>

<h1>首页</h1>

</body>
</html>

<%-------------------------------------------------------------------------------------------------%>
<%@ page contentType="text/html;charset=UTF-8" language="java" %>
<html>
<head>
    <title>Title</title>
</head>
<body>
<%--  在 WEB-INF 下的所有页面或资源只能通过 controller 或者 servlet 访问>  --%>
<h1>登录页面</h1>

<form action="${pageContext.request.contextPath}/user/login" method="post">
    用户名:<input type="text" name="username"/>
    密 码:<input type="text" name="password"/>
    <input type="submit" value="提交">

</form>
</body>
</html>
首页 index 增加 跳转请求
<%@ page contentType="text/html;charset=UTF-8" language="java" %>
<html>
  <head>
    <title>$Title$</title>
  </head>
  <body>
<h1><a href="${pageContext.request.contextPath}/user/toLogin">登录</a></h1>
<h1><a href="${pageContext.request.contextPath}/user/main">首页</a></h1>

  </body>
</html>
LoginController 实现跳转
package com.lee.controller;

import org.springframework.stereotype.Controller;
import org.springframework.web.bind.annotation.RequestMapping;

@Controller
@RequestMapping("/user")
public class LoginController {

    @RequestMapping("/toLogin")
    public String toLogin() {
        return "login";
    }


    @RequestMapping("/login")
    public String login(String username, String password) {
        return "main";
    }

    @RequestMapping("/main")
    public String mainPage() {
        return "main";
    }
}
结果
- 可通过首页 --> main
- 可通过首页 --> login --> main
限制未登录访问 main
applicationContext.xml 注册用户登录过滤功能
    <!--  用户登录页过滤  -->
    <mvc:interceptor>
        <mvc:mapping path="/user/**"/>
        <bean class="com.lee.config.LoginInterceptor"/>
    </mvc:interceptor>
</mvc:interceptors>
LoginController
package com.lee.controller;

import org.springframework.stereotype.Controller;
import org.springframework.web.bind.annotation.RequestMapping;

import javax.servlet.http.HttpSession;

@Controller
@RequestMapping("/user")
public class LoginController {

    @RequestMapping("/toLogin")
    public String toLogin() {
        return "login";
    }


    @RequestMapping("/login")
    public String login(HttpSession session, String username, String password) {
        session.setAttribute("userLoginInfo", username);
        session.setAttribute("username", username);
        return "main";
    }

    @RequestMapping("/main")
    public String mainPage() {
        return "main";
    }
    @RequestMapping("/logoff")
    public String logoff(HttpSession session, String username) {

        session.removeAttribute("userLoginInfo");
        return "redirect:/";
    }

}
拦截器实现 LoginInterceptor
package com.lee.config;

import org.springframework.web.servlet.HandlerInterceptor;

import javax.servlet.http.HttpServletRequest;
import javax.servlet.http.HttpServletResponse;
import javax.servlet.http.HttpSession;

public class LoginInterceptor implements HandlerInterceptor {

    @Override
    public boolean preHandle(HttpServletRequest request, HttpServletResponse response, Object handler) throws Exception {

        HttpSession session = request.getSession();
        /*
            放行 判断什么情况下访问主页
                1. 登录页面可访问
                2. 已经登录过的
         */

        // 1. 登录页面可访问
        if (request.getRequestURI().contains("toLogin") || request.getRequestURI().contains("login")) {
            System.out.println(request.getRequestURI());
            return true;
        }

        // 2. 已经登录过的
        if (session.getAttribute("userLoginInfo") != null) {
            System.out.println("session OK");
            return true;
        }
        // 其他情况重定向登录页面
        request.getRequestDispatcher("/WEB-INF/jsp/login.jsp").forward(request,response);
        return false;
    }
}
main 页面 添加注销功能
<%@ page contentType="text/html;charset=UTF-8" language="java" %>
<html>
<head>
    <title>Title</title>
</head>
<body>

<h1>首页</h1>

<span>${username}</span>

<a href="${pageContext.request.contextPath}/user/logoff">注销</a>

</body>
</html>
结果
- 首页 --> toLogin --> login --> main --> 注销 --> 首页
- 首页 --> main --> login --> main --> 注销 --> 首页
10 文件上传下载
准备工作
SpringMVC上下文中默认没有装配MultipartResolver,因此默认情况下其不能处理文件上传工作。如果想使用Spring的文件上传功能,则需要在上下文中配置MultipartResolver。
前端表单要求:为了能上传文件,必须将表单的method设置为POST,并将enctype设置为multipart/form-data。只有在这样的情况下,浏览器才会把用户选择的文件以二进制数据发送给服务器
对表单中的enctype属性做个详细的说明:
application/x-www=form-urlencoded:默认方式,只处理表单域中的value属性值,采用这种编码方式的表单会将表单域中的值处理成URL编码方式multipart/form-data这种编码方式会以二进制流的方式来处理表单数据,这种编码方式会把文件域指定文件的内容也封装到请求参数中,不会对字符编码text/plain:除了把空格转换为“+”号外,其他字符都不做编码处理,这种方式适用直接通过表单发送邮件
<form action="" enctype="multipart/form-data" method="post">
    <input type="file" name="file"/>
    <input type="submit">
</form>
一旦设置了enctype为multipart/form-data,浏览器即会采用二进制流的方式来处理表单数据,而对于文件上传的处理则涉及在服务器端解析原始的HTTP响应。在2003年,Apache Software Foundation发布了开源的Commons FileUpload组件,其很快成为Servlet/JSP程序员上传文件的最佳选择。
- Servlet3.0规范已经提供方法来处理文件上传,但这种上传需要在Servlet中完成
- 而Spring MVC则提供了更简单的封装
- Spring MVC为文件上传提供了直接的支持,这种支持是用即插用的MultipartResolver实现的
- Spring MVC使用Apache Commons FileUpload技术实现了一个MultipartResolver实现类 CommonsMultipartResolver SpringMVC的文件上传还需要依赖ApacheCommons FileUpload的组件。
案例
pom 导入依赖
<dependencies>
    <!-- https://mvnrepository.com/artifact/commons-fileupload/commons-fileupload -->
    <dependency>
        <groupId>commons-fileupload</groupId>
        <artifactId>commons-fileupload</artifactId>
        <version>1.3.3</version>
    </dependency>

    <dependency>
        <groupId>javax.servlet</groupId>
        <artifactId>javax.servlet-api</artifactId>
        <version>4.0.1</version>
    </dependency>
    <dependency>
        <groupId>org.projectlombok</groupId>
        <artifactId>lombok</artifactId>
        <version>1.18.24</version>
    </dependency>
</dependencies>
applicationContext.xml 文件上传配置
<!--  文件上传配置  -->
<bean class="org.springframework.web.multipart.commons.CommonsMultipartResolver" id="multipartResolver">
    <!--  编码格式 必须和 jsp 的 pageEncoding 属性一致  -->
    <property name="defaultEncoding" value="utf-8"/>
    <!--  上传文件大小限制  10485760字节(10M)  -->
    <property name="maxInMemorySize" value="10485760"/>
    <property name="maxUploadSize" value="40960"/>
</bean>
index.jsp 上传、下载 按钮
<%@ page contentType="text/html;charset=UTF-8" language="java" %>
<html>
<head>
    <title>$Title$</title>
</head>
<body>
    <form action="${pageContext.request.contextPath}/upload" enctype="multipart/form-data" method="post">
        <input type="file" name="file">
        <input type="submit" value="upload">

    </form>

<a href="${pageContext.request.contextPath}/statics/2.png">下载图片</a>
</body>
</html>
FileController 上传下载功能实现
package com.lee.controller;

import org.springframework.stereotype.Controller;
import org.springframework.web.bind.annotation.RequestMapping;
import org.springframework.web.bind.annotation.RequestParam;
import org.springframework.web.bind.annotation.RestController;
import org.springframework.web.multipart.commons.CommonsMultipartFile;

import javax.servlet.http.HttpServletRequest;
import javax.servlet.http.HttpServletResponse;
import java.io.*;
import java.net.URLEncoder;

@RestController
public class FileController {
    // @Requestparam("file")将name=file控件得到的文件封装成commonsMultipartFile 对象
    // 批最上:传CommonsMultipartFile则为数组即可
    @RequestMapping("/upload")
    public String upload(@RequestParam("file") CommonsMultipartFile file, HttpServletRequest request) throws IOException {
        // 获取文件名:file.getoriginalFilename();
        String uploadFileName = file.getOriginalFilename();

        // 如果文件名为空,首接回到首页!
        if ("".equals(uploadFileName)) {
            return "redirect:/index.jsp";
        }
        System.out.println("上传文件名:"+uploadFileName);

        // 上传路径保存设置
        String path = request.getServletContext().getRealPath("/upload");
        // 如果路径不存在,创建一个
        File realPath = new File(path);
        if (!realPath.exists()) {
            realPath.mkdir();
        }
        System.out.println("上传文件保存地址:" + realPath);

        InputStream is =file.getInputStream(); //义件输入流
        OutputStream os = new FileOutputStream(new File(realPath,uploadFileName));// 文件输出流

        //读取写出
        int len=0;
        byte[] buffer = new byte[1024];
        while ((len=is.read(buffer))!=-1){
            os.write(buffer, 0, len);
            os.flush();
        }
        os.close();
        is.close();

        return "redirect:/index.jsp";
    }

    /*
            file.transferTo 保存上传文件
     */

    @RequestMapping("/upload2")
    public String upload2(@RequestParam("file") CommonsMultipartFile file, HttpServletRequest request) throws IOException {
        //上:传路径保存设置
        String path = request.getServletContext().getRealPath("/upload");
        File realPath = new File(path);
        if (!realPath.exists()) {
            realPath.mkdir();
        }
        //上传文件地址
        System.out.println("上传文件保存地址:" + realPath);
        //通过CommonsMultipartFile的方法直接写文件(注意这个时候)

        file.transferTo(new File(realPath + "/" + file.getOriginalFilename()));

        return "redirect:/index.jsp";
    }


    @RequestMapping(value="/download")
    public String downloads(HttpServletResponse response , HttpServletRequest request) throws IOException {

        // 要下载的图片地址
        String path = request.getServletContext().getRealPath("/statics");
        String fileName = "1.png";
        // 1. 设置response 响应头
        response.reset();   // 设置页而不缓存,清空buffer
        response.setCharacterEncoding("UTF-8");     // 学符缩码
        response.setContentType("multipart/form-data"); // 进制传输数#

        // 设置响应头
        response.setHeader("Content-Disposition","attachment;fileName="+ URLEncoder.encode(fileName, "UTF-8"));

        File file = new File(path,fileName);
        // 2. 读取文件--输入流
        InputStream input=new FileInputStream(file);
        // 3. 写出文件--输出流
        OutputStream out = response.getOutputStream();

        byte[] buff = new byte[1024];
        int index = 0;
        // 4. 执行写出操作
        while ((index = input.read(buff)) != -1) {
            out.write(buff, 0, index);
            out.flush();
        }
        out.close();
        input.close();
        return null;
    }
}

 浙公网安备 33010602011771号