14、Nginx-编译安装&平滑升级与回退
版权声明:原创作品,谢绝转载!否则将追究法律责任。 ————— 作者:kirin
获取原有环境的编译参数
#查看nginx版本
[root@web01 ~]#  nginx -v

#查看编译参数
[root@m01 ~]#  nginx -V
在新的环境重新下载软件包安装即可
到官方下载nginx软件包
#由于是编译安装的nginx,所以不会创建nginx用户,需要手动创建,否则nginx -t报错
[root@web02 ~]# groupadd nginx
[root@web02 ~]# useradd nginx -g nginx

#编译过程中根据提示安装所需要的依赖包
[root@web02 ~]# yum install -y pcre-devel openssl-devel libxml2-devel libxslt-devel gd-devel perl-devel perl-ExtUtils-Embed gperftools

#下载软件包、解压、进入目录进行编译
[root@web02 ~]# wget http://nginx.org/download/nginx-1.18.0.tar.gz
[root@web02 ~]# tar xf nginx-1.18.0.tar.gz
[root@web02 ~]# cd nginx-1.18.0/
[root@web02 ~nginx-1.18.0 ]# ./configure --# 自行获取编译参数填充
[root@web02 ~/nginx-1.18.0]# make
[root@web02 ~/nginx-1.18.0]# echo $?
[root@web02 ~/nginx-1.18.0]# make install
#如果不优先执行前面的命令,在编译安装完成之后就会报如下错误
#遇到错误不要慌,有错误的话解决它就好了。
启动Nginx 停止Nginx
#启动nginx
[root@web02 ~/nginx-1.18.0]# nginx
#或者接绝对路径启动
[root@web02 ~/nginx-1.18.0]# nginx -c /etc/nginx/nginx.conf

#检查启动与运行端口
[root@web02 ~/nginx-1.18.0]# ps -ef|grep nginx
root      18327      1  0 22:43 ?        00:00:00 nginx: master process nginx
nginx     18328  18327  0 22:43 ?        00:00:00 nginx: worker process
root      18330   1653  0 22:43 pts/0    00:00:00 grep --color=auto nginx
[root@web02 ~/nginx-1.18.0]# netstat -lntup|grep nginx
tcp        0      0 0.0.0.0:80              0.0.0.0:*               LISTEN      18327/nginx: master

#停止nginx
[root@web02 ~/nginx-1.18.0]# nginx -s stop
5.小结
编译步骤三部曲:
1、./configure      定义软件的路径\定义软件模块\  ---> Makefile文件
2、make           读取清单,然后进行编译的操作  [可执行的二进制文件]
3、make install	   将配置文件\二进制文件拷贝到指定的目录下
1.Nginx平滑升级概述
1.什么是平滑升级
在进行服务版本升级的时候,对于用户访问体验无感知、不会造成服务中断。
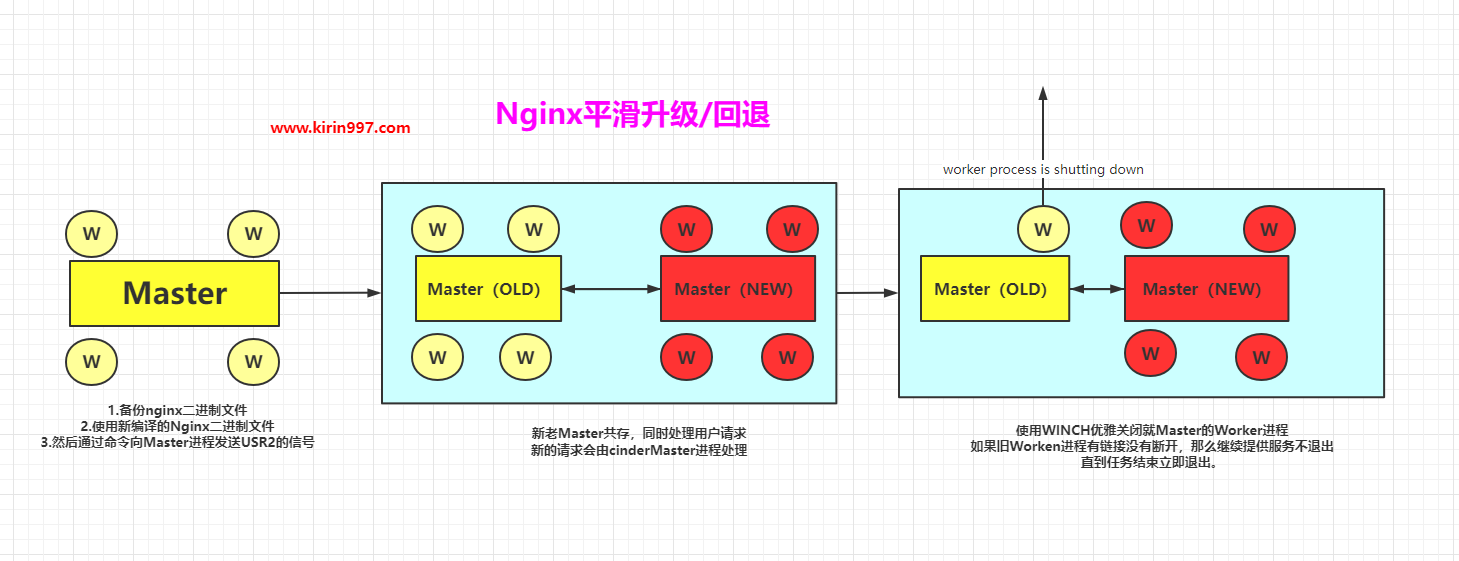
2.Nginx平滑升级原理

3.如何实现Nginx平滑升级思路(建议准备一个大文件持续下载验证升级是否会影响业务)
1.下载新版本Nginx
2.了解原旧版本Nginx编译参数
3.将旧的nginx二进制文件进行备份,然后替换成为新的 nginx二进制文件
4.向旧的Nginx的Master进程发送USR2信号
4.1,旧的master进程的pid文件添加后缀.oldbin
4.2,master进程会用新nginx二进制文件启动新的 master进程。
5.向旧的master进程发送WINCH信号,旧的worker子进 程优雅退出。
6.向旧的master进程发送QUIT信号,旧的master进程就 退出了。
2.Nginx平滑升级:1.18 ---> 1.19
1.创建目录,准备站点文件
[root@web01 /etc/nginx/conf.d]# mkdir /code
[root@web01 /etc/nginx/conf.d]# vim default.conf
[root@web01 /etc/nginx/conf.d]# cat default.conf
server {
	listen 80 default_server;
	server_name localhost;
    location / {
	limit_rate 200k;
	root /code;
	index index.html index.htm;
	}
}

[root@web01 /etc/nginx/conf.d]# nginx -t
[root@web01 ~]# dd if=/dev/zero of=/code/bigdata bs=500M count=1
2.下载最新版本的nginx
[root@web01 ~]#  wget http://nginx.org/download/nginx-1.21.1.tar.gz
[root@web01 ~]#  tar xf nginx-1.21.1.tar.gz
[root@web01 ~]#  cd nginx-1.21.1/
[root@web01 ~/nginx-1.21.1]#  yum install -y pcre-devel openssl-devel libxml2-devel libxslt-devel gd-devel perl-devel perl-ExtUtils-Embed gperftools
[root@web01 ~/nginx-1.21.1]#  ./configure
[root@web01 ~/nginx-1.21.1]#  make
3.将旧的nginx二进制文件进行备份,然后替换成为新的nginx二进制文件
[root@web01 ~]#  mv /usr/sbin/nginx /usr/sbin/nginx_1.20
[root@web01 ~]#  cp /root/nginx-1.21.1/objs/nginx /usr/sbin/nginx
#检查是否替换成功
[root@web01 ~]#  nginx -v
#打开浏览器输入:10.0.0.7/bigdata
4.向旧的Nginx的Master进程发送USR2信号
4.1、旧的master进程的pid文件添加后缀.oldbin
4.2、master进程会用新nginx二进制文件启动新的master进程。
[root@web01 ~]# ps -ef |grep nginx		# 1.18
root       1309      1  0 16:53 ?        00:00:00 nginx: master process /usr/sbin/nginx -c /etc/nginx/nginx.conf
www        1787   1309  0 19:08 ?        00:00:00 nginx: worker process
www        1788   1309  0 19:08 ?        00:00:00 nginx: worker process
www        1789   1309  0 19:08 ?        00:00:00 nginx: worker process
www        1790   1309  0 19:08 ?        00:00:00 nginx: worker process

[root@web01 ~]# kill -USR2 1309			# 发送USR2信号,平滑升级Nginx
[root@web01 ~]# ps -ef |grep nginx
root       1309      1  0 16:53 ?        00:00:00 nginx: master process /usr/sbin/nginx -c /etc/nginx/nginx.conf
www        1787   1309  0 19:08 ?        00:00:00 nginx: worker process
www        1788   1309  0 19:08 ?        00:00:00 nginx: worker process
www        1789   1309  0 19:08 ?        00:00:00 nginx: worker process
www        1790   1309  0 19:08 ?        00:00:00 nginx: worker process

root       5400   1309  0 19:15 ?        00:00:00 nginx: master process /usr/sbin/nginx -c /etc/nginx/nginx.conf
www        5401   5400  0 19:15 ?        00:00:00 nginx: worker process
www        5402   5400  0 19:15 ?        00:00:00 nginx: worker process
www        5403   5400  0 19:15 ?        00:00:00 nginx: worker process
www        5404   5400  0 19:15 ?        00:00:00 nginx: worker process

#打开浏览器刷新界面,发现依旧在下载,因为现在旧版本的master与新版本的master是共存状态。
5.向旧的master进程发送WINCH信号,旧的worker子进程优雅退出。
[root@web01 ~]# kill -WINCH 1309
[root@web01 ~]# ps -ef |grep nginx
root       1309      1  0 16:53 ?        00:00:00 nginx: master process /usr/sbin/nginx -c /etc/nginx/nginx.conf
root       5400   1309  0 19:15 ?        00:00:00 nginx: master process /usr/sbin/nginx -c /etc/nginx/nginx.conf
www        5401   5400  0 19:15 ?        00:00:00 nginx: worker process
www        5402   5400  0 19:15 ?        00:00:00 nginx: worker process
www        5403   5400  0 19:15 ?        00:00:00 nginx: worker process
www        5404   5400  0 19:15 ?        00:00:00 nginx: worker process
6.向旧的master进程发送QUIT信号,旧的master进程就退出了
[root@web01 ~]# kill -QUIT 1309
[root@web01 ~]# ps -ef |grep nginx
root       5400      1  0 19:15 ?        00:00:00 nginx: master process /usr/sbin/nginx -c /etc/nginx/nginx.conf
www        5401   5400  0 19:15 ?        00:00:00 nginx: worker process
www        5402   5400  0 19:15 ?        00:00:00 nginx: worker process
www        5403   5400  0 19:15 ?        00:00:00 nginx: worker process
www        5404   5400  0 19:15 ?        00:00:00 nginx: worker process
ps:nginx平滑降版本,跟升级操作一样,只是版本不一样
3.Nginx平滑降版本: 1.19 —> 1.18
在运行新版本的nginx的时候发现出错了,现在想退回来,怎么办??所以一般情况下我们在做到【5、向旧的master进程发送WINCH信号,旧的worker子进程优雅退出。】这一步的时候就先不要动了,先让他运行一两个月,确定稳定没问题了在继续【6、向旧的master进程发送QUIT信号,旧的master进程就退出了】这一步。
1.替换二进制文件
[root@web01 ~]# mv /usr/sbin/nginx /usr/sbin/nginx_1.19
[root@web01 ~]# mv /usr/sbin/nginx_1.18 /usr/sbin/nginx
2.执行USR2信号,平滑过度
[root@web01 ~]# ps -ef |grep nginx			(旧版本的Nginx1.19)
root       5400      1  0 19:15 ?        00:00:00 nginx: master process /usr/sbin/nginx -c /etc/nginx/nginx.conf
www        5401   5400  0 19:15 ?        00:00:00 nginx: worker process
www        5402   5400  0 19:15 ?        00:00:00 nginx: worker process
www        5403   5400  0 19:15 ?        00:00:00 nginx: worker process
www        5404   5400  0 19:15 ?        00:00:00 nginx: worker process

[root@web01 ~]# kill -USR2 5400
[root@web01 ~]# ps -ef |grep nginx
root       5400      1  0 19:15 ?        00:00:00 nginx: master process /usr/sbin/nginx -c /etc/nginx/nginx.conf
www        5401   5400  0 19:15 ?        00:00:00 nginx: worker process
www        5402   5400  0 19:15 ?        00:00:00 nginx: worker process
www        5403   5400  0 19:15 ?        00:00:00 nginx: worker process
www        5404   5400  0 19:15 ?        00:00:00 nginx: worker process
root       5459   5400  1 19:24 ?        00:00:00 nginx: master process /usr/sbin/nginx -c /etc/nginx/nginx.conf
www        5460   5459  0 19:24 ?        00:00:00 nginx: worker process
www        5461   5459  0 19:24 ?        00:00:00 nginx: worker process
www        5462   5459  0 19:24 ?        00:00:00 nginx: worker process
www        5463   5459  0 19:24 ?        00:00:00 nginx: worker process
3.将1.19版本的Nginx的Work关闭
[root@web01 ~]# kill -WINCH 5400
[root@web01 ~]# ps -ef |grep nginx
root       5400      1  0 19:15 ?        00:00:00 nginx: master process /usr/sbin/nginx -c /etc/nginx/nginx.conf
root       5459   5400  0 19:24 ?        00:00:00 nginx: master process /usr/sbin/nginx -c /etc/nginx/nginx.conf
www        5460   5459  0 19:24 ?        00:00:00 nginx: worker process
www        5461   5459  0 19:24 ?        00:00:00 nginx: worker process
www        5462   5459  0 19:24 ?        00:00:00 nginx: worker process
www        5463   5459  0 19:24 ?        00:00:00 nginx: worker process
4、将1.19版本的Nginx的Master关闭
[root@web01 ~]# kill -QUIT 5400
[root@web01 ~]# ps -ef |grep nginx			# 1.18
root       5459      1  0 19:24 ?        00:00:00 nginx: master process /usr/sbin/nginx -c /etc/nginx/nginx.conf
www        5460   5459  0 19:24 ?        00:00:00 nginx: worker process
www        5461   5459  0 19:24 ?        00:00:00 nginx: worker process
www        5462   5459  0 19:24 ?        00:00:00 nginx: worker process
www        5463   5459  0 19:24 ?        00:00:00 nginx: worker process
#Nginx版本成功退回到1.18版本
对应升级或回滚对应的信号
| 信号 | 含义 |
|---|---|
| QUIT | 优雅关闭、quit |
| HUP | 优雅重启、reload |
| USR1 | 重新打开日志文件、reopen |
| USR2 | 平滑升级可执行的二进制程序 |
| WINCH | 平滑关闭worker进程 |
本文来自博客园,作者:kirin(麒麟),转载请注明原文链接:https://www.cnblogs.com/kirin365/articles/16137285.html


 浙公网安备 33010602011771号