9、Nginx-七层负载均衡
版权声明:原创作品,谢绝转载!否则将追究法律责任。 ————— 作者:kirin
1.Nginx负载均衡基本概述
1.什么是负载均衡
负载均衡Load Balance,指的是根据负载均衡算法,将工作任务进行平衡、分摊到多个操作单元上运行。
=2.为什么要做负载均衡=
当我们的web服务器直接面向用户,往往需要承载大量的并发请求,单台服务器难以负荷,使用多台web服务器组成集群,前段使用nginx负载均衡,将请求分散到后端服务器集群中。实现负载的分发。从而提升整体性能、以及系统的容灾能力。

3.四层负载均衡TCP
所谓四层负载经指的是OSI七层模型中的传输层,四层仅需要对客户端的请求进程TCP/IP协议的包转发就可以实现负载均衡。四层负载均衡的性能极好、因为只需要底层进行转发处理,而不需要进行一些复杂的逻辑。
4.七层负载均衡
七层负载均衡他是在应用层,那么它可以完成很多应用方面的协议请求,比如我们说的http应用负载均衡,它可以实现http头信息的改写(proxy_set_header)、安全应用规则控制、URI匹配规则控制、及rewrite等功能,所以在应用层里面可以做的内容就更多了。
5.四层负载与七层负载的区别
四层负载数据包在底层就进行了分发,而七层负载数据包则是在最顶层进行分发,由此可以看出,七层负载效率没有四层高。
七层负载更贴近于服务,如http协议就是七层协议,我们可以用nginx做URL路径规则匹配、head改写、rewrite、会话保持等,这些是四层负载均衡无法实现的。
2.Nginx负载均衡配置场景
Nginx要实现负载均衡需要用到proxy_pass代理模块和upstream两个模块。
1.upstream虚拟配置语法
| Syntax: | **upstream** *name* { ... } |
|---|---|
| Default: | — |
| Context: | http |
2.upstream配置示例
[root@lb01 ~]# cat /etc/nginx/conf.d/upstream.conf
upstream blog {
	ip_hash;
	server blog1.com;###注意这里需要有hosts解析,如果没有需要写IP
	server blog2.com;
}


server {
	listen 80;
	server_name blog.com;
	location / {
		proxy_pass http://blog;
		include proxy.params;
	}
}
3.配置验证
###1.创建对应html文件
[root@Nginx ~]# mkdir /soft/{code1,code2,code3} -p
[root@Nginx ~]# cat /soft/code1/index.html
<html>
        <title> Code1</title>
        <body bgcolor="red">
                <h1> Code1-8081 </h1>
        </body>
</html>

[root@Nginx ~]# cat /soft/code2/index.html
<html>
        <title> Coder2</title>
        <body bgcolor="blue">
                <h1> Code1-8082</h1>
        </body>
</html>

[root@Nginx ~]# cat /soft/code3/index.html
<html>
        <title> Coder3</title>
        <body bgcolor="green">
                <h1> Code1-8083</h1>
        </body>
</html>
###2.建立对应的配置文件
[root@Nginx ~]# cat /etc/nginx/conf.d/releserver.conf
server {
    listen 8081;
    root /soft/code1;
    index index.html;
}

server {
    listen 8082;
    root /soft/code2;
    index index.html;
}

server {
    listen 8083;
    root /soft/code3;
    index index.html;
}
###3.配置Nginx反向代理
[root@Nginx ~]# cat /etc/nginx/conf.d/proxy.conf
upstream node {
    server 10.0.0.7:8081;
    server 10.0.0.7:8082;
    server 10.0.0.7:8083;
}

server {
    server_name 10.0.0.7;
    listen 80;
    location / {
        proxy_pass http://node;
        include proxy_params;
    }
}
3.nginx负载均衡调度算法
| 调度算法 | 概述 |
|---|---|
| 轮询 | 按时间顺序逐一分配到不同的后端服务器(默认) |
| weight | 加权轮询,weight值越大,分配到的访问几率越高 |
| ip_hash | 每个请求按访问IP的hash结果分配,这样来自同一IP的固定访问一个后端服务器 |
| url_hash | 按照访问URL的hash结果来分配请求,是每个URL定向到同一个后端服务器 |
| least_conn | 最少链接数,那个机器链接数少就分发 |
| hash关键数值 | hash自定义的key |
1.Nginx负载均衡权重轮询具体配置
upstream load_pass {
    server 10.0.0.7:8001;
    server 10.0.0.8:8002 weight=5;
    server 10.0.0.9:8003;
}
2.Nginx负载均衡ip_hash具体配置
//如果客户端都走相同代理, 会导致某一台服务器连接过多
upstream load_pass {
    ip_hash;
    server 10.0.0.7:8001;
    server 10.0.0.8:8002;
    server 10.0.0.9:8003;
}
//如果出现通过代理访问会影响后端节点接收状态均衡

3.Nginx负载均衡url_hash具体配置
upstream load_pass {
    hash $request_uri;
    server 10.0.0.7:8001;
    server 10.0.0.8:8002;
    server 10.0.0.9:8003;
}

//针对三台服务器添加相同文件
/soft/code1/url1.html url2.html url3.html
/soft/code2/url1.html url2.html url3.html
/soft/code3/url1.html url2.html url3.html
4.Nginx负载均衡后端状态
后端服务器在负载均衡调度中的状态
| 状态 | 概述 |
|---|---|
| down | 当前的server暂时不参与负载均衡 |
| backup | 预留的备份服务器 |
| max_fails | 允许请求失败的次数 |
| fail_timeout | 经过max_fails失败后, 服务暂停时间 |
| max_conns | 限制最大的接收连接数 |
upstream load_pass {
    server 10.0.0.7:8001 down;
    server 10.0.0.8:8002 backup;
    server 10.0.0.9:8003 max_fails=1 fail_timeout=10s;
}

location  / {
    proxy_pass http://load_pass;
    include proxy_params;
}

//关闭8003测试
5.Nginx负载均衡会话共享
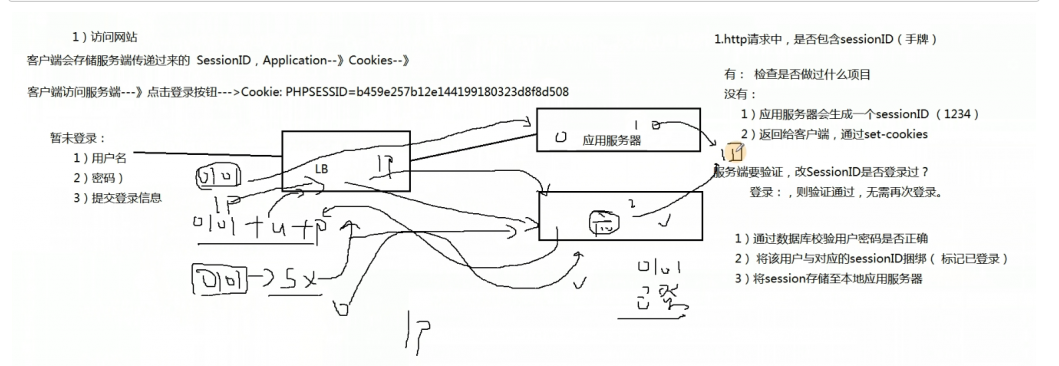
1.什么是会话保持?
当用户登录一个网站服务器,网站服务器会将用户的登录信息存储下来(存储下来的内容叫session),以保证我们能后一直处于登录在线状态。
2.为什么要做会话保持?
由于我们使用的是负载均衡轮询机制,会导致用户请求分散在不同地节点上,从而造成会话无法保持。
3.如何实现会话保持?
1.粘性session:指nginx每次都将同一用户的请求都转发至同一台服务器上,即nginx的ip_hash。
2.session复制:即每次session发送变化时,就广播给集群中的服务器,使所有服务器上的session相同。
3.session共享:缓存session至内存数据库中,使用resis,memcached实现。
4.session持久化:将session存储至数据库中,像操作数据一样操作session。
4.Session共享场景演示
环境准备
| lb01 | 10.0.0.5 |
|---|---|
| web01 | 10.0.0.7 |
| web02 | 10.0.0.8 |
#web环境web01和web02相同配置:
##上传phpmyadmin至web服务器
[root@web01 /code/phpmyadmin]# cp config.sample.inc.php config.inc.php
[root@web01 /code/phpmyadmin]# vim +30 config.inc.php
$cfg['Servers'][$i]['host'] = '172.16.1.51'; #修改 localhost为ip地址
[root@web01 /code/phpmyadmin]# chown -R nginx.nginx /var/lib/php/session
#php.ini 配置
[root@web01 ~]# grep -m 2 -n ^session. /etc/php.ini
1231:session.save_handler = redis
1264:session.save_path = "tcp://172.16.1.51:6379"
#注释默认的配置
[root@web01 ~]# tail -4 /etc/php-fpm.d/www.conf
;php_value[session.save_handler] = files
;php_value[session.save_path] = /var/lib/php/session
php_value[soap.wsdl_cache_dir] = /var/lib/php/wsdlcache


#负载均衡配置
[root@lb01 /etc/nginx/conf.d]# cat mysql.kirin7.com.conf
upstream mysql {
server 10.0.0.7:80;
server 10.0.0.8:80;
}

server {
	listen 80;
	server_name mysql.kirin7.com;
	location / {
		proxy_pass http://mysql;
		include proxy_params;
	}
}

#数据库(redis缓存)配置
[root@db01 ~]# yum install -y redis-server
[root@db01 ~]# grep ^bind -n /etc/redis.conf
61:bind 127.0.0.1 172.16.1.51 10.0.0.51
[root@db01 ~]# systemctl restart redis

###刷新页面测试
6.基于URI代理转发
1.基于location实现
web01配置
[root@web01 ~]# cat /etc/nginx/conf.d/jing.conf
server {
	listen 80;
	server_name zhuan.com;
	root /code/uri;
	location /static {
		index index.html;
	}
}
[root@web01 ~]# mkdir -p /code/uri/staic/
[root@web01 ~]# echo web01 static > /code/uri/staic/index.html
web02配置
[root@web02 ~]# cat /etc/nginx/conf.d/dong.conf
server {
	listen 80;
	server_name zhuan.com;
	root /code/uri;
	location /dong {
		index index.html;
	}
}
[root@web02 ~]# mkdir -p /code/uri/dong
[root@web02 ~]# echo web02 dong > /code/uri/dong/index.html
lb01配置
[root@lb01 ~]# cat /etc/nginx/conf.d/zhuan.com.conf
upstream static {
	server 10.0.0.7;
}
upstream dong {
	server 10.0.0.8;
}

server {
	listen 80;
	server_name zhuan.com;
	location / {
		proxy_pass http://static;
		include proxy_params;
	}
	location /static {
                proxy_pass http://static;
                include proxy_params;
        }
	location /dong {
                proxy_pass http://dong;
                include proxy_params;
        }
}
测试
[root@lb01 ~]# curl -H Host:zhuan.com 10.0.0.5/static/
web01 static
[root@lb01 ~]# curl -H Host:zhuan.com 10.0.0.5/dong/
web02 dong
2.以if语句实现
[root@lb01 ~]# cat /etc/nginx/conf.d/zhuan.com.conf
upstream static {
	server 10.0.0.7;
}
upstream dong {
	server 10.0.0.8;
}

server {
	listen 80;
	server_name zhuan.com;

location / {

if ($request_uri   ~*   "^/static/(.*)$")
{
        proxy_pass http://static/static/$1;
}
if ($request_uri   ~*   "^/dong/(.*)$")
{
        proxy_pass http://dong/dong/$1;
}
    proxy_pass http://static;
    include proxy_params;
}
}
7.基于user_agent转发
lb01配置
[root@local ~]# cat /etc/nginx/conf.d/zhuan.com.conf
upstream jing {
	server 10.0.0.7;
}
upstream dong {
	server 10.0.0.8;
}

server {
	listen 80;
	server_name zhuan.com;

location / {

        if ($http_user_agent ~* "Safari"){
        proxy_pass http://dong;
        }
    #firefox浏览器访问效果
        if ($http_user_agent ~* "Firefox"){
        proxy_pass http://jing;
        }
    #chrome浏览器访问效果
        if ($http_user_agent ~* "Chrome"){
        proxy_pass http://dong;
        }

    #iphone手机访问效果
        if ($http_user_agent ~* "iphone"){
        proxy_pass http://jing;
        }

    #android手机访问效果
        if ($http_user_agent ~* "android"){
        proxy_pass http://dong;
        }

    #其他浏览器访问默认规则
        proxy_pass http://jing;
        include proxy_params;


}
}
8.多级7层代理透传真实IP
1.基于X-Forward-For实现
##一级代理proxy_node1 Nginx配置如下:
[root@lb01 conf.d]# cat proxy_ip.com.conf
server {
    listen 80;
    server_name ip.com;

    location / {
        proxy_pass http://10.0.0.6;
        proxy_http_version 1.1;
        proxy_set_header Host $http_host;
        proxy_set_header X-Real-IP $remote_addr;
        proxy_set_header X-Forwarded-For $proxy_add_x_forwarded_for;
    }
}
##二级代理proxy_node2 Nginx配置如下:
[root@lb01 conf.d]# cat proxy_ip.com.conf
server {
    listen 80;
    server_name ip.com;

    location / {
        proxy_pass http://10.0.0.7;
        proxy_http_version 1.1;
        proxy_set_header Host $http_host;
        proxy_set_header X-Real-IP $remote_addr;
        proxy_set_header X-Forwarded-For $proxy_add_x_forwarded_for;
    }
}
##三级代理proxy_node3 Nginx配置如下:
[root@lb01 conf.d]# cat proxy_ip.com.conf
server {
    listen 80;
    server_name ip.com;

    location / {
        proxy_pass http://10.0.0.8;
        proxy_http_version 1.1;
        proxy_set_header Host $http_host;
        proxy_set_header X-Real-IP $remote_addr;
        proxy_set_header X-Forwarded-For $proxy_add_x_forwarded_for;
    }
}
##WebServer Nginx配置如下:
[root@web02 conf.d]# cat ip.com.conf
server {
    listen 80;
    server_name ip.com;
    root /code;

    location / {
        index index.php index.html;
    }
    location ~ \.php$ {
        fastcgi_pass 127.0.0.1:9000;
        fastcgi_param SCRIPT_FILENAME $document_root$fastcgi_script_name;
        include fastcgi_params;
    }
}
####访问页面查看web端日志
2.基于nginx Realip_module实现
####Lb1和lb2配置不变,web配置如下
[root@web02 conf.d]# cat ip.com.conf
server {
    listen 80;
    server_name ip.com;
    root /code;
    set_real_ip_from  10.0.0.5;
    set_real_ip_from  10.0.0.6;
    set_real_ip_from  10.0.0.7;
    real_ip_header    X-Forwarded-For;
    real_ip_recursive on;
    #set_real_ip_from:真实服务器上一级代理的IP地址或者IP段,可以写多行
    #real_ip_header:从哪个header头检索出需要的IP地址
    #real_ip_recursive:递归排除set_real_ip_from里面出现的IP,其余没有出现的认为是用户真实IP


    location / {
        index index.php index.html;
    }

    location ~ \.php$ {
        fastcgi_pass 127.0.0.1:9000;
        fastcgi_param SCRIPT_FILENAME $document_root$fastcgi_script_name;
        include fastcgi_params;
    }
}
本文来自博客园,作者:kirin(麒麟),转载请注明原文链接:https://www.cnblogs.com/kirin365/articles/16137264.html


 浙公网安备 33010602011771号