.NET 4.5 WCF 异步文件上传/下载-1-不带进度条
2012-08-23 14:55 duzher 阅读(1962) 评论(4) 编辑 收藏 举报
一、准备工作
1、新建一个空白解决方案“Kinoo.WCF.AyncFileTransfer”,添加一个WCF服务库项目“Kinoo.WCF.AyncFileTransferService”,添加一个WPFWindows程序“Kinoo.WCF.TestClient”,为简化工作,不添加主机了。
2、将“Kinoo.WCF.AyncFileTransferService”项目中的默认服务Service1改名为“FileTransfer”
3、在项目“Kinoo.WCF.TestClient”中添加服务引用,在【添加服务引用】窗口中直接点击【发现】,将命名空间命名为“AsyncFileTransferServiceReference”。
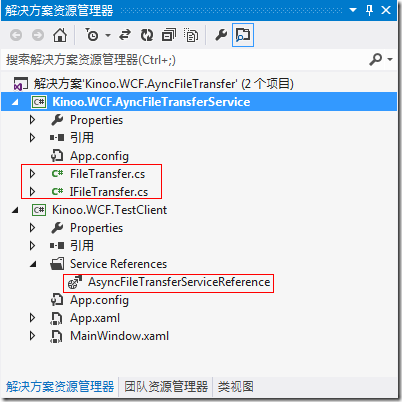
做完上述工作后,解决方案如下所示:
4、在WPF项目的MainWindow中添加几个控件:
- <Window x:Class="Kinoo.WCF.TestClient.MainWindow"
- xmlns="http://schemas.microsoft.com/winfx/2006/xaml/presentation"
- xmlns:x="http://schemas.microsoft.com/winfx/2006/xaml"
- Title="MainWindow" Height="350" Width="525">
- <Grid>
- <Button Name="btnBrowse" Content="Browse" HorizontalAlignment="Left" Margin="30,30,0,0" VerticalAlignment="Top" Width="75" Click="btnBrowse_Click"/>
- <ListBox Margin="30,60,30,30" />
- <Button Name="btnUpload" Content="Upload" HorizontalAlignment="Right" Margin="0,30,30,0" VerticalAlignment="Top" Width="75" Click="btnUpload_Click"/>
- </Grid>
- </Window>
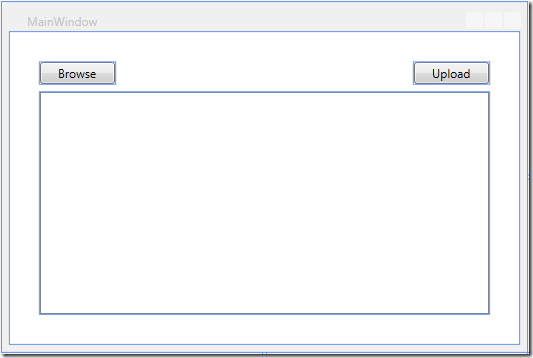
界面如下:
OK,准备工作就绪。
二、理论工作
在讲实现之前,先说一下原理。
.NET 4.5版本上面增加了几个新关键词,其中一个叫做“async”,用于将默认为同步执行的操作变为异步执行,就像是开启线程一样不再独占主进程的运行。
详细的中文讲解可以看这里:http://sd.csdn.net/a/20120326/313535.html
英文讲解可以看这两篇:
http://blogs.msdn.com/b/dotnet/archive/2012/04/03/async-in-4-5-worth-the-await.aspx
其中英文文章用非常棒的例子说明了同步方法改造成异步实现时的困难,并说明了用async关键字实现异步的简练!
先把这个经典的例子Copy过来看看:
原始非异步的方法:
- public static void CopyTo(Stream source, Stream destination)
- {
- byte[] buffer = new byte[0x1000];
- int numRead;
- while ((numRead = source.Read(buffer, 0, buffer.Length))> 0)
- {
- destination.Write(buffer, 0, numRead);
- }
- }
改造后的异步方法:
- public static async void CopyToAsync(Stream source, Stream destination)
- {
- byte[] buffer = new byte[0x1000];
- int numRead;
- while ((numRead = await source.ReadAsync(buffer, 0, buffer.Length)) > 0)
- {
- await destination.WriteAsync(buffer, 0, numRead);
- }
- }
那么,WCF环境该怎么使用异步呢。
可以看上面提到的第二篇英文文章:Simplified Asynchronous Programming Model in WCF with async/await
1、首先,服务契约必须要标记成Task<T>
- [ServiceContract]
- public interface IServiceContract
- {
- [OperationContract]
- Task<string> HelloAsync(string name);
- }
2、实现接口时必须使用async关键字
- public class HelloService : IServiceContract
- {
- public async Task<string> HelloAsync(string name)
- {
- return await Task.Factory.StartNew(() => "hello " + name);
- }
- }
3、【添加服务引用】时Visual Studio 给自动实现的代码
- public partial class HelloServiceClient : ClientBase<IServiceContract>,
- IServiceContract {
- public System.Threading.Tasks.Task<string> HelloAsync(int value) {
- return base.Channel.HelloAsync(value);
- }
上述代码可以在这里找到:
【解决方案所在文件夹\Service References\AsyncFileTransferServiceReference\Reference.cs】
4.客户端调用时使用如下语法:
- private async void btnUpload_Click(object sender, RoutedEventArgs e)
- {
- FileTransferClient client = new FileTransferClient();
- string msg = await client.HelloAsync("Kinoo");
- MessageBox.Show(msg);
- }
注意:按钮的Click事件必须标记为async,否则await关键字无法用。
如下图所示,连使用方法都自动实现成注释了.
本文就利用这个文章的例子深入挖掘实现异步文件上传下载。
三、准备阶段实现的代码的研究(重点)
1、双击服务引用【AsyncFileTransferServiceReference】,打开【对象浏览器】
导航到FileTransferClient发现,有两个方法是已经自动带了Async,难道已经实现了异步?是的!不信你看看后台代码
2、打开:【解决方案所在文件夹\Service References\AsyncFileTransferServiceReference\Reference.cs】,到代码的最下面,可以看到下面的代码:
- public string GetData(int value) {
- return base.Channel.GetData(value);
- }
- public System.Threading.Tasks.Task<string> GetDataAsync(int value) {
- return base.Channel.GetDataAsync(value);
- }
- public Kinoo.WCF.TestClient.AsyncFileTransferServiceReference.CompositeType GetDataUsingDataContract(Kinoo.WCF.TestClient.AsyncFileTransferServiceReference.CompositeType composite) {
- return base.Channel.GetDataUsingDataContract(composite);
- }
- public System.Threading.Tasks.Task<Kinoo.WCF.TestClient.AsyncFileTransferServiceReference.CompositeType> GetDataUsingDataContractAsync(Kinoo.WCF.TestClient.AsyncFileTransferServiceReference.CompositeType composite) {
- return base.Channel.GetDataUsingDataContractAsync(composite);
- }
3、Visual Studio为什么要自动实现异步呢?
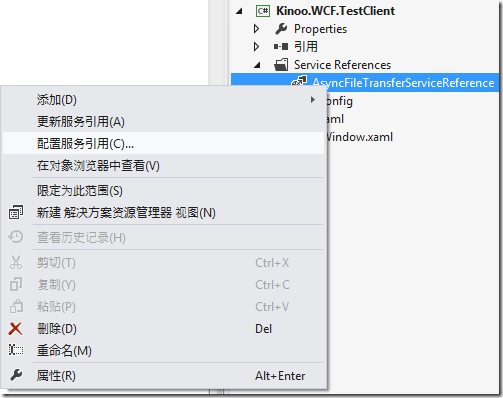
在解决方案上,右键单机【AsyncFileTransferServiceReference】,选择【配置服务引用】
看到【服务引用设置】窗体
如上图所示,在.NET 4.0以前的代码中,这里的允许生产异步操作只有一个CheckBox,要么是,要么否。但是现在多了一个选项【生成基于任务的操作】!这两个选项什么区别呢?
1、首先,Visual Studio 在添加基于.NET4.5的服务引用时会默认生成【异步的】【使用基于任务的操作】,这个不用说肯定是微软推荐得了,这也是本节介绍的async的用武之地
2、使用第二个Radio选项【生产异步操作】,会生成传统的异步实现方式,这个方法网上经典的例子很多,推荐几个:
WCF异步调用正确实现方法讲解:http://developer.51cto.com/art/201002/185107.htm
WCF技术剖析之十一:异步操作在WCF中的应用(上篇):http://www.cnblogs.com/artech/archive/2009/07/08/1519423.html
在这里,可以明确的说:这些文章中的方法都过时了!
四、实现最简单的异步操作
1、添加引用:
- using Kinoo.WCF.TestClient.AsyncFileTransferServiceReference;
2、添加Client并实现异步调用
- public partial class MainWindow : Window
- {
- FileTransferClient client = null;
- public MainWindow()
- {
- InitializeComponent();
- client = new FileTransferClient();
- }
- private async void btnUpload_Click(object sender, RoutedEventArgs e)
- {
- string msg = await client.GetDataAsync(123);
- MessageBox.Show(msg);
- }
- }
是不是非常简单呢,不需要学一大堆语法,只要按照代码注释里的调用说明,Async和Await两个关键字搭配使用就OK了.
简单到简直不敢想象啊!!![]()
![]()
![]()
![]()
三、实现步骤
OK,.NET4.5平台上,异步的实现原理已经交代清楚了,下面我们按照传统的思路写一个文件上传下载的接口,然后在客户端调用时使用Visual Studio自动实现的方法进行,异步调用就OK了。
上传下载的接口可以去参考好多前人的文章:
http://www.pin5i.com/showtopic-16855.html
http://www.cnblogs.com/blackcore/archive/2009/11/21/1607823.html
http://blog.csdn.net/fangxinggood/article/details/6164017
比较好的外国人的例子:
http://www.codeproject.com/Articles/37057/File-Transfer-using-WCF-and-Socket
可以不客气地说,之前文章中这些异步实现及进度条实现都过时了,后面会看到。
我们只采用其形,不采用其质。
具体步骤如下:
1、删掉IFileTransfer中默认的接口,定义如下接口
- [ServiceContract]
- public interface IFileTransfer
- {
- [OperationContract]
- string UploadFile(Stream source);
- [OperationContract]
- Stream DownloadFile(string fileName);
- }
2、实现接口
- public class FileTransfer : IFileTransfer
- {
- private string uploadFolder = @"d:\uploads\";
- /// <summary>
- ///
- /// </summary>
- static string fileName;
- /// <summary>
- /// Stream
- /// </summary>
- /// <param name="filename"></param>
- public void FileTransferSetting(string filename)
- {
- fileName = filename;
- }
- /// <summary>
- ///
- /// </summary>
- /// <param name="source">
- /// StreamStream
- ///
- /// For request in operation UploadFile to be a stream the operation
- /// must have a single parameter whose type is Stream.</param>
- /// <returns></returns>
- public string UploadFile(Stream source)
- {
- try
- {
- // Handle stream here - e.g. save to disk
- string path = uploadFolder + fileName;
- Stream destination = new FileStream(path, FileMode.OpenOrCreate, FileAccess.Write);
- byte[] buffer = new byte[0x1000];
- int numRead;
- while ((numRead = source.Read(buffer, 0, buffer.Length)) > 0)
- {
- destination.Write(buffer, 0, numRead);
- }
- // Close the stream when done processing it
- source.Close();
- destination.Close();
- return "Successed";
- }
- catch (Exception ex)
- {
- return ex.Message;
- }
- }
- /// <summary>
- ///
- /// </summary>
- /// <param name="fileName"></param>
- /// <returns></returns>
- public Stream DownloadFile(string fileName)
- {
- string path = uploadFolder + fileName;
- return new FileStream(path, FileMode.Open, FileAccess.Read);
- }
- }
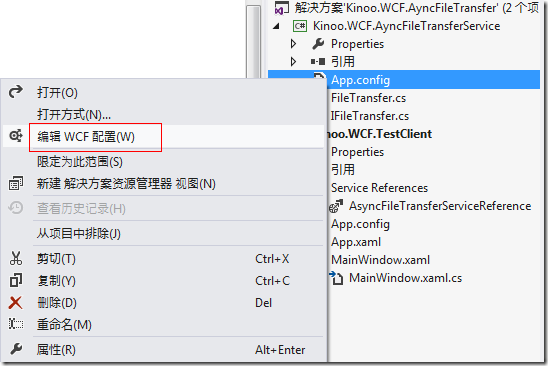
3、由于使用了Stream传输文件,需要修改服务器端配置文件:右键单击服务中的app.config,选择【编辑WCF配置】
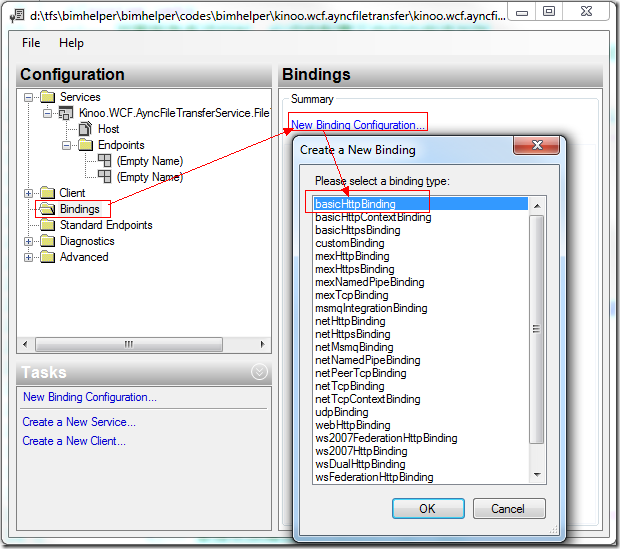
在弹出的窗口中选择【Bindings】-【New Binding Configuration】-【basicHttpBinding】
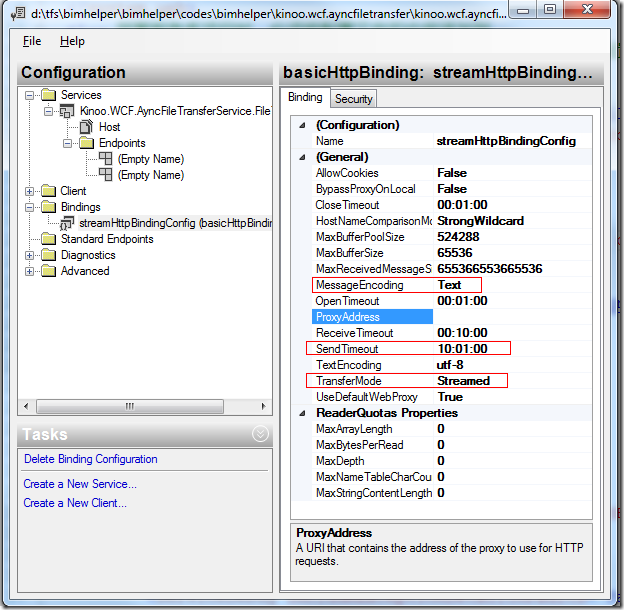
选择basicHttpBinding绑定是因为我们使用Visual Studio生成的WCF服务库的代码默认是用的这种,WCF的好处在于写代码时不用管传输协议,只要在配置文件中配置,Host会自动使用配置文件中指明的协议。
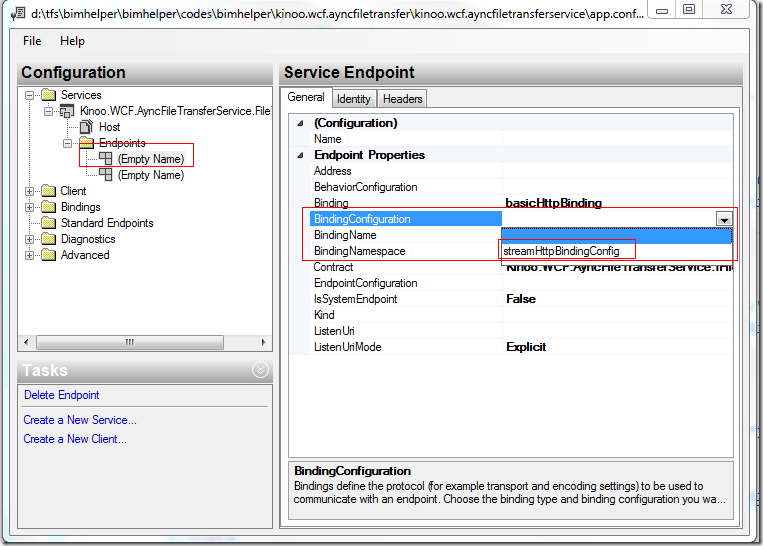
修改完几个属性后,修改Service的BindingConfiguration的值为streamHttpBindingConfig
服务器端配置文件最终如下所示:
- <?xml version="1.0" encoding="utf-8" ?>
- <configuration>
- <appSettings>
- <add key="aspnet:UseTaskFriendlySynchronizationContext" value="true" />
- </appSettings>
- <system.web>
- <compilation debug="true" />
- </system.web>
- <!--
- app.config System.Configuration -->
- <system.serviceModel>
- <bindings>
- <basicHttpBinding>
- <binding name="streamHttpBindingConfig" sendTimeout="10:01:00"
- maxReceivedMessageSize="6553665536" transferMode="Streamed"
- messageEncoding="Mtom" />
- </basicHttpBinding>
- </bindings>
- <services>
- <service name="Kinoo.WCF.AyncFileTransferService.FileTransfer">
- <endpoint address="" binding="basicHttpBinding" bindingConfiguration="streamHttpBindingConfig"
- contract="Kinoo.WCF.AyncFileTransferService.IFileTransfer">
- <identity>
- <dns value="localhost" />
- </identity>
- </endpoint>
- <endpoint address="mex" binding="mexHttpBinding" contract="IMetadataExchange" />
- <host>
- <baseAddresses>
- <add baseAddress="http://localhost:8733/Design_Time_Addresses/Kinoo.WCF.AyncFileTransferService/FileTransfer/" />
- </baseAddresses>
- </host>
- </service>
- </services>
- <behaviors>
- <serviceBehaviors>
- <behavior>
- <!--
- false-->
- <serviceMetadata httpGetEnabled="True" httpsGetEnabled="True"/>
- <!--
- true false
- -->
- <serviceDebug includeExceptionDetailInFaults="False" />
- </behavior>
- </serviceBehaviors>
- </behaviors>
- </system.serviceModel>
- </configuration>
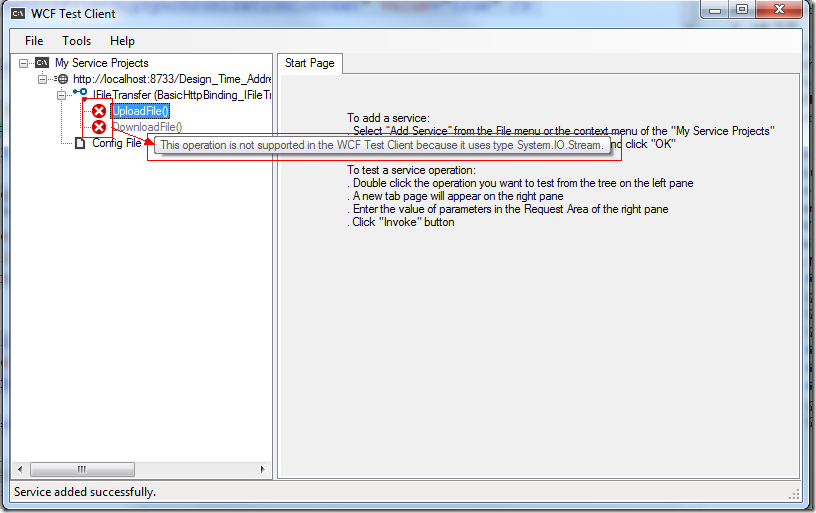
4、测试服务器端接口。右键单机服务器端,选择【调试】-【启动新实例】,会自动打开【WCF Test Client】,界面如下所示:
注意:虽然窗口中提示不支持Stream接口,但是只要可以打开这个界面,说明代码是可以通过了。
5、更新客户端服务引用。
注意:由于对接口配置发生了大变动,客户端更新服务引用时可能不成功,可以删掉引用重新添加。
==本节尚未完成,待续==
下一节讲述使用IProgress实现带进度条功能的,并可以加入取消、断点续传等功能的文件传输。

