IoC容器装配Bean(xml配置方式)(Bean的生命周期)
1、Spring管理Bean,实例化Bean对象 三种方式
第一种:使用类构造器实例化(默认无参数)
 1 package cn.itcast.spring.initbean;
 2
 3 /**
 4  * 使用构造方法 实例化
 5  *
 6  * @author seawind
 7  *
 8  */
 9 public class Bean1 {
10
11 }
12
13     <!-- Bean 实例化第一种 方式 构造器 -->
14     <bean id="bean1" class="cn.itcast.spring.initbean.Bean1"></bean>
第二种:使用静态工厂方法实例化(简单工厂模式)
 1 package cn.itcast.spring.initbean;
 2 /**
 3  * 使用静态工厂方法进行Bean 实例化
 4  *
 5  * @author seawind
 6  *
 7  */
 8 public class Bean2 {
 9
10 }
11
12 package cn.itcast.spring.initbean;
13 // 工厂类
14 public class Bean2Factory {
15     public static Bean2 getBean2() {
16         return new Bean2();
17     }
18 }
19
20     <!-- Bean 实例化第二种 方式 静态工厂方法 -->
21     <bean id="bean2" class="cn.itcast.spring.initbean.Bean2Factory" factory-method="getBean2" />
第三种:使用实力工厂方法实例化(工厂方法模式)
 1 package cn.itcast.spring.initbean;
 2 /**
 3  * 通过实例 工厂方法进行构造
 4  *
 5  * @author seawind
 6  *
 7  */
 8 public class Bean3 {
 9
10 }
11
12 package cn.itcast.spring.initbean;
13 public class Bean3Factory {
14     public Bean3 getBean3() {
15         return new Bean3();
16     }
17 }
18
19     <!-- Bean 实例化 第三种 方式  实例工厂方法 -->
20     <bean id="bean3factory" class="cn.itcast.spring.initbean.Bean3Factory"></bean>
21     <bean id="bean3" factory-bean="bean3factory" factory-method="getBean3"></bean>
测试三种方式
 1 package cn.itcast.spring.initbean;
 2
 3 import org.junit.Test;
 4 import org.springframework.context.ApplicationContext;
 5 import org.springframework.context.support.ClassPathXmlApplicationContext;
 6
 7 /**
 8  * 实例化 Bean 三种方式
 9  *
10  * @author seawind
11  *
12  */
13 public class SpringTest {
14     @Test
15     // 实例工厂方法 实例化 Bean
16     public void demo3() {
17         ApplicationContext applicationContext = new ClassPathXmlApplicationContext(
18                 "applicationContext.xml");
19         Bean3 bean3 = (Bean3) applicationContext.getBean("bean3");
20         System.out.println(bean3);
21     }
22
23     @Test
24     // 使用 静态工厂方法实例化Bean
25     public void demo2() {
26         ApplicationContext applicationContext = new ClassPathXmlApplicationContext(
27                 "applicationContext.xml");
28         Bean2 bean2 = (Bean2) applicationContext.getBean("bean2");
29         System.out.println(bean2);
30     }
31
32     @Test
33     // 使用Bean 的构造方法 实例化Bean
34     public void demo1() {
35         ApplicationContext applicationContext = new ClassPathXmlApplicationContext(
36                 "applicationContext.xml");
37         // Bean1 bean1 = (Bean1) applicationContext.getBean("bean1");
38         // Spring3 集合 JDK5 泛型特性
39         Bean1 bean1 = applicationContext.getBean("bean1", Bean1.class);
40
41         System.out.println(bean1);
42     }
43 }
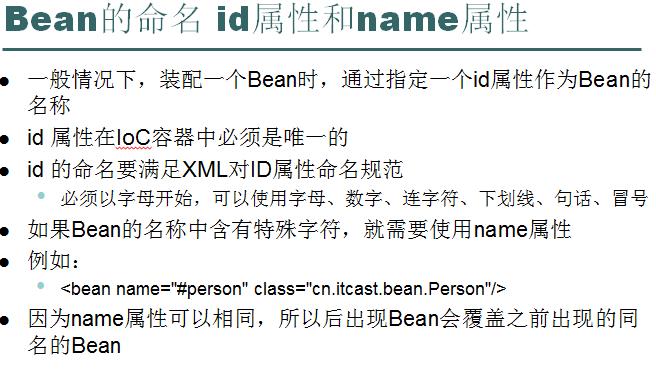
2、Bean的id属性和name属性
在使用Spring 配置Bean
<bean id="helloService" class=".....HelloService" />
<bean name="helloService" class="....HelloSerivce" />
* 在配置Bean过程中 id 属性 和 name 属性 都行 ,都可以通过 applicationContext.getBean(id/name) 来获得一个Bean实例
配置id 必须唯一,通常不含有特殊字符, 比如以/开始,以数字开始
配置name 属性,不必须唯一, 可以含有特殊字符
* 为什么要有name属性 ?
比如 struts1 整合 spring 需要将 请求路径 配置到spring 中
<bean id="/login" class="..... UserAction" /> ------ 在早期Spring版本 是报错的
<bean name="/login" class="..... UserAction" /> ------ 以前整合都是这样写的
3、 Bean的作用域
在配置 <bean> 元素时, 通过 scope 属性 指定 Bean的作用域
singleton : 代表Bean 在整个Spring 容器环境中 是单例的
prototype : 多例 (原型模式) , 在一个Spring 容器中,每次使用Bean 都会返回一个新的实例
request : 相当于 构造对象,保存request数据范围 (request.setAttribute())
session : 相当于 构造对象,保存session数据范围 (session.setAttribute()) 以后再次使用,同一个Session无需构造
* 在实际开发中 只需要掌握 singleton 和 prototype 就可以了 ----- 默认值是 singleton
4、Bean 生命周期
在配置 <bean> 通过 init-method destroy-method 定义Bean的初始化 和 销毁的方法
 1   applicationContext.xml: <bean id="product" class="cn.itcast.spring.lifecycle.Product" init-method="myinit" destroy-method="mydestroy"></bean>
 2
 3     public class Product {
 4         public Product() {
 5             System.out.println("执行 Product的 构造 ...");
 6         }
 7
 8         public void myinit() {
 9             System.out.println("Product对象初始化....");
10         }
11
12         public void mydestroy() {
13             System.out.println("Product对象销毁....");
14         }
15     }
16
17 @Test
18     // 配置 init-method 和 destroy-method 执行 bean 的初始化和销毁 方法
19     public void demo1() {
20         ClassPathXmlApplicationContext applicationContext = new ClassPathXmlApplicationContext(
21                 "applicationContext.xml");
22         Product product = (Product) applicationContext.getBean("product");
23         System.out.println(product);
24
25         // 如果销毁 Spring 手动 调用 close方法
26         applicationContext.close();
27     }

有构造方法,为什么要有init ?
java语言不建议在构造器 编写复杂处理逻辑,通常在构造器 只会成员变量赋值。初始化
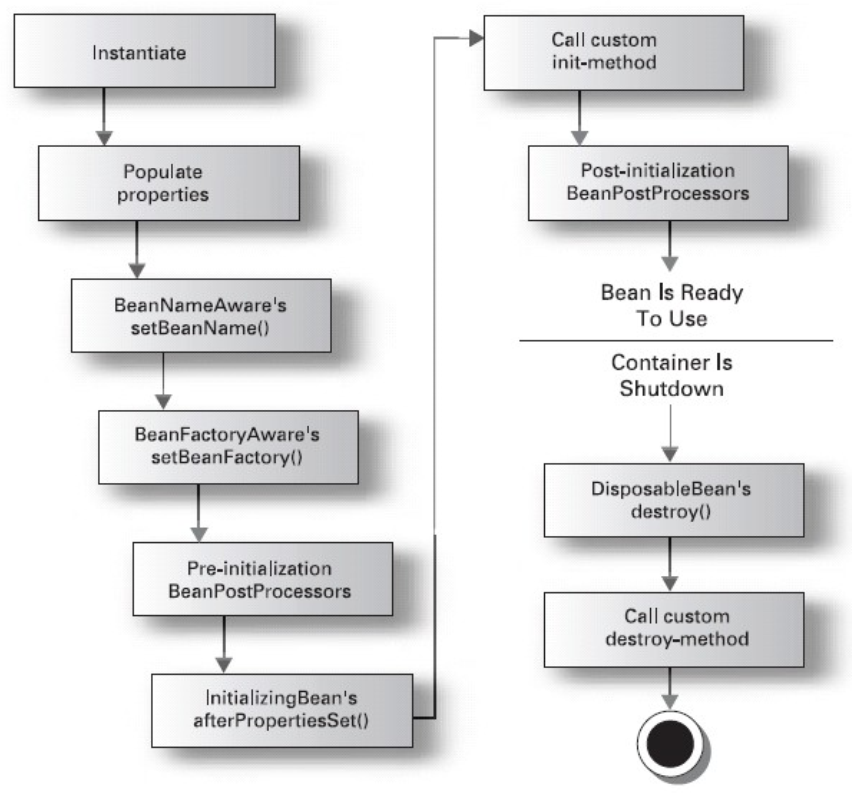
完整Bean的生命周期
1) instantiate bean对象实例化
2) populate properties 封装属性(setXxxx方法执行)
3) 如果Bean实现BeanNameAware 执行 setBeanName(String beanName)
4) 如果Bean实现BeanFactoryAware 或者 ApplicationContextAware 设置工厂 setBeanFactory 或者上下文对象 setApplicationContext
* void setApplicationContext(ApplicationContext applicationContext)
5) 如果存在类实现 BeanPostProcessor(后处理Bean) ,执行postProcessBeforeInitialization
6) 如果Bean实现InitializingBean 执行 afterPropertiesSet
7) 调用<bean init-method="init"> 指定初始化方法 init
8) 如果存在类实现 BeanPostProcessor(处理Bean) ,执行postProcessAfterInitialization
9) 执行业务处理
10)如果Bean实现 DisposableBean 执行 destroy
11)调用<bean destroy-method="customerDestroy"> 指定销毁方法 customerDestroy
3) 4) 知识点: 让Bean 了解Spring 容器
5) Bean的后处理器 BeanPostProcessor ,该类成为Bean的后处理器
* 后处理Bean 可以对 已经创建 Bean对象 进行代理增强
  1 package cn.itcast.spring.lifecycle;
  2
  3 // 定义业务接口
  4
  5 public interface CustomerService {
  6     public void addCustomer();
  7 }
  8
  9
 10 package cn.itcast.spring.lifecycle;
 11
 12 import org.springframework.beans.BeansException;
 13 import org.springframework.beans.factory.BeanNameAware;
 14 import org.springframework.beans.factory.DisposableBean;
 15 import org.springframework.beans.factory.InitializingBean;
 16 import org.springframework.context.ApplicationContext;
 17 import org.springframework.context.ApplicationContextAware;
 18
 19 // CustomerService 一个实现类
 20 public class CustomerServiceImpl implements CustomerService, BeanNameAware,
 21         ApplicationContextAware, InitializingBean, DisposableBean {
 22     private String name;
 23
 24     // 第一步
 25     public CustomerServiceImpl() {
 26         System.out.println("第一步 Bean的构造器执行....");
 27     }
 28
 29     @Override
 30     public void addCustomer() {
 31         // 第九步 执行业务操作
 32         System.out.println("第九步 ,使用业务Bean 执行业务操作....");
 33         System.out.println("添加客户");
 34     }
 35
 36     // 第二步
 37     public void setName(String name) {
 38         System.out.println("第二步  属性依赖注入....");
 39         this.name = name;
 40     }
 41
 42     @Override
 43     // 第三步,如果 Bean 实现 BeanNameAware, Spring 就会将 <bean> 配置 id 属性 、name 属性 注入
 44     public void setBeanName(String beanName) {
 45         System.out.println("第三步 获得当前Bean在Spring 注册 Bean 名字 :" + beanName);
 46     }
 47
 48     @Override
 49     // 第四步 如果 Bean 实现 ApplicationContextAware, Spring 就会将Spring 应用上下文 注入给 Bean
 50     public void setApplicationContext(ApplicationContext applicationContext)
 51             throws BeansException {
 52         System.out.println("第四步 获得当前 Spring上下文 :" + applicationContext);
 53         // 通过该对象 操作其它Bean
 54     }
 55
 56     @Override
 57     // 第六步
 58     public void afterPropertiesSet() throws Exception {
 59         System.out.println("第六步 属性封装完成 ....");
 60     }
 61
 62     // 第七步 通过配置文件,指定初始化方法
 63     public void myinit() {
 64         System.out.println("第七步  自定义初始化方法...");
 65     }
 66
 67     @Override
 68     // 第十步 释放资源
 69     public void destroy() throws Exception {
 70         System.out.println("第十步, 不需要配置 调用释放资源方法");
 71     }
 72
 73     // 第十一步
 74     public void mydestroy() {
 75         System.out.println("第十一步  自定义 释放资源方法");
 76     }
 77
 78 }
 79
 80 package cn.itcast.spring.lifecycle;
 81
 82 import java.lang.reflect.InvocationHandler;
 83 import java.lang.reflect.Method;
 84 import java.lang.reflect.Proxy;
 85
 86 import org.springframework.beans.BeansException;
 87 import org.springframework.beans.factory.config.BeanPostProcessor;
 88
 89 // 自定义 一个 Bean的 后处理器
 90
 91 public class MyBeanPostProcessor implements BeanPostProcessor {
 92
 93     @Override
 94     // 提供两个方法,用户通过实现 两个方法,对原有Bean 进行增强
 95     // 第八步
 96     /**
 97      * beanName 就是 配置文件 <bean> id 属性
 98      * bean 增强前对象
 99      */
100     public Object postProcessAfterInitialization(final Object bean,
101             String beanName) throws BeansException {
102         System.out.println("第八步 BeanPostProcessor 后处理Bean 初始化完成后增强....");
103         // 通过beanName 判断要对哪个Bean 进行代理增强
104         if (beanName.equals("customerService")) {
105             // 增强
106             return Proxy.newProxyInstance(bean.getClass().getClassLoader(),
107                     bean.getClass().getInterfaces(), new InvocationHandler() {
108                         @Override
109                         public Object invoke(Object proxy, Method method,
110                                 Object[] args) throws Throwable {
111                             if (method.getName().equals("addCustomer")) { // 增强
112                                 System.out
113                                         .println("增强addCustomer=======================================");
114                             }
115
116                             // 不增强
117                             return method.invoke(bean, args);
118                         }
119                     });
120         }
121         return bean;
122     }
123
124     @Override
125     // 第五步
126     public Object postProcessBeforeInitialization(Object bean, String beanName)
127             throws BeansException {
128         System.out.println("第五步BeanPostProcessor 后处理Bean 初始化完成前增强... ");
129         return bean;
130     }
131
132 }
133
134 @Test
135     // 通过CustomerService 来理解Bean 的生命周期
136     public void demo2() {
137         ClassPathXmlApplicationContext applicationContext = new ClassPathXmlApplicationContext(
138                 "applicationContext.xml");
139         CustomerService customerService = (CustomerService) applicationContext
140                 .getBean("customerService");
141         customerService.addCustomer();
142
143         applicationContext.close();
144     }
145
146
147 <!-- 可以配置Bean 初始化和销毁 调用方法 -->
149     <bean id="customerService" class="cn.itcast.spring.lifecycle.CustomerServiceImpl" init-method="myinit" destroy-method="mydestroy">
150         <property name="name" value="张三"></property>
151     </bean>
152
153     <!-- 配置后处理Bean ,不需要为Bean 指定id ,会对所有Bean 产生作用 -->
154      <bean class="cn.itcast.spring.lifecycle.MyBeanPostProcessor"></bean>
结果:


 浙公网安备 33010602011771号