六、spring boot开发web应用--mybatis-plus为简化而生
上一节《spring boot开发web应用-更为常用的mybatis》中我们简单介绍了mybatis持久化框架的使用,本节内容扩展介绍下针对mybatis的增强工具mybatis-plus,在 MyBatis 的基础上只做增强不做改变,为简化开发、提高效率而生。
二话不多说,我们先写编写个简单的例子,让大家先初步的了解下mybatis-plus。
1.mybatis-plus初步实例
(1)创建一个spring boot web工程(具体创建过程就不再演示了,还不会的同学去看看spring boot专题第一节内容)
(2)引入依赖
<!--web项目依赖-->
 <dependency>
     <groupId>org.springframework.boot</groupId>
     <artifactId>spring-boot-starter-web</artifactId>
 </dependency>
 <!--validation表单校验-->
 <dependency>
     <groupId>org.springframework.boot</groupId>
     <artifactId>spring-boot-starter-validation</artifactId>
 </dependency>
 <!--mybatis-plus-->
 <dependency>
     <groupId>com.baomidou</groupId>
     <artifactId>mybatis-plus-boot-starter</artifactId>
     <version>3.4.0</version>
 </dependency>
 <!--mysql驱动-->
 <dependency>
     <groupId>mysql</groupId>
     <artifactId>mysql-connector-java</artifactId>
 </dependency>
 <!--thymeleaf依赖包-->
 <dependency>
     <groupId>org.springframework.boot</groupId>
     <artifactId>spring-boot-starter-thymeleaf</artifactId>
 </dependency>
 <!--lombok-->
 <dependency>
     <groupId>org.projectlombok</groupId>
     <artifactId>lombok</artifactId>
     <optional>true</optional>
 </dependency>
(3)配置文件application.yml
 # DataSource Config
 spring:
   datasource:
     username: root
     password: tx@mysql@2020
     url: jdbc:mysql://188.131.233.55:3306/spring_boot_topic
     driver-class-name: com.mysql.cj.jdbc.Driver(4)
(4)实体类User
package com.kinglead.demo.domain; import com.baomidou.mybatisplus.annotation.TableName; import lombok.Data; @Data @TableName(value = "t_user") //指明数据库表名 public class User { private Long id; private String name; private Integer age; private String email; }
(5)创建Mapper接口
package com.kinglead.demo.mapper; import com.baomidou.mybatisplus.core.mapper.BaseMapper; import com.kinglead.demo.domain.User; //未来使用mybatis-plus的公共接口,必须继承BaseMapper public interface UserMapper extends BaseMapper<User> { }
(6)创建Service接口
UserService
package com.kinglead.demo.service; import com.kinglead.demo.domain.User; import java.util.List; public interface UserService { List<User> queryUserList(); }
UserServiceImpl
package com.kinglead.demo.service.impl; import com.kinglead.demo.domain.User; import com.kinglead.demo.mapper.UserMapper; import com.kinglead.demo.service.UserService; import org.springframework.stereotype.Service; import javax.annotation.Resource; import java.util.List; @Service public class UserServiceImpl implements UserService { @Resource private UserMapper userMapper; @Override public List<User> queryUserList() { //使用mybatis-plus公共查询接口完成列表查询 return userMapper.selectList(null); } }
(7)创建controller
package com.kinglead.demo.controller; import com.kinglead.demo.domain.User; import com.kinglead.demo.service.UserService; import org.springframework.stereotype.Controller; import org.springframework.web.bind.annotation.RequestMapping; import org.springframework.web.servlet.ModelAndView; import javax.annotation.Resource; import java.util.List; @Controller @RequestMapping("/user") public class UserController { @Resource private UserService userService; @RequestMapping("/userList") public ModelAndView queryUserList(ModelAndView modelAndView){ List<User> userList = userService.queryUserList(); modelAndView.addObject("userList", userList); modelAndView.setViewName("userList"); return modelAndView; } }
(8)用户列表页面
<!DOCTYPE html>
 <html xmlns:th="http://www.thymeleaf.org">
     <head>
         <meta http-equiv="Content-Type" content="text/html;charset=UTF-8" />
         <title>用户信息</title>
         <!--<link rel="stylesheet" type="text/css" href="/css/common.css" />-->
         <style type="text/css">
             table {
                 border: 1px solid black;
                 text-align: center;
                 border-collapse: collapse;
             }
             table thead th {
                 border: 1px solid black;
             }
             table tbody td {
                 border: 1px solid black;
             }
         </style>
     </head>
     <body>
         <div>
             <h2>用户列表</h2>
         </div>
         <table cellpadding="0" cellspacing="0">
             <thead>
                 <th>序号</th>
                 <th>编码</th>
                 <th>用户名</th>
             </thead>
             <tbody>
             <tr th:each="entries,stat:${userList}" th:style="' color: rgb(17, 119, 0);">>
                 <td th:text="${stat.count}"></td>
                 <td th:text="${entries['id']}"></td>
                 <td th:text="${entries['name']}"></td>
             </tr>
             </tbody>
         </table>
     </body>
 </html>
(9)启动类
package com.kinglead.demo; import org.mybatis.spring.annotation.MapperScan; import org.springframework.boot.SpringApplication; import org.springframework.boot.autoconfigure.SpringBootApplication; @SpringBootApplication @MapperScan("com.kinglead.demo.mapper") public class App { public static void main(String[] args) { SpringApplication.run(App.class, args); } }
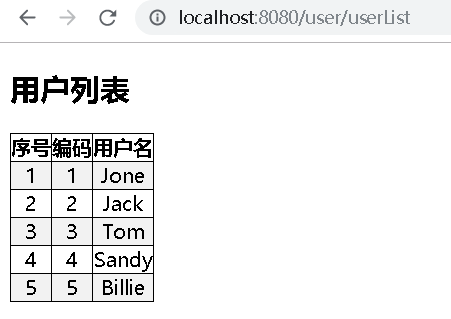
(10)测试访问

小结
我们能看到mybatis-plus通过对mybatis的加强,能在不写mapper.xml文件的情况下,完成简单的CRUD的操作。看到这里,有的小伙伴可能会想,这和JPA有什么不一样,直接用JPA不就好啦。
下面我们来对比下他们俩的区别:要说mybatis-plus,得先说mybatis。mybatis比较接近原生sql,要想使用的好,需要很好的sql基础,所有的数据库操作都必须写sql语句;JPA是对hibernate的封装,提取了很多CRUD的公共方法,可以在不写sql的情况下完成不复杂的CRUD;mybatis-plus是mybatis的增强工具,天生拥有mybatis的优势,也具备像JPA一样拥有很多CRUD的公共方法,简单的sql直接调用,不要编写语句。
那我们该如何选择他们呢?没有哪个框架是最优的,主要还是要根据实际项目情况而定。如果项目不复杂,涉及不到很多复杂的数据处理,那么建议考虑JPA。如果项目复杂,涉及到很多复杂的数据处理,那么建议考虑mybatis或mybatis-plus,在这基础上,如果想简化mybatis,可以考虑mybatis-plus。
本节内容只是展示了mybatis-plus的冰山一角,它还有拥有很多特色功能,如支持主键字段生成、内置分页插件等。


