SpringBoot自动装配
SpringBoot
自动装配
启动类通过@SpringBootApplication 进行启动
@SpringBootApplication
public class DemoApplication {
    public static void main(String[] args) {
    		SpringApplication.run(DemoApplication.class, args);
    }
}
主要有3个重要的注解@SpringBootConfiguration ,@EnableConfiguration ,@ComponentScan
@Target(ElementType.TYPE)
@Retention(RetentionPolicy.RUNTIME)
@Documented
@Inherited
@SpringBootConfiguration
@EnableAutoConfiguration
@ComponentScan(excludeFilters = {
@Filter(type = FilterType.CUSTOM, classes = TypeExcludeFilter.class),
@Filter(type = FilterType.CUSTOM, classes = AutoConfigurationExcludeFilter.class) })
public @interface SpringBootApplication {
}
@SpringBootConfiguration
@Target({ElementType.TYPE})
@Retention(RetentionPolicy.RUNTIME)
@Documented
@Configuration
public @interface SpringBootConfiguration {
}
从源码中可以看出SpringBootConfiguration是@Configuration的派生注解,与@Configuration注解的功能是一致的,标注这个类是一个配置类,只不过@SpringBootConfiguration是springboot的注解,而@Configuration是Spring的注解。
@EnableConfiguration
@Target({ElementType.TYPE})
@Retention(RetentionPolicy.RUNTIME)
@Documented
@Inherited
@AutoConfigurationPackage
@Import({EnableAutoConfigurationImportSelector.class})
public @interface EnableAutoConfiguration {
    String ENABLED_OVERRIDE_PROPERTY = "spring.boot.enableautoconfiguration";
    Class<?>[] exclude() default {};
    String[] excludeName() default {};
}
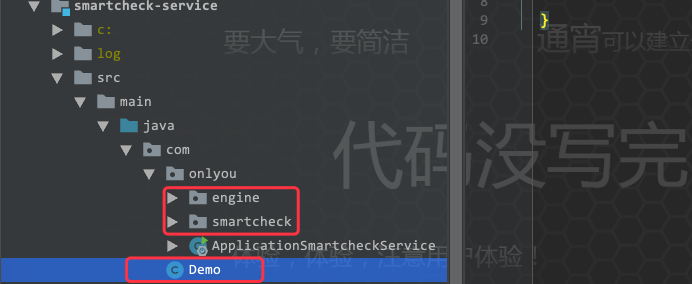
@EnableAutoConfiguration注解的作用主要是开启自动装配的功能,有2个比较重要的注解@AutoConfigurationPackage:这个用来将启动类所在包,以及下面所有子包里面的所有组件扫描到Spring容器中,如下图,启动类与engine包和smartcheck同级,Demo与onlyou包同级,当启动类启动时并不会加载到Demo类,这就是为什么我们在SpringBoot项目中要把启动类放在项目的最高级中。
@Import({EnableAutoConfigurationImportSelectors.class})实现了ImportSelector接口,主要的是
public String[] selectImports(AnnotationMetadata metadata) {
  if (!this.isEnabled(metadata)) {
    	return NO_IMPORTS;
  } else {
    try {
      //获取 @EnableAutoConfigoration 标注类的元信息,也就是获取该注解 exclude、excludeName 属性值
      AnnotationAttributes attributes = this.getAttributes(metadata);
      //获取META-INF/spring.factories文件下自动装配的类名集合
      List<String> configurations = this.getCandidateConfigurations(metadata, attributes);
      //去除重复的自动装配组件,就是将List转为Set进行去重
      configurations = this.removeDuplicates(configurations);
      //这部分就是根据上面获取的 exclude 及 excludeName 属性值,排除指定的类
      Set<String> exclusions = this.getExclusions(metadata, attributes);
      //删除对应的例外配置
      configurations.removeAll(exclusions);
      //排序,因为自动配置会有bean引用依赖,先按字母排序,再根据order排序,再根据ConfigurationBefore等排序
      configurations = this.sort(configurations);
      //输出满足条件的配置项目
      this.recordWithConditionEvaluationReport(configurations, exclusions);
      return (String[])configurations.toArray(new String[configurations.size()]);
    } catch (IOException var5) {
      throw new IllegalStateException(var5);
    }
  }
}
@ComponentScan
自定义自动装配
在 Spring Boot 项目中,我们将大量的参数配置在 application.properties 或 application.yml 文件中,通过@ConfigurationProperties 注解,我们可以获取这些参数值
首先在目录下新增配置文件类,通过@ConfigurationProperties注解该类对配置的属性进行绑定
@ConfigurationProperties(prefix = "framework.service.trace")
public class ServiceTraceProperties {
    public static final String PREFIX = "framework.service.trace";
    private String endpoint;
    private boolean enabled;
    private Float sampling = 0.1F;

    public ServiceTraceProperties() {
    }

    public Float getSampling() {
        return this.sampling;
    }

    public void setSampling(Float sampling) {
        this.sampling = sampling;
    }

    public boolean isEnabled() {
        return this.enabled;
    }

    public void setEnabled(boolean enabled) {
        this.enabled = enabled;
    }

    public String getEndpoint() {
        return this.endpoint;
    }

    public void setEndpoint(String endpoint) {
        this.endpoint = endpoint;
    }
}
其次通过@Configuration声明该类为bean,@EnableConfigurationProperties使使用 @ConfigurationProperties 注解的类生效。
@Configuration
@EnableConfigurationProperties({ServiceTraceProperties.class})
@ConditionalOnProperty(name = {"framework.service.trace.enabled"},havingValue = "true")
public class ServiceTraceConfiguration {
    @Autowired
    private ServiceTraceProperties properties;

    public ServiceTraceConfiguration() {
    }

    @Bean
    Sender sender() {
        return OkHttpSender.create(this.properties.getEndpoint());
    }

    @Bean
    AsyncReporter<Span> spanReporter() {
        return AsyncReporter.create(this.sender());
    }

    @Bean
    Tracing tracing(@Value("${framework.dubbo.application.name}") String serviceName) {
        return 					Tracing.newBuilder().sampler(CountingSampler.create(this.properties.getSampling())).localServiceName(serviceName).propagationFactory(ExtraFieldPropagation.newFactory(B3Propagation.FACTORY, new String[]{"user-name"})).currentTraceContext(ThreadLocalCurrentTraceContext.newBuilder().addScopeDecorator(MDCScopeDecorator.create()).build()).spanReporter(this.spanReporter()).build();
    }
}
最后在resource目录下新建spring.factories 文件,将需要自动装配的配置暴露出来
org.springframework.boot.autoconfigure.EnableAutoConfiguration=\
com.onlyou.framework.boot.autoconfigure.TransactionManagementAutoConfiguration,\
com.onlyou.framework.boot.autoconfigure.ServiceTraceConfiguration

 浙公网安备 33010602011771号