
webpack学习笔记丁点积累
webpack是什么?
https://webpack.js.org/concepts/
https://code.tutsplus.com/tutorials/introduction-to-webpack-part-1--cms-25791
webpack是一个为现代javascript application而生的module bundler:模块打包器。
某种意义上说,webpack也是可以代替gulp,grunt等传统意义上的task runner,而webpack中的loader就来实现gulp,grunt工具链build时的不同功能,比如concat,uglify等。
它支持非常多的配置,拥有强大的功能。但也正是因为这一点可能导致我们很多人一团雾水。在学习之前,先搞明白几个概念:
https://webpack.js.org/glossary/
Module, Chunk, Bundle
{
  entry: {
    foo: ["webpack/hot/only-dev-server.js","./src/foo.js"],
    bar: ["./src/bar.js"]
  },
  output: {
    path: "./dist",
    filename: "[name].js"
  }
}
- Modules: "webpack/hot/only-dev-server.js", "./src/foo.js", "./src/bar.js" ( + any other modules that are dependencies of these entry points!)
- Chunks: foo, bar
- Bundles: foo, bar
上面的样例中chunks和bundles是1:1 关系, 但是这并不是总对的. 比如,如果你增加了sourcemaps,你将会获得1:2 的关系 chunk : bundle.
Entry
webpack经过编译后将会为你的application创建一张依赖图:dependency graph. 而这张依赖图的起点就被称之为: entry point. 这个entry point告诉webpakc从哪里开始根据扫描require(cmd), import(es6)等调用来不断描绘这张依赖图从而知道要打包哪些元素到最终的bundle中。
你可以将application的entry point看作 contextual root或者the first file to kick off your app
在webpack configuration object中,我们就使用entry这个属性来配置,最简单的例子:
module.exports = {
  entry: './path/to/my/entry/file.js'
};
entry point的设置有多种形式:
单个字符串:
const config = {
  entry: './path/to/my/entry/file.js'
};

module.exports = config;
数组字符串:
const config = {
  entry: ['./path/to/lib/library.js','./path/to/my/entry/main.js']
};

module.exports = config;
object syntax:
const config = {
  entry: {
    main: './path/to/my/entry/file.js'
  }
};
const config = {
  entry: {
    app: './src/app.js',
    vendors: './src/vendors.js'
  }
};
const config = {
  entry: {
    pageOne: './src/pageOne/index.js',
    pageTwo: './src/pageTwo/index.js',
    pageThree: './src/pageThree/index.js'
  }
};
具体参考: https://webpack.js.org/concepts/entry-points/
Output
一旦你已经将你的assets全部打包在一起了,我们仍然需要告诉webpack应该将我们的application bundle放到哪里.
这是通过output 属性来定义:(output也会有很多其他的属性,比如filename,path...)
var path = require('path');

module.exports = {
  entry: './path/to/my/entry/file.js',
  output: {
    path: path.resolve(__dirname, 'dist'),
    filename: 'my-first-webpack.bundle.js'
  }
};
Loaders
Loader是webpack中非常重要的概念。webpack的目标是将项目中的所有assets都可以由webpack来打包,而不是直接放到浏览器那里(通过script tag, link tag css)去异步加载。(注意这也并不意味着这些assets都必须打包在一起,可以有些折中). webpack将任何一个文件(.css,.html,.less,.scss,.jpg...)都视作一个javascript module.然而,webpack仅能够理解javascript!
而Loaders就能够将这些webpack本身并不能够理解和认识的文件转化为一个module从而加入到bundle的依赖树中去。
loader相关的配置从高层上讲有两个目的:
1. 指定什么文件类型应该由一个Loader来transform (通过test 属性来完成)
2. 指定应该由哪个loader来transform作为bundle的输入
var path = require('path');

const config = {
  entry: './path/to/my/entry/file.js',
  output: {
    path: path.resolve(__dirname, 'dist'),
    filename: 'my-first-webpack.bundle.js'
  },
  module: {
    rules: [
      {test: /\.(js|jsx)$/, use: 'babel-loader'}
    ]
  }
};

module.exports = config;
上面的配置就像是我们要告诉webpack的编译器:
"
Hey webpack compiler,when you come across a path that resolves to a '.js' or '.jsx' file inside of a require/import statement, use the babel-loader to transform it before you add it to the bundle
"
创建一个自己的loader
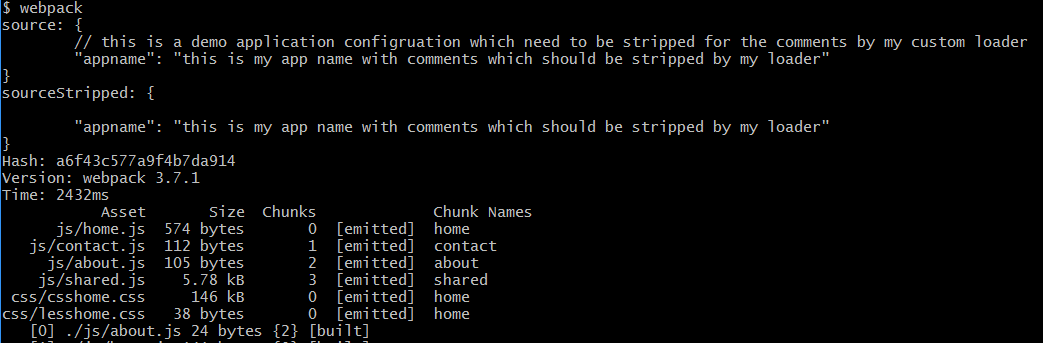
大部分时间,你所需要的webpack功能,都能通过已经存在的loader来帮你完成,但是事情总归没有那么简单,有时候你需要特殊的文件处理流程,比如,如果我们希望在require一个json文件之前我们先把这个json文件中的comments全部清除,这时,我们已知有一个node module名叫:strip-json-comments,他可以实现这个功能,我们当然可以直接使用这个module来作为loader,配置json文件被require之前来使用,但是我们又希望在此基础上打印出strip comments之前和之后的内容,这时,我们就可以以此为基础来创作一个自己的loader~!
// 在strip.js文件中定义loader的逻辑
var stripComments = require('strip-json-comments')
module.exports = function (source) {
    this.cacheable()
    console.log('source:',source)
    console.log('sourceStripped:',stripComments(source))
    return stripComments(source)
}
// 在webpack.config.js loaders section定义如下:
                {
                    test: /\.json$/,
                    exclude: /node_modules/,
                    use: ["json-loader",path.resolve('src/customloaders/strip')]
}
// 在app.js中
var config = require('../appconfig/jsonconfig.json') // 这时就将调用到我们的strip loader打印出strip之前和之后的结果,最终调用strip-loader来返回结果
console.log(config);
Plugin
Loader本身只能对一个个文件来做transform,而plugin则通常用于对bundled module的chunks或者compilations执行一些特定的action并且定制部分功能。要使用一个plugin,我们需要require(),并且放在plugins属性中。webpack本身已经提供了很多plugin,我们也可以自己创建适合我们特定需求的plugin. plugin更像grunt或者gulp的tasks.
plugin本身将webpack engine的所有能力暴露给第三方开发者。通过使用阶段性的构建callback,开发者可以向webpack的build process中注入自己的期望行为。
const HtmlWebpackPlugin = require('html-webpack-plugin'); //installed via npm
const webpack = require('webpack'); //to access built-in plugins

const config = {
  entry: './path/to/my/entry/file.js',
  output: {
    filename: 'my-first-webpack.bundle.js',
    path: './dist'
  },
  module: {
    rules: [
      {test: /\.(js|jsx)$/, use: 'babel-loader'}
    ]
  },
  plugins: [
    new webpack.optimize.UglifyJsPlugin(),
    new HtmlWebpackPlugin({template: './src/index.html'})
  ]
};

module.exports = config;
创建一个自己的webpack plugin
https://webpack.js.org/contribute/writing-a-plugin/
一个webpack的plugin由以下几个步骤:
1. 创建一个命名js函数
2.在该命名函数中定一个apply方法
3.指定将该函数绑定到webpack内部的event hook
4.操作webpack internal instance的特定数据
5.在函数完成时调用webpack提供的callback函数继续webpack构建流程
// A named JavaScript function.
function MyExampleWebpackPlugin() {

};

// Defines `apply` method in it's prototype.
MyExampleWebpackPlugin.prototype.apply = function(compiler) {
  // Specifies webpack's event hook to attach itself.
  compiler.plugin('webpacksEventHook', function(compilation /* Manipulates webpack internal instance specific data. */, callback) {
    console.log("This is an example plugin!!!");
    // some other code logic to custom webpack build

    // Invokes webpack provided callback after functionality is complete.
    callback();
  });
};
compiler和compilation对象
在plugin开发时最重要的就是要使用好compiler和compilation两个objects.下面我们来仔细梳理一下他们在扩展webpack engine开发时所担当的角色.
compiler object代表了配置好的完整webpack environment.这个对象一旦启动了webpack就被创建,并且该对象会被包括options,loaders,plugins等配置项所配置。当应用一个plugin到webpack环境时,plugin将会接收一个对这个compiler对象的引用。我们使用compiler对象来访问main webpack environment.
compilation对象则代表了一个versioned assets的一个single build.当运行webpack development middleware时,一旦监测到文件变更,那么就会创建一个新的compilation,这样就新生成了一套编译后的assets.每一个compilation对象使得module resources,compiled assets,changed files以及watched dependencies有一个参照水平面.该对象也提供了很多个callback points供plugin选择使用以便定制行为。
这两个组件是任何plugin必将关心的部分(特别是一个compilation对象),因此建议好好阅读以下源代码。
plugin的基础架构:
plugins本质上是一些在其原型上定义了apply方法的实例化objects.这个apply方法由webpack compiler在安装对应plugin时来调用一次。apply方法将被传入对webpack compiler的引用,而通过这个compiler引用就授权了对compiler callbacks的访问。
定义和使用hello plugin:
function HelloWorldPlugin(options) {
  // Setup the plugin instance with options...
}

HelloWorldPlugin.prototype.apply = function(compiler) {
  compiler.plugin('done', function() {
    console.log('Hello World!');
  });
};

module.exports = HelloWorldPlugin;
// 使用时:
var HelloWorldPlugin = require('hello-world');

var webpackConfig = {
  // ... config settings here ...
  plugins: [
    new HelloWorldPlugin({options: true})
  ]
};
Accessing th
访问compilation对象:
使用compiler object,你可以绑定到callbacks,并且能够访问到每个new compilation.这些compilations又提供了能够hooking到build process不同步骤的callbacks.
比如:
function HelloCompilationPlugin(options) {}

HelloCompilationPlugin.prototype.apply = function(compiler) {

  // Setup callback for accessing a compilation:
  compiler.plugin("compilation", function(compilation) {

    // Now setup callbacks for accessing compilation steps:
    compilation.plugin("optimize", function() {
      console.log("Assets are being optimized.");
    });
  });
};

module.exports = HelloCompilationPlugin;
async compilation plugins:
一些compilation plugin steps是异步的,将传入一个callback function进来,当你的plugin完成工作后必须调用这个callback以便build系统正常完成.
function HelloAsyncPlugin(options) {}

HelloAsyncPlugin.prototype.apply = function(compiler) {
  compiler.plugin("emit", function(compilation, callback) {

    // Do something async...
    setTimeout(function() {
      console.log("Done with async work...");
      callback();
    }, 1000);

  });
};

module.exports = HelloAsyncPlugin;
一个完整的复杂plugin例子:
该plugin实现build完成时,罗列出所有assets文件集合,生成一个新的asset文件
定义:
function FileListPlugin(options) {}

FileListPlugin.prototype.apply = function(compiler) {
  compiler.plugin('emit', function(compilation, callback) {
    // Create a header string for the generated file:
    var filelist = 'In this build:\n\n';

    // Loop through all compiled assets,
    // adding a new line item for each filename.
    for (var filename in compilation.assets) {
      filelist += ('- '+ filename +'\n');
    }

    // Insert this list into the webpack build as a new file asset:
    compilation.assets['filelist.md'] = {
      source: function() {
        return filelist;
      },
      size: function() {
        return filelist.length;
      }
    };

    callback();
  });
};

module.exports = FileListPlugin;
使用:
var FileListPlugin = require('file-list');

var webpackConfig = {
  // ... config settings here ...
  plugins: [
    new FileListPlugin()
  ]
};
webpack compiler event hook and types
entry-optionafter-pluginscompilerafter-resolverscompilerenvironmentafter-environmentbefore-runcompiler.run() startscompilerruncompilerwatch-runcompilernormal-module-factoryNormalModuleFactorynormalModuleFactorycontext-module-factoryContextModuleFactorycontextModuleFactorybefore-compilecompilationParamscompilecompilationParamsthis-compilationcompilation eventcompilationcompilationcompilationmakecompilationafter-compilecompilationshould-emitcompilationneed-additional-passemitcompilationafter-emitcompilationdonestatsfailederrorinvalidfileName, changeTimewatch-closehttps://webpack.js.org/contribute/writing-a-plugin/#different-plugin-shapes
Different Plugin Shapes:
根据plugin注册到的事件类型我们可以把插件划分为不同的类型。每个事件钩子来定义它是如何在其注册中来应用这些插件的。
synchrouous:
applyPlugins/applyPluginsBailResult
waterfull:
applyPluginsWaterfall
asynchronous :
applyPluginsAsync
async waterfall:
applyPluginsAsyncWaterfall
async series:
applyPluginsAsyncSeries
parallel:
applyPluginsParallel,applyPluginsParallelBailResult
https://webpack.js.org/contribute/writing-a-plugin/#different-plugin-shapes
webpack的依赖分析
方法: profile: true配置,使用一个plugin来生成stats.json文件https://github.com/unindented/stats-webpack-plugin,随后在http://webpack.github.io/analyse页面选择这个stats.json文件就能分析出来下面的图形来,好强大,好梦幻!

如何使用webpack-stats-graph来清晰分析bundle构成并做优化?
choco install graphviz // 注意choco是windows下的package manager方便安装一些package
npm install -g webpack-stats-graph
webpack-stats-graph # by default looks for stats.json in current directory
webpack-stats-graph --help
https://github.com/g0t4/webpack-stats-graph
webpack-dev-server
请参考以下文章了解更加详细的webpack-dev-server的技术概念及相关配置
https://www.jianshu.com/p/e547fb9747e0
webpack-dev-server是一个专门用于webpack开发的web服务,一旦启动该服务,它也会watch文件的变化,当文件变化时,自动编译,但是注意:它并不会将编译的输出写到文件系统中,而是直接serve,这个webpack --watch是有区别的,因为这种模式下是会直接写文件到磁盘上的。
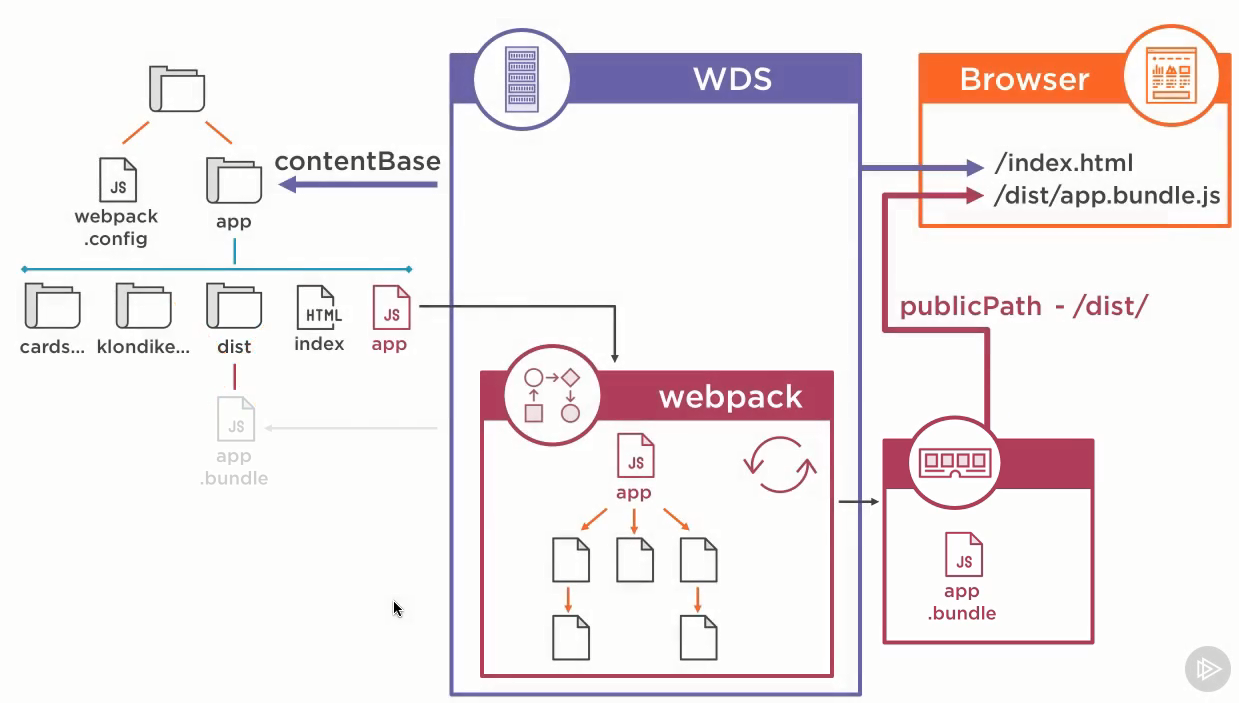
下面一张图解释webpack-dev-server的各个参数及其作用.其中最重要的是publicPath和contentBase两个参数。publicPath指定dev server编译后的webpack bundle访问的url地址,耳contentBase则指向非webpack bundle的静态内容所在的起始目录(比如index.html)。很多时候,如果你是在集成环境中开发,比如使用laravel作为后端,那么这时所谓index.html实际上应该是由laravel blade编译后提供的,这时这个contentBase参数就无所谓了,我们就只需要将bunlder放到blade模板中做好正确的引用即可。
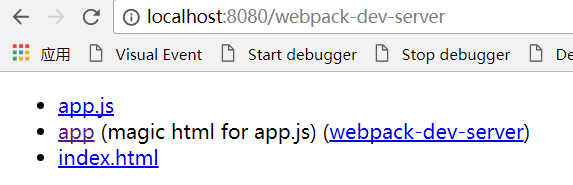
如何调试webpack-dev-server的某些问题?
很多时候如果webpack-dev-server工作不如你的意,那么你可以通过: http://localhost:8080/webpack-dev-server 来查看。很多时候都是因为地址不对的缘故.
如何让webpack-dev-server可以在外网访问?
很多时候使用linux作为开发和部署服务器都是比较合适的,但是我们自己家里又没有linux环境,往往会使用一个云主机来做开发用机。这时可能就需要webpack-dev-server能够被外网访问了.很简单加上“webpack-dev-server --hot --host 0.0.0.0 --disableHostCheck --port 9999”
注意--disableHostCheck参数,如果不加的话,可能会出现""Invalid Host header""的错误!!!
简单webpack bundle的内容学习
app.js require login.js
/******/ (function(modules) { // webpackBootstrap
/******/     // The module cache
/******/     var installedModules = {};
/******/
/******/     // The require function
/******/     function __webpack_require__(moduleId) {
/******/
/******/         // Check if module is in cache
/******/         if(installedModules[moduleId]) {
/******/             return installedModules[moduleId].exports;
/******/         }
/******/         // Create a new module (and put it into the cache)
/******/         var module = installedModules[moduleId] = {
/******/             i: moduleId,
/******/             l: false,
/******/             exports: {}
/******/         };
/******/
/******/         // Execute the module function
/******/         modules[moduleId].call(module.exports, module, module.exports, __webpack_require__);
/******/
/******/         // Flag the module as loaded
/******/         module.l = true;
/******/
/******/         // Return the exports of the module
/******/         return module.exports;
/******/     }
/******/
/******/
/******/     // expose the modules object (__webpack_modules__)
/******/     __webpack_require__.m = modules;
/******/
/******/     // expose the module cache
/******/     __webpack_require__.c = installedModules;
/******/
/******/     // define getter function for harmony exports
/******/     __webpack_require__.d = function(exports, name, getter) {
/******/         if(!__webpack_require__.o(exports, name)) {
/******/             Object.defineProperty(exports, name, {
/******/                 configurable: false,
/******/                 enumerable: true,
/******/                 get: getter
/******/             });
/******/         }
/******/     };
/******/
/******/     // getDefaultExport function for compatibility with non-harmony modules
/******/     __webpack_require__.n = function(module) {
/******/         var getter = module && module.__esModule ?
/******/             function getDefault() { return module['default']; } :
/******/             function getModuleExports() { return module; };
/******/         __webpack_require__.d(getter, 'a', getter);
/******/         return getter;
/******/     };
/******/
/******/     // Object.prototype.hasOwnProperty.call
/******/     __webpack_require__.o = function(object, property) { return Object.prototype.hasOwnProperty.call(object, property); };
/******/
/******/     // __webpack_public_path__
/******/     __webpack_require__.p = "";
/******/
/******/     // Load entry module and return exports
/******/     return __webpack_require__(__webpack_require__.s = 0);
/******/ })
/************************************************************************/
/******/ ([
/* 0 */
/***/ (function(module, exports, __webpack_require__) {

__webpack_require__(1) // 唯一一个entry入口: app.js,加载login.js(require)
document.write("app.js loaded and new info displayed")
console.log('app loaded')

/***/ }),
/* 1 */
/***/ (function(module, exports) {

console.log('login loaded')

/***/ })
/******/ ]);
app.js require login.js and secondmodule.js
/******/ (function(modules) { // webpackBootstrap
/******/     // The module cache
/******/     var installedModules = {};
/******/
/******/     // The require function
/******/     function __webpack_require__(moduleId) {
/******/
/******/         // Check if module is in cache
/******/         if(installedModules[moduleId]) {
/******/             return installedModules[moduleId].exports;
/******/         }
/******/         // Create a new module (and put it into the cache)
/******/         var module = installedModules[moduleId] = {
/******/             i: moduleId,
/******/             l: false,
/******/             exports: {}
/******/         };
/******/
/******/         // Execute the module function
/******/         modules[moduleId].call(module.exports, module, module.exports, __webpack_require__);
/******/
/******/         // Flag the module as loaded
/******/         module.l = true;
/******/
/******/         // Return the exports of the module
/******/         return module.exports;
/******/     }
/******/
/******/
/******/     // expose the modules object (__webpack_modules__)
/******/     __webpack_require__.m = modules;
/******/
/******/     // expose the module cache
/******/     __webpack_require__.c = installedModules;
/******/
/******/     // define getter function for harmony exports
/******/     __webpack_require__.d = function(exports, name, getter) {
/******/         if(!__webpack_require__.o(exports, name)) {
/******/             Object.defineProperty(exports, name, {
/******/                 configurable: false,
/******/                 enumerable: true,
/******/                 get: getter
/******/             });
/******/         }
/******/     };
/******/
/******/     // getDefaultExport function for compatibility with non-harmony modules
/******/     __webpack_require__.n = function(module) {
/******/         var getter = module && module.__esModule ?
/******/             function getDefault() { return module['default']; } :
/******/             function getModuleExports() { return module; };
/******/         __webpack_require__.d(getter, 'a', getter);
/******/         return getter;
/******/     };
/******/
/******/     // Object.prototype.hasOwnProperty.call
/******/     __webpack_require__.o = function(object, property) { return Object.prototype.hasOwnProperty.call(object, property); };
/******/
/******/     // __webpack_public_path__
/******/     __webpack_require__.p = "";
/******/
/******/     // Load entry module and return exports
/******/     return __webpack_require__(__webpack_require__.s = 0);
/******/ })
/************************************************************************/
/******/ ([
/* 0 */
/***/ (function(module, exports, __webpack_require__) {

__webpack_require__(1); // 加载第一个entry app.js
module.exports = __webpack_require__(4); // 加载第二个entry utils.js


/***/ }),
/* 1 */
/***/ (function(module, exports, __webpack_require__) {

__webpack_require__(2)
__webpack_require__(3)
document.write("app.js loaded and new info displayed")
console.log('app loaded')

/***/ }),
/* 2 */
/***/ (function(module, exports) {

console.log('login loaded')

/***/ }),
/* 3 */
/***/ (function(module, exports) {

console.log('this is the second module loaded by app')

/***/ }),
/* 4 */
/***/ (function(module, exports) {
// utils.js放在entry数组中作为multi-entry build
// global lib for example jquery can be put into entry
console.log('utils.js loaded')

/***/ })
/******/ ]);
如何在js中引入css(注意webpack2.5.1以上的區別)
在webpack.config.js的module section中,增加rules字段,指定css必須使用style-loader和css-loader,而这一点在webpack2.5.1之前只需要在loaders section增加对应配置!
module:{
        // comment out jshint
        rules: [
            // {
            //     test: /\.js$/,
            //     exclude: /node_modules/,
            //     enforce: "pre",
            //     loader: 'jshint-loader'
            // },
                   { test: /\.css$/, use: [ 'style-loader', 'css-loader' ] }
        ]
...
}
webpack code splitting and ajax loading bundle
http://jilles.me/webpack-async-bundle-loading/
https://toddmotto.com/lazy-loading-angular-code-splitting-webpack
loader vs plugin
loader完成对几乎任何文件格式的的预处理转换,比如通过以下代码就可以调用你自己的loader来实现对相关require文件的转换,只有转换之后才能进入bundle.
require("my-loader!./my-awesome-module")
和plugin相比,loader要简单很多,因为他们仅仅暴露给webpack一个简单的函数,并且不具有影响到webpack的实际build过程的能力。
而, plugin则不同,plugin可以深度集成到webpack中,因为他们可以通过注册webpack build system的一些钩子今儿可以访问或者更改compiler, compilation,从而更改webpack的构建过程。
loader只为一个单一的文件在进入bundle之前做变换。plugin则往往处理的对象是bundle或者chunk level,并且往往在bundle genneration的结尾时开始被调用工作。
使用Nodejs V8 Inspector Manager结合chrome调试webpack运行过程
如果我们安装了chrome的v8 inspector manager的话,可以结合chrome dev tool来调试webpack的运行过程,对学习和开发webpack构建是一个很大的帮助。
https://mattdesl.svbtle.com/debugging-nodejs-in-chrome-devtools
node --inspect-brk build/build.js
Debugger listening on ws://127.0.0.1:9229/44fed39e-501a-43d3-b928-8e0a51eebc03
For help see https://nodejs.org/en/docs/inspector
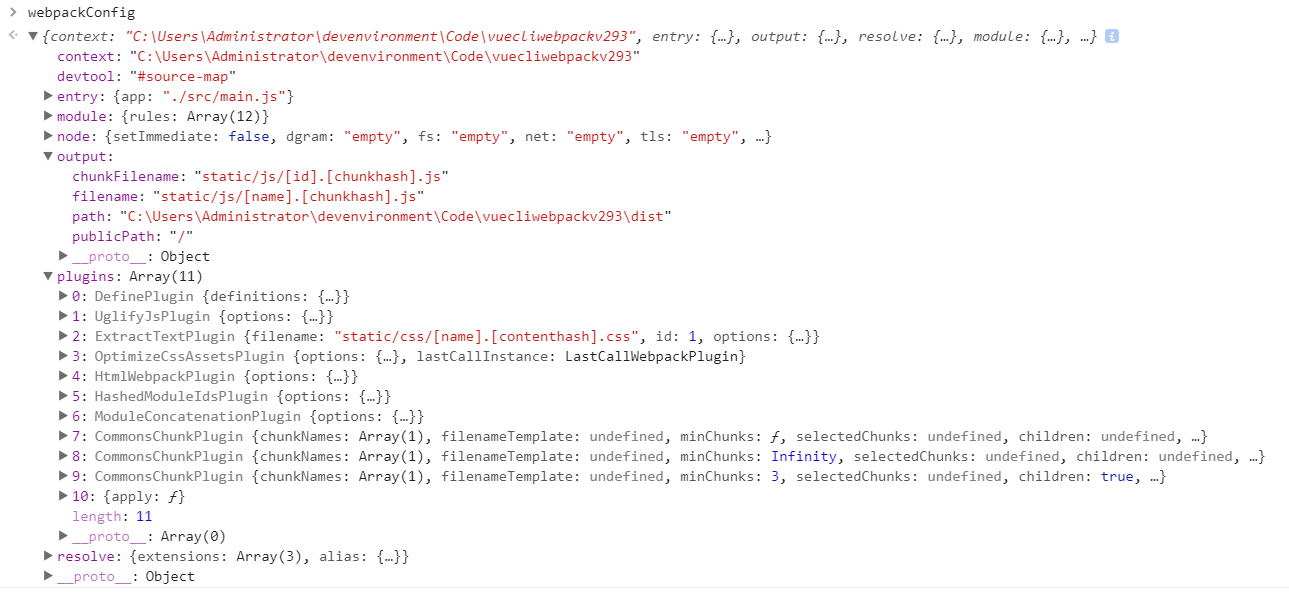
之后使用chrome连接,下面就是使用chrome dev tool打开的vue-cli创建的webpack项目对应做product build时的配置对象。
node --inspect-brk ./node_modules/jest/bin/jest --runInBand --no-cache --no-watchman
调试npm run dev的方法
node --inspect-brk ./node_modules/webpack-dev-server/bin/webpack-dev-server.js --inline --progress --config "build/webpack.dev.conf.js"
为了看清楚node执行的顺序,我们可以在webpack.dev.conf.js中主动添加一个debugger指令,强制nodejs在此中断。
// myscript.js
global.x = 5;
setTimeout(() => {
  debugger;
  console.log('world');
}, 1000);
console.log('hello');
vue-cli npm run dev时可能报code generator exceeds the max of "500KB"错误
 10% building modules 4/4 modules 0 active[BABEL] Note: The code generator has deoptimised the styling of "D:/devenv/Code/newkidsit/resources/assets/js/vueapp/node_modules/lodash/lodash.js" as it exceeds the max of "500KB".
 95% emitting ERROR  Failed to compile with 1 errors11:08:48
解决办法,bable增加compact: false:
{
        test: /\.js$/,
        loader: 'babel-loader',
        query: {compact: false}
}
如何解决context加载时不必要的加载?以momentjs的locale为例
https://webpack.js.org/plugins/context-replacement-plugin/
new webpack.ContextReplacementPlugin(
  /moment[\/\\]locale$/,
  /zh-cn/
)
https://stackoverflow.com/questions/25384360/how-to-prevent-moment-js-from-loading-locales-with-webpack
https://github.com/moment/moment/issues/2373
resolve.mainFields package.json中的main,module, browser是什么意思?
https://webpack.js.org/configuration/resolve/#resolve-mainfields
https://github.com/defunctzombie/package-browser-field-spec
当我们import一个npm package时,比如
import * as D3 from "d3"
时,这个resolve.mainFeilds的配置选项将决定package.json中的哪个字段的值被检查并使用。默认值将随着webpack configuration文件的target选项而不同,而target配置项目具有"node","webworker","web"(默认值),"electron-main"。其中"node" target用于nodejs的服务端环境;"web" target用于一个browser-like的环境,这是默认配置。
如果target字段设置为“web”,"webworker"或者不做设置的话,mainFields的默认值顺序如下:
mainFields: ["browser", "module", "main"]
对于任何其他的非web,webworker值设置,则mainFields的默认值顺序如下:
mainFields: ["module", "main"]
比如,D3js的package.json包含以下字段:
{
  ...
  main: 'build/d3.Node.js',
  browser: 'build/d3.js',
  module: 'index',
  ...
}
这意味着,在web target的情况下,import * as D3 from "d3"将会使用browser字段中指定的文件:build/d3.js,因为browser字段在web target下为第一个出现的值。而如果我们为node target做d3的build则引入的是module字段的文件:
如何加载一个模块下面的某个文件的部分内容?比如main文件中并未export,而其他的utils.js部分函数希望被引用??
// 注意qiniu-js目录下的index.js是其“主"文件,export了一些函数,
// 但是我们希望使用base64目录下面的urlSafeBase64Encode函数,就可以
// 像下面的语法来挑选我们想用的函数
import { urlSafeBase64Encode } from 'qiniu-js/src/base64'
tree-shaking and side-effect
很多时候,我们import一个module时,可能仅仅用到其中的一两个export函数,大部分代码为无用的死代码,如何能够找到这些死代码,并且在webpack4做bundle时剔除这些无用代码呢?
https://webpack.js.org/guides/tree-shaking/
harmony modules = webpack builtin ES2015 module
何时使用module.noParse配置项?
module.noParse配置项用于阻止webpack扫描解析任何匹配了正则规则的文件。需要注意的是被忽略的那些文件不允许有任何 import, require, defined或者任何其他的importing机制调用。这可以大大提高ewbpack build的性能,特别是大的库文件。再比如,你如果只有dist/xxxlib.min.js文件的时候,就可以派上用场了。
noParse: /jquery|lodash/

// since webpack 3.0.0
noParse: function(content) {
  return /jquery|lodash/.test(content);
}
webpack dev server访问时出现Invalid Host header
devServer: {

    compress: true,

    disableHostCheck: true,   // That solved it

 }

