学习spring第三天
Spring第三天笔记
今日内容
- Spring的核心之一 - AOP思想
(1) 代理模式- 动态代理
① JDK的动态代理 (Java官方)
② CGLIB 第三方代理
(2) AOP思想在Spring中的具体体现(AOP底层使用的就是动态代理)
1. AOP概述
1.1. 什么是AOP, 面向切面编程
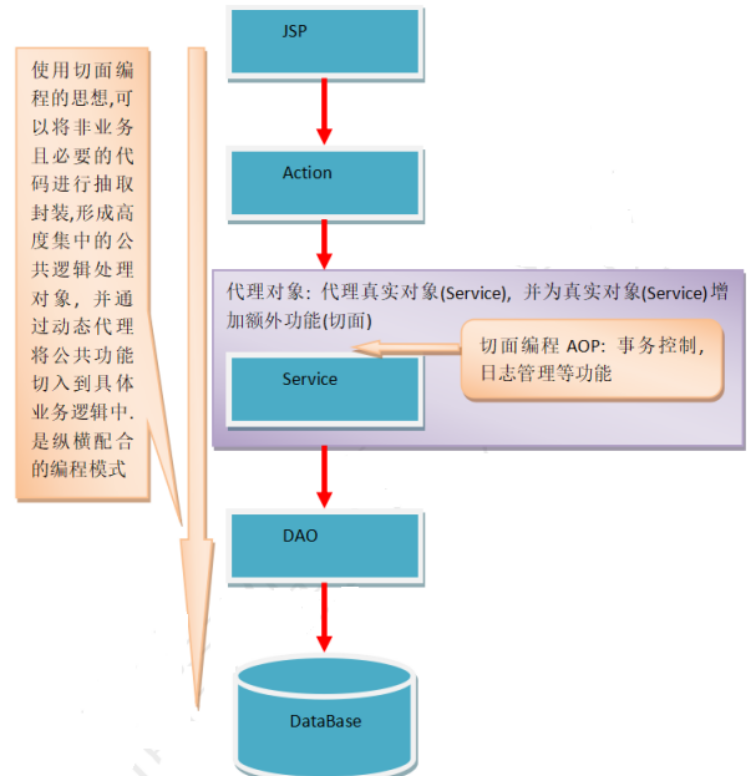
AOP为Aspect Oriented Programming的缩写, 意为:面向切面编程, 通过预编译方式和运行期动态代理实现程序功能的统一维护的一种技术. AOP是OOP的延续, 是函数式编程的一种衍生范型. 利用AOP可以对业务逻辑的各个部分进行隔离, 从而使得业务逻辑各部分之间的耦合度降低, 提高程序的可重用性, 同时提高了开发的效率. -解耦
1.2. 传统开发模型: 纵向的编程.
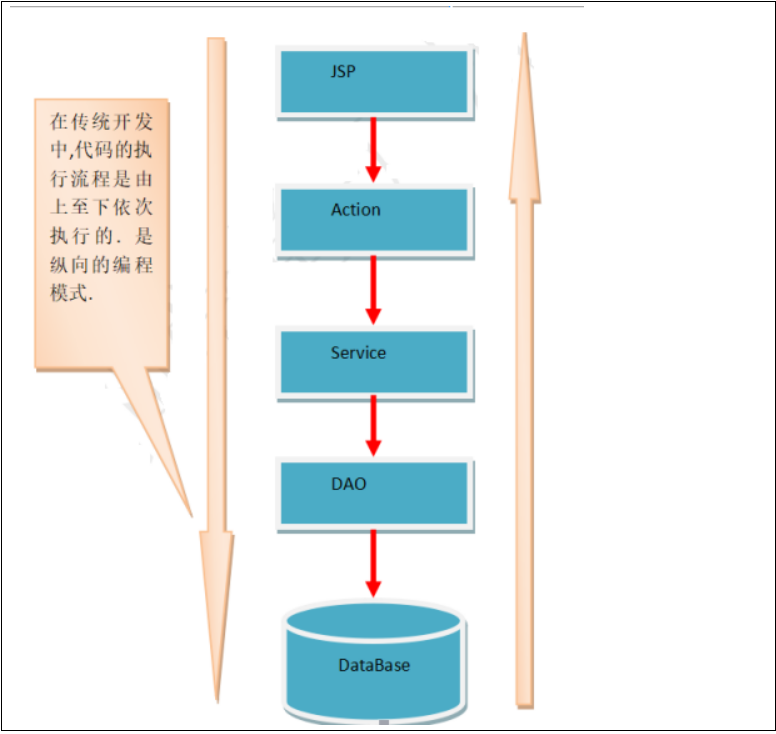
|
1.3. 面向切面编程: 纵横配合的编程.
|
|
|
|
1.4. AOP的作用及优势
作用:
在程序运行期间,不修改任何相关源码对已有方法进行增强。
优势:
减少重复代码、提高开发效率、维护方便
1.5. AOP的实现方式
使用动态代理模式来实现
可能通过上面的介绍,我们还是没有一个清晰的认识。没关系,我们看看下面的具体应用。
2. 案例中问题
通过下面的实现代码,我们能看出什么问题吗?
2.1. 模拟事务管理器
|
public class TransactionManagerHandler { public void begin() { System.out.println("开启事务"); }
public void commit() { System.out.println("提交事务"); }
public void rollback() { System.out.println("回滚事务"); }
public void close() { System.out.println("关闭session"); } } |
2.2. Service层代码
|
public class UserServiceImpl implements UserService { // 引入事务管理器 private TransactionManagerHandler txManager = new TransactionManagerHandler();
@Override public void insert(String username) { try { txManager.begin(); System.out.println("调用dao层插入方法"); txManager.commit(); } catch (Exception e) { txManager.rollback(); } finally { txManager.close(); } }
@Override public void update(String username) { try { txManager.begin(); System.out.println("调用dao层修改方法"); txManager.commit(); } catch (Exception e) { txManager.rollback(); } finally { txManager.close(); } } } |
2.3. 存在的问题
上面代码的问题就是:我们的事务控制的代码是重复性的。这还只是一个业务类,如果有多个业务了,每个业务类中都会有这些重复性的代码。是不是重复代码太多了?
思考:我们有什么办法解决这个问题吗?
2.4. 解决上述问题的方案
- JDK的动态代理
- CGLIB代理
- Spring的AOP技术(底层就是JDK动态代理和CGLIB代理技术)
3. 什么是动态代理技术?
Java中的动态代理,就是使用者使用的不是真实的对象,而是使用的一个代理对象,而这个代理对象中包含的就是真实的对象,代理对象就是不改变原有对象的功能方法的基础之上封装新的功能
4. 使用JDK动态代理
JDK动态代理是Java官方的代理
使用JDK官方的Proxy类创建代理对象
- 需要通过Proxy类创建代理对象
- 创建代理对象必须要一个代理处理类(实现了接口InvocationHandler的类)
4.1. DK动态代理API分析
|
1、java.lang.reflect.Proxy 类: Java 动态代理机制生成的所有动态代理类的父类,它提供了一组静态方法来为一组接口动态地生成代理类及其对象。 主要方法: public static Object newProxyInstance(ClassLoader loader, Class<?>[] interfaces,InvocationHandler hanlder) 方法职责:为指定类加载器、一组接口及调用处理器生成动态代理类实例 参数: loader :类加载器 interfaces : 模拟的接口 hanlder :代理执行处理器
返回:动态生成的代理对象 |
|
2、java.lang.reflect.InvocationHandler接口: public Object invoke(Object proxy, Method method, Object[] args) 方法职责:负责集中处理动态代理类上的所有方法调用 参数: proxy :生成的代理对象 method :当前调用的真实方法对象 args :当前调用方法的实参
返回: 真实方法的返回结果 ------------------------------------------------------------------------------------ njdk动态代理操作步骤 ① 实现InvocationHandler接口,创建自己增强代码的处理器。 ② 给Proxy类提供ClassLoader对象和代理接口类型数组,创建动态代理对象。 ③ 在处理器中实现增强操作。 |
4.2. 案例代码
在我们的UserServiceImpl的实现类中,使用JDK的动态代理,进行方法的增强,增强事物的功能
|
JDK动态代理类 |
|
public class DynamicProxyHandler { //被代理的对象 private Object target; //事务管理器 private TransactionManagerHandler txManager; /** * 返回一个代理对象,代理对象就做了方法的增强,(事物管理,日志控制,权限管理等等) */ public <T> T getProxyObject(Class<T> clz) {
/* * JDK内置有一个代理类,专门负责创建动态代理对象的,类 * Proxy 类 , Proxy为被代理的对象创建代理对象 * 理论上创建被代理对象,是需要被代理对象的类对应的字节码的 * Proxy 在JVM动态的创建被代理对象的字节码,冬天的创建代理对象 */
/* * loader: 类加载器,类加载器就是从当前classpath下面加载字节码,在整个应用有且只有一个类加载器 * 如何或者类加载器, * 方式一: 使用当前线程 * ClassLoader classLoader = Thread.currentThread().getContextClassLoader(); * 方式二: 使用任何一个类的字节码 * target.getClass().getClassLoader() * interfaces : 被代理对象的接口 * h : 处理器: 真正做代码增强的地方 */ //代理对象 Object newProxyInstance = Proxy.newProxyInstance(target.getClass().getClassLoader(), target.getClass().getInterfaces(), new InvocationHandler() { /** * 代理内的增强方法,正常增强的地方 * @param proxy 代理对象 * @param method 被代理对象的方法 * @param args 被代理对象方法的参数 * @return 被代理对象执行的结果 * @throws Throwable */
@Override public Object invoke(Object proxy, Method method, Object[] args) throws Throwable { //执行被代理对象的方法 Object result = null; try { //方法之前执行操作 //开始事务 txManager.begin(); result = method.invoke(target, args); //方法之后执行操作 //提交事物 txManager.commit(); } catch (Exception e) { //回滚事物 txManager.rollback(); }finally { txManager.close(); } return result; } });
//返回代理对象 return (T) newProxyInstance; }
public void setTarget(Object target) { this.target = target; }
public void setTxManager(TransactionManagerHandler txManager) { this.txManager = txManager; } } |
|
配置文件 |
|
<!-- 配置事物管理器 --> <bean id="txMananger" class="cn.zj.spring.TransactionManagerHandler"/>
<!-- 配置动态代理类 --> <bean id="dynamicProxy" class="cn.zj.spring.proxy.DynamicProxyHandler"> <!-- 注入事物管理器 --> <property name="txManager" ref="txMananger"/>
<!-- 配置被代理对象 --> <property name="target"> <bean class="cn.zj.spring.service.impl.UserServiceImpl"/> </property> </bean> |
|
测试代码 |
|
@RunWith(SpringJUnit4ClassRunner.class) // 表示先启动Spring容器,把junit运行在Spring容器中 @ContextConfiguration("classpath:applicationContext.xml") // 读取Spring的配置文件 public class DynamicProxyTest { // 自动注入 UserService @Autowired private DynamicProxyHandler proxy;
@Test public void testInsert() throws Exception {
// 获取代理类对象的中的获取动态代理对象的方法 UserService proxyObject = proxy.getProxyObject(UserServiceImpl.class); proxyObject.insert("张三"); } @Test public void testUpdate() throws Exception { // 获取代理类对象的中的获取动态代理对象的方法 UserService proxyObject = proxy.getProxyObject(UserServiceImpl.class); proxyObject.update("李四"); } } |
4.3. JDK动态代理的不足
1,JDK动态代理的对象必须要实现一个接口;
2,需要为每个对象创建代理对象;
3,动态代理的最小单位是类(所有类中的方法都会被处理),查询方法不需要事务,可能不需要被代理
5. 使用CGLIB 第三方代理
CGLIB(Code Generation Library)是一个开源项目
CGLIB和JDK动态代理一样都是动态代理,但是CGLIB代理没有接口可以进行代理
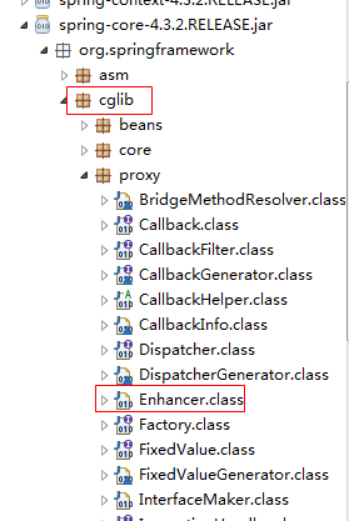
Spring默认已经集成CGLIB代理,直接可以使用即可,不用拷贝任何jar包
|
|
5.1. 案例代码
在我们的UserServiceImpl的实现类中,使用CGLIB的动态代理,进行方法的增强,增强事物的功能
|
CGLIB代理类 |
|
public class CglibProxyHandler { //被代理的对象 private Object target; //事务管理器 private TransactionManagerHandler txManager; /** * 返回一个代理对象,代理对象就做了方法的增强,(事物管理,日志控制,权限管理等等) * @return */ public <T> T getProxyObject(Class<T> clz) {
//使用CGLIB代理,CGLIB代理 可以没有接口,直接使用类代理
//创建Enhancer CGLIB代理镀锡 Enhancer enhancer = new Enhancer(); //设置类加载器 enhancer.setClassLoader(this.getClass().getClassLoader()); //设置被代理对象字节码 enhancer.setSuperclass(target.getClass());
//代理的具体实现 enhancer.setCallback(new org.springframework.cglib.proxy.InvocationHandler() {
/** * 代理内的增强方法,正常增强的地方 * @param proxy 代理对象 * @param method 被代理对象的方法 * @param args 被代理对象方法的参数 * @return 被代理对象执行的结果 * @throws Throwable */
@Override public Object invoke(Object proxy, Method method, Object[] args) throws Throwable { //执行被代理对象的方法 Object result = null; try { //方法之前执行操作 //开始事务 txManager.begin(); result = method.invoke(target, args); //方法之后执行操作 //提交事物 txManager.commit(); } catch (Exception e) { //回滚事物 txManager.rollback(); }finally { txManager.close(); } return result; } });
//创建代理对象 Object proxy = enhancer.create();
//返回代理对象 return (T) proxy; } public void setTarget(Object target) { this.target = target; }
public void setTxManager(TransactionManagerHandler txManager) { this.txManager = txManager; } } |
|
配置文件 |
|
<!-- 配置事务管理器 --> <bean id="txMananger" class="cn.zj.spring.TransactionManagerHandler"/>
<!-- 配置CGLIB代理类 --> <bean id="dynamicProxy" class="cn.zj.spring.cglib.CglibProxyHandler"> <!-- 注入事务管理器 --> <property name="txManager" ref="txMananger"/>
<!-- 配置被代理对象 --> <property name="target"> <bean class="cn.zj.spring.service.impl.UserServiceImpl"/> </property> </bean> |
|
测试代码 |
|
@RunWith(SpringJUnit4ClassRunner.class) // 表示先启动Spring容器,把junit运行在Spring容器中 @ContextConfiguration("classpath:applicationContext.xml") // 读取Spring的配置文件 public class DynamicProxyTest { // 自动注入 UserService @Autowired private DynamicProxyHandler proxy; @Test public void testInsert() throws Exception { // 获取代理类对象的中的获取动态代理对象的方法 UserService proxyObject = proxy.getProxyObject(UserServiceImpl.class); proxyObject.insert("张三"); } @Test public void testUpdate() throws Exception { // 获取代理类对象的中的获取动态代理对象的方法 UserService proxyObject = proxy.getProxyObject(UserServiceImpl.class); proxyObject.update("李四"); } } |
5.2. CGLIB代理总结
1,CGLIB可以生成目标类的子类,并重写父类非final修饰符的方法。
2,要求类不能是final的,要代理的方法要是非final、非static、非private的。
3,动态代理的最小单位是类(所有类中的方法都会被处理);
6. 代理小结
6.1. 解决代码重复的方案
在Spring中:
若目标对象实现了若干接口,Spring就会使用JDK动态代理。
若目标对象没有实现任何接口,Spring就使用CGLIB库生成目标对象的子类。
6.2. 直接使用代理的缺陷
- 如果直接使用代理解决代码重复问题,我们会发现,我们每一个类都要配置代理类,非常的麻烦
7. 动态代理模式的缺陷是什么
动态代理模式的缺陷是:
- 必须需要实现类必须要有一个接口
- 无法通过规则制定拦截的方法
如何解决这个问题:Spring提供了AOP的实现。
8. Spring的AOP
Spring通过动态代理模式的实现后,我们可以定义AOP其实就是用于通过规则设置来拦截方法,加入可以统一处理的代码。
8.0.1. 关于代理的选择
在spring中,框架会根据目标类是否实现了接口来决定采用哪种动态代理的方式。
8.0.2. AOP相关术语
Joinpoint(连接点):
所谓连接点是指那些被拦截到的点。在spring中,这些点指的是方法,因为spring只支持方法类型的连接点。
---就是根据规则,可以指定拦截的方法,我们将每一个被拦截的方法称为连接点。
Pointcut(切入点):
--所谓的切入点,就是拦截方法设置的规则
所谓切入点是指我们要对哪些Joinpoint进行拦截的定义。
Advice(通知/增强):
--就是可以设置在方法之前拦截或者方法执行之后拦截或者方法出异常后拦截,或者方法之前和之后都拦截。我们将这些拦截场景称为通知
所谓通知是指拦截到Joinpoint之后所要做的事情就是通知。
通知的类型:前置通知,后置通知,异常通知,最终通知,环绕通知。
Aspect(切面):
--所谓的切面就是我们的拦截处理类。
是切入点和通知的结合。
Weaving(织入):
-把切面加入到对象,并创建出代理对象的过程。(该过程由Spring来完成)
9. 基于XML配置AOP
通过XML的方式配置AOP
9.1. 搭建环境
9.1.1. 第一步:创建一个Java项目
需求:编写一个切面类,在执行insert,update方法,分别在方法执行前、方法之后、异常出现后、分别方法执行前后调用编写统一处理的代码,
创建一个Java项目,加入Spring框架的基础支持包

|
9.1.2. 第二步:编写业务层类和接口
9.1.2.1. UserService 接口
|
package cn.zj.spring.service;
import cn.zj.spring.pojo.User;
public interface UserService { void insert(User user); void update(User user); }
|
9.1.2.2. 业务层UserServiceImpl 实现类
|
package cn.zj.spring.service.impl;
import cn.zj.spring.pojo.User; import cn.zj.spring.service.UserService;
public class UserServiceImpl implements UserService{
public void insert(User user) { System.out.println("---调用DAO层保存方法---"); } public void update(User user) { System.out.println("---调用DAO层修改方法---"); } }
|
9.1.3. 第三步:编写Spring配置文件
引入aop的命名空间
|
<?xml version="1.0" encoding="UTF-8"?> <beans xmlns="http://www.springframework.org/schema/beans" xmlns:p="http://www.springframework.org/schema/p" xmlns:context="http://www.springframework.org/schema/context" xmlns:aop="http://www.springframework.org/schema/aop" xmlns:xsi="http://www.w3.org/2001/XMLSchema-instance" xsi:schemaLocation="http://www.springframework.org/schema/beans http://www.springframework.org/schema/beans/spring-beans.xsd http://www.springframework.org/schema/context http://www.springframework.org/schema/context/spring-context.xsd http://www.springframework.org/schema/aop http://www.springframework.org/schema/aop/spring-aop.xsd "> <!-- 配置UserService层 --> <bean id="userService" class="cn.zj.spring.service.impl.UserServiceImpl"/> </beans> |
9.1.4. 第四步:编写测试代码
|
package cn.zj.spring.test;
import javax.annotation.Resource;
import org.junit.Test; import org.junit.runner.RunWith; import org.springframework.test.context.ContextConfiguration; import org.springframework.test.context.junit4.SpringJUnit4ClassRunner;
import cn.zj.spring.pojo.User; import cn.zj.spring.service.impl.UserServiceImpl;
@RunWith(SpringJUnit4ClassRunner.class) @ContextConfiguration("classpath:applicationContext.xml") public class UserServiceTest {
@Resource private UserServiceImpl service;
@Test public void testSave() { User user = new User(null, "张三", "zhangsan@qq.com"); service.insert(user); }
@Test public void testUpdate() { User user = new User(1, "李四", "lisi@qq.com"); service.update(user); } }
|
9.2. 配置AOP
9.2.1. 第一步:加入AOP的支持包
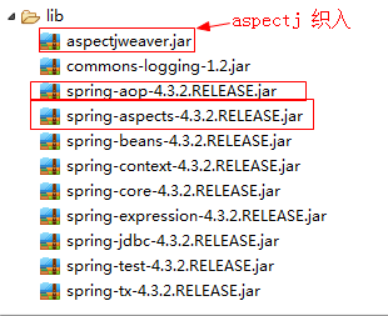
AOP 思想必须使用AspectJ语法,而AOP思想不是Spring框架设计出来的,而是叫一个AOP联盟组织提出这种思想,所以开发者需要导入 AOP联盟提供的 aspectjweaver.jar(aspectweaver织入包)
|
9.2.2. 第二步:编写一个切面类
|
package cn.zj.spring;
import java.util.Arrays;
import org.aspectj.lang.JoinPoint; import org.aspectj.lang.ProceedingJoinPoint;
public class TransactionManagerHandler {
/** * 环绕增强的方法 * * @param pjp ProceedingJoinPoint 连接点 ProceedingJoinPoint 连接点 * */ public void allInOne(ProceedingJoinPoint pjp) { try { begin(pjp); // 执行方法 pjp.proceed(); //此方法在环绕方法中可以调用正在的业务方法
System.out.println("提交事务");
} catch (Throwable e) { System.out.println("回滚事务 :" + e.getMessage()); } finally { System.out.println("关闭session"); } }
// JoinPoint : 连接点, 获取被代理对象的相关信息 public void begin(JoinPoint jp) { // 获取被代理对象的类型 Class<?> clz = jp.getTarget().getClass(); System.out.println(clz); // 获取被代理对象执行方法对应的参数 Object[] args = jp.getArgs(); System.out.println(Arrays.toString(args)); System.out.println("开启事务"); }
public void begin() { System.out.println("开启事务"); }
public void commit() { System.out.println("提交事务"); }
/* * public void rollback() { System.out.println("回滚事务"); } */
public void rollback(Throwable e) {
System.out.println("回滚事务 : " + e.getMessage()); }
public void close() { System.out.println("关闭session"); } } |
9.2.3. 第三步:配置AOP配置
|
<?xml version="1.0" encoding="UTF-8"?> <beans xmlns="http://www.springframework.org/schema/beans" xmlns:p="http://www.springframework.org/schema/p" xmlns:context="http://www.springframework.org/schema/context" xmlns:aop="http://www.springframework.org/schema/aop" xmlns:xsi="http://www.w3.org/2001/XMLSchema-instance" xsi:schemaLocation="http://www.springframework.org/schema/beans http://www.springframework.org/schema/beans/spring-beans.xsd http://www.springframework.org/schema/context http://www.springframework.org/schema/context/spring-context.xsd http://www.springframework.org/schema/aop http://www.springframework.org/schema/aop/spring-aop.xsd ">
<!-- 配置UserService层 --> <bean id="userService" class="cn.zj.spring.service.impl.UserServiceImpl"/>
<!-- 配置事物管理器 --> <bean id="txMananger" class="cn.zj.spring.TransactionManagerHandler"/>
<!-- AOP 相关配置: W (where)W(when)W(what) 原则 -->
<!-- 配置切入点: where --> <aop:config> <!-- 做什么(what:增强的功能) --> <aop:aspect ref="txMananger"> <!-- 切入点(Pointcut):在哪些类,哪些方法上切入(where); --> <aop:pointcut expression="execution( * cn.zj.spring.service..*.*(..))" id="pt"/>
<!-- 增强(Advice):早期翻译为通知,在方法执行的什么时机(when:方法前/方法后/方法前后) 前置增强 : method : 需要增强的方法 --> <aop:before method="begin" pointcut-ref="pt"/>
<aop:after-returning method="commit" pointcut-ref="pt"/><!-- 后置增强 -->
<!-- 异常增强 : 抛出的异是常异常顶级类Throwable throwing : 是异常增城方法,参数的名称: 必须和参数一致 --> <aop:after-throwing throwing="e" method="rollback" pointcut-ref="pt"/><!-- 异常增强 -->
<aop:after method="close" pointcut-ref="pt"/><!-- 最终增强 -->
<!-- 环绕增强: 将多个增加集中到一起了 --> <!-- <aop:around method="allInOne" pointcut-ref="pt"/> -->
</aop:aspect> <!-- 织入(Weaving):把切面加入到对象,并创建出代理对象的过程。(该过程由Spring来完成)。 --> </aop:config> </beans> |
9.3. 切入点表达式说明
execution:
|
匹配方法的执行(常用) execution(表达式) 表达式语法:execution([修饰符] 返回值类型 包名.类名.方法名(参数)) 写法说明: 全匹配方式: public void cn.zj.service.impl.CustomerServiceImpl.saveCustomer() 访问修饰符可以省略 void com.zj.service.impl.CustomerServiceImpl.saveCustomer() 返回值可以使用*号,表示任意返回值 * com.zj.service.impl.CustomerServiceImpl.saveCustomer() 包名可以使用*号,表示任意包,但是有几级包,需要写几个* * *.*.*.*.CustomerServiceImpl.saveCustomer() 使用..来表示当前包,及其子包 * com..CustomerServiceImpl.saveCustomer() 类名可以使用*号,表示任意类 * com..*.saveCustomer() 方法名可以使用*号,表示任意方法 * com..*.*() 参数列表可以使用*,表示参数可以是任意数据类型,但是必须有参数 * com..*.*(*) 参数列表可以使用..表示有无参数均可,有参数可以是任意类型 * com..*.*(..) 全通配方式: * *..*.*(..) |
9.4. 常用标签
9.4.1. <aop:config>
作用:
用于声明开始aop的配置
9.4.2. <aop:aspect>
作用:
用于配置切面。
属性:
id:给切面提供一个唯一标识。
ref:引用配置好的通知类bean的id。
9.4.3. <aop:pointcut>
作用:
用于配置切入点表达式
属性:
expression:用于定义切入点表达式。
id:用于给切入点表达式提供一个唯一标识。
9.4.4. <aop:before>
作用:
用于配置前置通知
属性:
method:指定通知中方法的名称。
pointct:定义切入点表达式
pointcut-ref:指定切入点表达式的引用
9.4.5. <aop:after-returning>
作用:
用于配置后置通知,如果出了异常就一定不会调用切面的方法
属性:
method:指定通知中方法的名称。
pointct:定义切入点表达式
pointcut-ref:指定切入点表达式的引用
9.4.6. <aop:after-throwing>
作用:
用于配置异常通知,只有出了异常才会调用切面对应的方法
属性:
method:指定通知中方法的名称。
pointct:定义切入点表达式
pointcut-ref:指定切入点表达式的引用
9.4.7. <aop:after>
作用:
用于配置最终通知,不管出不出异常,调用的切面的方法
属性:
method:指定通知中方法的名称。
pointct:定义切入点表达式
pointcut-ref:指定切入点表达式的引用
9.4.8. <aop:around>
作用:
用于配置环绕通知
属性:
method:指定通知中方法的名称。
pointct:定义切入点表达式
pointcut-ref:指定切入点表达式的引用
10. 基于注解配置AOP
10.1. 搭建环境
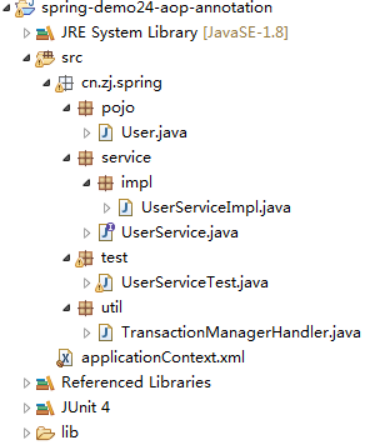
10.1.1. 第一步:创建一个Java项目
创建一个Java项目,加入Spring框架的基础支持包
10.1.2. 第二步:编写业务层类和接口
10.1.2.1. UserService 接口
|
package cn.zj.spring.service;
import cn.zj.spring.pojo.User;
public interface UserService { void insert(User user); void update(User user); }
|
10.1.2.2. 业务层UserServiceImpl 实现类
|
package cn.zj.spring.service.impl;
import cn.zj.spring.pojo.User; import cn.zj.spring.service.UserService;
public class UserServiceImpl implements UserService{
public void insert(User user) { System.out.println("---调用DAO层保存方法---"); } public void update(User user) { System.out.println("---调用DAO层修改方法---"); } }
|
10.1.3. 第三步:编写Spring配置文件
|
<?xml version="1.0" encoding="UTF-8"?> <beans xmlns="http://www.springframework.org/schema/beans" xmlns:p="http://www.springframework.org/schema/p" xmlns:context="http://www.springframework.org/schema/context" xmlns:aop="http://www.springframework.org/schema/aop" xmlns:xsi="http://www.w3.org/2001/XMLSchema-instance" xsi:schemaLocation="http://www.springframework.org/schema/beans http://www.springframework.org/schema/beans/spring-beans.xsd http://www.springframework.org/schema/context http://www.springframework.org/schema/context/spring-context.xsd http://www.springframework.org/schema/aop http://www.springframework.org/schema/aop/spring-aop.xsd "> <!-- 配置UserService层 --> <bean id="userService" class="cn.zj.spring.service.impl.UserServiceImpl"/> </beans> |
10.1.4. 第四步:编写测试代码
|
package cn.zj.spring.test;
import javax.annotation.Resource;
import org.junit.Test; import org.junit.runner.RunWith; import org.springframework.test.context.ContextConfiguration; import org.springframework.test.context.junit4.SpringJUnit4ClassRunner;
import cn.zj.spring.pojo.User; import cn.zj.spring.service.impl.UserServiceImpl;
@RunWith(SpringJUnit4ClassRunner.class) @ContextConfiguration("classpath:applicationContext.xml") public class UserServiceTest {
@Resource private UserServiceImpl service;
@Test public void testSave() { User user = new User(null, "张三", "zhangsan@qq.com"); service.insert(user); }
@Test public void testUpdate() { User user = new User(1, "李四", "lisi@qq.com"); service.update(user); } }
|
10.2. 配置AOP
10.2.1. 第一步:加入AOP的支持包
--注意:必须要导入加入支持AOP的包。
Spring的AOP包基于AspectJ框架,所以必须加入AspectJ-->aspectjweaver.jar

|
10.2.2. 第二步:编写一个切面类
|
package cn.zj.spring;
import org.aspectj.lang.ProceedingJoinPoint; import org.aspectj.lang.annotation.After; import org.aspectj.lang.annotation.AfterReturning; import org.aspectj.lang.annotation.AfterThrowing; import org.aspectj.lang.annotation.Around; import org.aspectj.lang.annotation.Aspect; import org.aspectj.lang.annotation.Before; import org.aspectj.lang.annotation.Pointcut; import org.springframework.stereotype.Component;
@Component @Aspect //在此类中可以使用注解进行aop的相关配置 <aop:aspect> public class TransactionManagerHandler {
//<aop:pointcut expression="execution( * cn.zj.spring.service..*.*(..))" id="当前方法名就是id"/> @Pointcut("execution( * cn.zj.spring.service..*.*(..))") public void pointcut() {}
@Before("pointcut()") //<aop:before method="begin" pointcut-ref="pt"/> public void begin() { System.out.println("开启事务"); }
@AfterReturning("pointcut()")//<aop:after-returning method="commit" pointcut-ref="pt"/> public void commit() { System.out.println("提交事务"); }
//<aop:after-throwing throwing="e" method="rollback" pointcut-ref="pt"/> @AfterThrowing(pointcut="pointcut()",throwing="ex") public void rollback(Throwable ex) { System.out.println("注解的回滚事务 : " + ex.getMessage()); }
@After("pointcut()")//<aop:after method="close" pointcut-ref="pt"/> public void close() { System.out.println("关闭session"); }
//环绕增强 @Around("pointcut()") //<aop:around method="allInOne" pointcut-ref="pt"/> public Object allInOne(ProceedingJoinPoint pjp) { Object result = null; try { System.out.println("开启事务------"); //执行被代理对象当前需要执行业务方法 result = pjp.proceed(); System.out.println("提交事务------"); } catch (Throwable ex) { System.out.println("------回滚事务 : " + ex.getMessage()); }finally { System.out.println("关闭session------"); } return result; } }
|
10.2.3. 第三步:配置AOP配置
|
<?xml version="1.0" encoding="UTF-8"?> <beans xmlns="http://www.springframework.org/schema/beans" xmlns:p="http://www.springframework.org/schema/p" xmlns:context="http://www.springframework.org/schema/context" xmlns:aop="http://www.springframework.org/schema/aop" xmlns:xsi="http://www.w3.org/2001/XMLSchema-instance" xsi:schemaLocation="http://www.springframework.org/schema/beans http://www.springframework.org/schema/beans/spring-beans.xsd http://www.springframework.org/schema/context http://www.springframework.org/schema/context/spring-context.xsd http://www.springframework.org/schema/aop http://www.springframework.org/schema/aop/spring-aop.xsd "> <!-- 配置spring的包扫描 --> <context:component-scan base-package="cn.zj.spring"/> <!-- 使用注解配置AOP配置配置自动注入AOP --> <aop:aspectj-autoproxy></aop:aspectj-autoproxy>
</beans> |
10.3. 常用注解
10.3.1. @Aspect
作用:
把当前类声明为切面类。
10.3.2. @Before
作用:
把当前方法看成是前置通知。
属性:
value:用于指定切入点表达式,还可以指定切入点表达式的引用。
10.3.3. @AfterReturning
作用:
把当前方法看成是后置通知。报异常,就不执行
属性:
value:用于指定切入点表达式,还可以指定切入点表达式的引用。
10.3.4. @AfterThrowing
作用:
把当前方法看成是异常通知。只有报异常才执行
属性:
value:用于指定切入点表达式,还可以指定切入点表达式的引用。
10.3.5. @After
作用:
把当前方法看成是最终通知。不管报不报异常都执行
属性:
value:用于指定切入点表达式,还可以指定切入点表达式的引用。
10.3.6. @Around
作用:
把当前方法看成是环绕通知。
属性:
value:用于指定切入点表达式,还可以指定切入点表达式的引用。
10.3.7. @Pointcut
作用:
指定切入点表达式
属性:
value:指定表达式的内容
11. 小结
今日内容
AOP 思想
- AOP 面向切面编程
(1) 目的: 减少重复代码
- AOP的底层原理(使用Java动态代理技术-动态代理技术就是java设计模式代理模式的一种具体体现)
- 什么动态代理?
(1) Java动态代理,不直接编写类的代理类,在程序的运行过程中,在JVM中动态的为被代理的类创建一份新的字节码,并使用这份新的字节码创建对应的代理对象。
(2) JDK 动态代理
① 缺点:必须有接口代理,没有接口不能代理
② 使用的 java.lang.reflect.Proxy 代理的静态方法
1) Object obj = Proxy.newProxyInstance(类加载器,被代理数据类型的接口字节码,处理器)
(3) CGLIB代理
① 即可有接口的类,又可以没有接口的类
1) 使用Enhancer 类创建代理对象
- AOP 的专业名词(术语)
(1) Joinpoint 连接点(具体的方法)
(2) Pointcut 切入点 具体的某一类方法
(3) Advice 通知/增强 (具体要做的事情,如:事务处理)
(4) Aspect :切面 = 切入点(pointcut)+通知(advice)
(5) Weaving : 织入,将整个AOP的配置在运行阶段组织在一起,由Spring框架完成
- AOPxml配置
(1) 引入相关的依赖包
(2) 引入命名空间(通俗讲:xml约束配置)
(3) AOPxml标签具体配置
- AOP注解配置



 浙公网安备 33010602011771号