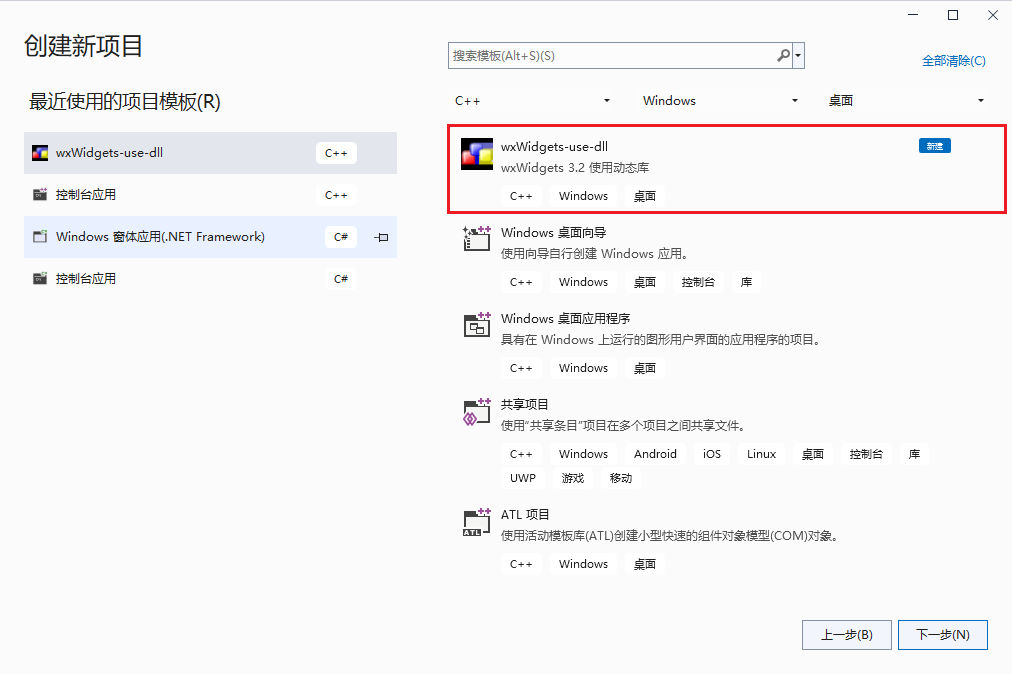
vs2022 wxWidgets
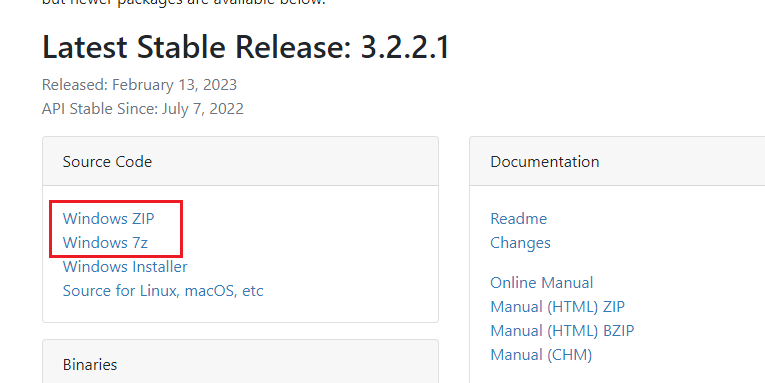
下载
https://www.wxwidgets.org/downloads/
下载压缩包即可
编译
vs 直接编译
打开 build\msw 目录下的 sln 文件
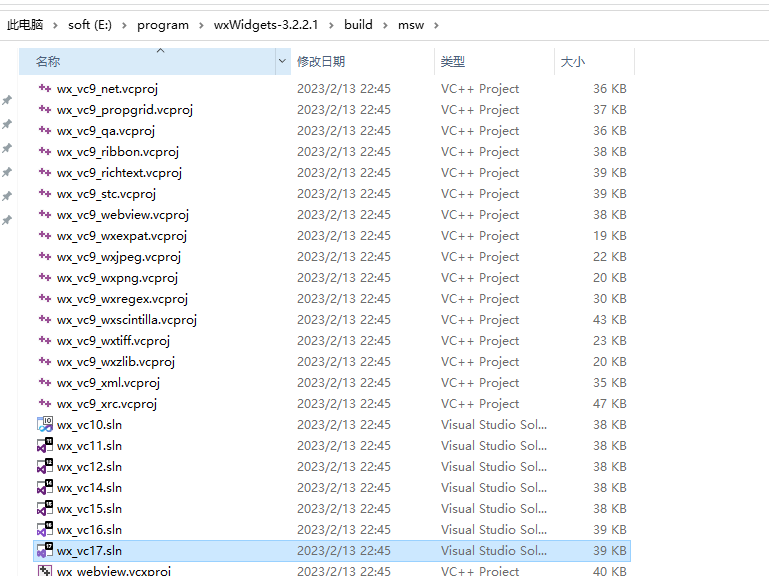
vs发布版本与vc版本对应关系: vs发布版本与vc版本对应关系
| vs发布包版本 | vc版本 |
|---|---|
| Visual Studio 2003 | VC7 |
| Visual Studio 2005 | VC8 |
| Visual Studio 2008 | VC9 |
| Visual Studio 2010 | VC10 |
| Visual Studio 2012 | VC11 |
| Visual Studio 2013 | VC12 |
| Visual Studio 2015 | VC14 |
| Visual Studio 2017 | VC15 |
| Visual Studio 2019 | VC16 |
| Visual Studio 2022 | VC17 |
cmake 结合 vs
在 wxWidgets 跟目录下新建 build, 然后用 cmake-gui 打开 cmake 图形界面
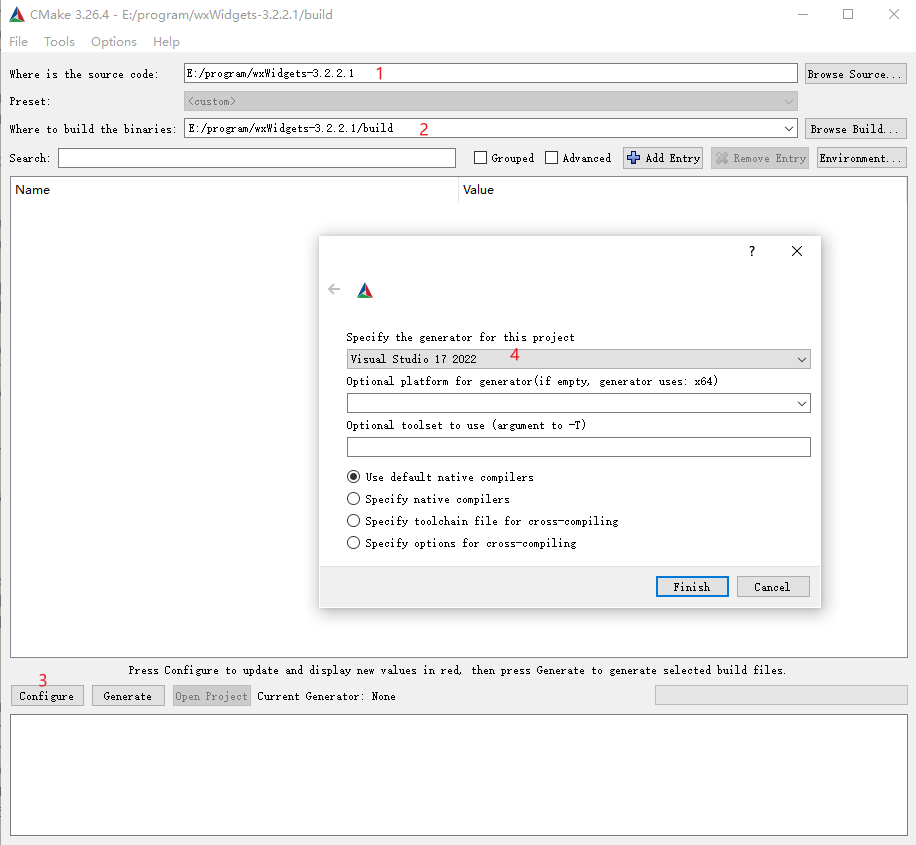
点击 Generate 之后打开 build\msw\wx_vc17.sln
生成->批生成
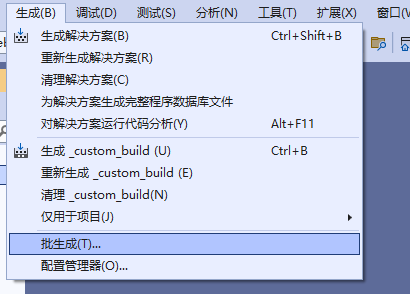
全选->重新生成
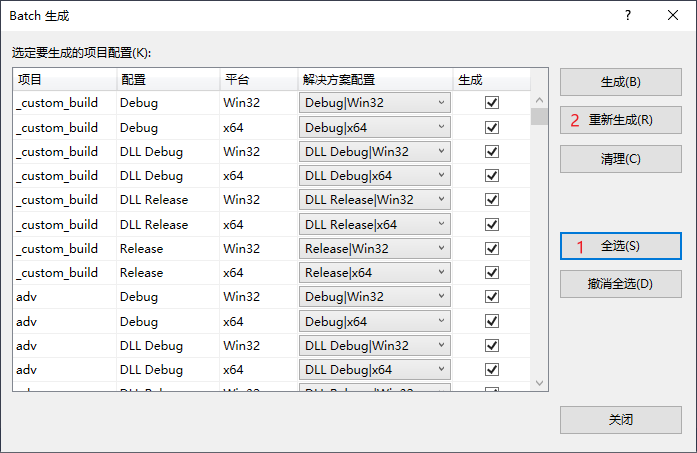
大约需要 30 分钟
新建 hello world 前的准备
新建一个目录, 将 include 目录和lib目录复制过去
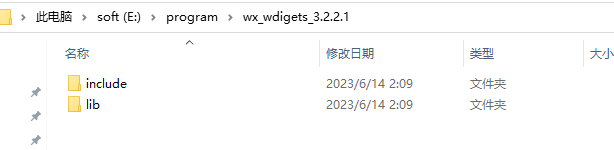
配置环境变量 wx_win, 值为include与lib所在目录: E:\program\wx_wdigets_3.2.2.1
hello world
editor config
[*]
guidelines = 120

[*.{cpp,c,h}]
charset = charset = utf-16le
indent_style = space
indent_size = 4
end_of_line = lf
trim_trailing_whitespace = true
insert_final_newline = true
tab_width = 4
代码
// wxWidgets "Hello World" Program
// For compilers that support precompilation, includes "wx/wx.h".
#define WXUSINGDLL
// #define __WXMSW__
// #define _UNICODE
#include <wx/wxprec.h>
#ifndef WX_PRECOMP
#include <wx/wx.h>
#endif
class MyApp : public wxApp
{
public:
virtual bool OnInit();
};
class MyFrame : public wxFrame
{
public:
MyFrame();
private:
void OnHello(wxCommandEvent& event);
void OnExit(wxCommandEvent& event);
void OnAbout(wxCommandEvent& event);
};
enum
{
ID_Hello = 1
};
wxIMPLEMENT_APP(MyApp);
bool MyApp::OnInit()
{
MyFrame* frame = new MyFrame();
frame->Show(true);
return true;
}
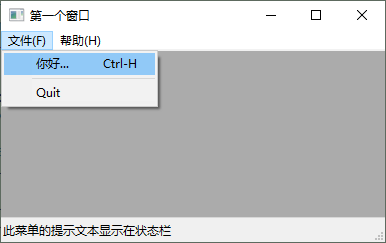
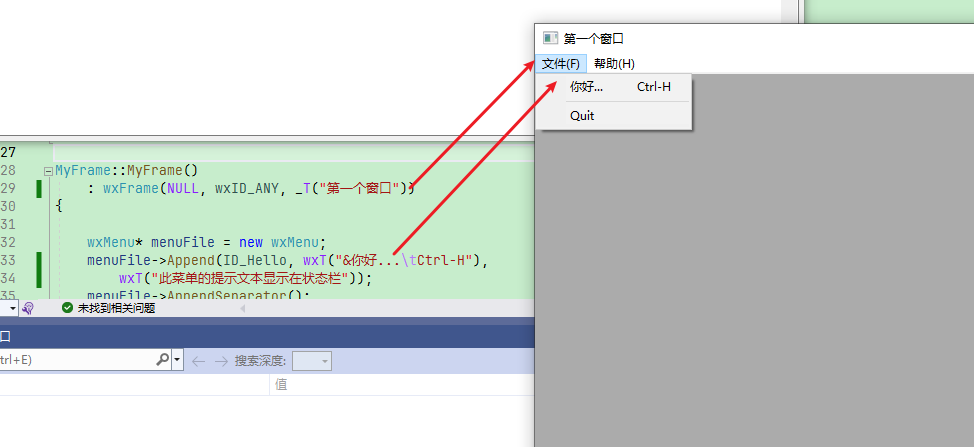
MyFrame::MyFrame()
: wxFrame(NULL, wxID_ANY, "第一个窗口")
{
wxMenu* menuFile = new wxMenu;
menuFile->Append(ID_Hello, "&你好...\tCtrl-H",
"此菜单的提示文本显示在状态栏");
menuFile->AppendSeparator();
menuFile->Append(wxID_EXIT);
wxMenu* menuHelp = new wxMenu;
menuHelp->Append(wxID_ABOUT);
wxMenuBar* menuBar = new wxMenuBar;
menuBar->Append(menuFile, "文件(&F)");
menuBar->Append(menuHelp, "帮助(&H)");
SetMenuBar(menuBar);
CreateStatusBar();
SetStatusText("Welcome to wxWidgets!");
Bind(wxEVT_MENU, &MyFrame::OnHello, this, ID_Hello);
Bind(wxEVT_MENU, &MyFrame::OnAbout, this, wxID_ABOUT);
Bind(wxEVT_MENU, &MyFrame::OnExit, this, wxID_EXIT);
}
void MyFrame::OnExit(wxCommandEvent& event)
{
Close(true);
}
void MyFrame::OnAbout(wxCommandEvent& event)
{
wxMessageBox("This is a wxWidgets Hello World example",
"About Hello World", wxOK | wxICON_INFORMATION);
}
void MyFrame::OnHello(wxCommandEvent& event)
{
wxLogMessage("Hello world from wxWidgets!");
}
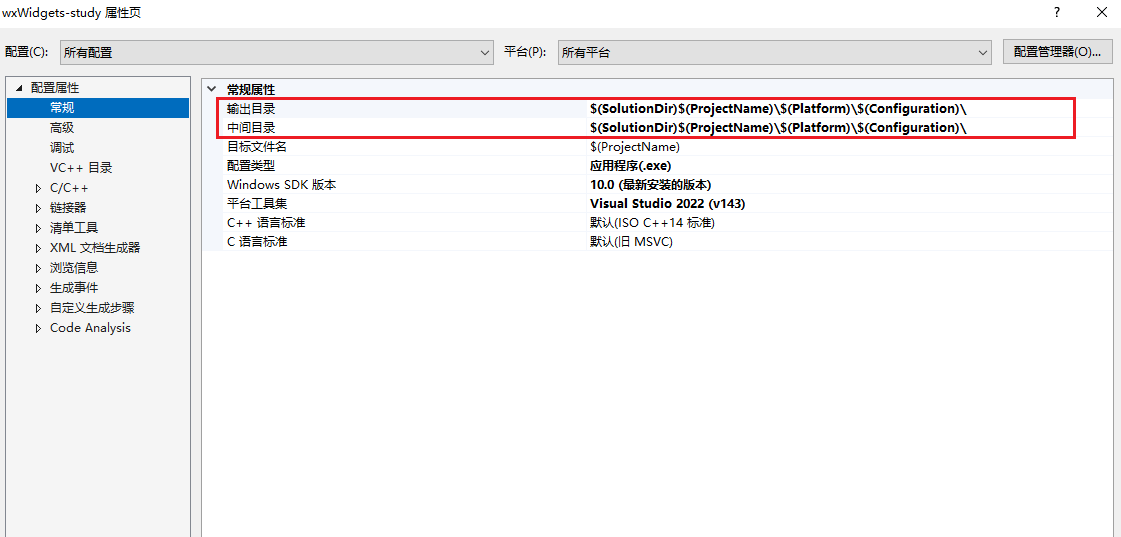
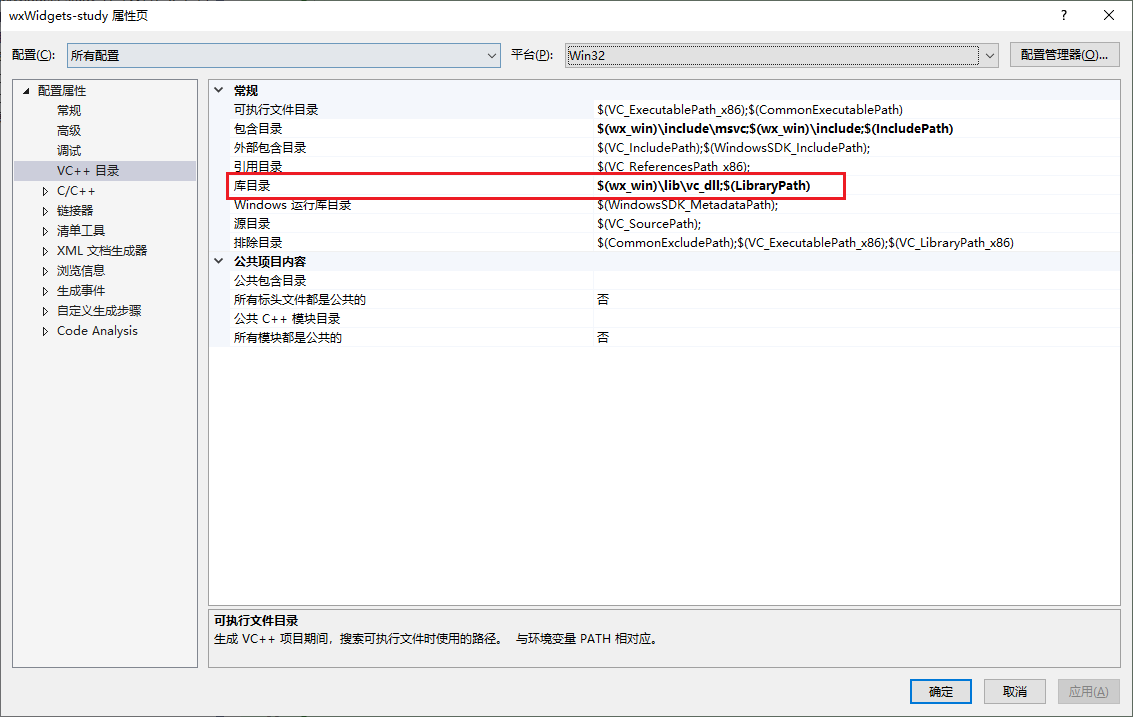
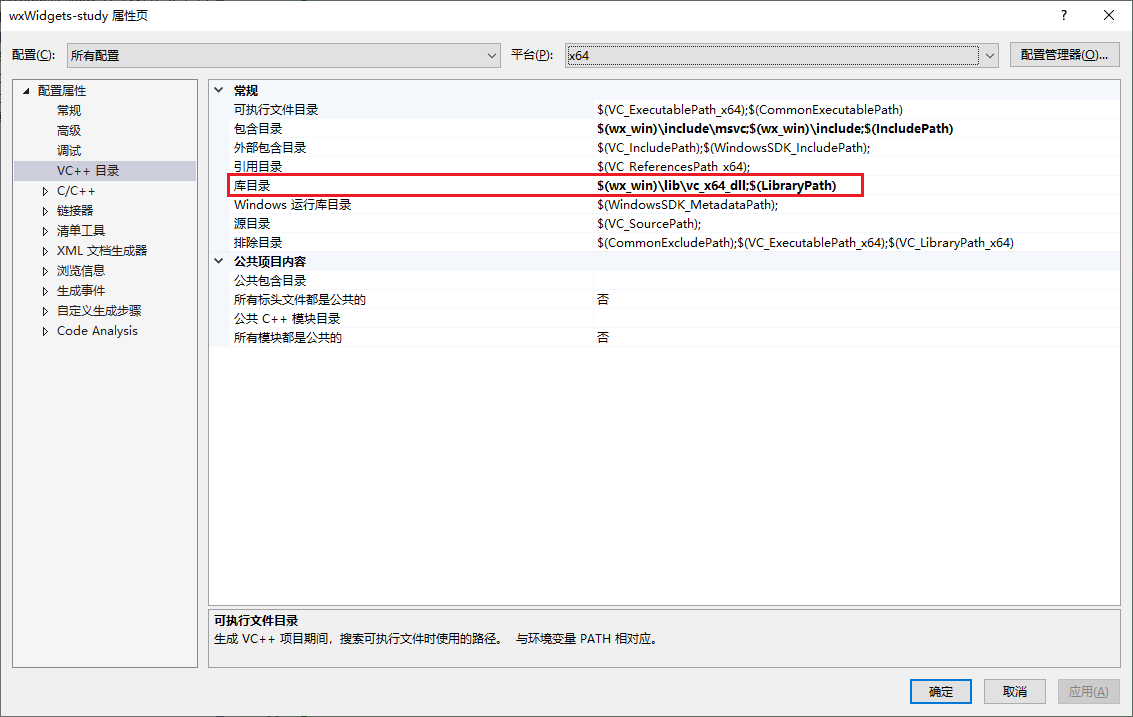
项目属性设置
修改输出目录与中间目录
所有配置, 所有平台
$(SolutionDir)$(ProjectName)\$(Platform)\$(Configuration)\
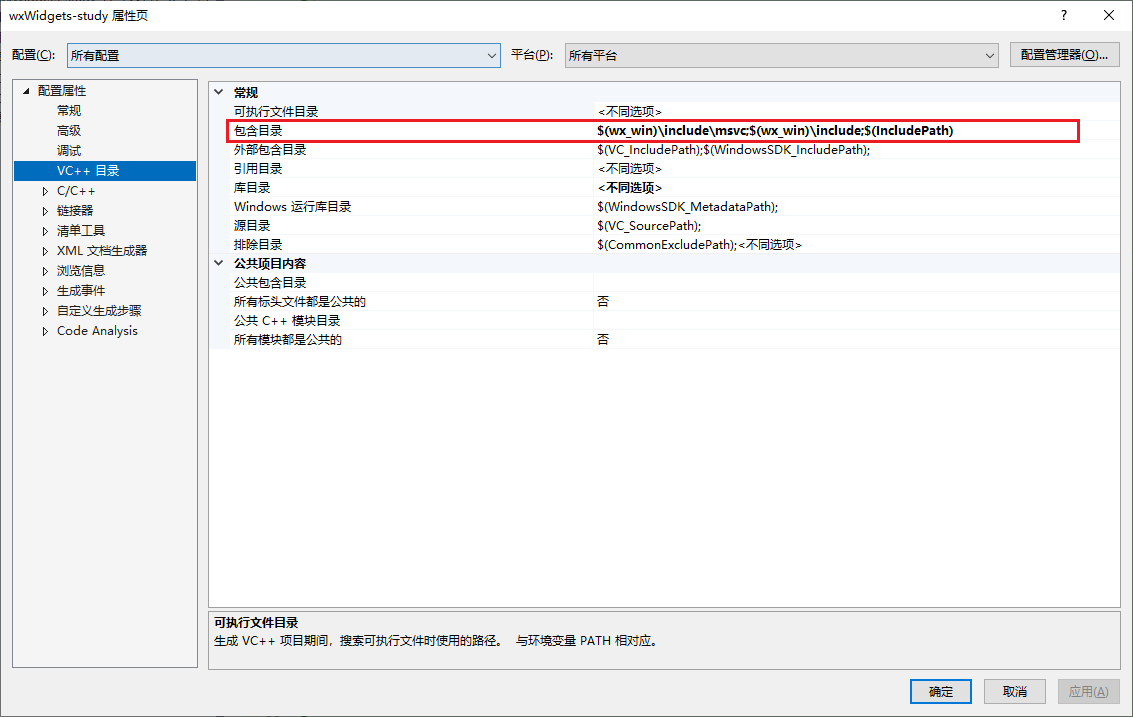
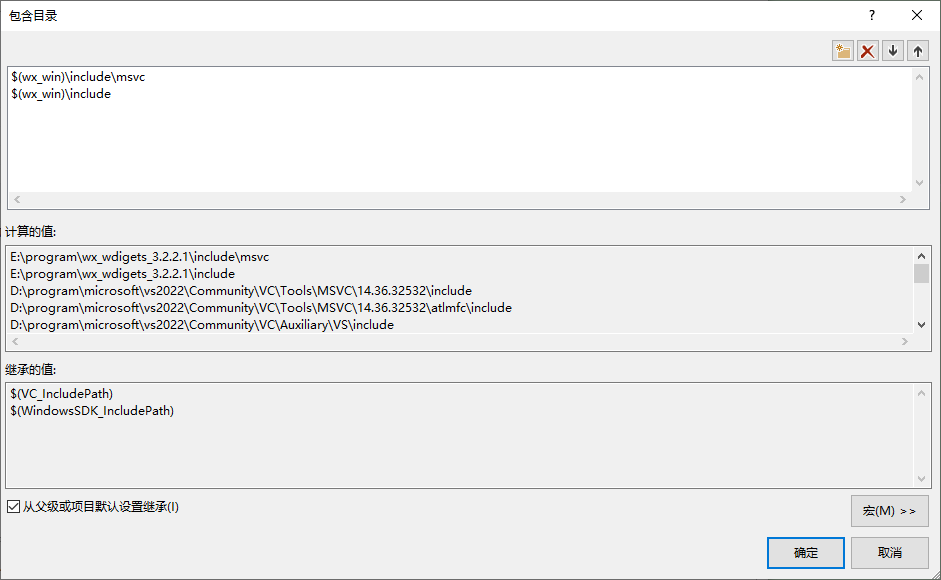
添加头文件目录
所有配置, 所有平台
$(wx_win)\include\msvc
$(wx_win)\include
添加库目录
注意, win32与x64 不同
win32
$(wx_win)\lib\vc_dll
x64
$(wx_win)\lib\vc_x64_dll
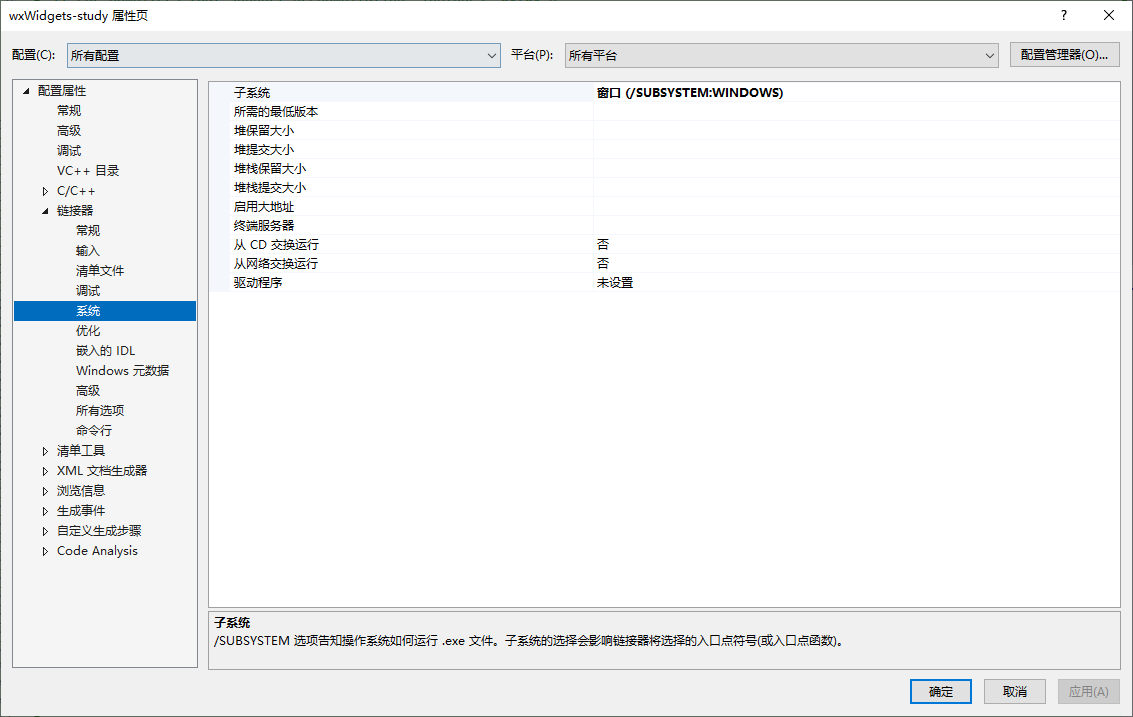
修改子系统
dll 文件的复制
因为使用的时动态库形式, 所以运行时需要动态库文件, 添加生成事件
所有配置, 所有平台
用于 MSBuild 命令和属性的常用宏
python $(SolutionDir)$(ProjectName)\copylib.py $(Platform) $(Configuration) $(SolutionDir)$(ProjectName)

python 脚本
#!/usr/bin/env python
# -*- coding: utf-8 -*-

import sys
import os
from shutil import copyfile

wx_env_name='wx_win'

dll_dict={
    # 'wxbase322u':'net',
    'wxbase322u':'',
    # 'wxbase322u':'xml',

    # 'wxmsw322u':'adv',
    # 'wxmsw322u':'aui',
    'wxmsw322u':'core',
    # 'wxmsw322u':'gl',
    # 'wxmsw322u':'html',
    # 'wxmsw322u':'media',
    # 'wxmsw322u':'propgrid',
    # 'wxmsw322u':'qa',
    # 'wxmsw322u':'ribbon',
    # 'wxmsw322u':'richtext',
    # 'wxmsw322u':'stc',
    # 'wxmsw322u':'webview',
    # 'wxmsw322u':'xrc'
}


if __name__ == "__main__":
    platform = sys.argv[1]
    configuration = sys.argv[2]
    proj_dir = sys.argv[3]
    wx_path = os.getenv(wx_env_name)

    # print('wx_path:',wx_path)
    # print('platform:', platform)
    # print('configuration:',configuration)
    # print('proj_dir:',proj_dir)

    for key,value in dll_dict.items():
        dll_name = key
        if 'Debug' == configuration:
            dll_name = dll_name + 'd'
        if 0 == len(value):
            dll_name = dll_name + '_vc_'
        else:
            dll_name = dll_name + '_' + value + '_vc_'
        if 'x64' == platform:
            dll_name = dll_name + 'x64_'
        dll_name = dll_name + 'custom.dll'
        # print('dll_name:',dll_name)

        source_dll = wx_path + os.path.sep + 'lib'
        if 'x64' == platform:
            source_dll = source_dll + os.path.sep + 'vc_x64_dll' + os.path.sep + dll_name
        else:
            source_dll = source_dll + os.path.sep + 'vc_dll' + os.path.sep + dll_name
        # print('source_dll',source_dll)
        target_dll = proj_dir + os.path.sep + platform + os.path.sep + configuration  +  os.path.sep + dll_name
        # print('target_dll',target_dll)
        print(source_dll + ' => ' + target_dll)
        if not os.path.exists(target_dll):
            copyfile(source_dll, target_dll)
测试效果
- 删除与解决方案
.sln同级的构建目录, 比如x64等, 保持目录清晰干净
分别运行 Debug x86 , Debug x64 , Release x86 , Release x64 验证效果
项目模板
将 .editorconfig与copylib.py添加到项目
添加->现有项
注意:
- 生成的模板文件位于:
C:\Users\用户名\Documents\Visual Studio 2022\My Exported Templates - 实际使用的模板文件在:
C:\Users\用户名\Documents\Visual Studio 2022\Templates\ProjectTemplates - 可能编辑模板之后不生效, 需要删除缓存:
C:\Users\用户名\AppData\Local\Microsoft\VisualStudio\vs版本号\ComponentModelCache\Microsoft.VisualStudio.Default.cache
效果
关于 utf-8 编码
上述方式源码为 utf-16le, 更为通用的编码方式为 utf-8, 此时我们可以设置源字符集和执行字符集, 参考: /utf-8(将源字符集和执行字符集设置为 UTF-8)
具体操作如下
1. 配置命令行选项
所哟配置, 所哟平台

2. 源码的修改
源码中所有涉及到中文的地方, 都要用 wxT("这是中文") 或者_T("这是中文")
3. .editorconfig 的修改
修改编码即可
关于在 vscode 中的配置
- c++ 文件并无不同
- 构建目录在 build 子目录下, debugx86, debugx64, releasex86 , releasex64 共四个文件夹, 和 visual studio 差不多
- 由于构建目录已经修改, 所以 python 脚本也要修改
- .editorconfig 和之前一样, 注意编码指定 utf-8 即可
- 状态栏两个 release 的快捷启动, debug 调试 也有对应的两个
- 关于
launch.json,settings.json与tasks.json几个文件的相互配合与相关插件可参考: ubuntu 搭建 cmake + vscode 的 c/c++ 开发环境
目录结构
F:\code\wxWidgets\wx-hello>tree /f
卷 dox 的文件夹 PATH 列表
卷序列号为 34D2-6BE8
F:.
│  .editorconfig
│  CMakeLists.txt
│  copylib.py
│  main.cpp
│
└─.vscode
        c_cpp_properties.json
        launch.json
        settings.json
        tasks.json
F:\code\wxWidgets\wx-hello>
CMakeLists.txt
cmake_minimum_required(VERSION 3.15)

project(HelloWorld CXX)

set(CMAKE_CXX_STANDARD 14)
set(CMAKE_CXX_STANDARD_REQUIRED True)

#[[ 设置 debug 标记 ==============================================================
    1. msvc 的 debug 判断方式应该使用 CMAKE_CONFIGURATION_TYPES
    2. 将 CMAKE_CONFIGURATION_TYPES 保存到 project_debug , 避免重复判断
]]
if(CMAKE_CONFIGURATION_TYPES)
    string(TOLOWER ${CMAKE_CONFIGURATION_TYPES} BUILD_TYPE)
    if(${BUILD_TYPE} STREQUAL "debug")
        set(project_debug 1)
        set(CMAKE_BUILD_TYPE "Debug")
    elseif(${BUILD_TYPE} STREQUAL "release")
        set(project_debug 0)
        set(CMAKE_BUILD_TYPE "Release")
    else()
        set(project_debug 1)
        set(CMAKE_BUILD_TYPE "Debug")
    endif()
else()
    set(project_debug 1)
    set(CMAKE_BUILD_TYPE "Debug")
endif()

# 设置 debug 库后缀
if(project_debug)
    set(CMAKE_DEBUG_POSTFIX d)
endif()

#[[ 架构判断 ====================================================================
    是否 64 位架构
]]
if(CMAKE_SIZEOF_VOID_P EQUAL 8)
    message("64 位系统")
    set(ARCH "x64")
    set(arch_64 1)
else()
    message("32 位系统")
    set(ARCH "x86")
    set(arch_64 0)
endif()

#[[ 设置字符集 ===================================================================
    添加 UNICODE 宏
]]
add_definitions(-DUNICODE -D_UNICODE)

#[[ wxWidgets 库处理 ============================================================

]]
# wxWidgets 根目录
set(wxWidgets_ROOT_DIR  E:/program/wx_wdigets_3.2.2.1)
# 64 位和 32 位的 lib 路径不同
if(arch_64)
    set(wxWidgets_LIB_DIR ${wxWidgets_ROOT_DIR}/lib/vc_x64_dll)
else()
    set(wxWidgets_LIB_DIR ${wxWidgets_ROOT_DIR}/lib/vc_dll)
endif()
# 库的使用方式, debug 和 release 的 dll 路径不同
set(wxWidgets_CONFIGURATION mswu${CMAKE_DEBUG_POSTFIX})
# 手动指定链接哪些动态库
set(wxWidgets_EXCLUDE_COMMON_LIBRARIES TRUE)

# findpackage
find_package(wxWidgets 3.2 COMPONENTS core base REQUIRED)


#[[ 主程序 ======================================================================

]]
# wxWidgets 头文件目录
include_directories(${wxWidgets_INCLUDE_DIRS})
# wxWidgets 库文件目录
link_directories(${wxWidgets_LIB_DIR})
# 添加预定义宏: WXUSINGDLL;UNICODE;_UNICODE
add_compile_definitions(${wxWidgets_DEFINITIONS})

# 可执行程序
set(SOURCE_FILES main.cpp)
add_executable(HelloWorld WIN32 ${SOURCE_FILES})

# 指定源字符集和执行字符集
# 另一种方式是:
# target_compile_options(MyApp PRIVATE "/source-charset:utf-8" "/execution-charset:utf-8")
target_compile_options(${PROJECT_NAME} PRIVATE "/utf-8")

# 链接 wxWidgets 库
target_link_libraries(${PROJECT_NAME} ${wxWidgets_LIBRARIES})

#[[ 复制 dll ====================================================================

]]
add_custom_command(TARGET ${PROJECT_NAME} POST_BUILD
    COMMAND python ${CMAKE_SOURCE_DIR}/copylib.py ${ARCH} ${CMAKE_BUILD_TYPE} ${CMAKE_SOURCE_DIR}
)
python 脚本
#!/usr/bin/env python
# -*- coding: utf-8 -*-

import sys
import os
from shutil import copyfile

wx_env_name='wx_win'

dll_dict={
    # 'wxbase322u':'net',
    'wxbase322u':'',
    # 'wxbase322u':'xml',

    # 'wxmsw322u':'adv',
    # 'wxmsw322u':'aui',
    'wxmsw322u':'core',
    # 'wxmsw322u':'gl',
    # 'wxmsw322u':'html',
    # 'wxmsw322u':'media',
    # 'wxmsw322u':'propgrid',
    # 'wxmsw322u':'qa',
    # 'wxmsw322u':'ribbon',
    # 'wxmsw322u':'richtext',
    # 'wxmsw322u':'stc',
    # 'wxmsw322u':'webview',
    # 'wxmsw322u':'xrc'
}


if __name__ == "__main__":
    platform = sys.argv[1]
    configuration = sys.argv[2]
    proj_dir = sys.argv[3]
    wx_path = os.getenv(wx_env_name)

    # print('wx_path:',wx_path)
    # print('platform:', platform)
    # print('configuration:',configuration)
    # print('proj_dir:',proj_dir)

    for key,value in dll_dict.items():
        # dll 名称
        dll_name = key
        if 'Debug' == configuration:
            dll_name = dll_name + 'd'
        if 0 == len(value):
            dll_name = dll_name + '_vc_'
        else:
            dll_name = dll_name + '_' + value + '_vc_'
        if 'x64' == platform:
            dll_name = dll_name + 'x64_'
        dll_name = dll_name + 'custom.dll'
        # print('dll_name:',dll_name)

        # dll 原路径
        source_dll = wx_path + os.path.sep + 'lib'
        if 'x64' == platform:
            source_dll = source_dll + os.path.sep + 'vc_x64_dll' + os.path.sep + dll_name
        else:
            source_dll = source_dll + os.path.sep + 'vc_dll' + os.path.sep + dll_name
        # print('source_dll',source_dll)

        # dll 目标路径
        target_dll = proj_dir + os.path.sep + 'build' + os.path.sep + 'cmake-build-'
        if 'Debug' == configuration:
            target_dll = target_dll + 'debug'
        else:
            target_dll = target_dll + 'release'
        if 'x64' == platform:
            target_dll = target_dll + '-x64'
        else:
            target_dll = target_dll + '-x86'
        if 'Debug' == configuration:
            target_dll = target_dll + os.path.sep + 'Debug'
        else:
            target_dll = target_dll + os.path.sep + 'Release'
        target_dll = target_dll  +  os.path.sep + dll_name
        # print('target_dll',target_dll)

        # 如果 dll 文件不存在则复制
        print(source_dll + ' => ' + target_dll)
        if not os.path.exists(target_dll):
            copyfile(source_dll, target_dll)
.vscode 相关配置
c_cpp_properties.json
官方文档: https://code.visualstudio.com/docs/cpp/c-cpp-properties-schema-reference
{
    "configurations": [
        {
            "name": "Win32",
            "includePath": [
                "${workspaceFolder}/**",
                "E:\\program\\wx_wdigets_3.2.2.1\\include\\**",
                // "E:\\program\\wx_wdigets_3.2.2.1\\lib\\vc_x64_dll\\mswu\\**",
                "E:\\program\\wx_wdigets_3.2.2.1\\lib\\vc_x64_dll\\mswud\\**",
                // "E:\\program\\wx_wdigets_3.2.2.1\\lib\\vc_dll\\mswu\\**",
                // "E:\\program\\wx_wdigets_3.2.2.1\\lib\\vc_dll\\mswu\\**"
            ],
            // "compilerPath": "",
            "intelliSenseMode":"${default}",
            "cStandard": "c17",
            "cppStandard": "c++14",
            "compilerArgs": [
                "-DUNICODE",
                "-D_UNICODE"
            ],
            "browse": {
                "path": [
                    "${workspaceFolder}",
                    "E:\\program\\wx_wdigets_3.2.2.1\\include\\**",
                    "E:\\program\\wx_wdigets_3.2.2.1\\lib\\vc_x64_dll\\mswud\\**"
                ],
                "limitSymbolsToIncludedHeaders": true,
                "databaseFilename": ""
            }
        }
    ],
    "version": 4
}
tasks.json
{
    // See https://go.microsoft.com/fwlink/?LinkId=733558
    // for the documentation about the tasks.json format
    "version": "2.0.0",
    "tasks": [
        // debug x86
        {
            "label": "clean-debug-x86",
            "type": "shell",
            "command": "if exist .\\build\\cmake-build-debug-x86 rd /q/s .\\build\\cmake-build-debug-x86",
            "group": "build",
            "presentation": {
                "reveal": "always"
            }
        },
        {
            "label": "build-debug-x86",
            "type": "shell",
            "command": "cmake -S . -G \"Visual Studio 17 2022\" -A Win32 -B build/cmake-build-debug-x86 -DCMAKE_CONFIGURATION_TYPES=Debug && cmake --build build/cmake-build-debug-x86 --config=Debug",
            "group": "build",
            "presentation": {
                "reveal": "always"
            }
        },
        {
            "label": "re-build-debug-x86",
            "type": "shell",
            "dependsOn": [
                "clean-debug-x86",
                "build-debug-x86"
            ],
            "group": "build",
            "presentation": {
                "reveal": "always"
            }
        },
        // debug x64
        {
            "label": "clean-debug-x64",
            "type": "shell",
            "command": "if exist .\\build\\cmake-build-debug-x64 rd /q/s .\\build\\cmake-build-debug-x64",
            "group": "build",
            "presentation": {
                "reveal": "always"
            }
        },
        {
            "label": "build-debug-x64",
            "type": "shell",
            "command": "cmake -S . -G \"Visual Studio 17 2022\" -A x64 -B build/cmake-build-debug-x64 -DCMAKE_CONFIGURATION_TYPES=Debug && cmake --build build/cmake-build-debug-x64 --config=Debug",
            "group": "build",
            "presentation": {
                "reveal": "always"
            }
        },
        {
            "label": "re-build-debug-x64",
            "type": "shell",
            "dependsOn": [
                "clean-debug-x64",
                "build-debug-x64"
            ],
            "group": "build",
            "presentation": {
                "reveal": "always"
            }
        },
        // release x86
        {
            "label": "clean-release-x86",
            "type": "shell",
            "command": "if exist .\\build\\cmake-build-release-x86 rd /q/s .\\build\\cmake-build-release-x86",
            "group": "build",
            "presentation": {
                "reveal": "always"
            }
        },
        {
            "label": "build-release-x86",
            "type": "shell",
            "command": "cmake -S . -G \"Visual Studio 17 2022\" -A Win32 -B build/cmake-build-release-x86 -DCMAKE_CONFIGURATION_TYPES=Release && cmake --build build/cmake-build-release-x86 --config=Release",
            "group": "build",
            "presentation": {
                "reveal": "always"
            }
        },
        {
            "label": "re-build-release-x86",
            "type": "shell",
            "dependsOn": [
                "clean-release-x86",
                "build-release-x86"
            ],
            "group": "build",
            "presentation": {
                "reveal": "always"
            }
        },
        // release x64
        {
            "label": "clean-release-x64",
            "type": "shell",
            "command": "if exist .\\build\\cmake-build-release-x64 rd /q/s .\\build\\cmake-build-release-x64",
            "group": "build",
            "presentation": {
                "reveal": "always"
            }
        },
        {
            "label": "build-release-x64",
            "type": "shell",
            "command": "cmake -S . -G \"Visual Studio 17 2022\" -A x64 -B build/cmake-build-release-x64 -DCMAKE_CONFIGURATION_TYPES=Release && cmake --build build/cmake-build-release-x64 --config=Release",
            "group": "build",
            "presentation": {
                "reveal": "always"
            }
        },
        {
            "label": "re-build-release-x64",
            "type": "shell",
            "dependsOn": [
                "clean-release-x64",
                "build-release-x64"
            ],
            "group": "build",
            "presentation": {
                "reveal": "always"
            }
        },
        // 运行 x86
        {
            "label": "run-x86",
            "type": "shell",
            "command": ".\\build\\cmake-build-release-x86\\Release\\HelloWorld.exe",
            "dependsOn": [
                "build-release-x86"
            ],
            "group": "build",
            "presentation": {
                "reveal": "always"
            }
        },
        // 运行 x64
        {
            "label": "run-x64",
            "type": "shell",
            "command": ".\\build\\cmake-build-release-x64\\Release\\HelloWorld.exe",
            "dependsOn": [
                "build-release-x64"
            ],
            "group": "build",
            "presentation": {
                "reveal": "always"
            }
        }
    ]
}
settings.json
{
    "editor.tokenColorCustomizations": {
        "comments": {
            "fontStyle": "",
            "foreground": "#4a524e"
        }
    },
    "editor.rulers": [120],
    "VsCodeTaskButtons.showCounter": true,
    "VsCodeTaskButtons.tasks": [
        {
            "label": "re-build-debug-x86",
            "task": "re-build-debug-x86"
        },
        {
            "label": "re-build-debug-x64",
            "task": "re-build-debug-x64"
        },
        {
            "label": "re-build-release-x86",
            "task": "re-build-release-x86"
        },
        {
            "label": "re-build-release-x64",
            "task": "re-build-release-x64"
        },
        {
            "label": "run-x86",
            "task": "run-x86"
        },
        {
            "label": "run-x64",
            "task": "run-x64"
        }
    ]
}
launch.json
{
  "version": "0.2.0",
  "configurations": [
    {
      "name": "debug-x86",
      "type": "cppvsdbg",
      "request": "launch",
      "program": ".\\build\\cmake-build-debug-x86\\Debug\\HelloWorld.exe",
      "args": [],
      "stopAtEntry": false,
      "cwd": "${workspaceFolder}",
      "environment": [],
      "console": "internalConsole",
      "preLaunchTask": "build-debug-x86"
    },{
        "name": "debug-x64",
        "type": "cppvsdbg",
        "request": "launch",
        "program": ".\\build\\cmake-build-debug-x64\\Debug\\HelloWorld.exe",
        "args": [],
        "stopAtEntry": false,
        "cwd": "${workspaceFolder}",
        "environment": [],
        "console": "internalConsole",
        "preLaunchTask": "build-debug-x64"
      },
  ]
}
visual studio 中的 cmake
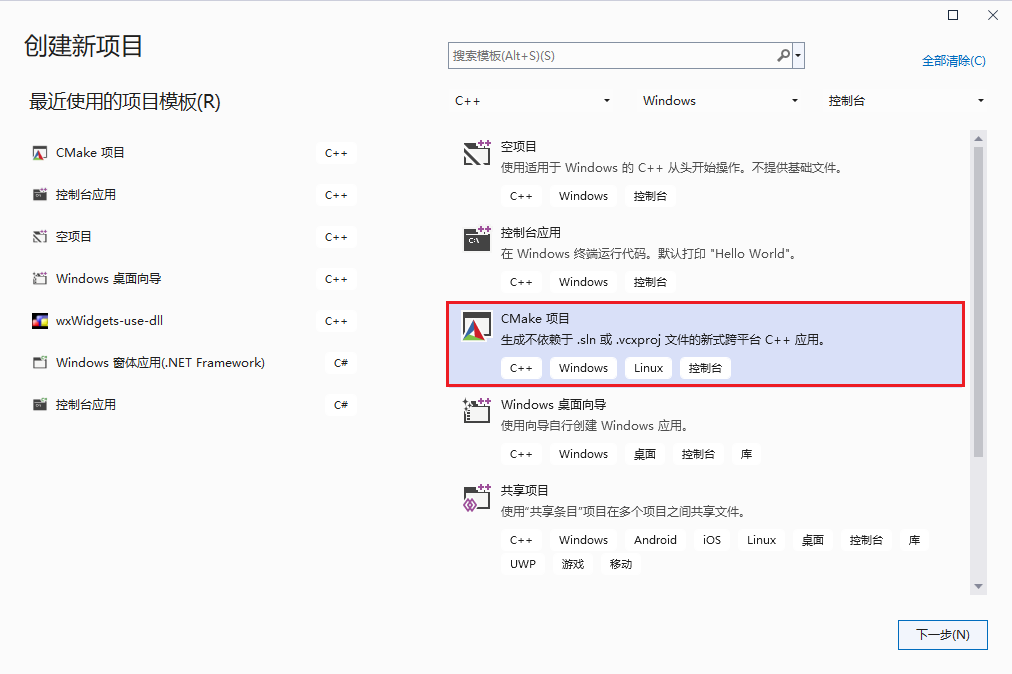
与 vscode 的配置比起来, visual studio 2022 就要简单的多 , 直接新建一个 cmake 项目然后修改 cmake 脚本与 python 脚本即可
- 子目录的 cmake 脚本在调用 python 脚本的时候, 多传了一个参数, 制定了可执行文件的生成目录, 也就是 PROJECT_NAME
- python 脚本做出了相应的更改
- 其他的没有什么区别
- 有时候 visual studio 可能会报头文件找不到的错误, 此时要确认脚本与代码没有问题的话, 退出vs, 删除项目记录, 删除 out 目录, 重新打开应该就可以了
CMakeLists.txt
顶层 CMakeLists.txt
# CMakeList.txt: 顶层 CMake 项目文件,在此处执行全局配置
# 并包含子项目。
#
cmake_minimum_required (VERSION 3.24)

project ("hello-wx" CXX)
set(CMAKE_CXX_STANDARD 14)
set(CMAKE_CXX_STANDARD_REQUIRED True)

# Enable Hot Reload for MSVC compilers if supported.
if (POLICY CMP0141)
  cmake_policy(SET CMP0141 NEW)
  set(CMAKE_MSVC_DEBUG_INFORMATION_FORMAT "$<IF:$<AND:$<C_COMPILER_ID:MSVC>,$<CXX_COMPILER_ID:MSVC>>,$<$<CONFIG:Debug,RelWithDebInfo>:EditAndContinue>,$<$<CONFIG:Debug,RelWithDebInfo>:ProgramDatabase>>")
endif()

#[[ 设置 debug 标记 ==============================================================
    1. 2022 版本的 vs 的 debug 判断方式应该使用 CMAKE_BUILD_TYPE
    2. 将 CMAKE_BUILD_TYPE 保存到 project_debug , 避免重复判断
]]
if(CMAKE_BUILD_TYPE)
    string(TOLOWER ${CMAKE_BUILD_TYPE} BUILD_TYPE)
    if(${BUILD_TYPE} STREQUAL "debug")
        set(project_debug 1)
        set(CMAKE_BUILD_TYPE "Debug")
    elseif(${BUILD_TYPE} STREQUAL "release")
        set(project_debug 0)
        set(CMAKE_BUILD_TYPE "Release")
    else()
        set(project_debug 1)
        set(CMAKE_BUILD_TYPE "Debug")
    endif()
else()
    set(project_debug 1)
    set(CMAKE_BUILD_TYPE "Debug")
endif()

# 设置 debug 库后缀
if(project_debug)
    set(CMAKE_DEBUG_POSTFIX d)
endif()

message(STATUS "====> project_debug : ${project_debug}")

#[[ 架构判断 ====================================================================
    是否 64 位架构
]]
if(CMAKE_SIZEOF_VOID_P EQUAL 8)
    message(STATUS "====> 64 位系统")
    set(ARCH "x64")
    set(arch_64 1)
else()
    message(STATUS "====> 32 位系统")
    set(ARCH "x86")
    set(arch_64 0)
endif()

#[[ 设置字符集 ===================================================================
    添加 UNICODE 宏
]]
add_definitions(-DUNICODE -D_UNICODE)

#[[ wxWidgets 库处理 ============================================================

]]
# wxWidgets 根目录
set(wxWidgets_ROOT_DIR  E:/program/wx_wdigets_3.2.2.1)
# 64 位和 32 位的 lib 路径不同
if(arch_64)
    set(wxWidgets_LIB_DIR ${wxWidgets_ROOT_DIR}/lib/vc_x64_dll)
else()
    set(wxWidgets_LIB_DIR ${wxWidgets_ROOT_DIR}/lib/vc_dll)
endif()
# 库的使用方式, debug 和 release 的 dll 路径不同
set(wxWidgets_CONFIGURATION mswu${CMAKE_DEBUG_POSTFIX})
# 手动指定链接哪些动态库
set(wxWidgets_EXCLUDE_COMMON_LIBRARIES TRUE)

# findpackage
find_package(wxWidgets 3.2 COMPONENTS core base REQUIRED)

# 包含子项目。
add_subdirectory ("hello-wx")
子目录 CMakeLists.txt
#[[ wxWidgets ======================================================================

]]
# wxWidgets 头文件目录
include_directories(${wxWidgets_INCLUDE_DIRS})
# wxWidgets 库文件目录
link_directories(${wxWidgets_LIB_DIR})
# 添加预定义宏: WXUSINGDLL;UNICODE;_UNICODE
add_compile_definitions(${wxWidgets_DEFINITIONS})

message(STATUS "====> wxWidgets_LIB_DIR : ${wxWidgets_LIB_DIR}")
message(STATUS "====> wxWidgets_DEFINITIONS : ${wxWidgets_DEFINITIONS}")
message(STATUS "====> wxWidgets_LIBRARIES : ${wxWidgets_LIBRARIES}")

aux_source_directory(. SOURCE_FILES)
add_executable(${PROJECT_NAME} WIN32 ${SOURCE_FILES})

# 指定源字符集和执行字符集
# 另一种方式是:
# target_compile_options(MyApp PRIVATE "/source-charset:utf-8" "/execution-charset:utf-8")
target_compile_options(${PROJECT_NAME} PRIVATE "/utf-8")

# 链接 wxWidgets 库
target_link_libraries(${PROJECT_NAME} ${wxWidgets_LIBRARIES})

#[[ 复制 dll ====================================================================

]]
add_custom_command(TARGET ${PROJECT_NAME} POST_BUILD
    COMMAND python ${CMAKE_SOURCE_DIR}/copylib.py ${PROJECT_NAME} ${ARCH} ${CMAKE_BUILD_TYPE} ${CMAKE_SOURCE_DIR}
)
python 脚本
#!/usr/bin/env python
# -*- coding: utf-8 -*-

import sys
import os
from shutil import copyfile

wx_env_name='wx_win'

dll_dict={
    # 'wxbase322u':'net',
    'wxbase322u':'',
    # 'wxbase322u':'xml',

    # 'wxmsw322u':'adv',
    # 'wxmsw322u':'aui',
    'wxmsw322u':'core',
    # 'wxmsw322u':'gl',
    # 'wxmsw322u':'html',
    # 'wxmsw322u':'media',
    # 'wxmsw322u':'propgrid',
    # 'wxmsw322u':'qa',
    # 'wxmsw322u':'ribbon',
    # 'wxmsw322u':'richtext',
    # 'wxmsw322u':'stc',
    # 'wxmsw322u':'webview',
    # 'wxmsw322u':'xrc'
}


if __name__ == "__main__":
    app_name = sys.argv[1]
    platform = sys.argv[2]
    configuration = sys.argv[3]
    proj_dir = sys.argv[4]
    wx_path = os.getenv(wx_env_name)

    print('wx_path:',wx_path)
    print('platform:', platform)
    print('configuration:',configuration)
    print('proj_dir:',proj_dir)

    for key,value in dll_dict.items():
        # dll 名称
        dll_name = key
        if 'Debug' == configuration:
            dll_name = dll_name + 'd'
        if 0 == len(value):
            dll_name = dll_name + '_vc_'
        else:
            dll_name = dll_name + '_' + value + '_vc_'
        if 'x64' == platform:
            dll_name = dll_name + 'x64_'
        dll_name = dll_name + 'custom.dll'
        # print('dll_name:',dll_name)

        # dll 原路径
        source_dll = wx_path + os.path.sep + 'lib'
        if 'x64' == platform:
            source_dll = source_dll + os.path.sep + 'vc_x64_dll' + os.path.sep + dll_name
        else:
            source_dll = source_dll + os.path.sep + 'vc_dll' + os.path.sep + dll_name
        # print('source_dll',source_dll)

        # dll 目标路径
        target_dll = proj_dir + os.path.sep + 'out' + os.path.sep + 'build'
        if 'x64' == platform:
            target_dll = target_dll + os.path.sep + 'x64'
        else:
            target_dll = target_dll + os.path.sep + 'x86'
        if 'Debug' == configuration:
            target_dll = target_dll + '-debug'
        else:
            target_dll = target_dll + '-release'
        target_dll = target_dll + os.path.sep + app_name  + os.path.sep + dll_name
        print('target_dll',target_dll)

        # 如果 dll 文件不存在则复制
        print(source_dll + ' => ' + target_dll)
        if not os.path.exists(target_dll):
            copyfile(source_dll, target_dll)
本文来自博客园,作者:laolang2016,转载请注明原文链接:https://www.cnblogs.com/khlbat/p/17479111.html

 浙公网安备 33010602011771号