win10 vs2022 搭建 cocos2d-x 3.17 开发环境
引擎下载地址
https://cocos2d-x.org/download/
也可以在 github 下载
https://github.com/cocos2d/cocos2d-x/tags
手册地址
https://docs.cocos2d-x.org/cocos2d-x/v3/zh/
api 文档地址
https://docs.cocos2d-x.org/api-ref/cplusplus/v3x/index.html
hello world
安装注意事项
- 需要 python2 , 安装后可以用 python2 的绝对路径运行 cocos 的
setup.py - 如何没有把 python2 加入到环境变量, 可以修改引擎路径下的
tools\cocos2d-console\bin\cocos.bat
@echo off
@python2 绝对路径 "%~dp0/cocos.py" %*
新建项目
cocos new HelloCocos -p com.laolang.hellococos -l cpp
然后打开 proj.win32 目录下的 .sln 文件, 提示升级点确认, 编译运行即可
中文乱码问题
参考:
Cocos2d-x 中文标题设置
Cocos2d-x 中文内容设置
标题直接用下面的函数转一下, Label等内容的中文显示还需要中文字体的支持, 可以从网上下载或者从C盘拷一个, 例如宋体常规, 此字体文件名为:simsun.ttc
std::string CommonUtil::GBKToUTF8(const std::string& strGBK)
{
    std::string strOutUTF8 = "";
    WCHAR* str1;
    int n = MultiByteToWideChar(CP_ACP, 0, strGBK.c_str(), -1, NULL, 0);
    str1 = new WCHAR[n];
    MultiByteToWideChar(CP_ACP, 0, strGBK.c_str(), -1, str1, n);
    n = WideCharToMultiByte(CP_UTF8, 0, str1, -1, NULL, 0, NULL, NULL);
    char* str2 = new char[n];
    WideCharToMultiByte(CP_UTF8, 0, str1, -1, str2, n, NULL, NULL);
    strOutUTF8 = str2;
    delete[]str1;
    str1 = NULL;
    delete[]str2;
    str2 = NULL;
    return strOutUTF8;
}
hello world 关键代码注释
AppDelegate的applicationDidFinishLaunching方法
其四个方法含义分别为(https://blog.csdn.net/xiayao2012/article/details/49472423)
initGLContextAttrs();//设置 OpenGL环境
applicationDidFinishLaunching(); //逻辑初始化
applicationDidEnterBackground(); //切换到后台
applicationWillEnterForeground(); //切换到前台
bool AppDelegate::applicationDidFinishLaunching() {
    // 初始化 director
    auto director = Director::getInstance();
    auto glview = director->getOpenGLView();
    // 初始化 opengl 试图
    if(!glview) {
        glview = GLViewImpl::createWithRect(CommonUtil::GBKToUTF8("第一个 Cocos2d-X 程序"), cocos2d::Rect(0, 0, resolutionSize.width, resolutionSize.height));
        director->setOpenGLView(glview);
    }

    // 开启左下角 FPS 状态信息
    director->setDisplayStats(true);
    // 设置 FPS 为 60, 默认为 60
    director->setAnimationInterval(1.0f / 60);

    // 设置屏幕分辨率
    glview->setDesignResolutionSize(resolutionSize.width, resolutionSize.height, ResolutionPolicy::NO_BORDER);

    register_all_packages();

    // 创建 Hello World 场景, 对象的释放交给 cocos2d-x 管理
    auto scene = HelloWorld::createScene();

    // 运行
    director->runWithScene(scene);

    return true;
}
HelloWorldScene的init方法
bool HelloWorld::init()
{
    // 先执行父类的 init
    if (!Scene::init())
    {
        return false;
    }

    // 获得可视区域大小
    const auto visibleSize = Director::getInstance()->getVisibleSize();
    log("width:%f , height:%f", visibleSize.width, visibleSize.height);
    // 获得原点位置 左下角
    const Vec2  origin = Director::getInstance()->getVisibleOrigin();
    log("x:%f , y:%f", origin.x, origin.y);


    // 关闭按钮, 是一个 MenuItemImage, 表示一个菜单项
    auto closeItem = MenuItemImage::create(
        "CloseNormal.png", // 非选中状态
        "CloseSelected.png", // 选中状态
        CC_CALLBACK_1(HelloWorld::menuCloseCallback, this) // 回调函数
    );
    // 按钮位置, 窗口右下角
    const float x = origin.x + visibleSize.width - closeItem->getContentSize().width / 2;
    const float y = origin.y + closeItem->getContentSize().height / 2;
    closeItem->setPosition(Vec2(x, y));

    // 把菜单项添加到菜单中
    auto menu = Menu::create(closeItem, NULL);
    menu->setPosition(Vec2::ZERO);
    // 菜单添加到当前层
    this->addChild(menu, 1);

    // Hello World 文本
    const auto label = Label::createWithTTF(CommonUtil::GBKToUTF8("第一个程序"), CommonUtil::GetDefaultFontPath(), 24);
    // 设置文本位置
    label->setPosition(Vec2(origin.x + visibleSize.width / 2, origin.y + visibleSize.height - label->getContentSize().height));
    // 文本添加到当前层
    this->addChild(label, 1);

    // 创建背景图片
    const auto sprite = Sprite::create("HelloWorld.png");
    // 图片位置
    sprite->setPosition(Vec2(visibleSize.width / 2 + origin.x, visibleSize.height / 2 + origin.y));
    // 背景图片添加到当前层
    this->addChild(sprite, 0);

    return true;
}
关于资源复制问题
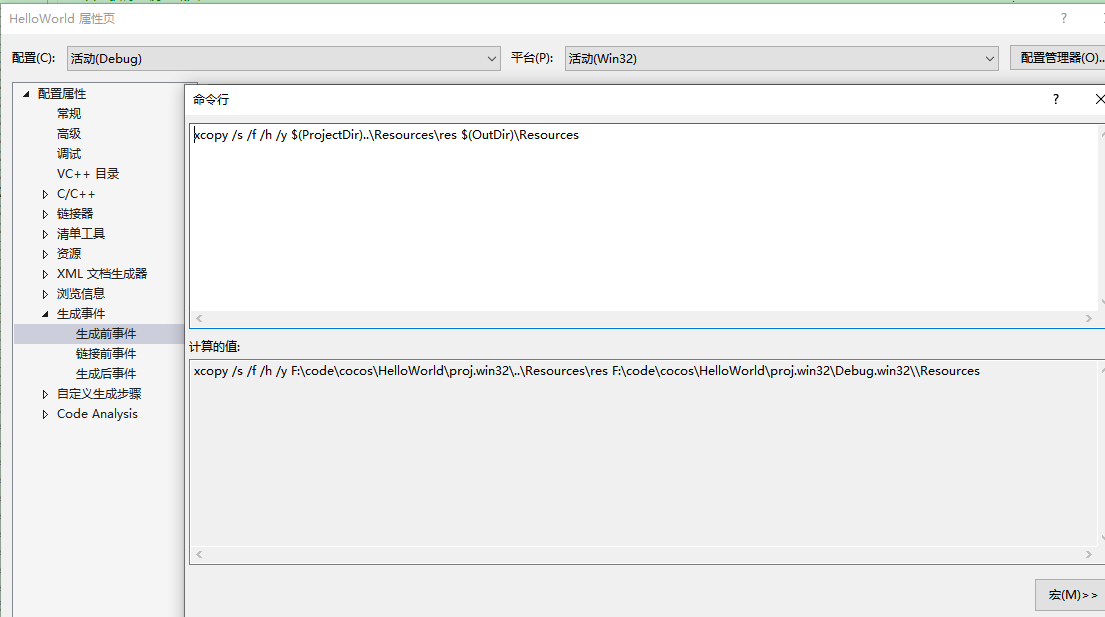
有时候 Resources 目录下的文件无法复制到输出目录, 此时可以使用生成事件解决这个问题
xcopy /s /f /h /y $(ProjectDir)..\Resources\res $(OutDir)\Resources

本文来自博客园,作者:laolang2016,转载请注明原文链接:https://www.cnblogs.com/khlbat/p/17465004.html


 浙公网安备 33010602011771号